maintenance NISSAN 370Z ROADSTER 2016 Z34 Owner's Guide
[x] Cancel search | Manufacturer: NISSAN, Model Year: 2016, Model line: 370Z ROADSTER, Model: NISSAN 370Z ROADSTER 2016 Z34Pages: 428, PDF Size: 3.01 MB
Page 364 of 428
freeze or equivalent.
CAUTION
.Do not substitute engine anti-freeze
coolant for window washer solution.
This may result in damage to the
paint.
. Do not fill the window washer
reservoir tank with washer fluid
concentrates at full strength. Some
methyl alcohol based washer fluid
concentrates may permanently stain
the grille if spilled while filling the
window washer reservoir tank.
. Pre-mix washer fluid concentrates
with water to the manufacturer’s
recommended levels before pouring
the fluid into the window washer
reservoir tank. Do not use the
window washer reservoir tank to
mix the washer fluid concentrate
and water. .
Keep the battery surface clean and dry.
Clean the battery with a solution of baking
soda and water.
. Make certain the terminal connections are
clean and securely tightened.
. If the vehicle is not to be used for 30 days or
longer, disconnect the negative ( í) battery
terminal cable to prevent discharging it.
NOTE:
Care should be taken to avoid situations
that can lead to potential battery discharge
and potential no-start conditions such as:
1. Installation or extended use of electro-
nic accessories that consume battery
power when the engine is not running
(Phone chargers, GPS, DVD players,
etc.)
2. Vehicle is not driven regularly and/or
only driven short distances.
In these cases, the battery may need to be
charged to maintain battery health.
CAUTION
When the battery cable is removed from
the battery terminal, do not close either
of front doors. The automatic window
adjusting function will not work, and the side roof panel may be damaged.
To disconnect the negative (í) battery terminal,
perform the procedure in the following order.
Otherwise, the window and the side roof panel
may contact and be damaged.
1. Close the windows.
2. Open the hood.
3. Close and lock all the doors.
4. Disconnect the negative (í) battery terminal.
5. Securely close the hood.
To connect the negative (í) battery terminal,
perform the procedure in the following order.
Otherwise, the window and the side roof panel
may contact and be damaged.
1. Unlock and open the driver side door. Do not close the door.
2. Open the hood.
3. Connect the negative (í) battery terminal. Then close the hood.
4. Fully open the driver side door window.
5. Close the driver side door and the window.
Maintenance and do-it-yourself8-15
BATTERY
Page 365 of 428
8-16Maintenance and do-it-yourself
WARNING
.Do not expose the battery to flames
or electrical sparks. Hydrogen gas
generated by the battery is explo-
sive. Do not allow battery fluid to
contact your skin, eyes, fabrics, or
painted surfaces. After touching a
battery or battery cap, do not touch
or rub your eyes. Thoroughly wash
your hands. If the acid contacts your
eyes, skin or clothing, immediately
flush with water for at least 15
minutes and seek medical attention.
. Do not operate the vehicle if the
fluid in the battery is low. Low
battery fluid can cause a higher load
on the battery which can generate
heat, reduce battery life, and in
some cases lead to an explosion.
. When working on or near a battery,
always wear suitable eye protection
and remove all jewelry.
. Battery posts, terminals and related
accessories contain lead and lead
compounds. Wash hands after
handling. .
Keep the battery out of the reach of
children.
DI0137MF
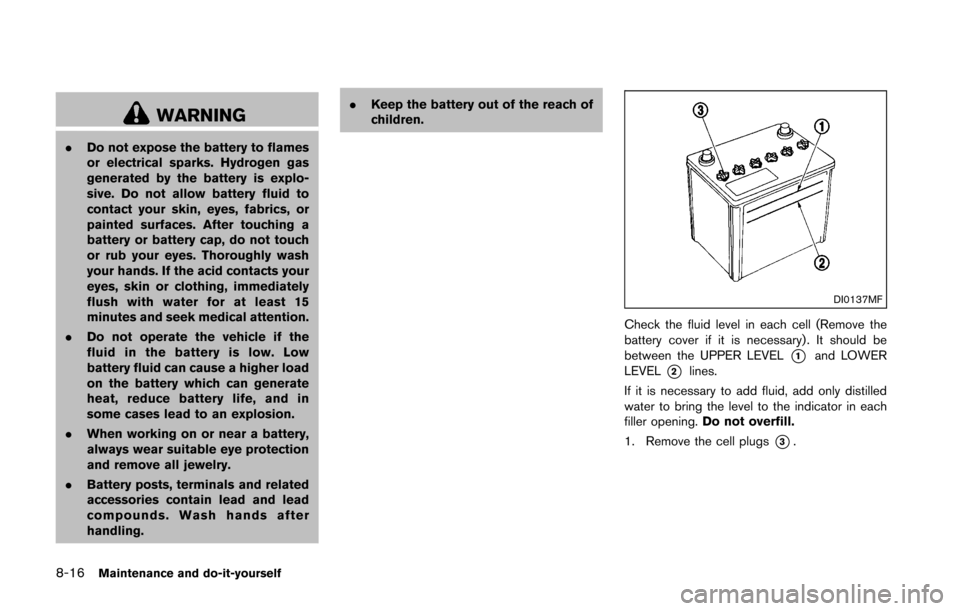
Check the fluid level in each cell (Remove the
battery cover if it is necessary) . It should be
between the UPPER LEVEL
*1and LOWER
LEVEL
*2lines.
If it is necessary to add fluid, add only distilled
water to bring the level to the indicator in each
filler opening. Do not overfill.
1. Remove the cell plugs
*3.
Page 366 of 428

SDI1480E
2. Add distilled water up to the UPPER LEVEL
*1line.
If the side of the battery is not clear, check
the distilled water level by looking directly
above the cell; the condition
*Aindicates
OK and the conditions
*Bneeds more to
be added.
3. Tighten cell plugs
*3.
Vehicles operated in high temperatures or under
severe conditions require frequent checks of the
battery fluid level.
JUMP STARTING
If jump starting is necessary, see “Jump starting”
(P.6-14) . If the engine does not start by jump
starting, the battery may have to be replaced.
Contact a NISSAN dealer.CAUTION
. Do not ground accessories directly
to the battery terminal. Doing so will
bypass the variable voltage control
system and the vehicle battery may
not charge completely.
. Use electrical accessories with the
engine running to avoid discharging
the vehicle battery.
The variable voltage control system measures
the amount of electrical discharge from the
battery and controls voltage generated by the
generator.
Maintenance and do-it-yourself8-17
VARIABLE VOLTAGE CONTROL
SYSTEM
Page 367 of 428
8-18Maintenance and do-it-yourself
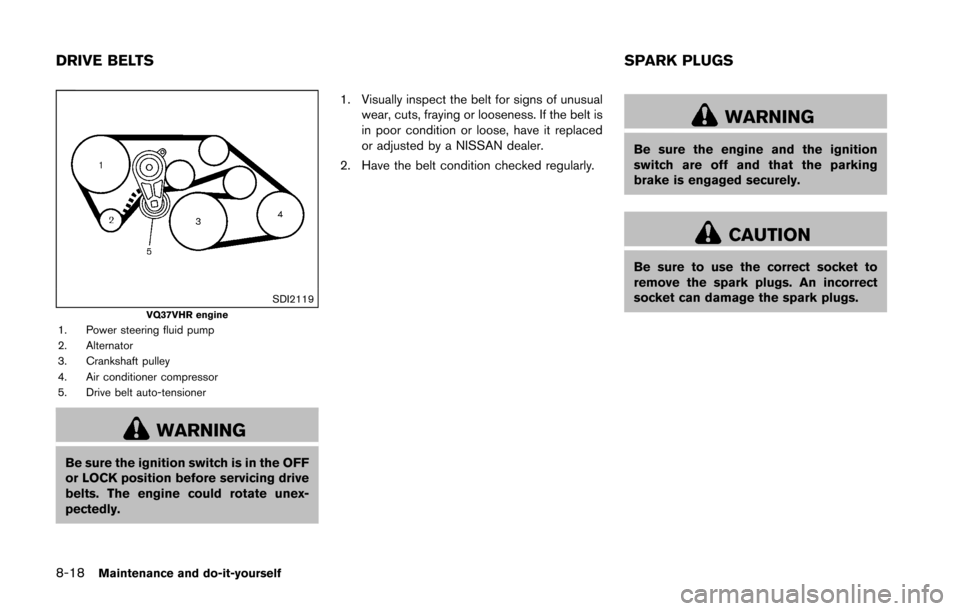
SDI2119VQ37VHR engine1. Power steering fluid pump
2. Alternator
3. Crankshaft pulley
4. Air conditioner compressor
5. Drive belt auto-tensioner
WARNING
Be sure the ignition switch is in the OFF
or LOCK position before servicing drive
belts. The engine could rotate unex-
pectedly.1. Visually inspect the belt for signs of unusual
wear, cuts, fraying or looseness. If the belt is
in poor condition or loose, have it replaced
or adjusted by a NISSAN dealer.
2. Have the belt condition checked regularly.
WARNING
Be sure the engine and the ignition
switch are off and that the parking
brake is engaged securely.
CAUTION
Be sure to use the correct socket to
remove the spark plugs. An incorrect
socket can damage the spark plugs.
DRIVE BELTS SPARK PLUGS
Page 368 of 428
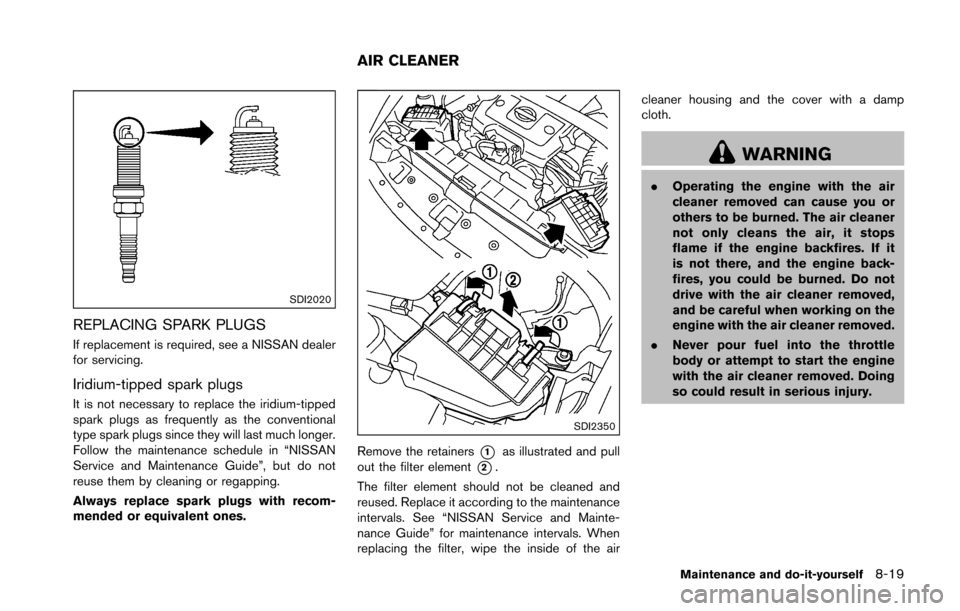
SDI2020
REPLACING SPARK PLUGS
If replacement is required, see a NISSAN dealer
for servicing.
Iridium-tipped spark plugs
It is not necessary to replace the iridium-tipped
spark plugs as frequently as the conventional
type spark plugs since they will last much longer.
Follow the maintenance schedule in “NISSAN
Service and Maintenance Guide”, but do not
reuse them by cleaning or regapping.
Always replace spark plugs with recom-
mended or equivalent ones.
SDI2350
Remove the retainers*1as illustrated and pull
out the filter element
*2.
The filter element should not be cleaned and
reused. Replace it according to the maintenance
intervals. See “NISSAN Service and Mainte-
nance Guide” for maintenance intervals. When
replacing the filter, wipe the inside of the air cleaner housing and the cover with a damp
cloth.
WARNING
.
Operating the engine with the air
cleaner removed can cause you or
others to be burned. The air cleaner
not only cleans the air, it stops
flame if the engine backfires. If it
is not there, and the engine back-
fires, you could be burned. Do not
drive with the air cleaner removed,
and be careful when working on the
engine with the air cleaner removed.
. Never pour fuel into the throttle
body or attempt to start the engine
with the air cleaner removed. Doing
so could result in serious injury.
Maintenance and do-it-yourself8-19
AIR CLEANER
Page 369 of 428
8-20Maintenance and do-it-yourself
CLEANING
If your windshield is not clear after using the
windshield washer or if a wiper blade chatters
when running, wax or other material may be on
the blade or windshield.
Clean the outside of the windshield with a
washer solution or a mild detergent. Your
windshield is clean if beads do not form when
rinsing with clear water.
Clean each blade by wiping it with a cloth
soaked in a washer solution or a mild detergent.
Then rinse the blade with clear water. If your
windshield is still not clear after cleaning the
blades and using the wiper, replace the blades.
CAUTION
Worn windshield wiper blades can
damage the windshield and impair
driver vision.
SDI2359
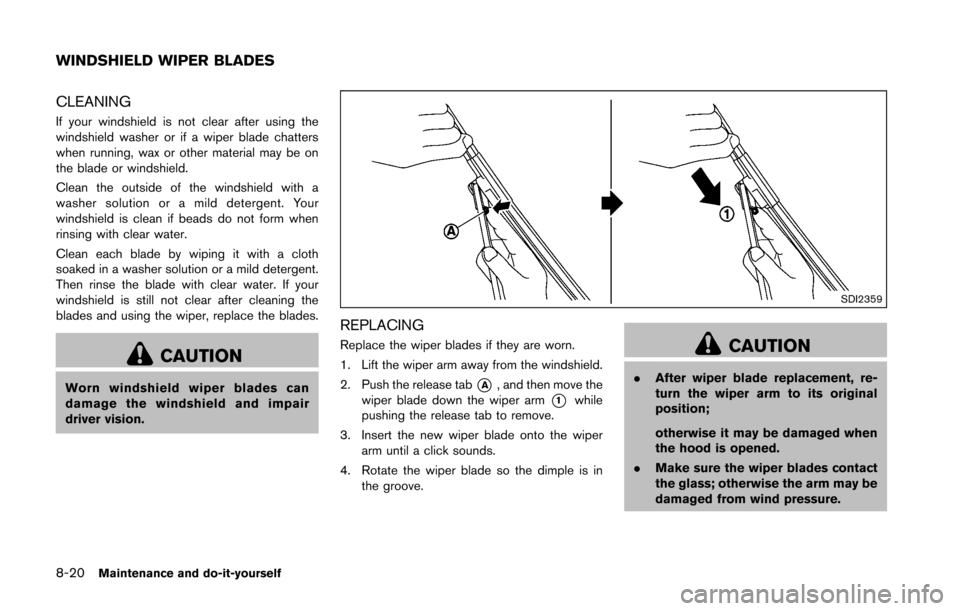
REPLACING
Replace the wiper blades if they are worn.
1. Lift the wiper arm away from the windshield.
2. Push the release tab
*A, and then move the
wiper blade down the wiper arm
*1while
pushing the release tab to remove.
3. Insert the new wiper blade onto the wiper arm until a click sounds.
4. Rotate the wiper blade so the dimple is in the groove.
CAUTION
.After wiper blade replacement, re-
turn the wiper arm to its original
position;
otherwise it may be damaged when
the hood is opened.
. Make sure the wiper blades contact
the glass; otherwise the arm may be
damaged from wind pressure.
WINDSHIELD WIPER BLADES
Page 370 of 428
SDI2362
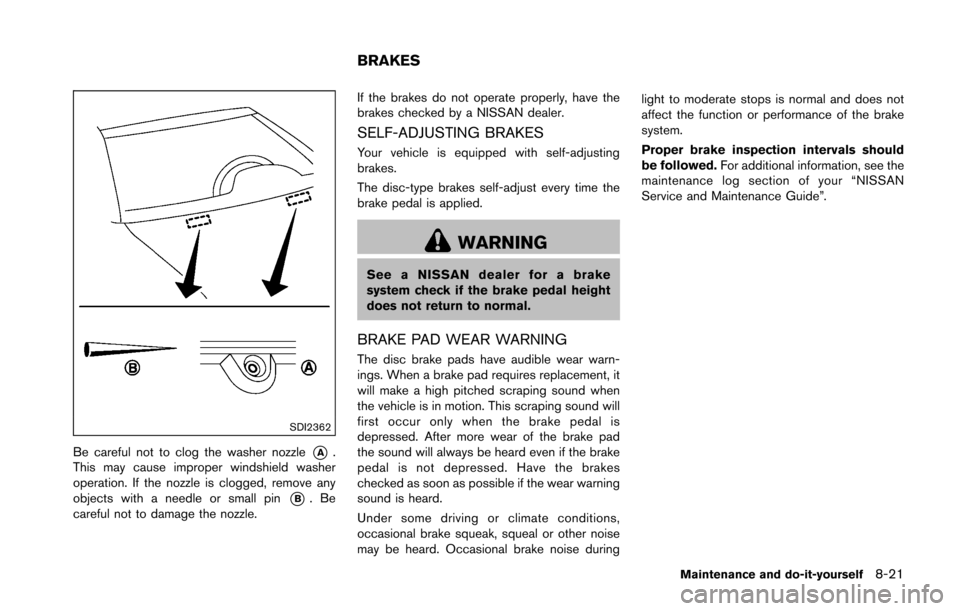
Be careful not to clog the washer nozzle*A.
This may cause improper windshield washer
operation. If the nozzle is clogged, remove any
objects with a needle or small pin
*B.Be
careful not to damage the nozzle. If the brakes do not operate properly, have the
brakes checked by a NISSAN dealer.
SELF-ADJUSTING BRAKES
Your vehicle is equipped with self-adjusting
brakes.
The disc-type brakes self-adjust every time the
brake pedal is applied.
WARNING
See a NISSAN dealer for a brake
system check if the brake pedal height
does not return to normal.
BRAKE PAD WEAR WARNING
The disc brake pads have audible wear warn-
ings. When a brake pad requires replacement, it
will make a high pitched scraping sound when
the vehicle is in motion. This scraping sound will
first occur only when the brake pedal is
depressed. After more wear of the brake pad
the sound will always be heard even if the brake
pedal is not depressed. Have the brakes
checked as soon as possible if the wear warning
sound is heard.
Under some driving or climate conditions,
occasional brake squeak, squeal or other noise
may be heard. Occasional brake noise duringlight to moderate stops is normal and does not
affect the function or performance of the brake
system.
Proper brake inspection intervals should
be followed.
For additional information, see the
maintenance log section of your “NISSAN
Service and Maintenance Guide”.
Maintenance and do-it-yourself8-21
BRAKES
Page 371 of 428
8-22Maintenance and do-it-yourself
SDI1479A
SDI2566
ENGINE COMPARTMENT
CAUTION
Never use a fuse of a higher or lower
amperage rating than that specified on
the fuse box cover. This could damage
the electrical system or cause a fire.
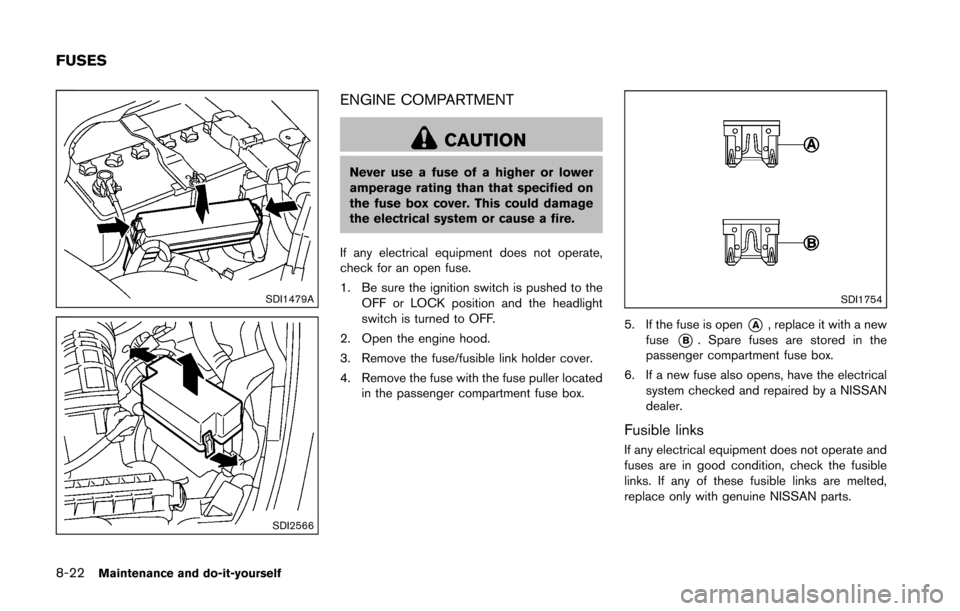
If any electrical equipment does not operate,
check for an open fuse.
1. Be sure the ignition switch is pushed to the OFF or LOCK position and the headlight
switch is turned to OFF.
2. Open the engine hood.
3. Remove the fuse/fusible link holder cover.
4. Remove the fuse with the fuse puller located in the passenger compartment fuse box.
SDI1754
5. If the fuse is open*A, replace it with a new
fuse
*B. Spare fuses are stored in the
passenger compartment fuse box.
6. If a new fuse also opens, have the electrical system checked and repaired by a NISSAN
dealer.
Fusible links
If any electrical equipment does not operate and
fuses are in good condition, check the fusible
links. If any of these fusible links are melted,
replace only with genuine NISSAN parts.
FUSES
Page 372 of 428
SDI2361
PASSENGER COMPARTMENT
CAUTION
Never use a fuse of a higher or lower
amperage rating than that specified on
the fuse box cover. This could damage
the electrical system or cause a fire.
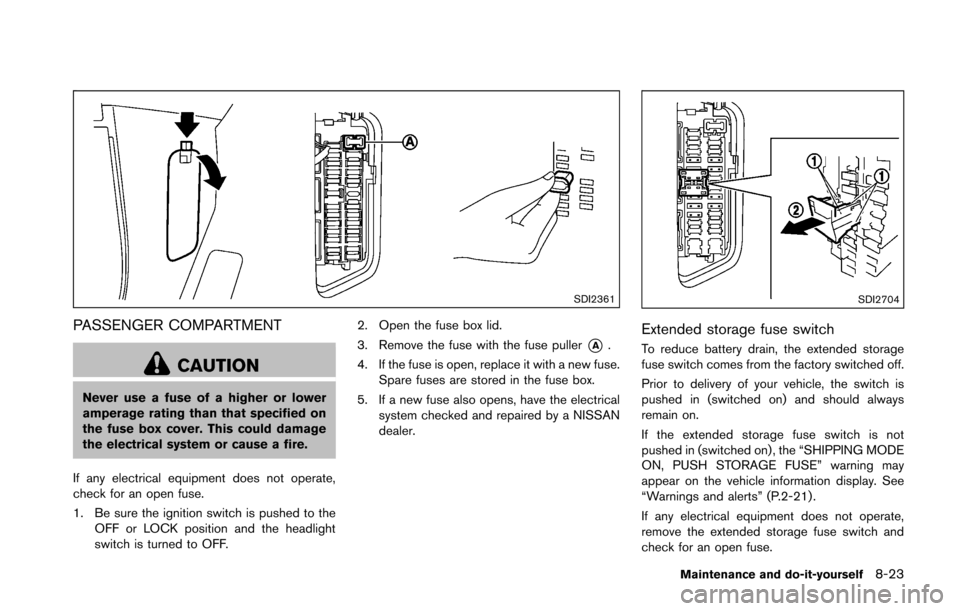
If any electrical equipment does not operate,
check for an open fuse.
1. Be sure the ignition switch is pushed to the OFF or LOCK position and the headlight
switch is turned to OFF. 2. Open the fuse box lid.
3. Remove the fuse with the fuse puller
*A.
4. If the fuse is open, replace it with a new fuse. Spare fuses are stored in the fuse box.
5. If a new fuse also opens, have the electrical system checked and repaired by a NISSAN
dealer.
SDI2704
Extended storage fuse switch
To reduce battery drain, the extended storage
fuse switch comes from the factory switched off.
Prior to delivery of your vehicle, the switch is
pushed in (switched on) and should always
remain on.
If the extended storage fuse switch is not
pushed in (switched on), the “SHIPPING MODE
ON, PUSH STORAGE FUSE” warning may
appear on the vehicle information display. See
“Warnings and alerts” (P.2-21) .
If any electrical equipment does not operate,
remove the extended storage fuse switch and
check for an open fuse.
Maintenance and do-it-yourself8-23
Page 373 of 428
8-24Maintenance and do-it-yourself
NOTE:
If the extended storage fuse switch mal-
functions, or if the fuse is open, it is not
necessary to replace the switch. In this
case, remove the extended storage fuse
switch and replace it with a new fuse of the
same rating.
How to remove the extended storage fuse
switch:
1. To remove the extended storage fuse switch,be sure the ignition switch is in the OFF or
LOCK position.
2. Be sure the headlight switch is in the OFF position.
3. Remove the fuse box cover.
4. Pinch the locking tabs
*1found on each
side of the storage fuse switch.
5. Pull the storage fuse switch straight out from the fuse box
*2.
SDI2451
CAUTION
Be careful not to allow children to
swallow the battery and removed parts. Replace the battery as follows:
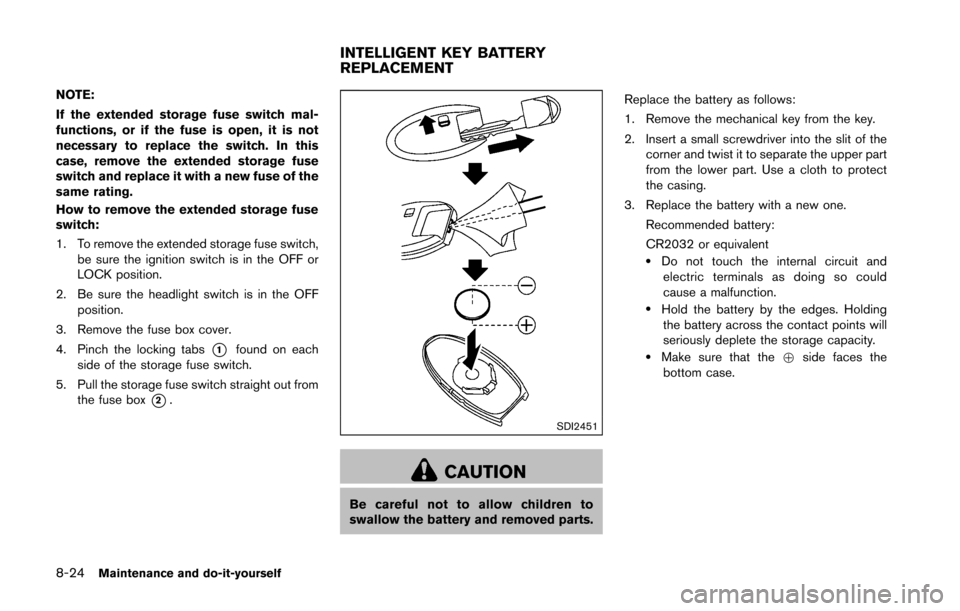
1. Remove the mechanical key from the key.
2. Insert a small screwdriver into the slit of the
corner and twist it to separate the upper part
from the lower part. Use a cloth to protect
the casing.
3. Replace the battery with a new one. Recommended battery:
CR2032 or equivalent
.Do not touch the internal circuit andelectric terminals as doing so could
cause a malfunction.
.Hold the battery by the edges. Holdingthe battery across the contact points will
seriously deplete the storage capacity.
.Make sure that the +side faces the
bottom case.
INTELLIGENT KEY BATTERY
REPLACEMENT