indicator NISSAN ALMERA N15 1995 Service Manual
[x] Cancel search | Manufacturer: NISSAN, Model Year: 1995, Model line: ALMERA N15, Model: NISSAN ALMERA N15 1995Pages: 1701, PDF Size: 82.27 MB
Page 28 of 1701
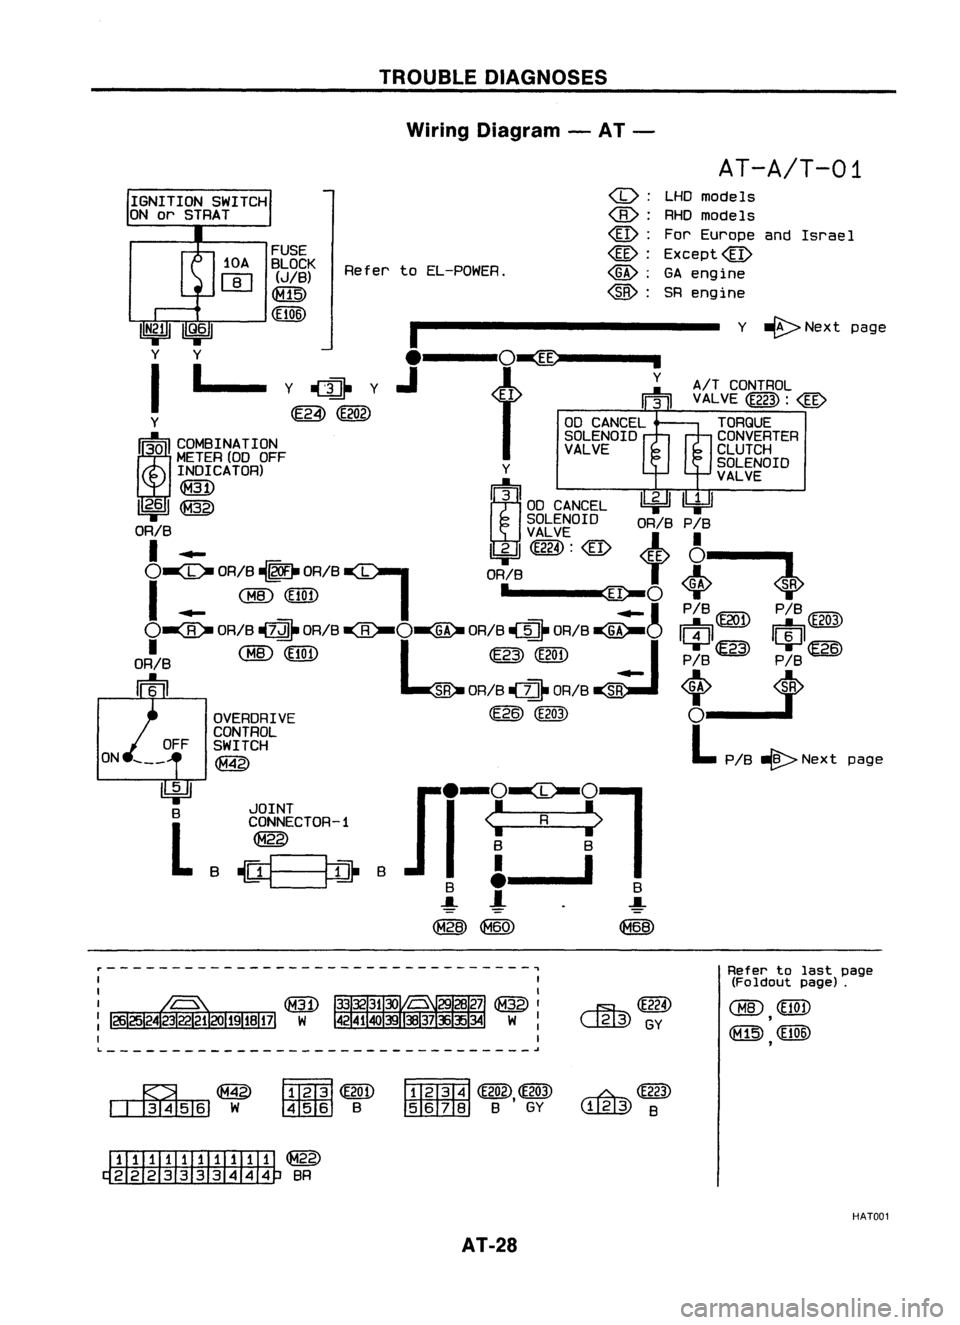
TROUBLEDIAGNOSES
Wiring Diagram -AT -
AT-A/T-01
page
Israel
Y ~Next page
A!T CONTROL
VAL VE
(E223) :
@
TORQUE
CONVERTER
CLUTCH
SOLENOID
VALVE
LHD
models
RHO models
For Europe and
Except@
GA engine
SR engine
(b):
:
@:
@:
@:
@:
Refer
toEL-POWER.
FUSE
BLOCK (J!B)
([@
(El06)
I
y ~.~ y
l---t~'~
Y ~(E202)
III
C~INATION
METER
(00OFF
INDICATOR) Y
~ t~)
11
2•6
1
@
300 CANCEL ~~
SOLENOID OR!BP!B
OR!B VALVE
I .-
I!::iJl
(E224) :
@
4~~
O~
OR!B
~1-
DRIB
I
OR!B
T
A
I
(BID
(Elan •
~o~
SR
.- .-1
P!B@l) P!B~
O~
OR!B~ DRIB
-ea-O~
OR!B~ OR!B
~O
/I;
II
E20l
II
i
II
E203
ORI!B
CBID
(El0n
L
@
(E20n
I
P!B~ P!B~
rm
SR
OR!B
-cz::n.
OR!B~
<0> ~
OVERDRIVE (E?6)
(E203)
0--1
CONTROL
L
OFF SWITCH
~ PIB-@>Next
ON
~
B
L
JOINT
CONNECTOR-1
~
B
~==~
B
r---------------------------------,
~(E224)
~GY
L ~
Refer
tolast page
(Foldout page).
CHID
(EtOn
,
([@
(El06)
,
~~
~W
~@D
~ B
~
(E202),~ ~
@J)
rn:rn:rz::rnJ
BGY
W@
B
ITIII:illIillIi ~
~ BR
HAT001
AT-28
Page 46 of 1701
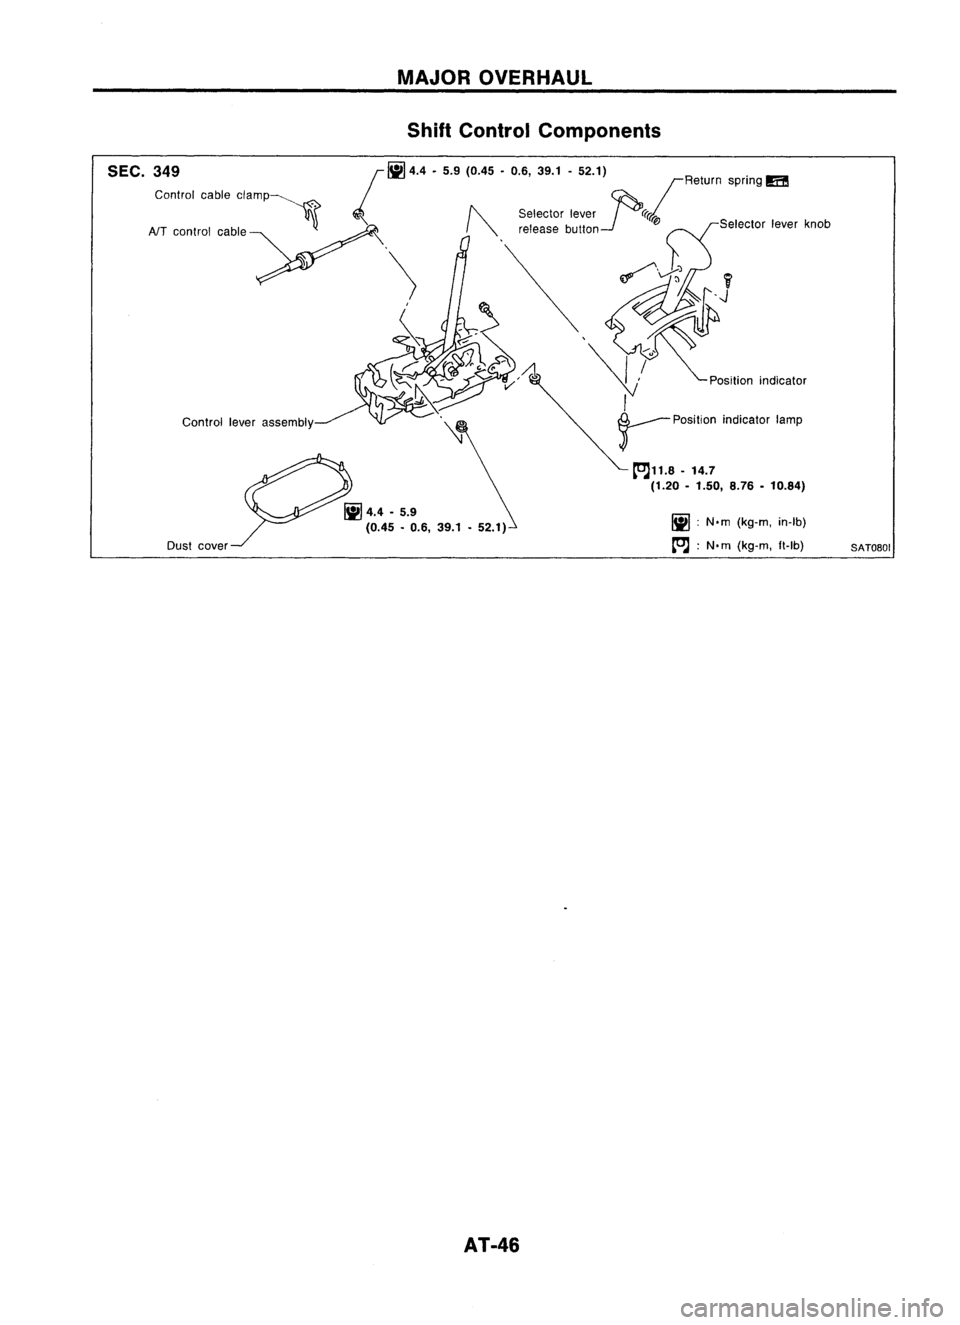
MAJOROVERHAUL
Shift Control Components
SATOBOI
Position
indicator
~ :N'm (kg-m. in-Ib)
~ :N'm (kg-m, tt-Ib)
~11.8
•14.7
(1.20 -1.50, 8.76•10.84)
~ 4.4 -5.9
(0.45 •0.6, 39.1 -52.1)
Control
leverassemblY~
Dust cover
I
~
4.4 •5.9 (0.45 •0.6, 39.1 •52.1)
'Return spring
m
Control cableclamp~
p
". '\ Selectorlever
rror.;
NT
"01
co,
'''''-y. "'.,,',,"
"II" •
S""",,,,"
k,o'
\
-~~
SEC.
349
AT-46
Page 136 of 1701
REPAIRFORCOMPONENT PARTS
Final Drive -Model 34X81
(Coni'd)
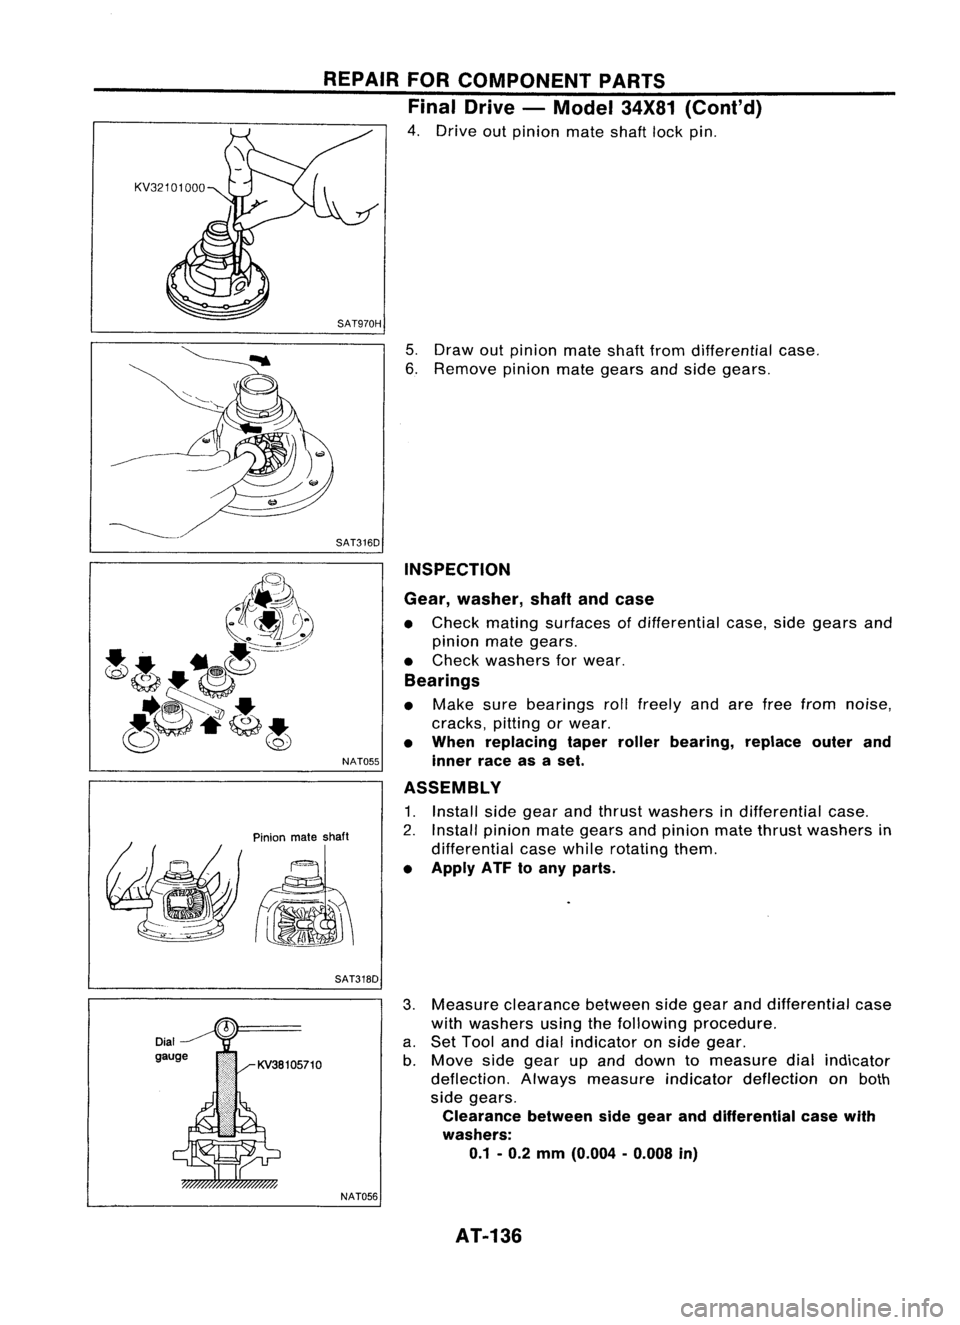
4. Drive outpinion mateshaftlockpin.
SAT970H
5.Draw outpinion mateshaftfromdifferential case.
6. Remove pinionmategears andside gears.
SAT316D INSPECTION
Gear, washer, shaftandcase
• Check mating surfaces ofdifferential case,sidegears and
pinion mategears.
• Check washers forwear.
Bearings
• Make surebearings rollfreely andarefree from noise,
cracks, pittingorwear.
• When replacing taperroller bearing, replaceouterand
NAT055
innerraceasaset.
'----------------'
Dial
gauge
Pinion
mateshaft
SAT318D
NAT056 ASSEMBLY
1. Install sidegear andthrust washers indifferential case.
2. Install pinion mategears andpinion matethrust washers in
differential casewhile rotating them.
• Apply ATFtoany parts.
3. Measure clearance betweensidegear anddifferential case
with washers usingthefollowing procedure.
a. Set Tool anddial indicator onside gear.
b. Move sidegear upand down tomeasure dialindicator
deflection. Alwaysmeasure indicatordeflection onboth
side gears.
Clearance betweensidegear anddifferential casewith
washers:
0.1 -0.2 mm (0.004 -0.008 in)
AT-136
Page 139 of 1701
~-_./-'--.~.-l
~
1I
-~------~._--~
.
• ~KV38105710
• Wooden
block
NAT060 ASSEMBLY
Assembly 1(Cont'd)
4. Install returnspring.
Adjustment 1
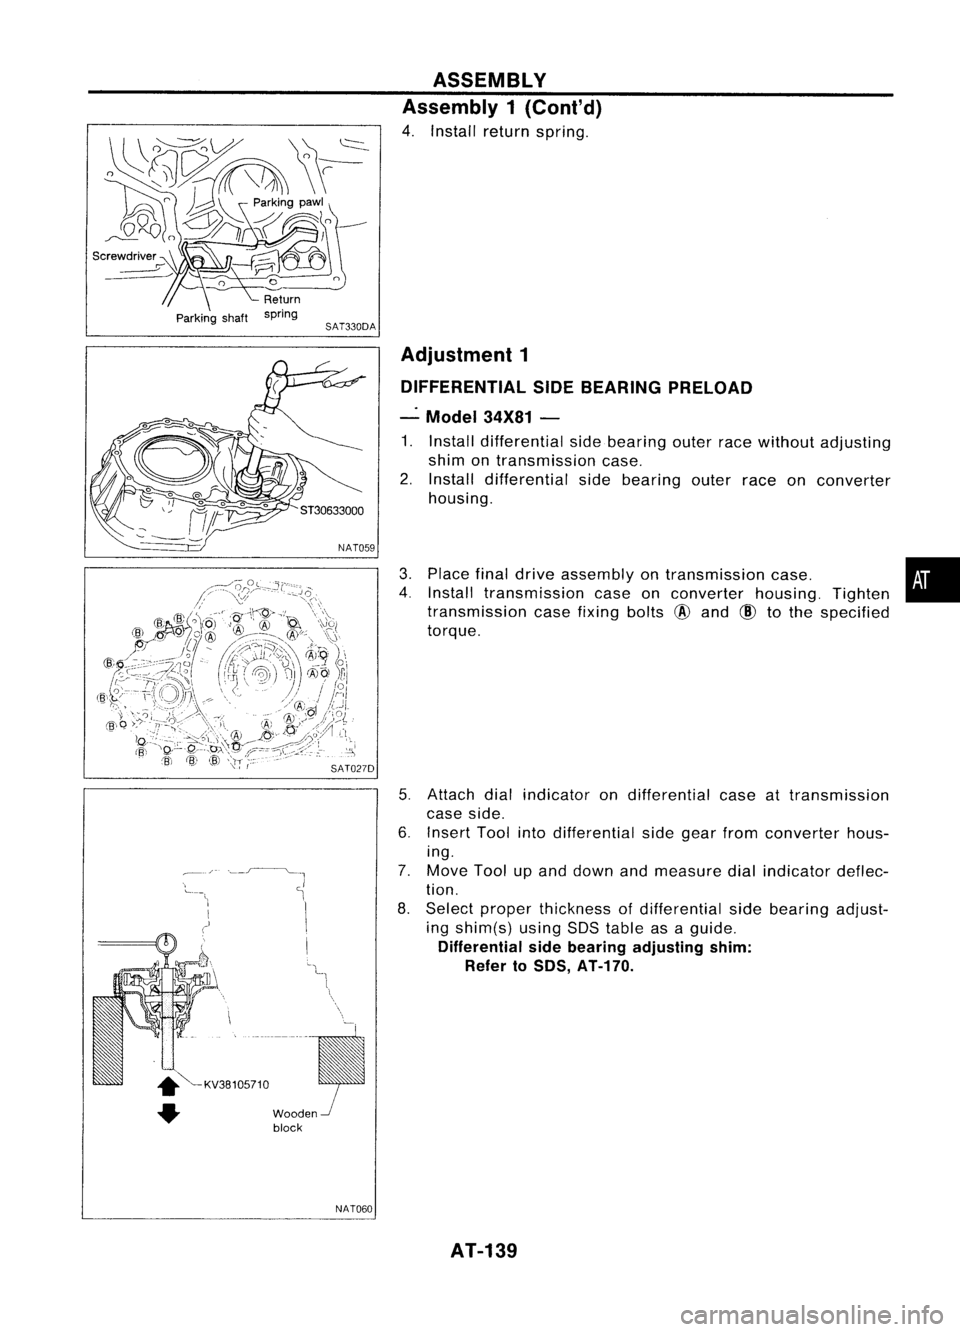
DIFFERENTIAL SIDEBEARING PRELOAD
-" Model 34X81-
1. Install differential sidebearing outerracewithout adjusting
shim ontransmission case.
2. Install differential sidebearing outerraceonconverter
housing.
3. Place finaldrive assembly ontransmission case. •
4. Install transmission caseonconverter housing.Tighten
transmission casefixing bolts
@
and
CID
tothe specified
torque.
5. Attach dialindicator ondifferential caseattransmission
case side.
6. Insert Toolintodifferential sidegear from converter hous-
ing.
7. Move Toolupand down andmeasure dialindicator deflec-
tion.
8. Select proper thickness ofdifferential sidebearing adjust-
ing shim(s) usingSDStable asaguide.
Differential sidebearing adjusting shim:
Refer to50S, AT-HO.
AT-139
Page 171 of 1701
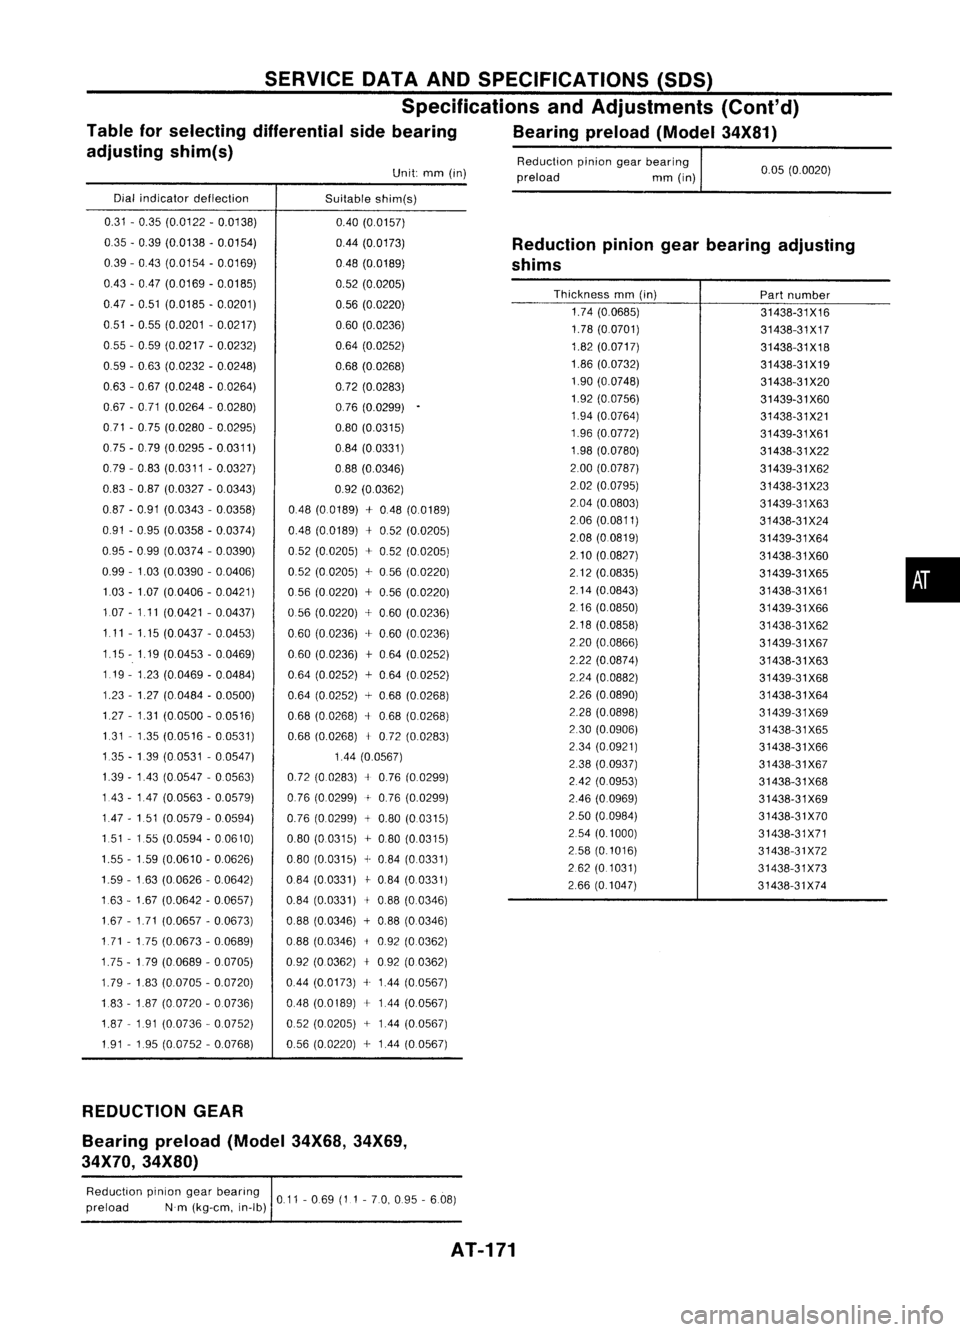
0.05(0.0020)
Reduction
piniongearbearing
preload mm(in)
Unit:
mm(in)
SERVICE
DATAANDSPECIFICATIONS (SOS)
Specifications andAdjustments (Cont'd)
Table forselecting differential sidebearing Bearingpreload(Model34X81)
adjusting shim(s)
Dial indicator deflection
Suitableshim(s)
Reductionpiniongearbearing adjusting
shims
0.31
-0.35 (0.0122 -0.0138)
035 -0.39 (0.0138 -0.0154)
0.39 -043 (0.0154 -0.0169)
043 -047 (0.0169 -0.0185)
047 -0.51 (0.0185 -0.0201)
0.51 -0.55 (0.0201 -0.0217)
055 -059 (0.0217 -0.0232)
0.59 -0.63 (0.0232 -0.0248)
0.63 -0.67 (0.0248 -00264)
0.67 -0.71 (0.0264 -0.0280)
071 -075 (0.0280 -0.0295)
075 -079 (0.0295 -0.0311)
0.79 -083 (0.0311 -0.0327)
0.83 -0.87 (0.0327 -0.0343)
087 -0.91 (0.0343 -0.0358)
0.91 -095 (0.0358 -0.0374)
095 -099 (0.0374 -0.0390)
0.99 -1.03 (0.0390 -0.0406)
103 -1.07 (0.0406 -0.0421)
1.07 -1.11 (0.0421 -0.0437)
1.11 -1.15 (0.0437 -00453)
1.15 -1.19 (0.0453 -0.0469)
119 -1.23 (0.0469 -0.0484)
1.23 -1.27 (0.0484 -0.0500)
1.27 -1.31 (0.0500 -0.0516)
1.31 -1.35 (0.0516 -0.0531)
135 -139 (00531 -0.0547)
139 -143 (0.0547 -0.0563)
143 -147 (0.0563 -0.0579)
147 -151 (0.0579 -0.0594)
151 -155 (00594 -0.0610)
1.55 -159 (0.0610 -00626)
1.59 -163 (0.0626 -0.0642)
163 -1.67 (0.0642 -0.0657)
1.67 -1.71 (0.0657 -0.0673)
1.71 -1.75 (0.0673 -0.0689)
1.75 -1.79 (0.0689 -0.0705)
1.79 -183 (0.0705 -0.0720)
1.83 -187 (0.0720 -00736)
1.87 -191 (0.0736 -0.0752)
1.91 -195 (0.0752 -0.0768) 040
(0.0157)
0.44 (0.0173)
048 (0.0189)
0.52 (0.0205)
0.56 (0.0220)
060 (0.0236)
0.64 (0.0252)
0.68 (0.0268)
0.72 (0.0283)
076 (0.0299)
0.80 (0.0315)
084 (0.0331)
0.88 (0.0346)
0.92 (00362)
048 (0.0189) +048 (0.0189)
048 (0.0189)
+
052 (0.0205)
0.52 (0.0205) +052 (0.0205)
052 (0.0205) +056 (0.0220)
056 (00220) +0.56 (0.0220)
056 (0.0220) +060 (0.0236)
0.60 (0.0236) +0.60 (0.0236)
060 (00236)
+
064 (0.0252)
064 (0.0252)
+
0.64 (0.0252)
0.64 (0.0252) +0.68 (0.0268)
068 (0.0268)
+
0.68 (0.0268)
0.68 (0.0268)
+
0.72 (0.0283)
144 (0.0567)
0.72 (0.0283)
+
0.76 (0.0299)
076 (0.0299)
+
0.76 (0.0299)
0.76 (0.0299)
+
0.80 (0.0315)
0.80 (0.0315) +080 (0.0315)
0.80 (0.0315)
+
0.84 (0.0331)
084 (0.0331)
j-
084 (0.0331)
0.84 (0.0331)
+
088 (0.0346)
088 (0.0346) +0.88 (0.0346)
088 (0.0346)
i
092 (0.0362)
092 (00362)
+
0.92 (0.0362)
044 (0.0173) +144 (0.0567)
048 (0.0189)
+
144 (0.0567)
052 (0.0205) +144 (0.0567)
0.56 (0.0220)
+
144 (0.0567)
Thickness
mm(in)
1.74 (0.0685)
1.78 (00701)
1.82 (0.0717)
1.86 (0.0732)
1.90 (0.0748)
1.92 (0.0756)
1.94 (0.0764)
1.96 (0.0772)
1.98 (0.0780)
2.00 (0.0787)
202 (0.0795)
2.04 (0.0803)
206 (0.0811)
2.08 (0.0819)
2.10 (00827)
2.12 (0.0835)
2.14 (0.0843)
2.16 (00850)
2.18 (0.0858)
2.20 (0.0866)
2.22 (0.0874)
2.24 (0.0882)
226 (0.0890)
2.28 (0.0898)
2.30 (0.0906)
234 (0.0921)
238 (0.0937)
242 (0.0953)
246 (0.0969)
250 (0.0984)
2.54 (0.1000)
2.58 (01016)
262 (0.1031)
266 (0.1047)
Part
number
31438-31X16
31438-31X17
31438-31X18
31438-31X19 31438-31 X20
31439-31 X60
31438-31X21
31439-31X61
31438-31 X22
31439-31 X62
31438-31 X23
31439-31X63
31438-31X24
31439-31X64
31438-31X60
31439-31X65
31438-31X61
31439-31 X66
31438-31X62
31439-31 X67
31438-31X63
31439-31 X68
31438-31X64
31439-31 X69
31438-31 X65
31438-31X66
31438-31 X67
31438-31 X68
31438-31X69
31438-31 X70
31438-31X71
31438-31 X72
31438-31 X73
31438-31 X74
•
REDUCTION GEAR
Bearing preload(Model34X68,34X69,
34X70, 34X80)
Reduction piniongearbearing
011-069 (11-70, 095 -6.08)
preload Nm(kg-em, in-Ib)
AT-171
Page 293 of 1701

Pistonbootretainer (AD22VF only)
Piston boot
Piston seal
FRONT
DISCBRAKE
Inspection -Caliper (Cont'd)
PISTON
Check pistonforscore, rust,wear, damage orpresence offor-
eign objects. Replace ifany ofthe above conditions are
observed.
CAUTION:
Piston sliding surface isplated. Donot polish withemery paper
even ifrust orforeign objects arestuck tosliding surface.
SLIDE PIN,PINBOLT ANDPINBOOT
Check forwear, cracks, rustorother damage. Replaceifany of
the above conditions areobserved.
Inspection -Rotor
RUNOUT
1: Secure rotortowheel hubwith atleast twonuts (M12 x
1.25).
2. Check runout usingadial indicator.
Make surethatwheel bearing axialendplay iswithin thespec-
ifications beforemeasuring. RefertoFA section ("FrontWheel
Bearing", "ON-VEHICLE SERVICE").
Maximum runout:
SBR936A 0.07mm(0.0028 in)
3.
If
the runout isout ofspecification, findminimum runout
position asfollows:
a. Remove nutsandrotor fromwheel hub.
b. Shift therotor onehole andsecure rotortowheel hub
with nuts.
c. Measure runout.
d. Repeat stepsa.to c.so that minimum runoutposition can
be found.
4. Ifthe runout isstill outofspecification, turnrotor withon-car
brake lathe("MAD, DL-8700", "AMMCO700and 705" or•••
equivalent).
THICKNESS Thickness variation(Atleast 8positions):
Maximum 0.02mm(0.0008 in)
If thickness variationexceedsthespecification, turnrotor with
on-car brakelathe.
Rotor repair limit:
CL22VD andCL22VE 16.0mm(0.630 in)
CL22VF 24.0mm(0.945 in)
SBR944A Assembly
1. With piston bootfitted topiston, insertpiston bootinto
groove oncylinder bodyandinstall piston.
2. Properly securepistonboot.
3. Secure pistonbootwithretainer.
(AD22VF modelonly)
Piston
SBR777B BR-23
Page 303 of 1701
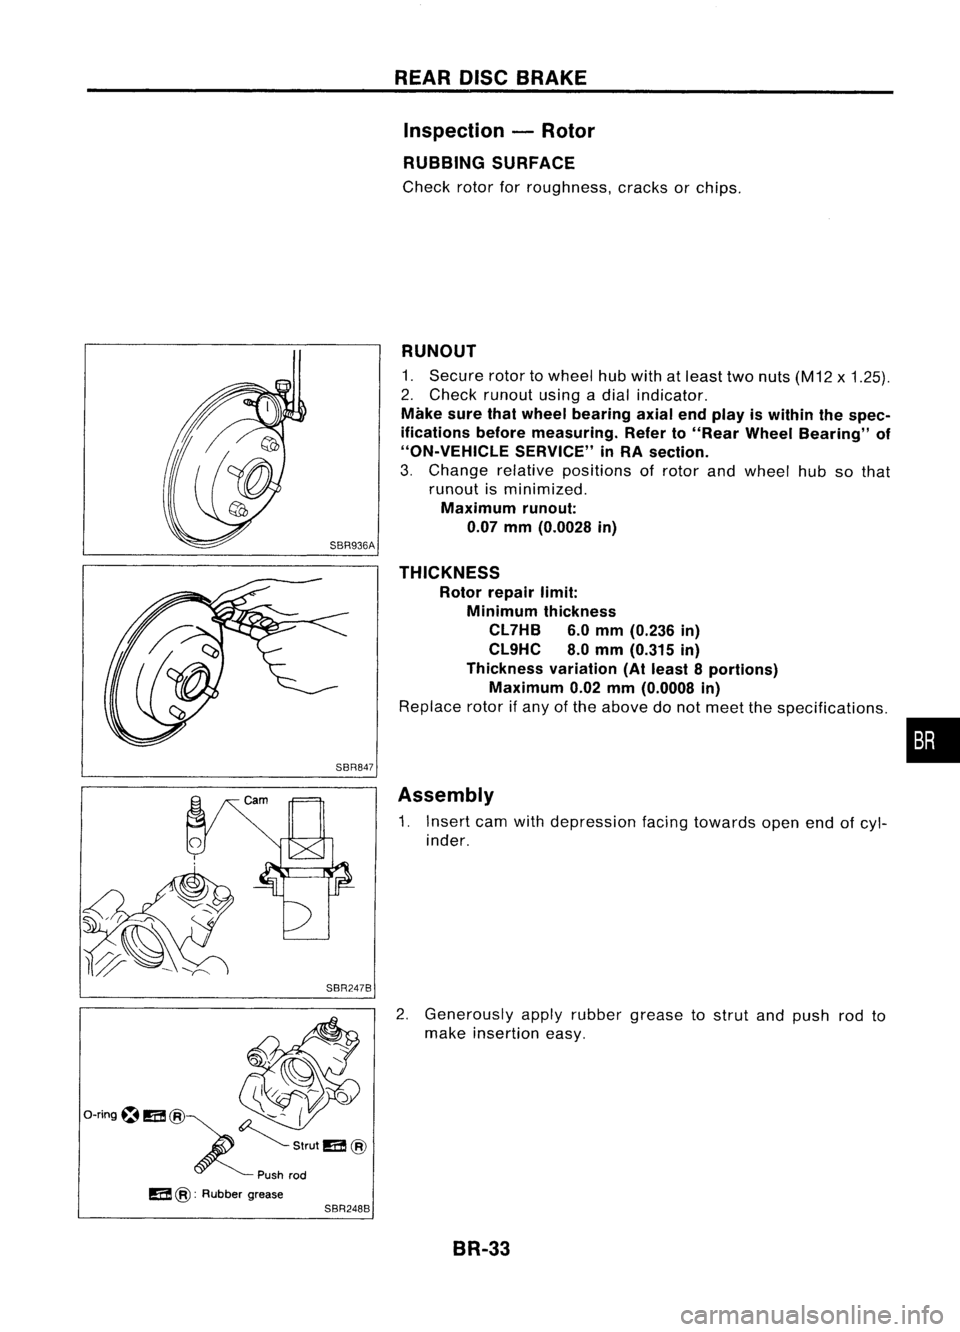
SBR847
SBR247B REAR
DISCBRAKE
Inspection -Rotor
RUBBING SURFACE
Check rotorforroughness, cracksorchips.
RUNOUT
1. Secure rotortowheel hubwith atleast twonuts (M12 x1.25).
2. Check runout usingadial indicator.
Make surethatwheel bearing axialendplay iswithin thespec-
ifications beforemeasuring. Referto"Rear Wheel Bearing" of
"ON-VEHICLE SERVICE"inRA section.
3. Change relativepositions ofrotor andwheel hubsothat
runout isminimized.
Maximum runout:
0.07 mm(0.0028 in)
THICKNESS Rotor repair limit:
Minimum thickness
CL7HB 6.0mm (0.236 in)
CL9HC 8.0mm (0.315 in)
Thickness variation(Atleast 8portions)
Maximum 0.02mm(0.0008 in)
Replace rotorifany ofthe above donot meet thespecifications .
Assembly
1. Insert camwithdepression facingtowards openendofcyl-
inder.
2. Generously applyrubber grease tostrut andpush rodto
make insertion easy.
BR-33
•
Page 393 of 1701
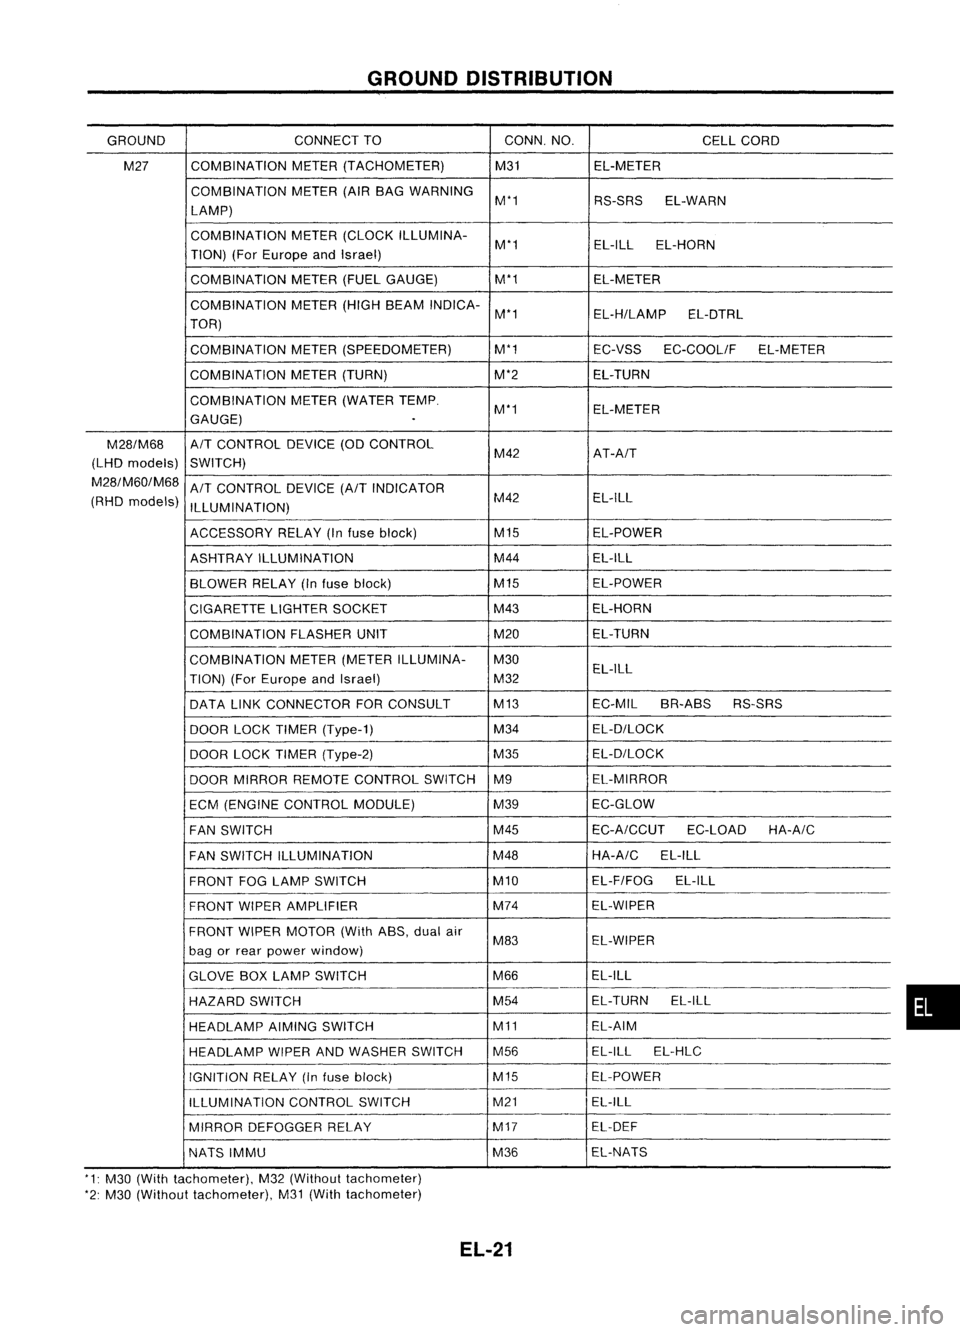
GROUNDDISTRIBUTION
GROUND CONNECT
TO CONN.NO.
CELLCORD
M27 COMBINATION
METER(TACHOMETER) M31EL-METER
COMBINATION METER(AIRBAG WARNING
M'1 RS-SRSEL-WARN
LAMP)
COMBINATION METER(CLOCK ILLUMINA-
M'1 EL-ILL
EL-HORN
TION) (ForEurope andIsrael)
COMBINATION METER(FUELGAUGE) M'1
EL-METER
COMBINATION METER(HIGHBEAM INDICA-
M'1 EL-H/LAMPEL-DTRL
TOR)
COMBINATION METER(SPEEDOMETER) M'1
EC-VSSEC-COOLIF EL-METER
COMBINATION METER(TURN) M'2EL-TURN
COMBINATION METER(WATER TEMP.
M'1 EL-METER
GAUGE)
.
M28/M68
A/T
CONTROL DEVICE(ODCONTROL
(LHD models)
SWITCH) M42
AT-A/T
M28/M60/M68
A/T
CONTROL DEVICE
(A/T
INDICATOR
(RHD models)
ILLUMINATION) M42
EL-ILL
ACCESSORY RELAY(Infuse block) M15
EL-POWER
ASHTRAY ILLUMINATION M44
EL-ILL
BLOWER RELAY(Infuse block) M15
EL-POWER
CIGARETTE LIGHTERSOCKET M43
EL-HORN
COMBINATION FLASHERUNIT M20EL-TURN
COMBINATION METER(METER ILLUMINA- M30
TION) (ForEurope andIsrael) M32EL-ILL
DATA LINKCONNECTOR FORCONSULT M13
EC-MILBR-ABS RS-SRS
DOOR LOCKTIMER (Type-1) M34
EL-D/LOCK
DOOR LOCKTIMER (Type-2) M35EL-D/LOCK
DOOR MIRROR REMOTE CONTROL SWITCHM9 EL-MIRROR
ECM (ENGINE CONTROL MODULE) M39EC-GLOW
FAN SWITCH M45
EC-A/CCUT
EC-LOADHA-A/C
FAN SWITCH ILLUMINATION M48HA-A/C
EL-ILL
FRONT FOGLAMP SWITCH M10EL-F/FOG
EL-ILL
FRONT WIPERAMPLIFIER M74
EL-WIPER
FRONT WIPERMOTOR (WithASS,dualair
M83 EL-WIPER
bag orrear power window)
GLOVE BOXLAMP SWITCH M66EL-ILL
HAZARD SWITCH M54
EL-TURN
EL-ILL
HEADLAMP AIMINGSWITCH M11EL-AIM
HEADLAMP WIPERANDWASHER SWITCH M56 EL-ILL
EL-HLC
IGNITION RELAY(Infuse block) M15EL-POWER
ILLUMINATION CONTROLSWITCH M21
EL-ILL
MIRROR DEFOGGER RELAY M17
EL-DEF
NATS IMMU M36EL-NATS
'1: M30 (With tachometer), M32(Without tachometer)
'2: M30 (Without tachometer), M31(With tachometer)
EL-21
•
Page 438 of 1701
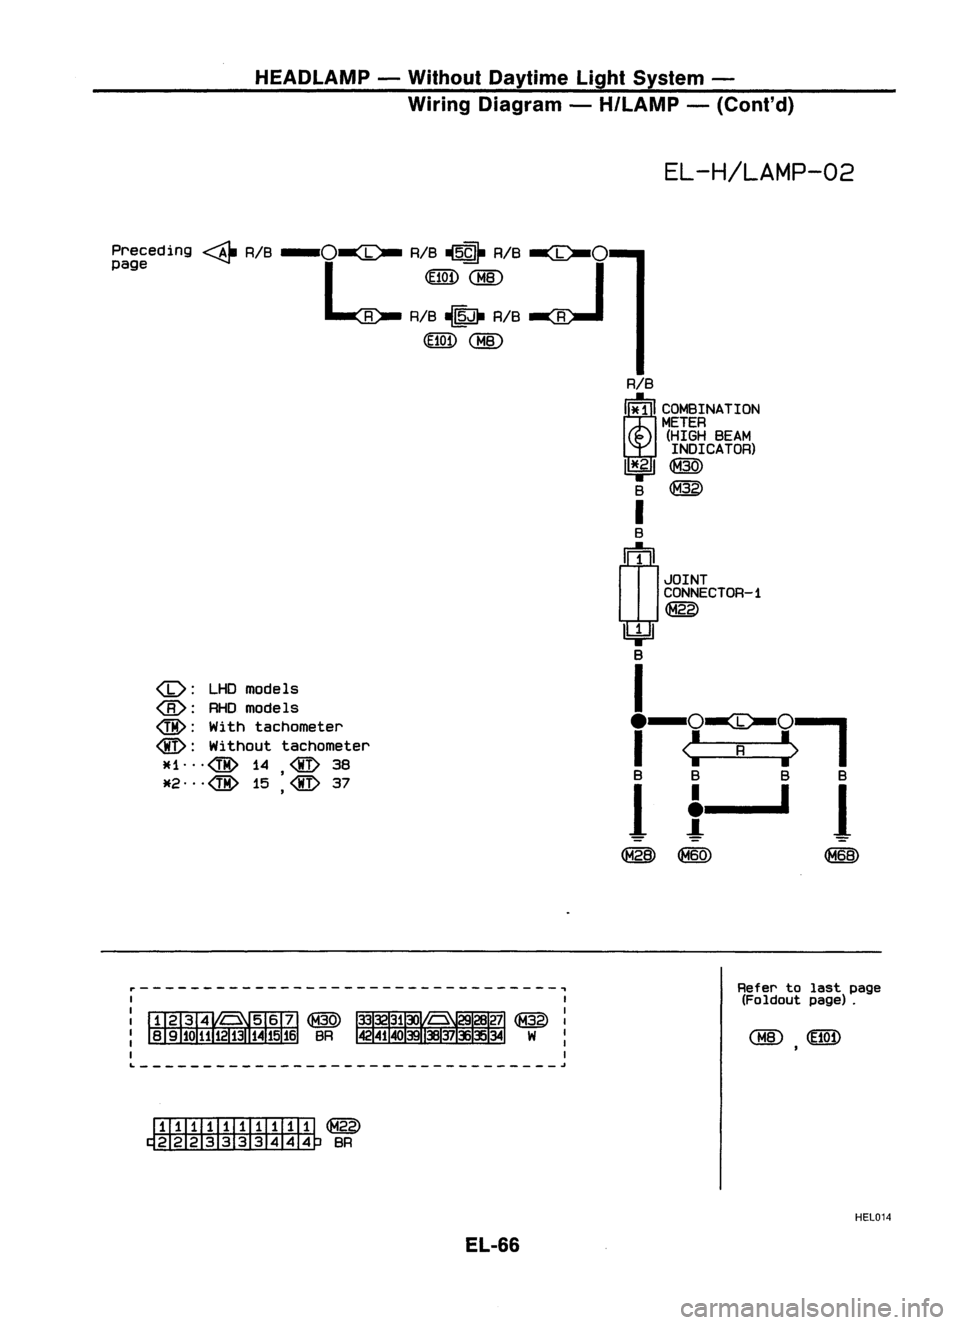
HEADLAMP-Without Daytime LightSystem -
Wiring Diagram -H/LAMP -(Cont'd)
EL-H/LAMP-02
Preceding ~RIB
-o~
RIB~ RIB
~o
page L.~
<:BID
R RIB~ RIB R
(HOf)
<:BID
:
LHDmodels
@:
RHOmodels
@:
Withtachometer
@:
Without tachometer
JU."@ 14
@
38
,
*2."@ 15
@
37
,
r---------------------------------~
I
ITITIilllIIIIIl
@
~BR
EL-66
RIB
i!i
C~INATION
METER
(HIGH BEAM
INDICATOR)
I*fl
@
8
@
I
B
~1
JOINT
CONNECTOR-1
~
~
8
I
e-o-ee-o--,
I
<:
R
:>
I
8 8 8B
1
t-~
1
@@ ~
Refer tolast page
(Foldout page).
HEL014
Page 439 of 1701
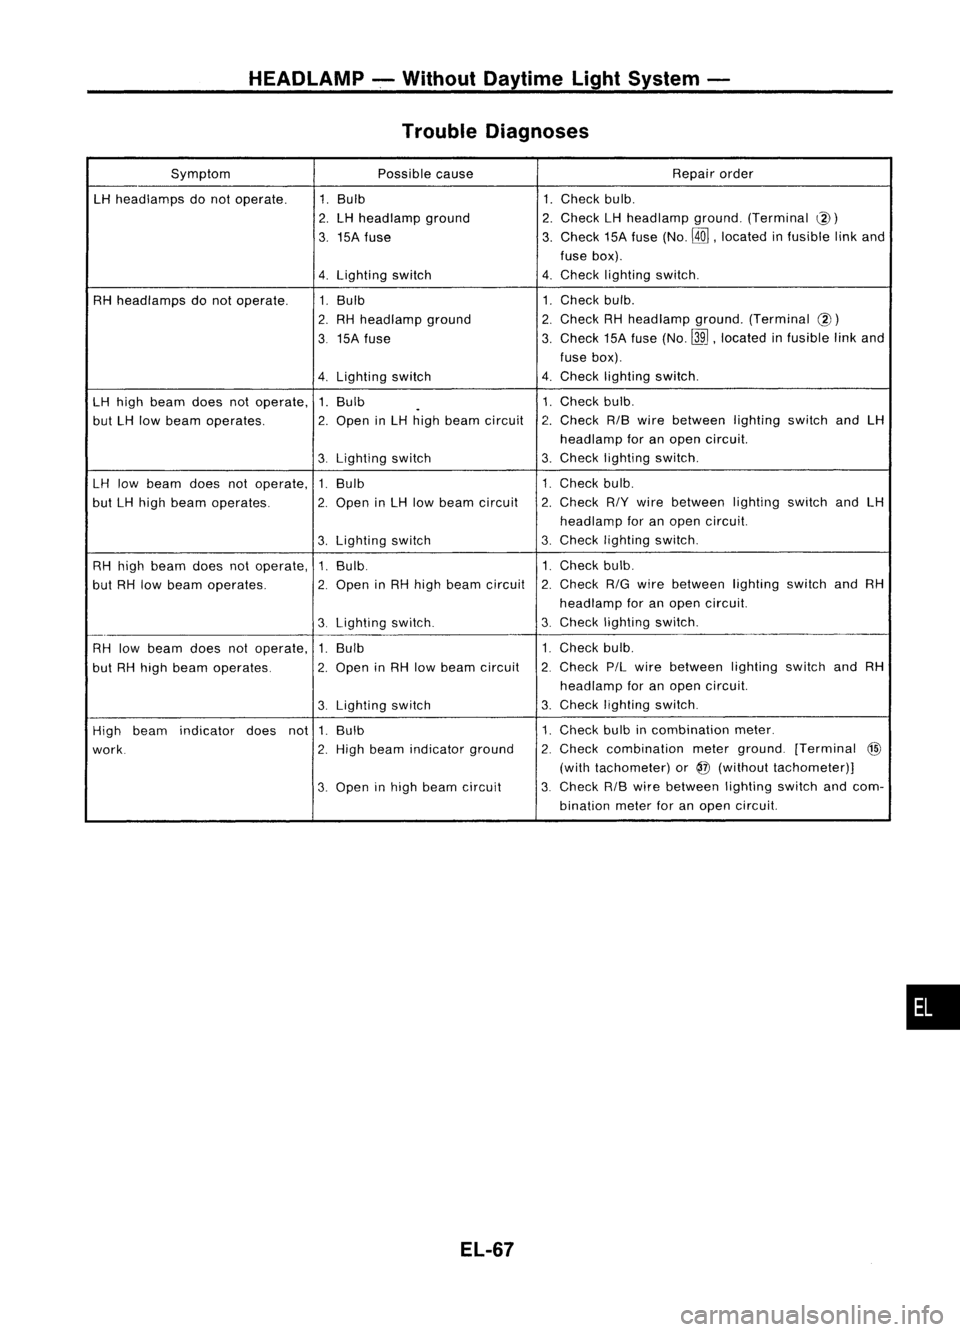
HEADLAMP-.Without Daytime LightSystem -
Trouble Diagnoses
Symptom Possiblecause Repair
order
LH
head lamps donot operate.
1.
Bulb
1.
Check bulb.
2. LH
head lamp ground
2.
Check
LH
headlamp ground.(Terminal
@)
3.
15A fuse
3.
Check
15Afuse (No.
@ill,
located infusible linkand
fuse box).
4.
Lighting switch
4.
Check
lighting switch.
RH headlamps donot operate.
1.
Bulb 1.
Check bulb.
2.
RH head lamp ground
2.
Check
RHhead lamp ground. (Terminal
@)
3
15A
fuse
3.
Check
15Afuse (No.~,located infusible linkand
fuse box).
4.
Lighting
switch
4.
Check lighting switch.
LH
high beam doesnotoperate, 1.Bulb
1. Check
bulb.
.
but
LH
low beam operates.
2.
Open in
LH
high beam circuit
r,
Check RIBwire between lightingswitch
and
LH
L.
head lamp foranopen circuit.
3.
Lighting switch
3.
Check
lighting switch.
LH
low beam doesnotoperate,
1.
Bulb
1.
Check bulb.
but
LH
high beam operates.
2.
Open
in
LH
low beam circuit
2.
Check
R/Ywire between lightingswitchand
LH
headlamp foranopen circuit.
3.
Lighting
switch
3.
Check
lighting switch.
RH high beam doesnotoperate, 1.Bulb. 1.Check
bulb.
but RHlow beam operates.
2.
Open
inRH high beam circuit
2.
Check
RIG
wire between lightingswitch
andRH
headlamp foranopen circuit.
3.
Lighting
switch.
3.
Check
lighting switch.
_.
RH low
beam doesnotoperate,
1.
Bulb 1.
Check bulb.
but RHhigh beam operates.
2.
Open
inRH low beam circuit
2.
Check
P/Lwire between lightingswitchandRH
head lamp foranopen circuit.
3.
Lighting
switch
3.
Check
lighting switch.
High beam indicator
doesnot
1.Bulb 1.Check
bulbincombination meter.
work.
2.
High
beam indicator ground
2.
Check
combination meterground. [Terminal
@
(with tachometer) or
@
(without tachometer)]
3.
Open inhigh beam circuit
3.
Check
RIBwire between lightingswitchandcom-
bination meterforanopen circuit.
EL-67
•