ESP NISSAN ALTIMA 1996 U13 / 1.G Owners Manual
[x] Cancel search | Manufacturer: NISSAN, Model Year: 1996, Model line: ALTIMA, Model: NISSAN ALTIMA 1996 U13 / 1.GPages: 183, PDF Size: 1.38 MB
Page 20 of 183
WARNING
Avoid abrupt starting and braking
when the cup holder is being used to
prevent spilling the drink. If the liquid is
hot it can scald you or your passenger.
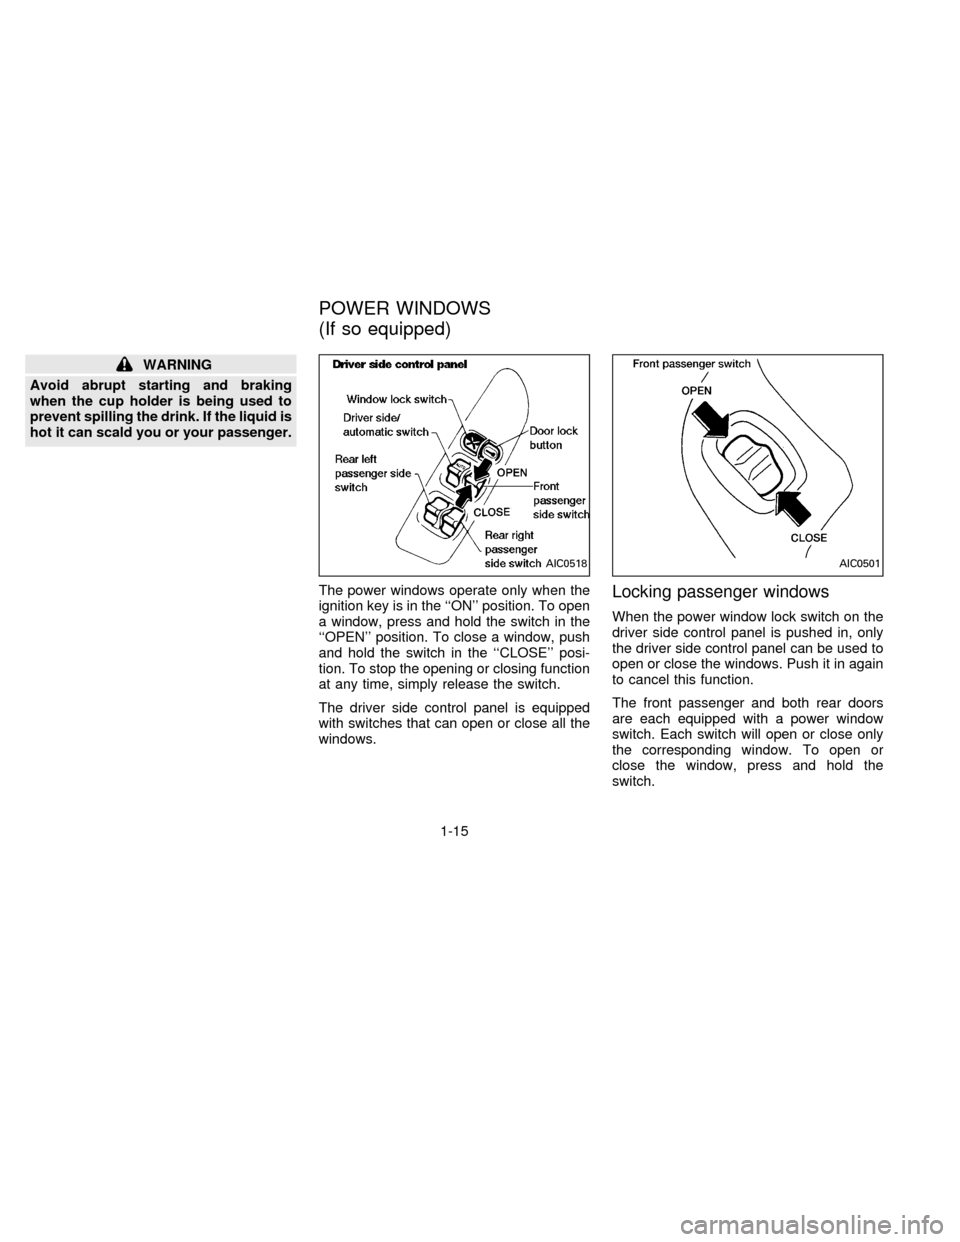
The power windows operate only when the
ignition key is in the ``ON'' position. To open
a window, press and hold the switch in the
``OPEN'' position. To close a window, push
and hold the switch in the ``CLOSE'' posi-
tion. To stop the opening or closing function
at any time, simply release the switch.
The driver side control panel is equipped
with switches that can open or close all the
windows.
Locking passenger windows
When the power window lock switch on the
driver side control panel is pushed in, only
the driver side control panel can be used to
open or close the windows. Push it in again
to cancel this function.
The front passenger and both rear doors
are each equipped with a power window
switch. Each switch will open or close only
the corresponding window. To open or
close the window, press and hold the
switch.
AIC0518AIC0501
POWER WINDOWS
(If so equipped)
1-15
ZX
Page 29 of 183
cDo not leave children unattended in-
side the vehicle. They may inadvert-
ently activate switches.
CHILD SAFETY REAR DOOR
LOCK
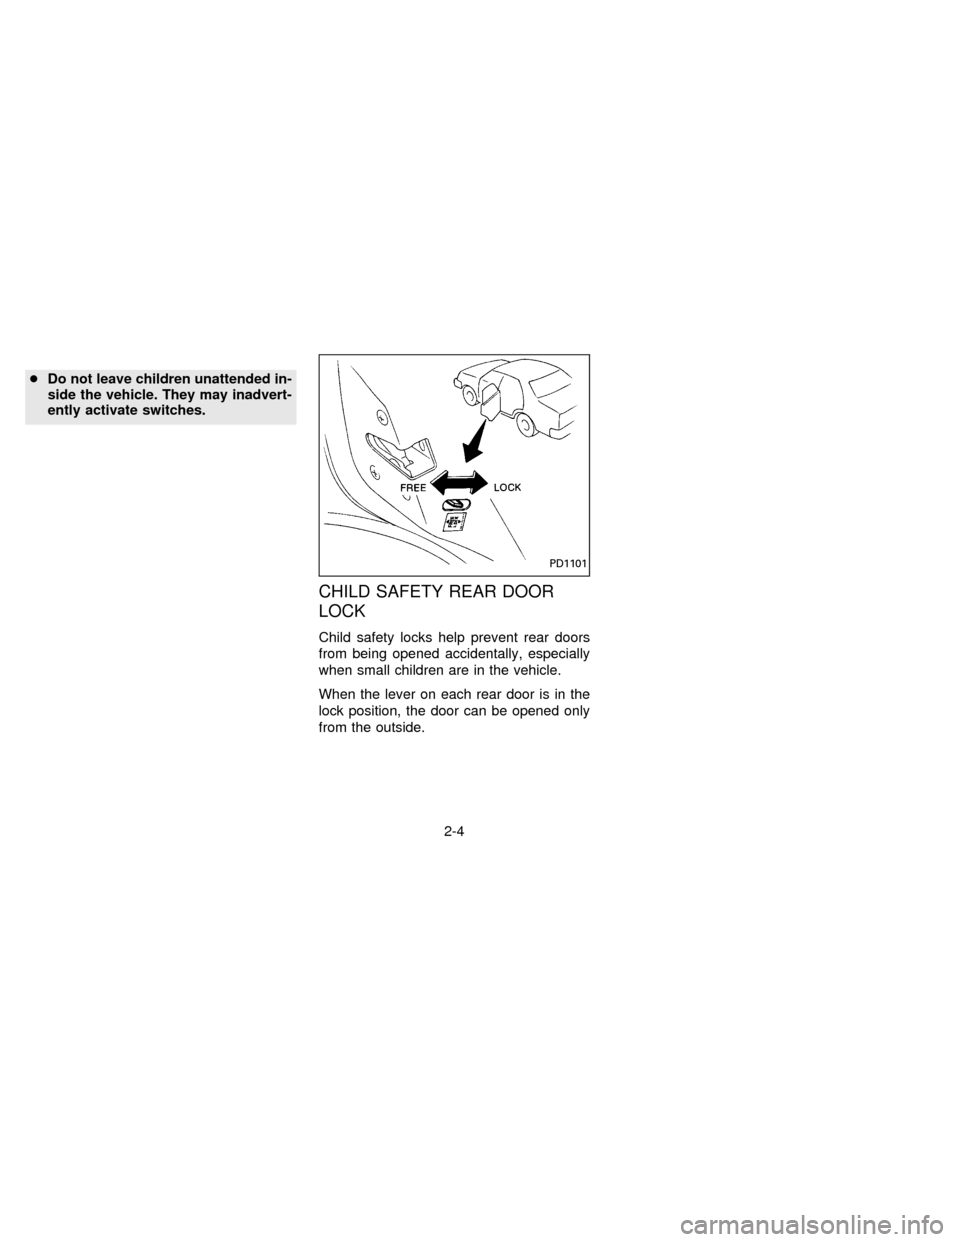
Child safety locks help prevent rear doors
from being opened accidentally, especially
when small children are in the vehicle.
When the lever on each rear door is in the
lock position, the door can be opened only
from the outside.
PD1101
2-4
ZX
Page 78 of 183
program being played returns to its begin-
ning. Push several times to skip back through
programs. The compact disc will go back the
number of times the button is pushed.
PROG (program) button
When this button is pushed while the com-
pact disc is being played, the play pattern
will change as follows:
ALL: All the programs will be played repeat-
edly in sequence.
1: Only one program (the one being played
when the PROG button is pushed) will be
repeated.
RANDOM: Programs will be played at ran-
dom, not following the sequence on the
compact disc. The same program may be
repeated twice.
h(no mark): All the programs will be played
in sequence and stop when the last pro-
gram is finished.
cWhen the compact disc is ejected, the
play pattern will automatically change
to ALL.
CD EJECT button
When the CD EJECT button is pushed withthe compact disc loaded, the compact disc
will be ejected.
When this button is pushed while the com-
pact disc is being played, the compact disc
will eject and the system will turn off.
If the compact disc ejects and is not
removed within 10 seconds, it will be
pulled back into the slot to protect it.
CD (DISC) indicator light
This light comes on when the compact disc
is loaded.
CAUTION
cDuring cold weather or rainy days,
the player may malfunction due to
the humidity. If this occurs, remove
the CD and dehumidify or ventilate
the player completely.
cThe player may skip while driving on
rough roads.
cThe CD player sometimes cannot
function when the compartment tem-
perature is extremely high. Decrease
the temperature before use.
cDo not expose the CD to direct sun-
light.
Power antenna (If so equipped)
The power antenna will automatically ex-
tend when the radio is turned on, and retract
when switched off. If the radio is left on, the
antenna will retract and extend with the
ignition key ``OFF-ON'' operation.
CAUTION
cBefore turning the radio on, make
sure that there is no one near the
antenna outlet and there is enough
space for it to extend.
cTo prevent damage, be sure that an-
tenna is fully retracted before the
vehicle enters an automated car
wash.
cDirt and other foreign matter on the
power antenna rod may interrupt its
operation. Clean the rod periodically
with a damp cloth. This type of
cleaning is especially important dur-
ing the winter seasons in areas
where road salt and other chemicals
may be spread on road surfaces and
splashed onto the antenna rod.
ANTENNA
3-21
ZX
Page 89 of 183
been stopped, keep the accelerator
pedal fully depressed while starting.
CAUTION
Do not operate the starter for more than
15 seconds at a time. If the engine does
not
start, wait 10 seconds before crank-
ing again, otherwise the starter could be
damaged.
4.Warm-up
Allow the engine to idle for at least 30
seconds after starting. Drive at moderate
speed for a short distance first, especially
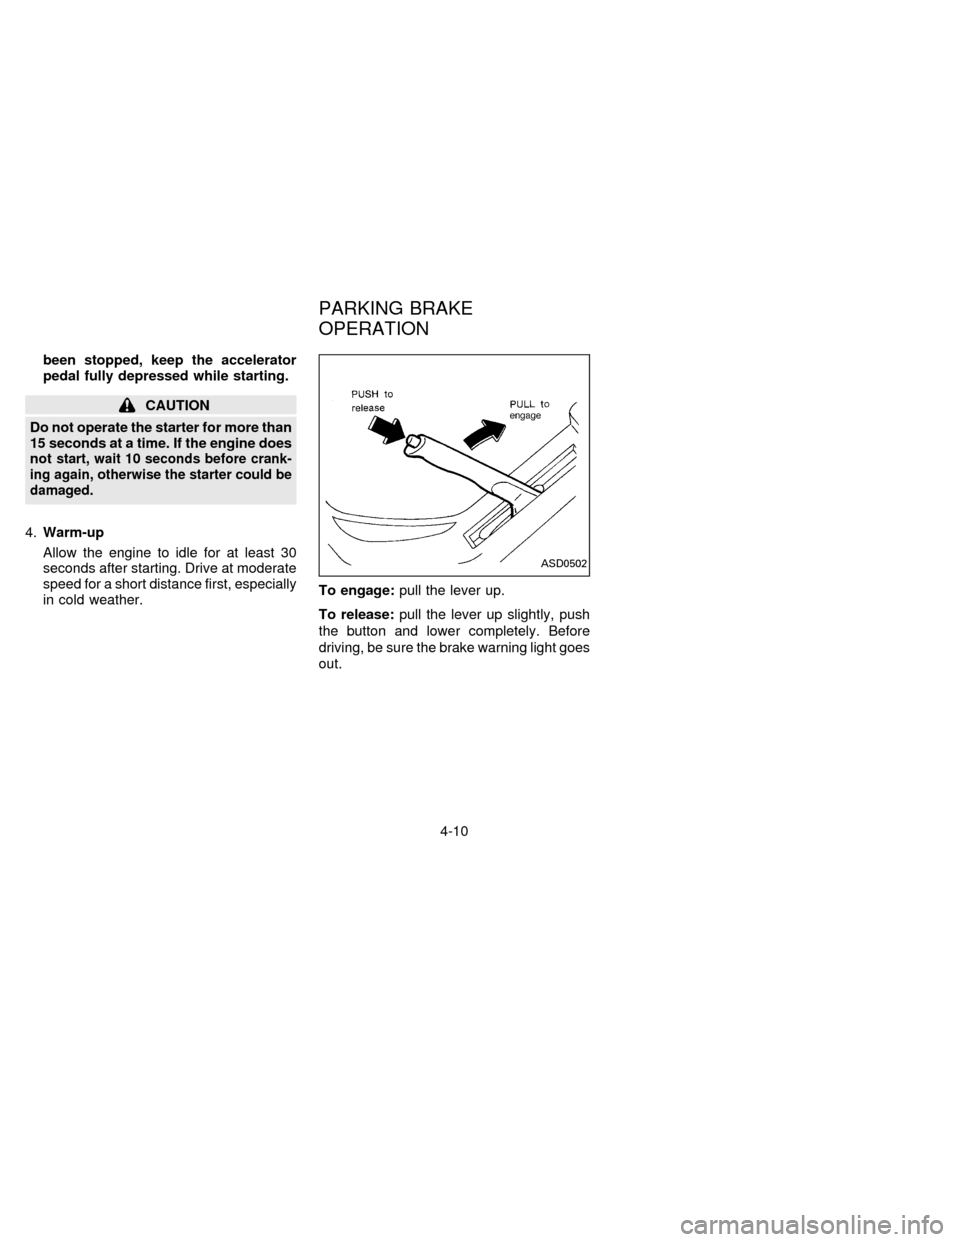
in cold weather.To engage:pull the lever up.
To release:pull the lever up slightly, push
the button and lower completely. Before
driving, be sure the brake warning light goes
out.
ASD0502
PARKING BRAKE
OPERATION
4-10
ZX
Page 94 of 183

cDriving with vacuum assisted brake:
The brake booster aids braking by using
engine vacuum. If the engine stops, you
can stop the vehicle by depressing the
brake pedal. However, greater foot pres-
sure on the brake pedal will be required
to stop the vehicle and the stopping
distance will be longer.
cDriving with power assisted steering:
The power assisted steering is designed
to use a hydraulic pump, driven by the
engine, to assist steering.
If the engine stops or drive belt breaks,
you will still have control of the vehicle.
However, much greater steering effort is
needed, especially in sharp turns or at
low speeds.
cWet brakes:
When the vehicle is washed or driven
through water, the brakes may get wet.
As a result, your braking distance will be
longer and the vehicle may pull to one
side during braking.
To dry brakes, drive the vehicle at a safe
speed while lightly pressing the brake
pedal to heat-up the brakes. Do this untilthe brakes return to normal. Avoid driving
the vehicle at high speeds until the
brakes function correctly.
cAvoid resting your foot on the brake
pedal while driving. This will overheat the
brakes, wear out the brake linings and
pads faster and reduce gas mileage.
cTo help save the brakes and to prevent
the brakes from overheating, reduce
speed and downshift to a lower gear
before going down a slope or long grade.
Overheated brakes may reduce braking
performance and could result in loss of
vehicle control.
cWhile driving on a slippery surface, be
careful when braking, accelerating or
downshifting. Abrupt braking actions or
acceleration could cause the wheels to
skid.The anti-lock brake system installed in
some models controls the brakes at each
wheel so the wheels will not lock when
braking abruptly or when braking on slip-
pery surfaces. The system detects the rota-
tion speed at each wheel and varies the
brake fluid pressure to prevent each wheel
from locking and sliding. By preventing
wheel lockup, the system helps the driver
maintain steering control and helps to mini-
mize swerving and spinning on slippery
surfaces.
Using the System
Depress the brake pedal and hold it down.
It is not necessary to pump the brake
pedal.
Doing so may result in increased stopping
distances.
Normal operation
The anti-lock brake system will not operate
at speeds below 3 to 6 MPH (5 to 10 km/h)
to completely stop the vehicle. (The speeds
will vary according to road conditions.)
When the anti-lock system senses that one
or more wheels are close to locking up, the
actuator (under the hood) rapidly applies
PRECAUTIONS WHEN
DRIVINGANTI-LOCK BRAKE SYSTEM
(ABS) (If so equipped)
4-15
ZX
Page 95 of 183
and releases hydraulic pressure (like pump-
ing the brakes very quickly). While the ac-
tuator is working, you may feel a pulsation in
the brake pedal and hear a noise or vibra-
tion from the actuator under the hood. This
is normal and indicates that the anti-lock
system is working properly. However, the
pulsation may indicate that road conditions
are hazardous and extra care is required
while driving.
Self-test feature
The anti-lock brake system is sophisticated,
with electronic sensors, electric pumps, and
hydraulic solenoids controlled by a com-
puter. The computer has a built-in diagnos-
tic feature that tests the system each time
you start the engine and move the vehicle at
a low speed in forward or reverse. When the
self-test occurs, you may hear a ``clunk''
noise and/or feel a pulsation in the brake
pedal. This is normal and is not an indica-
tion of any malfunction. If the computer
senses any malfunction, it switches the anti-
lock brake system OFF and turns on the
ABS brake warning light in the dashboard.
The brake system will then behave nor-
mally, but without anti-lock assistance.
If the light comes on during the self-test orwhile you are driving, you should take your
car to your NISSAN dealer for repair at your
earliest convenience.
WARNING
The anti-lock brake system is a sophis-
ticated device, but it cannot prevent
accidents resulting from careless or
dangerous driving techniques. It can
help maintain vehicle control during
braking on slippery surfaces, but re-
member that the stopping distance on
slippery surfaces will be longer than on
normal surfaces, even with the anti-
lock system. Stopping distances may
also be longer on rough, gravel or
snow covered roads, or if you are using
tire chains. Always maintain a safe dis-
tance from the vehicle in front of you.
Ultimately, the responsibility for safety
of self and others rests in the hands of
the driver.
Tire type and condition of tires may
also affect braking effectiveness.
cWhen replacing tires, install the
specified size of tire on all 4 wheels.cWhen installing a spare tire, make
sure it is the proper size and type as
specified on the tire placard. For tire
placard location information, refer to
ªTire placardº in the Owner's Manual
index.
Refer to ``Wheels and Tires'' in the
``Do-it-yourself operations'' section of
this manual.
4-16
ZX
Page 102 of 183
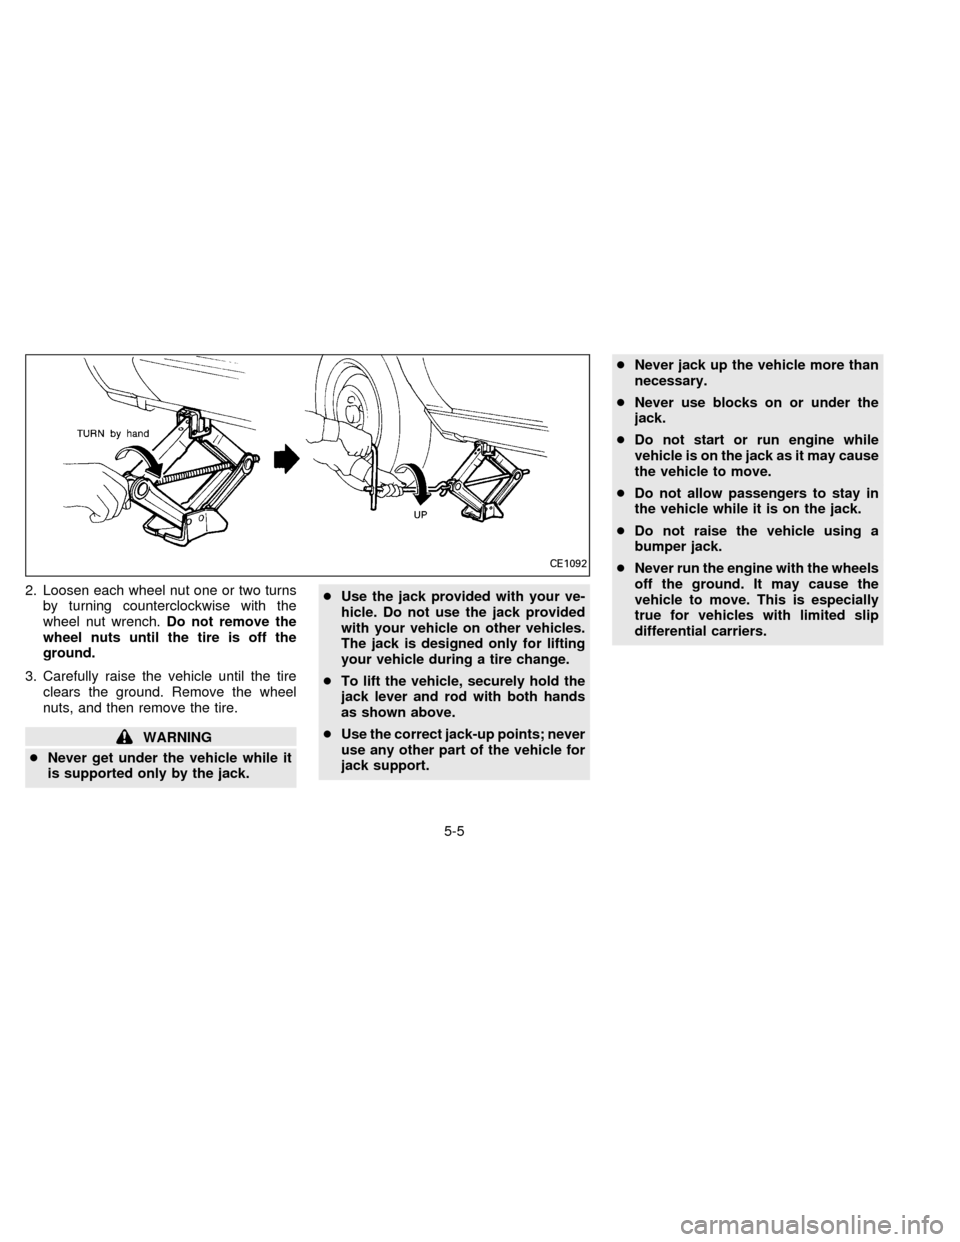
2. Loosen each wheel nut one or two turns
by turning counterclockwise with the
wheel nut wrench.Do not remove the
wheel nuts until the tire is off the
ground.
3. Carefully raise the vehicle until the tire
clears the ground. Remove the wheel
nuts, and then remove the tire.
WARNING
cNever get under the vehicle while it
is supported only by the jack.cUse the jack provided with your ve-
hicle. Do not use the jack provided
with your vehicle on other vehicles.
The jack is designed only for lifting
your vehicle during a tire change.
cTo lift the vehicle, securely hold the
jack lever and rod with both hands
as shown above.
cUse the correct jack-up points; never
use any other part of the vehicle for
jack support.cNever jack up the vehicle more than
necessary.
cNever use blocks on or under the
jack.
cDo not start or run engine while
vehicle is on the jack as it may cause
the vehicle to move.
cDo not allow passengers to stay in
the vehicle while it is on the jack.
cDo not raise the vehicle using a
bumper jack.
cNever run the engine with the wheels
off the ground. It may cause the
vehicle to move. This is especially
true for vehicles with limited slip
differential carriers.
CE1092
5-5
ZX
Page 113 of 183
Cleaning alloy wheels
Wash regularly, especially during winter
months in areas where road salt is used.
Salt could discolor the wheel if not removed.
Chrome parts
Clean all chrome parts regularly with a
non-abrasive chrome polish to maintain the
finish.
Plastic parts
Plastic parts can be cleaned with a mild
soap solution. If the dirt cannot be easily
removed, use a plastic cleaner. Do not use
solvents.
Cleaning interior
Occasionally remove loose dust from the
interior trim and seats using a vacuum
cleaner or soft brush. Wipe the vinyl and
leather surfaces with a clean, soft cloth
dampened in mild soap solution, then wipe
clean with a dry soft cloth. Before using any
fabric protector, read the manufacturer's
recommendations. Some fabric protectors
contain chemicals that may stain or bleach
the seat material.
CAUTION
cNever use benzine, thinner, or any
similar material.
cThe leather seats should be regu-
larly coated with a leather wax like
saddle soap. Never use car wax.
cNever use fabric protectors unless
recommended by the manufacturer.
Floor mat positioning aid
(Driver side only)
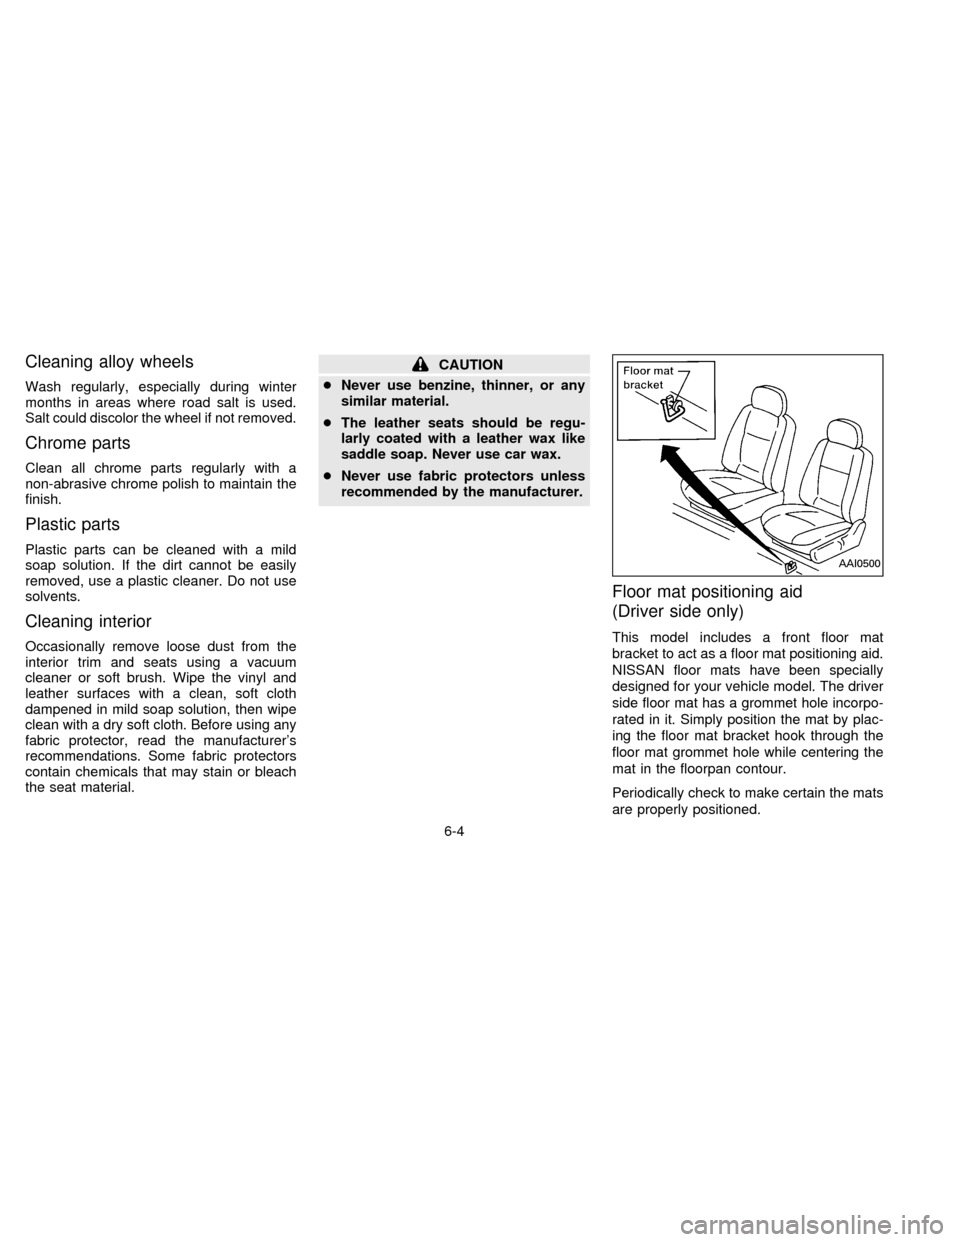
This model includes a front floor mat
bracket to act as a floor mat positioning aid.
NISSAN floor mats have been specially
designed for your vehicle model. The driver
side floor mat has a grommet hole incorpo-
rated in it. Simply position the mat by plac-
ing the floor mat bracket hook through the
floor mat grommet hole while centering the
mat in the floorpan contour.
Periodically check to make certain the mats
are properly positioned.
AAI0500
6-4
ZX
Page 114 of 183

Floor mats
The use of Genuine NISSAN floor mats can
extend the life of your vehicle carpet and
make it easier to clean the interior. No
matter what mats are used, be sure they are
fitted for your vehicle and are properly posi-
tioned in the footwell to prevent interference
with pedal operation. Mats should be main-
tained with regular cleaning and replaced if
they become excessively worn.
Seat belts
The seat belts can be cleaned by wiping
them with a sponge dampened in a mild
soap solution. Allow the belts to dry com-
pletely before using them. Do not allow wet
belts to roll up in the retractor. NEVER use
bleach, dye, or chemical solvents since
these may severely weaken the seat belt
webbing.
Most common factors contributing
to vehicle corrosion:
1. The accumulation of moisture-retaining
dirt and debris in body panel sections,
cavities, and other areas.
2. Damage to paint and other protective
coatings caused by gravel and stone
chips or minor traffic accidents.
Environmental factors which influ-
ence the rate of corrosion:
Moisture
Accumulation of sand, dirt and water on the
vehicle body underside can accelerate cor-
rosion. Wet floor coverings will not dry com-
pletely inside the vehicle, and should be
removed for drying to avoid floor panel
corrosion.
Relative humidity
Corrosion will be accelerated:
cIn areas of high relative humidity
cespecially in those areas where the tem-
peratures stay above freezing
cwhere atmospheric pollution existscwhere road salt is used
Temperature
A temperature increase will accelerate the
rate of corrosion to those parts which are
not well ventilated.
Air pollution
Industrial pollution, the presence of salt in
the air in coastal areas, or heavy road salt
use will accelerate the corrosion process.
Road salt will also accelerate the disintegra-
tion of paint surfaces.To protect your vehicle from
corrosion:
cWash and wax your vehicle often to keep
the vehicle clean.
cAlways check for minor damage to the
paint and repair it as soon as possible.
cKeep drain holes at the bottom of the
doors open to avoid water accumulation.
cCheck the underbody for accumulation of
sand, dirt or salt. If present, wash with
water as soon as possible.
cNEVER remove dirt, sand or other
debris from the passenger compart-
CORROSION PROTECTION
6-5
ZX
Page 149 of 183

Your new NISSAN has been designed to
have minimum maintenance requirements
with longer service intervals to save you
both time and money. However, some day-
to-day and regular maintenance is essential
to maintain your NISSAN's good mechani-
cal condition, as well as its emission and
engine performance.
It is the owner's responsibility to make sure
that the specified maintenance, as well as
general maintenance, is performed.
As the vehicle owner, you are the only one
who can ensure that your vehicle receives
the proper maintenance care. You are a
vital link in the maintenance chain.
General maintenance
General maintenance includes those items
which should be checked during normal
day-to-day operation of the vehicle. They
are essential if your vehicle is to continue to
operate properly. It is your responsibility to
perform these procedures regularly as pre-
scribed.
These checks or inspections can be done
by yourself, a qualified technician or, if you
prefer, your NISSAN dealer.
Periodic maintenance
The maintenance items listed in this part are
required to be serviced at regular intervals.
However, under severe driving conditions,
additional or more frequent maintenance
will be required.
Where to go for service
If maintenance service is required or your
vehicle appears to malfunction, have the
systems checked and tuned by an autho-
rized NISSAN dealer.
NISSAN technicians are well-trained spe-
cialists and are kept up to date with the
latest service information through technical
bulletins, service tips, and in-dealership
training programs. They are completely
qualified to work on NISSAN's vehiclesbe-
forethey work on your vehicle, rather than
after they have worked on it.
You can be confident that your NISSAN
dealer's service department performs the
best job to meet the maintenance require-
ments on your vehicle Ð in a reliable and
economic way.
During the normal day-to-day operation of the
vehicle, general maintenance should be per-
formed regularly as prescribed in this section.
If you detect any unusual sounds, vibrations
or smells, be sure to check for the cause or
have your NISSAN dealer do it promptly. In
addition, you should notify your NISSAN
dealer if you think that repairs are required.
When performing any checks or mainte-
nance work, closely observe the precautions
in the ``Do-it-yourself operations'' section.
OUTSIDE THE VEHICLE
The maintenance items listed here should
be performed from time to time, unless
otherwise specified.
Additional information on the items
marked with ``*'' can be found in the
``Do-it- yourself operations'' section.
Tires*Ð Check the pressure with a gauge
periodically when at a service station, in-
cluding the spare, and adjust to the speci-
fied pressure if necessary. Check carefully
for damage, cuts or excessive wear.
Wheel nuts*Ð When checking the tires,
make sure no nuts are missing, and check
for any loose nuts. Tighten if necessary.
GENERAL MAINTENANCE
8-2
ZX