start stop button NISSAN ALTIMA 1996 U13 / 1.G Owners Manual
[x] Cancel search | Manufacturer: NISSAN, Model Year: 1996, Model line: ALTIMA, Model: NISSAN ALTIMA 1996 U13 / 1.GPages: 183, PDF Size: 1.38 MB
Page 60 of 183

Ð Air flows from center and side
ventilators and foot outlets.
Ð Air flows mainly from foot outlets.
Ð Air flows from defroster outlets
and foot outlets.
Ð Air flows mainly from defroster
outlets.
Temperature control lever
This lever allows you to adjust the tempera-
ture of the outlet air.
Air recirculation button
OFF position:
Outside air is drawn into the passenger
compartment and distributed through the
selected outlet.
Use this position for normal heater or air
conditioning operation.
ON position (Indicator light on):
Interior air is recirculated inside the vehicle.
Push the air recirculation button to the ``ON''
position when driving on a dusty road or to
avoid traffic fumes and for maximum cooling
when using the air conditioning.
WARNING
Do not use the recirculation mode for
long periods as it may cause the inte-
rior air to become stale and the win-
dows to fog up.
Air conditioning button
(If so equipped)
This button is provided only on vehicles
equipped with air conditioning.
Start the engine, move the fan control dial to
the desired (1 to 4) position and push the
A/C button to turn on the air conditioning.
The indicator light will come on when the air
conditioning is on. To stop the air condition-
ing, push the switch again to return it to its
original position.
The air conditioning cooling function op-
erates only when the engine is running.
WARNING
Positioning of the heating or air condi-
tioning controls should not be done
while driving, in order that full attention
may be given to the driving operation.
HEATER OPERATION
Heating
This mode is used to direct heated air from
the floor outlets. Some air will also come
from the defrost vents.
1. Push the air recirculation button to the
``OFF'' position for normal heating.
2. Push the ``
'' button in.
3. Move the fan control dial to the desired
position.
4. Move the temperature control lever to the
desired position between the middle and
the ``HOT'' position.
Ventilation
This mode directs outside air from the side
and center vents.
1. Push the air recirculation button to the
``OFF'' position.
2. Push the ``
'' button in.
3. Move the fan control dial to the desired
position.
4. Move the temperature control lever to the
desired position.
3-3
ZX
Page 76 of 183

POWERbutton with the cassette tape still in
the player, the tape will resume playing
when the POWER button is pushed once
again.
TAPE button
cWhen this button is pushed with the
system turned off and a tape loaded, the
system will come on and the tape will
play.
cWhen this button is pushed with either
the radio or compact disc turned on and
the tape loaded, the compact disc or the
radio will automatically be turned off and
the tape will play.
While the tape is playing, pushing the TAPE
button stops tape play. Pushing the button
again resumes tape play.
FF (fast forward), REW (rewind)
button
Push the FF (fast forward) button to fast
forward the tape. To rewind the tape, push
the REW (rewind) button. Either the indica-
tor light ``
'' or ``'' will come on when
the FF or REW function is started. To stop
the FF or REW function, press the TAPE
button.
Automatic Program Search (APS)
FF, APS REW button
When the APS FF button is pushed while
the tape is being played, the next program
will start to play from the beginning. Push
the APS FF button several times to skip
through programs. The tape will advance
the number of times the button is pushed
(up to 9 programs).
When the APS REW button is pushed once,
the program being played starts over from
the beginning. Push several times to fast
rewind programs. The tape will rewind back
the number of times the button is pushed.
Either the indicator light ``
'' or
``'' will come on when the APS FF or
APS REW function is started.
This system searches for the blank intervals
between selections. If there is a blank inter-
val within one program or there is no interval
between programs, the system may not
stop in the desired or expected location.
PROG (program) button
Push the PROG (program) button to change
the tape side while the tape is being played.The cassette tape will automatically change
directions to play the other side when the
first side is completed.
Dolby NR (noise reduction)
button
Push the``DOLBY NR'' button for
Dolby NR encoded tapes to reduce high
frequency tape noise. The indicator will
come on.
Dolby NR is manufactured under license
from Dolby Laboratories Licensing Corpora-
tion. ``DOLBY NR'' and the double-D symbol
are trademarks of Dolby Laboratories Li-
censing Corporation.
TAPE EJECT button
Push this button to eject an inserted tape.
When the tape is ejected while it is being
played, the system will be turned off.
Precautions on cassette player op-
eration
cTo maintain good quality sound,
NISSAN recommends that you use
cassette tapes of 60 minutes or
shorter in length.
3-19
ZX
Page 77 of 183

cCassette tapes should be removed
from the player when not in use. Store
cassettes in their protective cases
and away from direct sunlight, heat,
moisture or magnetic sources.
Direct sunlight can cause the cassette
to become deformed. The use of de-
formed cassettes may cause the cas-
sette to jam in the player.
cDo not use cassettes that have peel-
ing or loose labels. If used, the label
could jam in the player.
cIf a cassette has loose tape, insert a
pencil through one of the cassette
hubs and rewind the tape firmly.
Loose tape may cause jamming and
wavering sound quality.
cOver a period of time, the playback
head, capstan and pinch roller may
gather a tape coating residue as the
tape passes over the head. This resi-
due accumulation can cause a weak
or wavering sound and should be re-
moved periodically with a head clean-
ing tape.
If the residue is not removed periodi-
cally, the player may need to be dis-
assembled for cleaning.Compact Disc (CD) Player Opera-
tion
Turn the ignition key to the ``ACC'' or ``ON''
position and insert the compact disc into the
slot with the label side facing up. The com-
pact disc will be guided automatically into
the slot and start playing.
If the radio or tape is already operating, it
will automatically turn off and the compact
disc will play.
Forcing in the compact disc will damage
the player.
If the system has been turned off while the
compact disc was playing, pushing the
POWER button will start the compact disc.
CD button
When this button is pushed with the system
off and the compact disc loaded, the system
will turn on and the compact disc will start to
play.
When this button is pushed with the com-
pact disc loaded but the tape or the radio
playing, the tape or radio will automatically
be turned off and the compact disc will start
to play.When this button is pushed while the com-
pact disc is playing, the compact disc will
stop playing. When this button is pushed
with the compact disc stopped, the compact
disc will start to play.
FF (fast forward), REW (rewind)
button
When the FF (fast forward) or REW (rewind)
button is pushed while the compact disc is
being played, the compact disc will play
while fast forwarding or rewinding. When
the button is released, the compact disc will
return to normal play speed.
Automatic Program Search (APS)
FF, APS REW button
When the APS FF button is pushed while
the compact disc is being played, the pro-
gram following the present one will start to
play from its beginning. Push several times
to skip through programs. The compact disc
will advance the number of times the button
is pushed. (When the last program on the
compact disc is skipped through, the first
program will be played.)
When the APS REW button is pushed, the
3-20
ZX
Page 86 of 183

Push the button to shift into ``P'', ``R'' or from
``D'' to ``2''. All other positions can be se-
lected without pushing the button.
``P'' (Park):
Use this position when the vehicle is parked
or when starting the engine. Always be sure
the vehicle is at a complete stop. For maxi-
mum safety, depress the brake pedal, then
push in the select lever button and move the
shift lever to the ``P'' position. Apply the
parking brake. When parking on a hill, apply
the parking brake first, then move the shift
lever into the ``P'' position.
Shifting from ``P'' (Park)
If the ignition switch is in the ``ON'' position
and the foot brake pedal is depressed, but
the shift lever still cannot be moved out of
``P'' (Park), follow these instructions:
1. Shut the engine off and remove the key.
2. Apply the parking brake.
3. Reinsert the ignition key and turn it clock-
wise to the ``ACC'' position.
4. Depress the brake pedal, move the gear-
shift lever to ``N'' (Neutral) and start the
engine.These instructions for starting the vehicle in
``N'' (Neutral) position should only be used
until service can be obtained.
``R'' (Reverse):
Use this position to back up. Always be sure
the vehicle is completely stopped. With the
brake pedal depressed, push in the select
lever button and move the shift lever to the
``R'' position.
``N'' (Neutral):
In Neutral, neither forward nor reverse gear
is engaged. The engine can be started in
this position. You may shift to ``N'' and
restart a stalled engine while the vehicle is
moving.
``D'' (Drive):
Use this position for all normal forward
driving.
``2'' (Second gear):
Use for hill climbing or engine braking on
downhill grades.
Do not shift into the ``2'' position at speeds
over 74 MPH (119 Km/h). Do not exceed 74
MPH (119 Km/h) in the ``2'' position.``1'' (Low gear):
Use this position when climbing steep hills
slowly or driving slowly through deep snow,
sand or mud, or for maximum engine brak-
ing on steep downhill grades.
Do not shift into the ``1'' position at speeds
over 74 MPH (119 km/h). Do not exceed 41
MPH (66 km/h) in the ``1'' position.
Accelerator downshift
Ð In ``D'' position Ð
For rapid passing or hill climbing, fully de-
press the accelerator pedal to the floor. This
shifts the transmission down into 2 (Sec-
ond) gear or 1 (Low) gear, depending on the
vehicle speed.
4-7
ZX
Page 89 of 183

been stopped, keep the accelerator
pedal fully depressed while starting.
CAUTION
Do not operate the starter for more than
15 seconds at a time. If the engine does
not
start, wait 10 seconds before crank-
ing again, otherwise the starter could be
damaged.
4.Warm-up
Allow the engine to idle for at least 30
seconds after starting. Drive at moderate
speed for a short distance first, especially
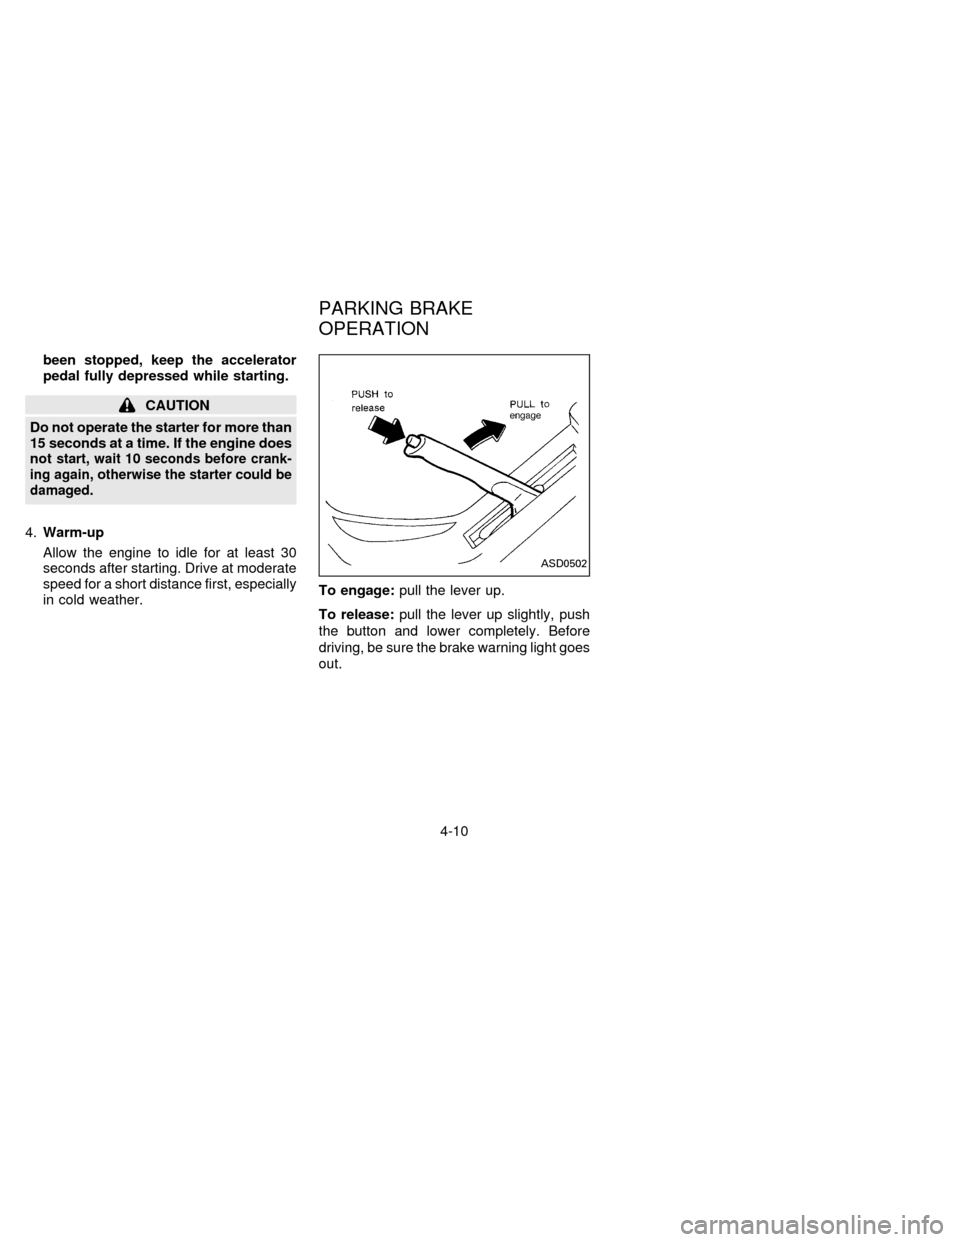
in cold weather.To engage:pull the lever up.
To release:pull the lever up slightly, push
the button and lower completely. Before
driving, be sure the brake warning light goes
out.
ASD0502
PARKING BRAKE
OPERATION
4-10
ZX