tire pressure NISSAN ALTIMA 1997 U13 / 1.G Owners Manual
[x] Cancel search | Manufacturer: NISSAN, Model Year: 1997, Model line: ALTIMA, Model: NISSAN ALTIMA 1997 U13 / 1.GPages: 203, PDF Size: 1.64 MB
Page 106 of 203

During the first 1,000 miles (1,600 km),
follow these recommendations for the future
reliability and economy of your new vehicle.
Failure to follow these recommendations
may result in vehicle damage or shortened
engine life.
cDo not drive over 55 MPH (90 km/h) and
do not run the engine over 4,000 rpm.
Avoid driving for long periods at constant
speed, either fast or slow.
cDo not accelerate at full throttle in any
gear.
cAvoid quick starts.
cAvoid hard braking as much as possible.
cDo not tow a trailer for the first 500 miles
(800 km).cAccelerate slowly and smoothly. Main-
tain cruising speeds with a constant ac-
celerator position.
cDrive at moderate speeds on the high-
way. Driving at high speed lowers fuel
economy.
cAvoid unnecessary stopping and brak-
ing. Maintain a safe distance behind
other vehicles.
cUse a proper gear range which suits road
conditions. On level roads, shift into high
gear as soon as possible.
cAvoid unnecessary engine idling.cKeep your engine tuned up.
cFollow the recommended periodic main-
tenance schedule.
cKeep the tires inflated at the correct
pressure. Low pressure increases tire
wear and wastes fuel.
cKeep the front wheels in correct align-
ment. Improper alignment increases tire
wear and lowers fuel economy.
cAir conditioner operation lowers fuel
economy. Use the air conditioner only
when necessary.
cWhen cruising at highway speeds, it is
more economical to use the air condi-
tioner and leave the windows closed to
reduce drag.
SD1001M
BREAK-IN SCHEDULE INCREASING FUEL
ECONOMY
4-14
ZX
Page 118 of 203

Installing wheel
The T-type spare tire is designed for
emergency use. See specific instruc-
tions under the heading ``Wheels and
tires'' in the ``Do-it- yourself operations''
section.
1. Clean any mud or dirt from the surface
between the wheel and hub.
2. Carefully put the wheel on and install the
wheel nuts finger-tight.
3. With the wheel nut wrench, tighten wheel
nuts alternately and evenly until they are
tight.4. Lower the vehicle slowly until the tire
touches the ground. Then, with the wheel
nut wrench, tighten the wheel nuts se-
curely in the sequence as illustrated.
WARNING
cIncorrect wheel nuts or improperly
tightened wheel nuts can cause the
wheel to become loose or come off.
This could cause an accident.
cDo not use oil or grease on the wheel
studs or nuts. This could cause the
nuts to become loose.As soon as possible tighten the wheel
nuts to the specified torque with a torque
wrench.
Wheel nut tightening torque:
72 to 87 ft-lb
(98 to 118 Nzm)
Adjust tire pressure to the COLD pres-
sure.
COLD pressure: After vehicle has been
parked for three hours or more or driven
less than 1 mile (1.6 km).
COLD tire pressures are shown on the tire
placard affixed to the center console lid.
cRetighten the wheel nuts when the
vehicle has been run for 600 miles
(1,000 km).
5. Securely store the spare tire and jacking
equipment in the vehicle.
WARNING
cAlways make sure that the spare tire
and jacking equipment are properly
secured after use. Such items can
become dangerous projectiles in an
accident or sudden stop.
CE1030CE1082
5-6
ZX
Page 153 of 203

HEADLIGHT AIMING
ADJUSTMENT
Before performing aiming adjustment, make
sure of the following:
a. Keep all of the tires inflated to the correct
pressure.
b. Place the vehicle on level ground.
c. See that the vehicle is unloaded (except
for full levels of coolant, engine oil and
fuel, and spare tire, jack, and tools).
Have the driver or an equivalent weight
placed in the driver's seat.
Low beam
1. Open the hood.
2. Adjust the vertical indicator by turning the
adjusting screw with a Phillips screw-
driver. The bubble in the gauge should
be centered on the ``0'' mark.3. Adjust the horizontal indicator by turning
the adjusting screw with a Phillips screw-
driver.
The inner red line with the ``0'' mark
should align with the indicator line. Never
turn screw
sAas indicated in earlier
illustration.
ADI0085ADI0526ADI0096
7-23
ZX
Page 159 of 203
If you have a flat tire, see the ``In case of
emergency'' section.
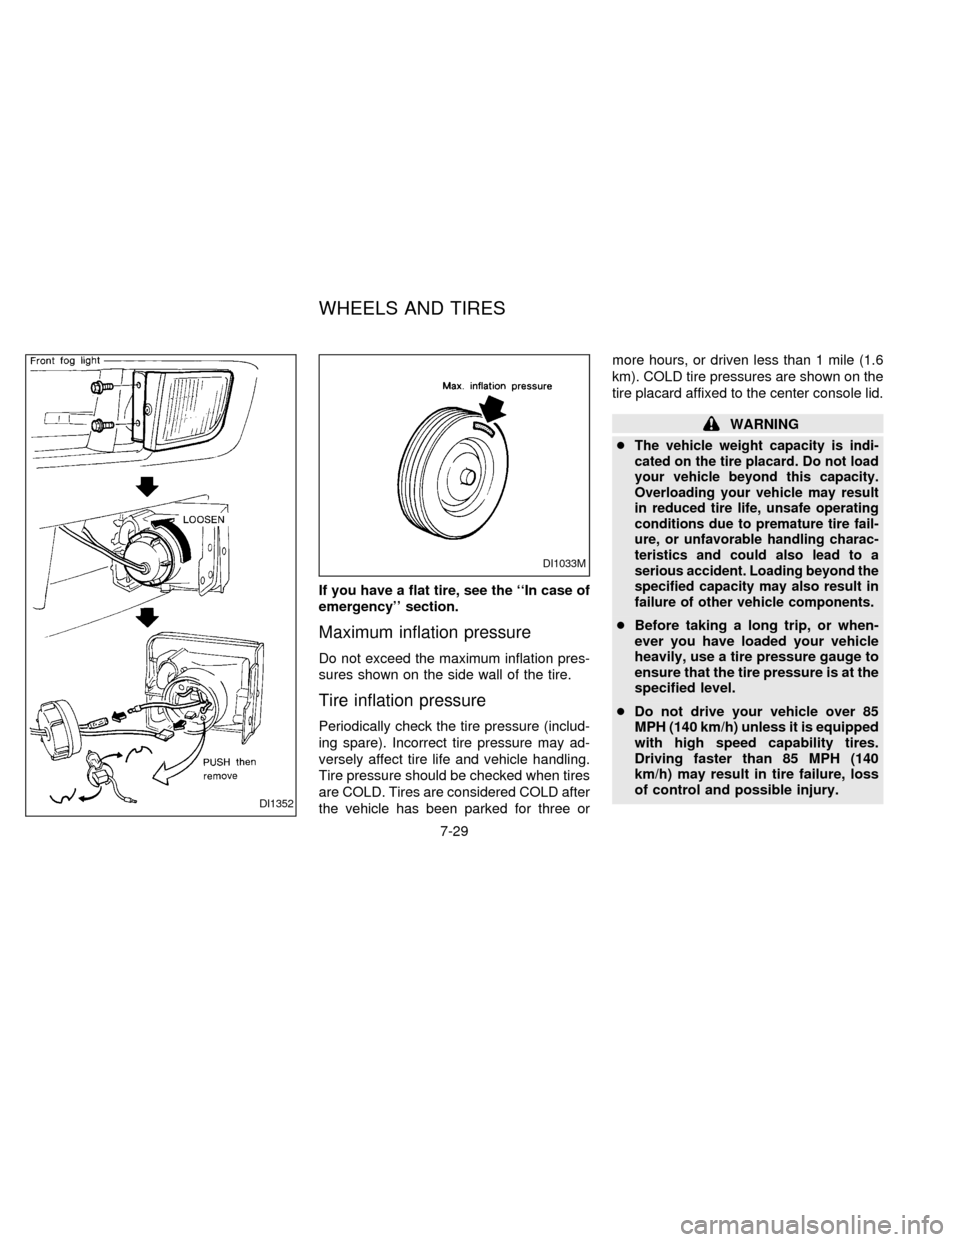
Maximum inflation pressure
Do not exceed the maximum inflation pres-
sures shown on the side wall of the tire.
Tire inflation pressure
Periodically check the tire pressure (includ-
ing spare). Incorrect tire pressure may ad-
versely affect tire life and vehicle handling.
Tire pressure should be checked when tires
are COLD. Tires are considered COLD after
the vehicle has been parked for three ormore hours, or driven less than 1 mile (1.6
km). COLD tire pressures are shown on the
tire placard affixed to the center console lid.
WARNING
c
The vehicle weight capacity is indi-
cated on the tire placard. Do not load
your vehicle beyond this capacity.
Overloading your vehicle may result
in reduced tire life, unsafe operating
conditions due to premature tire fail-
ure, or unfavorable handling charac-
teristics and could also lead to a
serious accident. Loading beyond the
specified capacity may also result in
failure of other vehicle components.
cBefore taking a long trip, or when-
ever you have loaded your vehicle
heavily, use a tire pressure gauge to
ensure that the tire pressure is at the
specified level.
cDo not drive your vehicle over 85
MPH (140 km/h) unless it is equipped
with high speed capability tires.
Driving faster than 85 MPH (140
km/h) may result in tire failure, loss
of control and possible injury.
DI1352
DI1033M
WHEELS AND TIRES
7-29
ZX
Page 161 of 203
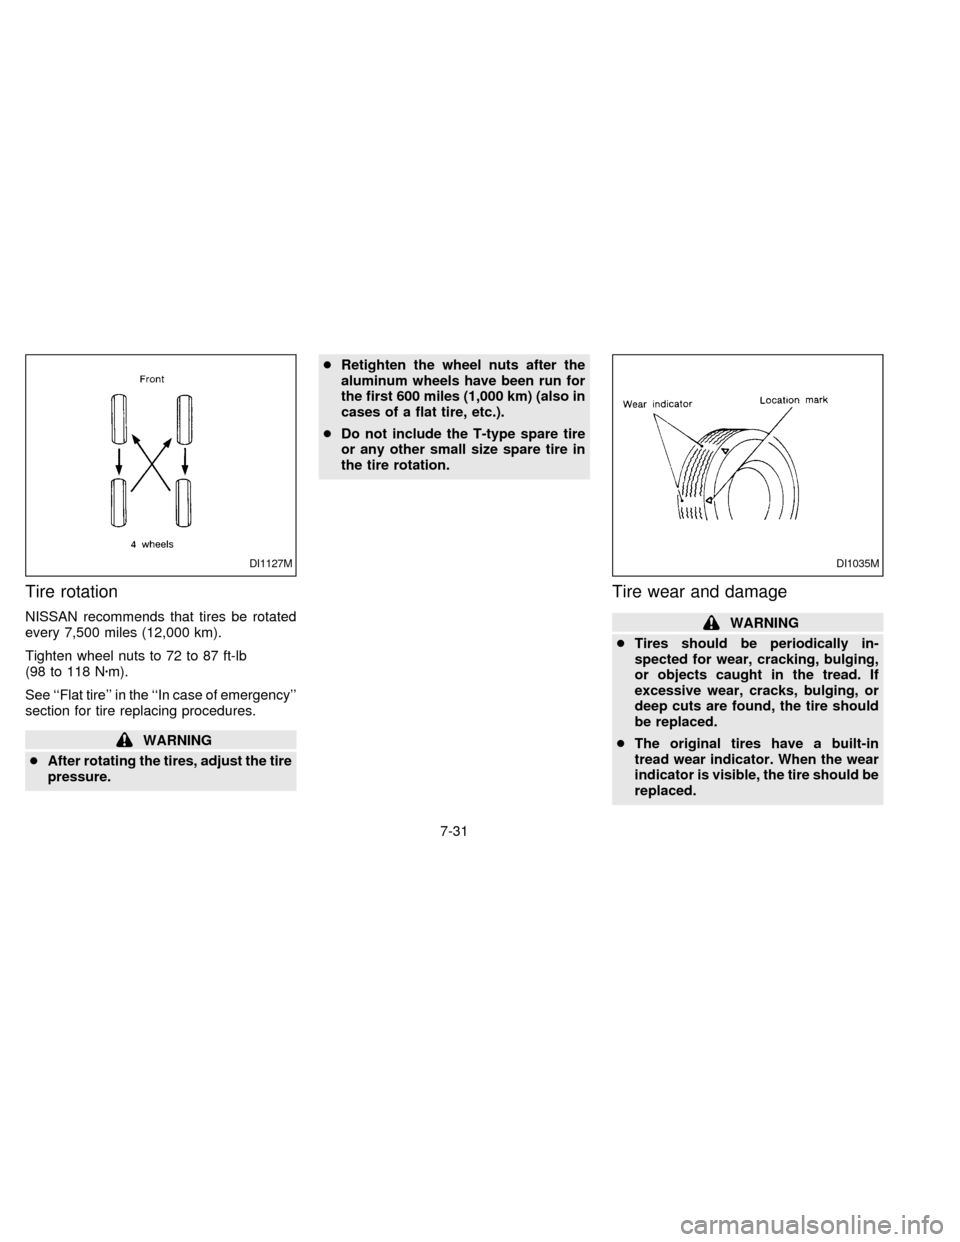
Tire rotation
NISSAN recommends that tires be rotated
every 7,500 miles (12,000 km).
Tighten wheel nuts to 72 to 87 ft-lb
(98 to 118 Nzm).
See ``Flat tire'' in the ``In case of emergency''
section for tire replacing procedures.
WARNING
cAfter rotating the tires, adjust the tire
pressure.cRetighten the wheel nuts after the
aluminum wheels have been run for
the first 600 miles (1,000 km) (also in
cases of a flat tire, etc.).
cDo not include the T-type spare tire
or any other small size spare tire in
the tire rotation.
Tire wear and damage
WARNING
cTires should be periodically in-
spected for wear, cracking, bulging,
or objects caught in the tread. If
excessive wear, cracks, bulging, or
deep cuts are found, the tire should
be replaced.
cThe original tires have a built-in
tread wear indicator. When the wear
indicator is visible, the tire should be
replaced.
DI1127MDI1035M
7-31
ZX
Page 163 of 203
the wheel is changed or the underside of
the vehicle is washed.
cDo not use abrasive cleaners when
washing the wheels.
cInspect wheel rims regularly for dents or
corrosion. Such damage may cause loss
of pressure or poor seal at the tire bead.
cNISSAN recommends waxing the road
wheels to protect against road salt in
areas where it is used during winter.
Spare tire (T-type spare tire)
Observe the following precautions if the
T-type spare tire must be used, otherwise
your vehicle could be damaged or involved
in an accident:
CAUTION
cThe T-type spare tire should be used
only for an emergency. It should be
replaced by the standard tire at the
first opportunity.
cDrive carefully while the T-type
spare tire is installed. Avoid sharp
turns and abrupt braking while
driving.cPeriodically check tire inflation pres-
sure, and always keep it at 60 psi
(420 kPa, 4.2 bar).
cDo not drive your vehicle at speeds
faster than 50 MPH (80 km/h).
cDo not use tire chains on a T-type
spare tire. Tire chains will not fit
properly on the T-type spare tire and
may cause damage to the vehicle.
cWhen driving on roads covered with
snow or ice, the T-type spare tire
should be used on the rear wheel
and the original tire used on the front
wheels (drive wheels). Use tire
chains only on the front two original
tires.
cTire tread of the T-type spare tire will
wear at a faster rate than the original
tire. Replace the T-type spare tire as
soon as the tread wear indicators
appear.cBecause the T-type spare tire is
smaller than the original tire, ground
clearance is reduced. To avoid dam-
age to the vehicle do not drive over
obstacles. Also do not drive the ve-
hicle through an automatic car wash
since it may get caught.
cDo not use the T-type spare tire on
other vehicles.
cDo not use more than one T-type
spare tire at the same time.
cDo not tow a trailer while the T-type
spare tire is installed.
7-33
ZX
Page 166 of 203

Your new NISSAN has been designed to
have minimum maintenance requirements
with longer service intervals to save you
both time and money. However, some day-
to-day and regular maintenance is essential
to maintain your NISSAN's good mechani-
cal condition, as well as its emission and
engine performance.
It is the owner's responsibility to make sure
the specified periodic maintenance, as well
as general maintenance, is performed.
As the vehicle owner, you are the only one
who can ensure that your vehicle receives
the proper maintenance care. You are a
vital link in the maintenance chain.
General maintenance
General maintenance includes those items
which should be checked during normal
day-to-day operation of the vehicle. They
are essential if your vehicle is to continue to
operate properly. It is your responsibility to
perform these procedures regularly as pre-
scribed.
These checks or inspections can be done
by yourself, a qualified technician or, if you
prefer, your NISSAN dealer.
Periodic maintenance
The maintenance items listed in this part are
required to be serviced at regular intervals.
However, under severe driving conditions,
additional or more frequent maintenance is
required.
Where to go for service
If maintenance service is required or your
vehicle appears to malfunction, have the
systems checked and tuned by an autho-
rized NISSAN dealer.
NISSAN technicians are well-trained spe-
cialists and are kept up to date with the
latest service information through technical
bulletins, service tips, and in-dealership
training programs. They are completely
qualified to work on NISSAN's vehiclesbe-
forethey work on your vehicle, rather than
after they have worked on it.
You can be confident that your NISSAN
dealer's service department performs the
best job to meet the maintenance require-
ments on your vehicle Ð in a reliable and
economic way.
During the normal day-to-day operation of the
vehicle, general maintenance should be per-
formed regularly as prescribed in this section.
If you detect any unusual sounds, vibrations
or smells, be sure to check for the cause or
have your NISSAN dealer do it promptly. In
addition, you should notify your NISSAN
dealer if you think repairs are required.
When performing any checks or mainte-
nance work, closely observe the precautions
in the ``Do-it-yourself operations'' section.
OUTSIDE THE VEHICLE
The maintenance items listed here should
be performed from time to time, unless
otherwise specified.
Additional information on the items
marked with ``*'' can be found in the
``Do-it- yourself operations'' section.
Tires*Ð Check the pressure with a gauge
periodically when at a service station, in-
cluding the spare, and adjust to the speci-
fied pressure if necessary. Check carefully
for damage, cuts or excessive wear.
Wheel nuts*Ð When checking the tires,
make sure no nuts are missing, and check
for any loose nuts. Tighten if necessary.
GENERAL MAINTENANCE
8-2
ZX
Page 187 of 203

EMISSION CONTROL
INFORMATION LABEL
The emission control information label is
attached as shown.
TIRE PLACARD
The cold tire pressure is shown on the tire
placard affixed to the center console lid.
AIR CONDITIONER
SPECIFICATION LABEL
The air conditioner specification label is
affixed as shown.
ATI0502ATI0501ATI0506
9-12
ZX
Page 191 of 203
hitch, trailer tongue load and any other
optional equipment. In addition, front or rear
gross axle weight must not exceed the
gross axle weight rating (GAWR) shown on
the F.M.V.S.S. certification label.
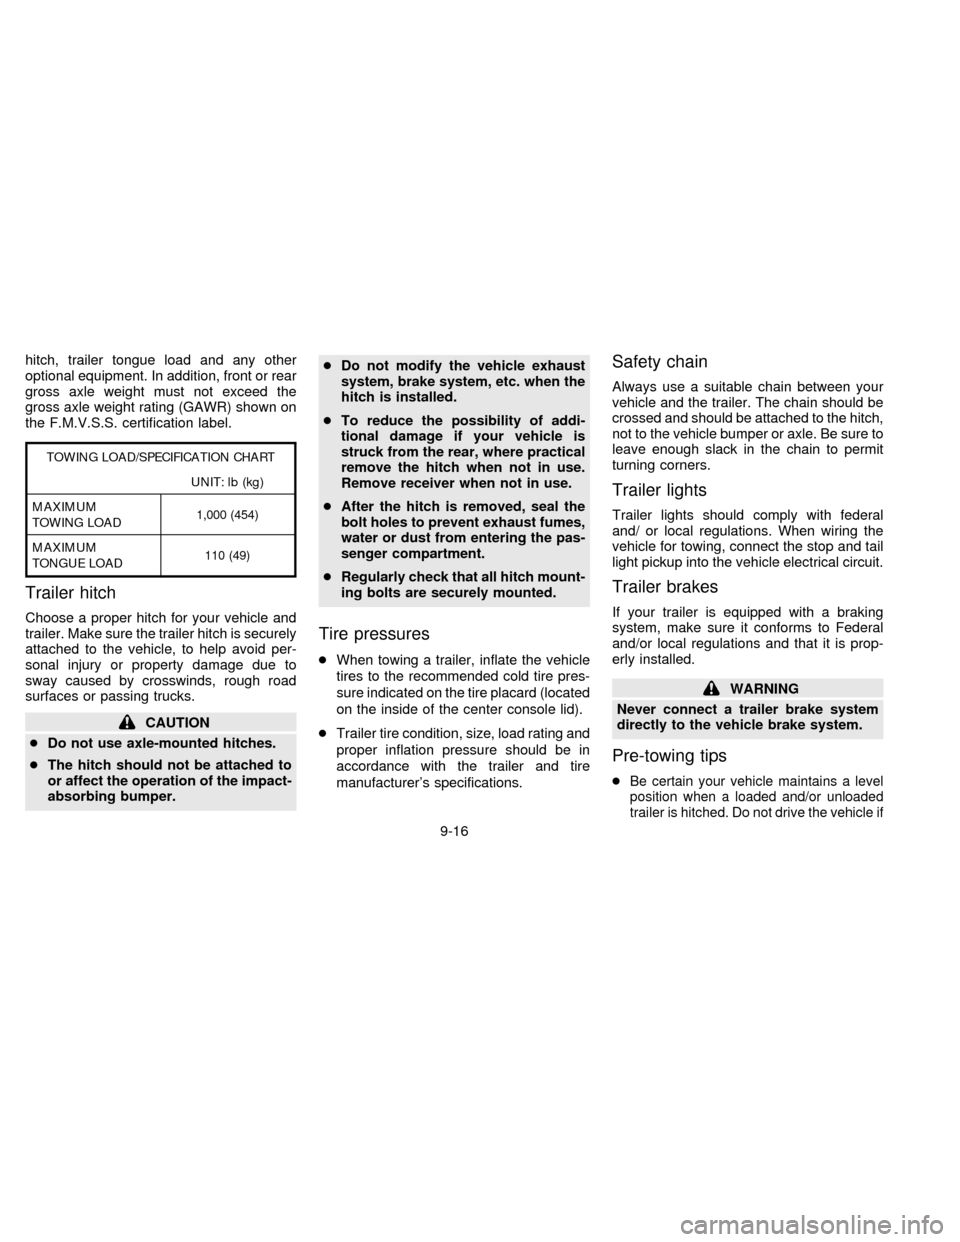
TOWING LOAD/SPECIFICATION CHART
UNIT: lb (kg)
MAXIMUM
TOWING LOAD1,000 (454)
MAXIMUM
TONGUE LOAD110 (49)
Trailer hitch
Choose a proper hitch for your vehicle and
trailer. Make sure the trailer hitch is securely
attached to the vehicle, to help avoid per-
sonal injury or property damage due to
sway caused by crosswinds, rough road
surfaces or passing trucks.
CAUTION
cDo not use axle-mounted hitches.
cThe hitch should not be attached to
or affect the operation of the impact-
absorbing bumper.cDo not modify the vehicle exhaust
system, brake system, etc. when the
hitch is installed.
cTo reduce the possibility of addi-
tional damage if your vehicle is
struck from the rear, where practical
remove the hitch when not in use.
Remove receiver when not in use.
cAfter the hitch is removed, seal the
bolt holes to prevent exhaust fumes,
water or dust from entering the pas-
senger compartment.
cRegularly check that all hitch mount-
ing bolts are securely mounted.
Tire pressures
cWhen towing a trailer, inflate the vehicle
tires to the recommended cold tire pres-
sure indicated on the tire placard (located
on the inside of the center console lid).
cTrailer tire condition, size, load rating and
proper inflation pressure should be in
accordance with the trailer and tire
manufacturer's specifications.
Safety chain
Always use a suitable chain between your
vehicle and the trailer. The chain should be
crossed and should be attached to the hitch,
not to the vehicle bumper or axle. Be sure to
leave enough slack in the chain to permit
turning corners.
Trailer lights
Trailer lights should comply with federal
and/ or local regulations. When wiring the
vehicle for towing, connect the stop and tail
light pickup into the vehicle electrical circuit.
Trailer brakes
If your trailer is equipped with a braking
system, make sure it conforms to Federal
and/or local regulations and that it is prop-
erly installed.
WARNING
Never connect a trailer brake system
directly to the vehicle brake system.
Pre-towing tips
cBe certain your vehicle maintains a level
position when a loaded and/or unloaded
trailer is hitched. Do not drive the vehicle if
9-16
ZX
Page 199 of 203

Checking engine coolant level ............... 7-4
Engine coolant temperature gauge ........ 1-4
Cornering light ........................................... 1-13
Corrosion protection .................................... 6-5
Cruise control............................................. 4-12
Cup holder ................................................. 1-16
D
Daytime running light system
(for Canada)............................................... 1-13
Defogger switch
Rear window defogger switch .............. 1-10
Dimensions and weights.............................. 9-9
Door locks .................................................... 2-2
Door open warning light .............................. 1-6
Drive belts .................................................. 7-14
Driving
Cold weather driving............................. 4-18
Driving with automatic transmission ....... 4-6
Driving with manual transmission ........... 4-9
Precautions when starting and driving ... 4-2
E
Economy - fuel........................................... 4-14
Emission control information label............. 9-12
Emission control system warranty ............. 9-19
Engine
Before starting the engine ...................... 4-5
Capacities and recommendedfuel/lubricants.......................................... 9-2
Changing engine coolant........................ 7-5
Changing engine oil................................ 7-8
Changing engine oil filter........................ 7-9
Checking engine coolant level ............... 7-4
Checking engine oil level ....................... 7-7
Engine compartment check locations .... 7-3
Engine coolant temperature gauge ........ 1-4
Engine cooling system ........................... 7-4
Engine oil ................................................ 7-7
Engine oil and oil filter
recommendation ..................................... 9-5
Engine oil pressure warning light ........... 1-5
Engine oil viscosity ................................. 9-6
Engine serial number ........................... 9-11
Engine specifications .............................. 9-8
Starting the engine ............................... 4-10
Exhaust gas (carbon monoxide).................. 4-2
Explanation of maintenance items ............ 8-10
F
Flashers (See hazard warning flasher switch)
Flat tire ......................................................... 5-2
Floor mat positioning aid ............................. 6-5
Fluid (checking)
Automatic transmission fluid (ATF) ........ 7-9
Brake and clutch fluid ........................... 7-11
Engine coolant ........................................ 7-4
Engine oil ................................................ 7-7
Power steering fluid .............................. 7-11
Window washer fluid ............................ 7-12F.M.V.S.S. certification label ..................... 9-11
Front fog light switch ................................. 1-14
Front seats ................................................. 2-12
Fuel
Capacities and recommended
fuel/lubricants.......................................... 9-2
Fuel economy ....................................... 4-14
Fuel filler cap ........................................ 2-11
Fuel filler lid lock operation .................. 2-10
Fuel octane rating................................... 9-3
Fuel recommendation ............................. 9-3
Fuses ......................................................... 7-20
Fusible links ............................................... 7-21
G
Gas station information.............................. 10-6
Gauge
Engine coolant temperature gauge ........ 1-4
Fuel gauge.............................................. 1-4
Odometer ................................................ 1-3
Speedometer .......................................... 1-3
Tachometer............................................. 1-3
Trip odometer ......................................... 1-3
Gear selection (See shifting)
General maintenance .................................. 8-2
Glove box..................................................... 2-8
H
Hazard warning flasher switch .................. 1-14
10-2
ZX