ESP NISSAN ALTIMA 1998 L30 / 2.G Owners Manual
[x] Cancel search | Manufacturer: NISSAN, Model Year: 1998, Model line: ALTIMA, Model: NISSAN ALTIMA 1998 L30 / 2.GPages: 217, PDF Size: 1.77 MB
Page 23 of 217
CHILD SAFETY
Children need adults to help protect them.
They need to be properly restrained.
The proper restraint depends on the child's
size. Generally, infants (up to about 1 year
and less than 20 pounds) should be placed
in rear facing child restraints. Forward fac-
ing child restraints are available for children
who outgrow rear facing child restraints.
WARNING
Infants and children need special pro-
tection. The vehicle's seat belts may
not fit them properly. The shoulder belt
may come too close to the face or neck.
The lap belt may not fit over their small
hip bones. In an accident, an improp-
erly fitting seat belt could cause seri-
ous or fatal injury. Always use appro-
priate child restraints.
All U.S. states and provinces of Canada
require the use of approved child restraints
for infants and small children. See ``Child
Restraints'' later in this section.
In addition, there are many types of child
restraints available for larger children which
should be used for maximum protection.
NISSAN recommends that all preteens and
children be restrained in the rear seat if
possible. According to accident statistics,
children are safer when properly restrained
in the rear seat than in the front seat. This
is especially important because your ve-
hicle has a supplemental restraint system
(Air bag system) for the front passenger.
See ``Supplemental restraint system'' ear-
lier in this section.
Infants and small children
NISSAN recommends that infants and small
children be placed in child restraints that
comply with Federal Motor Vehicle Safety
Standards or Canadian Motor Vehicle
Safety Standards. You should choose a
child restraint that fits your vehicle and
always follow the manufacturer's instruc-
tions for installation and use.
Larger children
Children who are too large for child re-
straints should be seated and restrained by
the seat belts which are provided.
If the child's seating position has a shoulder
belt that fits close to the face or neck, the
use of a booster seat (commercially avail-
able) may help overcome this. The booster
seat should raise the child so that the shoul-der belt is properly positioned across the
top, middle portion of the shoulder and the
lap belt is low on the hips. The booster seat
should fit the vehicle seat and have a label
certifying that it complies with Federal Motor
Vehicle Safety Standards or Canadian Mo-
tor Vehicle Safety Standards. Once the
child has grown so the shoulder belt is no
longer on or near the face and neck, use the
shoulder belt without the booster seat.
WARNING
Never let a child stand or kneel on any
seat and do not allow a child in the
cargo areas while the vehicle is mov-
ing. The child could be seriously in-
jured or killed in an accident.
PREGNANT WOMEN
NISSAN recommends that pregnant women
use seat belts. Contact your doctor for spe-
cific recommendations. The lap belt should
be worn snug and positioned as low as
possible around the hips, not the waist.
INJURED PERSONS
NISSAN recommends that injured persons
use seat belts. Check with your doctor for
specific recommendations.
1-16Seats, restraints and supplemental air bag systems
ZX
Page 61 of 217
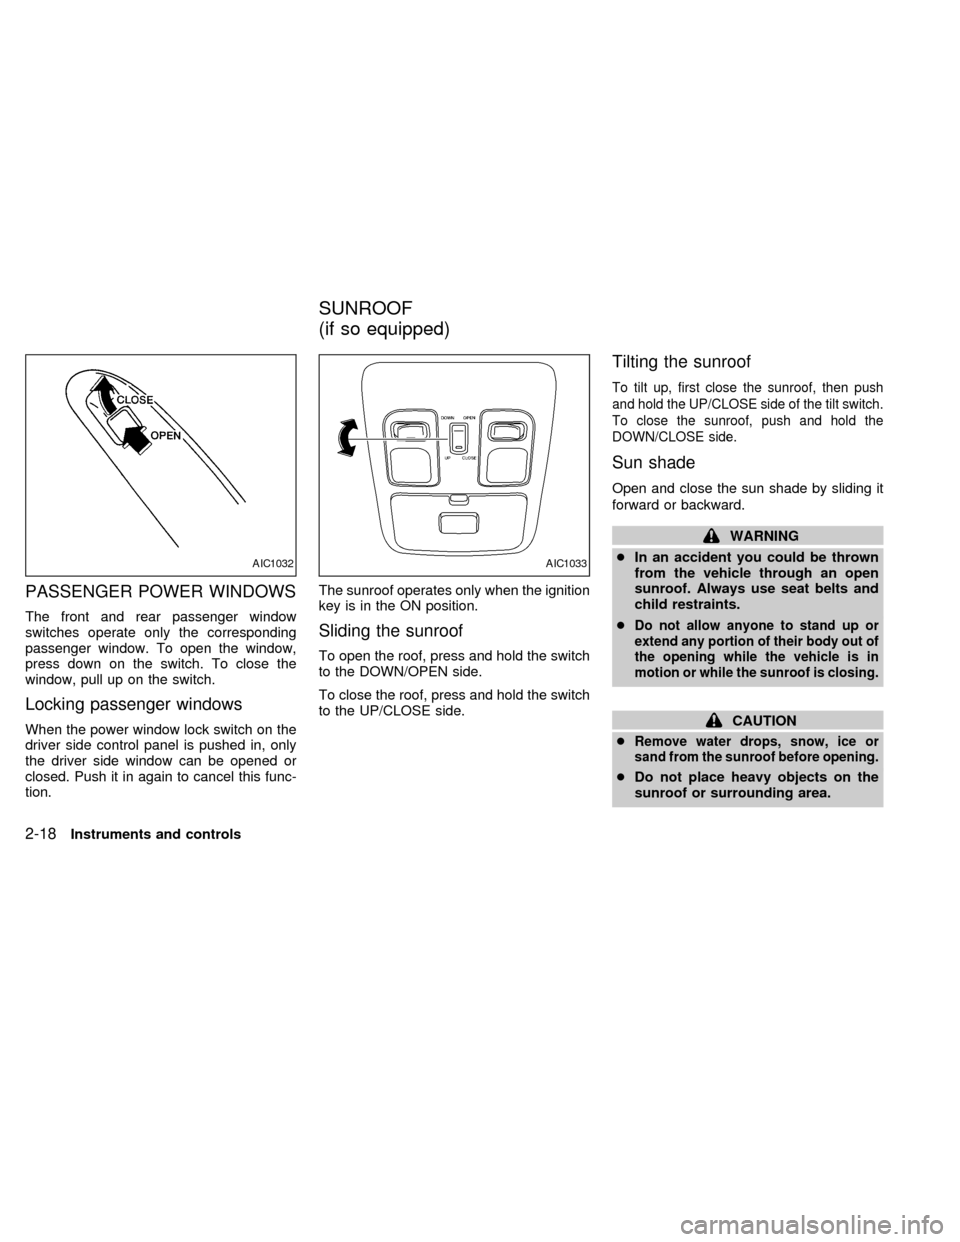
PASSENGER POWER WINDOWS
The front and rear passenger window
switches operate only the corresponding
passenger window. To open the window,
press down on the switch. To close the
window, pull up on the switch.
Locking passenger windows
When the power window lock switch on the
driver side control panel is pushed in, only
the driver side window can be opened or
closed. Push it in again to cancel this func-
tion.The sunroof operates only when the ignition
key is in the ON position.
Sliding the sunroof
To open the roof, press and hold the switch
to the DOWN/OPEN side.
To close the roof, press and hold the switch
to the UP/CLOSE side.
Tilting the sunroof
To tilt up, first close the sunroof, then push
and hold the UP/CLOSE side of the tilt switch.
To close the sunroof, push and hold the
DOWN/CLOSE side.
Sun shade
Open and close the sun shade by sliding it
forward or backward.
WARNING
cIn an accident you could be thrown
from the vehicle through an open
sunroof. Always use seat belts and
child restraints.
c
Do not allow anyone to stand up or
extend any portion of their body out of
the opening while the vehicle is in
motion or while the sunroof is closing.
CAUTION
c
Remove water drops, snow, ice or
sand from the sunroof before opening.
cDo not place heavy objects on the
sunroof or surrounding area.
AIC1032AIC1033
SUNROOF
(if so equipped)
2-18Instruments and controls
ZX
Page 68 of 217

To lock the door without the key, move the
inside lock knob to the lock position, then
close the door.
When locking the door this way, be certain
not to leave the key inside the vehicle.POWER DOOR LOCK
The power door lock system allows you to
lock or unlock all doors simultaneously.
Turning the front door key to the front of the
vehicle locks all doors.
Turning the front door key one time to the
rear of the vehicle unlocks the correspond-
ing door. From that position, returning the
key to Neutral (where the key can only be
removed and inserted) and turning it to the
rear again within 5 seconds unlocks all
doors.
AIC1012APD1011
Pre-driving checks and adjustments3-3
ZX
Page 69 of 217
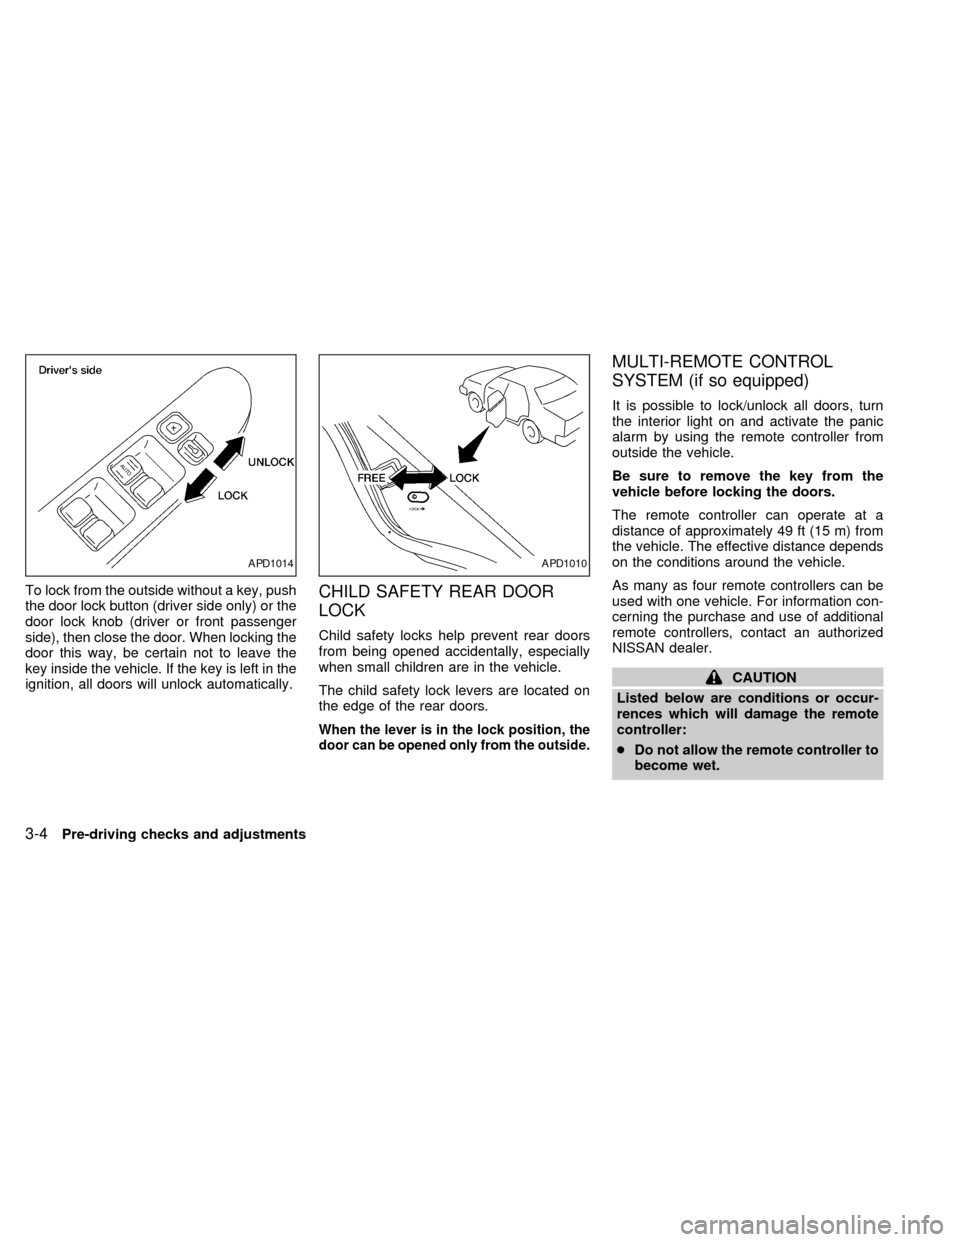
To lock from the outside without a key, push
the door lock button (driver side only) or the
door lock knob (driver or front passenger
side), then close the door. When locking the
door this way, be certain not to leave the
key inside the vehicle. If the key is left in the
ignition, all doors will unlock automatically.CHILD SAFETY REAR DOOR
LOCK
Child safety locks help prevent rear doors
from being opened accidentally, especially
when small children are in the vehicle.
The child safety lock levers are located on
the edge of the rear doors.
When the lever is in the lock position, the
door can be opened only from the outside.
MULTI-REMOTE CONTROL
SYSTEM (if so equipped)
It is possible to lock/unlock all doors, turn
the interior light on and activate the panic
alarm by using the remote controller from
outside the vehicle.
Be sure to remove the key from the
vehicle before locking the doors.
The remote controller can operate at a
distance of approximately 49 ft (15 m) from
the vehicle. The effective distance depends
on the conditions around the vehicle.
As many as four remote controllers can be
used with one vehicle. For information con-
cerning the purchase and use of additional
remote controllers, contact an authorized
NISSAN dealer.
CAUTION
Listed below are conditions or occur-
rences which will damage the remote
controller:
cDo not allow the remote controller to
become wet.
APD1014APD1010
3-4Pre-driving checks and adjustments
ZX
Page 105 of 217
If the compact disc ejects and is not
removed within 10 seconds, it is pulled
back into the slot.
CD (DISC) indicator light
This light comes on when a compact disc is
loaded into the player.
CAUTION
cDuring cold weather or rainy days,
the player may malfunction due to
the humidity. If this occurs, remove
the CD and dehumidify or ventilate
the player completely.
cThe player may skip while driving on
rough roads.
cThe CD player sometimes cannot
function when the compartment tem-
perature is extremely high. Decrease
the temperature before use.
cDo not expose the CD to direct sun-
light.
Power antenna (if so equipped)
The power antenna automatically extends
when the radio is turned on, and retracts
when the radio is turned off. If the radio is
left on, the antenna retracts and extends
with the ignition key OFF-ON operation.
CAUTION
cBefore turning the radio on, make
sure that there is no one near the
antenna outlet and there is enough
space for it to extend.
cTo prevent damage, be sure that an-
tenna is fully retracted before the
vehicle enters an automated car
wash.
cDirt and other foreign matter on the
power antenna rod may interrupt its
operation. Clean the rod periodically
with a damp cloth. This type of
cleaning is especially important dur-
ing the winter seasons in areas
where road salt and other chemicals
may be spread on road surfaces and
splashed onto the antenna rod.
Manual antenna
The manual antenna cannot be shortened,
but can be removed. When you need to
remove the antenna, turn its base counter-
clockwise.
ANTENNA
4-26Heater, air conditioner and audio systems
ZX
Page 117 of 217
Suggested maximum speed in each
gear
Downshift to a lower gear if the engine is not
running smoothly, or if you need to accelerate.
Do not exceed the maximum suggested
speed (shown below) in any gear. For level
road driving, use the highest gear sug-
gested for that speed. Always observe
posted speed limits, and drive according to
the road conditions, which will ensure safe
operation. Do not over-rev the engine when
shifting to a lower gear as it may cause
engine damage or loss of vehicle control.
GEAR MPH (km/h)
1st 30 (50)
2nd 60 (95)
3rd 90 (145)
4th þ
5th þ1. Apply the parking brake.
2.Automatic transmission:
Move the shift selector lever to P (Park)
or N (Neutral). (P is recommended.)The shift selector lever cannot be
moved out of P (Park) and into any of
the other gear positions if the ignition
key is turned to OFF or if the key is
removed.
The starter is designed not to operate
if the shift selector lever is in any of
the driving positions.
Manual transmission:
Move the shift selector lever to N (Neu-
tral), and depress the clutch pedal to the
floor while cranking the engine.
The starter is designed not to operate
unless the clutch pedal is fully de-
pressed.
3. Crank the enginewith your foot off the
accelerator pedalby turning the ignition
key to START. Release the key when the
engine starts. If the engine starts, but
fails to run, repeat the above procedure.
Ð If the engine is very hard to start in
extremely cold or hot weather, de-
press and hold the accelerator pedalto help start the engine.
Ð In the summer, when restarting the
engine within 30 minutes after it has
been stopped, keep the accelerator
pedal fully depressed while starting.
CAUTION
Do not operate the starter for more than
15 seconds at a time. If the engine does
not
start, turn the key off and wait 10
seconds before cranking again, other-
wise the starter could be damaged.
4.Warm-up
Allow the engine to idle for at least 30
seconds after starting. Drive at moderate
speed for a short distance first, especially
in cold weather.
STARTING THE ENGINE
5-10Starting and driving
ZX
Page 123 of 217
WARNING
cNever leave the engine running while
the vehicle is unattended.
cDo not leave children unattended in-
side the vehicle. They could un-
knowingly activate switches or con-
trols. Unattended children could
become involved in serious acci-
dents.The power assisted steering is designed to
use a hydraulic pump, driven by the engine,
to assist steering.
If the engine stops or the hydraulic pump
drive belt breaks, you will still have control of
the vehicle. However, much greater steer-
ing effort is needed, especially in sharp
turns and at low speeds.
WARNING
If the engine is not running or is turned
off while driving, the power assist for
the steering will not work. Steering will
be much harder to operate.The brake system has two separate
hydraulic circuits. If one circuit develops a
problem, you will still have braking at two
wheels.
Vacuum assisted brake
The brake booster aids braking by using
engine vacuum. If the engine stops, you can
stop the vehicle by depressing the brake
pedal. However, greater foot pressure on
the brake pedal will be required to stop the
vehicle and stopping distance will be longer.
Wet brakes
When the vehicle is washed or driven
through water, the brakes may get wet. As a
result, your braking distance will be longer
and the vehicle may pull to one side during
braking.
To dry brakes, drive the vehicle at a safe
speed while lightly pressing the brake pedal
to heat-up the brakes. Do this until the
brakes return to normal. Avoid driving the
vehicle at high speeds until the brakes
function correctly.
Using the brakes
Avoid resting your foot on the brake pedal
while driving. This overheats the brakes,
POWER STEERING SYSTEM BRAKE SYSTEM
5-16Starting and driving
ZX
Page 125 of 217
while driving, take the vehicle to an autho-
rized NISSAN dealer for repair.
WARNING
The anti-lock brake system is a sophis-
ticated device, but it cannot prevent
accidents resulting from careless or
dangerous driving techniques. It can
help maintain vehicle control during
braking on slippery surfaces, but re-
member that the stopping distance on
slippery surfaces will be longer than on
normal surfaces, even with the anti-
lock system. Stopping distances may
also be longer on rough, gravel or
snow covered roads, or if you are using
tire chains. Always maintain a safe dis-
tance from the vehicle in front of you.
Ultimately, the responsibility for safety
of self and others rests in the hands of
the driver.
Tire type and condition of tires may
also affect braking effectiveness.
cWhen replacing tires, install the
specified size of tire on all 4 wheels.cWhen installing a spare tire, make
sure it is the proper size and type as
specified on the tire placard. For tire
placard location information, refer to
ªTire placardº in the Owner's Manual
index.
Refer to ``Wheels and Tires'' in the
``Do-it-yourself'' section of this manual.
Freeing a frozen door lock
To prevent a door lock from freezing, apply
de-icer or glycerin through the key hole. If
the lock becomes frozen, heat the key be-
fore inserting it into the key hole.
Anti-freeze
In the winter when it is anticipated that the
temperature will drop below 32ÉF (0ÉC),
check the anti-freeze (ethylene glycol base)
to assure proper winter protection. For de-
tails, see ``Engine cooling system'' in the
``Do-it-yourself'' section.
Battery
If the battery is not fully charged during
extremely cold weather conditions, the bat-
tery fluid may freeze and damage the bat-
tery. To maintain maximum efficiency, the
battery should be checked regularly. For
details, see ``Battery'' in the ``Do-it-yourself ''
section.
Draining of coolant
If the vehicle is to be left outside without
anti-freeze, drain the cooling system by
opening the drain valves located under the
radiator and on the engine block. Refill
COLD WEATHER DRIVING
5-18Starting and driving
ZX
Page 132 of 217
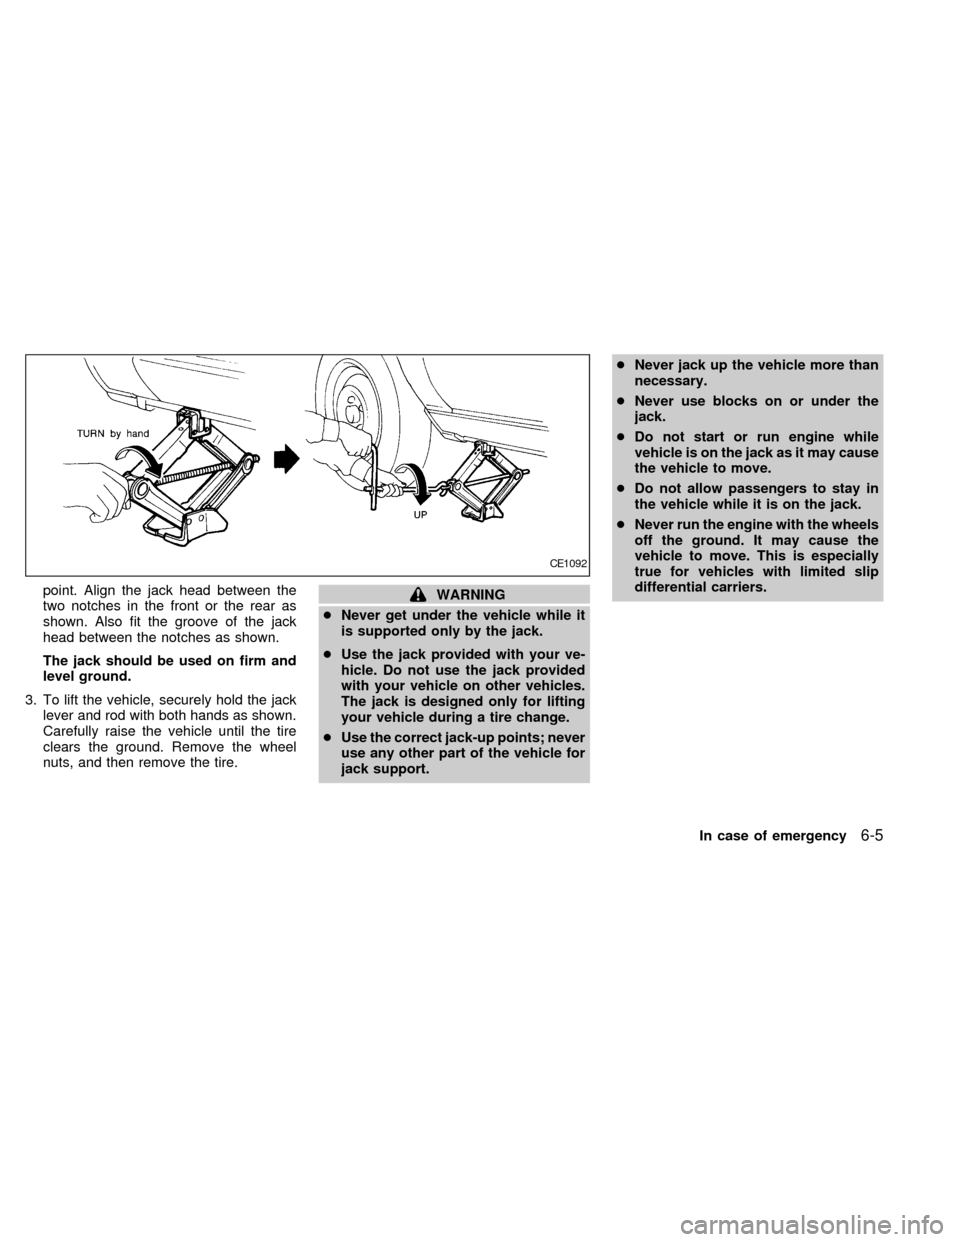
point. Align the jack head between the
two notches in the front or the rear as
shown. Also fit the groove of the jack
head between the notches as shown.
The jack should be used on firm and
level ground.
3. To lift the vehicle, securely hold the jack
lever and rod with both hands as shown.
Carefully raise the vehicle until the tire
clears the ground. Remove the wheel
nuts, and then remove the tire.WARNING
cNever get under the vehicle while it
is supported only by the jack.
cUse the jack provided with your ve-
hicle. Do not use the jack provided
with your vehicle on other vehicles.
The jack is designed only for lifting
your vehicle during a tire change.
cUse the correct jack-up points; never
use any other part of the vehicle for
jack support.cNever jack up the vehicle more than
necessary.
cNever use blocks on or under the
jack.
cDo not start or run engine while
vehicle is on the jack as it may cause
the vehicle to move.
cDo not allow passengers to stay in
the vehicle while it is on the jack.
cNever run the engine with the wheels
off the ground. It may cause the
vehicle to move. This is especially
true for vehicles with limited slip
differential carriers.
CE1092
In case of emergency6-5
ZX
Page 143 of 217
after the vehicle is parked in the hot sun.
Glass cleaner and a soft cloth will easily
remove this film.
CAUTION
When cleaning the inside of the win-
dow, do not use sharp-edged tools,
abrasive cleaners or chlorine based
disinfectant cleaners. They could dam-
age the rear window defogger.
Cleaning aluminum alloy wheels
Wash regularly, especially during winter
months in areas where road salt is used. If
not removed, salt could discolor the wheels.
Chrome parts
Clean all chrome parts regularly with a
non-abrasive chrome polish to maintain the
finish.
Cleaning interior
Occasionally remove loose dust from the
interior trim, plastic parts and seats using a
vacuum cleaner or soft brush. Wipe the
vinyl and leather surfaces with a clean, soft
cloth dampened in mild soap solution, then
wipe clean with a dry, soft cloth. Before
using any fabric protector, read the manu-
facturer's recommendations. Some fabric
protectors contain chemicals that may stain
or bleach the seat material.
CAUTION
cNever use benzine, thinner, or any
similar material.
cThe leather seats should be regu-
larly coated with a leather wax like
saddle soap. Never use car wax.
cNever use fabric protectors unless
recommended by the manufacturer.
7-4Appearance and care
ZX