battery NISSAN ALTIMA 1998 L30 / 2.G Owners Manual
[x] Cancel search | Manufacturer: NISSAN, Model Year: 1998, Model line: ALTIMA, Model: NISSAN ALTIMA 1998 L30 / 2.GPages: 217, PDF Size: 1.77 MB
Page 11 of 217
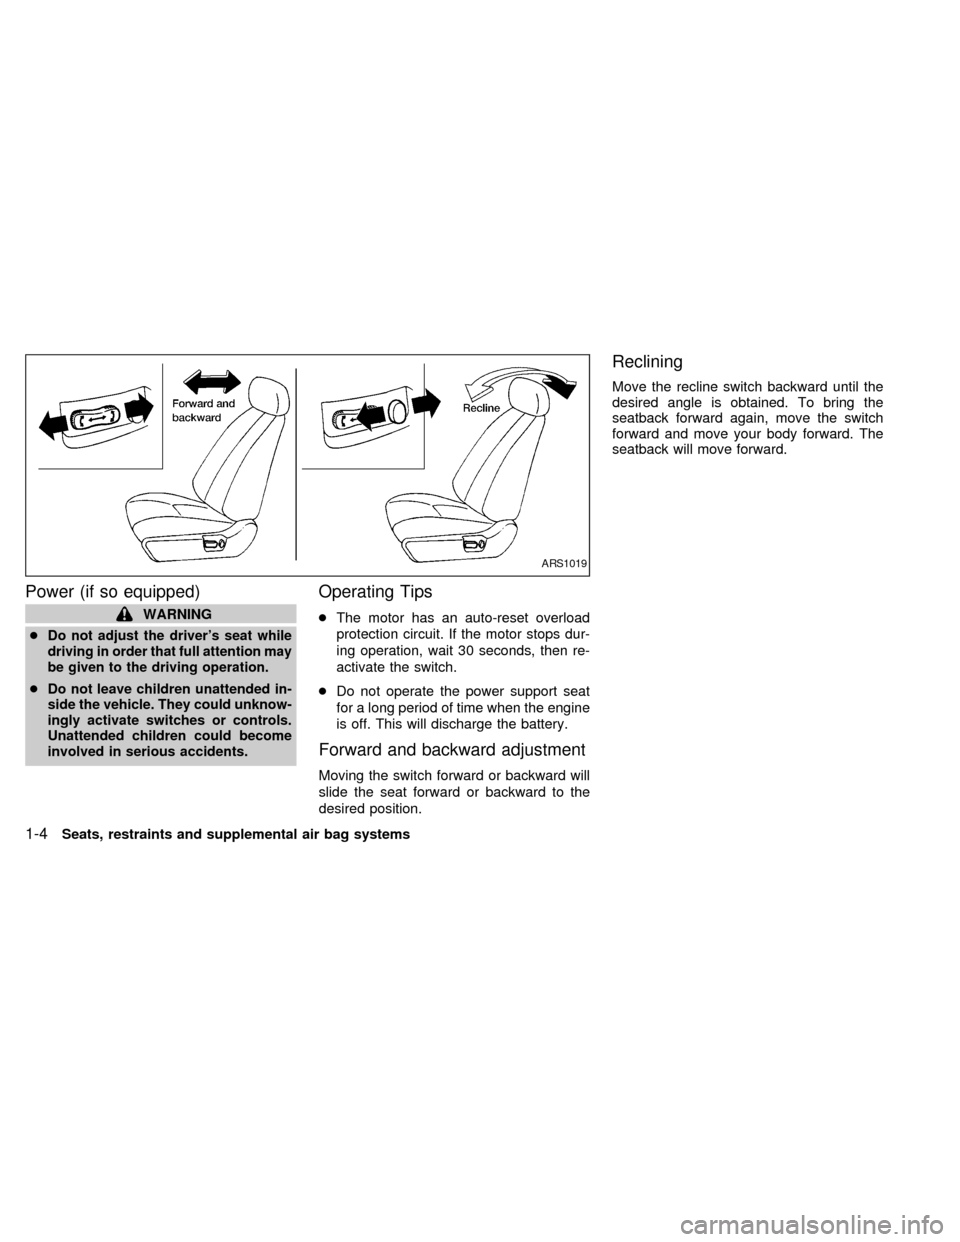
Power (if so equipped)
WARNING
c
Do not adjust the driver's seat while
driving in order that full attention may
be given to the driving operation.
cDo not leave children unattended in-
side the vehicle. They could unknow-
ingly activate switches or controls.
Unattended children could become
involved in serious accidents.
Operating Tips
cThe motor has an auto-reset overload
protection circuit. If the motor stops dur-
ing operation, wait 30 seconds, then re-
activate the switch.
cDo not operate the power support seat
for a long period of time when the engine
is off. This will discharge the battery.
Forward and backward adjustment
Moving the switch forward or backward will
slide the seat forward or backward to the
desired position.
Reclining
Move the recline switch backward until the
desired angle is obtained. To bring the
seatback forward again, move the switch
forward and move your body forward. The
seatback will move forward.
ARS1019
1-4Seats, restraints and supplemental air bag systems
ZX
Page 64 of 217
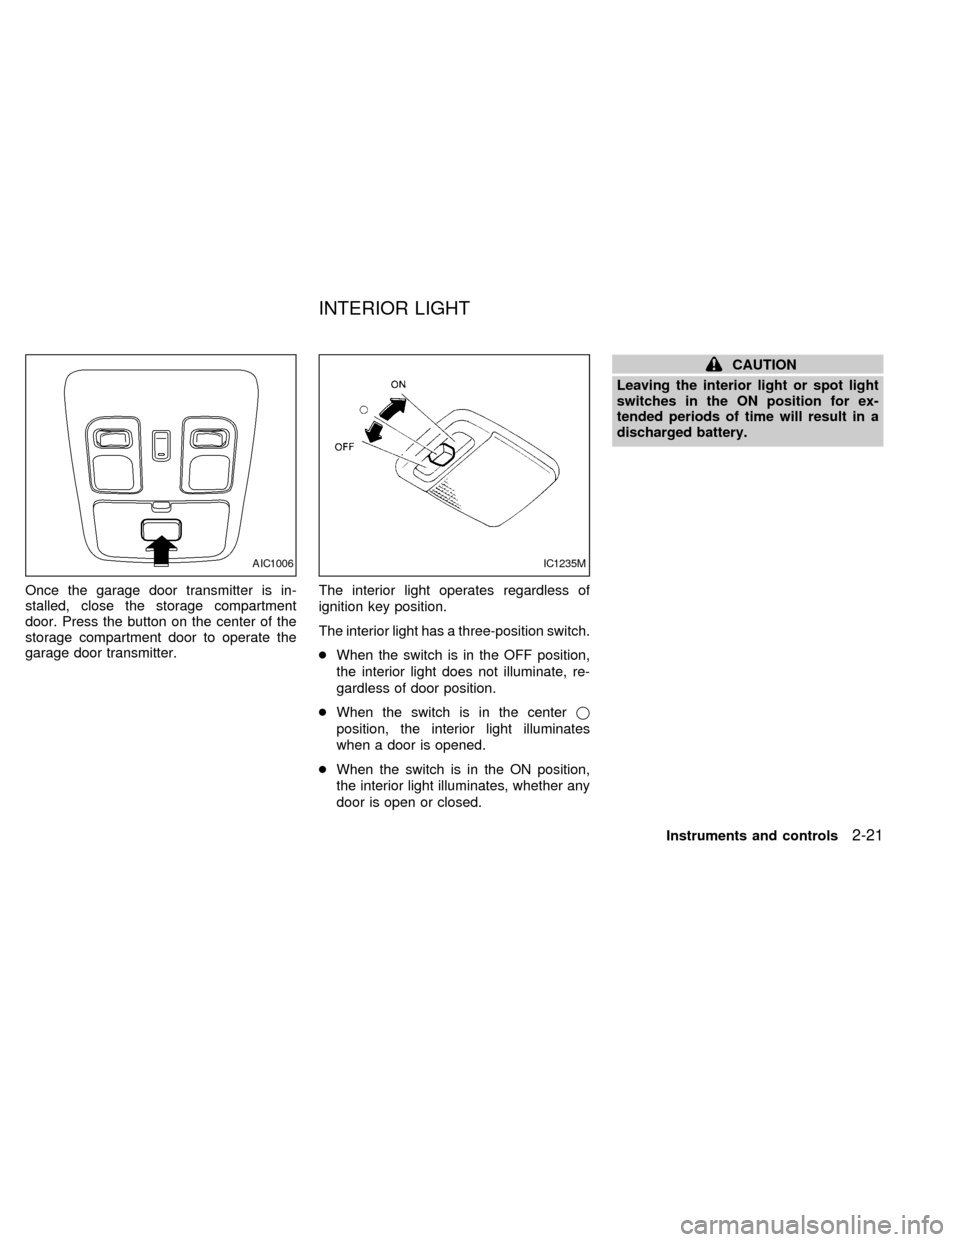
Once the garage door transmitter is in-
stalled, close the storage compartment
door. Press the button on the center of the
storage compartment door to operate the
garage door transmitter.The interior light operates regardless of
ignition key position.
The interior light has a three-position switch.
cWhen the switch is in the OFF position,
the interior light does not illuminate, re-
gardless of door position.
cWhen the switch is in the centerj
position, the interior light illuminates
when a door is opened.
cWhen the switch is in the ON position,
the interior light illuminates, whether any
door is open or closed.
CAUTION
Leaving the interior light or spot light
switches in the ON position for ex-
tended periods of time will result in a
discharged battery.
AIC1006IC1235M
INTERIOR LIGHT
Instruments and controls2-21
ZX
Page 66 of 217

3 Pre-driving checks and adjustments
Key .........................................................................3-2
Door locks ..............................................................3-2
Manual door lock ....................................................3-2
Power door lock .....................................................3-3
Child safety rear door lock .....................................3-4
Multi-remote control system (if so equipped).........3-4
Battery replacement ...............................................3-7
Hood release ..........................................................3-8Glove box ...............................................................3-9
Trunk lid lock operation ..........................................3-9
Fuel filler lid lock operation ..................................3-11
Fuel filler cap ........................................................3-11
Tilting steering wheel ...........................................3-13
Outside mirror remote control ..............................3-13
Inside mirror .........................................................3-13
Vanity mirror (if so equipped)...............................3-14
ZX
Page 72 of 217

Replace the battery in the multi-remote con-
troller as follows:
1. Open the lid using a coin.
2. Replace the battery with a new one.
Recommended battery: Sanyo CR2025or equivalent.
3. Close the lid securely.
4. Press the
button, then thebutton
two or three times to check the multi-
remote controller operation.
Each time the
button is pressed, thehazard lights flash once.
If the battery is removed for any reason
other than replacement, perform step 4.
cAn improperly disposed battery can
hurt the environment. Always confirm
local regulations for battery disposal.
cThe multi-remote controller is water-
resistant; however, if it does get wet,
immediately wipe completely dry.
cThe operational range of the multi-
remote controller extends to approxi-
mately 49 ft (15 m) from the vehicle.
This range may vary with conditions.
FCC Notice:
Changes or modifications not expressly
approved by the manufacturer for com-
pliance could void the user's authority to
operate the equipment.
This device complies with part 15 of the
FCC Rules and RSS-210 of Industry
Canada.
APD1026
BATTERY REPLACEMENT
Pre-driving checks and adjustments3-7
ZX
Page 91 of 217

Station memory operations
Six stations can be set for the AM band. 12
stations can be set for the FM band (six for
FM1, six for FM2).
1. Push
to select AM, FM1, or FM2.The selected band illuminates in the dis-
play.
2. Tune to the desired station.
3. Push the desired station select button for
more than 2 seconds. For example, in
the illustrations, ch2 is to be memorized.
The radio mutes when the select button
is pushed.
4. When the sound resumes, memorizing is
complete.
5. Other station select buttons can be set in
the same manner.
If the battery cable is disconnected, or if the
radio fuse opens, the radio memory is can-
celled. In that case, reset the desired sta-
tions.
Adjusting tone quality and speaker
balance
To adjust BASSzTREBzFADERzBAL (Bass,
Treble, Fader, Balance), press the AUDIO
button until the desired mode (BAS, TRE,
FAD or BAL) appears in the display.
Press the
orbutton to adjust Bass
(BAS) and Treble (TRE) to the desired level.
Use the
orbutton to adjust
Fader or Balalnce modes. Fader adjusts the
sound level between the front and rear
speakers and Balance (BAL) adjusts the
AHA1005
AHA1027
4-12Heater, air conditioner and audio systems
ZX
Page 96 of 217

Station memory operations
Six stations can be set for the AM band. 12
stations can be set for the FM band (six for
FM1, six for FM2).1. Push
to select AM, FM1, or
FM2. The selected band illuminates in
the display.
2. Tune to the desired station.
3. Push the desired station select button for
more than 3 seconds. For example, in
the illustrations ch2 is to be memorized.
The radio mutes when the select button
is pushed.
4. The indicator, ch2, then illuminates in the
display and the sound resumes. Memo-
rizing is now complete.
5. Other station select buttons can be set in
the same manner.
If the battery cable is disconnected, or if the
radio fuse opens, the radio memory is can-
celled. In that case, reset the desired stations.
AHA1007
Heater, air conditioner and audio systems4-17
ZX
Page 101 of 217

Station memory operations
Six stations can be set for the AM band. 12
stations can be set for the FM band (six for
FM1, six for FM2).
1. Push
to select AM, FM1, or FM2.The selected band illuminates in the dis-
play.
2. Tune to the desired station.
3. Push the desired station select button for
more than 3 seconds. For example, in
the illustrations ch2 is to be memorized.
The radio mutes when the select button
is pushed.
4. The indicator, ch2, then illuminates in the
display and the sound resumes. Memo-
rizing is now complete.
5. Other station select buttons can be set in
the same manner.
If the battery cable is disconnected, or if the
radio fuse opens, the radio memory is can-
celled. In that case, reset the desired stations.
AHA1009
4-22Heater, air conditioner and audio systems
ZX
Page 113 of 217
WARNING
cDo not depress the accelerator pedal
while shifting from P (Park) or N
(Neutral) to R (Reverse), D (Drive), 2
or 1. Always depress the brake pedal
until shifting is completed. Failure to
do so could cause you to lose con-
trol and have an accident.
cCold engine idle speed is high, so
use caution when shifting into a for-
ward or reverse gear before the en-
gine has warmed up.
cNever shift to P (Park) or R (Reverse)
while the vehicle is moving. This
could cause an accident.
CAUTION
cWhen stopping the vehicle on an
uphill grade, do not hold the vehicle
by depressing the accelerator pedal.
The foot brake should be used for
this purpose.
cOn slippery roads, do not downshift.
This may cause a loss of control.The automatic transmission in your vehicle
is electronically controlled by the transmis-
sion control module to produce maximum
power and smooth operation.
The recommended operating procedures for
this transmission are shown on the following
pages. Follow these procedures for maximum
vehicle performance and driving enjoyment.
Starting the vehicle
cAfter starting the engine, fully depress
the foot brake pedal before shifting the
shift selector lever to the D (Drive), R
(Reverse), 2 or 1 position. Be sure the
vehicle is fully stopped before attempt-
ing to shift the shift selector lever.
cKeep the foot brake pedal depressed
and shift into a driving gear.
c
Release the foot brake, then gradually
start the vehicle in motion.
The automatic transmission is designed
so the foot brake pedal MUST be de-
pressed before shifting from P (Park) to
any drive position while the ignition switch
is ON.
The shift lever cannot be moved out of P
(Park) and into any of the other gearpositions if the ignition key is turned to
LOCK or if the key is removed.
If the battery charge is low, the shift
selector lever can be moved if the igni-
tion switch is in the ACC position.
DRIVING WITH AUTOMATIC
TRANSMISSION
(if so equipped)
5-6Starting and driving
ZX
Page 125 of 217
while driving, take the vehicle to an autho-
rized NISSAN dealer for repair.
WARNING
The anti-lock brake system is a sophis-
ticated device, but it cannot prevent
accidents resulting from careless or
dangerous driving techniques. It can
help maintain vehicle control during
braking on slippery surfaces, but re-
member that the stopping distance on
slippery surfaces will be longer than on
normal surfaces, even with the anti-
lock system. Stopping distances may
also be longer on rough, gravel or
snow covered roads, or if you are using
tire chains. Always maintain a safe dis-
tance from the vehicle in front of you.
Ultimately, the responsibility for safety
of self and others rests in the hands of
the driver.
Tire type and condition of tires may
also affect braking effectiveness.
cWhen replacing tires, install the
specified size of tire on all 4 wheels.cWhen installing a spare tire, make
sure it is the proper size and type as
specified on the tire placard. For tire
placard location information, refer to
ªTire placardº in the Owner's Manual
index.
Refer to ``Wheels and Tires'' in the
``Do-it-yourself'' section of this manual.
Freeing a frozen door lock
To prevent a door lock from freezing, apply
de-icer or glycerin through the key hole. If
the lock becomes frozen, heat the key be-
fore inserting it into the key hole.
Anti-freeze
In the winter when it is anticipated that the
temperature will drop below 32ÉF (0ÉC),
check the anti-freeze (ethylene glycol base)
to assure proper winter protection. For de-
tails, see ``Engine cooling system'' in the
``Do-it-yourself'' section.
Battery
If the battery is not fully charged during
extremely cold weather conditions, the bat-
tery fluid may freeze and damage the bat-
tery. To maintain maximum efficiency, the
battery should be checked regularly. For
details, see ``Battery'' in the ``Do-it-yourself ''
section.
Draining of coolant
If the vehicle is to be left outside without
anti-freeze, drain the cooling system by
opening the drain valves located under the
radiator and on the engine block. Refill
COLD WEATHER DRIVING
5-18Starting and driving
ZX
Page 134 of 217
place the tool bag in the spare tire stor-
age area.
6. Place the spare tire cover and the trunk
floor carpeting over the damaged tire.
7. Install the jack in its storage area and
tighten the jack screw clockwise.
8. Close the jack access door. Close the
trunk.
WARNING
cAlways make sure that the spare tire
and jacking equipment are properly
secured after use. Such items can
become dangerous projectiles in an
accident or sudden stop.
cThe T-type spare tire is designed for
emergency use. See specific instruc-
tions under the heading ``Wheels
and tires'' in the ``Do-it-yourself''
section.To start your engine with a booster battery,
the instructions and precautions below must
be followed.
WARNING
cIf done incorrectly, jump starting can
lead to a battery explosion, resulting
in severe injury or death. It could
also damage your vehicle.
cExplosive hydrogen gas is always
present in the vicinity of the battery.
Keep all sparks and flames away
from the battery.
cDo not allow battery fluid to come
into contact with eyes, skin, cloth or
painted surfaces. Battery fluid is a
corrosive sulphuric acid solution
which can cause severe burns. If the
fluid should come into contact with
anything, immediately flush the con-
tacted area with water.
cKeep battery out of the reach of
children.
cThe booster battery must be rated at
12 volts. Use of an improper rated
battery can damage your vehicle.cWhenever working on or near a bat-
tery, always wear suitable eye pro-
tectors (for example, goggles or in-
dustrial safety spectacles) and
remove rings, metal bands, or any
other jewelry. Do not lean over the
battery when jump starting.
cDo not attempt to jump start a frozen
battery. It could explode and cause
serious injury.
cYour vehicle has an automatic en-
gine cooling fan. It could come on at
any time. Keep hands and other ob-
jects away from it.
JUMP STARTING
In case of emergency6-7
ZX