NISSAN ALTIMA 1999 L30 / 2.G Owners Manual
Manufacturer: NISSAN, Model Year: 1999, Model line: ALTIMA, Model: NISSAN ALTIMA 1999 L30 / 2.GPages: 220, PDF Size: 1.81 MB
Page 101 of 220

AM-FM RADIO WITH CASSETTE
PLAYER AND COMPACT DISC
PLAYER
RADIO OPERATION
To turn the radio on, turn the ignition key to
ACC or ON. If you listen to the radio with the
engine not running, turn the key to the ACC
position.
Radio reception is affected by station signal
strength, distance from radio transmitter,
buildings, bridges, mountains and other ex-
ternal influences. Intermittent changes in
reception quality normally are caused by
these external influences.
Using a cellular phone in or near the
vehicle may influence radio reception
quality.
This radio has an FM Diversity reception
system, which employs two antennas. One
is a rod type antenna; the other is an an-
tenna printed on the rear window. This sys-
tem automatically switches to the antenna
which is receiving the strongest radio signal.
AHA1072
4-20Heater, air conditioner and audio systems
ZX
Page 102 of 220
ONzOFF/VOL control knob
Turn the ignition key to ACC or ON, then
push the ONzOFF/VOL control knob button.
The mode (radio, tape or CD) which was
playing immediately before the system was
turned off resumes playing. When no CD or
tape is loaded, the radio comes on. Pushing
the ONzOFF/VOL control knob button again
turns the system off.
Turn the ONzOFF/VOL control knob to ad-
just the volume.
Clock operation
Pressing the clock button alternates the
clock and the radio/cassette/CD player op-
tions in the display.
Clock set
Depressing the clock andbuttons to-
gether sets hours. Depressing the clock and
buttons together sets minutes.
Clock priority mode
In this mode the clock is shown in the
display. If any radio, cassette or CD func-
tions are activated, the radio, cassette or
CD display illuminates for 10 seconds then
returns to the clock mode.NOTE:
After clock adjustment, the radio is in the
clock priority mode.
FM-AM band select button
Push thebutton to change from AM to
FM reception.
The FM stereo indicator, ST, illuminates
during FM stereo reception. When the ste-
reo broadcast signal is weak, the radio
automatically changes from stereo to mon-
aural reception.
TUNE/DISC buttons
WARNING
The radio should not be tuned while
driving in order that full attention may
be given to the driving operation.
Use the
andbuttons for manual
tuning. To move quickly through the chan-
nels, hold either of the tuning buttons down.
SEEK/SCAN buttons
SEEK tuning
Push the SEEK/SCAN tuning buttonorfor less than 0.5 seconds. SEEK tuningbegins from high to low frequencies or low to
high frequencies, depending on which but-
ton is pressed, and stops at the next broad-
casting station. Once the highest broadcast-
ing station is reached, the radio continues in
the SEEK mode at the lowest broadcasting
station. If using the
button, once the
lowest broadcasting station is reached, the
radio continues in the SEEK mode at the
highest broadcasting station.
SCAN tuning
Push the SEEK/SCAN tuning buttonorfor more than 0.5 seconds. SCAN illu-
minates in the display, and the radio station
blinks. SCAN tuning begins from low to high
frequencies or high to low frequencies, de-
pending on which button is pressed. SCAN
tuning stops at each broadcasting station for
five seconds. During the SCAN function,
SCAN comes on and the radio station blinks
in the display window. Pushing the button
again during this five second period stops
SCAN tuning and the radio remains tuned to
that station.
Heater, air conditioner and audio systems4-21
ZX
Page 103 of 220

Station memory operations
Six stations can be set for the AM band. 12
stations can be set for the FM band (six for
FM1, six for FM2).
1. Push
to select AM, FM1, or FM2.The selected band illuminates in the dis-
play.
2. Tune to the desired station.
3. Push the desired station select button for
more than 1.5 seconds. For example, in
the illustrations ch2 is to be memorized.
The radio mutes when the select button
is pushed.
4. The indicator, ch2, then illuminates in the
display and the sound resumes. Memo-
rizing is now complete.
5. Other station select buttons can be set in
the same manner.
If the battery cable is disconnected, or if the
radio fuse opens, the radio memory is can-
celled. In that case, reset the desired stations.
AHA1087
4-22Heater, air conditioner and audio systems
ZX
Page 104 of 220
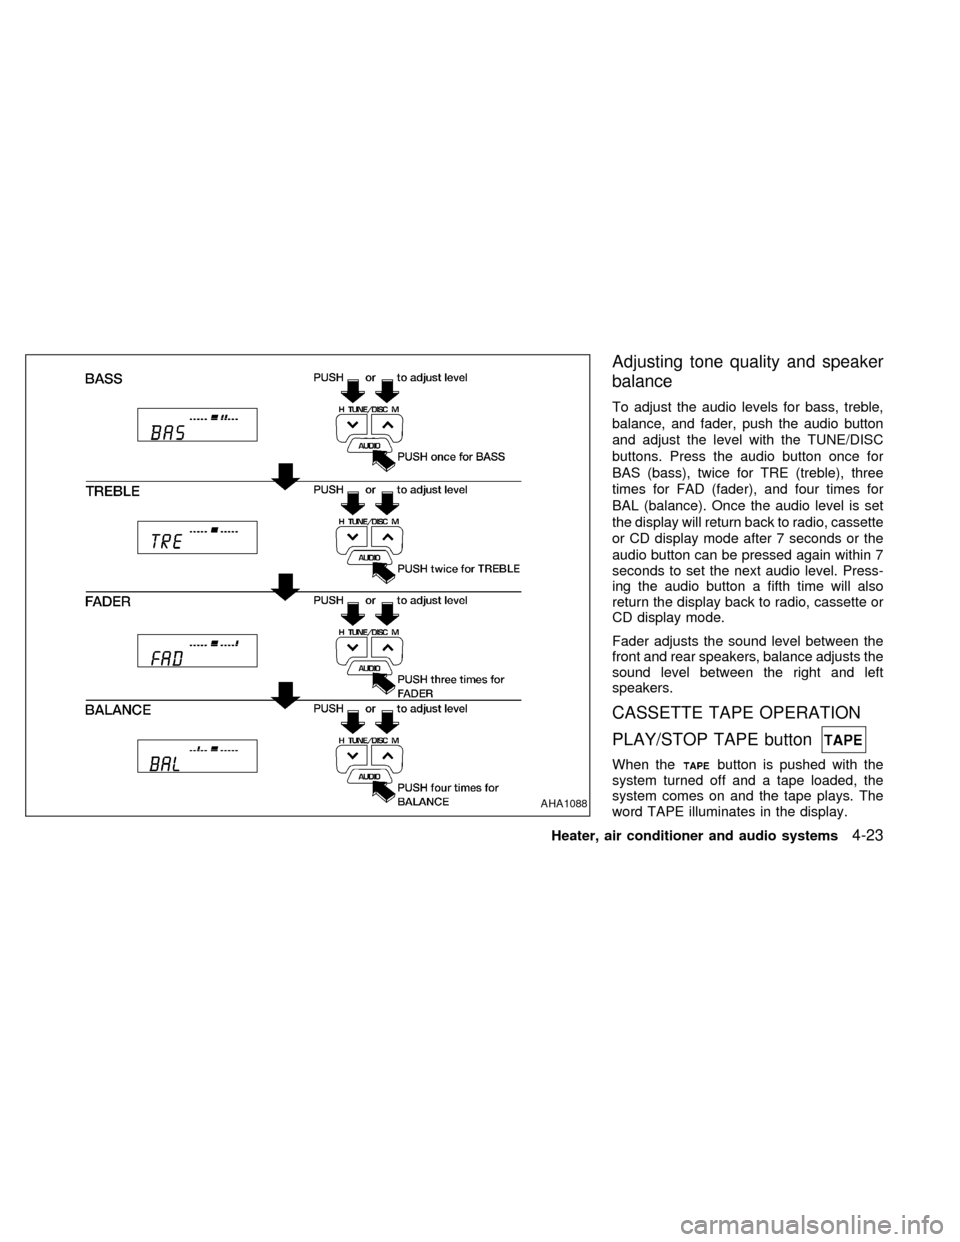
Adjusting tone quality and speaker
balance
To adjust the audio levels for bass, treble,
balance, and fader, push the audio button
and adjust the level with the TUNE/DISC
buttons. Press the audio button once for
BAS (bass), twice for TRE (treble), three
times for FAD (fader), and four times for
BAL (balance). Once the audio level is set
the display will return back to radio, cassette
or CD display mode after 7 seconds or the
audio button can be pressed again within 7
seconds to set the next audio level. Press-
ing the audio button a fifth time will also
return the display back to radio, cassette or
CD display mode.
Fader adjusts the sound level between the
front and rear speakers, balance adjusts the
sound level between the right and left
speakers.
CASSETTE TAPE OPERATION
PLAY/STOP TAPE button
When thebutton is pushed with the
system turned off and a tape loaded, the
system comes on and the tape plays. The
word TAPE illuminates in the display.
AHA1088
Heater, air conditioner and audio systems4-23
ZX
Page 105 of 220
When thebutton is pushed with either
the radio or compact disc turned on and a
tape loaded, the compact disc or the radio
turns off and the tape plays.
FF (fast forward) and REW (rewind)
buttons
Push thebutton to fast forward the
tape. Push the
button to rewind the
tape. Either REW or FF illuminates in the
display. To stop the FF or REW function,
press the
,,orbuttons.
Automatic Program Search (APS)
FF and REW buttons
When thebutton is pushed while the
tape is being played, the tape runs quickly,
stops, then plays the next selection from the
beginning. Push the
button several
times to skip several selections. Each time
the button is pushed, the tape fast forwards
one additional selection. This number ap-
pears in the display window. The tape can
be fast forwarded through up to nine selec-
tions. (for example: 7 in the display indi-
cates that the
button has been pushedseven times to skip forward through seven
selections).
When thebutton is pushed, the selec-
tion being played starts again from the be-
ginning. Push the
button several times
to rewind several selections. Each time the
button is pushed, the tape rewinds
back one additional selection. The number
of selections skipped appears in the display
window as a negative number (for example:
27 in the display indicates that the
but-
ton has been pushed seven times to rewind
back through seven selections).
Either the FF or REW blinks in the display
when the
orbutton is pushed.
The system searches for the blank intervals
between selections. If there is a blank inter-
val within one selection or there is no inter-
val between selections, the system may not
stop in the desired or expected location.
PROG (Program) button
Push thebutton to change the tape
side while the tape is being played.
The cassette tape automatically changes
directions to play the other side when the
first side is complete.
Dolby NR (noise reduction)
Push thebutton for Dolby NR encoded
tapes to reduce high frequency tape noise.
The
indicator illuminates in the display.
Dolby NR is manufactured under license
from Dolby Laboratories Licensing Corpora-
tion. DOLBY NR and the double-D symbol
are trademarks of Dolby Laboratories Li-
censing Corporation.
Metal or chrome tape usage
The cassette player is automatically set to
high performance play when playing a metal
or chrome cassette tape.
TAPE EJECT button
Push thebutton to eject the cassette
tape.
Precautions on cassette player op-
eration
cTo maintain good quality sound,
NISSAN recommends using cassette
tapes of 60 minutes or shorter in
length.
4-24Heater, air conditioner and audio systems
ZX
Page 106 of 220
cCassette tapes should be removed
from the player when not in use. Store
cassettes in their protective cases
and away from direct sunlight, heat,
dust moisture or magnetic sources.
cDirect sunlight can cause the cassette
to become deformed. The use of de-
formed cassettes may cause the cas-
sette to jam in the player.
cDo not use cassettes that have peel-
ing or loose labels. If used, the label
could jam in the player.
cIf a cassette has loose tape, insert a
pencil through one of the cassette
hubs and rewind the tape firmly.
Loose tape may cause jamming and
wavering sound quality.
cOver a period of time, the playback
head, capstan and pinch roller may
collect a tape coating residue as the
tape is played. This residue accumu-
lation can cause a weak or wavering
sound and should be removed peri-
odically with a head cleaning tape. If
the residue is not removed periodi-
cally, the player may need to be dis-
assembled for cleaning.COMPACT DISC (CD) PLAYER
OPERATION
Turn the ignition key to the ACC or ON
position, and carefully insert the compact
disc into the slot with the label side up. The
compact disc is automatically pulled into the
slot and starts to play.
If the radio or cassette tape is already
operating, it automatically turns off and the
compact disc begins to play.
CAUTION
Do not force the compact disc into the
slot. This could damage the player.
CD button
When thebutton is pushed with the
compact disc loaded and the tape or the
radio playing, the tape or radio turns off and
compact disc starts to play.
FF (fast forward) REW (rewind)
buttons
When theorbutton is pushed
while the compact disc is playing, the com-
pact disc plays at an increased speed whilefast forwarding or rewinding. When the but-
ton is released, the compact disc returns to
normal play speed.
Automatic Program Search (APS)
APS FF, APS REW buttons
When thebutton is pushed while the
compact disc is playing, the selection fol-
lowing the present one starts to play from
the beginning. Push the
button several
times to skip several selections. Each time
the button is pushed, the CD advances one
additional selection. The number appears in
the display window. (When the last selec-
tion on the compact disc is skipped, the first
selection is played.)
When the
button is pushed, the selec-
tion being played returns to the beginning.
Push the
button several times to skip
back several selections. Each time the but-
ton is pushed, the CD moves back one
selection.
PROG (program) button
When thebutton is pushed while the
compact disc is playing, the play pattern
changes as follows.
Heater, air conditioner and audio systems
4-25
ZX
Page 107 of 220
1.The current selection is repeated.
RANDOM:Selections are played at ran-
dom, not following the sequence on the
compact disc. The same program may be
repeated twice.
Blank(no symbol): All selections are played
repeatedly in sequence.
When a new compact disc is inserted,
the play pattern automatically changes
to Blank.
CD EJECT button
When thebutton is pushed with a com-
pact disc loaded, the compact disc ejects.
When the
button is pushed while the
compact disc is playing, the compact disc
ejects and the system turns off.If the compact disc ejects and is not
removed within 10 seconds, it is pulled
back into the slot.
CD IN (DISC) indicator light
CD IN appears in the display when a com-
pact disc is loaded into the player.
CAUTION
cDuring cold weather or rainy days,
the player may malfunction due to
the humidity. If this occurs, remove
the CD and dehumidify or ventilate
the player completely.
cThe player may skip while driving on
rough roads.
cThe CD player sometimes cannot
function when the compartment tem-
perature is extremely high. Decrease
the temperature before use.
cDo not expose the CD to direct sun-
light.
Power antenna (if so equipped)
The power antenna automatically extends
when the radio is turned on, and retracts
when the radio is turned off or when a
compact disc or cassette tape is playing. If
the radio is left on, the antenna retracts and
extends with the ignition key OFF-ON op-
eration.
CAUTION
cBefore turning the radio on, make
sure that there is no one near the
antenna outlet and there is enough
space for it to extend.
cTo prevent damage, be sure that an-
tenna is fully retracted before the
vehicle enters an automated car
wash.
cDirt and other foreign matter on the
power antenna rod may interrupt its
operation. Clean the rod periodically
with a damp cloth. This type of
cleaning is especially important dur-
ing the winter seasons in areas
where road salt and other chemicals
may be spread on road surfaces and
splashed onto the antenna rod.
ANTENNA
4-26Heater, air conditioner and audio systems
ZX
Page 108 of 220
Manual antenna
The manual antenna cannot be shortened,
but can be removed. When you need to
remove the antenna, turn the antenna rod
counterclockwise.
To install the antenna rod, turn the antenna
clockwise. Tighten the antenna rod to speci-
fication using a suitable tool such as a
open-end wrench. The antenna rod tighten-
ing specification is 3.4 - 3.6 Nzm(30-32
in-lb). Do not use pliers to tighten the an-
tenna as they can leave marks on the
antenna surface. The antenna rod can not
be hand tightened to the proper specifica-
tion.
CAUTION
Always properly tighten the antenna
rod during installation or the antenna
rod may break during vehicle opera-
tion.
Microphone installed model
If equipped with a genuine NISSAN cellular
phone, your NISSAN features a non-
directional microphone in the steering col-
umn cover, so it is not necessary to look at
or speak directly into the microphone when
calling. To do so could detract from the
driving operation and cause an accident.
See the manual for car phone operation.
Pre-wired and antenna for phone
installed model
Some models are pre-wired to accept the
genuine NISSAN cellular phone. In addition,
the same model has the phone antenna
built into the rear glass window.
When installing a CB, ham radio or car
phone in your NISSAN, be sure to observe
the following cautions, otherwise the new
equipment may adversely affect the MFI
(Multiport Fuel Injection) system and other
electronic parts.
CAUTION
cKeep the antenna as far as possible
away from the Engine Control Mod-
ule.
cAlso keep the antenna wire more
than 8 inches (20 cm) away from the
MFI harness. Do not route the an-
tenna wire next to any harness.
cAdjust the antenna standing-wave
ratio as recommended by the manu-
facturer.
cConnect the ground wire from the
CB radio chassis to the body.
cFor details, consult an authorized
NISSAN dealer.
CB RADIO OR CAR PHONE
Heater, air conditioner and audio systems4-27
ZX
Page 109 of 220

MEMO
4-28Heater, air conditioner and audio systems
ZX
Page 110 of 220

5 Starting and driving
Precautions when starting and driving ...................5-2
Exhaust gas (carbon monoxide) ............................5-2
Three way catalyst .................................................5-3
Avoiding collision and rollover................................5-3
Drinking alcohol/drugs and driving .........................5-4
Ignition switch .........................................................5-4
Manual transmission ..............................................5-4
Automatic transmission ..........................................5-5
Before starting the engine ......................................5-6
Driving with automatic transmission
(if so equipped) ......................................................5-6
Overdrive switch .....................................................5-9Driving with manual transmission ........................5-10
Starting the engine ...............................................5-11
Parking brake operation .......................................5-12
Cruise control .......................................................5-13
Break-in schedule ................................................5-15
Increasing fuel economy ......................................5-15
Parking/parking on hills ........................................5-16
Power steering system .........................................5-17
Brake system........................................................5-17
Anti-lock brake system (ABS) (if so equipped) ....5-18
Cold weather driving ............................................5-19
ZX