battery NISSAN ALTIMA 1999 L30 / 2.G Owners Manual
[x] Cancel search | Manufacturer: NISSAN, Model Year: 1999, Model line: ALTIMA, Model: NISSAN ALTIMA 1999 L30 / 2.GPages: 220, PDF Size: 1.81 MB
Page 11 of 220

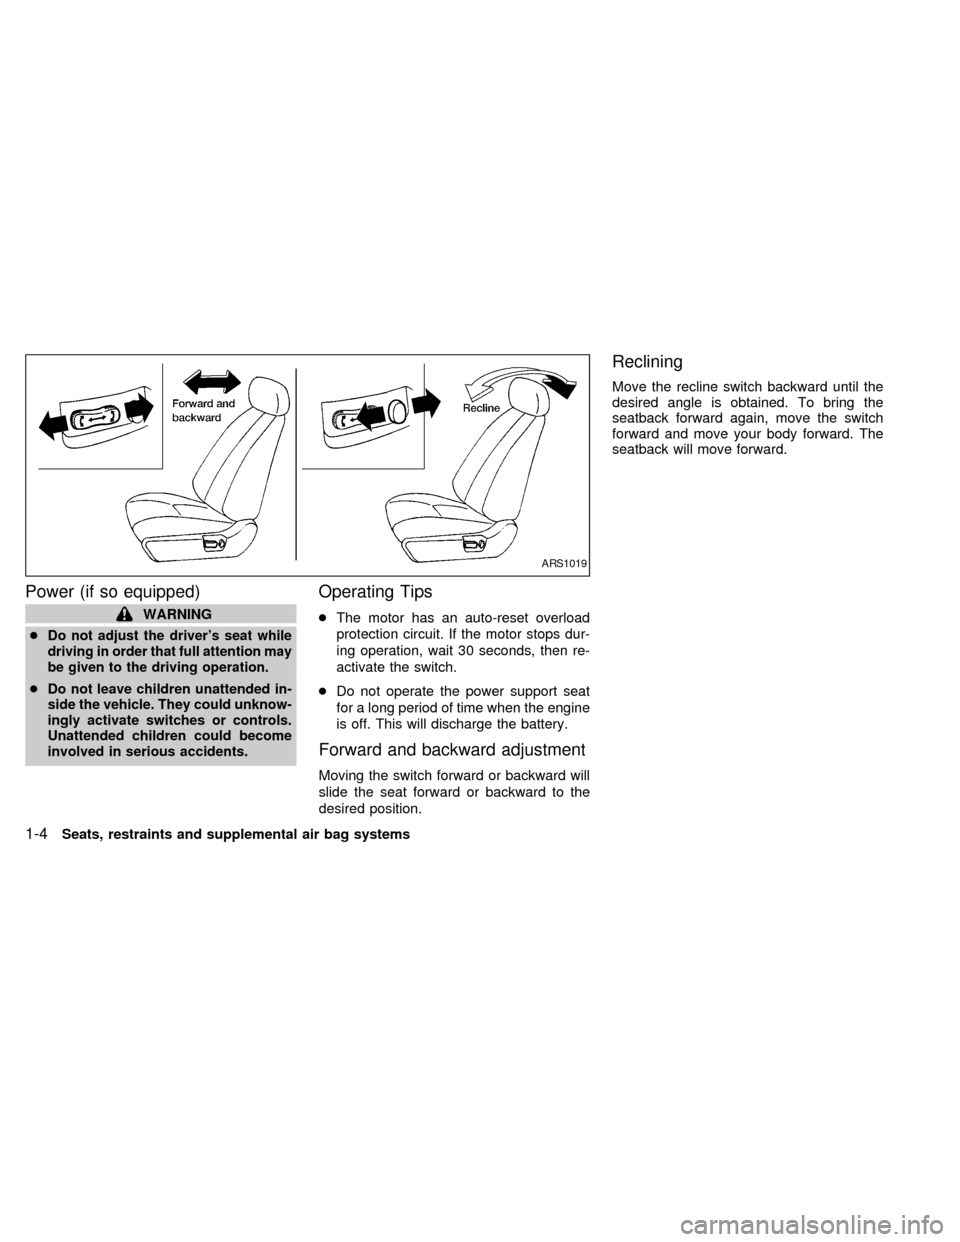
Power (if so equipped)
WARNING
c
Do not adjust the driver's seat while
driving in order that full attention may
be given to the driving operation.
cDo not leave children unattended in-
side the vehicle. They could unknow-
ingly activate switches or controls.
Unattended children could become
involved in serious accidents.
Operating Tips
cThe motor has an auto-reset overload
protection circuit. If the motor stops dur-
ing operation, wait 30 seconds, then re-
activate the switch.
cDo not operate the power support seat
for a long period of time when the engine
is off. This will discharge the battery.
Forward and backward adjustment
Moving the switch forward or backward will
slide the seat forward or backward to the
desired position.
Reclining
Move the recline switch backward until the
desired angle is obtained. To bring the
seatback forward again, move the switch
forward and move your body forward. The
seatback will move forward.
ARS1019
1-4Seats, restraints and supplemental air bag systems
ZX
Page 66 of 220

Once the garage door transmitter is in-
stalled, close the storage compartment
door. Press the button on the center of the
storage compartment door to operate the
garage door transmitter.The interior light operates regardless of
ignition key position.
The interior light has a three-position switch.
cWhen the switch is in the OFF position,
the interior light does not illuminate, re-
gardless of door position.
cWhen the switch is in the centerj
position, the interior light illuminates
when a door is opened.
cWhen the switch is in the ON position,
the interior light illuminates, whether any
door is open or closed.
CAUTION
Leaving the interior light or spot light
switches in the ON position for ex-
tended periods of time will result in a
discharged battery.
AIC1006IC1235M
INTERIOR LIGHT
Instruments and controls2-21
ZX
Page 68 of 220

3 Pre-driving checks and adjustments
Key .........................................................................3-2
Door locks ..............................................................3-2
Manual door lock ....................................................3-2
Power door lock .....................................................3-3
Child safety rear door lock .....................................3-4
Multi-remote control system (if so equipped).........3-4
Battery replacement ...............................................3-7
Hood release ..........................................................3-8Glove box ...............................................................3-9
Trunk lid lock operation ..........................................3-9
Fuel filler lid lock operation ..................................3-11
Fuel filler cap ........................................................3-11
Tilting steering wheel ...........................................3-13
Outside mirror remote control ..............................3-13
Inside mirror .........................................................3-13
Vanity mirror (if so equipped)...............................3-14
ZX
Page 74 of 220

Replace the battery in the multi-remote con-
troller as follows:
1. Open the lid using a coin.
2. Replace the battery with a new one.
Recommended battery: Sanyo CR2025or equivalent.
3. Close the lid securely.
4. Press the
button, then thebutton
two or three times to check the multi-
remote controller operation.
Each time the
button is pressed, thehazard lights flash once.
If the battery is removed for any reason
other than replacement, perform step 4.
cAn improperly disposed battery can
hurt the environment. Always confirm
local regulations for battery disposal.
cThe multi-remote controller is water-
resistant; however, if it does get wet,
immediately wipe completely dry.
cThe operational range of the multi-
remote controller extends to approxi-
mately 49 ft (15 m) from the vehicle.
This range may vary with conditions.
FCC Notice:
Changes or modifications not expressly
approved by the manufacturer for com-
pliance could void the user's authority to
operate the equipment.
This device complies with part 15 of the
FCC Rules and RSS-210 of Industry
Canada.
APD1087
BATTERY REPLACEMENT
Pre-driving checks and adjustments3-7
ZX
Page 93 of 220

Station memory operations
Six stations can be set for the AM band. 12
stations can be set for the FM band (six for
FM1, six for FM2).
1. Push
to select AM, FM1, or FM2.The selected band illuminates in the dis-
play.
2. Tune to the desired station.
3. Push the desired station select button for
more than 1.5 seconds. For example, in
the illustrations, ch2 is to be memorized.
The radio mutes when the select button
is pushed.
4. When the sound resumes, memorizing is
complete.
5. Other station select buttons can be set in
the same manner.
If the battery cable is disconnected, or if the
radio fuse opens, the radio memory is can-
celled. In that case, reset the desired sta-
tions.
Adjusting tone quality and speaker
balance
To adjust BASSzTREBzFADERzBAL (Bass,
Treble, Fader, Balance), press the AUDIO
button until the desired mode (BAS, TRE,
FAD or BAL) appears in the display.
Press the
orbutton to adjust Bass
(BAS) and Treble (TRE) to the desired level.
Use the
orbutton to adjust
Fader or Balance modes. Fader adjusts the
sound level between the front and rear
speakers and Balance (BAL) adjusts the
AHA1045
AHA1027
4-12Heater, air conditioner and audio systems
ZX
Page 98 of 220

Station memory operations
Six stations can be set for the AM band. 12
stations can be set for the FM band (six for
FM1, six for FM2).1. Push
to select AM, FM1, or
FM2. The selected band illuminates in
the display.
2. Tune to the desired station.
3. Push the desired station select button for
more than 1.5 seconds. For example, in
the illustrations ch2 is to be memorized.
The radio mutes when the select button
is pushed.
4. The indicator, ch2, then illuminates in the
display and the sound resumes. Memo-
rizing is now complete.
5. Other station select buttons can be set in
the same manner.
If the battery cable is disconnected, or if the
radio fuse opens, the radio memory is can-
celled. In that case, reset the desired stations.
AHA1046
Heater, air conditioner and audio systems4-17
ZX
Page 103 of 220

Station memory operations
Six stations can be set for the AM band. 12
stations can be set for the FM band (six for
FM1, six for FM2).
1. Push
to select AM, FM1, or FM2.The selected band illuminates in the dis-
play.
2. Tune to the desired station.
3. Push the desired station select button for
more than 1.5 seconds. For example, in
the illustrations ch2 is to be memorized.
The radio mutes when the select button
is pushed.
4. The indicator, ch2, then illuminates in the
display and the sound resumes. Memo-
rizing is now complete.
5. Other station select buttons can be set in
the same manner.
If the battery cable is disconnected, or if the
radio fuse opens, the radio memory is can-
celled. In that case, reset the desired stations.
AHA1087
4-22Heater, air conditioner and audio systems
ZX
Page 114 of 220

AUTOMATIC TRANSMISSION
On automatic transmission models the igni-
tion lock is designed so the key cannot be
turned to LOCK and removed until the shift
selector lever is moved to the P (Park)
position.
When removing the key from the ignition,
make sure the shift selector lever is in the P
(Park) position.
If the key cannot be turned to the LOCK
position, proceed as follows to remove the
key.1) Move the shift selector lever into the P
(Park) position.
2) Turn the ignition key slightly toward the
ON position.
3) Turn the key to the LOCK position.
4) Remove the key.
If the key is removed from the ignition switch,
the shift selector lever cannot be moved from
P (Park).The shift selector lever can be
moved if the ignition switch is in the ACC
position. This allows the vehicle to be
moved if the battery is discharged.
The shift selector lever can also be
moved if the ignition switch is in the ON
position and the foot brake pedal is de-
pressed.
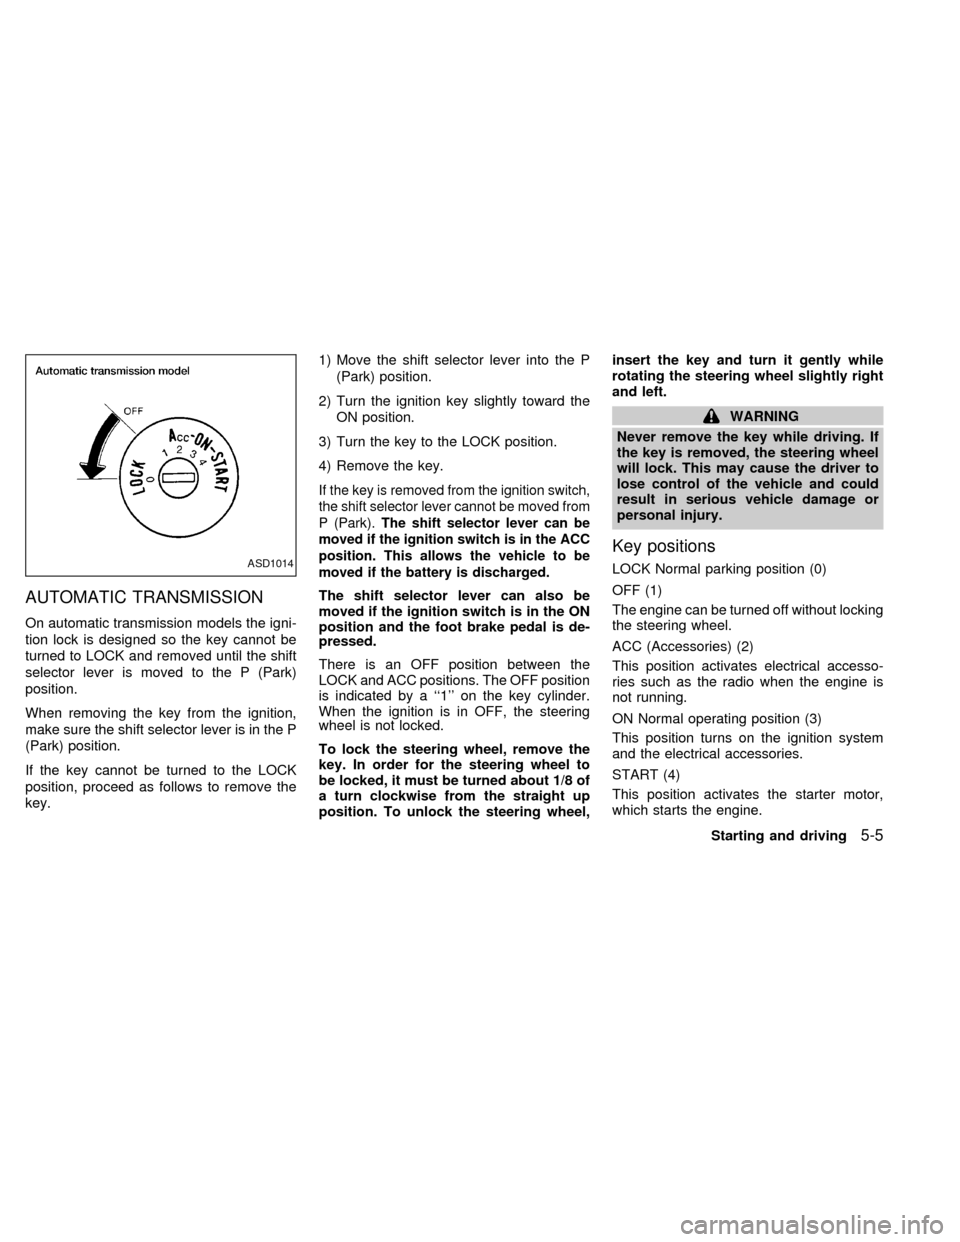
There is an OFF position between the
LOCK and ACC positions. The OFF position
is indicated by a ``1'' on the key cylinder.
When the ignition is in OFF, the steering
wheel is not locked.
To lock the steering wheel, remove the
key. In order for the steering wheel to
be locked, it must be turned about 1/8 of
a turn clockwise from the straight up
position. To unlock the steering wheel,insert the key and turn it gently while
rotating the steering wheel slightly right
and left.
WARNING
Never remove the key while driving. If
the key is removed, the steering wheel
will lock. This may cause the driver to
lose control of the vehicle and could
result in serious vehicle damage or
personal injury.
Key positions
LOCK Normal parking position (0)
OFF (1)
The engine can be turned off without locking
the steering wheel.
ACC (Accessories) (2)
This position activates electrical accesso-
ries such as the radio when the engine is
not running.
ON Normal operating position (3)
This position turns on the ignition system
and the electrical accessories.
START (4)
This position activates the starter motor,
which starts the engine.ASD1014
Starting and driving5-5
ZX
Page 116 of 220

The selector lever cannot be moved out
of P (Park) and into any of the other gear
positions if the ignition key is turned to
LOCK or if the key is removed.
The shift selector lever can be moved if
the ignition switch is in the ACC posi-
tion. This allows the vehicle to be moved
if the battery is discharged.
Shifting with automatic transmission
Push the button to shift into P (Park), R
(Reverse) or from D (Drive) to 2. All other
positions can be selected without pushing
the button.
P (Park):
Use this position when the vehicle is parked
or when starting the engine. Always be sure
the vehicle is at a complete stop. For maxi-
mum safety, depress the brake pedal, then
push in the selector lever button and move
the shift selector lever to the P (Park) posi-
tion. Apply the parking brake. When parkingon a hill, apply the parking brake first, then
move the shift selector lever into the P
(Park) position.
Shifting from P (Park)
If the ignition switch is in the ON position
and the foot brake pedal is depressed, but
the shift selector lever still cannot be moved
out of P (Park), follow these instructions.
1. Turn the ignition key to the lock position
and remove the key.
2. Apply the parking brake.
ASD0510
Starting and driving5-7
ZX
Page 118 of 220

Selector lever lock release
If the battery is discharged, the selector
lever may not be moved from the P position
even with the brake pedal depressed and
the selector lever button pushed.
To move the selector lever, push the shift
lock release and selector lever button. The
selector lever can be moved to N (Neutral).
To push the shift lock release, follow the
following procedure:
1. Turn the ignition key to the lock position
and remove the key
2. Apply the parking brake.
3. Remove the shift lock release cap.
4. Insert a small screwdriver in the shift lock
release slot, and push down.
5. Push the selector lever button and move
the selector lever to N (Neutral) position
while holding down the shift lock release.
6. Start the engine.
If there is any problem moving the selector
lever out of P (Park), take your vehicle to an
authorized NISSAN dealership as soon as
possible.Accelerator downshift
in D position
For rapid passing or hill climbing while driv-
ing, fully depress the accelerator pedal to
the floor. This shifts the transmission down
into second gear or first gear, depending on
vehicle speed.
OVERDRIVE SWITCH
ON: With the engine running and the
selector lever in the D (Drive) posi-
tion, the transmission upshifts into
OVERDRIVE as vehicle speed in-
creases.
OVERDRIVE does not engage until the
engine has reached operating tempera-
ture.
ASD1004
Starting and driving5-9
ZX