window NISSAN ALTIMA 1999 L30 / 2.G Owners Manual
[x] Cancel search | Manufacturer: NISSAN, Model Year: 1999, Model line: ALTIMA, Model: NISSAN ALTIMA 1999 L30 / 2.GPages: 220, PDF Size: 1.81 MB
Page 46 of 220

2 Instruments and controls
Meters and gauges ................................................2-2
Speedometer and odometer ..................................2-3
Tachometer ............................................................2-3
Engine coolant temperature gauge and fuel
gauge .....................................................................2-4
Warning/indicator lights and chimes ......................2-5
Theft warning (if so equipped) ...............................2-9
Windshield wiper and washer switch ...................2-11
Rear window defogger switch ..............................2-11
Headlight and turn signal switch ..........................2-12
Daytime running light system (Canada only) .......2-13
Instrument brightness control ...............................2-13
Front fog light switch (if so equipped)..................2-14Hazard warning flasher switch .............................2-14
Cigarette lighter (accessory) and ash tray ...........2-15
Cup holder ............................................................2-16
Power windows ....................................................2-17
Automatic power window switch ..........................2-17
Passenger power windows ..................................2-18
Sunroof (if so equipped).......................................2-18
If the sunroof does not close ...............................2-19
Storage compartment for garage door
transmitter (if so equipped) ..................................2-20
Interior light...........................................................2-21
Map light (if so equipped) ....................................2-22
Trunk light.............................................................2-22
ZX
Page 54 of 220

The theft warning system provides visual
and audio alarm signals if parts of the
vehicle are disturbed.
How to activate the theft warning
system
1. Close all windows.
2. Remove the key from the ignition switch.
3. Close the hood, trunk lid and all doors.
4. Push the
button on the multi-remote
controller. All doors lock. The hazard
lights flash twice and the horn beeps
once to indicate all doors are locked.cWhen the
button is pushed with all
doors locked, the hazard lights flash
twice and the horn beeps once as a
reminder that the doors are already
locked.
The horn may or may not beep once.
Refer to ``silencing the horn beep fea-
ture'' later in this section.
The system can be activated even if the
windows are open.
5.
Confirm that the SECURITY indicator light
comes on. The SECURITY light glows for
about 30 seconds and then begins to flash
once every three seconds. The system is
now activated. If, during this 30-second
time period, the door is unlocked by the
key or the multi-remote controller, or the
ignition key is turned to ACC or ON, the
system will not activate.
cIf the key is turned slowly when lock-
ing the door, the system may not acti-
vate. Furthermore, if the key is turned
excessively to the unlock position, the
system may be deactivated when the
key is removed. If the indicator light
fails to glow for 30 seconds, unlock
the door once and lock it again.
cEven when the driver and/or passen-
gers are in the vehicle, the system will
activate with all doors, hood and trunk
lid locked and ignition key off. Turn
the ignition key to ACC or ON to turn
the system off.
Theft warning system operation
The theft warning system emits the follow-
ing alarm:
cThe headlights blink and the horn sounds
intermittently. In addition, the starter mo-
tor does not operate.
cThe alarm automatically turns off after 2
to 3 minutes. However, the alarm reacti-
vates if the vehicle is tampered with
again. The alarm can be shut off by
unlocking a door or trunk lid with the key,
or by pressing the
button on the
multi-remote controller.
The alarm is activated by:
copening the door or trunk lid without
using the key (even if the door is un-
locked by releasing the door inside lock
switch) or opening the trunk lid by oper-
ating the opener lever.
copening the hood.
IC0005
THEFT WARNING
(if so equipped)
Instruments and controls2-9
ZX
Page 56 of 220
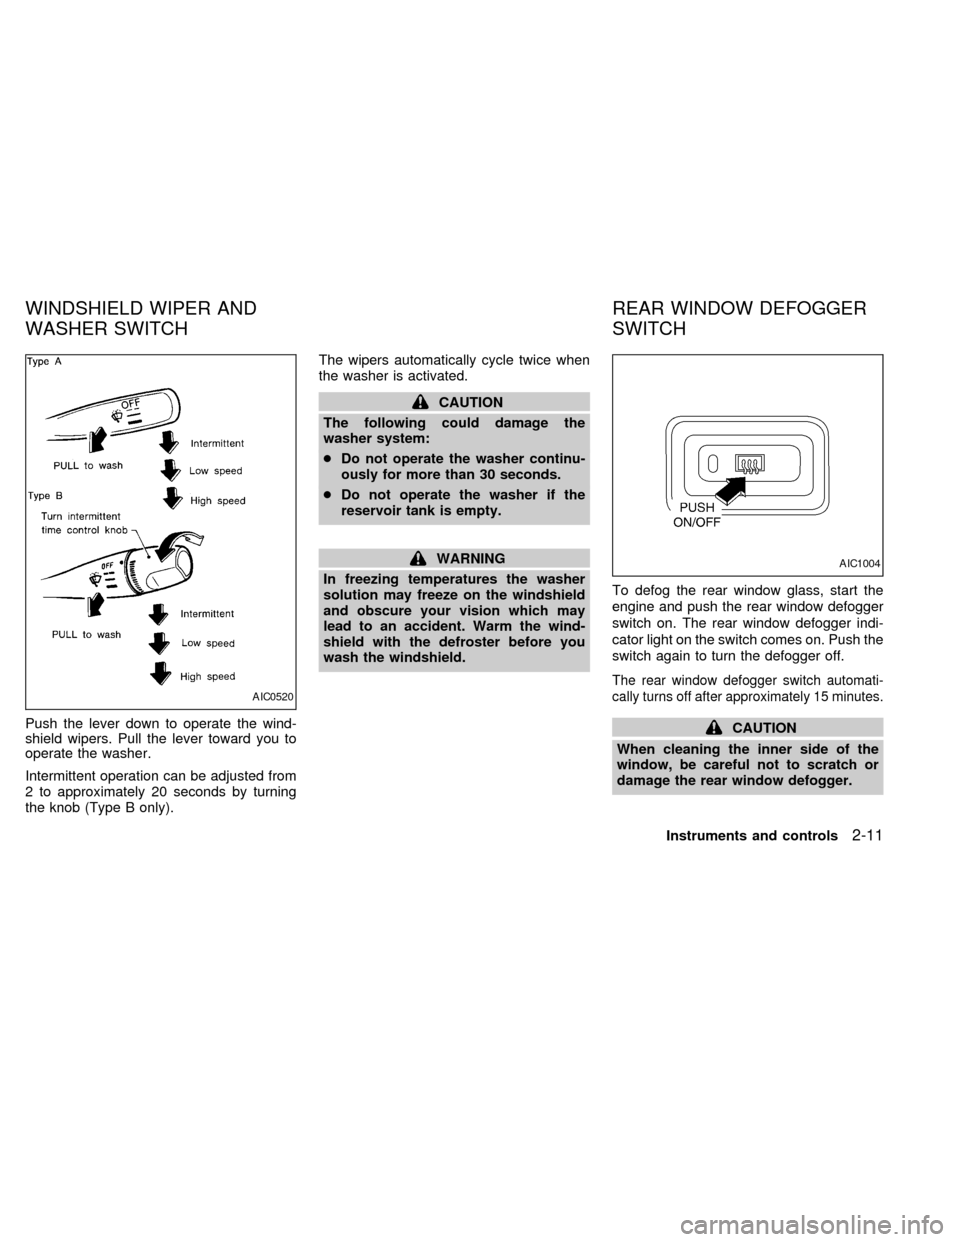
Push the lever down to operate the wind-
shield wipers. Pull the lever toward you to
operate the washer.
Intermittent operation can be adjusted from
2 to approximately 20 seconds by turning
the knob (Type B only).The wipers automatically cycle twice when
the washer is activated.
CAUTION
The following could damage the
washer system:
cDo not operate the washer continu-
ously for more than 30 seconds.
cDo not operate the washer if the
reservoir tank is empty.
WARNING
In freezing temperatures the washer
solution may freeze on the windshield
and obscure your vision which may
lead to an accident. Warm the wind-
shield with the defroster before you
wash the windshield.To defog the rear window glass, start the
engine and push the rear window defogger
switch on. The rear window defogger indi-
cator light on the switch comes on. Push the
switch again to turn the defogger off.
The rear window defogger switch automati-
cally turns off after approximately 15 minutes.
CAUTION
When cleaning the inner side of the
window, be careful not to scratch or
damage the rear window defogger.
AIC0520
AIC1004
WINDSHIELD WIPER AND
WASHER SWITCHREAR WINDOW DEFOGGER
SWITCH
Instruments and controls2-11
ZX
Page 57 of 220

NOTE: On some vehicles, the top few rows
of wires on the rear window are not part of
the rear window defogging system. These
wires, if so equipped, make up the diversity
antenna for the audio system.
Lighting
Turn the switch to theposition: The
front turn signal/parking, rear combination,
side marker, license plate and instrument
panel lights come on.
Turn the switch to the
position:The headlights come on and all the other
lights remain on.
To select the high beam function, push the
lever forward. The high beam lights come
on and the indicator light illuminates. Pull it
back to select the low beam.
AIC0505
HEADLIGHT AND TURN
SIGNAL SWITCH
2-12Instruments and controls
ZX
Page 62 of 220
WARNING
cMake sure that all passengers have
their hands, etc. inside the vehicle
before closing the windows. Use the
window lock switch to prevent unex-
pected use of the power windows.
cDo not leave children unattended in-
side the vehicle. They could un-
knowingly activate switches or con-
trols and become trapped in a
window. Unattended children could
become involved in serious acci-
dents.
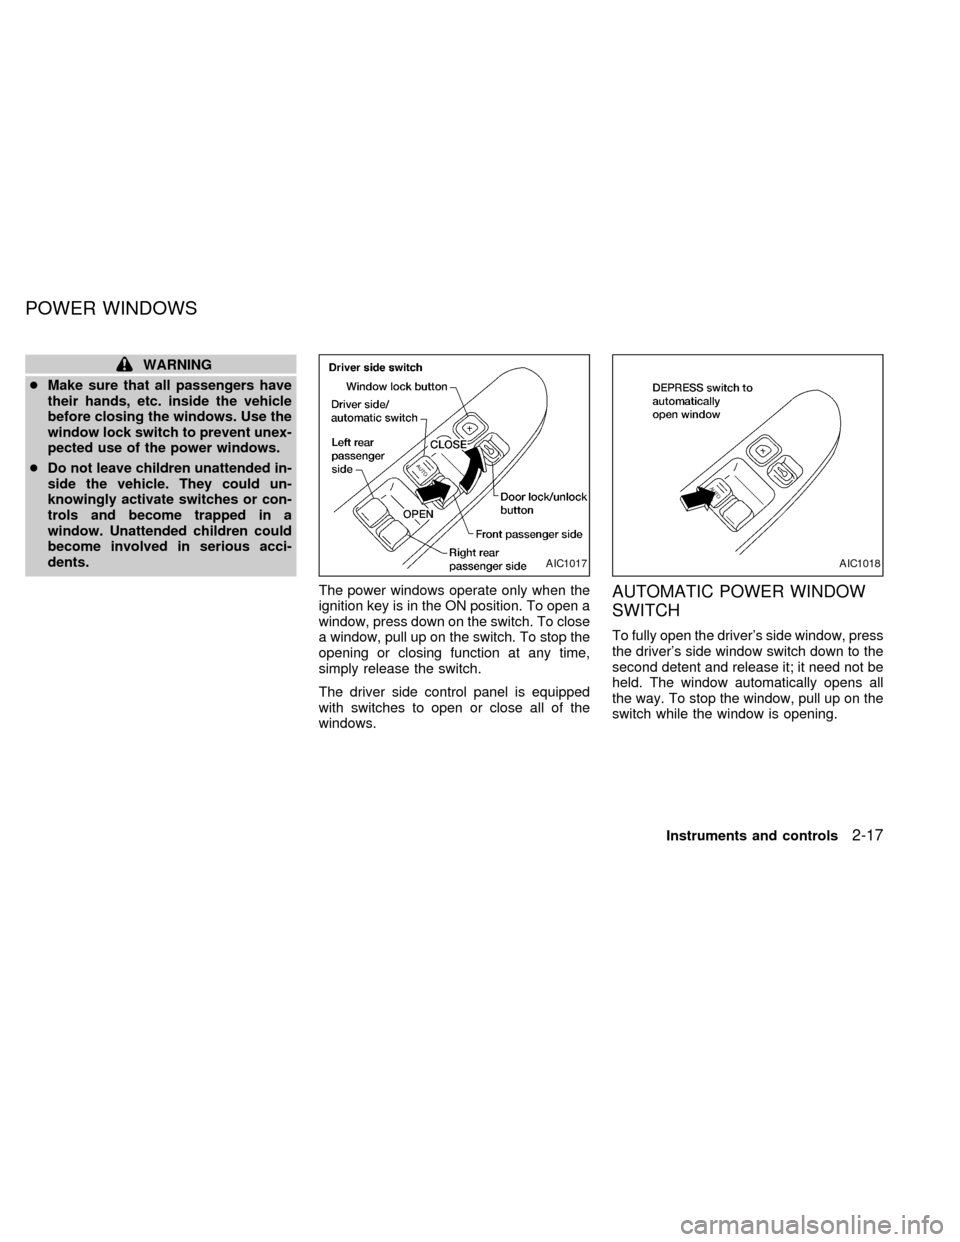
The power windows operate only when the
ignition key is in the ON position. To open a
window, press down on the switch. To close
a window, pull up on the switch. To stop the
opening or closing function at any time,
simply release the switch.
The driver side control panel is equipped
with switches to open or close all of the
windows.
AUTOMATIC POWER WINDOW
SWITCH
To fully open the driver's side window, press
the driver's side window switch down to the
second detent and release it; it need not be
held. The window automatically opens all
the way. To stop the window, pull up on the
switch while the window is opening.
AIC1017AIC1018
POWER WINDOWS
Instruments and controls2-17
ZX
Page 63 of 220
PASSENGER POWER WINDOWS
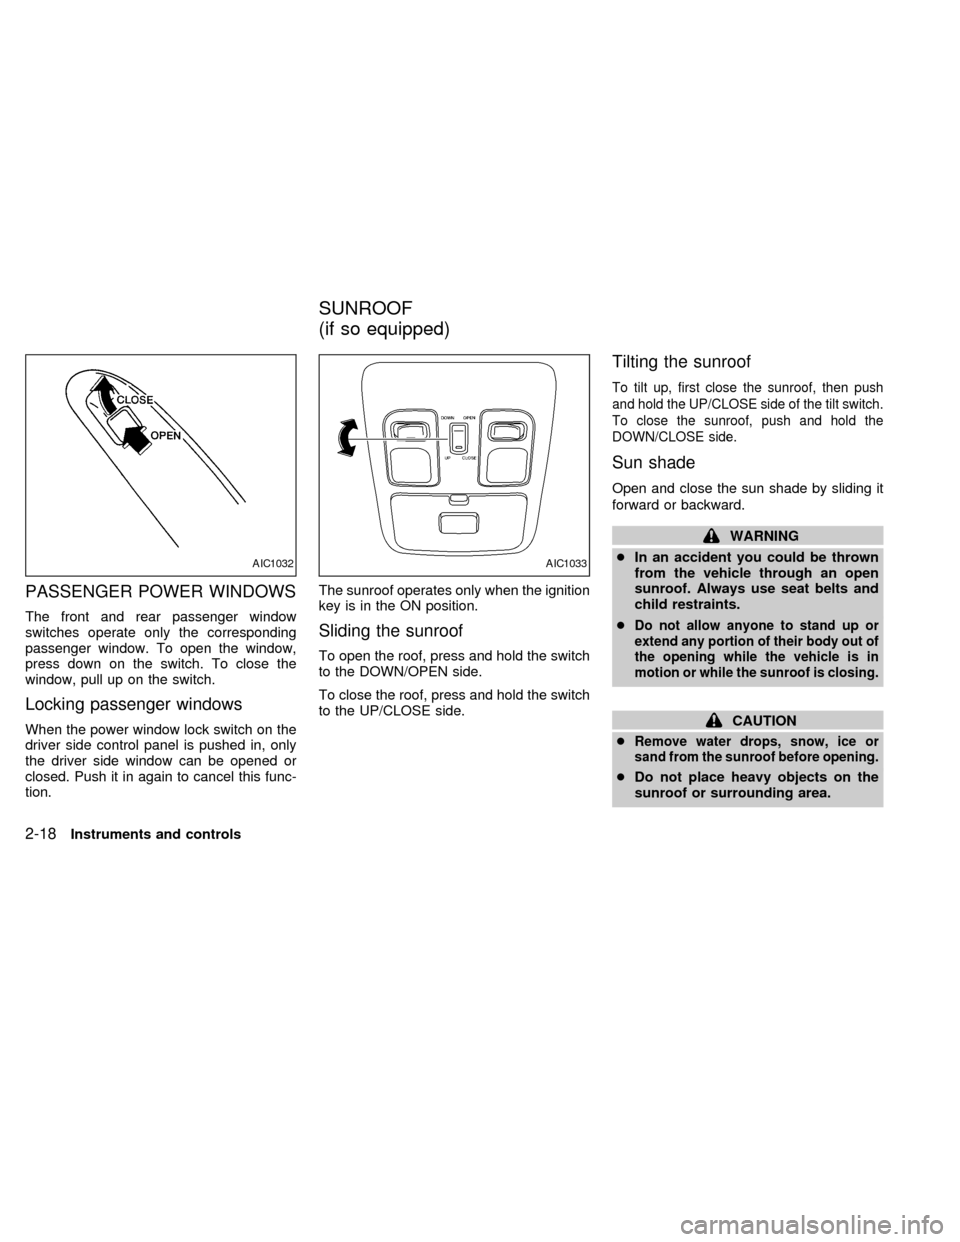
The front and rear passenger window
switches operate only the corresponding
passenger window. To open the window,
press down on the switch. To close the
window, pull up on the switch.
Locking passenger windows
When the power window lock switch on the
driver side control panel is pushed in, only
the driver side window can be opened or
closed. Push it in again to cancel this func-
tion.The sunroof operates only when the ignition
key is in the ON position.
Sliding the sunroof
To open the roof, press and hold the switch
to the DOWN/OPEN side.
To close the roof, press and hold the switch
to the UP/CLOSE side.
Tilting the sunroof
To tilt up, first close the sunroof, then push
and hold the UP/CLOSE side of the tilt switch.
To close the sunroof, push and hold the
DOWN/CLOSE side.
Sun shade
Open and close the sun shade by sliding it
forward or backward.
WARNING
cIn an accident you could be thrown
from the vehicle through an open
sunroof. Always use seat belts and
child restraints.
c
Do not allow anyone to stand up or
extend any portion of their body out of
the opening while the vehicle is in
motion or while the sunroof is closing.
CAUTION
c
Remove water drops, snow, ice or
sand from the sunroof before opening.
cDo not place heavy objects on the
sunroof or surrounding area.
AIC1032AIC1033
SUNROOF
(if so equipped)
2-18Instruments and controls
ZX
Page 72 of 220
cDo not drop the remote controller.
cDo not strike the remote controller
sharply against another object.
cDo not place the remote controller
for an extended period in an area
where temperatures exceed 140ÉF
(60ÉC).
Locking doors
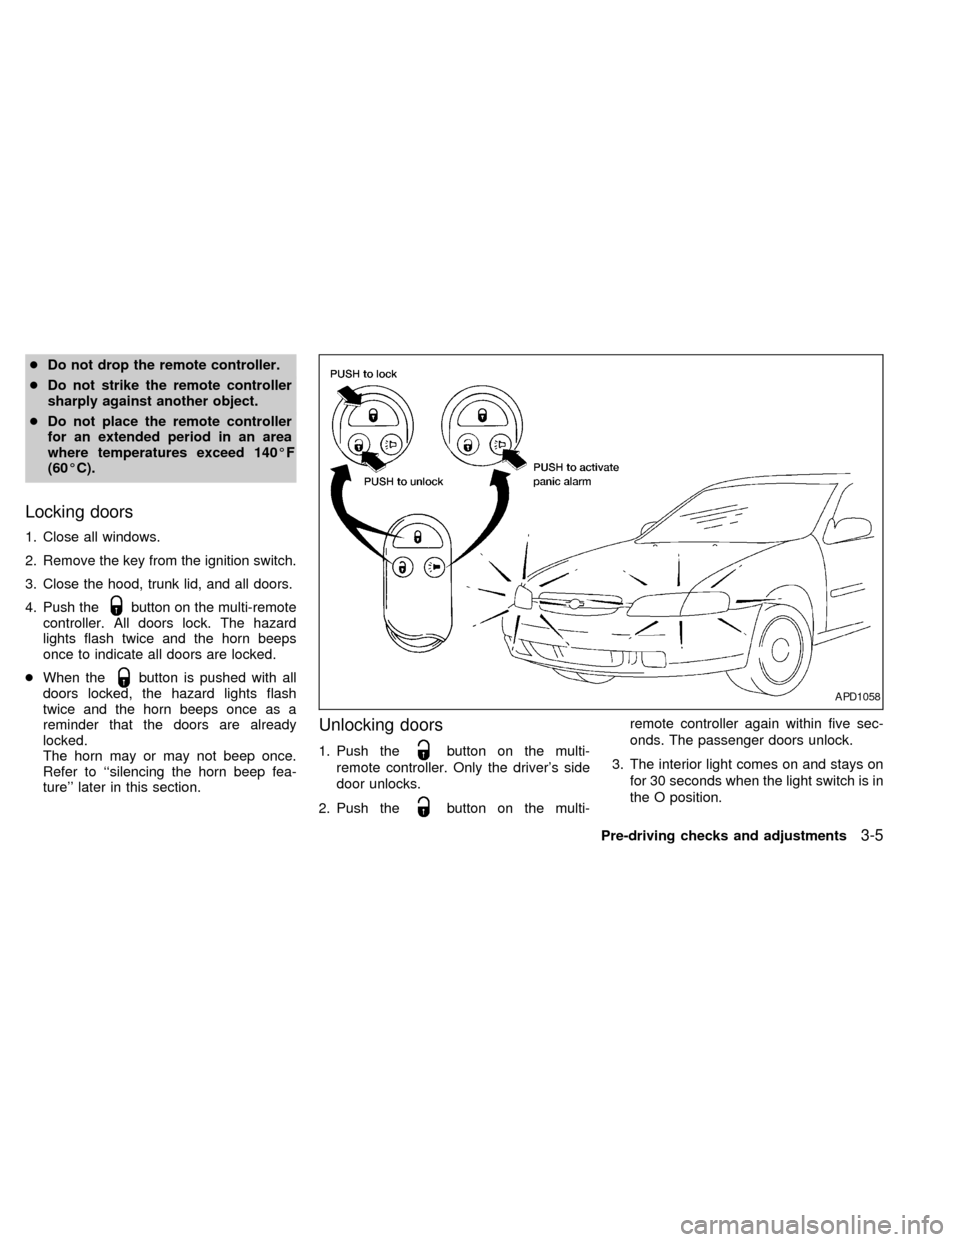
1. Close all windows.
2. Remove the key from the ignition switch.
3. Close the hood, trunk lid, and all doors.
4. Push the
button on the multi-remote
controller. All doors lock. The hazard
lights flash twice and the horn beeps
once to indicate all doors are locked.
cWhen the
button is pushed with all
doors locked, the hazard lights flash
twice and the horn beeps once as a
reminder that the doors are already
locked.
The horn may or may not beep once.
Refer to ``silencing the horn beep fea-
ture'' later in this section.
Unlocking doors
1. Push thebutton on the multi-
remote controller. Only the driver's side
door unlocks.
2. Push the
button on the multi-remote controller again within five sec-
onds. The passenger doors unlock.
3. The interior light comes on and stays on
for 30 seconds when the light switch is in
the O position.
APD1058
Pre-driving checks and adjustments3-5
ZX
Page 84 of 220
WARNING
cThe air conditioner cooling function
operates only when the engine is
running.
c
Do not leave children, unreliable
adults, or pets alone in your vehicle.
On hot sunny days, temperatures in a
closed vehicle could quickly become
high enough to cause severe or possi-
bly fatal injuries to people or animals.
cDo not use the recirculation mode
for long periods as it may cause the
interior air to become stale and the
windows to fog up.
cPositioning of the heating or air con-
ditioning controls should not be
done while driving, in order that full
attention may be given to the driving
operation.
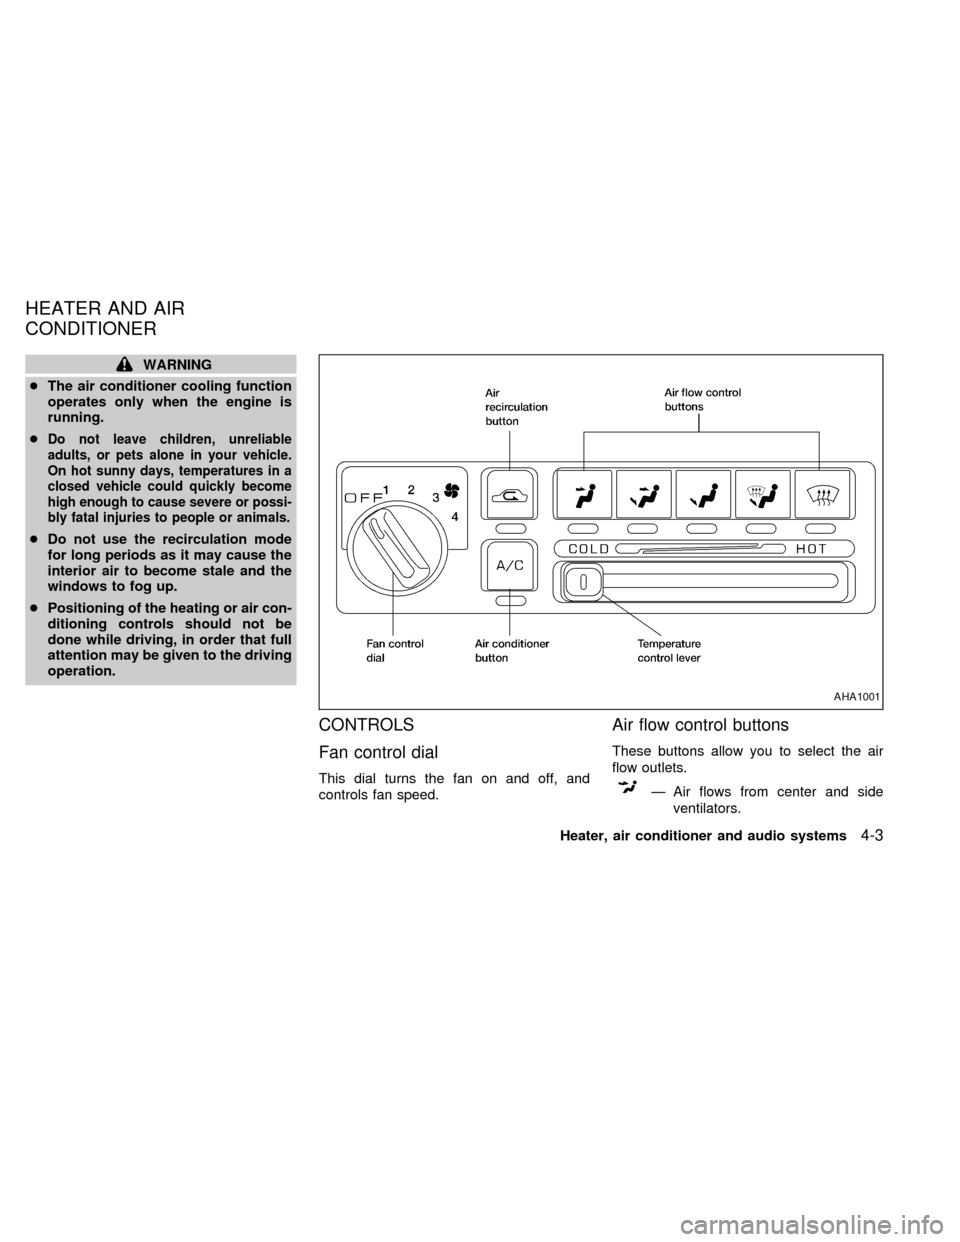
CONTROLS
Fan control dial
This dial turns the fan on and off, and
controls fan speed.
Air flow control buttons
These buttons allow you to select the air
flow outlets.
Ð Air flows from center and side
ventilators.
AHA1001
HEATER AND AIR
CONDITIONER
Heater, air conditioner and audio systems4-3
ZX
Page 85 of 220

Ð Air flows from center and side
ventilators and foot outlets.
Ð Air flows mainly from foot outlets.
Ð Air flows from defroster outlets
and foot outlets.
Ð Air flows mainly from defroster
outlets.
Temperature control lever
This lever allows you to adjust the tempera-
ture of the outlet air.
Air recirculation button
Off position (Indicator light off):
Outside air is drawn into the passenger
compartment and distributed through the
selected outlet.
Use the off position for normal heater or air
conditioner operation.
On position (Indicator light on):
Interior air is recirculated inside the vehicle.
Push the
button to the on position
when:
cdriving on a dusty road.cto avoid traffic fumes.
cfor maximum cooling when using the air
conditioner
Air conditioner button
(if so equipped)
This button is provided only on vehicles
equipped with an air conditioner.
Start the engine, move the fan control dial to
the desired (1 to 4) position and push the
A/C button to turn on the air conditioner.
The indicator light comes on when the air
conditioner is operating. To stop the air
conditioner, push the switch again.
The air conditioner cooling function op-
erates only when the engine is running.
HEATER OPERATION
Heating
This mode is used to direct heated air to the
foot outlets. Some air also flows from the
defroster outlets.
1. Push the
button to the off position
for normal heating.
2. Push the
button in.3. Move the fan control dial to the desired
position.
4. Move the temperature control lever to the
desired position between the middle and
the HOT position.
Ventilation
This mode directs outside air to the side and
center ventilators.
1. Push the
button to the off position.
2. Push the
button in.
3. Move the fan control dial to the desired
position.
4. Move the temperature control lever to the
desired position.
Defrosting or defogging
This mode is used to defrost/defog the
windows.
1. Push the
button in.
2. Move the fan control dial to the desired
position.
3. Move the temperature control lever to the
desired position between the middle and
the HOT position.
4-4Heater, air conditioner and audio systems
ZX
Page 86 of 220

cTo quickly remove ice or fog from the
windows, turn on the fan control dial to 4
and the temperature control lever to the
full HOT position.
cWhen the
position is selected, the
air conditioner automatically turns on
(however, the indicator light will not illu-
minate). This dehumidifies the air which
helps defog the windshield. The air recir-
culation mode automatically turns off,
allowing outside air to be drawn into the
passenger compartment which helps de-
fog the windshield.
Bi-level heating/cooling
This mode directs air from the side, center
and foot outlets.
1. Push the
button to the off position.
2. Push the
button in.
3. Move the fan control dial to the desired
position.
4. Move the temperature control lever to the
desired position.
Heating and defogging
This mode heats the interior and defogs the
windshield.1. Push the
button in.
2. Move the fan control dial to the desired
position.
3. Move the temperature control lever to the
desired position between the middle and
the HOT position.
Operating tips
cClear snow and ice from the wiper
blades and air inlet in front of the
windshield. This improves heater op-
eration.
cWhen the
orswitch is selected,
the air recirculation mode automatically
turns off.
Outside air is drawn into the passenger
compartment to improve the defogging
performance.
AIR CONDITIONER OPERATION
(if so equipped)
Start the engine, move the fan control dial to
the desired (1 to 4) position and push in the
A/C button to activate the air conditioner.
When the air conditioner is on, cooling and
dehumidifying functions are added to the
heater operation.The air conditioner cooling function op-
erates only when the engine is running.
Cooling
This mode is used to cool and dehumidify
the air.
1. Push the
button to the off position.
2. Push the
button in.
3. Move the fan control dial to the desired
position.
4. Push on the air conditioner button. The
indicator light comes on.
5. Move the temperature control lever to the
desired position.
cFor quick cooling when the outside tem-
perature is high, push the
button to
the on position (Indicator light on). Be
sure to return the
button to the off
position for normal cooling.
Dehumidified heating
This mode is used to heat and dehumidify.
1. Push the
button to the off position.
2. Push the
button in.
Heater, air conditioner and audio systems
4-5
ZX