wheel NISSAN ALTIMA 2000 L30 / 2.G Owners Manual
[x] Cancel search | Manufacturer: NISSAN, Model Year: 2000, Model line: ALTIMA, Model: NISSAN ALTIMA 2000 L30 / 2.GPages: 242, PDF Size: 1.94 MB
Page 16 of 242

PRECAUTIONS ON SUPPLE-
MENTAL RESTRAINT SYSTEM
This Supplemental Restraint System (SRS)
section contains important information con-
cerning the driver and passenger supple-
mental front air bags, supplemental side air
bags and pre-tensioner seat belts.
Supplemental front air bag system:This
system can help cushion the impact force to
the face and chest of the driver and front
passenger in certain frontal collisions.
Supplemental side air bag system (if so
equipped):This system can help cushion
the impact force to the head and the chest
area of the driver and front passenger in
certain side impact collisions The supple-
mental side air bag is designed to inflate on
the side where the vehicle is impacted.
These supplemental restraint systems are
designed tosupplementthe crash protec-
tion provided by the driver and front passen-
ger seat belts and arenot a substitutefor
them. Seat belts should always be correctly
worn and the driver and front passenger
seated a suitable distance away from the
steering wheel, instrument panel and front
door finishers. (See ``Seat belts'' later in thissection for instructions and precautions on
seat belt usage.)
The supplemental air bags operate only
when the ignition switch is in the ON or
START position.
After turning the ignition key to the ON
position, the supplemental air bag warn-
ing light illuminates. The supplemental
air bag warning light will turn off after
about 7 seconds if the system is opera-
tional.
SUPPLEMENTAL RESTRAINT
SYSTEM
Seats, restraints and supplemental air bag systems1-9
ZX
Page 17 of 242
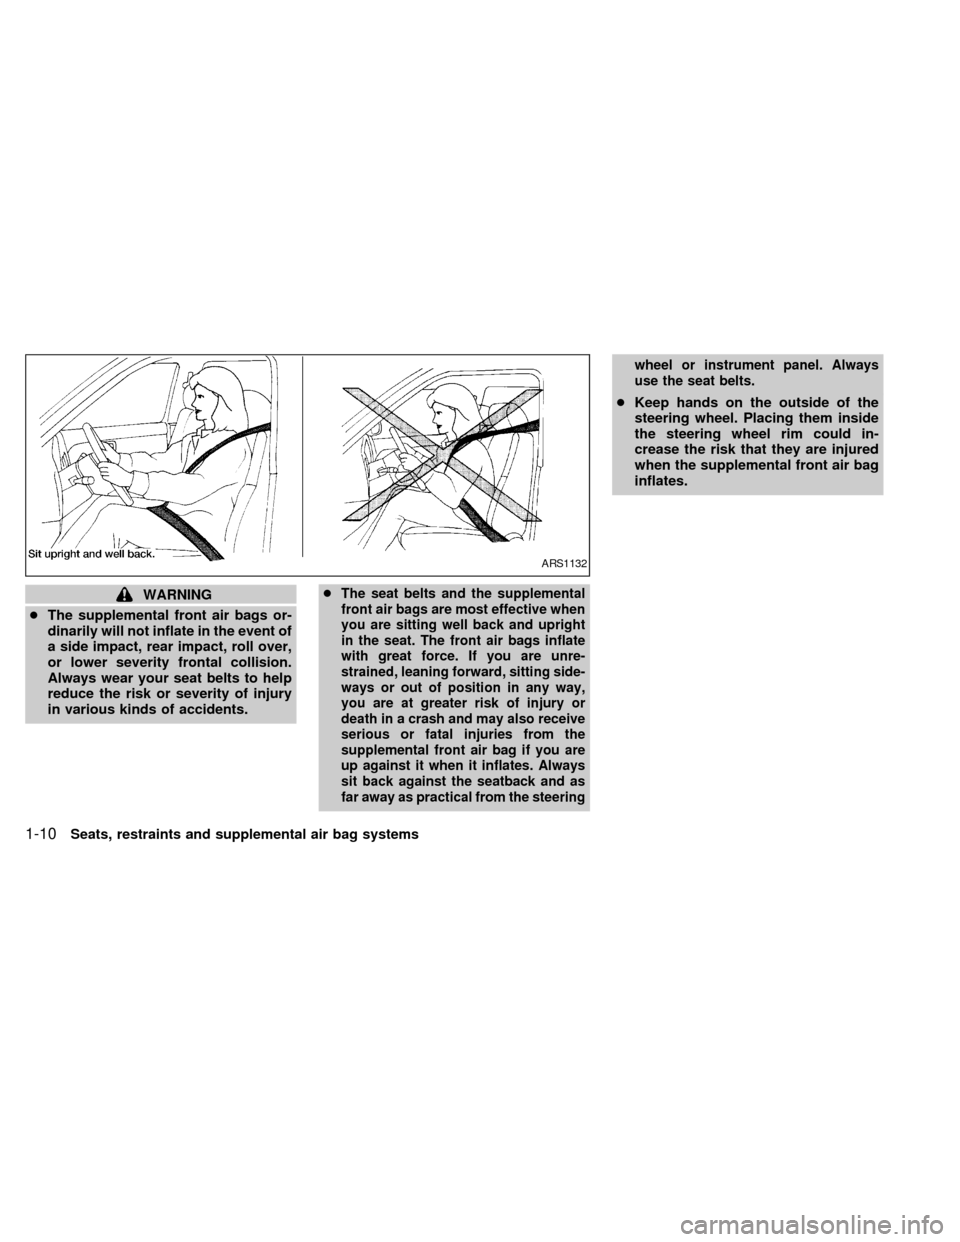
WARNING
cThe supplemental front air bags or-
dinarily will not inflate in the event of
a side impact, rear impact, roll over,
or lower severity frontal collision.
Always wear your seat belts to help
reduce the risk or severity of injury
in various kinds of accidents.cThe seat belts and the supplemental
front air bags are most effective when
you are sitting well back and upright
in the seat. The front air bags inflate
with great force. If you are unre-
strained, leaning forward, sitting side-
ways or out of position in any way,
you are at greater risk of injury or
death in a crash and may also receive
serious or fatal injuries from the
supplemental front air bag if you are
up against it when it inflates. Always
sit back against the seatback and as
far away as practical from the steeringwheel or instrument panel. Always
use the seat belts.
cKeep hands on the outside of the
steering wheel. Placing them inside
the steering wheel rim could in-
crease the risk that they are injured
when the supplemental front air bag
inflates.
ARS1132
1-10Seats, restraints and supplemental air bag systems
ZX
Page 21 of 242

Supplemental front air bag system
The driver supplemental front air bag is lo-
cated in the center of the steering wheel. The
passenger supplemental front air bag is
mounted in the dashboard above the glove
box.
These systems are designed to meet op-
tional certification requirements under U.S.
regulations. They are also permitted in
Canada. The optional certification allows
the front air bags to be designed to inflate
somewhat less forcefully than previously.
However, all of the information, cautions
and warnings in this manual still applyand must be followed.
The supplemental front air bag system is
designed to inflate in higher severity frontal
collisions, although it may inflate if the
forces in another type of collision are similar
to those of a higher severity frontal impact. It
may not inflate in certain frontal collisions.
Vehicle damage (or lack of it) is not always
an indication of proper supplemental front
air bag system operation.
When the supplemental front air bag in-
flates, a fairly loud noise may be heard,
followed by the release of smoke. This
smoke is not harmful and does not indicate
SSS0162WRS0003
1-14Seats, restraints and supplemental air bag systems
ZX
Page 22 of 242
a fire, but care should be taken to not
intentionally inhale it, as it may cause irrita-
tion and choking. Those with a history of a
breathing condition should get fresh air
promptly.
The supplemental front air bags, along with
the use of seat belts, help to cushion the
impact force on the face and chest of the
occupant. They can help save lives and
reduce serious injuries. However, an inflat-
ing supplemental front air bag may cause
facial abrasions or other injuries. Supple-
mental front air bags do not provide restraint
to the lower body.
Seat belts should be correctly worn and the
driver and passenger seated upright as far
as practical away from the steering wheel or
instrument panel. Since the supplemental
front air bags inflate quickly in order to help
protect the front occupants, the force of the
supplemental front air bag inflating can in-
crease the risk of injury if the occupant is too
close to or is against the supplemental front
air bag module during inflation.
The supplemental front air bags deflate
quickly after a collision.The supplemental front air bags operate
only when the ignition switch is in the
ON or START position.
After turning the ignition key to the ON
position, the supplemental air bag warn-
ing light illuminates. The supplemental
air bag warning light will turn off after
about 7 seconds if the system is opera-
tional.
WARNING
c
Do not place any objects on the steer-
ing wheel pad or on the instrument
panel. Also, do not place any objects
between any occupant and the steer-
ing wheel or instrument panel. Such
objects may become dangerous pro-
jectiles and cause injury if the supple-
mental front air bag inflates.
cRight after inflation, several supple-
mental front air bag system compo-
nents will be hot. Do not touch them;
you may severely burn yourself.c
No unauthorized changes should be
made to any components or wiring of
the supplemental front air bag sys-
tem. This is to prevent accidental in-
flation of the supplemental front air
bags or damage to the supplemental
front air bag system.
cDo not make unauthorized changes
to your vehicle's electrical system,
suspension system or front end
structure. This could affect proper
operation of the supplemental front
air bag system.
c
Tampering with the supplemental front
air bag system may result in serious
personal injury. Tampering includes
changes to the steering wheel and the
instrument panel assembly by placing
material over the steering wheel pad
and above the dashboard, or by install-
ing additional trim material around the
supplemental front air bag system.
Seats, restraints and supplemental air bag systems1-15
ZX
Page 66 of 242
cDo not use the switch while moving
on the highway unless unusual cir-
cumstances force you to drive so
slowly that your vehicle might be-
come a hazard to other traffic.
cTurn signals do not work when the
hazard warning flasher lights are on.
The flashers can be actuated with the igni-
tion switch either OFF or ON.
Some state laws may prohibit the use of
the hazard warning flasher switch while
driving.
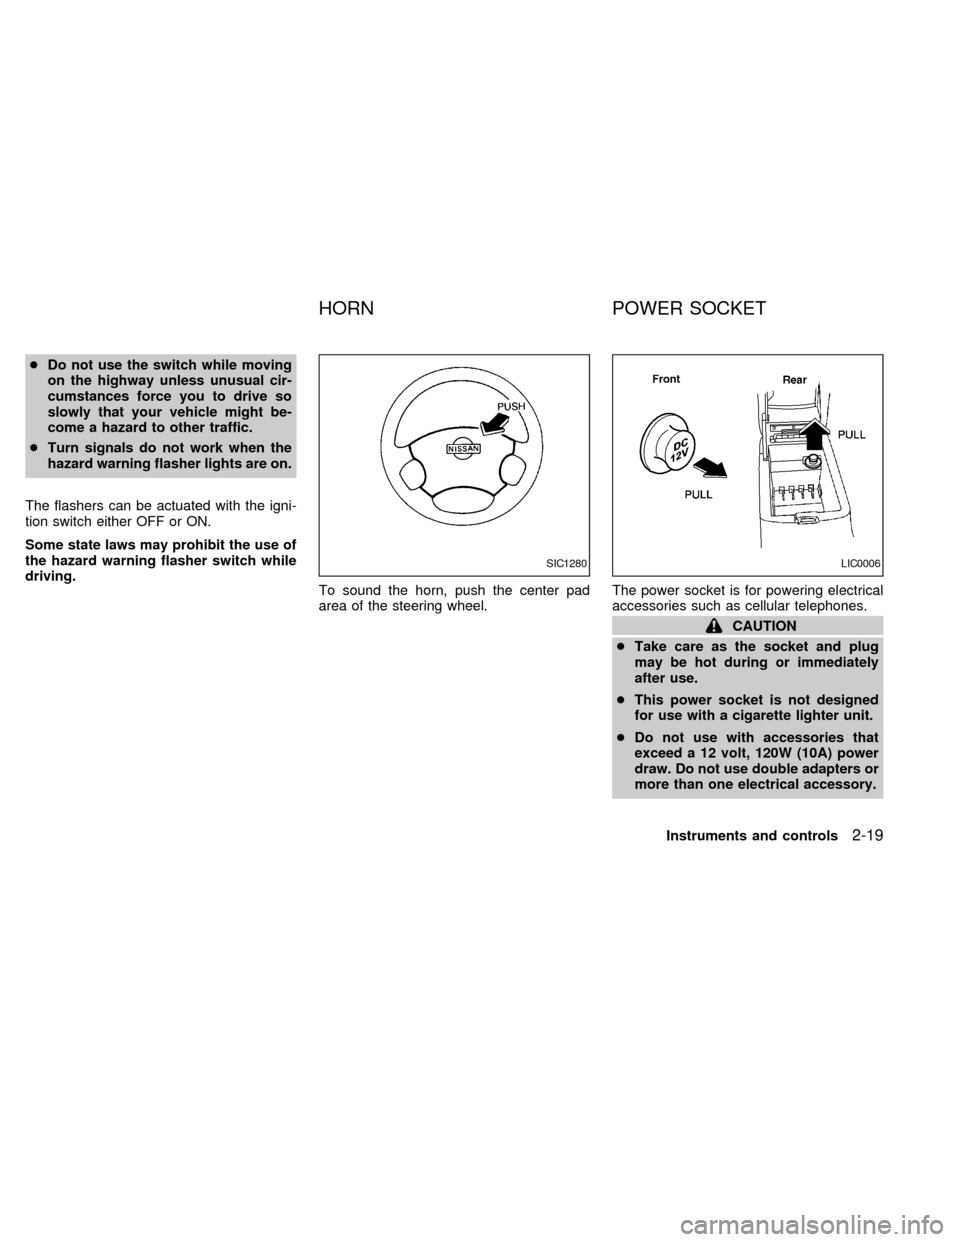
To sound the horn, push the center pad
area of the steering wheel.The power socket is for powering electrical
accessories such as cellular telephones.
CAUTION
cTake care as the socket and plug
may be hot during or immediately
after use.
cThis power socket is not designed
for use with a cigarette lighter unit.
cDo not use with accessories that
exceed a 12 volt, 120W (10A) power
draw. Do not use double adapters or
more than one electrical accessory.
SIC1280LIC0006
HORN POWER SOCKET
Instruments and controls2-19
ZX
Page 82 of 242

3 Pre-driving checks and adjustments
Keys .......................................................................3-2
Nissan vehicle immobilizer system (NVIS)
keys ........................................................................3-2
Doors ......................................................................3-2
Locking with key .....................................................3-3
Locking with inside lock knob ................................3-3
Locking with power door lock switch .....................3-4
Child safety rear door lock .....................................3-5
Multi-remote control system (if so equipped).........3-5
How to use multi-remote control system ...............3-5
Battery replacement ...............................................3-8
Hood .......................................................................3-9
Trunk lid................................................................3-10Opener operation .................................................3-10
Key operation .......................................................3-10
Fuel filler lid ..........................................................3-11
Opener operation .................................................3-11
Fuel filler cap ........................................................3-11
Steering wheel .....................................................3-13
Tilt operation.........................................................3-13
Sunvisors ..............................................................3-13
Vanity mirrors .......................................................3-13
Mirrors ..................................................................3-14
Inside mirror .........................................................3-14
Outside mirror remote control ..............................3-14
ZX
Page 94 of 242
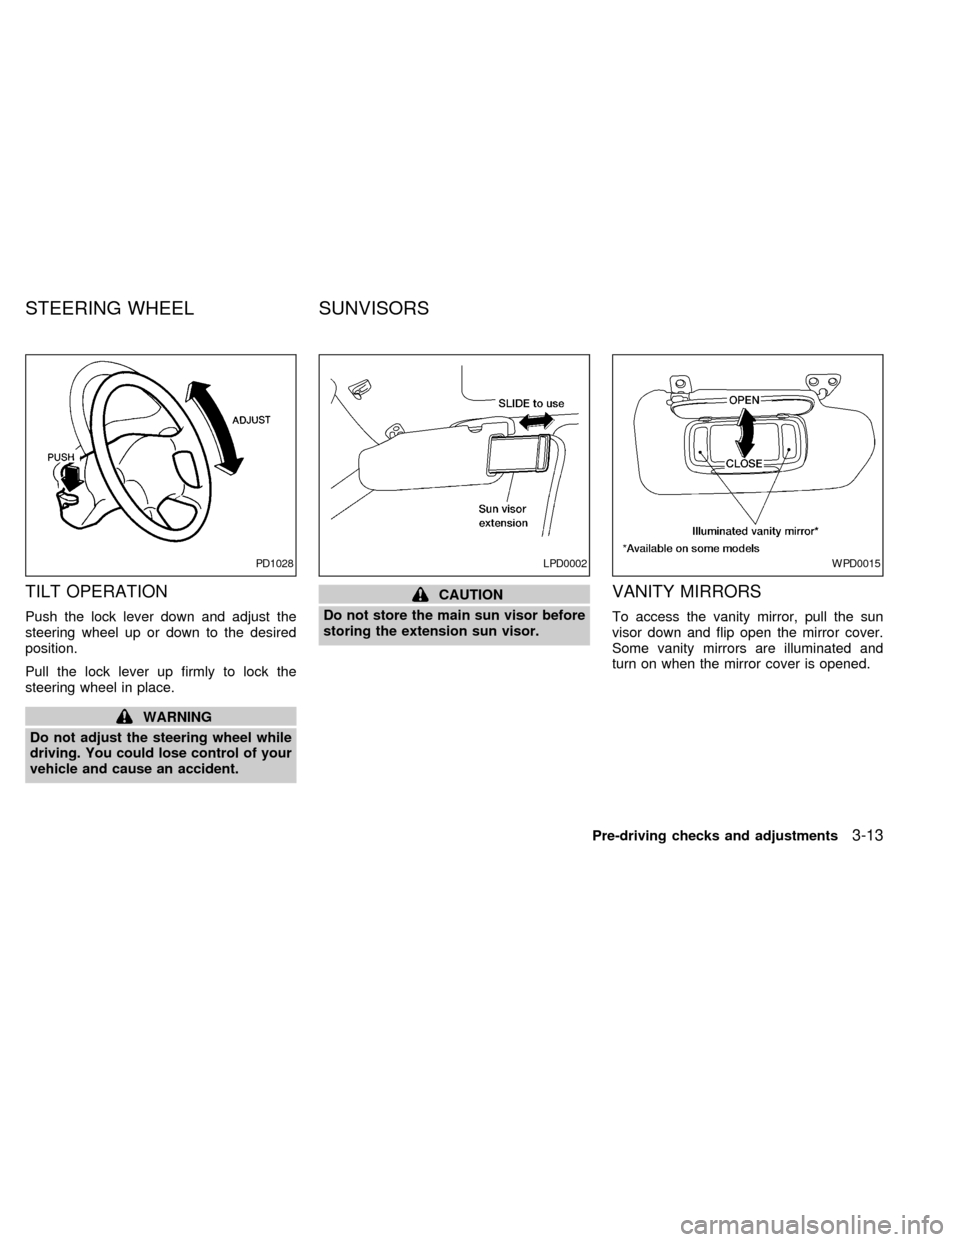
TILT OPERATION
Push the lock lever down and adjust the
steering wheel up or down to the desired
position.
Pull the lock lever up firmly to lock the
steering wheel in place.
WARNING
Do not adjust the steering wheel while
driving. You could lose control of your
vehicle and cause an accident.
CAUTION
Do not store the main sun visor before
storing the extension sun visor.VANITY MIRRORS
To access the vanity mirror, pull the sun
visor down and flip open the mirror cover.
Some vanity mirrors are illuminated and
turn on when the mirror cover is opened.
PD1028LPD0002WPD0015
STEERING WHEEL SUNVISORS
Pre-driving checks and adjustments3-13
ZX
Page 123 of 242

laws vary on what is considered to be
legally intoxicated, the fact is that alcohol
affects all people differently and most
people underestimate the effects of alcohol.
Remember, drinking and driving don't mix!
And that's true for drugs, too (over the
counter, prescription, and illegal drugs).
Don't drive if your ability to operate your
vehicle is impaired by alcohol, drugs, or
some other physical condition.
AUTOMATIC TRANSMISSION
On automatic transmission models the igni-
tion lock is designed so the key cannot be
turned to LOCK and removed until the shift
selector lever is moved to the P (Park)
position.
When removing the key from the ignition,
make sure the shift selector lever is in the P
(Park) position.
If the key cannot be turned to the LOCK
position, proceed as follows to remove the
key.1) Move the shift selector lever into the P
(Park) position.
2) Turn the ignition key slightly toward the
ON position.
3) Turn the key to the LOCK position.
4) Remove the key.
The shift lever is designed so it cannot be
moved out of P (Park) and into any of the
other gear positions if the ignition key is
turned to OFF or if the key is removed from
the switch.
The shift selector lever can be moved if
the ignition switch is in the ACC posi-
tion. This allows the vehicle to be moved
if the battery is discharged. The shift
selector lever can also be moved if the
ignition switch is in the ON position and
the foot brake pedal is depressed.
There is an OFF position between the
LOCK and ACC positions. The OFF posi-
tion is indicated by a ``1'' on the key
cylinder. When the ignition is in OFF, the
steering wheel is not locked.
In order for the steering wheel to be locked,
it must be turned about 1/8 of a turn clock-
wise from the straight up position.
ASD1014
IGNITION SWITCH
5-4Starting and driving
ZX
Page 124 of 242
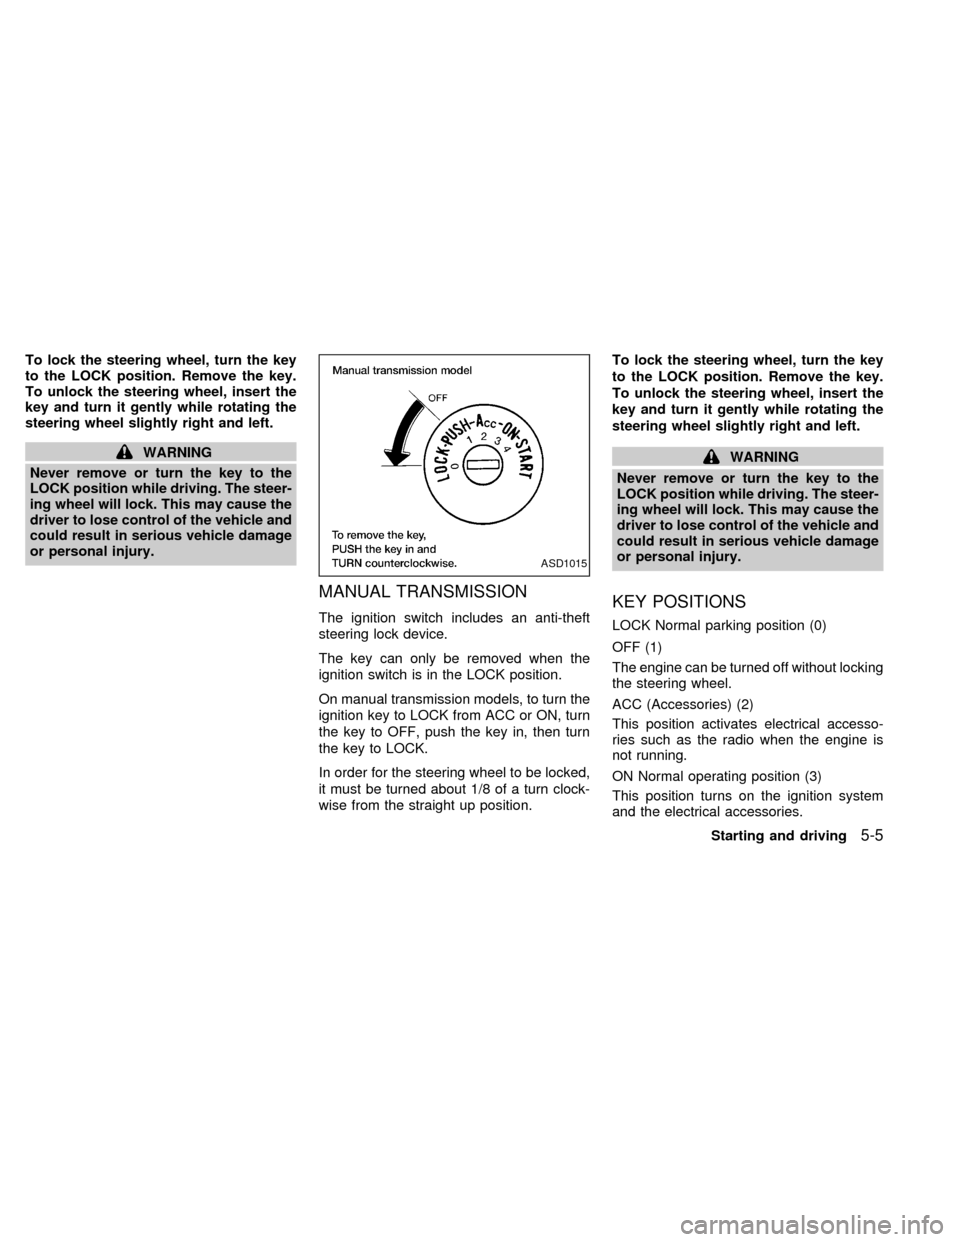
To lock the steering wheel, turn the key
to the LOCK position. Remove the key.
To unlock the steering wheel, insert the
key and turn it gently while rotating the
steering wheel slightly right and left.
WARNING
Never remove or turn the key to the
LOCK position while driving. The steer-
ing wheel will lock. This may cause the
driver to lose control of the vehicle and
could result in serious vehicle damage
or personal injury.
MANUAL TRANSMISSION
The ignition switch includes an anti-theft
steering lock device.
The key can only be removed when the
ignition switch is in the LOCK position.
On manual transmission models, to turn the
ignition key to LOCK from ACC or ON, turn
the key to OFF, push the key in, then turn
the key to LOCK.
In order for the steering wheel to be locked,
it must be turned about 1/8 of a turn clock-
wise from the straight up position.To lock the steering wheel, turn the key
to the LOCK position. Remove the key.
To unlock the steering wheel, insert the
key and turn it gently while rotating the
steering wheel slightly right and left.
WARNING
Never remove or turn the key to the
LOCK position while driving. The steer-
ing wheel will lock. This may cause the
driver to lose control of the vehicle and
could result in serious vehicle damage
or personal injury.
KEY POSITIONS
LOCK Normal parking position (0)
OFF (1)
The engine can be turned off without locking
the steering wheel.
ACC (Accessories) (2)
This position activates electrical accesso-
ries such as the radio when the engine is
not running.
ON Normal operating position (3)
This position turns on the ignition system
and the electrical accessories.
ASD1015
Starting and driving5-5
ZX
Page 133 of 242
PRECAUTIONS ON CRUISE
CONTROL
cIf the cruise control system malfunctions,
it cancels automatically. The SET indica-
tor light in the instrument panel then
blinks to warn the driver.
cIf the SET indicator light blinks, turn the
cruise control main switch off and have
the system checked by an authorized
NISSAN dealer.
cThe SET indicator light may blink when
the cruise control main switch is turned
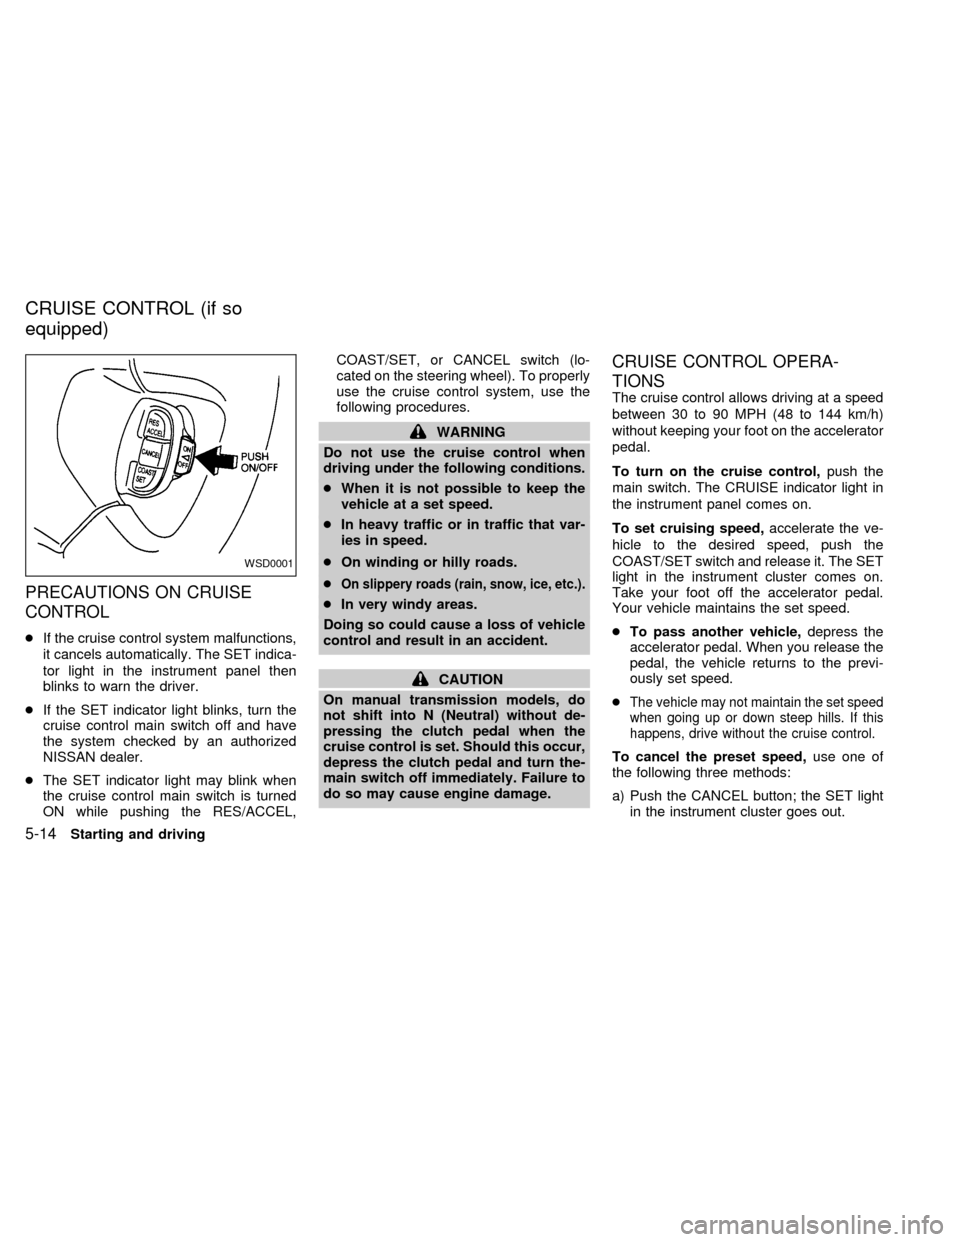
ON while pushing the RES/ACCEL,COAST/SET, or CANCEL switch (lo-
cated on the steering wheel). To properly
use the cruise control system, use the
following procedures.
WARNING
Do not use the cruise control when
driving under the following conditions.
cWhen it is not possible to keep the
vehicle at a set speed.
cIn heavy traffic or in traffic that var-
ies in speed.
cOn winding or hilly roads.
c
On slippery roads (rain, snow, ice, etc.).
cIn very windy areas.
Doing so could cause a loss of vehicle
control and result in an accident.
CAUTION
On manual transmission models, do
not shift into N (Neutral) without de-
pressing the clutch pedal when the
cruise control is set. Should this occur,
depress the clutch pedal and turn the-
main switch off immediately. Failure to
do so may cause engine damage.
CRUISE CONTROL OPERA-
TIONS
The cruise control allows driving at a speed
between 30 to 90 MPH (48 to 144 km/h)
without keeping your foot on the accelerator
pedal.
To turn on the cruise control,push the
main switch. The CRUISE indicator light in
the instrument panel comes on.
To set cruising speed,accelerate the ve-
hicle to the desired speed, push the
COAST/SET switch and release it. The SET
light in the instrument cluster comes on.
Take your foot off the accelerator pedal.
Your vehicle maintains the set speed.
cTo pass another vehicle,depress the
accelerator pedal. When you release the
pedal, the vehicle returns to the previ-
ously set speed.
c
The vehicle may not maintain the set speed
when going up or down steep hills. If this
happens, drive without the cruise control.
To cancel the preset speed,use one of
the following three methods:
a) Push the CANCEL button; the SET light
in the instrument cluster goes out.
WSD0001
CRUISE CONTROL (if so
equipped)
5-14Starting and driving
ZX