display NISSAN ALTIMA 2002 L31 / 3.G Owners Manual
[x] Cancel search | Manufacturer: NISSAN, Model Year: 2002, Model line: ALTIMA, Model: NISSAN ALTIMA 2002 L31 / 3.GPages: 249, PDF Size: 2.02 MB
Page 52 of 249
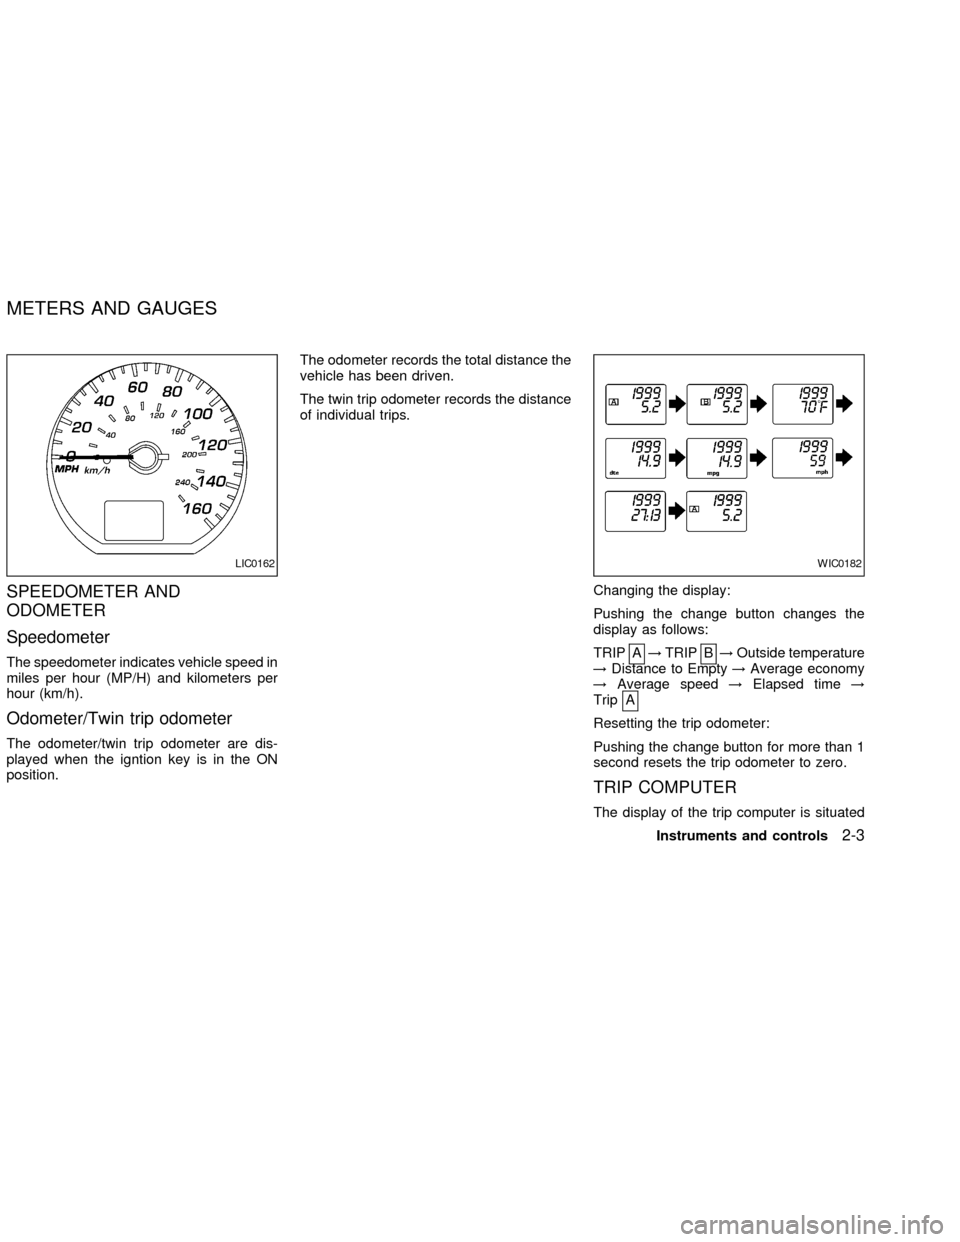
SPEEDOMETER AND
ODOMETER
Speedometer
The speedometer indicates vehicle speed in
miles per hour (MP/H) and kilometers per
hour (km/h).
Odometer/Twin trip odometer
The odometer/twin trip odometer are dis-
played when the igntion key is in the ON
position.The odometer records the total distance the
vehicle has been driven.
The twin trip odometer records the distance
of individual trips.
Changing the display:
Pushing the change button changes the
display as follows:
TRIP A
!TRIP B!Outside temperature
!Distance to Empty!Average economy
!Average speed!Elapsed time!
Trip A
Resetting the trip odometer:
Pushing the change button for more than 1
second resets the trip odometer to zero.
TRIP COMPUTER
The display of the trip computer is situated
LIC0162WIC0182
METERS AND GAUGES
Instruments and controls2-3
ZX
Page 53 of 249

in the speedometer display. When the igni-
tion is turned to ON, the display scrolls all
the modes of the trip computer and then
shows the mode chosen before the ignition
switch is turned OFF.
If the battery terminal is disconnected,
push the trip computer mode switch
more than 1 second to activate the com-
puter.
When the ignition switch is turned to ON,
modes of the trip computer can be selected
by pushing the trip mode switch on the
steering wheel switch for audio controls or
by the trip computer change button. The
following modes can be selected:
Outside air temperature (ICY±ÉF or
ÉC)
The outside air temperature is displayed in
ÉF or ÉC.
The outside air temperature mode includes
a low temperature warning feature: below
37ÉF (3ÉC), the outside air temperaturemode is automatically selected and ICY will
illuminate in order to draw the driver's atten-
tion. Press the mode switch if you wish to
return to the mode that was selected before
the warning occurred. The ICY indicator will
continue blinking as long as the tempera-
ture remains below 39ÉF (4ÉC).
The ambient temperature sensor is located
in front of the radiator. The sensor may be
affected by road or engine heat, wind direc-
tions and other driving conditions. The dis-
play may differ from the actual ambient
temperature or the temperature displayed
on various signs or billboards.
Distance to empty (dte±mile or km)
The distance to empty (dte) mode provides
you with an estimation of the distance that
can be driven before refueling. The dte is
constantly being calculated, based on the
amount of fuel in the fuel tank and the actual
fuel consumption.
The display is updated every 30 seconds.
The dte mode inlcudes a low range warning
feature: when the fuel level is low, the dte
mode is automatically selected and the dig-
its blink in order to draw the driver's atten-
tion. Press the mode switch if you wish to
WIC0159
2-4Instruments and controls
ZX
Page 54 of 249

return to the mode that was selected before
the warning occurred. The dte mark (dte)
will remain blinking until the vehicle is refu-
elled.
When the fuel level drops even lower, the
dte display will change to (----).
NOTE:
cIf the amount of fuel added while the
ignition switch is OFF is small, the
display just before the ignition switch
is turned OFF may continue to be
displayed.
cWhen driving uphill or rounding
curves, the fuel in the tank shifts,
which may momentairly change the
display.
Average fuel consumption
(Mpg or l/100km)
The Average fuel consumption mode shows
the average fuel consumption since the last
reset. Resetting is done by pressing the
mode switch for more than approximately 1
second. The display is updated every 30
seconds. At about the first 1/3 miles (500 m)
after a reset, the display shows (----).
Average speed (MPH or km/h)
The average speed mode shows the aver-
age vehicle speed since last reset. Reset-
ting is done by pressing the mode switch for
more than approximately 1 minute. The
display is updated every 30 seconds. The
first 30 seconds after a reset, the display
shows (----).
Journey time
The journey time mode shows the time
since the last reset. The displayed time can
be reset by pressing the mode switch for
more than approximately 1 second.
NOTE:
If a low temperature warning and low
range warning occur simultaneously,
other display modes switch automati-
cally to the outside temperature display.
When the mode switch is pushed, the
display switches to the mode chosen
before the warning display, and the out-
side air temperature indicator marked
ICY will blink.
WIC0187
Instruments and controls2-5
ZX
Page 112 of 249
WARNING
cThe air conditioner cooling function
operates only when the engine is
running.cDo not leave children, impaired
adults, or pets alone in your vehicle.
On hot, sunny days, temperatures in
a closed vehicle could quickly be-
come high enough to cause severe orpossibly fatal injuries to people or
animals.
cDo not use the recirculation mode
for long periods as it may cause the
interior air to become stale and the
windows to fog up.
cPositioning of the heating or air con-
ditioning controls should not be
done while driving, so full attention
may be given to vehicle operation.
Start the engine and operate the controls to
activate the air conditioner.
AUTOMATIC OPERATION
Cooling and/or dehumidified heat-
ing (AUTO)
This mode may be normally used all year
round as the system automatically works to
keep a constant temperature. Air flow distri-
bution and fan speed are also controlled
automatically.
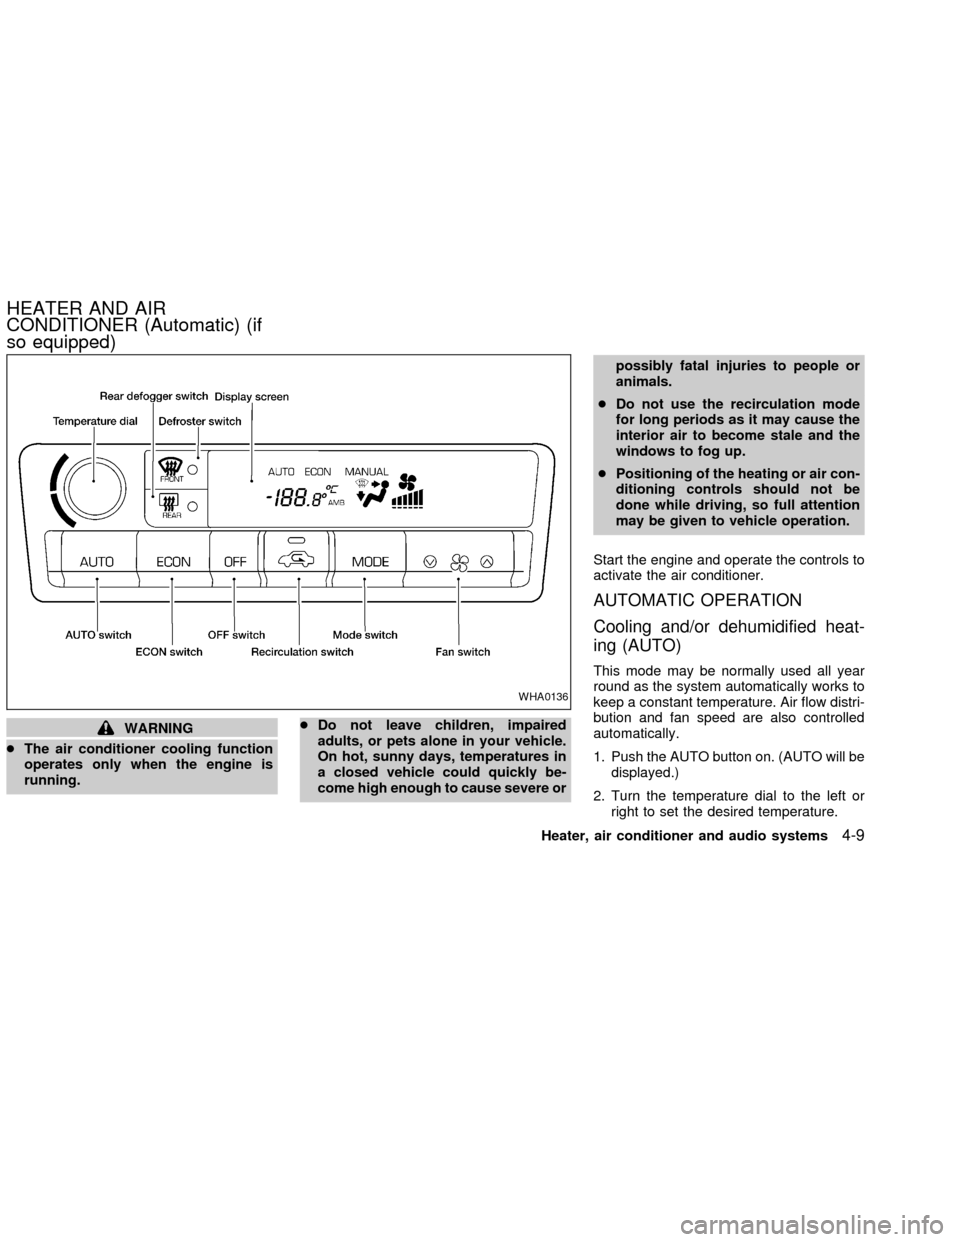
1. Push the AUTO button on. (AUTO will be
displayed.)
2. Turn the temperature dial to the left or
right to set the desired temperature.
WHA0136
HEATER AND AIR
CONDITIONER (Automatic) (if
so equipped)
Heater, air conditioner and audio systems4-9
ZX
Page 113 of 249

cAdjust the temperature dial to about 75ÉF
(24ÉC) for normal operation.
cThe temperature of the passenger com-
partment will be maintained automati-
cally. Air flow distribution and fan speed
are also controlled automatically.
Heating (ECON)
The air conditioner does not activate. When
you need to heat only, use this mode.
1. Push the ECON (Economy) button on.
(ECON will be displayed.)
2. Turn the temperature dial to the left or
right to set the desired temperature.
cThe temperature of the passenger com-
partment will be maintained automati-
cally. Air flow distribution and fan speed
are also controlled automatically.
cDo not set the temperature lower than
the outside air temperature. Otherwise
the system may not work properly.
cNot recommended if windows fog up.
Dehumidified defogging
1. Push the DEF buttonon. The in-
dicator light on the button will come on.2. Turn the temperature dial to the left or
right to set the desired temperature.
cTo quickly remove ice from the outside of
the windows, push the manual fan con-
trol button
and set to the maxi-
mum position
.
cAs soon as possible after the windshield
is clean, push the AUTO button to return
to the auto mode.
cWhen the DEF button
is pushed,
the air conditioner will automatically be
turned on at outside temperatures above
23ÉF (þ5ÉC) to defog the windshield, and
the air recirculate mode will automatically
be turned off.
Outside air is drawn into the passenger
compartment to improve the defogging
performance.
MANUAL OPERATION
Fan speed control
Push the fan control buttonto manu-
ally control the fan speed.
Push the AUTO button to return to auto-
matic control of the fan speed.
Air recirculation
Push the air recirculation buttonto
recirculate interior air inside the vehicle. The
indicator light on the switch will come on.
Push it again to make the air inlet controlled
automatically (FRESH, REC/FRE and RE-
CIRCULATION). The indicator will go out.
The air recirculation button will not be acti-
vated when the air conditioner is in DEF
mode.
Air flow control
Pushing the manual air flow control button
selects the air outlet to:
: Air flows from center and side ventila-
tors.
: Air flows from center and side ventila-
tors and foot outlets.
: Air flows mainly from foot outlets.
: Air flow from defroster and foot out-
lets.
To turn system off
Push the OFF button.
4-10Heater, air conditioner and audio systems
ZX
Page 118 of 249

1. PRESET ABC button
2. MIX button
3. CD select button
4. Display
5. FM band select button
6. AM band select button
7. CD eject button
8. TRAVEL button
9. TUNE FF-REV button
10. CLOCK button or MENU/CLOCK button
for radios with SCV
11. Priority scan button
12. AUDIO button
13. SCAN button
14. Station select buttons
15. POWER/VOL control knob
16. CD insert slot
17. SEEK/TRACK button
LHA0115
Heater, air conditioner and audio systems4-15
ZX
Page 119 of 249

FM-AM RADIO WITH COMPACT
DISC (CD) PLAYER
ONzOFF/VOL control
Turn the ignition key to the ACC or ON
position, then push the PWR control knob. If
you listen to the radio with the engine not
running, turn the key to the ACC position.
The mode (radio or CD) that was playing
immediately before the system was turned
off resumes playing.
When no CD is loaded, the radio comes on.
Pushing the PWR control knob again turns
the system off.
Turn the PWR control knob to the right to
increase volume or to the left to decrease
volume.
Adjusting tone quality and speaker bal-
ance
Press the AUDIO button to enter the audio
adjust mode:
Bass!Mid!Treb!Fade!Bal
Press the TUNE/FF-REV (
or)or
SEEK/TRACK (or) to adjust to the
desired levels. The display will return to the
regular radio display after 7 seconds, or youmay press the AUDIO button again to return
to the regular radio display.
Clock operation
Pressing the MENU or CLOCK button dis-
plays the clock with the radio on or off.
Press the MENU or CLOCK button again to
turn off the clock display.
Clock set
1. Press and hold the MENU or CLOCK
button until it beeps (>2 seconds).
2. The hours will start flashing. Press
TUNE/FF-REV (
or)or
SEEK/TRACK (or) to adjust the
hours.
3. Press the MENU or CLOCK button to
switch to the minute adjustment.
4. Press TUNE/FF-REV (
or)or
SEEK/TRACK (or) to adjust
the minutes.
5. Press the MENU or CLOCK button again
to exit the clock set mode.
The display will return to the regular clock
display after 7 seconds, or you may press
the MENU or CLOCK button again to return
to the regular clock display.
FM-AM radio operation
FM-AM band select
Push the AM or the FM button to change
from AM to FM reception.
The FM stereo indicator, ST, illuminates
during FM stereo reception. When the ste-
reo broadcast signal is weak, the radio
automatically changes from stereo to mon-
aural reception.
Station signal strength, distance from radio
transmitter, buildings, bridges, mountains,
and other external influences affect radio
reception. Intermittent changes in reception
quality normally are caused by these exter-
nal influences.
Using a cellular phone in or near the
vehicle may influence radio reception
quality.
4-16Heater, air conditioner and audio systems
ZX
Page 120 of 249
TUNE/FF-REV
WARNING
The radio should not be tuned while
driving so full attention may be given to
vehicle operation.
Use the
orbuttons for manual tun-
ing. To move quickly through the channels,
hold the tuning buttons down.
SEEK tuning
Push SEEK/TRACK (or). SEEK
tuning begins from low to high frequencies or
high to low frequencies, depending on which
button is pressed, and stops at the next
broadcasting station. If using the up button,
once the highest broadcasting station is
reached, the radio continues in the SEEK
mode at the lowest broadcasting station. If
using the down button, once the lowest
broadcasting station is reached, the radio
continues in the SEEK mode at the highest
broadcasting station.
SCAN tuning
Push the SCAN button. SCAN illuminates in
the display window. Scan tuning begins
from low to high frequencies or from high to
low frequencies. Scan tuning stops at each
broadcasting station that has sufficient sig-
nal strength for 5 seconds. When scanning,
SCAN blinks in the display. Pushing the
SCAN button again during this 5 second
period stops Scan tuning and the radio
remains tuned to that station.
Station memory operation þ Travel Pre-
set is OFF
Each preset mode (A, B or C) has 6 presets,
capable of storing any combination of AM,
FM and FM RDS stations.
Press the PRESET ABC button to change
between the presets:
A!B!C
The radio displays icon A, B or C to indicate
which set of presets is active.
To store a radio station in a preset:
1. Select the desired preset by pressing
PRESET ABC.
2. Tune to the desired station.3. Press the desired station select button
(>2 seconds.)
4. A beep will sound indicating memoriza-
tion is complete.
5. Other station select buttons can be set in
the same manner.
If the battery cable is disconnected, or if the
radio fuse opens, the radio memory is can-
celled. In that case, reset the desired sta-
tions.
Turning ON Travel Preset
1. Press the TRAVEL preset button (<1.5
seconds). The TRAVEL icon shows in
the display.
2. The radio selects the strongest stations
in the area and stores them in Travel
Presets A, B and C. 12 FM stations and
6 AM stations are the default settings. To
change the default settings, see ªEditing
Travel Presetº later in this section.
3. When finished storing radio stations, the
radio tunes to the first stored preset of
Travel Preset A.
4. If the radio cannot find any stations, the
Heater, air conditioner and audio systems
4-17
ZX
Page 121 of 249
radio displaysªNO STATIONºand
mutes the audio.
5. If the radio cannot fill all the presets, the
remaining presets are stored with 87.9
for FM, and 600 for AM.
The TUNE, SCAN, SEEK and preset
memory functions are available while Travel
Preset mode is on.
Canceling Travel Preset
Press the TRAVEL preset button (<1.5 sec-
onds) to clear the Travel Preset memory.
This turns off the Travel icon. The radio
returns to the last used preset of A, B or C in
the permanent preset memory.
Storing Travel Preset stations in perma-
nent memory
1. While in Travel Preset mode, press and
hold the TRAVEL preset button until it
beeps (>3 seconds).
2. The presets are transferred from Travel
Preset memory to the permanent preset
memory for A, B, and C.ªLOADºis
displayed.
3. The TRAVEL preset indicator turns off.Preset Scan
Pressing the Preset Scan button (<1.5 sec-
onds) scans the permanent preset memory
that is selected (A, B or C) from 1-6 for 5
seconds. If the Travel Preset is ON, the
travel preset that is selected (A, B, or C)
from 1-6 is scanned for 5 seconds.
All Preset Scan
Pressing the Preset Scan button (>1.5 sec-
onds) scans all the permanent preset
memory banks (A, B or C) from 1-6 for 5
seconds. If the Travel Preset is ON, all the
travel preset memory banks (A, B, or C)
from 1-6 are scanned for 5 seconds.
Canceling preset scan mode
Pressing any button except CLOCK,
EJECT, MIX and CD cancels the Preset
Scan mode.
Speed Sensitive Control Volume (SCV)
(if so equipped)
Your vehicle has Speed Sensitive Control
Volume (SCV) for audio. The audio volume
changes as the driving speed changes.
Press and hold the MENU button (>2 sec-
onds) until the radio beeps to start the
editing mode. Press the MENU button untilthe display showsªSCVº. This display will
last 2 seconds and then change toªOFFº.
Press TUNE/FF-REV (
or)to
change between:
Off!Low!Mid!High
Compact disc (CD) operation
Turn the ignition key to the ACC or ON
position.
CAUTION
cDo not force a compact disc (CD)
into the CD insert slot. This could
damage the CD and/or CD changer.
cTrying to load a CD with the CD door
closed could damage the CD and/or
CD changer.
CD button
When the CD button is pressed with a
compact disc loaded and the radio playing,
the radio turns off and the last used com-
pact disc starts to play.
FF (fast forward) REW
(rewind) buttons
When the TUNE/FF-REV (
or) but-
ton is pressed while the compact disc is
4-18Heater, air conditioner and audio systems
ZX
Page 122 of 249
playing, the compact disc plays at an in-
creased speed while fast forwarding or re-
winding. When the button is released, the
CD returns to normal play speed.
SEEK/TRACK buttons
When
is pressed while the compact
disc is playing, the selection following the
present one starts to play from the begin-
ning. Press
several times to skip sev-
eral selections. Each time the button is
pressed, the CD advances one additional
selection. The track number appears in the
display window. (When the last selection on
the compact disc is skipped, the first selec-
tion is played.)
When
is pressed, the selection being
played returns to the beginning. Press
several times to skip back several
selections. Each time the button is pressed,
the CD moves back one selection. If the
play pattern is in MIX mode when the button
is pressed, the next random selection will be
played.MIX
Press the MIX button to change CD play
patterns:
Repeat!Mix!Normal Play
Repeat
Press the MIX button (<1.5 seconds) once
to repeat the current track. The ª1º icon is
turned on.
Mix
Press the MIX button (<1.5 seconds) again
to start shuffle play of the current disc. The
ªMIXº icon is turned on.
Normal Play
Press the MIX button (<1.5 seconds) again
to return to normal play mode. The ªMIXº
icon is turned off.
CD Scan
Press the SCAN button (<1.5 seconds) to
scan all tracks of the current disc for 7
seconds per track. The SCAN icon is
flashed during Scan mode.
The Scan mode is cancelled once it scans
through all tracks on the disc, or if the SCAN
button is pressed during Scan mode.
Eject CD
1. Press the
button.
2. The disc ejects. Remove the disc. (If the
disc is not removed within 15 seconds,
the disc will reload.)
3. The indicator and symbol for the disc are
turned off.
Heater, air conditioner and audio systems
4-19
ZX