CD player NISSAN ALTIMA 2005 L31 / 3.G Owners Manual
[x] Cancel search | Manufacturer: NISSAN, Model Year: 2005, Model line: ALTIMA, Model: NISSAN ALTIMA 2005 L31 / 3.GPages: 304, PDF Size: 4.91 MB
Page 103 of 304
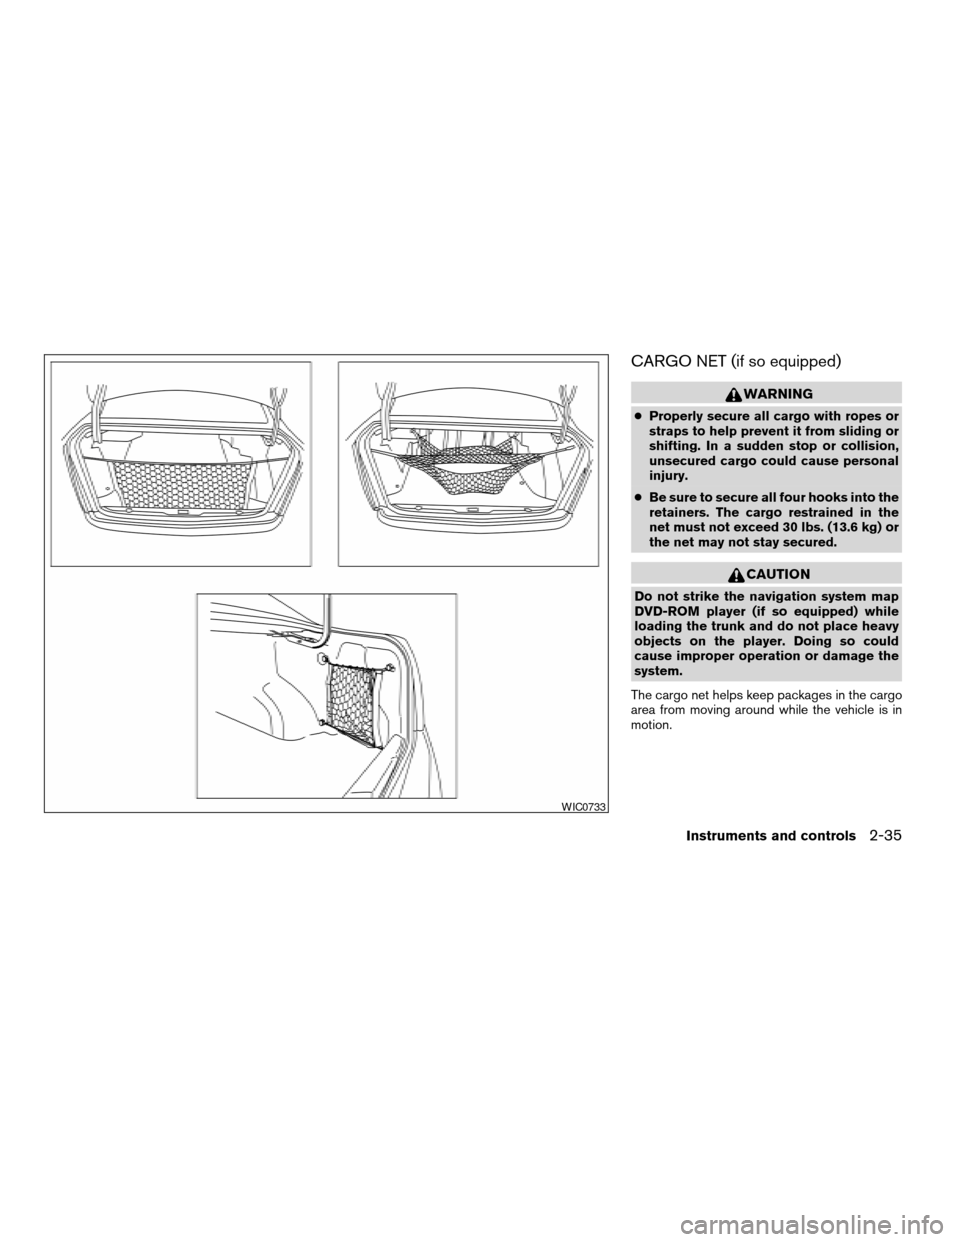
CARGO NET (if so equipped)
WARNING
cProperly secure all cargo with ropes or
straps to help prevent it from sliding or
shifting. In a sudden stop or collision,
unsecured cargo could cause personal
injury.
c Be sure to secure all four hooks into the
retainers. The cargo restrained in the
net must not exceed 30 lbs. (13.6 kg) or
the net may not stay secured.
CAUTION
Do not strike the navigation system map
DVD-ROM player (if so equipped) while
loading the trunk and do not place heavy
objects on the player. Doing so could
cause improper operation or damage the
system.
The cargo net helps keep packages in the cargo
area from moving around while the vehicle is in
motion.
WIC0733
Instruments and controls2-35
ZREVIEW COPYÐ2005 Altima (l30)
Owners ManualÐUSA_English (nna)
06/28/04Ðtbrooks
X
Page 129 of 304
4 Display screen, heater, air conditioner
and audio systems
Control panel buttons — with navigation system.......4-2
Names of the components .......................4-3
How to use joystick and “ENTER” button ..........4-3
How to use “PREV” button ......................4-3
Setting up the start-up screen ...................4-3
How to use the “TRIP” button ....................4-4
How to use the “SETTING” button ................4-6
button.................................. 4-10
Ventilators ....................................... 4-11
Heater and air conditioner (manual) .................4-12
Controls ...................................... 4-13
Heater operation .............................. 4-14
Air conditioner operation (if so equipped) ........4-15
Airflow charts ................................. 4-16
Heater and air conditioner (automatic)
(if so equipped) .................................. 4-20
Automatic operation ........................... 4-20
Manual operation .............................. 4-21Operating tips
................................. 4-22
Servicing air conditioner ........................... 4-22
Audio system .................................... 4-23
Radio ........................................ 4-23
FM radio reception ............................ 4-23
AM radio reception ............................ 4-23
Satellite radio reception (if so equipped) .........4-23
Audio operation precautions ....................4-24
FM-AM radio with compact disc (CD) player
(if so equipped) ............................... 4-27
FM-AM SAT radio with compact disc (CD)
changer (if so equipped) .......................4-31
FM-AM-SAT radio with compact disc (CD)
changer (if so equipped) .......................4-37
CD care and cleaning .......................... 4-42
Steering wheel switch for audio control
(if so equipped) ............................... 4-42
Antenna ...................................... 4-43
Car phone or CB radio ............................ 4-43
ZREVIEW COPYÐ2005 Altima(l30)
Owners ManualÐUSA_English (nna)
07/09/04Ðdebbie
X
Page 152 of 304
the vehicle outside of any metal or large building
for satellite radio to receive all of the necessary
data.
No satellite radio reception is available and “NO
SAT” is displayed when the SAT band option is
selected unless optional satellite receiver and
antenna are installed and an XMTor SIRIUS™
satellite radio service subscription is active.
Satellite radio performance may be affected if
cargo carried on the roof blocks the satellite radio
signal.
If possible, do not put cargo over the satellite
antenna.
AUDIO OPERATION PRECAUTIONS
Compact disc (CD) player
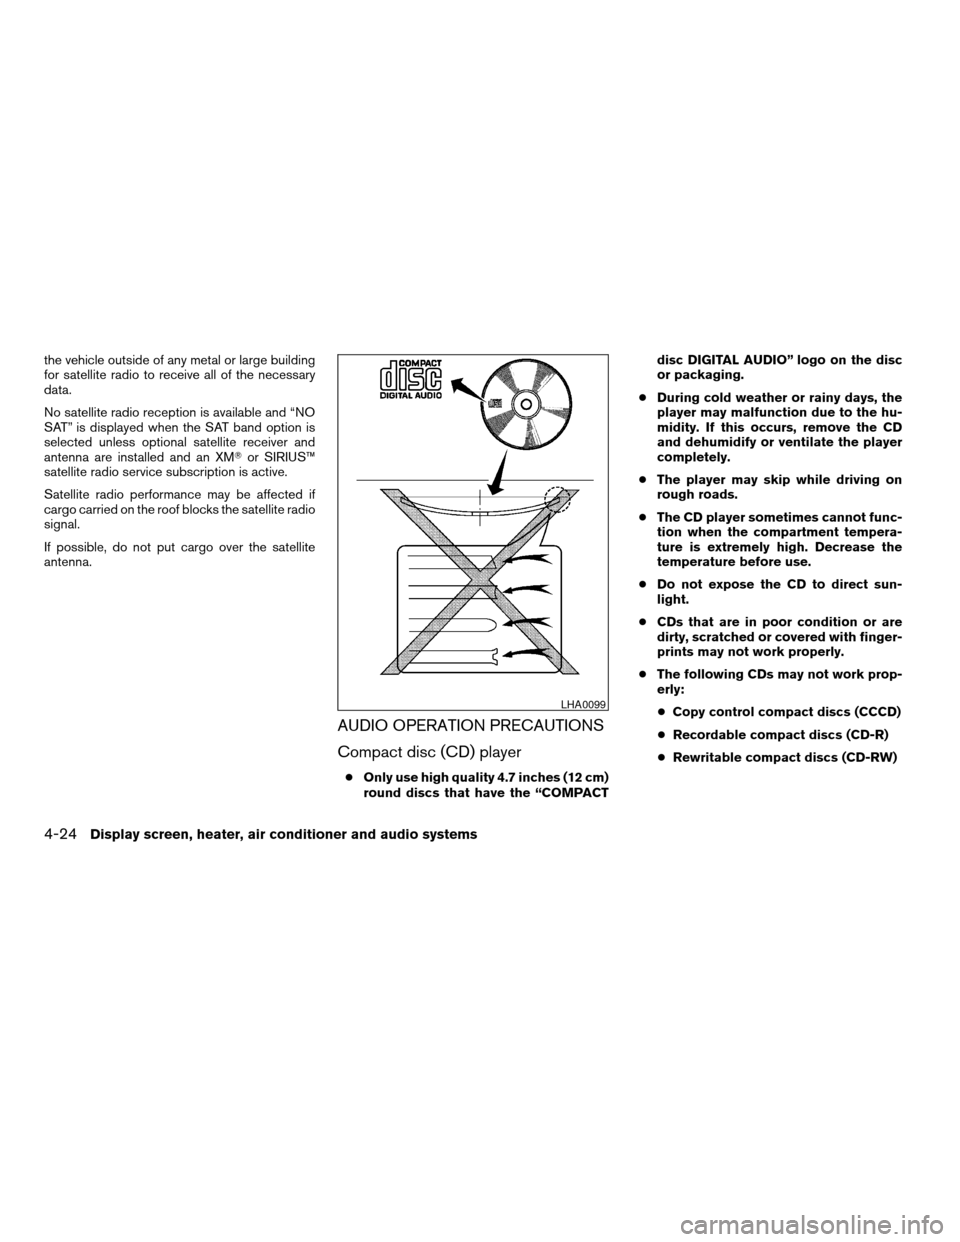
c Only use high quality 4.7 inches (12 cm)
round discs that have the “COMPACT disc DIGITAL AUDIO” logo on the disc
or packaging.
c During cold weather or rainy days, the
player may malfunction due to the hu-
midity. If this occurs, remove the CD
and dehumidify or ventilate the player
completely.
c The player may skip while driving on
rough roads.
c The CD player sometimes cannot func-
tion when the compartment tempera-
ture is extremely high. Decrease the
temperature before use.
c Do not expose the CD to direct sun-
light.
c CDs that are in poor condition or are
dirty, scratched or covered with finger-
prints may not work properly.
c The following CDs may not work prop-
erly:
c Copy control compact discs (CCCD)
c Recordable compact discs (CD-R)
c Rewritable compact discs (CD-RW)
LHA0099
4-24Display screen, heater, air conditioner and audio systems
ZREVIEW COPYÐ2005 Altima (l30)
Owners ManualÐUSA_English (nna)
06/28/04Ðtbrooks
X
Page 153 of 304
cDo not use the following CDs as they
may cause the CD player to malfunc-
tion:
c 3.1 in (8 cm) discs with an adapter
c CDs that are not round
c CDs with a paper label
c CDs that are warped, scratched, or
have abnormal edges
Display screen, heater, air conditioner and audio systems4-25
ZREVIEW COPYÐ2005 Altima (l30)
Owners ManualÐUSA_English (nna)
06/28/04Ðtbrooks
X
Page 155 of 304
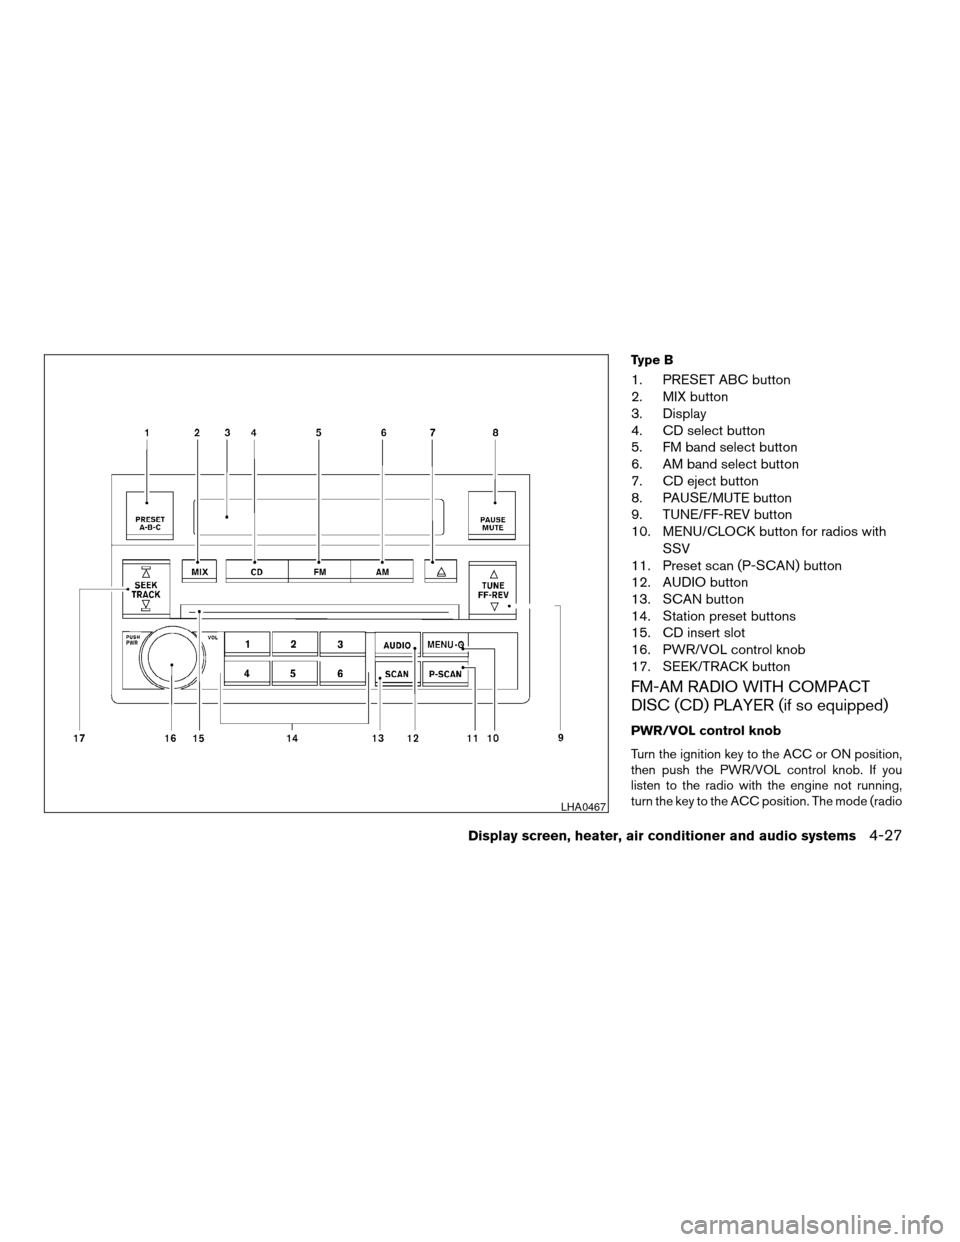
Type B
1. PRESET ABC button
2. MIX button
3. Display
4. CD select button
5. FM band select button
6. AM band select button
7. CD eject button
8. PAUSE/MUTE button
9. TUNE/FF-REV button
10. MENU/CLOCK button for radios withSSV
11. Preset scan (P-SCAN) button
12. AUDIO button
13. SCAN button
14. Station preset buttons
15. CD insert slot
16. PWR/VOL control knob
17. SEEK/TRACK button
FM-AM RADIO WITH COMPACT
DISC (CD) PLAYER (if so equipped)
PWR/VOL control knob
Turn the ignition key to the ACC or ON position,
then push the PWR/VOL control knob. If you
listen to the radio with the engine not running,
turn the key to the ACC position. The mode (radio
LHA0467
Display screen, heater, air conditioner and audio systems4-27
ZREVIEW COPYÐ2005 Altima (l30)
Owners ManualÐUSA_English (nna)
06/28/04Ðtbrooks
X
Page 157 of 304
blinks in the display. Pushing the SCAN button
again during this 5 second period stops SCAN
tuning and the radio remains tuned to that station.
Station memory operation
Each preset mode (A, B or C) has 6 presets,
capable of storing any combination of AM, FM,
SAT (if so equipped ) and FM RDS stations.
Press the PRESET ABC button to change be-
tween the presets:
A! B! C
The radio displays icon A, B or C to indicate
which set of presets is active.
To store a radio station in a preset: 1. Select the desired preset by pressing PRE- SET ABC.
2. Select the desired AM, FM or SAT (if so equipped) station band.
3. Tune to the desired station.
4. Press the desired station select button (>1.5 seconds) .
5. A beep will sound indicating memorization is complete.
6. Other station select buttons can be set in the same manner. If the battery cable is disconnected, or if the radio
fuse opens, the radio memory is canceled. In that
case, reset the desired stations.
Preset Scan
Pressing the Preset Scan button (<1.5 seconds)
scans the permanent preset memory that is se-
lected (A, B or C) fro
m1-6for5seconds.
All Preset Scan
Pressing the Preset Scan button (>1.5 seconds)
scans all the permanent preset memory banks (A,
BorC)from1-6for5 seconds.
Canceling Preset Scan mode
Pressing the Preset Scan (P.SCAN) button again
will cancel the Preset Scan mode.
Speed Sensitive Control Volume (SSV) (if
so equipped)
Your vehicle has Speed Sensitive Control Vol-
ume (SSV) for audio. The audio volume changes
as the driving speed changes.
Press and hold the MENU button (>2 seconds)
until the radio beeps to start the editing mode.
Press the MENU button until the display shows
“SSV”. This display will last 2 seconds and then
change to “OFF”. Press TUNE/FF-REV (
or) to change between:
Off !Low !Mid !High
Compact disc (CD) player operation
Turn the ignition key to the ACC or ON position.
CAUTION
c Do not force a compact disc into the CD
insert slot. This could damage the CD
and/or CD changer/player.
c Trying to load a CD with the CD door
closed could damage the CD and/or CD
changer.
CD button
When the CD button is pressed with a compact
disc loaded and the radio playing, the radio turns
off and the last used compact disc starts to play.
FF (Fast Forward) , REW
(Rewind) buttons
When the TUNE/FF-REV (
or) but-
ton is pressed while the compact disc is playing,
the compact disc plays at an increased speed
while fast forwarding or rewinding. When the
button is released, the compact disc returns to
normal play speed.
SEEK/TRACK buttons
When
is pressed while the compact disc
is playing, the selection following the present one
Display screen, heater, air conditioner and audio systems4-29
ZREVIEW COPYÐ2005 Altima (l30)
Owners ManualÐUSA_English (nna)
06/28/04Ðtbrooks
X
Page 162 of 304
SEEK tuning:3.
After selecting a program type, push the
SEEK/TRACK button (or) for
less than 1.5 seconds within 10 seconds.
Tuning to the PTY station will start. If you do
not push the SEEK button within the 10 sec-
ond period, the PTY mode will be canceled.
SCAN tuning:
4.
Push the SCAN button for more than 1.5
seconds to scan the PTY name stations and
stop at each broadcasting station for 5 sec-
onds. Pushing the button again during this 5
second period will stop SCAN tuning and the
radio will remain tuned to that station. If the
SCAN button is not pushed within 5 seconds,
SCAN tuning moves to the next station.
Speed Sensitive Control Volume (SSV) (if
so equipped)
Your vehicle has Speed Sensitive Control Vol-
ume (SSV) for audio. The audio volume changes
as the driving speed changes.
Press and hold the AUDIO button until the radio
beeps to start the editing mode. Press the AU-
DIO button until the display shows “SSV OFF”.
Press TUNE/FF-REV (
or)to
change between:
Off !Low !Mid !High
Compact disc (CD) player operation
Turn the ignition key to the ACC or ON position.
CAUTION
c Do not force a compact disc into the CD
insert slot. This could damage the CD
and/or CD changer/player.
c Trying to load a CD with the CD door
closed could damage the CD and/or CD
changer.
CD6 button
When the CD6 button is pressed with a compact
disc loaded and the radio playing, the radio turns
off and the last used compact disc starts to play.
CD loading
Press the LOAD button to start CD loading
mode.
The following sequence will occur: 1. If other discs are already loaded, the disc number indicator on the lowest available
disc select button will start blinking. The
display shows “Select Disc” .
2. The display changes to “Insert Disc”for a
maximum of 15 seconds. 3. During the 15 second interval, insert the
disc. The display changes to “Loading
Disc” .
4. The CD will play after the disc is set to a play position.
5. The indicator changes from blinking disc
number indicator tosolid disc number
indicator and the display changes to show
the Disc number icon, Disc number, Track
number and Elapsed time.
All disc loading 1. Press and hold the LOAD button until the radio beeps (>1.5 seconds) .
2. The numbered disc indicator on the lowest
available disc select button will start blink-
ing. The display shows “All Loading”.
3. The display changes to “Insert Disc”for a
maximum of 15 seconds.
4. During the 15 second interval, insert the disc. The display changes to “Loading
Disc”.
5. The indicator changes from blinking num-
bered disc tosolid numbered disc.
6. The disc number icon is turned on.
4-34Display screen, heater, air conditioner and audio systems
ZREVIEW COPYÐ2005 Altima (l30)
Owners ManualÐUSA_English (nna)
06/28/04Ðtbrooks
X
Page 168 of 304
Searching or scanning by program type may yield
a limited number of selections.
When CAT/RPT button is pressed for more than
1.5 seconds during FM or SAT (if so equipped)
mode, the PTY name of the current tuned station
is displayed. During this time if the PTY data code
is zero or the data is unreadable, the display will
show NONE.
To change the PTY:1. Press the CAT/RPT button.
2. Press the TUNE/FF-REV (
or)
up/down button to chose a specific program
type.
ROCK, CLASSIC ROCK, SOFT ROCK,
TOP 40, COUNTRY, JAZZ, CLASSICAL,
OLDIES, NEWS, SPORTS, TALK, ANY
SEEK tuning: 3. After selecting a program type, push the SEEK/TRACK button (
or) for
less than 1.5 seconds within 10 seconds.
Tuning to the PTY station will start. If you do
not push the SEEK button within the 10
second period, the PTY mode will be can-
celed. SCAN tuning:
4. Push the SCAN button for more than 1.5 seconds to scan the PTY name stations and
stop at each broadcasting station for 5 sec-
onds. Pushing the button again during this 5
second period will stop SCAN tuning and
the radio will remain tuned to that station. If
the SCAN button is not pushed within 5
seconds, SCAN tuning moves to the next
station.
Compact disc (CD) changer operation
CAUTION
cDo not force a compact disc into the CD
insert slot. This could damage the CD
and/or CD changer/player.
c Trying to load a CD with the CD door
closed could damage the CD and/or CD
changer.
Turn the ignition key to the ACC or ON position
and insert the compact disc into the slot with the
label side facing up. The compact disc will be
guided automatically into the slot and start play-
ing. To insert the disc, first push the LOAD button.
If the radio is already operating, it will automati-
cally turn off and the compact disc will play. If the system has been turned off while the com-
pact disc was playing, pushing the
POWER/VOLUME control knob will start the
compact disc.
LOAD button:
To insert a CD in the CD changer, push the LOAD
button for less than 1.5 seconds. Select the
loading slot by pushing the CD insert select
button (1 - 6) , then insert the CD.
To insert 6 CDs to the CD changer, push the
LOAD button for more than 1.5 seconds.
The slot numbers (1 - 6) will illuminate on the
display when CDs are loaded into the changer.
CD button:
When the CD button is pushed with the system
off and the compact disc loaded, the system will
turn on and the compact disc will start to play.
When the CD button is pushed with the compact
disc loaded with the radio playing, the radio will
automatically be turned off and the compact disc
will start to play.
REW (Rewind) , FF (Fast
Forward):
When the
(rewind) or(fast forward)
button is pushed while a compact disc is playing,
the compact disc will play while rewinding or fast
4-40Display screen, heater, air conditioner and audio systems
ZREVIEW COPYÐ2005 Altima (l30)
Owners ManualÐUSA_English (nna)
06/28/04Ðtbrooks
X
Page 291 of 304
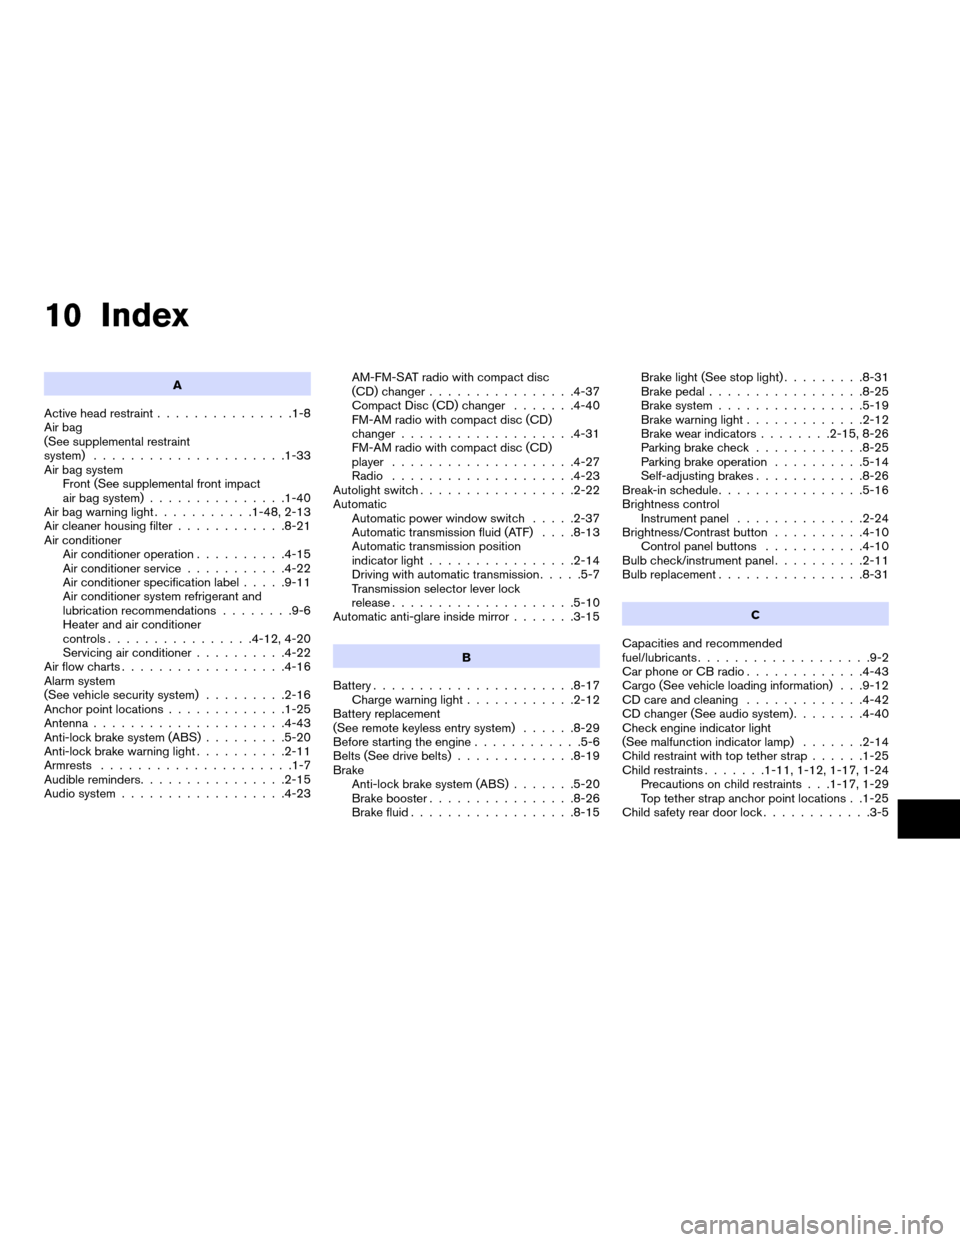
10 Index
A
Active head restraint .............. .1-8
Air bag
(See supplemental restraint
system) .................... .1-33
Air bag system Front (See supplemental front impact
air bag system) .............. .1-40
Air bag warning light ...........1-48, 2-13
Air cleaner housing filter ............8-21
Air conditioner Air conditioner operation ..........4-15
Air conditioner service ...........4-22
Air conditioner specification label .....9-11
Air conditioner system refrigerant and
lubrication recommendations ........9-6
Heater and air conditioner
controls ............... .4-12, 4-20
Servicing air conditioner ..........4-22
Air flow charts ................. .4-16
Alarm system
(See vehicle security system) .........2-16
Anchor point locations .............1-25
Antenna .................... .4-43
Anti-lock brake system (ABS) .........5-20
Anti-lock brake warning light ..........2-11
Armrests .................... .1-7
Audible reminders ............... .2-15
Audio system ................. .4-23AM-FM-SAT radio with compact disc
(CD) changer
............... .4-37
Compact Disc (CD) changer .......4-40
FM-AM radio with compact disc (CD)
changer .................. .4-31
FM-AM radio with compact disc (CD)
player ................... .4-27
Radio ................... .4-23
Autolight switch ................ .2-22
Automatic Automatic power window switch .....2-37
Automatic transmission fluid (ATF) . . . .8-13
Automatic transmission position
indicator light ............... .2-14
Driving with automatic transmission .....5-7
Transmission selector lever lock
release ................... .5-10
Automatic anti-glare inside mirror .......3-15
B
Battery ..................... .8-17
Charge warning light ............2-12
Battery replacement
(See remote keyless entry system) ......8-29
Before starting the engine ............5-6
Belts (See drive belts) .............8-19
Brake Anti-lock brake system (ABS) .......5-20
Brake booster ............... .8-26
Brake fluid ................. .8-15Brake light (See stop light)
.........8-31
Brake pedal ................ .8-25
Brake system ............... .5-19
Brake warning light ............ .2-12
Brake wear indicators ........2-15, 8-26
Parking brake check ............8-25
Parking brake operation ..........5-14
Self-adjusting brakes ............8-26
Break-in schedule ............... .5-16
Brightness control Instrument panel ............. .2-24
Brightness/Contrast button ..........4-10
Control panel buttons ...........4-10
Bulb check/instrument panel ..........2-11
Bulb replacement ............... .8-31
C
Capacities and recommended
fuel/lubricants .................. .9-2
Car phone or CB radio .............4-43
Cargo (See vehicle loading information) . . .9-12
CD care and cleaning .............4-42
CD changer (See audio system) ........4-40
Check engine indicator light
(See malfunction indicator lamp) .......2-14
Child restraint with top tether strap ......1-25
Child restraints .......1-11, 1-12, 1-17, 1-24
Precautions on child restraints . . .1-17, 1-29
Top tether strap anchor point locations . .1-25
Child safety rear door lock ............3-5
ZREVIEW COPYÐ2005 Altima(l30)
Owners ManualÐUSA_English (nna)
07/09/04Ðtbrooks
X
Page 295 of 304
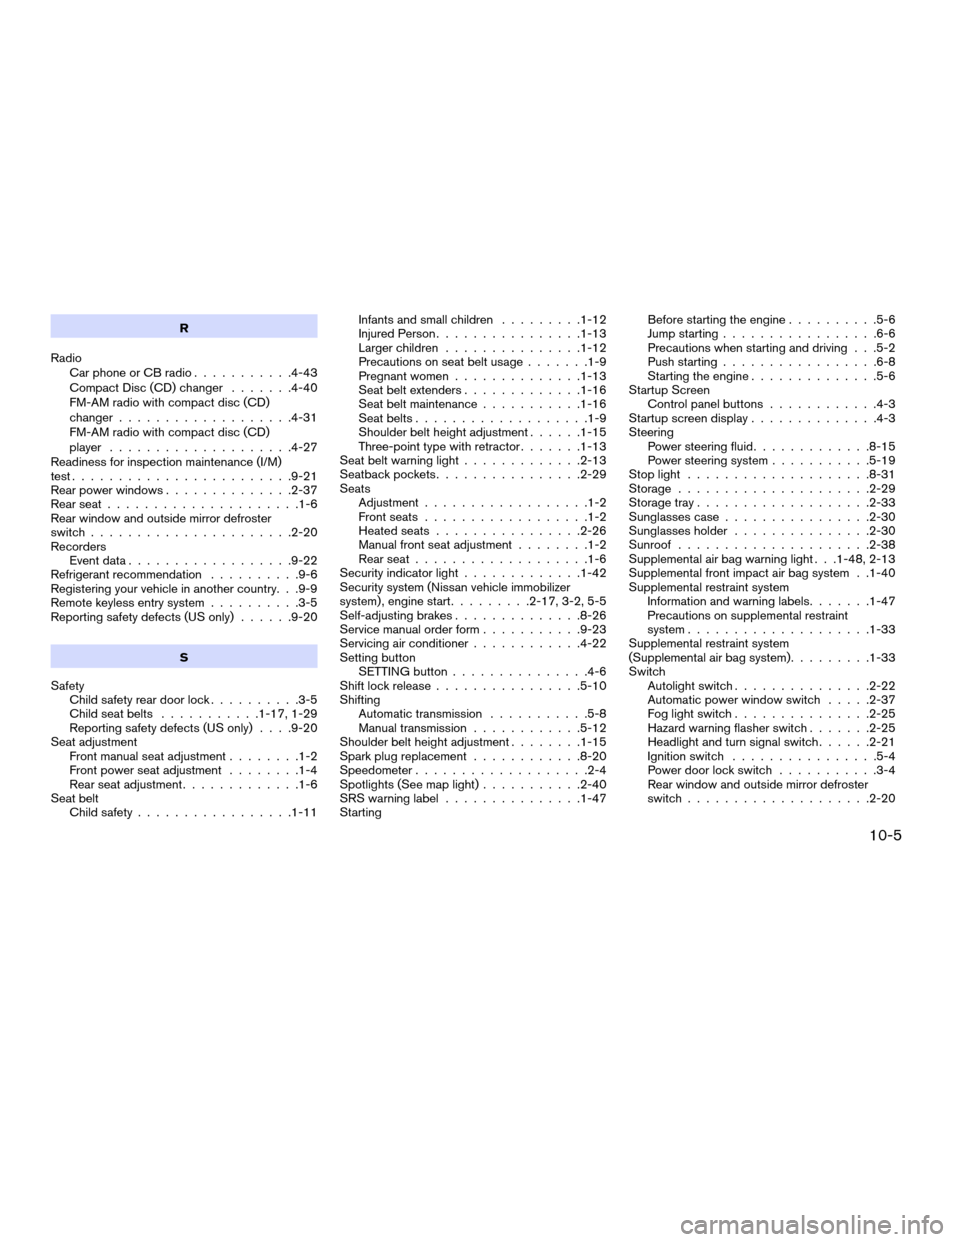
R
Radio Car phone or CB radio ...........4-43
Compact Disc (CD) changer .......4-40
FM-AM radio with compact disc (CD)
changer .................. .4-31
FM-AM radio with compact disc (CD)
player ................... .4-27
Readiness for inspection maintenance (I/M)
test ....................... .9-21
Rear power windows ............. .2-37
Rear seat .................... .1-6
Rear window and outside mirror defroster
switch ..................... .2-20
Recorders Event data ................. .9-22
Refrigerant recommendation ..........9-6
Registering your vehicle in another country. . .9-9
Remote keyless entry system ..........3-5
Reporting safety defects (US only) ......9-20
S
Safety Child safety rear door lock ..........3-5
Child seat belts .......... .1-17, 1-29
Reporting safety defects (US only) . . . .9-20
Seat adjustment Front manual seat adjustment ........1-2
Front power seat adjustment ........1-4
Rear seat adjustment .............1-6
Seat belt Child safety ................ .1-11Infants and small children
.........1-12
Injured Person ............... .1-13
Larger children .............. .1-12
Precautions on seat belt usage .......1-9
Pregnant women ............. .1-13
Seat belt extenders ............ .1-16
Seat belt maintenance ...........1-16
Seat belts .................. .1-9
Shoulder belt height adjustment ......1-15
Three-point type with retractor .......1-13
Seat belt warning light .............2-13
Seatback pockets ............... .2-29
Seats Adjustment ................. .1-2
Front seats ................. .1-2
Heated seats ............... .2-26
Manual front seat adjustment ........1-2
Rear seat .................. .1-6
Security indicator light .............1-42
Security system (Nissan vehicle immobilizer
system) , engine start .........2-17, 3-2, 5-5
Self-adjusting brakes ............. .8-26
Service manual order form ...........9-23
Servicing air conditioner ............4-22
Setting button SETTING button .............. .4-6
Shift lock release ............... .5-10
Shifting Automatic transmission ...........5-8
Manual transmission ............5-12
Shoulder belt height adjustment ........1-15
Spark plug replacement ............8-20
Speedometer .................. .2-4
Spotlights (See map light) ...........2-40
SRS warning label .............. .1-47
Starting Before starting the engine
..........5-6
Jump starting ................ .6-6
Precautions when starting and driving . . .5-2
Push starting ................ .6-8
Starting the engine ............. .5-6
Startup Screen Control panel buttons ............4-3
Startup screen display ..............4-3
Steering Power steering fluid ............ .8-15
Power steering system ...........5-19
Stop light ................... .8-31
Storage .................... .2-29
Storage tray .................. .2-33
Sunglasses case ............... .2-30
Sunglasses holder .............. .2-30
Sunroof .................... .2-38
Supplemental air bag warning light . . .1-48, 2-13
Supplemental front impact air bag system . .1-40
Supplemental restraint system Information and warning labels .......1-47
Precautions on supplemental restraint
system ................... .1-33
Supplemental restraint system
(Supplemental air bag system) .........1-33
Switch Autolight switch .............. .2-22
Automatic power window switch .....2-37
Fog light switch .............. .2-25
Hazard warning flasher switch .......2-25
Headlight and turn signal switch ......2-21
Ignition switch ............... .5-4
Power door lock switch ...........3-4
Rear window and outside mirror defroster
switch ................... .2-20
10-5
ZREVIEW COPYÐ2005 Altima(l30)
Owners ManualÐUSA_English (nna)
07/09/04Ðtbrooks
X