fuse NISSAN ALTIMA 2005 L31 / 3.G Owners Manual
[x] Cancel search | Manufacturer: NISSAN, Model Year: 2005, Model line: ALTIMA, Model: NISSAN ALTIMA 2005 L31 / 3.GPages: 304, PDF Size: 4.91 MB
Page 14 of 304
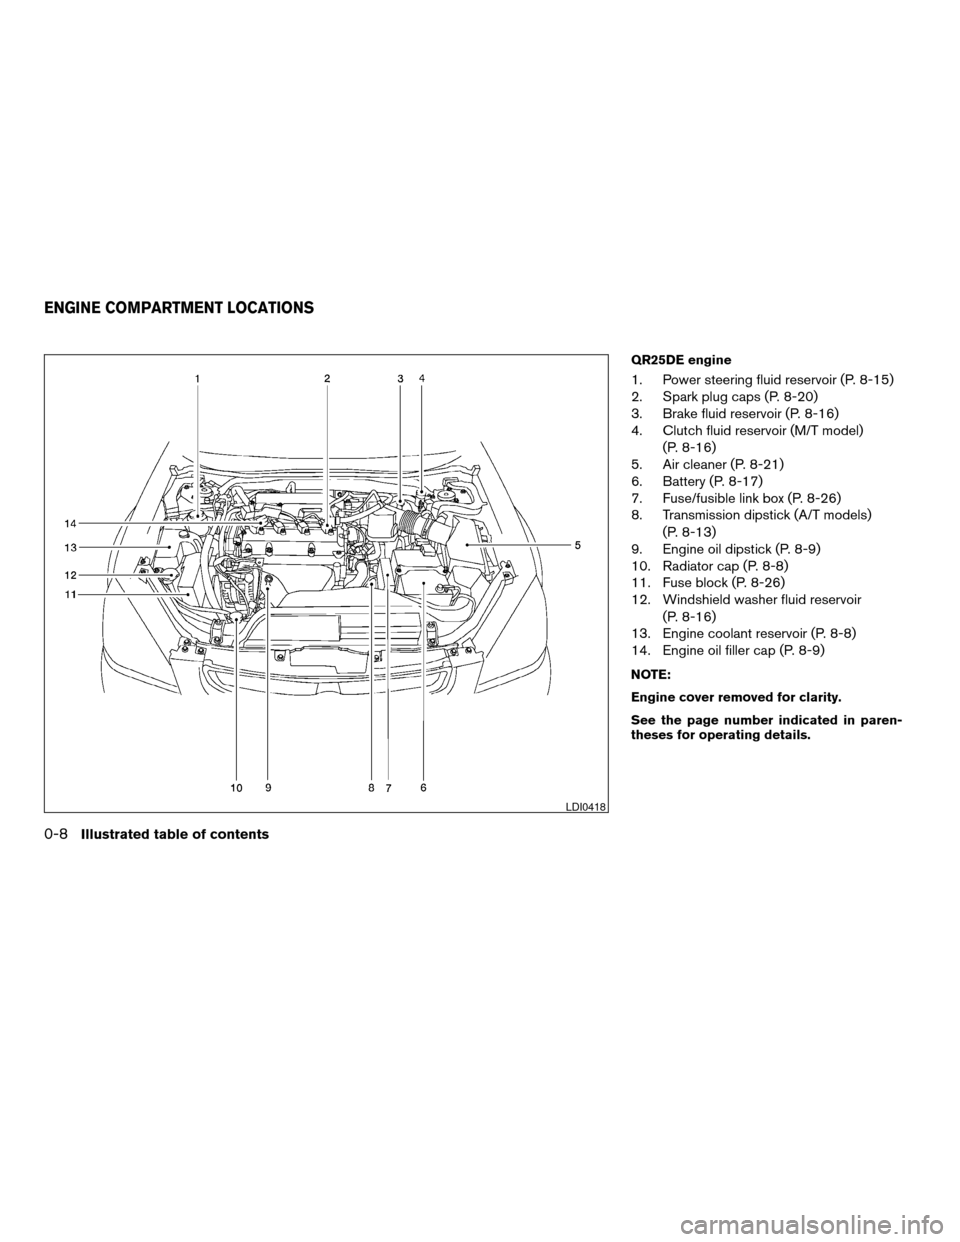
QR25DE engine
1. Power steering fluid reservoir (P. 8-15)
2. Spark plug caps (P. 8-20)
3. Brake fluid reservoir (P. 8-16)
4. Clutch fluid reservoir (M/T model)(P. 8-16)
5. Air cleaner (P. 8-21)
6. Battery (P. 8-17)
7. Fuse/fusible link box (P. 8-26)
8. Transmission dipstick (A/T models)
(P. 8-13)
9. Engine oil dipstick (P. 8-9)
10. Radiator cap (P. 8-8)
11. Fuse block (P. 8-26)
12. Windshield washer fluid reservoir
(P. 8-16)
13. Engine coolant reservoir (P. 8-8)
14. Engine oil filler cap (P. 8-9)
NOTE:
Engine cover removed for clarity.
See the page number indicated in paren-
theses for operating details.
LDI0418
ENGINE COMPARTMENT LOCATIONS
0-8Illustrated table of contents
ZREVIEW COPYÐ2005 Altima (l30)
Owners ManualÐUSA_English (nna)
06/29/04Ðtbrooks
X
Page 15 of 304
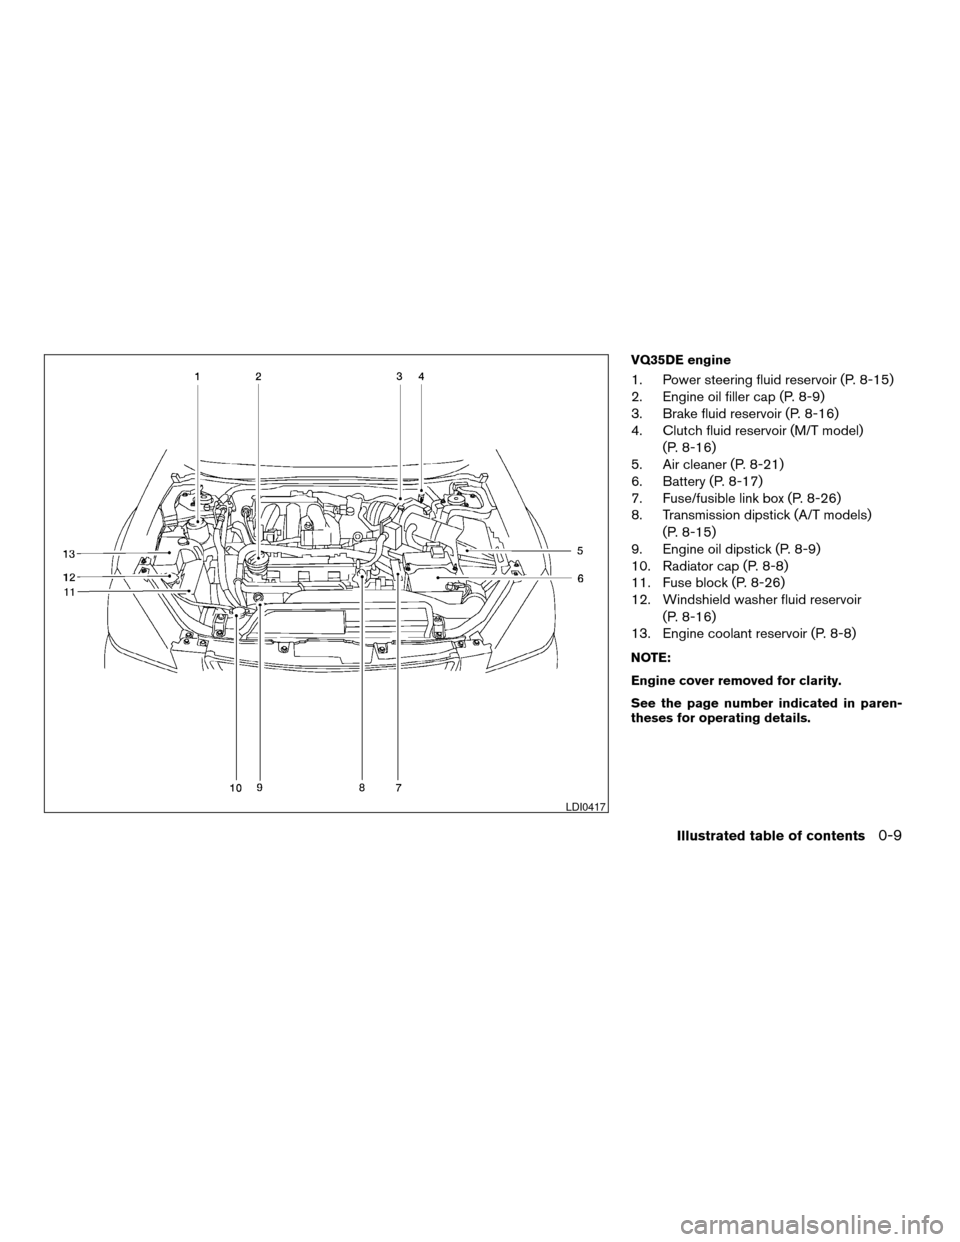
VQ35DE engine
1. Power steering fluid reservoir (P. 8-15)
2. Engine oil filler cap (P. 8-9)
3. Brake fluid reservoir (P. 8-16)
4. Clutch fluid reservoir (M/T model)(P. 8-16)
5. Air cleaner (P. 8-21)
6. Battery (P. 8-17)
7. Fuse/fusible link box (P. 8-26)
8. Transmission dipstick (A/T models)
(P. 8-15)
9. Engine oil dipstick (P. 8-9)
10. Radiator cap (P. 8-8)
11. Fuse block (P. 8-26)
12. Windshield washer fluid reservoir
(P. 8-16)
13. Engine coolant reservoir (P. 8-8)
NOTE:
Engine cover removed for clarity.
See the page number indicated in paren-
theses for operating details.
LDI0417
Illustrated table of contents0-9
ZREVIEW COPYÐ2005 Altima (l30)
Owners ManualÐUSA_English (nna)
06/29/04Ðtbrooks
X
Page 96 of 304
cBefore inserting or disconnecting a
plug, be sure the electrical accessory
being used is turned OFF.
c Push the plug in as far as it will go. If
good contact is not made, the plug may
overheat or the internal temperature
fuse may open.
c When not in use, be sure to close the
cap. Do not allow water to contact the
outlet.
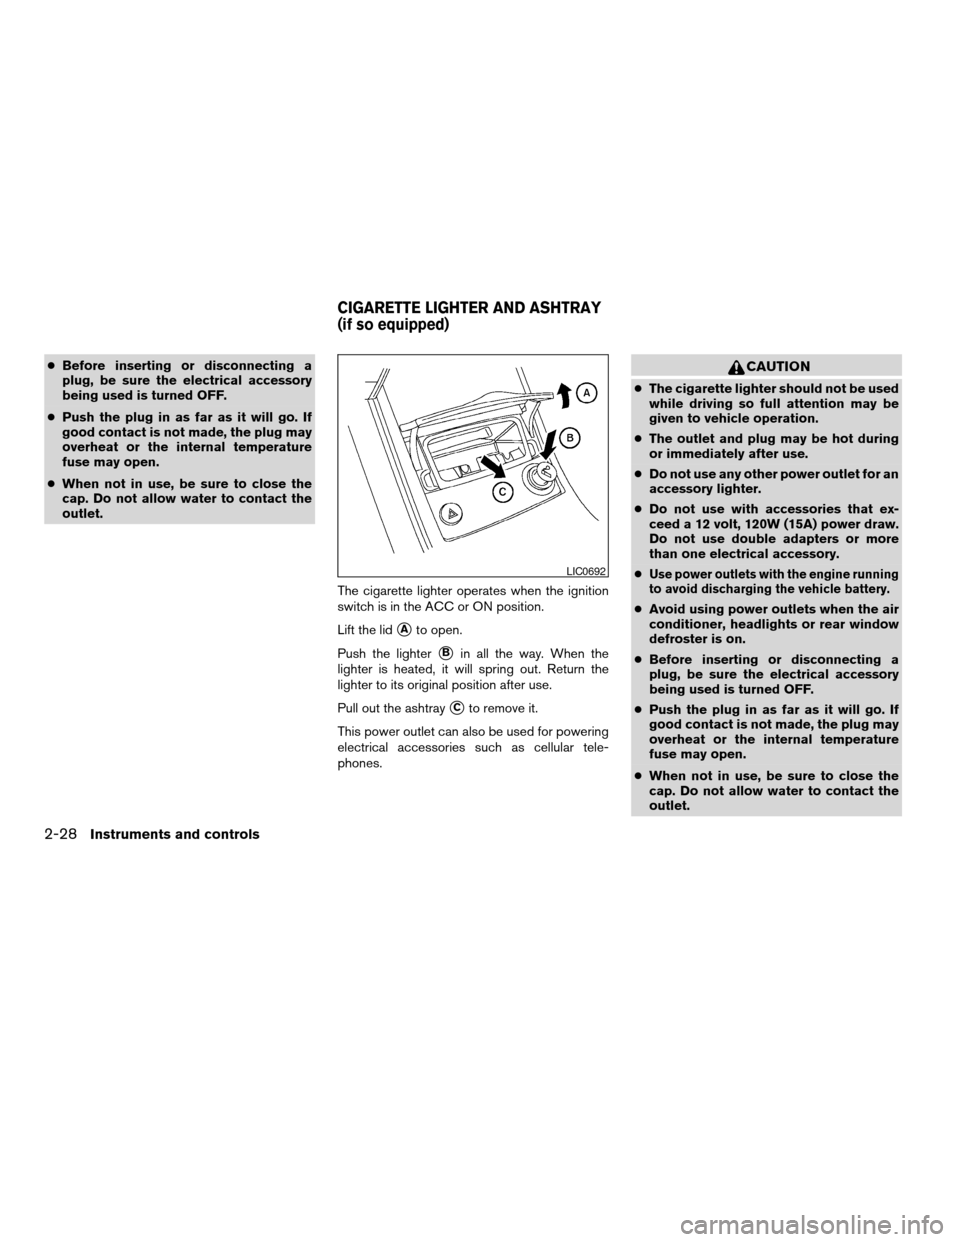
The cigarette lighter operates when the ignition
switch is in the ACC or ON position.
Lift the lid
sAto open.
Push the lighter
sBin all the way. When the
lighter is heated, it will spring out. Return the
lighter to its original position after use.
Pull out the ashtray
sCto remove it.
This power outlet can also be used for powering
electrical accessories such as cellular tele-
phones.
CAUTION
c The cigarette lighter should not be used
while driving so full attention may be
given to vehicle operation.
c The outlet and plug may be hot during
or immediately after use.
c Do not use any other power outlet for an
accessory lighter.
c Do not use with accessories that ex-
ceed a 12 volt, 120W (15A) power draw.
Do not use double adapters or more
than one electrical accessory.
c
Use power outlets with the engine running
to avoid discharging the vehicle battery.
c Avoid using power outlets when the air
conditioner, headlights or rear window
defroster is on.
c Before inserting or disconnecting a
plug, be sure the electrical accessory
being used is turned OFF.
c Push the plug in as far as it will go. If
good contact is not made, the plug may
overheat or the internal temperature
fuse may open.
c When not in use, be sure to close the
cap. Do not allow water to contact the
outlet.
LIC0692
CIGARETTE LIGHTER AND ASHTRAY
(if so equipped)
2-28Instruments and controls
ZREVIEW COPYÐ2005 Altima (l30)
Owners ManualÐUSA_English (nna)
06/28/04Ðtbrooks
X
Page 157 of 304
blinks in the display. Pushing the SCAN button
again during this 5 second period stops SCAN
tuning and the radio remains tuned to that station.
Station memory operation
Each preset mode (A, B or C) has 6 presets,
capable of storing any combination of AM, FM,
SAT (if so equipped ) and FM RDS stations.
Press the PRESET ABC button to change be-
tween the presets:
A! B! C
The radio displays icon A, B or C to indicate
which set of presets is active.
To store a radio station in a preset: 1. Select the desired preset by pressing PRE- SET ABC.
2. Select the desired AM, FM or SAT (if so equipped) station band.
3. Tune to the desired station.
4. Press the desired station select button (>1.5 seconds) .
5. A beep will sound indicating memorization is complete.
6. Other station select buttons can be set in the same manner. If the battery cable is disconnected, or if the radio
fuse opens, the radio memory is canceled. In that
case, reset the desired stations.
Preset Scan
Pressing the Preset Scan button (<1.5 seconds)
scans the permanent preset memory that is se-
lected (A, B or C) fro
m1-6for5seconds.
All Preset Scan
Pressing the Preset Scan button (>1.5 seconds)
scans all the permanent preset memory banks (A,
BorC)from1-6for5 seconds.
Canceling Preset Scan mode
Pressing the Preset Scan (P.SCAN) button again
will cancel the Preset Scan mode.
Speed Sensitive Control Volume (SSV) (if
so equipped)
Your vehicle has Speed Sensitive Control Vol-
ume (SSV) for audio. The audio volume changes
as the driving speed changes.
Press and hold the MENU button (>2 seconds)
until the radio beeps to start the editing mode.
Press the MENU button until the display shows
“SSV”. This display will last 2 seconds and then
change to “OFF”. Press TUNE/FF-REV (
or) to change between:
Off !Low !Mid !High
Compact disc (CD) player operation
Turn the ignition key to the ACC or ON position.
CAUTION
c Do not force a compact disc into the CD
insert slot. This could damage the CD
and/or CD changer/player.
c Trying to load a CD with the CD door
closed could damage the CD and/or CD
changer.
CD button
When the CD button is pressed with a compact
disc loaded and the radio playing, the radio turns
off and the last used compact disc starts to play.
FF (Fast Forward) , REW
(Rewind) buttons
When the TUNE/FF-REV (
or) but-
ton is pressed while the compact disc is playing,
the compact disc plays at an increased speed
while fast forwarding or rewinding. When the
button is released, the compact disc returns to
normal play speed.
SEEK/TRACK buttons
When
is pressed while the compact disc
is playing, the selection following the present one
Display screen, heater, air conditioner and audio systems4-29
ZREVIEW COPYÐ2005 Altima (l30)
Owners ManualÐUSA_English (nna)
06/28/04Ðtbrooks
X
Page 161 of 304
broadcasting station. If using the down button,
once the lowest broadcasting station is reached,
the radio continues in the SEEK mode at the
highest broadcasting station.
SCAN tuning
Push the SCAN button. SCAN illuminates in the
display window. SCAN tuning begins from low to
high frequencies. SCAN tuning stops for 5 sec-
onds at each broadcasting station that has suffi-
cient signal strength. When scanning, SCAN
blinks in the display. Pushing the SCAN button
again during this 5 second period stops SCAN
tuning and the radio remains tuned to that station.
Station memory operation
Each preset mode (A, B or C) has 6 presets,
capable of storing any combination of AM, FM,
SAT (if so equipped ) and FM RDS stations.
Press the PRESET ABC button to change be-
tween the presets:
A! B! C
The radio displays icon A, B or C to indicate
which set of presets is active.
To store a radio station in a preset: 1. Select the desired preset by pressing PRE- SET ABC. 2. Select the desired AM, FM or SAT (if so
equipped) station band.
3. Tune to the desired station.
4. Press the desired station select button (>1.5 seconds) .
5. A beep will sound indicating memorization is complete.
6. Other station select buttons can be set in the same manner.
If the battery cable is disconnected, or if the radio
fuse opens, the radio memory is canceled. In that
case, reset the desired stations.
Radio data system (RDS):
RDS stands for Radio Data System, and is a data
information service transmitted by some radio
stations on the FM band (not AM band) and/or
SAT radio encoded within a regular radio broad-
cast. Currently, most RDS stations are in large
cities, but many stations are now considering
broadcasting RDS data.
RDS can display: c Station call sign, such as “WHFR 98.3”.
c Station name, such as “The Groove”.
c Music or programming type such as “Clas-
sical”, “Country”, or “Rock”. c
Traffic reports about delays or construction.
If the station broadcasts RDS information, the
RDS icon is displayed.
Program type (PTY):
PTY can be used to search for a certain program
type. Certain areas have a limited number of
stations that transmit RDS. Many stations trans-
mit call letters and frequencies only.
Searching or scanning by program type may yield
a limited number of selections.
When CAT/RPT button is pressed for more than
1.5 seconds during FM or SAT (if so equipped)
mode, the PTY name of the current tuned station
is displayed. During this time if the PTY data code
is zero or the data is unreadable, the display will
show NONE.
To change the PTY: 1. Press the CAT/RPT button.
2. Press the TUNE/FF-REV (
or)
up/down button to chose a specific program
type.
ROCK, CLASSIC ROCK, SOFT ROCK,
TOP 40, COUNTRY, JAZZ, CLASSICAL,
OLDIES, NEWS, SPORTS, TALK, ANY
Display screen, heater, air conditioner and audio systems4-33
ZREVIEW COPYÐ2005 Altima (l30)
Owners ManualÐUSA_English (nna)
06/28/04Ðtbrooks
X
Page 167 of 304
disc will automatically be turned off and the last
radio station played will come on.
The FM stereo indicator ST will glow during FM
stereo reception. When the stereo broadcast
signal is weak, the radio will automatically change
from stereo to monaural reception.
TUNE (Tuning):
WARNING
The radio should not be tuned while driv-
ing so full attention may be given to ve-
hicle operation.
To manually tune the radio, push the TUNE button
(
or) or turn the tuning knob to right
or left.
To move quickly through the channels, hold either
the
orbutton down for more than
1.5 seconds.
SEEK tuning:
Push the SEEK/TRACK button (
or)
for less than 1.5 seconds to tune from high to low
or low to high frequencies and stop at the next
broadcasting station. SCAN tuning
Push the SCAN button. SCAN illuminates in the
display window. SCAN tuning begins from low to
high frequencies. SCAN tuning stops for 5 sec-
onds at each broadcasting station that has suffi-
cient signal strength. When scanning, SCAN
blinks in the display. Pushing the SCAN button
again during this 5 second period stops SCAN
tuning and the radio remains tuned to that station.
Station memory operations:
18 stations can be set for the FM, AM and SAT
(Satellite-if so equipped) radio to the A, B and C
preset button in any combination of FM, AM or
SAT stations.
1. Choose preset channel A, B or C using the preset select button.
2. Select the desired FM, AM or SAT station band.
3. Tune to the desired station using manual, SEEK or SCAN tuning. Push and hold any of
the desired station memory buttons (1 - 6)
until a beep sound is heard.
4. The channel indicator will then come on and the sound will resume. Memorizing is now
complete.
5. Other buttons can be set in the same man- ner. If the battery cable is disconnected, or if the fuse
blows, the radio memory will be canceled. In that
case, reset the desired stations.
Radio data system (RDS):
RDS stands for Radio Data System, and is a data
information service transmitted by some radio
stations on the FM band (not AM band) and/or
SAT radio encoded within a regular radio broad-
cast. Currently, most RDS stations are in large
cities, but many stations are now considering
broadcasting RDS data.
RDS can display:
c Station call sign, such as “WHFR 98.3”.
c Station name, such as “The Groove”.
c Music or programming type such as “Clas-
sical”, “Country”, or “Rock”.
c Traffic reports about delays or construction.
If the station broadcasts RDS information, the
RDS icon is displayed.
Program type (PTY):
PTY can be used to search for a certain program
type. Certain areas have a limited number of
stations that transmit RDS. Many stations trans-
mit call letters and frequencies only.
Display screen, heater, air conditioner and audio systems4-39
ZREVIEW COPYÐ2005 Altima (l30)
Owners ManualÐUSA_English (nna)
06/28/04Ðtbrooks
X
Page 216 of 304
8 Maintenance and do-it-yourself
Maintenance requirements..........................8-2
General maintenance ..............................8-2
Explanation of general maintenance items .........8-2
Maintenance precautions ...........................8-5
Engine compartment check locations ................8-6
Engine cooling system .............................8-8
Checking engine coolant level ...................8-8
Changing engine coolant ........................8-9
Engine oil .........................................8-9
Checking engine oil level ........................8-9
Changing engine oil ........................... 8-10
Changing engine oil filter .......................8-12
4-speed automatic transmission fluid ...............8-13
Temperature conditions for checking .............8-13
5-speed automatic transmission fluid ...............8-15
Power steering fluid ............................... 8-15
Brake and clutch fluid ............................. 8-15
Brake fluid .................................... 8-16
Clutch fluid ................................... 8-16
Window washer fluid ............................. 8-16
Window washer fluid reservoir ..................8-16
Battery .......................................... 8-17
Jump starting ................................. 8-18Drive belts
....................................... 8-19
Spark plugs ...................................... 8-20
Replacing spark plugs ......................... 8-20
Air cleaner ....................................... 8-21
In-cabin microfilter (if so equipped) ..............8-21
Windshield wiper blades .......................... 8-24
Cleaning ..................................... 8-24
Replacing .................................... 8-24
Parking brake and brake pedal .....................8-25
Checking parking brake ........................ 8-25
Checking brake pedal .......................... 8-25
Brake booster ................................. 8-26
Fuses ........................................... 8-26
Engine compartment ........................... 8-26
Passenger compartment .......................8-28
Keyfob battery replacement ........................8-29
Lights ........................................... 8-30
Headlights .................................... 8-30
Front park/turn/sidemarker light .................8-30
Fog lights (if so equipped) ......................8-30
Exterior and interior lights .......................8-31
Wheels and tires ................................. 8-38
Tire pressure .................................. 8-38
ZREVIEW COPYÐ2005 Altima(l30)
Owners ManualÐUSA_English (nna)
06/29/04Ðtbrooks
X
Page 222 of 304
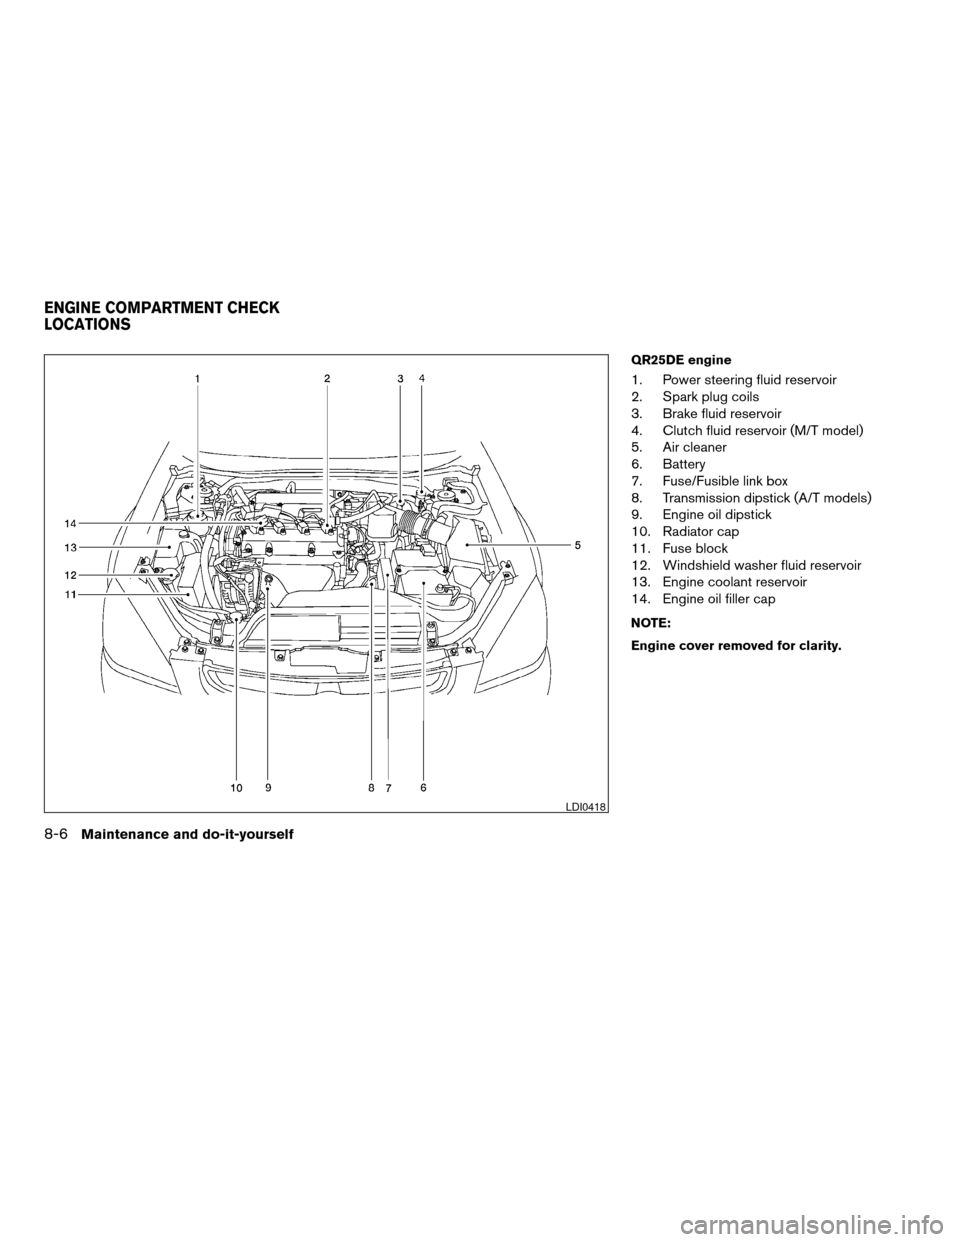
QR25DE engine
1. Power steering fluid reservoir
2. Spark plug coils
3. Brake fluid reservoir
4. Clutch fluid reservoir (M/T model)
5. Air cleaner
6. Battery
7. Fuse/Fusible link box
8. Transmission dipstick (A/T models)
9. Engine oil dipstick
10. Radiator cap
11. Fuse block
12. Windshield washer fluid reservoir
13. Engine coolant reservoir
14. Engine oil filler cap
NOTE:
Engine cover removed for clarity.
LDI0418
ENGINE COMPARTMENT CHECK
LOCATIONS
8-6Maintenance and do-it-yourself
ZREVIEW COPYÐ2005 Altima(l30)
Owners ManualÐUSA_English (nna)
06/28/04Ðtbrooks
X
Page 223 of 304
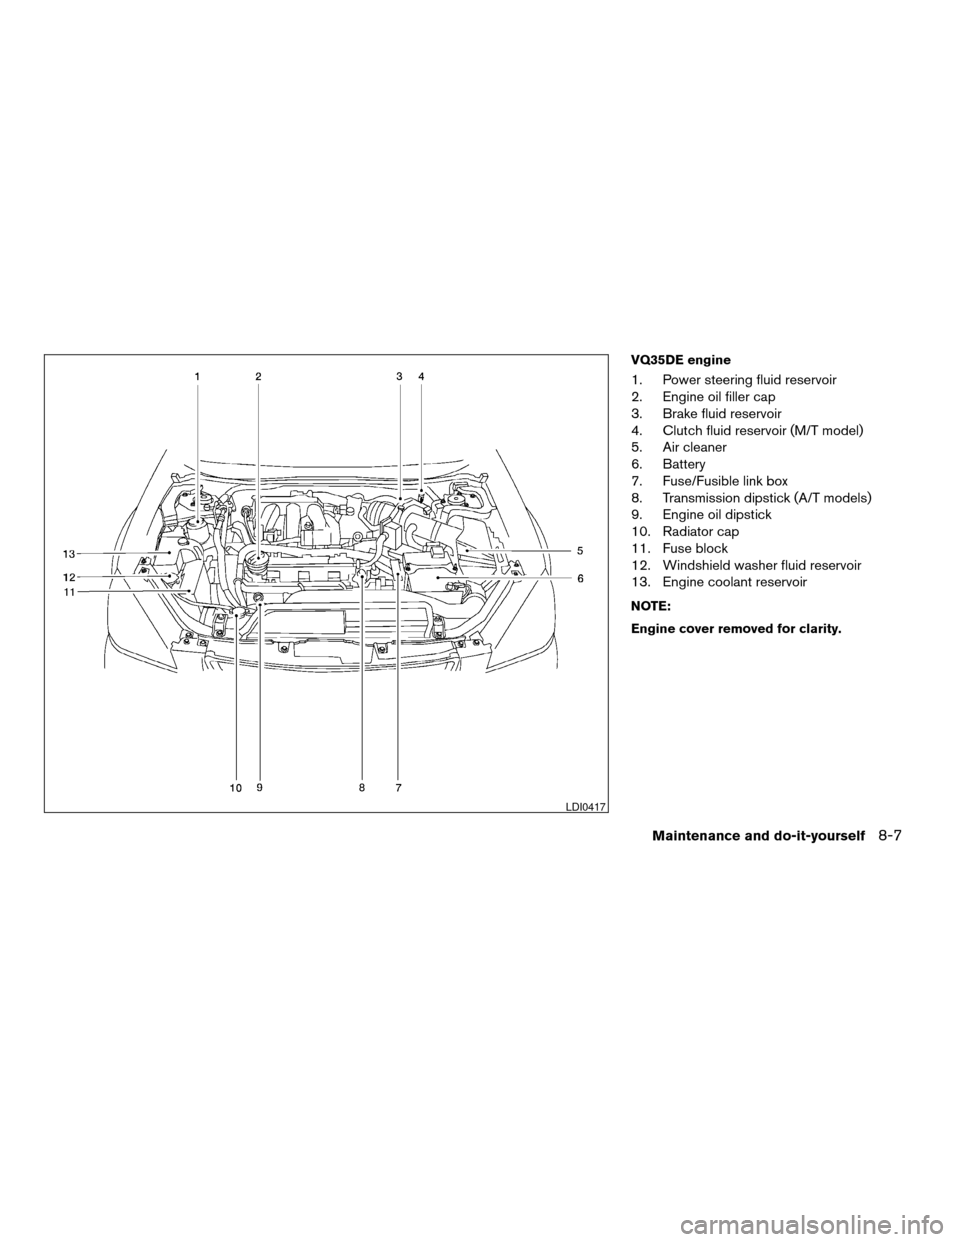
VQ35DE engine
1. Power steering fluid reservoir
2. Engine oil filler cap
3. Brake fluid reservoir
4. Clutch fluid reservoir (M/T model)
5. Air cleaner
6. Battery
7. Fuse/Fusible link box
8. Transmission dipstick (A/T models)
9. Engine oil dipstick
10. Radiator cap
11. Fuse block
12. Windshield washer fluid reservoir
13. Engine coolant reservoir
NOTE:
Engine cover removed for clarity.
LDI0417
Maintenance and do-it-yourself8-7
ZREVIEW COPYÐ2005 Altima(l30)
Owners ManualÐUSA_English (nna)
06/28/04Ðtbrooks
X
Page 242 of 304
Self-adjusting brakes
Your vehicle is equipped with self-adjusting
brakes.
The front and rear disc-type brakes self-adjust
every time the brake pedal is applied.
WARNING
See a NISSAN dealer for a brake system
check if the brake pedal height does not
return to normal.
Brake pad wear indicators
The disc brake pads on your vehicle have audible
wear indicators. When a brake pad requires re-
placement, a high pitched scraping or screech-
ing sound will be heard when the vehicle is in
motion. The noise will be heard whether or not the
brake pedal is depressed. Have the brakes
checked as soon as possible if the wear indicator
sound is heard.
Under some driving or climate conditions, occa-
sional brake squeak, squeal or other noise may
be heard. Occasional brake noise during light to
moderate stops is normal and does not affect the
function or performance of the brake system.
Proper brake inspection intervals should
be followed.For more information regarding
brake inspections, see the appropriate mainte- nance schedule information in the “NISSAN Ser-
vice and Maintenance Guide”.
BRAKE BOOSTER
Check the brake booster function as follows:
1. With the engine off, press and release the brake pedal several times. When brake
pedal movement (distance of travel) remains
the same from one pedal application to the
next, continue on to the next step.
2. While depressing the brake pedal, start the engine. The pedal height should drop a little.
3. With the brake pedal depressed, stop the engine. Keep the pedal depressed for about
30 seconds. The pedal height should not
change.
4. Run the engine for one minute without de- pressing the brake pedal, then turn it off.
Depress the brake pedal several times. The
pedal travel distance will decrease gradually
with each depression as the vacuum is re-
leased from the booster.
If the brakes do not operate properly, have the
brakes checked by a NISSAN dealer.
ENGINE COMPARTMENT
CAUTION
Never use a fuse of a higher or lower
amperage rating than specified on the
fuse box cover. This could damage the
electrical system or cause a fire.
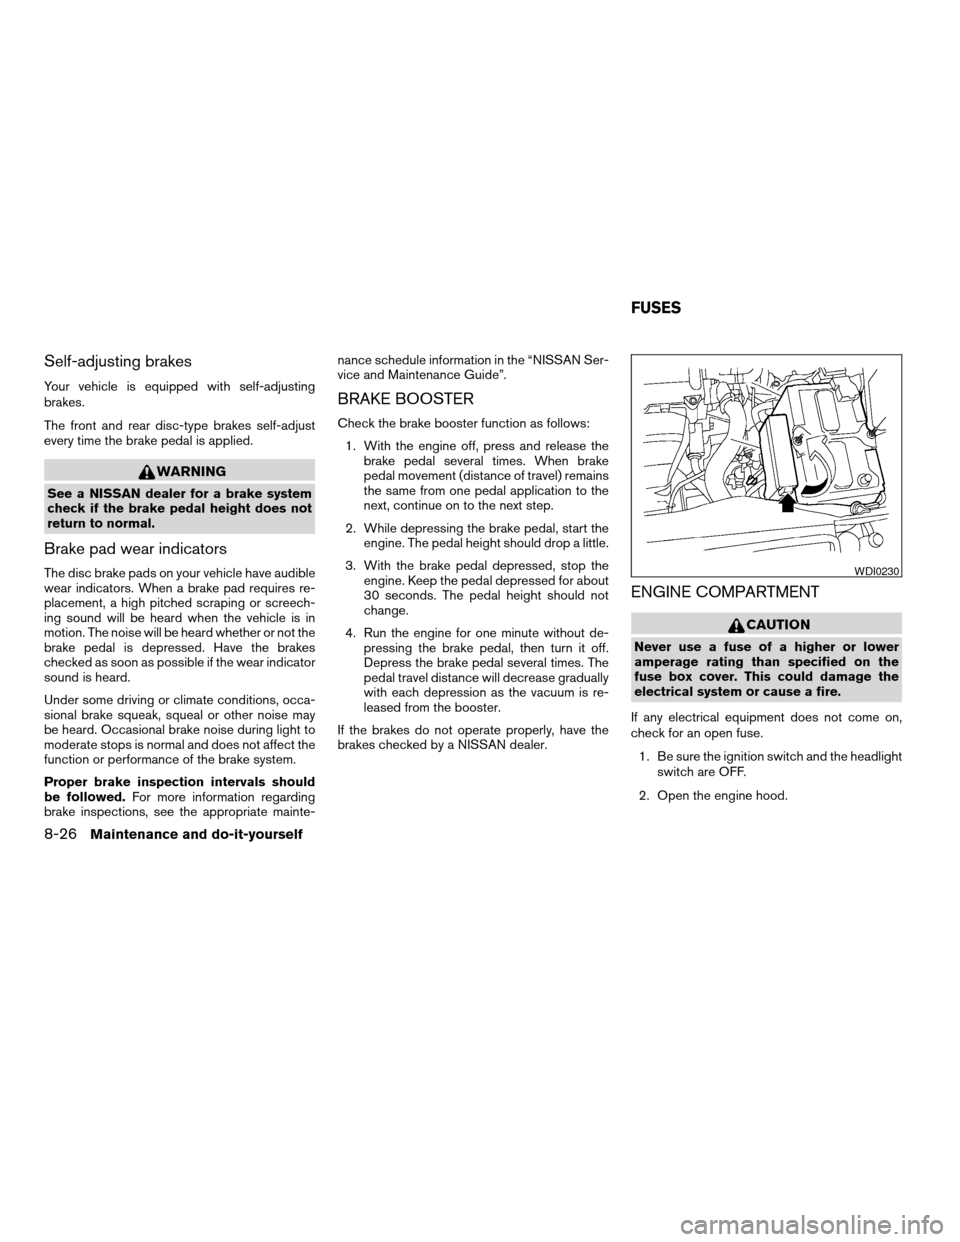
If any electrical equipment does not come on,
check for an open fuse. 1. Be sure the ignition switch and the headlight switch are OFF.
2. Open the engine hood.
WDI0230
FUSES
8-26Maintenance and do-it-yourself
ZREVIEW COPYÐ2005 Altima (l30)
Owners ManualÐUSA_English (nna)
06/28/04Ðtbrooks
X