hood release NISSAN ALTIMA 2006 L31 / 3.G Owners Manual
[x] Cancel search | Manufacturer: NISSAN, Model Year: 2006, Model line: ALTIMA, Model: NISSAN ALTIMA 2006 L31 / 3.GPages: 304, PDF Size: 4.74 MB
Page 117 of 304

3 Pre-driving checks and adjustments
Keys .............................................3-2
Nissan vehicle immobilizer system keys...........3-2
Doors............................................3-3
Locking with key................................3-3
Locking with inside lock knob....................3-4
Locking with power door lock switch.............3-4
Child safety rear door lock.......................3-5
Remote keyless entry system (if so equipped).........3-5
How to use remote keyless entry system..........3-6
Hood............................................3-9
Trunk lid.........................................3-10
Opener operation..............................3-10
Key operation (if so equipped)..................3-11
Interior trunk lid release........................3-11Fuel-filler door...................................3-12
Opener operation..............................3-12
Fuel-filler cap.................................3-12
Tilting telescopic steering column..................3-13
Tilt operation..................................3-13
Telescopic operation...........................3-14
Sun visors.......................................3-14
Vanity mirrors.................................3-14
Mirrors..........................................3-15
Rearview mirror...............................3-15
Automatic anti-glare rearview mirror
(if so equipped)...............................3-15
Outside mirrors...............................3-15
ZREVIEW COPYÐ2006 Altima(l30)
Owners ManualÐUSA_English(nna)
09/08/05Ðdebbie
X
Page 125 of 304

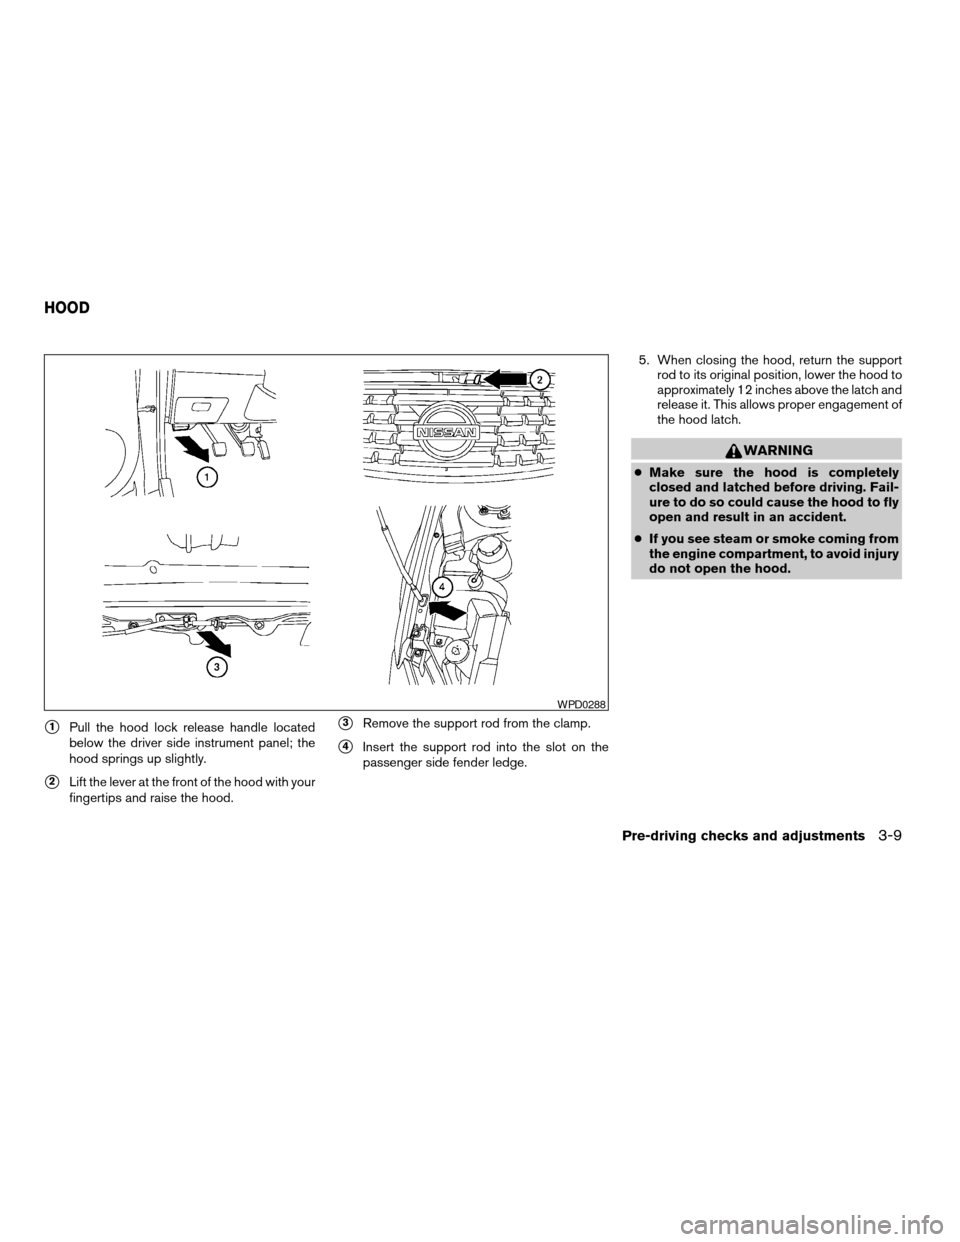
s1Pull the hood lock release handle located
below the driver side instrument panel; the
hood springs up slightly.
s2Lift the lever at the front of the hood with your
fingertips and raise the hood.
s3Remove the support rod from the clamp.
s4Insert the support rod into the slot on the
passenger side fender ledge.5. When closing the hood, return the support
rod to its original position, lower the hood to
approximately 12 inches above the latch and
release it. This allows proper engagement of
the hood latch.
WARNING
cMake sure the hood is completely
closed and latched before driving. Fail-
ure to do so could cause the hood to fly
open and result in an accident.
cIf you see steam or smoke coming from
the engine compartment, to avoid injury
do not open the hood.
WPD0288
HOOD
Pre-driving checks and adjustments3-9
ZREVIEW COPYÐ2006 Altima(l30)
Owners ManualÐUSA_English(nna)
09/08/05Ðdebbie
X
Page 220 of 304

Your new NISSAN has been designed to have
minimum maintenance requirements with longer
service intervals to save you both time and
money. However, some day-to-day and regular
maintenance is essential to maintain your NIS-
SAN’s good mechanical condition, as well as its
emission and engine performance.
It is the owner’s responsibility to make sure that
the scheduled maintenance, as well as general
maintenance, is performed.
As the vehicle owner, you are the only one who
can ensure that your vehicle receives proper
maintenance. You are a vital link in the mainte-
nance chain.
Scheduled maintenance
For your convenience, both required and optional
scheduled maintenance items are described and
listed in your “NISSAN Service and Maintenance
Guide.” You must refer to that guide to ensure
that necessary maintenance is performed on your
NISSAN at regular intervals.
General maintenance
General maintenance includes those items which
should be checked during normal day-to-day op-
eration. They are essential for proper vehicle op-
eration. It is your responsibility to perform these
maintenance procedures regularly as prescribed.Performing general maintenance checks requires
minimal mechanical skill and only a few general
automotive tools.
These checks or inspections can be done by you,
a qualified technician, or, if you prefer, a NISSAN
dealer.
Where to go for service
If maintenance service is required or your vehicle
appears to malfunction, have the systems
checked and corrected by a NISSAN dealer.
NISSAN technicians are well-trained specialists
who are kept up-to-date with the latest service
information through technical bulletins, service
tips, and in-dealership training programs. They
are completely qualified to work on NISSAN ve-
hiclesbeforethey work on your vehicle, rather
than after they have worked on it.
You can be confident that a NISSAN dealer’s
service department performs the best job to meet
the maintenance requirements on your vehicle —
in a reliable and economic way.During the normal day-to-day operation of the
vehicle, general maintenance should be per-
formed regularly as prescribed in this section. If
you detect any unusual sounds, vibrations or
smells, be sure to check for the cause or have a
NISSAN dealer do it promptly. In addition, you
should notify a NISSAN dealer if you think that
repairs are required.
When performing any checks or maintenance
work, closely observe the “Maintenance precau-
tions” later in this section.
EXPLANATION OF GENERAL
MAINTENANCE ITEMS
Additional information on the following
items with “*” is found later in this section.
Outside the vehicle
The maintenance items listed here should be
performed from time to time, unless otherwise
specified.
Doors and engine hoodCheck that the doors
and engine hood operate properly. Also ensure
that all latches lock securely. Lubricate hinges,
latches, latch pins, rollers and links as necessary.
Make sure that the secondary latch keeps the
hood from opening when the primary latch is
released.
MAINTENANCE REQUIREMENTS GENERAL MAINTENANCE
8-2Maintenance and do-it-yourself
ZREVIEW COPYÐ2006 Altima(l30)
Owners ManualÐUSA_English(nna)
09/08/05Ðdebbie
X
Page 242 of 304

CLEANING
If your windshield is not clear after using the
windshield washer or if a wiper blade chatters
when running, wax or other material may be on
the blade or windshield.
Clean the outside of the windshield with a washer
solution or a mild detergent. Your windshield is
clean if beads do not form when rinsing with clear
water.
Clean each blade by wiping it with a cloth soaked
in a washer solution or a mild detergent. Then
rinse the blades with clear water. If your wind-
shield is still not clear after cleaning the blades
and using the wiper, replace the blades.
CAUTION
Worn windshield wiper blades can dam-
age the windshield and impair driver
vision.
REPLACING
Replace the wiper blades if they are worn.
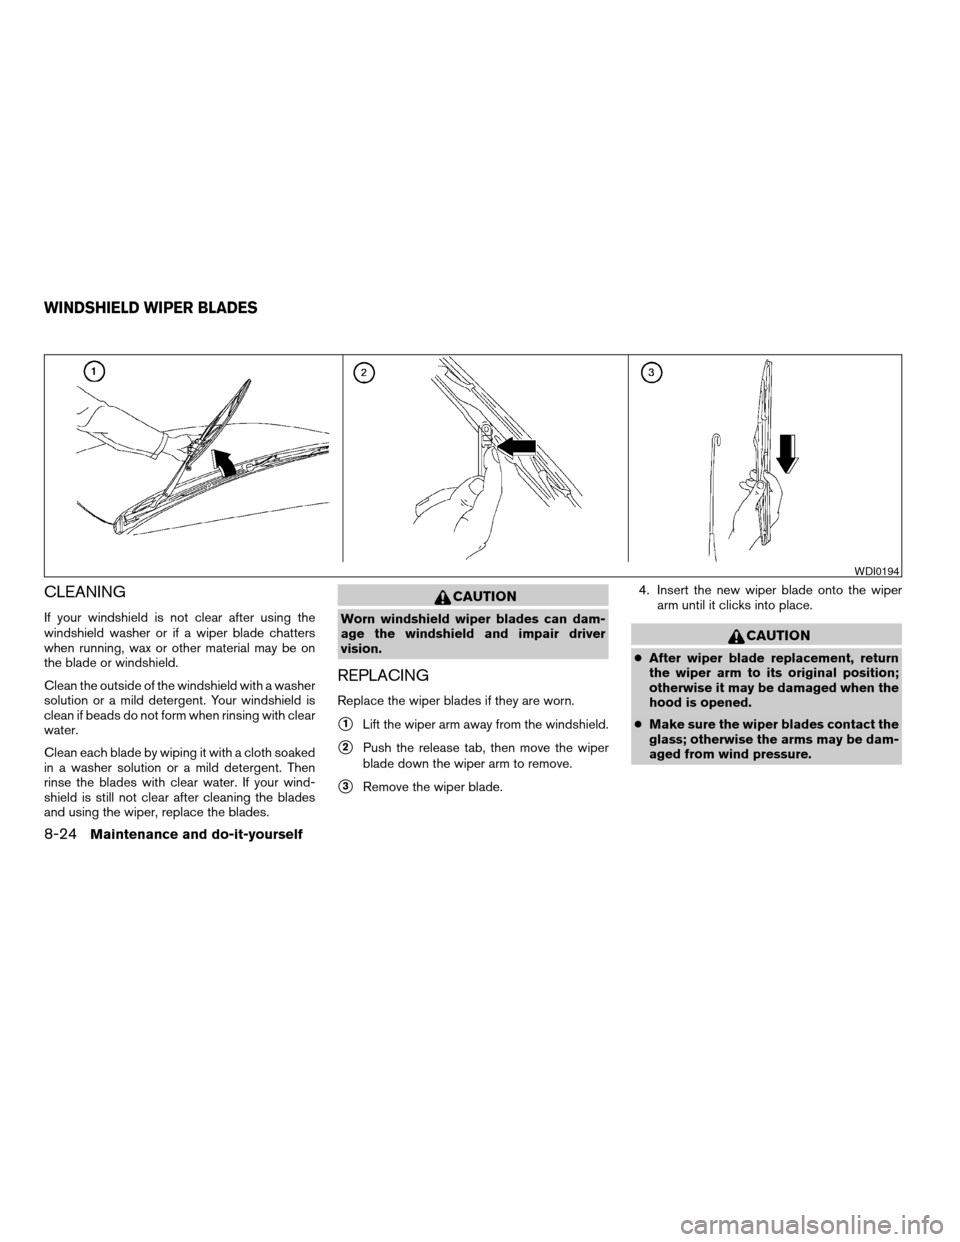
s1Lift the wiper arm away from the windshield.
s2Push the release tab, then move the wiper
blade down the wiper arm to remove.
s3Remove the wiper blade.4. Insert the new wiper blade onto the wiper
arm until it clicks into place.
CAUTION
cAfter wiper blade replacement, return
the wiper arm to its original position;
otherwise it may be damaged when the
hood is opened.
cMake sure the wiper blades contact the
glass; otherwise the arms may be dam-
aged from wind pressure.
WDI0194
WINDSHIELD WIPER BLADES
8-24Maintenance and do-it-yourself
ZREVIEW COPYÐ2006 Altima(l30)
Owners ManualÐUSA_English(nna)
09/08/05Ðdebbie
X
Page 243 of 304

If you wax the surface of the hood, be careful not
to let wax get into the washer nozzle
s1. This may
cause clogging or improper windshield washer
operation. If wax gets into the nozzle, remove it
with a needle or small pin
s2.
CHECKING PARKING BRAKE
From the released position, pull the parking brake
lever up slowly and firmly. If the number of clicks is
out of the range listed, see a NISSAN dealer.
c7 - 8 clicks under pulling force of
44 lb (196 N) .
CHECKING BRAKE PEDAL
With the engine running, check the distanceA
between the upper surface of the pedal and the
metal floor. If it is out of the range shown, see a
NISSAN dealer.
Distance A: Under depression force of
110 lb (490 N)
Automatic
TransmissionManual
Transmission
3.55 in (90.3 mm)
or more3.31 in (84 mm)
or more
WDI0424
WDI0228WDI0229
PARKING BRAKE AND BRAKE PEDAL
Maintenance and do-it-yourself8-25
ZREVIEW COPYÐ2006 Altima(l30)
Owners ManualÐUSA_English(nna)
09/08/05Ðdebbie
X
Page 244 of 304

Self-adjusting brakes
Your vehicle is equipped with self-adjusting
brakes.
The front and rear disc-type brakes self-adjust
every time the brake pedal is applied.
WARNING
See a NISSAN dealer for a brake system
check if the brake pedal height does not
return to normal.
Brake pad wear indicators
The disc brake pads on your vehicle have audible
wear indicators. When a brake pad requires re-
placement, a high pitched scraping or screech-
ing sound will be heard when the vehicle is in
motion. The noise will be heard whether or not the
brake pedal is depressed. Have the brakes
checked as soon as possible if the wear indicator
sound is heard.
Under some driving or climate conditions, occa-
sional brake squeak, squeal or other noise may
be heard. Occasional brake noise during light to
moderate stops is normal and does not affect the
function or performance of the brake system.Proper brake inspection intervals should
be followed.For more information regarding
brake inspections, see the appropriate mainte-
nance schedule information in the “NISSAN Ser-
vice and Maintenance Guide”.
BRAKE BOOSTER
Check the brake booster function as follows:
1. With the engine off, press and release the
brake pedal several times. When brake
pedal movement (distance of travel) remains
the same from one pedal application to the
next, continue on to the next step.
2. While depressing the brake pedal, start the
engine. The pedal height should drop a little.
3. With the brake pedal depressed, stop the
engine. Keep the pedal depressed for about
30 seconds. The pedal height should not
change.
4. Run the engine for one minute without de-
pressing the brake pedal, then turn it off.
Depress the brake pedal several times. The
pedal travel distance will decrease gradually
with each depression as the vacuum is re-
leased from the booster.
If the brakes do not operate properly, have the
brakes checked by a NISSAN dealer.
ENGINE COMPARTMENT
CAUTION
Never use a fuse of a higher or lower
amperage rating than specified on the
fuse box cover. This could damage the
electrical system or cause a fire.
If any electrical equipment does not come on,
check for an open fuse.
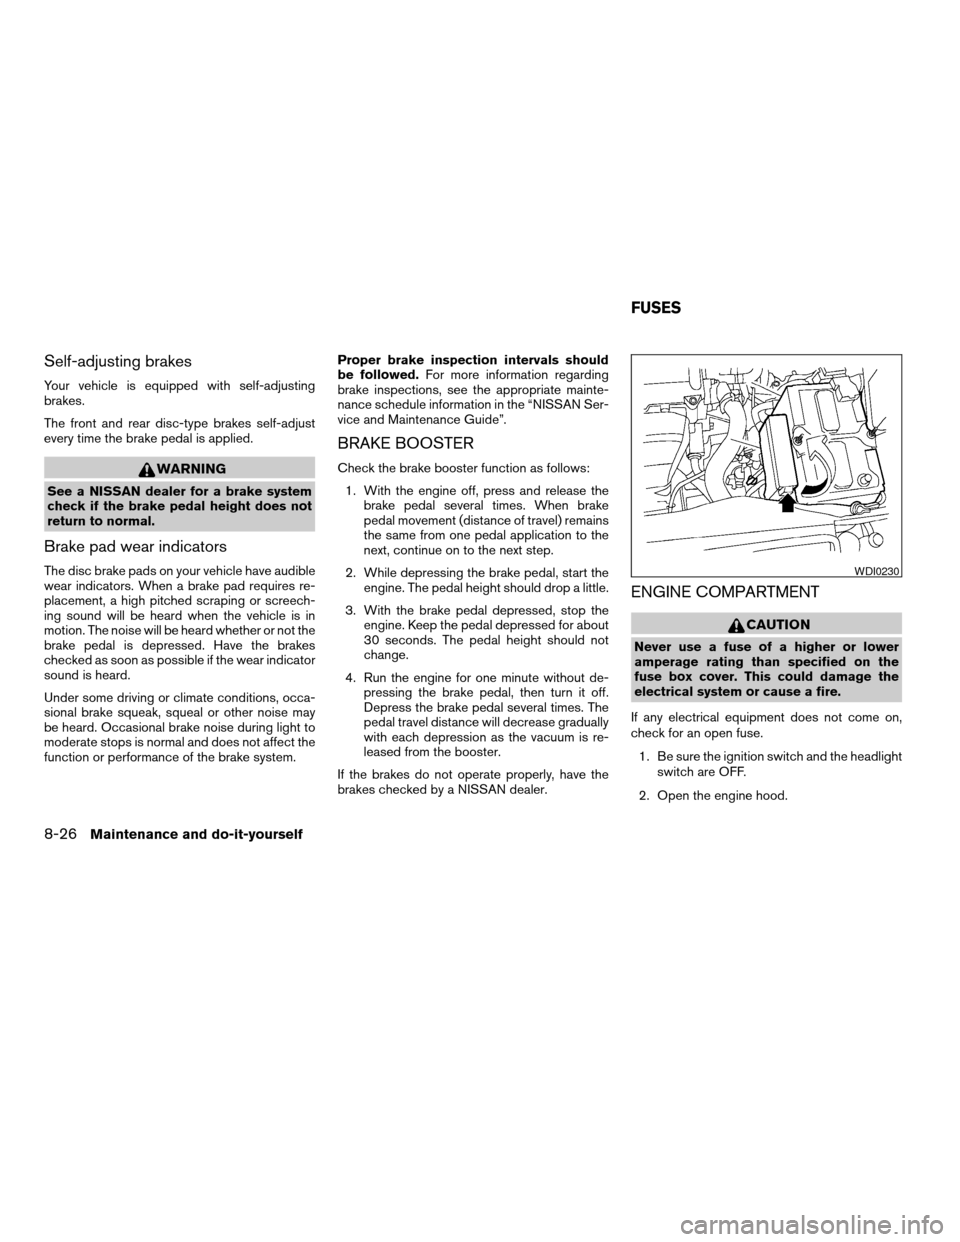
1. Be sure the ignition switch and the headlight
switch are OFF.
2. Open the engine hood.
WDI0230
FUSES
8-26Maintenance and do-it-yourself
ZREVIEW COPYÐ2006 Altima(l30)
Owners ManualÐUSA_English(nna)
09/08/05Ðdebbie
X
Page 297 of 304

Fuel Econ button
Control panel buttons............4-4
Fuses......................8-26
Fusible links...................8-27
G
Garage door opener, HomeLinkTUniversal
Transceiver...................2-43
Gascap.....................3-12
Gauge
Engine coolant temperature gauge.....2-8
Engine oil pressure gauge..........2-9
Fuel consumption gauge..........2-10
Fuel gauge..................2-8
Odometer...................2-4
Speedometer.................2-4
Tachometer..................2-7
Trip computer.................2-5
Trip odometer.................2-4
Voltmeter..................2-10
General maintenance..............8-2
Glove box....................2-33
Glove box lock.................2-33
Grocery hooks.................2-36
H
Hazard warning flasher switch.........2-26
Head restraints..................1-7
Active head restraint.............1-8
Headlight and turn signal switch........2-21
Headlight control switch............2-21
Heated seats..................2-27Heater
Heater and air conditioner
controls................4-11, 4-20
Heater operation...........4-14, 4-21
HomeLinkTUniversal Transceiver.......2-43
Hood release...................3-9
Horn.......................2-26
I
Ignition switch..................5-4
Immobilizer system..........2-17, 3-2, 5-5
Important vehicle information label.......9-10
In-cabin microfilter...............8-21
Increasing fuel economy............5-16
Indicator lights and audible reminders
(See warning/indicator lights and audible
reminders)....................2-11
Inside mirror...................3-15
Instrument brightness control.........2-24
Instrument panel.................2-2
Instrument panel dimmer switch........2-24
Interior light...................2-41
Interior trunk lid release.............3-11
ISOFIX child restraints.............1-24
J
Jump starting...................6-6
K
Key ........................3-2Keyfob battery replacement..........8-29
Keyless entry system
(See remote keyless entry system).......3-5
L
Labels
Air conditioner specification label.....9-11
C.M.V.S.S. certification label........9-10
Emission control information label.....9-11
Engine serial number............9-10
F.M.V.S.S. certification label........9-10
Vehicle identification number (VIN) plate . .9-9
Warning labels (for SRS)..........1-48
LATCH (Lower Anchors and Tethers
for CHildren) System..............1-24
License plate
Installing the license plate.........9-12
Light
Air bag warning light.........1-49, 2-13
Brake light (See stop light).........8-32
Bulb check/instrument panel........2-11
Bulb replacement..............8-32
Charge warning light............2-12
Fog light switch...............2-25
Headlight and turn signal switch......2-21
Headlight control switch..........2-21
Interior light.................2-41
Light bulbs..................8-30
Low washer fluid warning light.......2-13
Passenger air bag and status light.....1-43
Spotlights (See map light).........2-42
Trunk light..................2-43
Warning/indicator lights and audible
reminders..................2-11
10-3
ZREVIEW COPYÐ2006 Altima(l30)
Owners ManualÐUSA_English(nna)
09/08/05Ðdebbie
X
Page 304 of 304

1. Engine coolant 8-8
2. Window washer fluid 8-16
3. Engine oil 8-9
4. Passenger supplemental front impact air bag
1-34
5. Audio system 4-23, 4-25, 4-30; Air condi-
tioner 4-11, 4-20
6. Supplemental side-impact air bag (if so
equipped) 1-34
7. Front seats 1-2
8. Spare tire 6-2
9. Fuel-filler door release 3-12; Fuel recom-
mendation 9-3
10. Keys 3-2
11. Supplemental side-impact air bag (if so
equipped) 1-34
12. Seat belts 1-9
13. Trunk release 3-10
14. Supplemental curtain side-impact air bag (if
so equipped) 1-34
15. Driver supplemental front impact air bag
1-34
16. Hood release 3-9
17. Meters and gauges 2-3
WGS0016
QUICK REFERENCE
ZREVIEW COPYÐ2006 Altima(l30)
Owners ManualÐUSA_English(nna)
09/20/05Ðbetty
X