ignition NISSAN ALTIMA 2008 L32A / 4.G Quick Reference Guide
[x] Cancel search | Manufacturer: NISSAN, Model Year: 2008, Model line: ALTIMA, Model: NISSAN ALTIMA 2008 L32A / 4.GPages: 36, PDF Size: 2.85 MB
Page 4 of 36
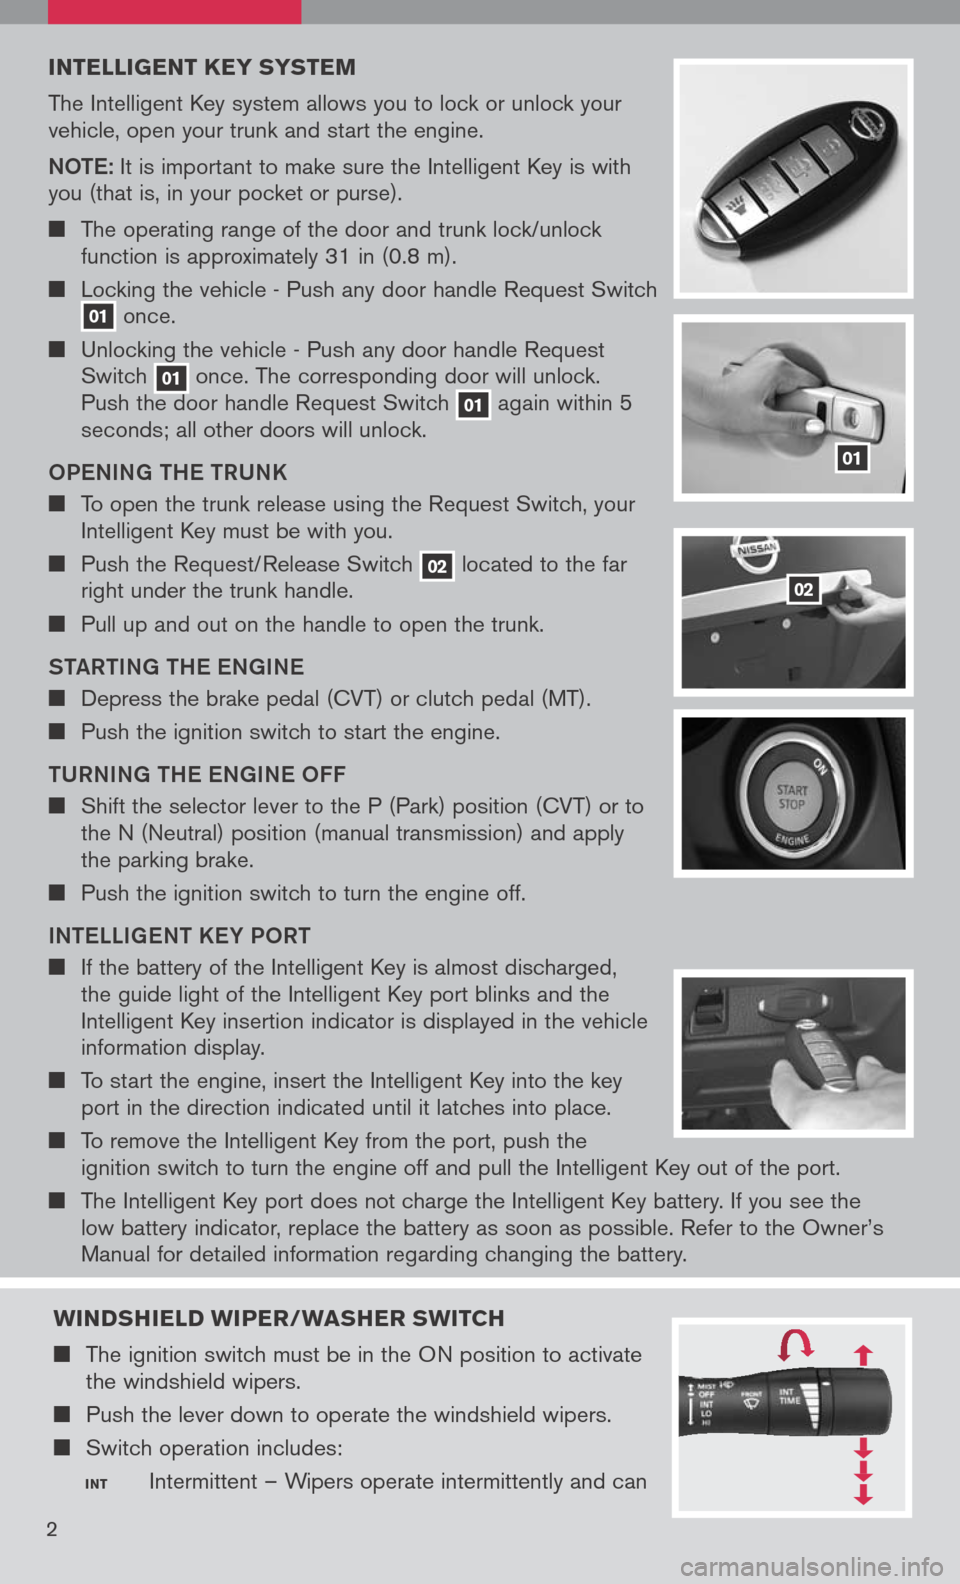
INTELLIGENT K EY SYSTEM
The Intelligent Key system allows you to lock or unlock your vehicle, open your trunk and start the engine.
Note: It is important to make sure the Intelligent Key is with you (that is, in your pocket or purse).
The operating range of the door and trunk lock/unlock function is approximately 31 in (0.8 m).
Locking the vehicle - Push any door handle Request Switch 01 once.
Unlocking the vehicle - Push any door handle Request Switch 01 once. The corresponding door will unlock. Push the door handle Request Switch 01 again within 5 seconds; all other doors will unlock.
o Pe NING tH e tRUNK
To open the trunk release using the Request Switch, your Intelligent Key must be with you.
Push the Request/Release Switch 02 located to the far right under the trunk handle.
Pull up and out on the handle to open the trunk.
S tAR tING tH e eNGIN e
Depress the brake pedal (CVT) or clutch pedal (MT).
Push the ignition switch to start the engine.
t URNING tH e eNGIN e oFF
Shift the selector lever to the P (Park) position (CVT) or to the N (Neutral) position (manual transmission) and apply the parking brake.
Push the ignition switch to turn the engine off.
IN te LLIG eN t K eY P oRt
If the battery of the Intelligent Key is almost discharged, the guide light of the Intelligent Key port blinks and the Intelligent Key insertion indicator is displayed in the vehicle information display.
To start the engine, insert the Intelligent Key into the key port in the direction indicated until it latches into place.
To remove the Intelligent Key from the port, push the ignition switch to turn the engine off and pull the Intelligent Key out of the port.
The Intelligent Key port does not charge the Intelligent Key battery. If you see the low battery indicator, replace the battery as soon as possible. Refer to the Owner’s
Manual for detailed information regarding changing the battery.
01
02
2
WINDSHIELD WIPER/WASHER SWITCH
The ignition switch must be in the ON position to activate the windshield wipers.
Push the lever down to operate the windshield wipers.
Switch operation includes:
INT Intermittent – Wipers operate intermittently and can
Page 5 of 36
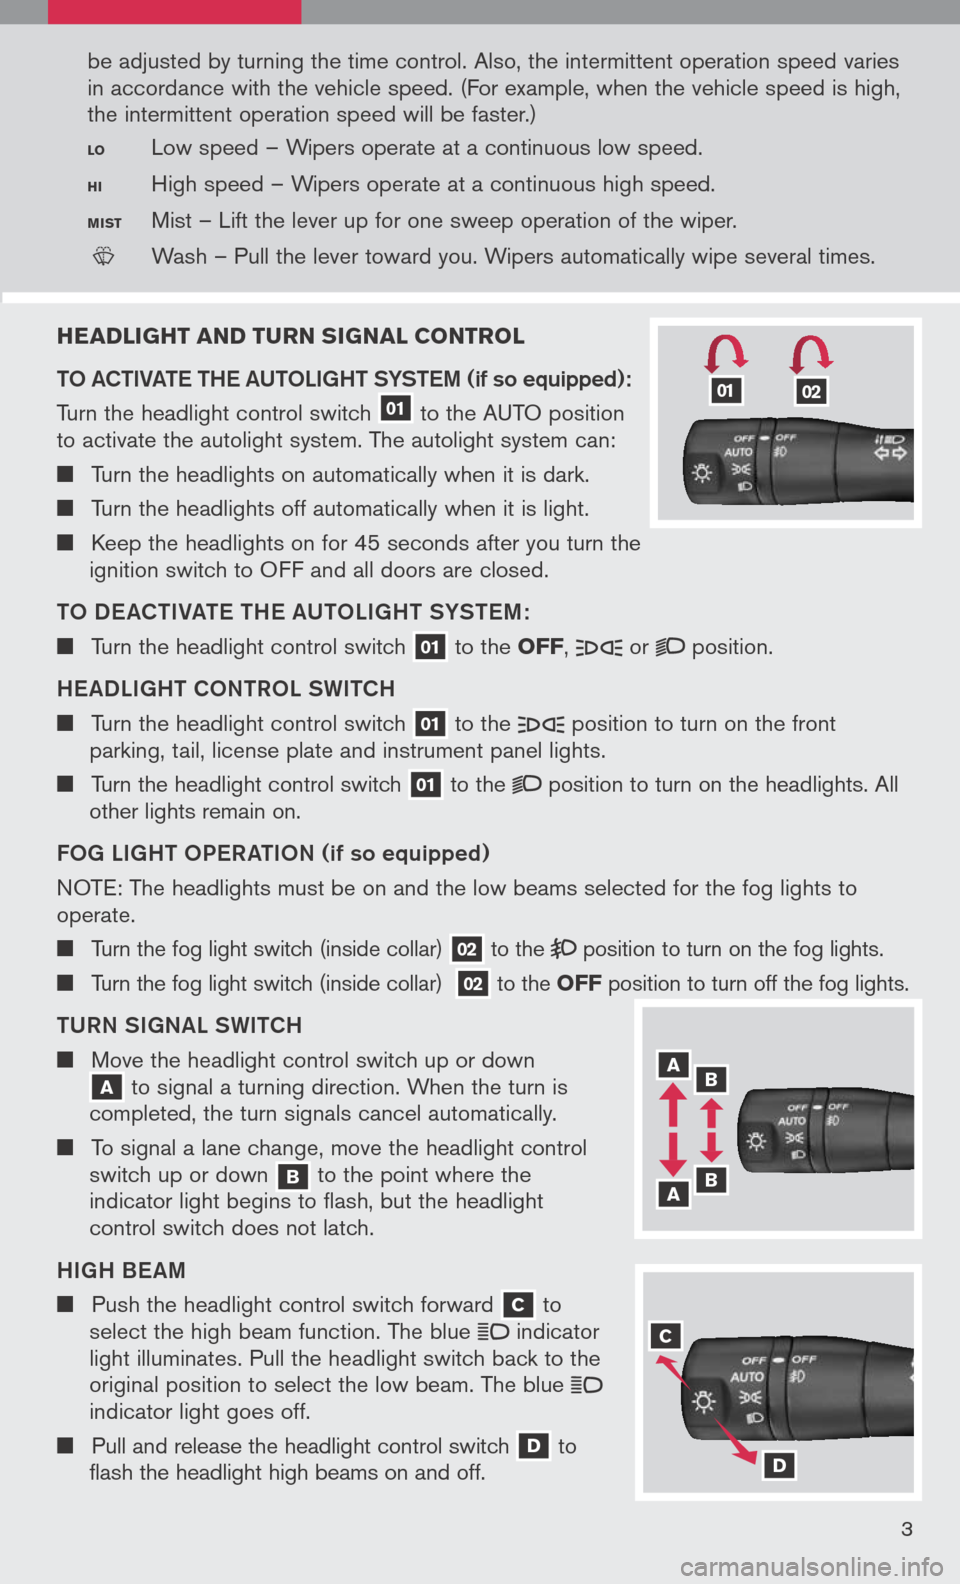
HEADLIGHT AND TURN SIGNAL CONTROL
to AC tIVA te t H e AU toLIGH t SYS teM
(if so equipped):
Turn the headlight control switch 01 to the AUTO position to activate the autolight system. The autolight system can:
Turn the headlights on automatically when it is dark.
Turn the headlights off automatically when it is light.
Keep the headlights on for 45 seconds after you turn the ignition switch to OFF and all doors are closed.
to DeAC tIVA te t H e AU toLIGH t SYS teM :
Turn the headlight control switch 01 to the OFF, or position.
H eADLIGH t CoNtR o L SWI tCH
Turn the headlight control switch 01 to the position to turn on the front parking, tail, license plate and instrument panel lights.
Turn the headlight control switch 01 to the position to turn on the headlights. All other lights remain on.
F o G LIGH t oPe RA tIo N (if so equipped)
N OTE:
The headlights must be on and the low beams selected for the fog lights to
operate.
Turn the fog light switch (inside collar) 02 to the position to turn on the fog lights.
Turn the fog light switch (inside collar) 02 to the OFF position to turn off the fog lights.
t URN SIGNAL SWI tCH
Move the headlight control switch up or down A to signal a turning direction. When the turn is completed, the turn signals cancel automatically.
To signal a lane change, move the headlight control switch up or down b to the point where the indicator light begins to flash, but the headlight control switch does not latch.
HIGH B eAM
Push the headlight control switch forward C to select the high beam function. The blue indicator light illuminates. Pull the headlight switch back to the original position to select the low beam. The blue indicator light goes off.
Pull and release the headlight control switch D to flash the headlight high beams on and off.
3
be adjusted by turning the time control. Also, the intermittent operation speed varies
in accordance with the vehicle speed. (For example, when the vehicle speed is high,
the intermittent operation speed will be faster.)
LO Low speed – Wipers operate at a continuous low speed.
HI High speed – Wipers operate at a continuous high speed.
MIST Mist – Lift the lever up for one sweep operation of the wiper.
LCN0042
Wash – Pull the lever toward you. Wipers automatically wipe several times.
A b
b A
C
D
0102
Page 12 of 36
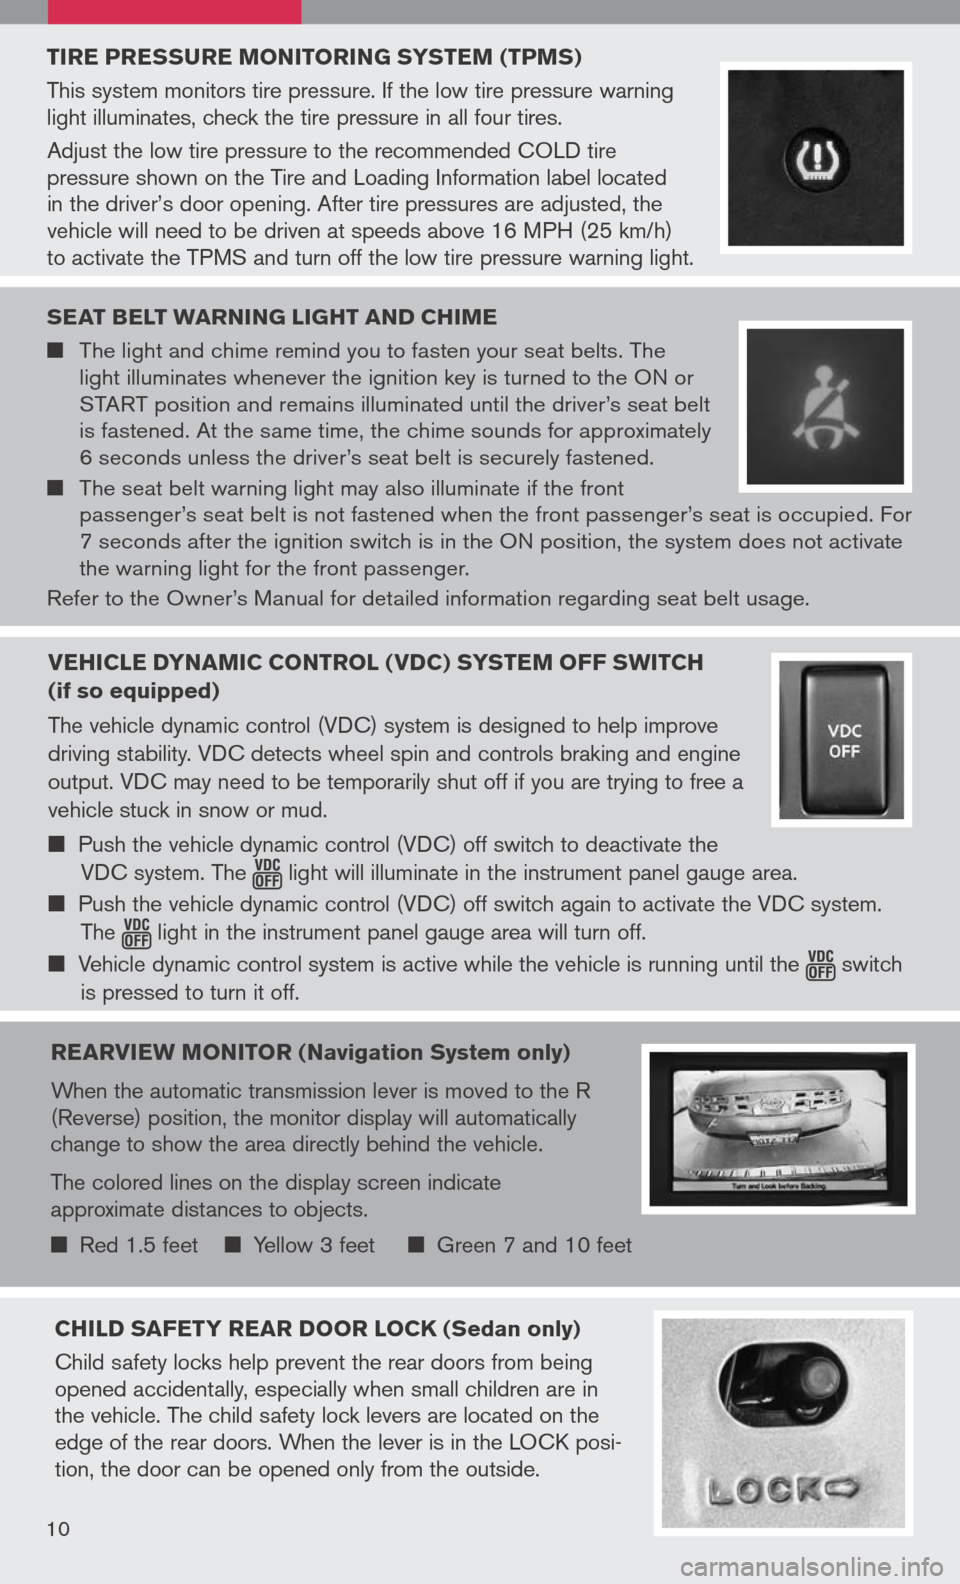
TIRE PRESSURE MONITORING SYSTEM (TPMS)
This system monitors tire pressure. If the low tire pressure warning light illuminates, check the tire pressure in all four tires.
Adjust the low tire pressure to the recommended COLD tire pressure shown on the Tire and Loading Information label located in the driver’s door opening. After tire pressures are adjusted, the vehicle will need to be driven at speeds above 16 MPH (25 km/h) to activate the TPMS and turn off the low tire pressure warning light.
SEAT bELT WARNING LIGHT AND CHIME
The light and chime remind you to fasten your seat belts. The light illuminates whenever the ignition key is turned to the ON or START position and remains illuminated until the driver’s seat belt is fastened. At the same time, the chime sounds for approximately 6 seconds unless the driver’s seat belt is securely fastened.
The seat belt warning light may also illuminate if the front passenger’s seat belt is not fastened when the front passenger’s seat is occupied. For 7 seconds after the ignition switch is in the ON position, the system does not activate the warning light for the front passenger.
Refer to the Owner’s Manual for detailed information regarding seat belt usage.
REARVIEW MONITOR (Navigation System only)
When the automatic transmission lever is moved to the R (Reverse) position, the monitor display will automatically change to show the area directly behind the vehicle.
The colored lines on the display screen indicate approximate distances to objects.
Red 1.5 feet Yellow 3 feet Green 7 and 10 feet
CHILD SAFETY REAR DOOR LOCK (Sedan only)
Child safety locks help prevent the rear doors from being opened accidentally, especially when small children are in the vehicle. The child safety lock levers are located on the edge of the rear doors. When the lever is in the LOCK posi-tion, the door can be opened only from the outside.
10
VEHICLE DYNAMIC CONTROL (VDC) SYSTEM OFF SWITCH
(if so equipped)
The vehicle dynamic control (VDC) system is designed to help improve
driving stability. VDC detects wheel spin and controls braking and engine
output. VDC may need to be temporarily shut off if you are trying to free a
vehicle stuck in snow or mud.
Push the vehicle dynamic control (VDC) off switch to deactivate the
VDC system. The light will illuminate in the instrument panel gauge area.
Push the vehicle dynamic control (VDC) off switch again to activate the VDC system.
The light in the instrument panel gauge area will turn off.
Vehicle dynamic control system is active while the vehicle is running until the switch
is pressed to turn it off.
Page 13 of 36
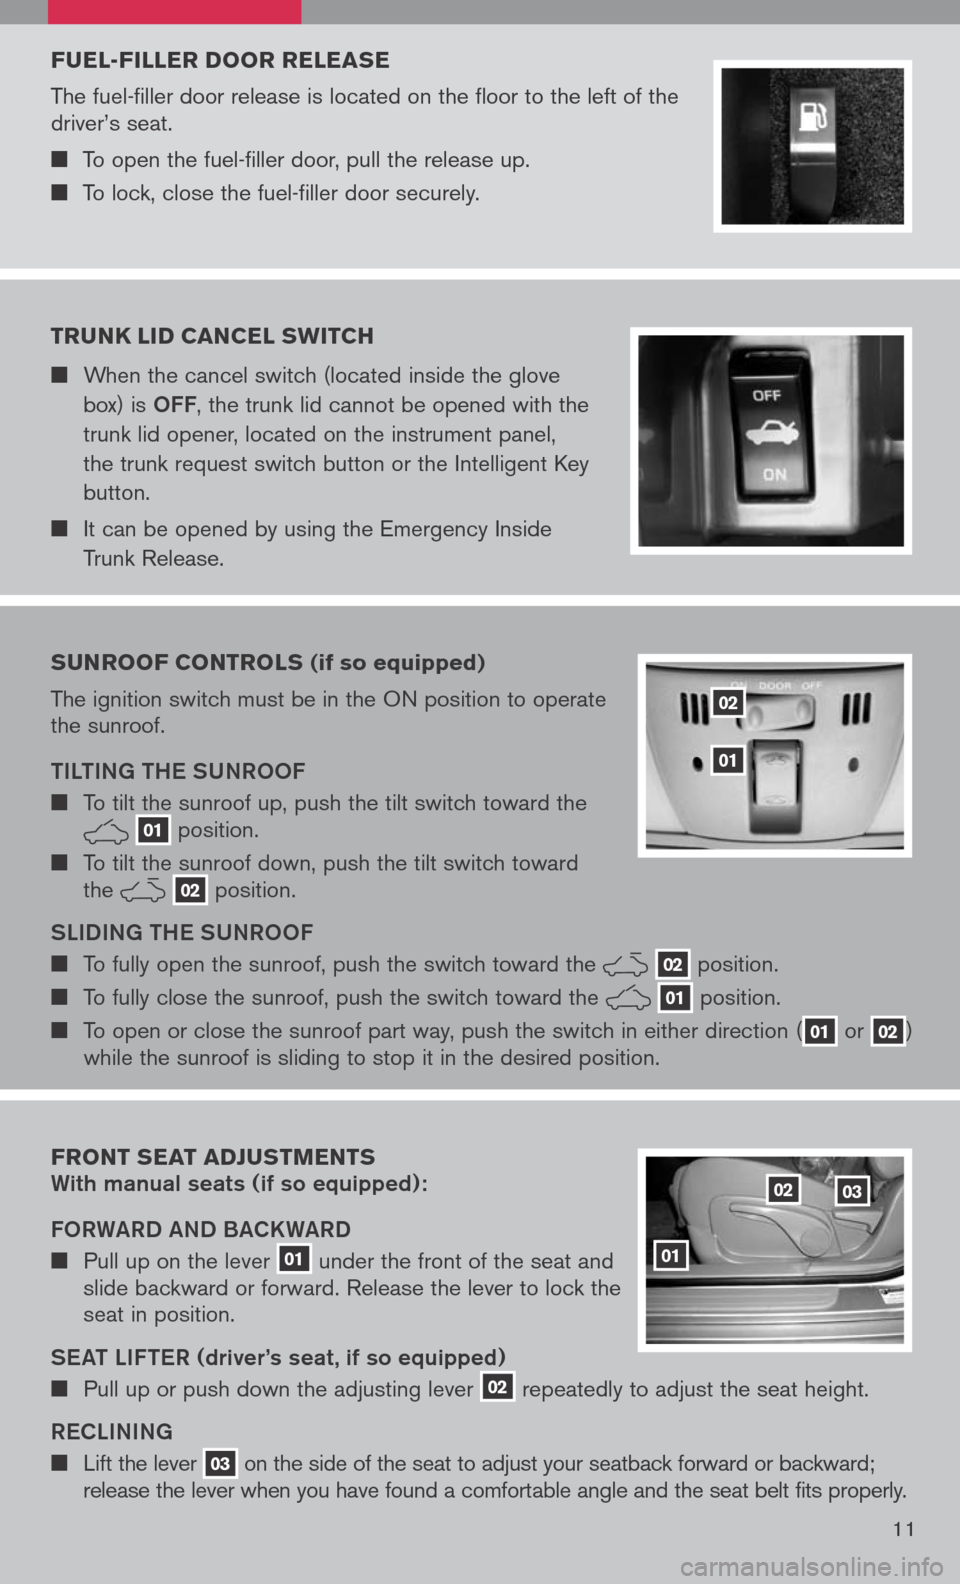
FUEL-FILLER DOOR RELEASE
The fuel-filler door release is located on the floor to the left of the driver’s seat.
To open the fuel-filler door, pull the release up.
To lock, close the fuel-filler door securely.
SUNROOF CONTROLS (if so equipped)
The ignition switch must be in the ON position to operate the sunroof.
tIL tING tH e SUNR ooF
To tilt the sunroof up, push the tilt switch toward the 01 position.
To tilt the sunroof down, push the tilt switch toward the 02 position.
SLIDING tH e SUNR ooF
To fully open the sunroof, push the switch toward the 02 position.
To fully close the sunroof, push the switch toward the 01 position.
To open or close the sunroof part way, push the switch in either direction (01 or 02) while the sunroof is sliding to stop it in the desired position.
02
01
TRUNK LID CANCEL SWITCH
When the cancel switch (located inside the glove
box) is oFF, the trunk lid cannot be opened with the
trunk lid opener, located on the instrument panel,
the trunk request switch button or the Intelligent Key
button.
It can be opened by using the Emergency Inside
Trunk Release.
11
FRONT SEAT ADJUSTMENTS With manual seats (if so equipped):
Fo RWARD AND BACKWARD
Pull up on the lever 01 under the front of the seat and slide backward or forward. Release the lever to lock the seat in position.
S eAt LIF teR
(driver’s seat , if so equipped)
Pull up or push down the adjusting lever 02 repeatedly to adjust the seat height.
Re CLINING
Lift the lever 03 on the side of the seat to adjust your seatback forward or backward; release the lever when you have found a comfortable angle and the seat belt fits properly.
01
0203
Page 16 of 36
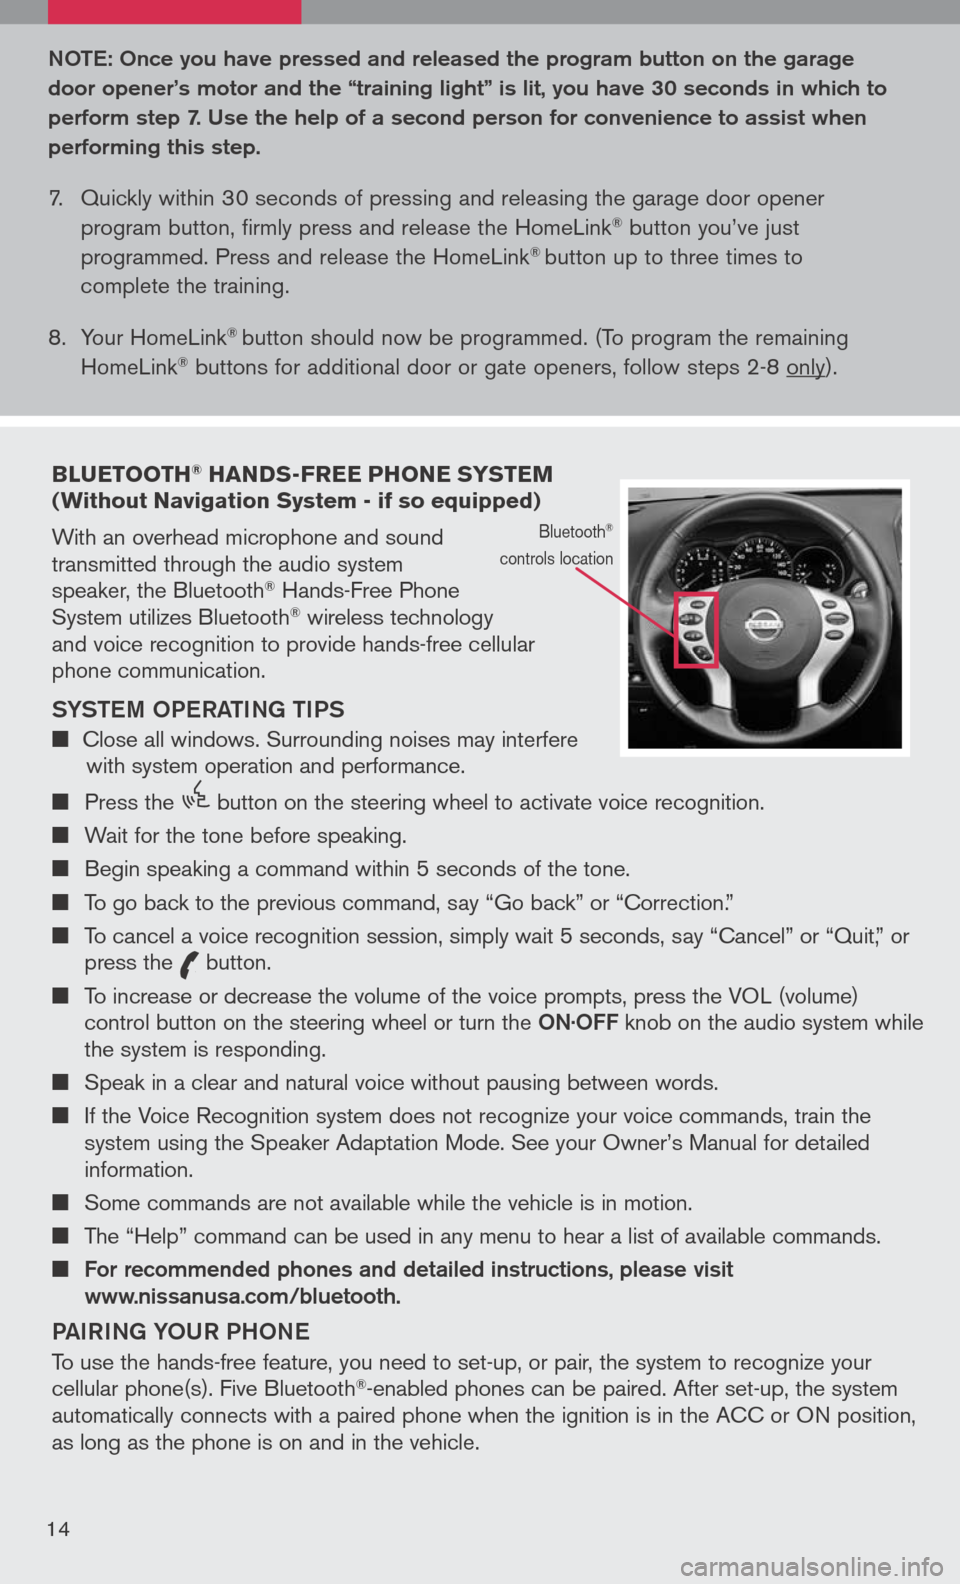
bLUETOOTH® HANDS-FREE PHONE SYSTEM (Without Navigation System - if so equipped)
With an overhead microphone and sound transmitted through the audio system speaker, the Bluetooth® Hands-Free Phone System utilizes Bluetooth® wireless technology and voice recognition to provide hands-free cellular phone communication.
SYS teM oPe RA tING tIPS
Close all windows. Surrounding noises may interfere with system operation and performance.
Press the
icon C
button on the steering wheel to activate voice recognition.
Wait for the tone before speaking.
Begin speaking a command within 5 seconds of the tone.
To go back to the previous command, say “Go back” or “Correction.”
To cancel a voice recognition session, simply wait 5 seconds, say “Cancel” or “Quit,” or press the
icon C
button.
To increase or decrease the volume of the voice prompts, press the VOL (volume) control button on the steering wheel or turn the oN· oFF knob on the audio system while the system is responding.
Speak in a clear and natural voice without pausing between words.
If the Voice Recognition system does not recognize your voice commands, train the system using the Speaker Adaptation Mode. See your Owner’s Manual for detailed information.
Some commands are not available while the vehicle is in motion.
The “Help” command can be used in any menu to hear a list of available commands.
For recommended phones and detailed instructions, please visit www.nissanusa.com/bluetooth.
PAIRING Y oUR PH oNe
To use the hands-free feature, you need to set-up, or pair, the system to recognize your cellular phone(s). Five Bluetooth®-enabled phones can be paired. After set-up, the system automatically connects with a paired phone when the ignition is in the ACC or ON position, as long as the phone is on and in the vehicle.
Bluetooth®
controls location
Note : o nce you have pressed and released the program button on the garage
door opener’s motor and the “training light” is lit, you have 30 seconds in which to
perform step 7. Use the help of a second person for convenience to assist when
performing this step.
7. Quickly within 30 seconds of pressing and releasing the garage door opener
program button, firmly press and release the HomeLink® button you’ve just
programmed. Press and release the HomeLink® button up to three times to
complete the training.
8. Your HomeLink
® button should now be programmed. (To program the remaining
HomeLink® buttons for additional door or gate openers, follow steps 2-8 only).
14
Page 19 of 36
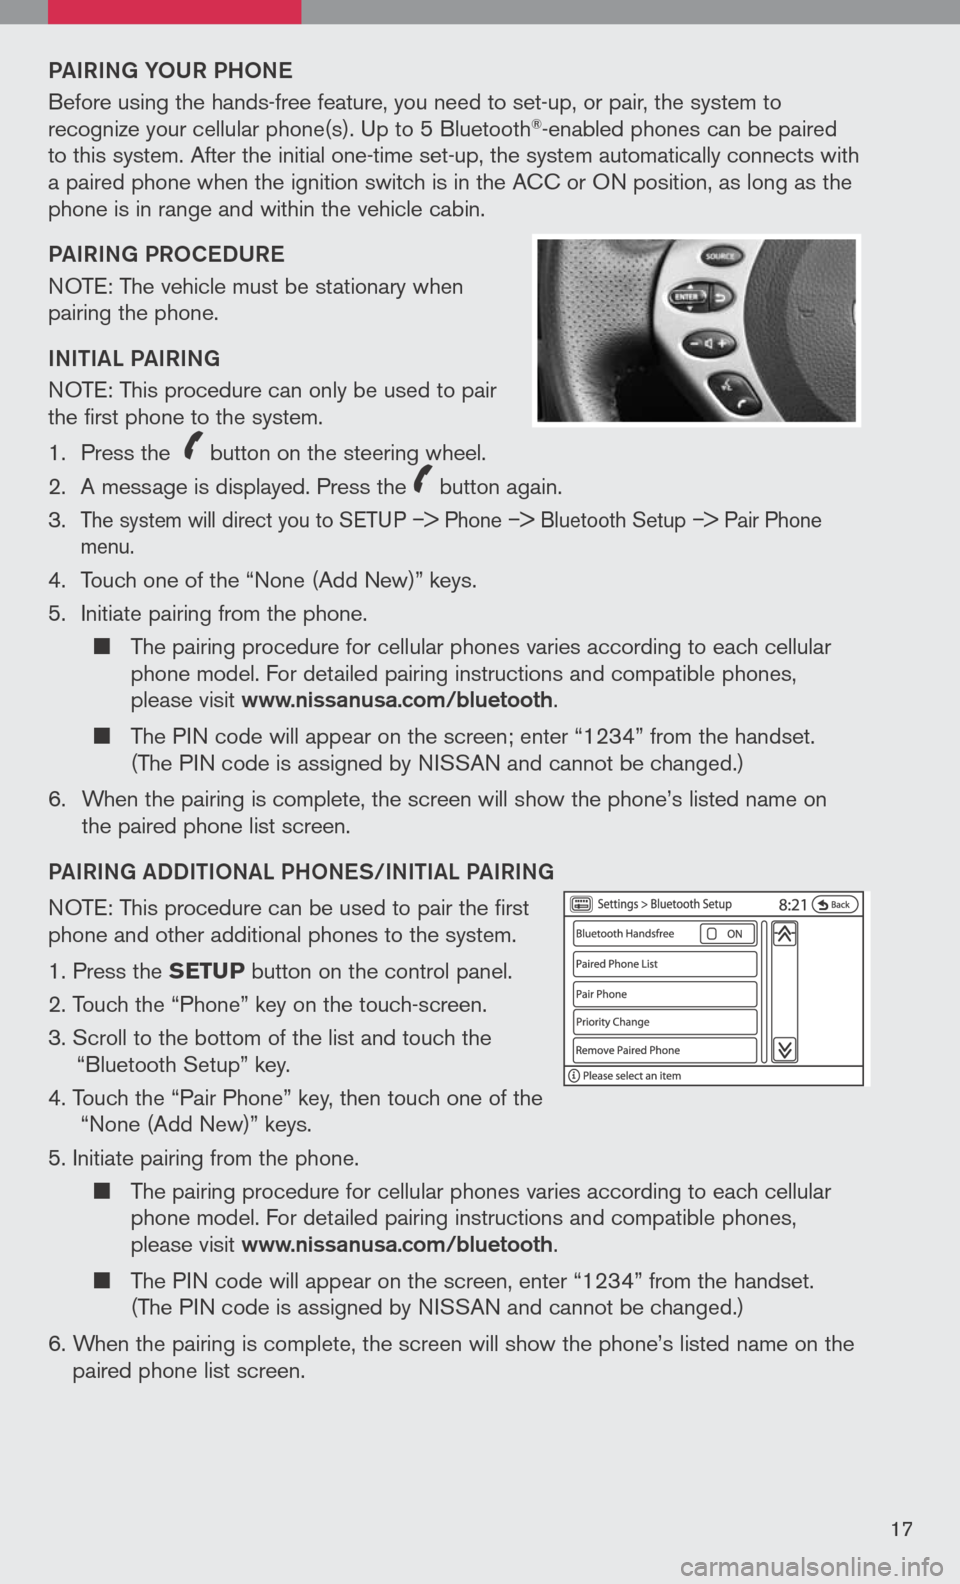
PAIRING YoUR PH oNe
Before using the hands-free feature, you need to set-up, or pair, the system to recognize your cellular phone(s). Up to 5 Bluetooth®-enabled phones can be paired to this system. After the initial one-time set-up, the system automatically connects with a paired phone when the ignition switch is in the ACC or ON position, as long as the phone is in range and within the vehicle cabin.
PAIRING PR oCeDUR e
NOTE: The vehicle must be stationary when pairing the phone.
INItIAL PAIRING
NOTE: This procedure can only be used to pair the first phone to the system.
1. Press the
icon C
button on the steering wheel.
2. A message is displayed. Press the
icon C
button again.
3.
The system will direct you to SETUP –> Phone –> Bluetooth Setup –> Pair Phone menu.
4. Touch one of the “None (Add New)” keys.
5. Initiate pairing from the phone.
The pairing procedure for cellular phones varies according to each cellular phone model. For detailed pairing instructions and compatible phones, please visit www.nissanusa.com/bluetooth.
The PIN code will appear on the screen; enter “1234” from the handset. (The PIN code is assigned by NISSAN and cannot be changed.)
6. When the pairing is complete, the screen will show the phone’s listed name on
the paired phone list screen.
PAIRING ADDIt Io NAL PH oNeS/INIt IAL PAIRING
NOTE: This procedure can be used to pair the first phone and other additional phones to the system.
1. Press the SETUP button on the control panel.
2. Touch the “Phone” key on the touch-screen.
3. Scroll to the bottom of the list and touch the
“Bluetooth Setup” key.
4. Touch the “Pair Phone” key, then touch one of the “None (Add New)” keys.
5. Initiate pairing from the phone.
The pairing procedure for cellular phones varies according to each cellular phone model. For detailed pairing instructions and compatible phones, please visit www.nissanusa.com/bluetooth.
The PIN code will appear on the screen, enter “1234” from the handset. (The PIN code is assigned by NISSAN and cannot be changed.)
6. When the pairing is complete, the screen will show the phone’s listed name on the
paired phone list screen.
17
Page 22 of 36
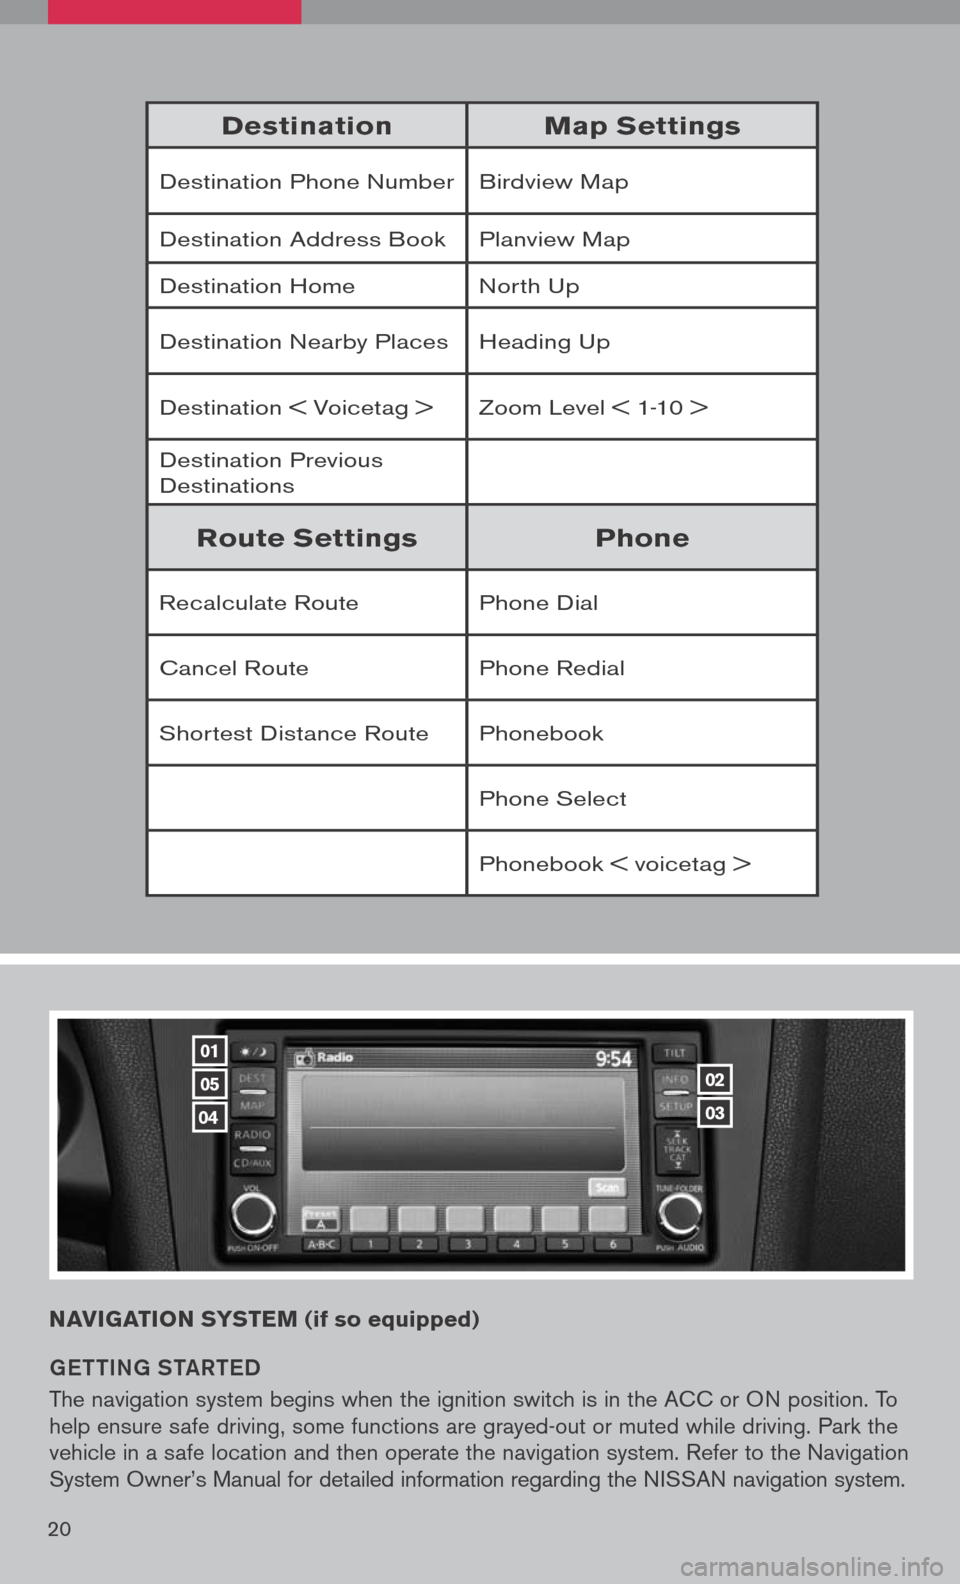
DestinationMap Settings
Destination Phone NumberBirdview Map
Destination Address BookPlanview Map
Destination HomeNorth Up
Destination Nearby PlacesHeading Up
Destination < Voicetag >Zoom Level < 1-10 >
Destination Previous Destinations
Route SettingsPhone
Recalculate RoutePhone Dial
Cancel RoutePhone Redial
Shortest Distance RoutePhonebook
Phone Select
Phonebook < voicetag >
NAVIGATION SYSTEM (if so equipped)
G ett ING S tAR teD
The navigation system begins when the ignition switch is in the ACC or ON position. To help ensure safe driving, some functions are grayed-out or muted while driving. Park the vehicle in a safe location and then operate the navigation system. Refer to the Navigation System Owner’s Manual for detailed information regarding the NISSAN navigation system.
01
05
04
02
03
20