tire pressure NISSAN ALTIMA 2012 Owners Manual
[x] Cancel search | Manufacturer: NISSAN, Model Year: 2012, Model line: ALTIMA, Model: NISSAN ALTIMA 2012Pages: 453, PDF Size: 4.23 MB
Page 11 of 453
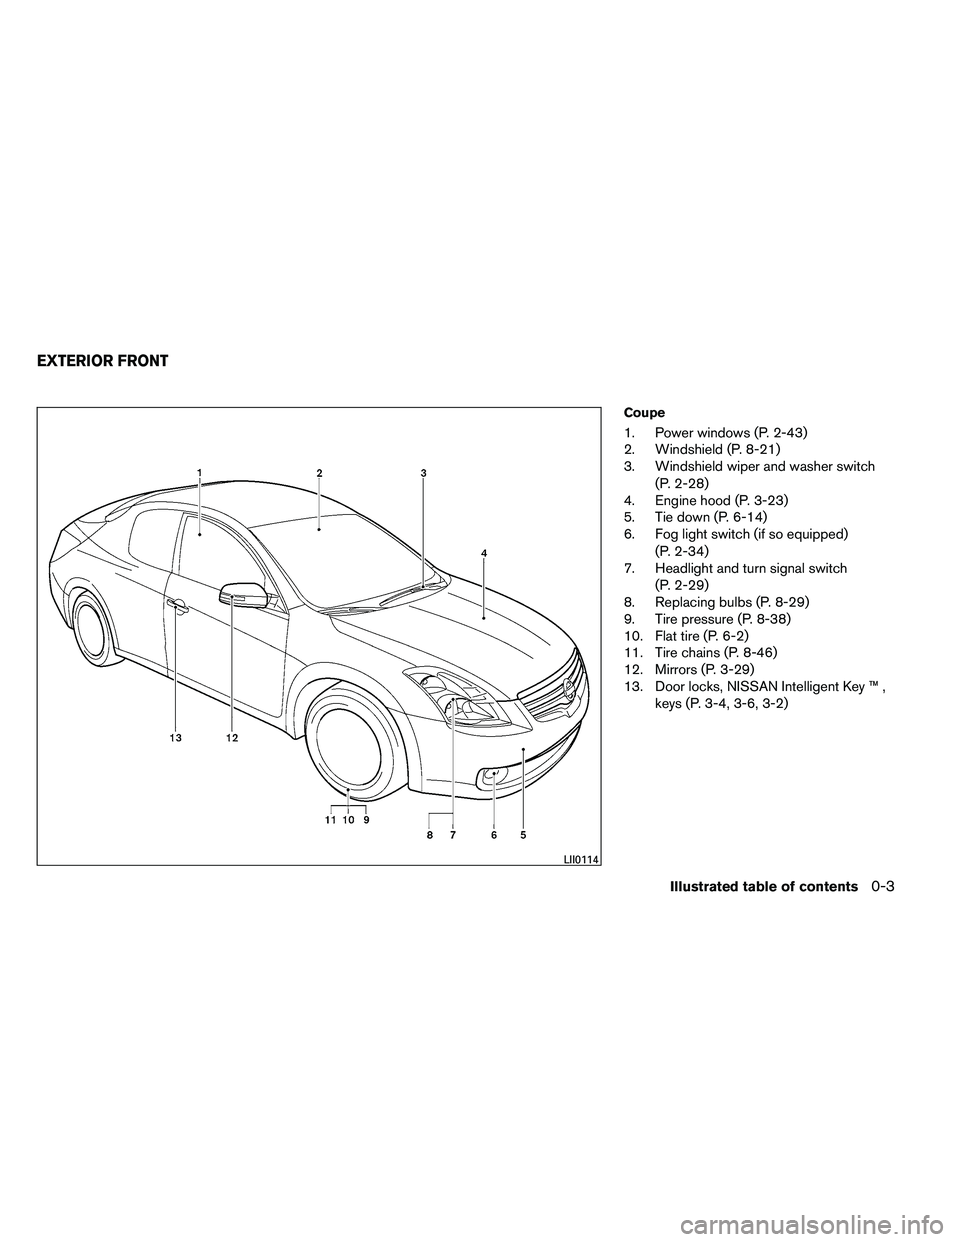
Coupe
1. Power windows (P. 2-43)
2. Windshield (P. 8-21)
3. Windshield wiper and washer switch(P. 2-28)
4. Engine hood (P. 3-23)
5. Tie down (P. 6-14)
6. Fog light switch (if so equipped)
(P. 2-34)
7. Headlight and turn signal switch
(P. 2-29)
8. Replacing bulbs (P. 8-29)
9. Tire pressure (P. 8-38)
10. Flat tire (P. 6-2)
11. Tire chains (P. 8-46)
12. Mirrors (P. 3-29)
13. Door locks, NISSAN Intelligent Key ™ ,
keys (P. 3-4, 3-6, 3-2)
Page 12 of 453
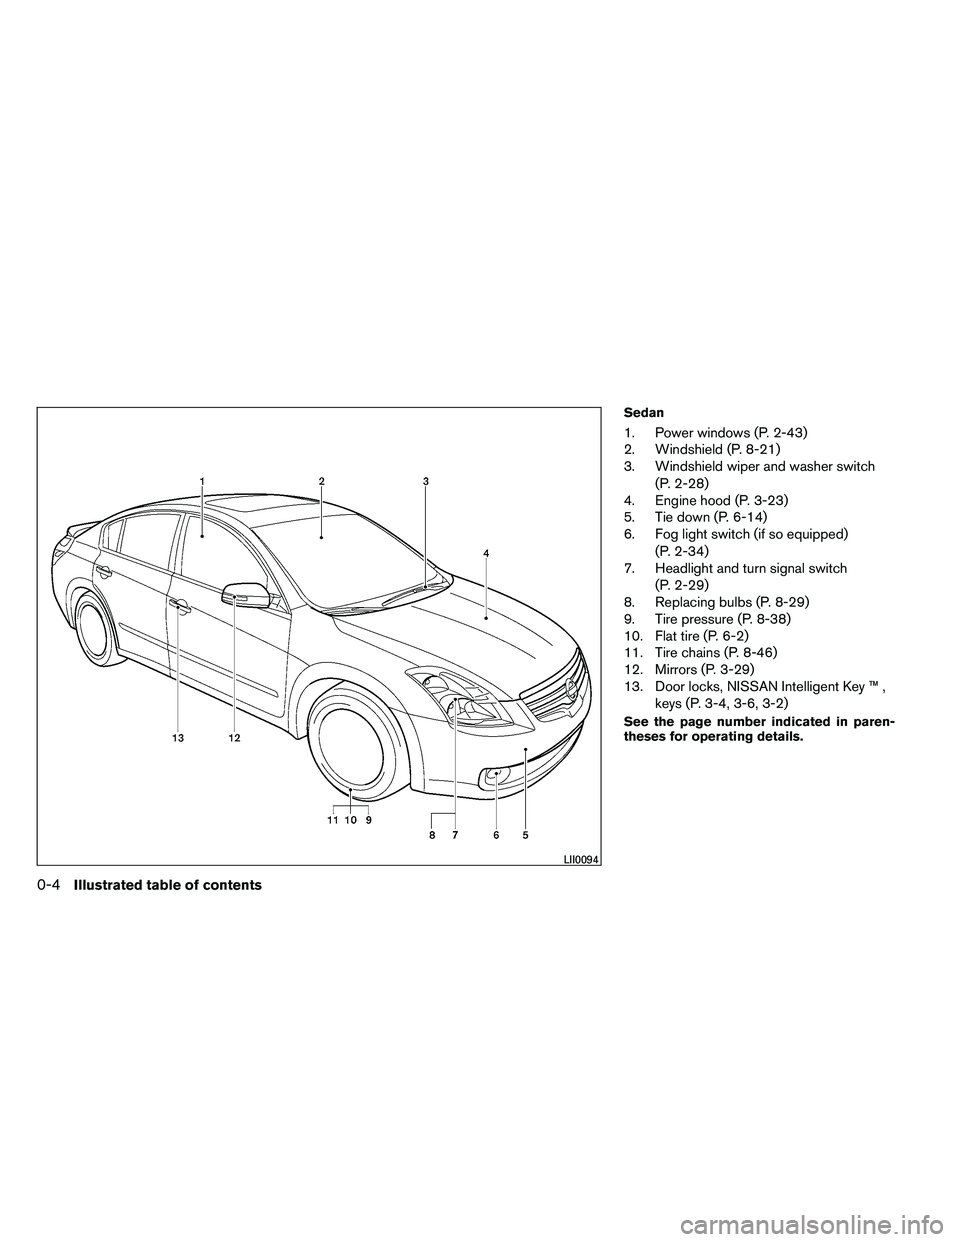
Sedan
1. Power windows (P. 2-43)
2. Windshield (P. 8-21)
3. Windshield wiper and washer switch(P. 2-28)
4. Engine hood (P. 3-23)
5. Tie down (P. 6-14)
6. Fog light switch (if so equipped)
(P. 2-34)
7. Headlight and turn signal switch
(P. 2-29)
8. Replacing bulbs (P. 8-29)
9. Tire pressure (P. 8-38)
10. Flat tire (P. 6-2)
11. Tire chains (P. 8-46)
12. Mirrors (P. 3-29)
13. Door locks, NISSAN Intelligent Key ™ ,
keys (P. 3-4, 3-6, 3-2)
See the page number indicated in paren-
theses for operating details.
Page 91 of 453
TPMS malfunction:
If the TPMS is not functioning properly, the low
tire pressure warning light will flash for approxi-
mately 1 minute when the ignition switch is
placed in the ON position. The light will remain on
after the 1 minute. Have the system checked by a
NISSAN dealer. The CHECK TIRE PRESSURE
warning does not appear if the low tire pressure
warning light illuminates to indicate a TPMS mal-
function.
For additional information, see “Tire Pressure
Monitoring System (TPMS)” in the “Starting and
driving” section and “Tire pressure” in the “Main-
tenance and do-it-yourself” section.
Page 92 of 453
●No key warning
● Low fuel warning
● Low windshield-washer fluid warning
● Parking brake release warning
● Door/trunk open warning
● Loose fuel cap
● Check tire pressure warning
Page 102 of 453
11. NISSAN Intelligent Key™ removal indicator
12. NISSAN Intelligent Key™ battery dischargeindicator
13. Loose fuel cap warning
14. Check tire pressure warning
Door and trunk open warning
This warning illuminates when a door or the trunk
has been opened when the engine is running.
Push warning (CVT models)
After the Shift P warning illuminates, the Push
warning will illuminate if the ignition switch is
placed in the ACC position when the shift selec-
tor is moved to the P (Park) position.
See “Shift P warning (CVT models)” in this sec-
tion for additional information.
To turn off the Push warning, place the ignition
switch in the ON position and then in the LOCK
position.
Low fuel warning
This warning illuminates when the fuel level in the
fuel tank is getting low. Refuel as soon as it is
convenient, preferably before the fuel gauge
reaches E (Empty) . There will be a small re-
serve of fuel in the tank when the fuel
gauge needle reaches E (Empty) . Low windshield-washer fluid warning
This warning illuminates when the windshield-
washer fluid is at a low level. Add windshield-
washer fluid as necessary. See “Windshield-
washer fluid” in the “Maintenance and do-it-
yourself” section of this manual.
No key warning
This warning illuminates following two condi-
tions:
1. When the ignition switch is pushed and the Intelligent Key cannot be recognized by the
system. If this warning illuminates, you can-
not start the engine.
Check for the following causes and perform
the assigned remedies:
– The battery of the Intelligent Key carried with you is discharged completely. Re-
place the battery with a new one.
– The Intelligent Key carried with you is not registered to the system. Use the regis-
tered Intelligent Key.
– You do not have an Intelligent Key with you. Carry an Intelligent Key with you. 2. When the door is closed with the Intelligent
Key left outside the vehicle and the ignition
switch is placed in the ACC or ON position.
A chime will also sound.
Parking brake warning
This warning illuminates when the parking brake
is set and the vehicle is driven.
SHIFT P warning (CVT models)
This warning illuminates when the ignition switch
is pushed to stop the engine with the shift selec-
tor in any position except in the P (Park) position.
If this warning illuminates, the ignition switch is
placed in the OFF position. Move the shift selec-
tor to the P (Park) position or place the ignition
switch in the ON position.
An inside warning chime will also sound.
If the shift selector is moved to the P (Park)
position, the Push warning will appear. Refer to
“Push warning (CVT models)” in this section.
For additional information about Intelligent Key,
see “NISSAN Intelligent Key™ ” in the “Pre-
driving checks and adjustments” section.
2-24Instruments and controls
Page 103 of 453
Engine start operation indicator (CVT
models)
This indicator illuminates when the ignition switch
is placed in the LOCK, OFF, ACC or ON position
with the shift selector in the P (Park) position.
This indicator means that the engine will start by
pushing the push-button ignition switch with the
brake pedal depressed.
Engine start operation indicator (M/T
models)
This indicator illuminates when the ignition switch
is placed in the LOCK, OFF, ACC or ON position
with the shift selector in neutral and the parking
brake on.
This indicator means that the engine will start by
pushing the ignition switch with the clutch and
the brake pedal depressed.
NISSAN Intelligent Key™ insertion indica-
tor
This indicator illuminates when the Intelligent Key
needs to be inserted into the Intelligent Key port.
(For example, the Intelligent Key battery is dis-
charged.)
If this indicator illuminates, insert the Intelligent
Key into the Intelligent Key port in the correct
direction. See “Push-button ignition switch” in
the “Starting and driving” section.NISSAN Intelligent Key™ removal indica-
tor
This indicator illuminates when the driver’s door
is opened with the ignition switch placed in the
OFF position and the Intelligent Key placed in the
Intelligent Key port. A key reminder chime also
sounds.
If this indicator illuminates, remove the Intelligent
Key from the Intelligent Key port and take it with
you when leaving the vehicle.
NISSAN Intelligent Key™ battery dis-
charge indicator
This indicator illuminates when the Intelligent Key
battery is running out of power.
If this indicator illuminates, replace the battery
with a new one. See “NISSAN Intelligent Key™” in
the “Maintenance and do-it-yourself” section.
Loose fuel cap warning
This warning appears when the fuel-filler cap is
not tightened correctly after the vehicle has been
refueled. See “Fuel-filler cap” in the “Pre-driving
checks and adjustments” section.
Check tire pressure warning
This warning appears when the low tire pressure
warning light in the meter illuminates and low tire
pressure is detected. If this warning appears,
stop the vehicle and adjust the tire pressure to
the recommended COLD tire pressure shown on
the Tire and Loading Information label. See “Low
tire pressure warning light” earlier in this section
and “Tire Pressure Monitoring System (TPMS)”
in the “Starting and driving” section.
Instruments and controls2-25
Page 317 of 453
●The TPMS will activate only when the vehicle
is driven at speeds above 16 MPH (25
km/h) . Also, this system may not detect a
sudden drop in tire pressure (for example a
flat tire while driving) .
● The low tire pressure warning light does not
automatically turn off when the tire pressure
is adjusted. After all 4 tires are inflated to the
recommended pressure, the vehicle must be
driven at speeds above 16 MPH (25 km/h)
to activate the TPMS and turn off the low tire
pressure warning light. Use a tire pressure
gauge to check the tire pressure.
● The CHECK TIRE PRESSURE warning ap-
pears in the vehicle information display when
the low tire pressure warning light is illumi-
nated and low tire pressure is detected. The
CHECK TIRE PRESSURE warning turns off
when the low tire pressure warning light
turns off.
● The CHECK TIRE PRESSURE warning
does not appear if the low tire pressure
warning light illuminates to indicate a TPMS
malfunction. ●
Tire pressure rises and falls depending on
the heat caused by the vehicle’s operation
and the outside temperature. Low outside
temperature can lower the temperature of
the air inside the tire which can cause a
lower tire inflation pressure. This may cause
the low tire pressure warning light to illumi-
nate. If the warning light illuminates in low
ambient temperature, check the tire pres-
sure for all four tires.
● The Tire and Loading Information label (also
referred to as the vehicle placard or tire
inflation pressure label) is located in the
driver’s door opening.
For additional information, see “Low tire pressure
warning light” in the “Instruments and controls”
section and “Tire Pressure Monitoring System
(TPMS)” in the “In case of emergency” section.
Page 318 of 453
●When a spare tire is mounted or a wheel
is replaced, tire pressure will not be
indicated, the TPMS will not function
and the low tire pressure warning light
will flash for approximately 1 minute.
The light will remain on after 1 minute.
Contact your NISSAN dealer as soon as
possible for tire replacement and/or
system resetting.
● Replacing tires with those not originally
specified by NISSAN could affect the
proper operation of the TPMS.
● Do not inject any tire liquid or aerosol
tire sealant into the tires, as this may
cause a malfunction of the tire pressure
sensors.
Page 319 of 453
avoid driving when tired. Never drive when under
the influence of alcohol or drugs (including pre-
scription or over-the-counter drugs which may
cause drowsiness) . Always wear your seat belt
as outlined in the “Safety – Seats, seat belts and
supplemental restraint system” section of this
manual, and also instruct your passengers to do
so.
Seat belts help reduce the risk of injury in colli-
sions and rollovers.In a rollover crash, an
unbelted or improperly belted person is
significantly more likely to be injured or
killed than a person properly wearing a
seat belt.
OFF-ROAD RECOVERY
If the right side or left side wheels unintentionally
leave the road surface, maintain control of the
vehicle by following the procedure below. Please
note that this procedure is only a general guide.
The vehicle must be driven as appropriate based
on the conditions of the vehicle, road and traffic.
1. Remain calm and do not overreact.
2. Do not apply the brakes.
3. Maintain a firm grip on the steering wheel with both hands and try to hold a straight
course. 4. When appropriate , slowly release the accel-
erator pedal to gradually slow the vehicle.
5. If there is nothing in the way, steer the ve- hicle to follow the road while vehicle speed
is reduced. Do not attempt to drive the ve-
hicle back onto the road surface until vehicle
speed is reduced.
6. When it is safe to do so, gradually turn the steering wheel until both tires return to the
road surface. When all tires are on the road
surface, steer the vehicle to stay in the ap-
propriate driving lane.
● If you decide that it is not safe to return the
vehicle to the road surface based on vehicle,
road or traffic conditions, gradually slow the
vehicle to a stop in a safe place off the road.
RAPID AIR PRESSURE LOSS
Rapid air pressure loss or a “blow-out” can occur
if the tire is punctured or is damaged due to
hitting a curb or pothole. Rapid air pressure loss
can also be caused by driving on under-inflated
tires.
Rapid air pressure loss can affect the handling
and stability of the vehicle, especially at highway
speeds.
Help prevent rapid air pressure loss by maintain-
ing the correct air pressure and visually inspect the tires for wear and damage. See “Wheels and
tires” in the “Maintenance and do-it-yourself”
section of this manual. If a tire rapidly loses air
pressure or “blows-out” while driving, maintain
control of the vehicle by following the procedure
below. Please note that this procedure is only a
general guide. The vehicle must be driven as
appropriate based on the conditions of the ve-
hicle, road and traffic.
Page 335 of 453
CAUTION
During the first 1,200 miles (2,000 km) ,
follow these recommendations to obtain
maximum engine performance and en-
sure the future reliability and economy of
your new vehicle. Failure to follow these
recommendations may result in short-
ened engine life and reduced engine
performance.● Avoid driving for long periods at constant
speed, either fast or slow, and do not run the
engine over 4,000 rpm.
● Do not accelerate at full throttle in any gear.
● Avoid quick starts.
● Avoid hard braking as much as possible.
● Do not tow a trailer for the first 500 miles
(800 km) . Your engine, axle or other parts
could be damaged. ●
Accelerate slowly and smoothly. Maintain
cruising speeds with a constant accelerator
position.
● Drive at moderate speeds on the highway.
Driving at high speed lowers fuel economy.
● Avoid unnecessary stopping and braking.
Maintain a safe distance behind other ve-
hicles.
● Use a proper gear range which suits road
conditions. On level roads, shift into high
gear as soon as possible.
● Avoid unnecessary engine idling.
● Keep your engine tuned up.
● Follow the recommended periodic mainte-
nance schedule.
● Keep the tires inflated to the correct pres-
sure. Low tire pressure increases tire wear
and lowers fuel economy.
● Keep the wheels in correct alignment. Im-
proper alignment increases tire wear and
lowers fuel economy.
● Air conditioner operation lowers fuel
economy. Use the air conditioner only when
necessary. ●
When cruising at highway speeds, it is more
economical to use the air conditioner and
leave the windows closed to reduce drag.
● Use the recommended viscosity engine oil.
See “Capacities and recommended
fuel/lubricants” in the “Technical and con-
sumer information” section of this manual.
BREAK-IN SCHEDULE INCREASING FUEL ECONOMY
5-22Starting and driving