door lock NISSAN ALTIMA 2015 L33 / 5.G Owners Manual
[x] Cancel search | Manufacturer: NISSAN, Model Year: 2015, Model line: ALTIMA, Model: NISSAN ALTIMA 2015 L33 / 5.GPages: 441, PDF Size: 4.59 MB
Page 13 of 441
1. Power windows (P. 2-44)
2. Power moonroof (if so equipped)(P. 2-47)
3. Windshield (P. 8-22)
4. Windshield wiper and washer switch
(P. 2-29)
5. Engine hood (P. 3-29)
6. Fog light switch (if so equipped)
(P. 2-31)
7. Headlight and turn signal switch
(P. 2-31)
8. Replacing bulbs (P. 8-30)
9. Tire pressure (P. 8-36)
10. Flat tire (P. 6-3)
11. Tire chains (P. 8-36)
12. Mirrors (P. 3-36)
13. Door locks, NISSAN Intelligent Key® ,
keys (P. 3-4, 3-7, 3-2)
Refer to the page number indicated in
parentheses for operating details.
LII2168
EXTERIOR FRONT
Illustrated table of contents0-3
Page 14 of 441
1. Rear window defroster switch (P. 2-31)
2. Interior trunk lid release (P. 3-30)
3. Trunk lid (P. 3-30)
4. Opener operation (P. 3-30)
5. Rearview camera (if so equipped)(P. 4-10)
6. Replacing bulbs (P. 8-30)
7. Fuel-filler cap, recommended fuel
(P. 3-32, 9-2)
8. Fuel-filler door (P. 3-32)
9. Child safety rear door lock (P. 3-4)
Refer to the page number indicated in
parentheses for operating details.
LII2171
EXTERIOR REAR
0-4Illustrated table of contents
Page 73 of 441
Steps1. Adjust the seat as outlined in the “Seats” section of the Owner’s Manual. Sit upright,
leaning against the seatback, and centered
on the seat cushion with your feet comfort-
ably extended to the floor.
2. Make sure there are no objects on the occu- pant’s lap.
3. Fasten the seat belt as outlined in the “Seat belts” section of the Owner’s Manual.
4. Remain in this position for 30 seconds al- lowing the system to classify the front pas-
senger before the vehicle is put into motion.
5. Ensure proper classification by checking the front passenger air bag status light.
NOTE:
This vehicle’s occupant classification sys-
tem locks the classification during driving
so it is important that you confirm that the
front passenger is properly classified prior
to driving. Also, the occupant classification
system may recalculate the weight of the
occupant when the vehicle comes to a stop
(i.e stop light, stop sign etc.) , so front pas-
senger seat occupants should continue to
remain seated as outlined above. Troubleshooting
If you think the front passenger air bag status light
is incorrect:
1. If the light is ON with no front passenger and no objects on the front passenger seat:
This may be due to the following conditions that
may be interfering with the weight sensors: ● An object weighing over 2.2 lbs (1 kg) hang-
ing on the seat or placed in the seatback
pocket.
● A child seat or other object pressing against
the rear of the seatback.
● A rear passenger pushing or pulling on the
back of the front passenger’s seat.
● The front seat or seatback is forced back
against an object on the seat or floor behind
it.
● An object placed under the front passen-
ger’s seat.
● An object placed between the seat cushion
and center console or between door and
cushion.
If the vehicle is moving, please come to a stop
when it is safe to do so. Check and correct any of
the above conditions. Restart the vehicle and
wait one minute. NOTE:
A system check will be performed during
which the front passenger air bag status
light will remain lit for about 7 seconds
initially.
If the light is still on after this, the vehicle should
be checked by a NISSAN dealer as soon as
possible.
2. If the light is ON with an adult occupying the front passenger seat:
● Occupant is a small adult →the air bag light
is functioning as intended. The front passen-
ger air bag is suppressed.
However, if the occupant is not a small adult, then
this may be due to the following conditions that
may be interfering with the weight sensors: ● Occupant is not sitting upright, leaning
against the seatback, and centered on the
seat cushion with feet comfortably extended
to the floor.
● A child seat or other object pressing against
the rear of the seatback.
● A rear passenger pushing or pulling on the
back of the front passenger’s seat.
Safety—Seats, seat belts and supplemental restraint system1-53
Page 92 of 441
Anti-lock Braking System (ABS) warning lightSupplemental air bag warning lightOverdrive OFF indicator light (if so equipped)
oror Brake warning lightCruise main switch indicator light
(if so equipped)Security indicator light
Charge warning lightCruise set switch indicator light
(if so equipped)Side light and headlight indicator light (green)
Low tire pressure warning lightFront fog light indicator light (if so equipped)Slip indicator light
Master warning lightFront passenger air bag status lightSPORT mode indicator light (if so equipped)
Power steering warning lightHigh beam indicator light (blue)Turn signal/hazard indicator lights
Seat belt warning light and chimeMalfunction Indicator Light (MIL)Vehicle Dynamic Control (VDC) OFF indicator
light
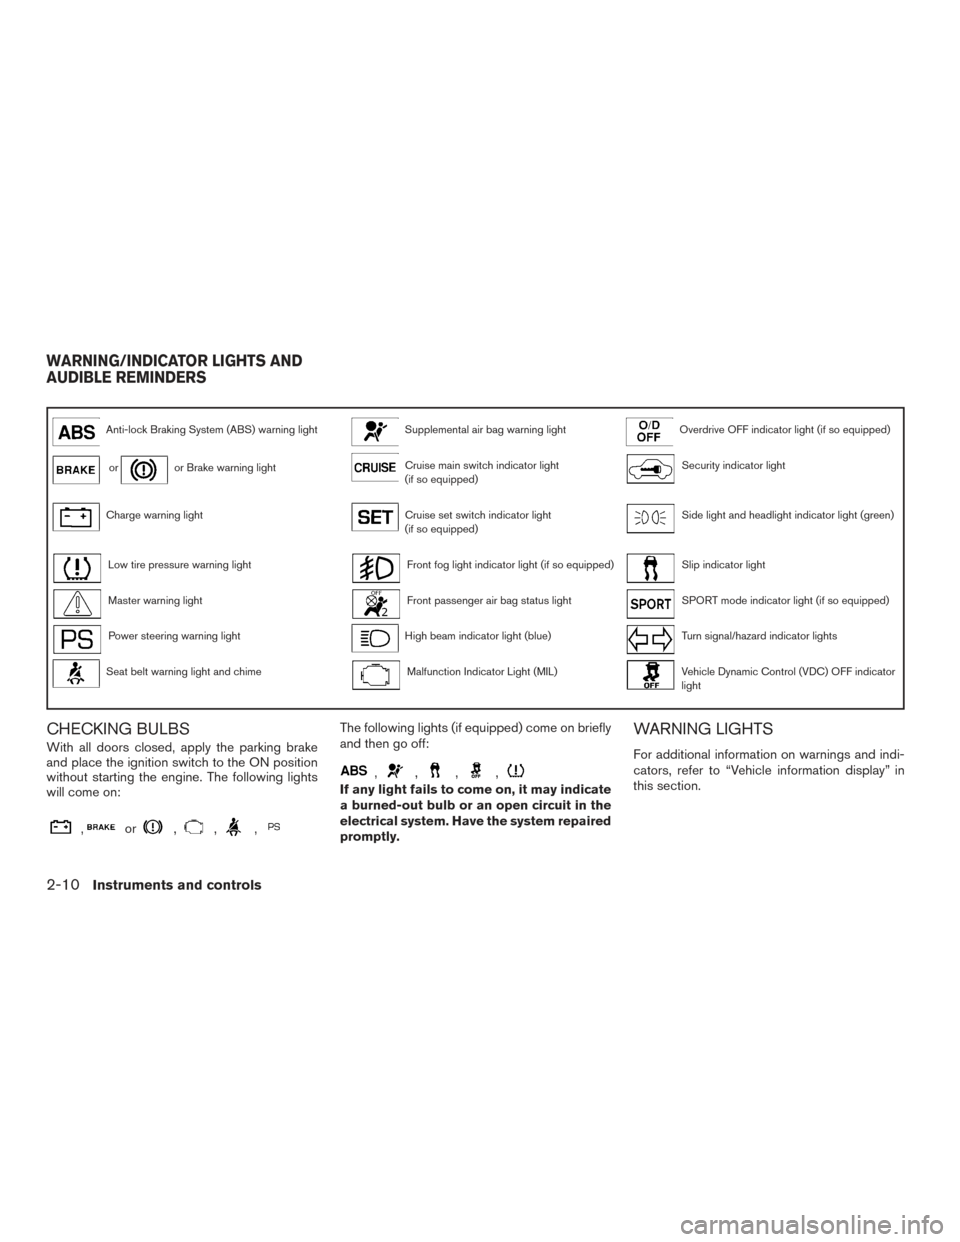
CHECKING BULBS
With all doors closed, apply the parking brake
and place the ignition switch to the ON position
without starting the engine. The following lights
will come on:
,or,,,
The following lights (if equipped) come on briefly
and then go off:
,,,,
If any light fails to come on, it may indicate
a burned-out bulb or an open circuit in the
electrical system. Have the system repaired
promptly.
WARNING LIGHTS
For additional information on warnings and indi-
cators, refer to “Vehicle information display” in
this section.
WARNING/INDICATOR LIGHTS AND
AUDIBLE REMINDERS
2-10Instruments and controls
Page 99 of 441
AUDIBLE REMINDERS
Brake pad wear warning
The disc brake pads have audible wear warnings.
When a disc brake pad requires replacement, it
makes a high pitched scraping sound when the
vehicle is in motion, whether or not the brake
pedal is depressed. Have the brakes checked as
soon as possible if the warning sound is heard.
Light reminder chime
With the ignition switch placed in the OFF posi-
tion, a chime sounds when the driver’s door is
opened if the headlights or parking lights are on.
Turn the headlight control switch off before leav-
ing the vehicle.
NISSAN Intelligent Key® door buzzer
The Intelligent Key door buzzer sounds if the
Intelligent Key is left inside the vehicle when
locking the doors. When the buzzer sounds, be
sure to check both the vehicle and the Intelligent
Key. For additional information, refer to “NISSAN
Intelligent Key®” in the “Pre-driving checks and
adjustments” section of this manual.The vehicle information display is located to the
left of the speedometer. It displays such items as:
● Vehicle settings
● Trip computer information
● Drive system warnings and settings (if so
equipped)
● Cruise control system information
● NISSAN Intelligent Key® operation informa-
tion
● Indicators and warnings (if so equipped)
● Tire Pressure information (if so equipped) ●
Audio information
● Navigation information (if so equipped)
LIC2205
VEHICLE INFORMATION DISPLAY
Instruments and controls2-17
Page 101 of 441
Driver Assistance (if so equipped)
To change the status, warnings or turn on or off
any of the systems/warnings displayed in the
“Driver Assistance” menu:
Use the
button to select and the ENTER
button to change a menu item:
● Driving Aids (if so equipped)
● Parking Aids (if so equipped)
Driving Aids (if so equipped)
To change the status, warnings or turn on or off
any of the systems/warnings displayed in the
“Driving Aids” menu.
Use the
button to select and the ENTER
button to change a menu item:
● Lane
● Blind Spot
Parking Aids (if so equipped)
To turn on or off the system displayed in the
“Parking Aids” menu use the
button to
select and the ENTER button to enable/disable
“Moving Object”.
For additional information, refer to “Moving Ob-
ject Detection (MOD)” in the “Monitor, climate,
audio, phone and voice recognition systems”
section.
Vehicle Settings
The vehicle settings allows the customer to
change settings for interior lights, Intelligent Key
settings, unlock settings and other vehicle set-
tings.
The vehicle settings can be changed using
the
,, and the ENTER buttons.
Auto Room Lamp
The interior lights can be set to be ON or OFF if
any door is unlocked. From the Vehicle Settings
menu, select “Auto Room Light”. Use the ENTER
button to turn this feature ON or OFF.
Welcome light (if so equipped)
The welcome light can be set to be ON or OFF.
From the Vehicle Settings menu, select “Wel-
come Light”. Use the ENTER button to turn this
feature ON or OFF.
Light Sensitivity (if so equipped)
The light sensitivity can be set to illuminate earlier
based on the brightness outside the vehicle.
From the Vehicle Settings menu, select “Light
Sensitivity”. Use the ENTER button to change the
sensitivity.
Light Off Delay (if so equipped)
The duration of the automatic headlights can be
changed from 0 to 180 seconds. From the Ve- hicle Settings menu, select “Light Off Delay”. Use
the ENTER button to change the duration.
Wiper with Speed
The wiper with speed can be set to be ON or
OFF. From the Vehicle Settings menu, select
“Wiper with Speed”. Use the ENTER button to
turn this feature ON or OFF.
I-Key Door Lock
When this item is turned on, the request switch
on the door is activated. From the Vehicle Set-
tings menu, select “I-Key Door Unlock”. Use the
ENTER button to activate this function.
Selective-Unlock
When this item is turned on, only the driver’s door
is unlocked first after the door unlock operation.
When the door handle request switch on the
driver’s or front passenger’s side door is pushed
to be unlocked, only the corresponding door is
unlocked first. All the doors can be unlocked if the
door unlock operation is performed again within
1 minute. When this item is turned to OFF, all the
doors will be unlocked after the door unlock
operation is performed once. From the Vehicle
Settings menu, select “Selective Unlock”. Use
the ENTER button to activate this function.
Instruments and controls2-19
Page 102 of 441
Auto Door Unlock
The auto door unlock function automatically un-
locks all the doors when the shift lever is placed in
the P (Park) position. From the Vehicle Settings
menu, select “Auto Door Unlock”. Use the EN-
TER button to enable/disable this function.
Answer Back Horn
When the answer back horn is on, the horn will
chirp and the hazard indicators will flash once
when locking the vehicle with the Intelligent Key.
Remote Start (if so equipped)
The remote start function can be turned on or off.
If the setting is OFF the vehicle cannot be started
using the Intelligent Key. From the Vehicle Set-
tings menu, select “Remote Start”. Use the EN-
TER button to enable/disable.
Battery Saver
The battery saver automatically turns off the igni-
tion after a period of time when the ignition switch
is left in the ACC or ON position.
Main Menu Selection
The items that display can be enabled/disabled
when the ignition switch is placed in the ON
position. To change the items that display.Use the
button to select and the ENTER
button to change a menu item:
● Trip Computer
● Audio
● Navigation (if so equipped)
● Fuel Economy
● Tire Pressures (if so equipped)
Trip Computer
The trip computer can be enabled/disabled to
display in the vehicle information display when
the ignition switch is placed in the ON position.
From the “Main Menu Selection” select “Trip
Computer” to display in the vehicle information
display when the ignition is placed in the ON
position.
Audio
The audio can be enabled/disabled to display in
the vehicle information display when the ignition
switch is placed in the ON position to display the
radio information in the vehicle information dis-
play.
From the “Main Menu Selection” select “Audio” to
display in the vehicle information display when
the ignition is placed in the ON position. Navigation (if so equipped)
The navigation can be enabled/disabled to dis-
play in the vehicle information display when the
ignition switch is placed in the ON position.
From the “Main Menu Selection” select “Naviga-
tion” to display in the vehicle information display
when turn-by-turn is used and the ignition is
placed in the ON position.
Fuel Economy
The fuel economy can be enabled/disabled to
display in the vehicle information display when
the ignition switch is placed in the ON position.
From the “Main Menu Selection” select “Fuel
Economy” to display in the vehicle information
display when the ignition is placed in the ON
position.
Tire Pressures (if so equipped)
The tire pressures can be enabled/disabled to
display in the vehicle information display when
the ignition switch is placed in the ON position.
From the “Main Menu Selection” select “Tire
Pressures” to display in the vehicle information
display when the ignition is placed in the ON
position.
2-20Instruments and controls
Page 109 of 441
Push to start
This warning appears in the vehicle information
display when the vehicle has been started using
the remote start function. To start the vehicle,
apply the brake and place the ignition switch in
the ON position.
Loose Fuel Cap
This warning appears when the fuel-filler cap is
not tightened correctly after the vehicle has been
refueled. For additional information, refer to
“Fuel-filler cap” in the “Pre-driving checks and
adjustments” section of this manual.
I-Key System Error: See Owner’s Manual
(if so equipped)
After the ignition switch is pushed to the ON
position, this light comes on for about 2 seconds
and then turns off.
The I-Key System Error message warns of a
malfunction with the Intelligent Key system. If the
light comes on while the engine is stopped, it may
be impossible to start the engine.
If the light comes on while the engine is running,
you can drive the vehicle. However in these
cases, contact a NISSAN dealer for repair as
soon as possible.Your vehicle may have two types of security sys-
tems:
● Vehicle security system
● NISSAN Vehicle Immobilizer System
VEHICLE SECURITY SYSTEM
The vehicle security system provides visual and
audible alarm signals if someone opens the
doors, trunk, liftgate or the hood when the system
is armed. It is not, however, a motion detection
type system that activates when a vehicle is
moved or when a vibration occurs. The system helps deter vehicle theft but cannot
prevent it, nor can it prevent the theft of interior or
exterior vehicle components in all situations. Al-
ways secure your vehicle even if parking for a
brief period. Never leave your Intelligent Key in
the vehicle, and always lock the vehicle when
unattended. Be aware of your surroundings, and
park in secure, well-lit areas whenever possible.
Many devices offering additional protection, such
as component locks, identification markers, and
tracking systems, are available at auto supply
stores and specialty shops. A NISSAN dealer
may also offer such equipment. Check with your
insurance company to see if you may be eligible
for discounts for various theft protection features.
How to arm the vehicle security
system
1. Close all windows.
(The system can be
armed even if the windows are open.)
2. Remove the Intelligent Key from the vehicle.
3. Close all doors, hood and trunk/liftgate. Lock all doors. The doors can be locked with
the Intelligent Key, door handle request
switch (if so equipped) , power door lock
switch or mechanical key.
LIC0301
SECURITY SYSTEMS
Instruments and controls2-27
Page 110 of 441
4. Confirm that the security indicator lightcomes on. The security light stays on for
about 30 seconds. The vehicle security sys-
tem is now pre-armed. After about 30 sec-
onds the vehicle security system automati-
cally shifts into the armed phase. The
security light begins to flash once every
3 seconds. If, during the 30-second pre-arm
time period, the driver’s door is unlocked by
the key or the key fob, or the ignition switch
is placed in the ACC or ON position, the
system will not arm.
● Even when the driver and/or passen-
gers are in the vehicle, the system will
activate with all the doors, hood and
trunk lid locked with the ignition switch
placed in the LOCK position. When
placing the ignition switch in the ACC
or ON position, the system will be re-
leased.
Vehicle security system activation
The vehicle security system will give the following
alarm:
● The headlights blink and the horn sounds
intermittently. ●
The alarm automatically turns off after a pe-
riod of time. However, the alarm reactivates if
the vehicle is tampered with again. The alarm
can be shut off by unlocking the driver’s door
or trunk lid with the key, or by pressing
the
button on the Intelligent Key.
The alarm is activated by:
● opening the door or trunk lid without using
the key or Intelligent Key (even if the door is
unlocked by releasing the door inside lock
switch) .
How to stop an activated alarm
The alarm stops only by unlocking the driver’s
door or the trunk lid with the key, pressing
the
button on the Intelligent Key, or press-
ing the request switch (if so equipped) on the
driver’s or passenger’s door with the Intelligent
Key in range of the door handle.
NISSAN VEHICLE IMMOBILIZER
SYSTEM
The NISSAN Vehicle Immobilizer System will not
allow the engine to start without the use of a
registered key.
If the engine fails to start using a registered key
(for example, when interference is caused by
another registered key, an automated toll road device or automatic payment device on the key
ring) , restart the engine using the following pro-
cedures:
1. Leave the ignition switch placed in the ON position for approximately 5 seconds.
2. Place the ignition switch in the OFF or LOCK position, and wait approximately
10 seconds.
3. Repeat Steps 1 and 2.
4. Restart the engine while holding the device (which may have caused the interference)
separate from the registered key.
If the no start condition re-occurs, NISSAN rec-
ommends placing the registered key on a sepa-
rate key ring to avoid interference from other
devices.
FCC Notice:
For USA:
This device complies with part 15 of the
FCC Rules. Operation is subject to the fol-
lowing two conditions: (1) This device may
not cause harmful interference, and (2) this
device must accept any interference re-
ceived, including interference that may
cause undesired operation.
2-28Instruments and controls
Page 126 of 441
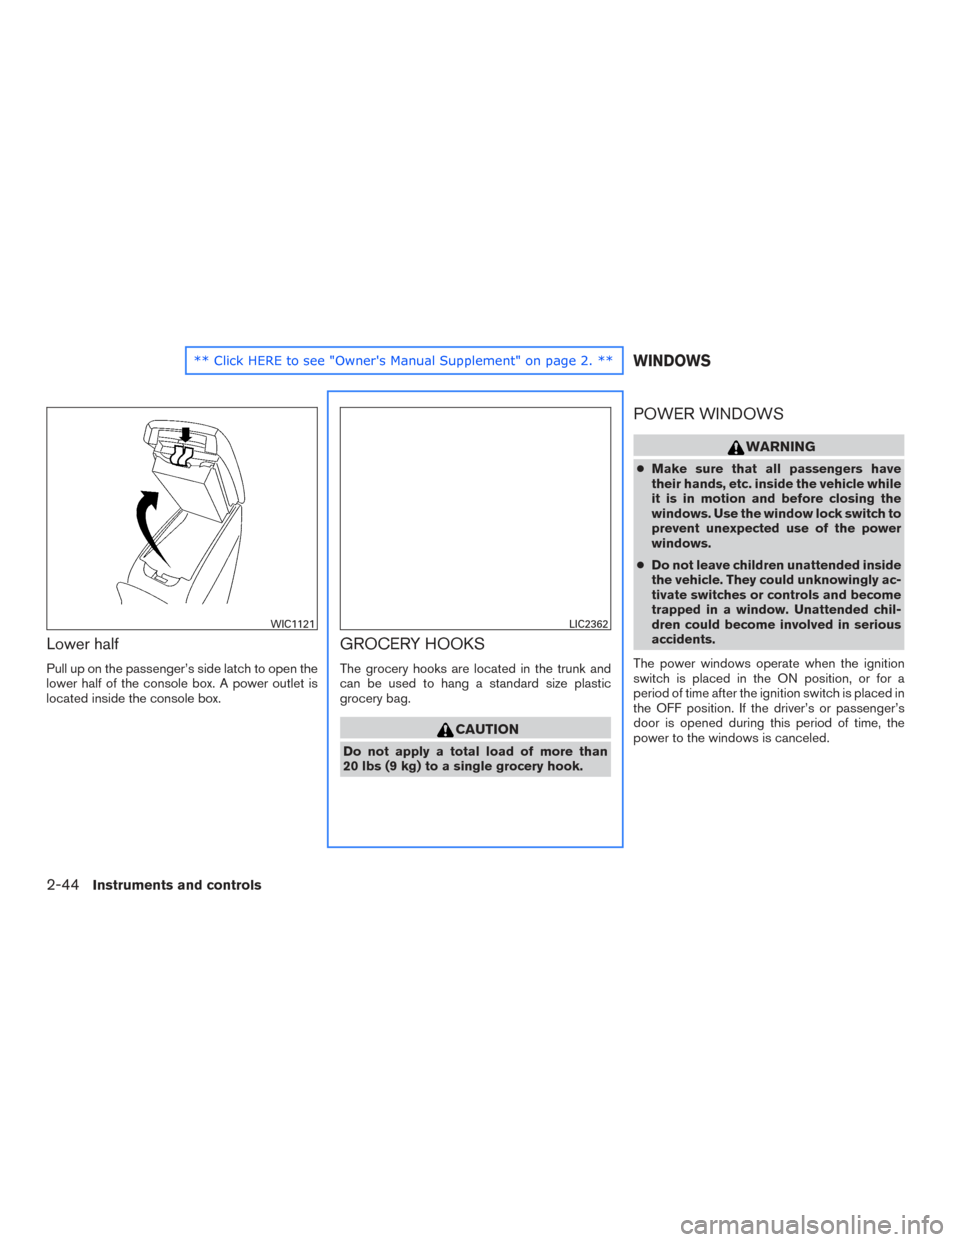
Lower half
Pull up on the passenger’s side latch to open the
lower half of the console box. A power outlet is
located inside the console box.
GROCERY HOOKS
The grocery hooks are located in the trunk and
can be used to hang a standard size plastic
grocery bag.
CAUTION
Do not apply a total load of more than
20 lbs (9 kg) to a single grocery hook.
POWER WINDOWS
WARNING
●Make sure that all passengers have
their hands, etc. inside the vehicle while
it is in motion and before closing the
windows. Use the window lock switch to
prevent unexpected use of the power
windows.
● Do not leave children unattended inside
the vehicle. They could unknowingly ac-
tivate switches or controls and become
trapped in a window. Unattended chil-
dren could become involved in serious
accidents.
The power windows operate when the ignition
switch is placed in the ON position, or for a
period of time after the ignition switch is placed in
the OFF position. If the driver’s or passenger’s
door is opened during this period of time, the
power to the windows is canceled.
WIC1121LIC2362
WINDOWS
2-44Instruments and controls