sat nav NISSAN ALTIMA 2018 Owner´s Manual
[x] Cancel search | Manufacturer: NISSAN, Model Year: 2018, Model line: ALTIMA, Model: NISSAN ALTIMA 2018Pages: 467, PDF Size: 5.42 MB
Page 186 of 467
4 Monitor, climate, audio, phone and
voice recognition systems
NissanConnect® Owner’s Manual................4-2
RearView Monitor ...............................4-3
RearView Monitor system operation ..........4-4
How to read the displayed lines ...............4-4
Difference between predicted and
actual distances ..............................4-5
How to park with predicted course
lines (if so equipped) ..........................4-7
Adjusting the screen .........................4-9
How to turn on and off predictive
course lines (if so equipped) ..................4-9
RearView Monitor system limitations ........4-10
System maintenance ......................... 4-11
Vents ............................................ 4-11
Heater and air conditioner (manual)
(if so equipped) ................................. 4-13
Controls ..................................... 4-14
Heater operation ............................ 4-14
Air conditioner operation ....................4-16
Air flow charts ............................... 4-17
Heater and air conditioner (automatic)
(if so equipped) ................................. 4-20
Automatic operation ........................ 4-21
Manual operation ........................... 4-22Operating tips
............................... 4-23
Servicing air conditioner ........................4-24
Audio system ................................... 4-24
Radio ........................................ 4-24
FM radio reception .......................... 4-25
AM radio reception .......................... 4-25
Satellite radio reception (if so equipped) .....4-25
Audio operation precautions ................4-26
FM/AM radio with compact disc (CD)
player (if so equipped) .......................4-33
FM/AM/SAT radio with compact disc
(CD) player (if so equipped) ..................4-37
USB (Universal Serial Bus) connection
port (models without Navigation
System) (if so equipped) .....................4-42
iPod®* player operation without
Navigation System (if so equipped) ..........4-44
Bluetooth® streaming audio without
Navigation System ..........................4-47
CD care and cleaning ........................ 4-48
Steering wheel switch for audio control ......4-48
Antenna ..................................... 4-50
Siri®
Eyes Free (if so equipped) ..................4-50
Requirements ............................... 4-50
Page 223 of 467
CD EJECT button
When the
CD eject button is pressed
with a compact disc loaded, the compact
disc will eject and the last source will be
played.
When the
CD eject button is pressed
twice with a compact disc loaded, the
compact disc will be ejected further for
easier CD removal. If the disc is not re-
moved within 20 seconds, the disc will re-
load.
Additional features
For additional information about the iPod®
player available with this system, refer to
“iPod® player operation without Navigation
System” in this section.
For additional information about the USB
(Universal Serial Bus) connection port avail-
able with this system, refer to “USB (Univer-
sal Serial Bus) Connection Port (models
without Navigation System)” in this section.
For additional information about the
Bluetooth® audio interface available with
this system, refer to “Bluetooth® streaming
audio without Navigation System (Type B)”
in this section.
FM/AM/SAT RADIO WITH
COMPACT DISC (CD) PLAYER (if so
equipped)
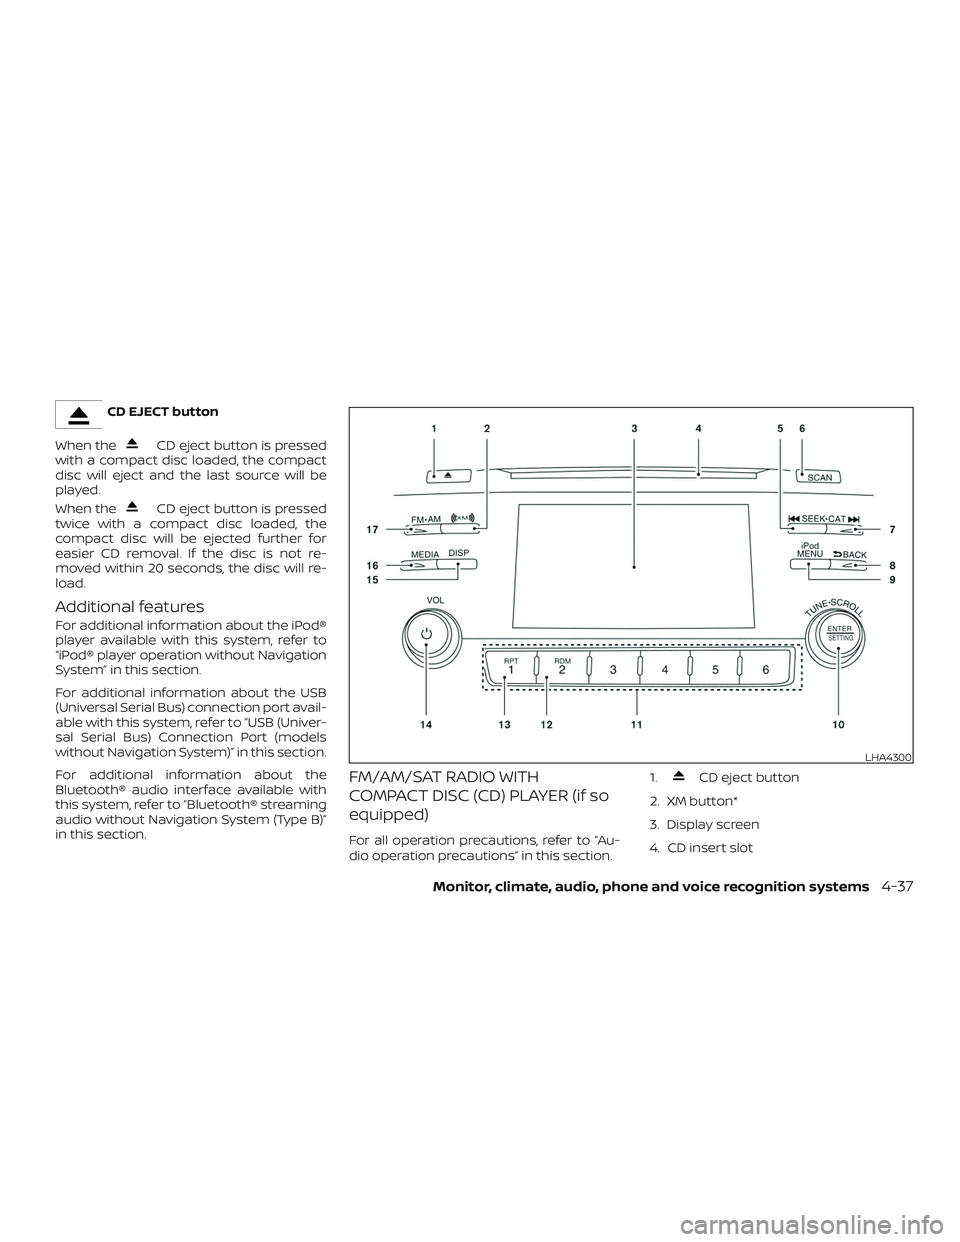
For all operation precautions, refer to “Au-
dio operation precautions” in this section. 1.
CD eject button
2. XM button*
3. Display screen
4. CD insert slot
LHA4300
Monitor, climate, audio, phone and voice recognition systems4-37
Page 224 of 467
5.SEEK button
6. SCAN button
7.
CAT button
8.
BACK button
9. iPod MENU button
10.
ENTER/SETTING button / TUNE/SCROLL
knob
11. Station select (1 - 6) buttons
12. RDM (random) button
13. RPT (repeat) button
14.
(power) button / VOL (volume)
control knob
15. DISP (display) button
16. MEDIA button
17. FM•AM button *No satellite radio reception is available
when the XM button is pressed to access
satellite radio stations unless optional sat-
ellite receiver and antenna are installed
and an SiriusXM® Satellite Radio service
subscription is active. Satellite radio is not
available in Alaska, Hawaii and Guam.
Audio main operation
(power) button / VOL (volume) con-
trol knob
Place the ignition switch in the ACC or ON
position and press the
(power) but-
ton while the system is off to call up the
mode (radio, CD, AUX, Bluetooth® audio,
USB or iPod®) that was playing immediately
before the system was turned off. To turn the system off, press the
(power) button.
Turn the VOL (volume) control knob to ad-
just the volume.
This vehicle may be equipped with Speed
Sensitive Volume. When this feature is ac-
tive, the audio volume changes as the driv-
ing speed changes.
ENTER/SETTING button
Press the ENTER/SETTING button to show
the Settings screen on the display. Turn the
TUNE/SCROLL knob to navigate the op-
tions and then press the ENTER/SETTING
button to make a selection.
4-38Monitor, climate, audio, phone and voice recognition systems
Page 226 of 467
iPod MENU button
This button can only be used for iPod® op-
erations. For additional information, refer to
“iPod® player operation (models without
navigation system)” in this section.
DISP (display) button
The DISP (display) button turns the display
screen on or off.
FM/AM/SAT radio operation
FM·AM button
Press the FM·AM button to change the
band as follows:
AM→FM1 →FM2 →AM
If another audio source is playing when the
FM·AM button is pressed, the audio source
playing will automatically be turned off and
the last radio station played will begin play-
ing.
XM band select
Press the XM button to change the band as
follows:
XM1* →XM2* →XM3* →XM1 (satellite, if so
equipped) When the XM button is pressed while the
ignition switch is in the ACC or ON position,
the radio will come on at the station last
played.
The last station played will also come on
when the
(power) button is pressed
on.
*When the XM button is pressed, the satel-
lite radio reception will not be available un-
less an optional satellite receiver and an-
tenna are installed and a SiriusXM® Satellite
Radio service subscription is active. Satel-
lite radio is not available in Alaska, Hawaii
and Guam.
If a compact disc is playing when the XM
button is pressed, the compact disc will
automatically be turned off and the last
radio station played will come on.
TUNE/SCROLL knob (Tuning)
Turn the TUNE/SCROLL knob to the lef t or
right for manual tuning.
SEEK/CAT tuning
Press the
SEEK button orCAT
button to tune from low to high or high to
low frequencies and to stop at the next
broadcasting station. SCAN (tuning) button
Press the SCAN button to stop at each
broadcasting station for 5 seconds. SCAN
will illuminate in the display while scan tun-
ing. Pressing the SCAN button again during
this 5 second period will stop the scan tun-
ing and the radio will remain tuned to that
station. If the SCAN button is not pressed
within 5 seconds, scan tuning moves to the
next station.
1 to 6 Station memory operations
Six stations can be set for the AM band.
Twelve stations can be set for the FM band
(6 for FM1, 6 for FM2). Eighteen channels can
be set for the satellite radio (6 for XM1, 6 for
XM2, 6 for XM3).
1. Choose the radio band AM, FM1 or FM2 using the FM·AM select button, or
choose the satellite band XM1, XM2 or
XM3 using the XM button.
2. Tune to the desired station using manual, SEEK or SCAN tuning. Press
and hold any of the desired station
memory buttons (1 – 6) until the preset
number is updated on the display and
the sound is briefly muted.
4-40Monitor, climate, audio, phone and voice recognition systems
Page 233 of 467
BACK button
When the
BACK button is pressed, it
returns to the previous menu.
BLUETOOTH® STREAMING AUDIO
WITHOUT NAVIGATION SYSTEM
If you have a compatible Bluetooth® audio
device that is capable of playing audio files,
the device can be connected to the vehi-
cle’s audio system so that the audio files on
the device play through the vehicle’s
speakers. For additional information, refer
to “FM/AM radio with compact disc (CD)
player” or “FM/AM/SAT radio with compact
disc (CD) player” in this section.
Connecting Bluetooth® audio
To connect your Bluetooth® audio device
to the vehicle, follow the procedure below:
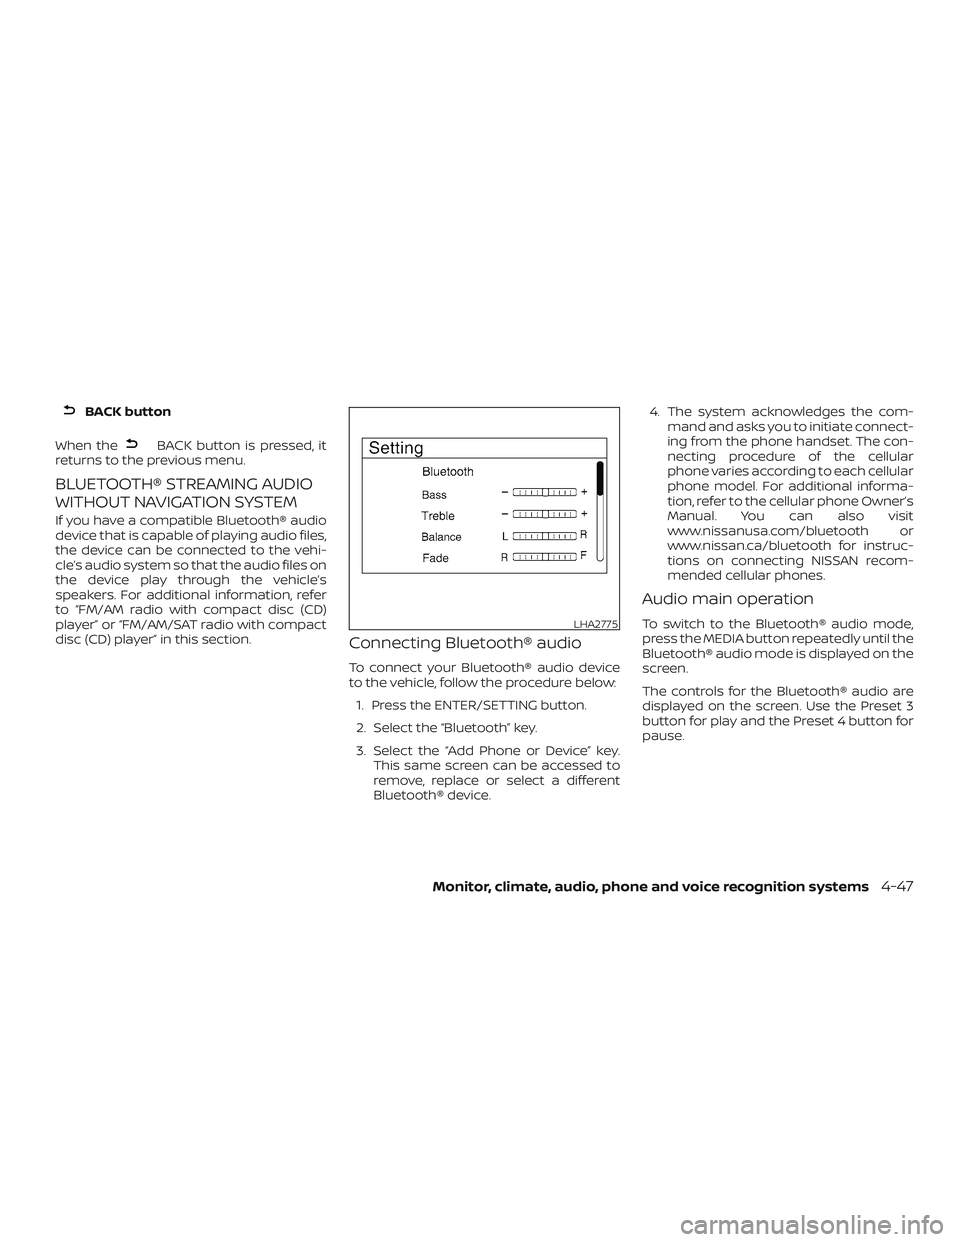
1. Press the ENTER/SETTING button.
2. Select the “Bluetooth” key.
3. Select the “Add Phone or Device” key. This same screen can be accessed to
remove, replace or select a different
Bluetooth® device. 4. The system acknowledges the com-
mand and asks you to initiate connect-
ing from the phone handset. The con-
necting procedure of the cellular
phone varies according to each cellular
phone model. For additional informa-
tion, refer to the cellular phone Owner’s
Manual. You can also visit
www.nissanusa.com/bluetooth or
www.nissan.ca/bluetooth for instruc-
tions on connecting NISSAN recom-
mended cellular phones.
Audio main operation
To switch to the Bluetooth® audio mode,
press the MEDIA button repeatedly until the
Bluetooth® audio mode is displayed on the
screen.
The controls for the Bluetooth® audio are
displayed on the screen. Use the Preset 3
button for play and the Preset 4 button for
pause.LHA2775
Monitor, climate, audio, phone and voice recognition systems4-47