AUX NISSAN ALTIMA 2023 Owners Manual
[x] Cancel search | Manufacturer: NISSAN, Model Year: 2023, Model line: ALTIMA, Model: NISSAN ALTIMA 2023Pages: 644, PDF Size: 4.12 MB
Page 14 of 644
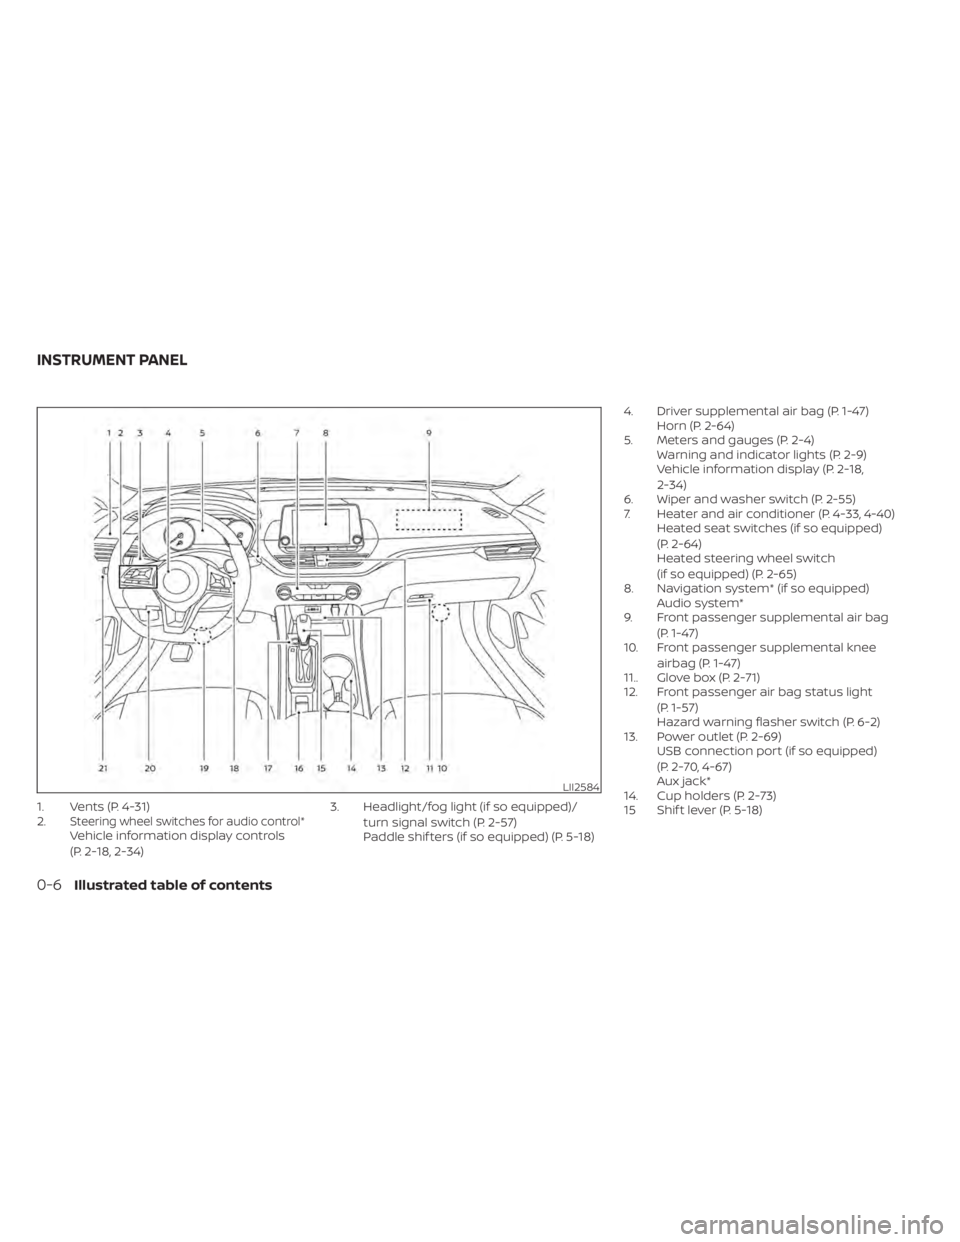
1. Vents (P. 4-31)
2.Steering wheel switches for audio control*Vehicle information display controls
(P. 2-18, 2-34)3. Headlight/fog light (if so equipped)/
turn signal switch (P. 2-57)
Paddle shif ters (if so equipped) (P. 5-18) 4. Driver supplemental air bag (P. 1-47)
Horn (P. 2-64)
5. Meters and gauges (P. 2-4) Warning and indicator lights (P. 2-9)
Vehicle information display (P. 2-18,
2-34)
6. Wiper and washer switch (P. 2-55)
7. Heater and air conditioner (P. 4-33, 4-40) Heated seat switches (if so equipped)
(P. 2-64)
Heated steering wheel switch
(if so equipped) (P. 2-65)
8. Navigation system* (if so equipped) Audio system*
9. Front passenger supplemental air bag
(P. 1-47)
10. Front passenger supplemental knee
airbag (P. 1-47)
11.. Glove box (P. 2-71)
12. Front passenger air bag status light
(P. 1-57)
Hazard warning flasher switch (P. 6-2)
13. Power outlet (P. 2-69) USB connection port (if so equipped)
(P. 2-70, 4-67)
Aux jack*
14. Cup holders (P. 2-73)
15 Shif t lever (P. 5-18)
LII2584
INSTRUMENT PANEL
0-6Illustrated table of contents
Page 92 of 644
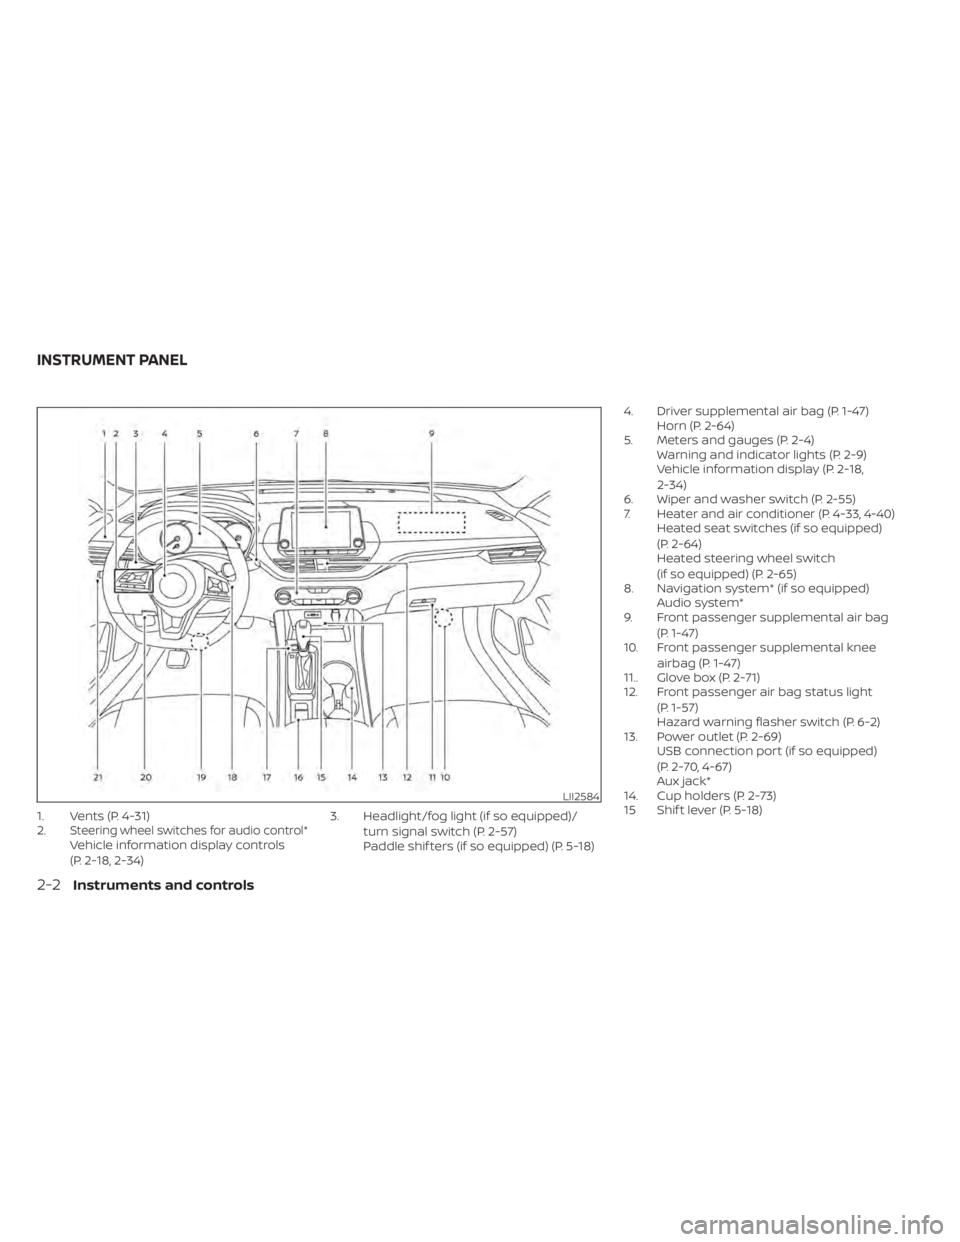
1. Vents (P. 4-31)
2.Steering wheel switches for audio control*Vehicle information display controls
(P. 2-18, 2-34)3. Headlight/fog light (if so equipped)/
turn signal switch (P. 2-57)
Paddle shif ters (if so equipped) (P. 5-18) 4. Driver supplemental air bag (P. 1-47)
Horn (P. 2-64)
5. Meters and gauges (P. 2-4) Warning and indicator lights (P. 2-9)
Vehicle information display (P. 2-18,
2-34)
6. Wiper and washer switch (P. 2-55)
7. Heater and air conditioner (P. 4-33, 4-40) Heated seat switches (if so equipped)
(P. 2-64)
Heated steering wheel switch
(if so equipped) (P. 2-65)
8. Navigation system* (if so equipped) Audio system*
9. Front passenger supplemental air bag
(P. 1-47)
10. Front passenger supplemental knee
airbag (P. 1-47)
11.. Glove box (P. 2-71)
12. Front passenger air bag status light
(P. 1-57)
Hazard warning flasher switch (P. 6-2)
13. Power outlet (P. 2-69) USB connection port (if so equipped)
(P. 2-70, 4-67)
Aux jack*
14. Cup holders (P. 2-73)
15 Shif t lever (P. 5-18)
LII2584
INSTRUMENT PANEL
2-2Instruments and controls
Page 217 of 644
(brightness control) BUTTON
To change the display brightness, press thebutton. Pressing the button again will
change the display to the day or the night
display.
Press and hold the
button for more
than 2 seconds to turn the display off. Press
and hold the button again to turn the dis-
play on.
HOW TO USE THE VOL (volume)
KNOB / PUSH
(power)
BUTTON
Press the PUSH(power) button to turn
audio function on and off. Turn the VOL
(volume) knob to adjust audio volume.
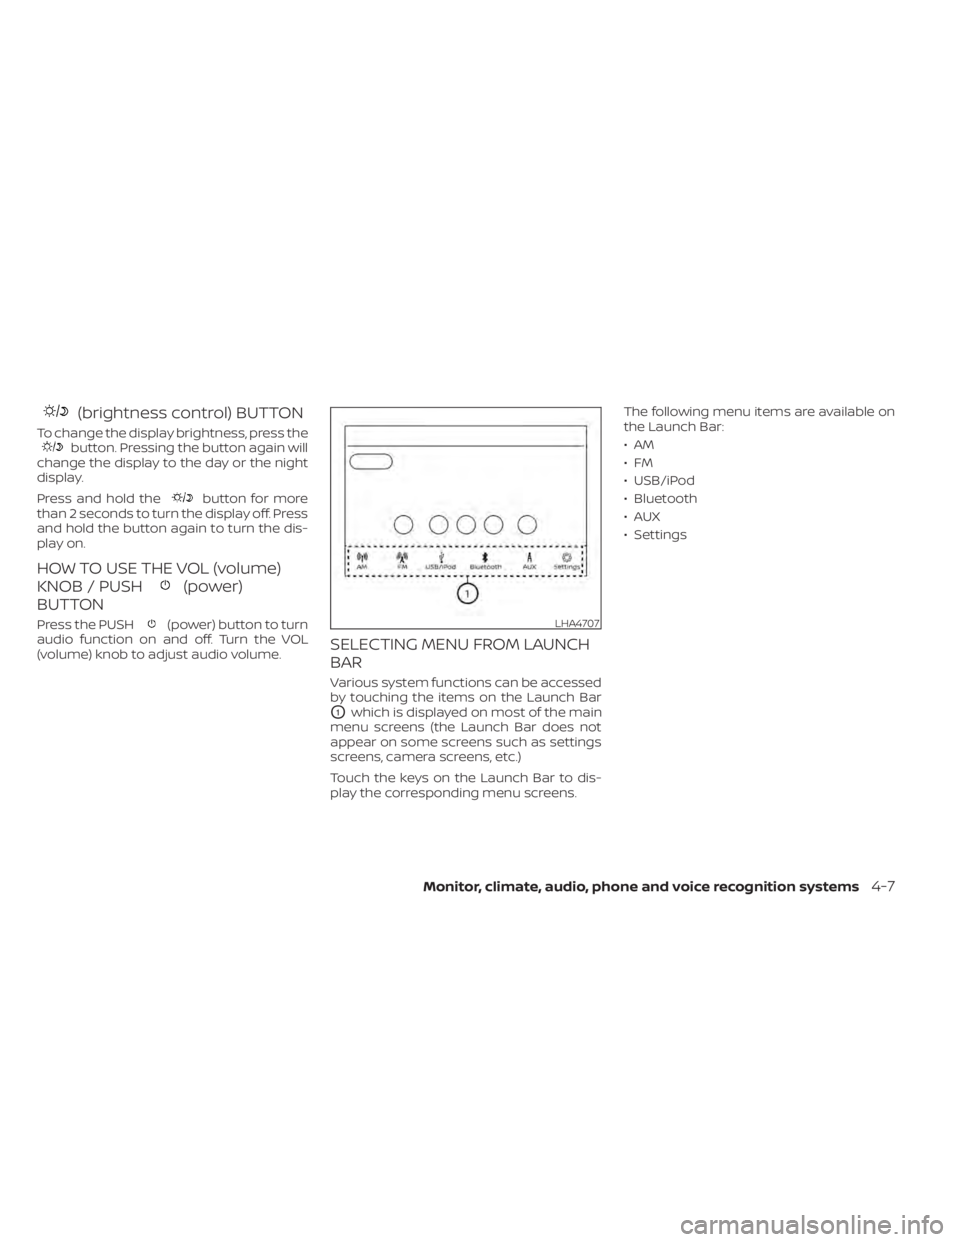
SELECTING MENU FROM LAUNCH
BAR
Various system functions can be accessed
by touching the items on the Launch Bar
O1which is displayed on most of the main
menu screens (the Launch Bar does not
appear on some screens such as settings
screens, camera screens, etc.)
Touch the keys on the Launch Bar to dis-
play the corresponding menu screens. The following menu items are available on
the Launch Bar:
•AM
•FM
• USB/iPod
• Bluetooth
•AUX
• Settings
LHA4707
Monitor, climate, audio, phone and voice recognition systems4-7
Page 260 of 644
Audio main operation
VOL (volume) knob / PUSH(power) button
Place the ignition switch in the ON position
and press the PUSH(power) button
while the system is off to call up the mode
(radio, AUX, Bluetooth® audio, USB or iPod®)
that was playing immediately before the
system was turned off. To turn the system off, press the PUSH
(power) button.
Turn the VOL (volume) knob to adjust the
volume.
This vehicle may be equipped with Speed
Sensitive Volume. When this feature is ac-
tive, the audio volume changes as the driv-
ing speed changes.MENU button
Press theMENU button to show the
Menu screen. Touch the “Settings” key on
the display, then touch the “Sound” key.
Sound Settings
Bass Adjusts the bass to the desired level.
Treble Adjusts the treble to the desired level.
Balance Adjusts the balance to the desired level. Balance adjusts the sound level between the lef t and right
speakers.
Fade Adjusts the fade to the desired level. Fade adjusts the sound level between the front and rear
speakers.
Speed Sensitive Volume Adjusts the speed sensitive volume function, which increases the volume of the audio system as
the speed of the vehicle increases. Set to “OFF” to disable the feature. The higher the setting, the
more the volume increases in relation to vehicle speed.
Bass, treble, balance, fade and Speed Sensitive Volume can be adjusted by touching “-”/“+” , “L”/”R”, or “R”/”F” keys.
4-50Monitor, climate, audio, phone and voice recognition systems
Page 262 of 644
• Refresh: Touch the “Refresh” key to scanand update the station list displayed on
the right side of the AM Menu screen.
(SEEK/TRACK) buttons
Press the
orbuttons to tune
from low to high or high to low frequencies
and to stop at the next broadcasting
station.
1 to 6 Station memory operations
Up to six stations can be registered in the
preset list.
1. Select the AM radio band.
2. Tune to the station you wish to store.
3. Touch and hold one of the preset num- bers in the preset list.
The information such as frequency will be
displayed on the preset list.
To select and listen to the preset stations,
push
on the steering wheel briefly or
touch a preferred station on the preset list
on the radio screen.
FM radio operation
Press theMENU button and touch the
“FM Menu” key or press the AUDIO button
and select FM on the bottom of the Launch
Bar to bring up the FM display screen. If another audio source is playing when the
“FM” key is pressed, the audio source play-
ing will automatically be turned off and the
last radio station played will begin playing.
The FM stereo indicator (STEREO) is shown
on the screen during FM stereo reception.
When the stereo broadcast signal is weak,
the radio automatically changes from ste-
reo to monaural reception.
FM Menu
Touch the “FM” Menu key to display the FM
Menu screen options:
• SCAN: To scan tune the stations, touch
the “FM Menu” key on the radio screen
and then touch the “SCAN” key. The sta-
tions will be tuned from low to high fre-
quencies and stop at each broadcasting
stations for several seconds. Touching
the “SCAN” key again during this period of
several seconds will stop tuning and the
radio will remain tuned to that station.
• Refresh: Touch the “Refresh” key to up- date the station list displayed on the right
side of the FM Menu screen.
• RDS Info: Radio station and song informa- tion can be displayed on the FM display
screen.
(SEEK/TRACK) buttons
Press the
orbuttons to tune
from low to high or high to low frequencies
and to stop at the next broadcasting
station.
1 to 12 Station memory operations
Up to 12 stations can be registered in the
preset list.
1. Select the FM radio band.
2. Tune to the station you wish to store.
3. Touch and hold one of the preset num- bers in the preset list.
The information such as frequency will be
displayed on the preset list.
To select and listen to the preset stations,
push
on the steering wheel briefly or
touch a preferred station on the preset list
on the radio screen.
Auxiliary (AUX) devices operation
Connecting auxiliary devices
Connect an AUX device into the AUX input
jack located on the center console below
the heater and air conditioner controls.
4-52Monitor, climate, audio, phone and voice recognition systems
Page 263 of 644
The AUX input jack accepts any standard
analog audio input such as from a portable
cassette player, CD player, MP3 player or
phone.
Insert a 1/8 in (3.5 mm) stereo mini plug in
the audio input jack. If a cable with a mono
plug is used, the audio output may not
function normally.
Activation and playing
Turn on the AUX device. Connect an AUX
cable to the AUX device and the AUX input
jack. Select AUX mode from the audio
source menu screen or by pressing the
Source button on the steering wheel.
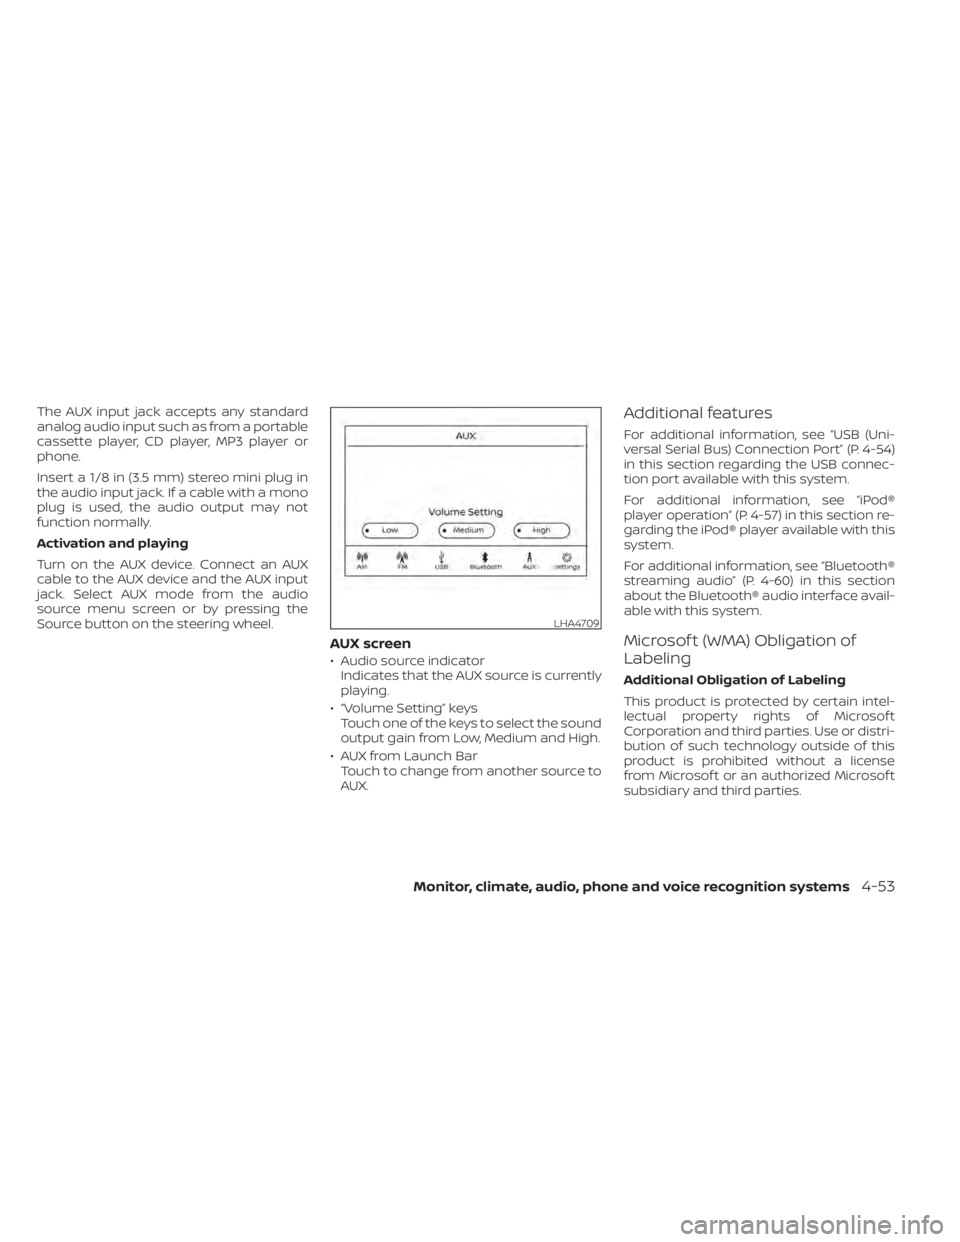
AUX screen
• Audio source indicatorIndicates that the AUX source is currently
playing.
• “Volume Setting” keys Touch one of the keys to select the sound
output gain from Low, Medium and High.
• AUX from Launch Bar Touch to change from another source to
AUX.
Additional features
For additional information, see “USB (Uni-
versal Serial Bus) Connection Port” (P. 4-54)
in this section regarding the USB connec-
tion port available with this system.
For additional information, see “iPod®
player operation” (P. 4-57) in this section re-
garding the iPod® player available with this
system.
For additional information, see “Bluetooth®
streaming audio” (P. 4-60) in this section
about the Bluetooth® audio interface avail-
able with this system.
Microsof t (WMA) Obligation of
Labeling
Additional Obligation of Labeling
This product is protected by certain intel-
lectual property rights of Microsof t
Corporation and third parties. Use or distri-
bution of such technology outside of this
product is prohibited without a license
from Microsof t or an authorized Microsof t
subsidiary and third parties.
LHA4709
Monitor, climate, audio, phone and voice recognition systems4-53
Page 273 of 644
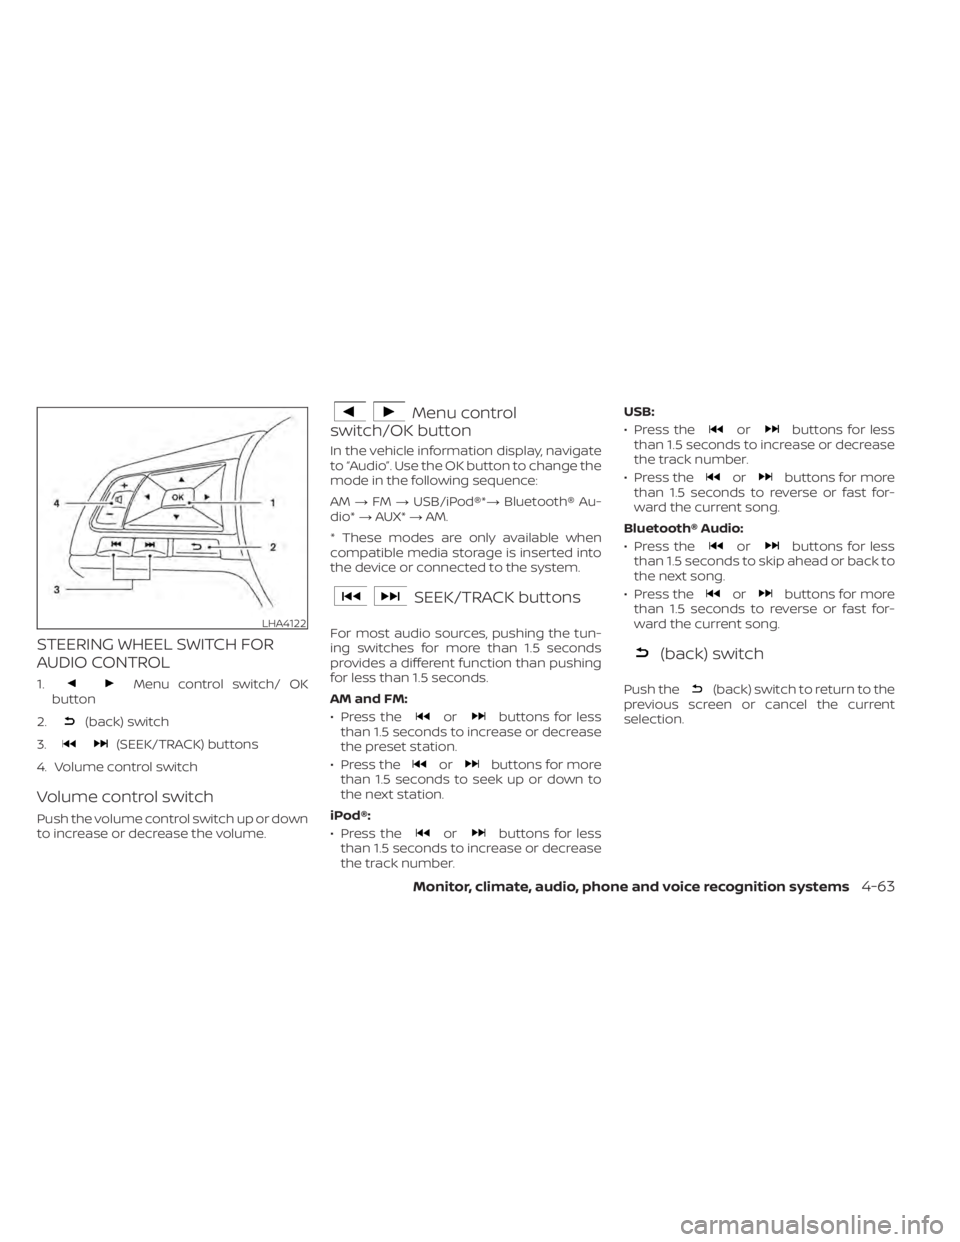
STEERING WHEEL SWITCH FOR
AUDIO CONTROL
1.Menu control switch/ OK
button
2.
(back) switch
3.
(SEEK/TRACK) buttons
4. Volume control switch
Volume control switch
Push the volume control switch up or down
to increase or decrease the volume.
Menu control
switch/OK button
In the vehicle information display, navigate
to “Audio”. Use the OK button to change the
mode in the following sequence:
AM →FM →USB/iPod®*→ Bluetooth® Au-
dio* →AUX* →AM.
* These modes are only available when
compatible media storage is inserted into
the device or connected to the system.
SEEK/TRACK buttons
For most audio sources, pushing the tun-
ing switches for more than 1.5 seconds
provides a different function than pushing
for less than 1.5 seconds.
AM and FM:
• Press the
orbuttons for less
than 1.5 seconds to increase or decrease
the preset station.
• Press the
orbuttons for more
than 1.5 seconds to seek up or down to
the next station.
iPod®:
• Press the
orbuttons for less
than 1.5 seconds to increase or decrease
the track number. USB:
• Press the
orbuttons for less
than 1.5 seconds to increase or decrease
the track number.
• Press the
orbuttons for more
than 1.5 seconds to reverse or fast for-
ward the current song.
Bluetooth® Audio:
• Press the
orbuttons for less
than 1.5 seconds to skip ahead or back to
the next song.
• Press the
orbuttons for more
than 1.5 seconds to reverse or fast for-
ward the current song.
(back) switch
Push the(back) switch to return to the
previous screen or cancel the current
selection.
LHA4122
Monitor, climate, audio, phone and voice recognition systems4-63
Page 276 of 644
TROUBLESHOOTING GUIDE
SymptomCause and Countermeasure
Cannot access Siri Eyes
Freefromswitchonthe
steering wheel Check if a Bluetooth® connection is established between the iPhone® and the system.
Check if Siri is enabled on the device. On your phone, go to Siri setting.
Check that Siri can be accessed from the device lock screen. This can be set in the settings menu of your phone.
Audio Source does not
change automatically to
iPod® or Bluetooth® Au-
dio mode For best results, use the native Music app. Performance of music control function while using Podcasts, Audiobook or other 3rd party
music apps may vary.
For best results, play media already stored on your device. Streaming music or playback from cloud storage may degrade perfor-
mance.
Switch the source manually by pressing the AUX or MEDIA button on the vehicle audio system or the SOURCE select switch on the
steering wheel.
Play, pause, next track,
previous track or play
timer does not work For best results, use the native Music app. Performance of music control function while using Podcasts, Audiobook or other 3rd party
music apps may vary and is controlled by the device.
Cannot hear any music/
audio being played back
from a connected
iPhone® Check that the audio source is set to Bluetooth® Audio or iPod® mode. A USB connection is required for iPod® mode.
Cannot receive text mes-
sage notifications on the
vehicle audio system Check if “Send Notifications” is enabled on your phone. On the phone, go to Bluetooth® settings. Find the device name, like “My Car”.
Press the INFO button. Turn on “Show Notifications”.
Cannot reply to text mes-
sage notifications by Siri
Eyes Free Af ter receiving an incoming text message, follow on-screen guidance. Press the
button for more than 1.5 seconds on the steer-
ing wheel for Siri Eyes Free. Af ter Siri Eyes Free starts, say “Text Message”.
4-66Monitor, climate, audio, phone and voice recognition systems
Page 385 of 644
• Do not attach metallic objects near thesensor area (brush guard, etc.). This could
cause failure or malfunction.
• Do not alter, remove, or paint the front bumper. Before customizing or restoring
the front bumper, it is recommended that
you visit a NISSAN dealer.
Radio frequency statement
For USA
FCC ID OAYARS4B
This device complies with Part 15 of the FCC
Rules. Operation is subject to the following
two conditions:
1. This device may not cause harmful inter- ference, and
2. This device must accept any interfer- ence received, including interference
that may cause undesired operation.
FCC Warning
Changes or modifications not expressly
approved by the party responsible for
compliance could void the user’s authority
to operate the equipment. For Canada
Model: ARS4–B
IC: 4135A-ARS4B
FCC ID: OAYARS4B
This device complies with Part 15 of the FCC
Rules and with Industry Canada licence-
exempt RSS standard(s). Operation is sub-
ject to the following two conditions:
1. This device may not cause interference,
and
2. This device must accept any interfer- ence received, including interference
that may cause undesired operation of
the device.
Le présent appareil est conforme aux CNR
d'Industrie Canada applicables aux appar-
eils radio exempts de licence. L'exploitation
est autorisée aux deux conditions
suivantes:
1. L'appareil ne doit pas produire de brouil- lage, et
2. L'utilisateur de l'appareil doit accepter tout brouillage radioélectrique subi,
même si le brouillage est susceptible
d'en compromettre le fonctionnement. Radio frequency radiation exposure
information:
This equipment complies with FCC and IC
radiation exposure limits set forth for an
uncontrolled environment.
This equipment should be installed and
operated with minimum distance of 30 cm
between the radiator and your body.
This transmitter must not be co-located or
operating in conjunction with any other an-
tenna or transmitter.
Cet équipement est conforme aux limites
d'exposition aux rayonnements IC établies
pour un environnement non contrôlé.
Cet équipement doit être installé et utilisé
avec un minimum de 30 cm de distance
entre la source de rayonnement et votre
corps.
FCC Notice
Changes or modifications not expressly
approved by the party responsible for
compliance could void the user’s authority
to operate the equipment.
Starting and driving5-89
Page 419 of 644
Radio frequency statement
For USA
FCC ID OAYARS4B
This device complies with Part 15 of the FCC
Rules. Operation is subject to the following
two conditions:
1. This device may not cause harmful inter-ference, and
2. This device must accept any interfer- ence received, including interference
that may cause undesired operation.
FCC Warning
Changes or modifications not expressly
approved by the party responsible for
compliance could void the user’s authority
to operate the equipment.
For Canada
Model: ARS4–B
IC: 4135A-ARS4B
FCC ID: OAYARS4B
This device complies with Part 15 of the FCC
Rules and with Industry Canada licence-
exempt RSS standard(s). Operation is sub-
ject to the following two conditions:
1. This device may not cause interference, and 2. This device must accept any interfer-
ence received, including interference
that may cause undesired operation of
the device.
Le présent appareil est conforme aux CNR
d'Industrie Canada applicables aux appar-
eils radio exempts de licence. L'exploitation
est autorisée aux deux conditions
suivantes:
1. L'appareil ne doit pas produire de brouil- lage, et
2. L'utilisateur de l'appareil doit accepter tout brouillage radioélectrique subi,
même si le brouillage est susceptible
d'en compromettre le fonctionnement.
Radio frequency radiation exposure
information:
This equipment complies with FCC and IC
radiation exposure limits set forth for an
uncontrolled environment.
This equipment should be installed and
operated with minimum distance of 30 cm
between the radiator and your body.
This transmitter must not be co-located or
operating in conjunction with any other an-
tenna or transmitter. Cet équipement est conforme aux limites
d'exposition aux rayonnements IC établies
pour un environnement non contrôlé.
Cet équipement doit être installé et utilisé
avec un minimum de 30 cm de distance
entre la source de rayonnement et votre
corps.
FCC Notice
Changes or modifications not expressly
approved by the party responsible for
compliance could void the user’s authority
to operate the equipment.
CONVENTIONAL (fixed speed)
CRUISE CONTROL MODE
NOTE:
ProPILOT Assist provides no approach
warnings, automatic braking, or steering
assist in the conventional (fixed speed)
cruise control mode.
This mode allows driving at a speed be-
tween 25 to 90 mph (40 to 144 km/h) with-
out keeping your foot on the accelerator
pedal.
Starting and driving5-123