change time NISSAN ALTIMA HYBRID 2007 L32A / 4.G Quick Reference Guide
[x] Cancel search | Manufacturer: NISSAN, Model Year: 2007, Model line: ALTIMA HYBRID, Model: NISSAN ALTIMA HYBRID 2007 L32A / 4.GPages: 28, PDF Size: 5.15 MB
Page 4 of 28
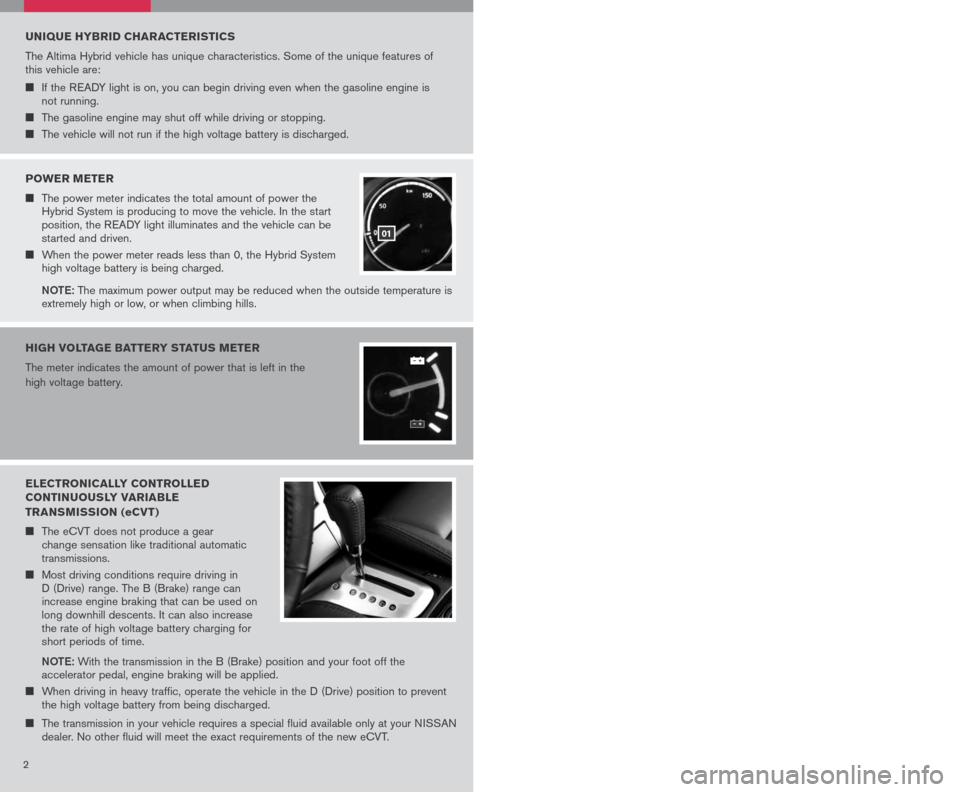
ELECTRONICALLY CONTROLLED
CONTINUOUSLY VARIABLE
TRANSMISSION (eCV T)
The eCVT does not produce a gear change sensation like traditional automatic transmissions.
Most driving conditions require driving in D (Drive) range. The B (Brake) range can increase engine braking that can be used on long downhill descents. It can also increase the rate of high voltage battery charging for short periods of time.
Note: With the transmission in the B (Brake) position and your foot off the accelerator pedal, engine braking will be applied.
When driving in heavy traffic, operate the vehicle in the D (Drive) position to prevent the high voltage battery from being discharged.
The transmission in your vehicle requires a special fluid available only at your NISSAN dealer. No other fluid will meet the exact requirements of the new eCVT.
32
UNIQUE HYBRID CHARACTERISTICS
The Altima Hybrid vehicle has unique characteristics. Some of the unique features of this vehicle are:
If the READY light is on, you can begin driving even when the gasoline engine is not running.
The gasoline engine may shut off while driving or stopping.
The vehicle will not run if the high voltage battery is discharged.
01
02
03
ENERGY/FUEL HISTORY MODE
(Navigation System only)
The Energy/Fuel History can be displayed
on the navigation system monitor. The
screen must be set to the Energy Flow
mode or the Energy/Fuel History mode.
This displays the vehicle’s average fuel
consumption and regenerative electric
power at 5 minute intervals.
The displayed values on the screen indicate general driving conditions. Accuracy varies
with driving habits and road conditions.
Regenerated energy in the past 30 minutes: The regenerated energy in the past
30 minutes is indicated with symbols. One symbol indicates 50 watt hours. The
energy of 50 watt hours illuminates a 50 watt bulb for an hour.
Fuel consumption in the past 30 minutes: Fuel consumption in the past 30
minutes is displayed.
Current fuel consumption (“Latest” column): The current fuel consumption is
calculated and displayed based on distance and fuel consumption.
0102
03
POWER METER
The power meter indicates the total amount of power the Hybrid System is producing to move the vehicle. In the start position, the READY light illuminates and the vehicle can be started and driven.
When the power meter reads less than 0, the Hybrid System high voltage battery is being charged.
Note: The maximum power output may be reduced when the outside temperature is extremely high or low, or when climbing hills.
01
HIGH VOLTAGE BATTERY STATUS METER
The meter indicates the amount of power that is left in the
high voltage battery.
LOW TEMPERATURE INDICATOR LIGHT (BLUE)
The low temperature indicator light illuminates blue when the engine
coolant temperature is low.
When the ignition switch is pushed to the ON position, the low temperature
indicator light will illuminate. The light will turn off after the engine coolant has warmed up.
If the low temperature indicator light remains illuminated after the engine has warmed
up, it may indicate that the engine coolant system is not functioning properly and may
need servicing.
ENERGY MONITORS (Navigation
System only)
Energy flow for various operating modes can
be displayed on the navigation system monitor.
The screen must be set to the Energy Flow
mode or the Energy/Fuel History mode.
eN eRGY FL oW M oDe
This is a representative example of the Energy Flow display. The Energy Flow display
might vary, depending on the operating condition of the vehicle. The graphic does not
reflect the actual motion of the vehicle.
The Energy Flow will display:
When the vehicle is powered only by the traction motor.
When the vehicle is powered by both the traction motor and the gasoline engine.
When the vehicle is powered only by the gasoline engine.
When the vehicle is regenerating and charging the high voltage battery.
When there is no energy flow in the vehicle.
Page 5 of 28
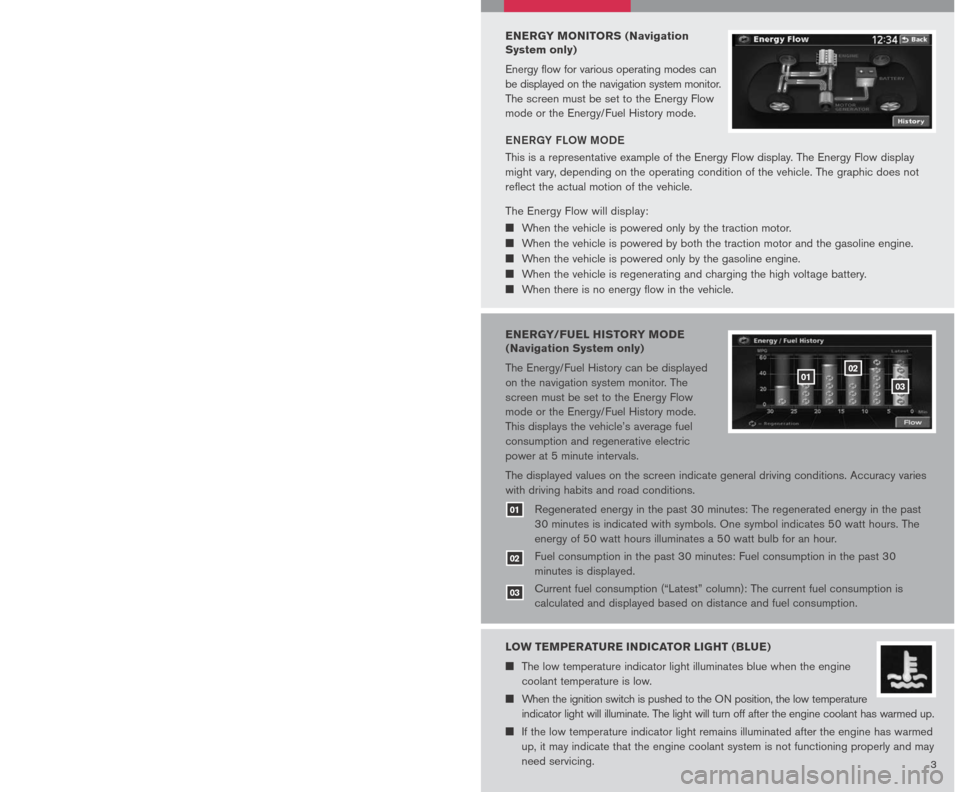
ELECTRONICALLY CONTROLLED
CONTINUOUSLY VARIABLE
TRANSMISSION (eCV T)
The eCVT does not produce a gear change sensation like traditional automatic transmissions.
Most driving conditions require driving in D (Drive) range. The B (Brake) range can increase engine braking that can be used on long downhill descents. It can also increase the rate of high voltage battery charging for short periods of time.
Note: With the transmission in the B (Brake) position and your foot off the accelerator pedal, engine braking will be applied.
When driving in heavy traffic, operate the vehicle in the D (Drive) position to prevent the high voltage battery from being discharged.
The transmission in your vehicle requires a special fluid available only at your NISSAN dealer. No other fluid will meet the exact requirements of the new eCVT.
32
UNIQUE HYBRID CHARACTERISTICS
The Altima Hybrid vehicle has unique characteristics. Some of the unique features of this vehicle are:
If the READY light is on, you can begin driving even when the gasoline engine is not running.
The gasoline engine may shut off while driving or stopping.
The vehicle will not run if the high voltage battery is discharged.
01
02
03
ENERGY/FUEL HISTORY MODE
(Navigation System only)
The Energy/Fuel History can be displayed
on the navigation system monitor. The
screen must be set to the Energy Flow
mode or the Energy/Fuel History mode.
This displays the vehicle’s average fuel
consumption and regenerative electric
power at 5 minute intervals.
The displayed values on the screen indicate general driving conditions. Accuracy varies
with driving habits and road conditions.
Regenerated energy in the past 30 minutes: The regenerated energy in the past
30 minutes is indicated with symbols. One symbol indicates 50 watt hours. The
energy of 50 watt hours illuminates a 50 watt bulb for an hour.
Fuel consumption in the past 30 minutes: Fuel consumption in the past 30
minutes is displayed.
Current fuel consumption (“Latest” column): The current fuel consumption is
calculated and displayed based on distance and fuel consumption.
0102
03
POWER METER
The power meter indicates the total amount of power the Hybrid System is producing to move the vehicle. In the start position, the READY light illuminates and the vehicle can be started and driven.
When the power meter reads less than 0, the Hybrid System high voltage battery is being charged.
Note: The maximum power output may be reduced when the outside temperature is extremely high or low, or when climbing hills.
01
HIGH VOLTAGE BATTERY STATUS METER
The meter indicates the amount of power that is left in the
high voltage battery.
LOW TEMPERATURE INDICATOR LIGHT (BLUE)
The low temperature indicator light illuminates blue when the engine
coolant temperature is low.
When the ignition switch is pushed to the ON position, the low temperature
indicator light will illuminate. The light will turn off after the engine coolant has warmed up.
If the low temperature indicator light remains illuminated after the engine has warmed
up, it may indicate that the engine coolant system is not functioning properly and may
need servicing.
ENERGY MONITORS (Navigation
System only)
Energy flow for various operating modes can
be displayed on the navigation system monitor.
The screen must be set to the Energy Flow
mode or the Energy/Fuel History mode.
eN eRGY FL oW M oDe
This is a representative example of the Energy Flow display. The Energy Flow display
might vary, depending on the operating condition of the vehicle. The graphic does not
reflect the actual motion of the vehicle.
The Energy Flow will display:
When the vehicle is powered only by the traction motor.
When the vehicle is powered by both the traction motor and the gasoline engine.
When the vehicle is powered only by the gasoline engine.
When the vehicle is regenerating and charging the high voltage battery.
When there is no energy flow in the vehicle.
Page 6 of 28
54
tURNING tH e HYBRID SYS teM oFF
Shift the selector lever to the P (Park) position and apply
the parking brake.
Push the ignition switch to turn the Hybrid System off.
IN te LLIG eN t K eY P oRt
If the battery of the Intelligent Key is almost discharged,
the guide light of the Intelligent Key port blinks and the
Intelligent Key insertion indicator is displayed in the vehicle
information display.
To start the vehicle, insert the Intelligent Key into the key
port in the direction indicated until it latches into place.
To remove the Intelligent Key from the port, push the
ignition switch to turn the vehicle off and pull the Intelligent Key out of the port.
The Intelligent Key port does not charge the Intelligent Key battery. If you see the
low battery indicator, replace the battery as soon as possible. Refer to the Owner’s
Manual for detailed information regarding changing the battery.
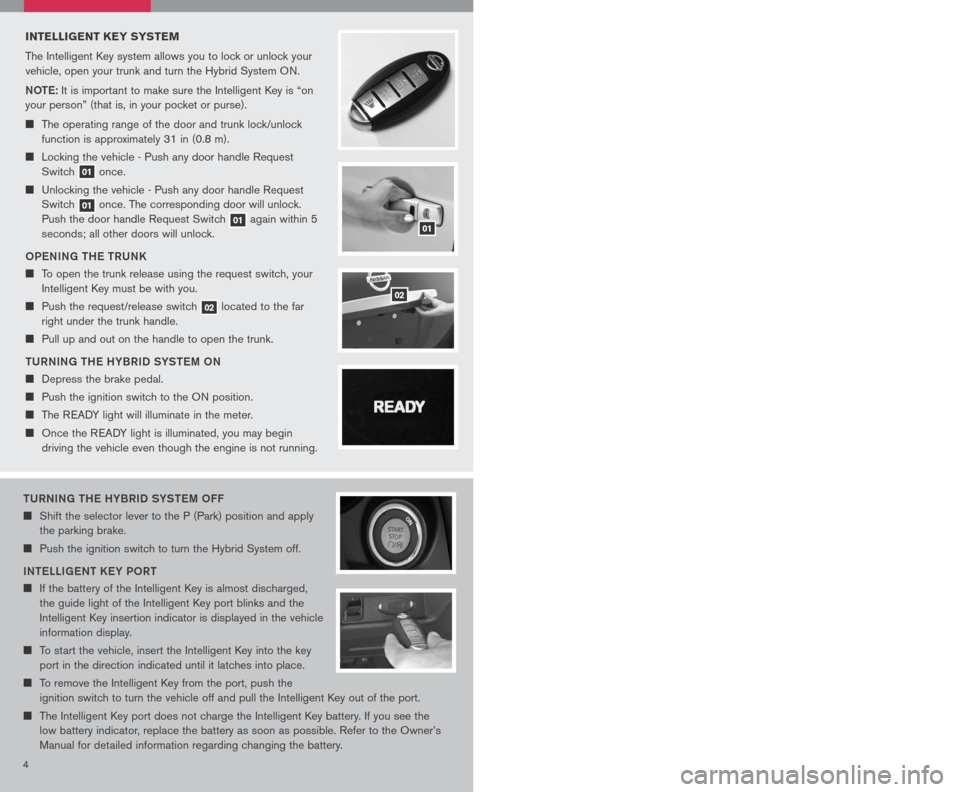
INTELLIGENT K EY SYSTEM
The Intelligent Key system allows you to lock or unlock your
vehicle, open your trunk and turn the Hybrid System ON.
Note: It is important to make sure the Intelligent Key is “on
your person” (that is, in your pocket or purse).
The operating range of the door and trunk lock/unlock
function is approximately 31 in (0.8 m).
Locking the vehicle - Push any door handle Request
Switch 01 once.
Unlocking the vehicle - Push any door handle Request
Switch 01 once. The corresponding door will unlock.
Push the door handle Request Switch 01 again within 5
seconds; all other doors will unlock.
o Pe NING tH e t RUNK
To open the trunk release using the request switch, your
Intelligent Key must be with you.
Push the request/release switch 02 located to the far
right under the trunk handle.
Pull up and out on the handle to open the trunk.
t URNING tH e HYBRID SYS teM oN
Depress the brake pedal.
Push the ignition switch to the ON position.
The READY light will illuminate in the meter.
Once the READY light is illuminated, you may begin
driving the vehicle even though the engine is not running.
HEADLIGHT AND TURN SIGNAL CONTROL
HeADLIGH t SWI tCH
Turn the headlight switch to the position to turn
on the front parking, tail, license plate and instrument
panel lights.
Turn the headlight switch to the position to turn
on the headlights. All other lights remain on.
HIGH B eAM
Push the headlight switch forward to select the high beam function. The blue
indicator light illuminates. Pull the headlight switch back to the original position to
select the low beam. The blue indicator light goes off.
Pull and release the headlight switch to flash the headlight high beams on and off.
t URN SIGNAL SWI tCH
Move the headlight control switch up or down to signal the turning direction. When
the turn is completed, the turn signals cancel automatically.
To signal a lane change, move the headlight control switch up or down to the point
where the indicator light begins to flash, but the headlight control switch does not latch.
F o G LIGH t o Pe R A tIo N (if so equipped)
N OTE:
The headlights must be on and the low beams selected for the fog lights to
operate.
Turn the switch to the position to turn on the fog lights.
Turn the switch to the oFF position to turn off the fog lights.
01
02
WINDSHIELD WIPER/WASHER SWITCH
The ignition switch must be in the ON position to
activate the windshield wipers.
Push the lever down to operate the windshield
wipers.
Switch operation includes:
Intermittent – Wipers operate intermittently
and can be adjusted by turning the time
control. Also, the intermittent operation speed
varies in accordance with the vehicle speed.
(For example, when the vehicle speed is high,
the intermittent operation speed will be faster.)
Low speed – Wipers operate at a continuous low speed.
High speed – Wipers operate at a continuous high speed.
Mist – Lift the lever up for one sweep operation of the wiper.
LCN0042
Wash – Pull the lever toward you. Wipers automatically wipe several times.
INT
LO
HI
MIST
Page 7 of 28
54
tURNING tH e HYBRID SYS teM oFF
Shift the selector lever to the P (Park) position and apply
the parking brake.
Push the ignition switch to turn the Hybrid System off.
IN te LLIG eN t K eY P oRt
If the battery of the Intelligent Key is almost discharged,
the guide light of the Intelligent Key port blinks and the
Intelligent Key insertion indicator is displayed in the vehicle
information display.
To start the vehicle, insert the Intelligent Key into the key
port in the direction indicated until it latches into place.
To remove the Intelligent Key from the port, push the
ignition switch to turn the vehicle off and pull the Intelligent Key out of the port.
The Intelligent Key port does not charge the Intelligent Key battery. If you see the
low battery indicator, replace the battery as soon as possible. Refer to the Owner’s
Manual for detailed information regarding changing the battery.
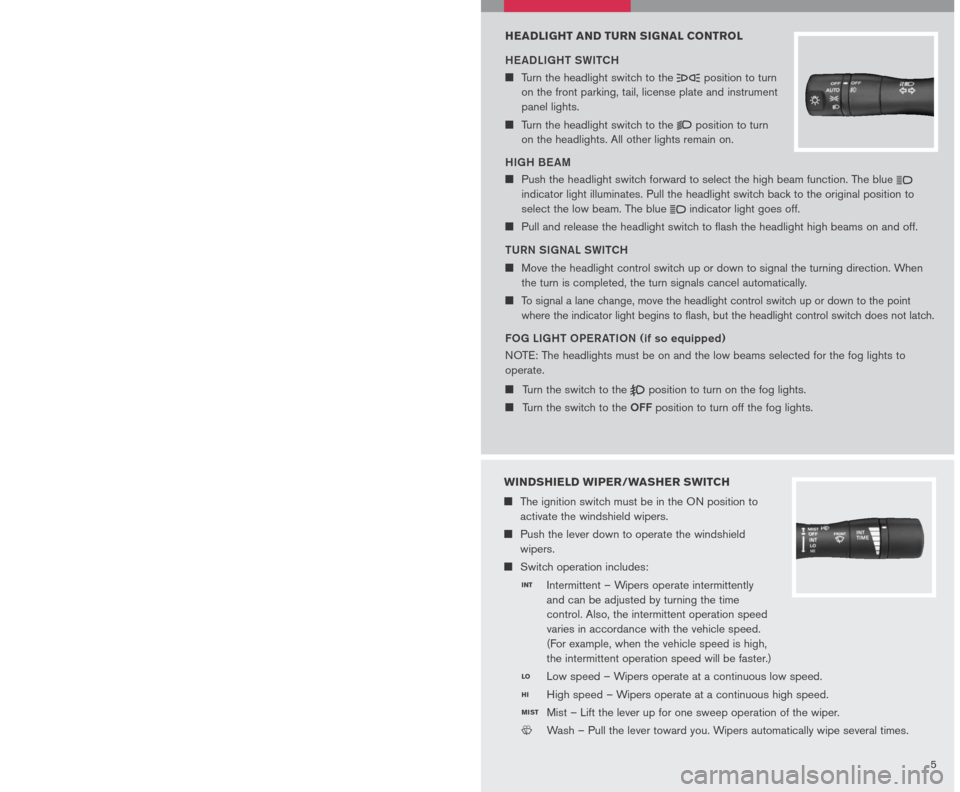
INTELLIGENT K EY SYSTEM
The Intelligent Key system allows you to lock or unlock your
vehicle, open your trunk and turn the Hybrid System ON.
Note: It is important to make sure the Intelligent Key is “on
your person” (that is, in your pocket or purse).
The operating range of the door and trunk lock/unlock
function is approximately 31 in (0.8 m).
Locking the vehicle - Push any door handle Request
Switch 01 once.
Unlocking the vehicle - Push any door handle Request
Switch 01 once. The corresponding door will unlock.
Push the door handle Request Switch 01 again within 5
seconds; all other doors will unlock.
o Pe NING tH e t RUNK
To open the trunk release using the request switch, your
Intelligent Key must be with you.
Push the request/release switch 02 located to the far
right under the trunk handle.
Pull up and out on the handle to open the trunk.
t URNING tH e HYBRID SYS teM oN
Depress the brake pedal.
Push the ignition switch to the ON position.
The READY light will illuminate in the meter.
Once the READY light is illuminated, you may begin
driving the vehicle even though the engine is not running.
HEADLIGHT AND TURN SIGNAL CONTROL
HeADLIGH t SWI tCH
Turn the headlight switch to the position to turn
on the front parking, tail, license plate and instrument
panel lights.
Turn the headlight switch to the position to turn
on the headlights. All other lights remain on.
HIGH B eAM
Push the headlight switch forward to select the high beam function. The blue
indicator light illuminates. Pull the headlight switch back to the original position to
select the low beam. The blue indicator light goes off.
Pull and release the headlight switch to flash the headlight high beams on and off.
t URN SIGNAL SWI tCH
Move the headlight control switch up or down to signal the turning direction. When
the turn is completed, the turn signals cancel automatically.
To signal a lane change, move the headlight control switch up or down to the point
where the indicator light begins to flash, but the headlight control switch does not latch.
F o G LIGH t o Pe R A tIo N (if so equipped)
N OTE:
The headlights must be on and the low beams selected for the fog lights to
operate.
Turn the switch to the position to turn on the fog lights.
Turn the switch to the oFF position to turn off the fog lights.
01
02
WINDSHIELD WIPER/WASHER SWITCH
The ignition switch must be in the ON position to
activate the windshield wipers.
Push the lever down to operate the windshield
wipers.
Switch operation includes:
Intermittent – Wipers operate intermittently
and can be adjusted by turning the time
control. Also, the intermittent operation speed
varies in accordance with the vehicle speed.
(For example, when the vehicle speed is high,
the intermittent operation speed will be faster.)
Low speed – Wipers operate at a continuous low speed.
High speed – Wipers operate at a continuous high speed.
Mist – Lift the lever up for one sweep operation of the wiper.
LCN0042
Wash – Pull the lever toward you. Wipers automatically wipe several times.
INT
LO
HI
MIST
Page 10 of 28
89
0102
03
0405
06
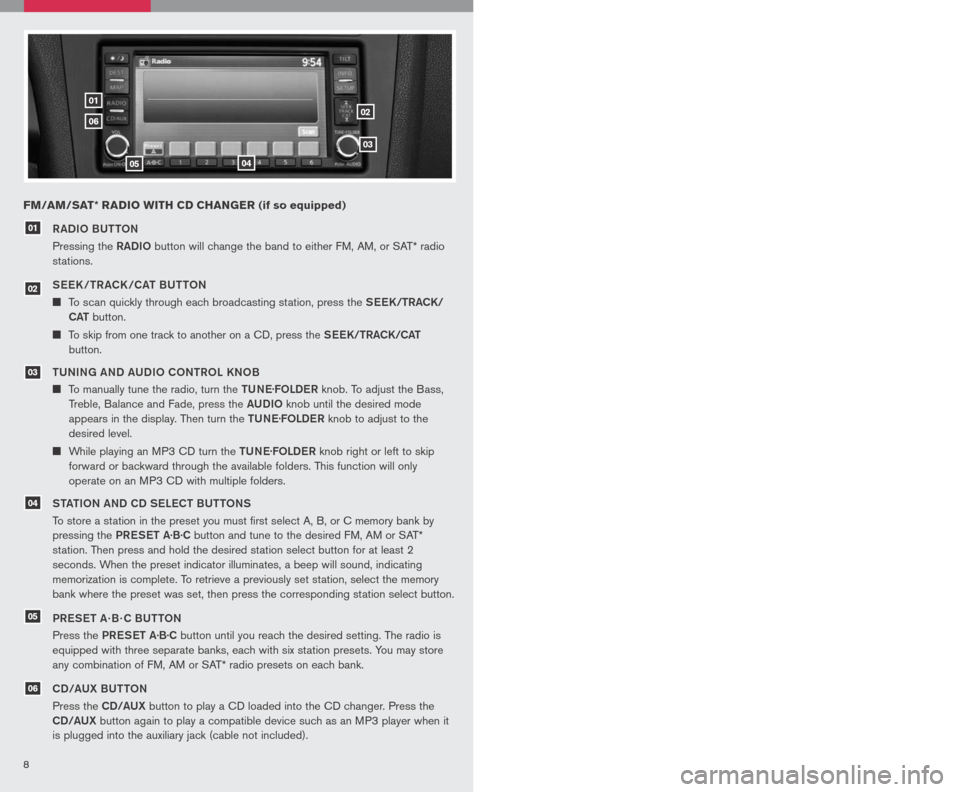
RADIo BU ttoN
Pressing the RADIo button will change the band to either FM, AM, or SAT* radio
stations.
See K /tR ACK /CA t BU tto N
To scan quickly through each broadcasting station, press the See K/tRACK/
CA t
button.
To skip from one track to another on a CD, press the See K/tRACK/CA t
button.
tUNING AND AUDI o C oNtR o L KN oB
To manually tune the radio, turn the tUNe.
FoLDe R knob. To adjust the Bass,
Treble, Balance and Fade, press the AUDIo knob until the desired mode
appears in the display. Then turn the tUNe.
FoLDe R knob to adjust to the
desired level.
While playing an MP3 CD turn the tUNe.
FoLDe R knob right or left to skip
forward or backward through the available folders. This function will only
operate on an MP3 CD with multiple folders.
S tA tIo N AND CD S eLe C t BU ttoNS
To store a station in the preset you must first select A, B, or C memory bank by
pressing the PReS et A·B·C button and tune to the desired FM, AM or SAT*
station. Then press and hold the desired station select button for at least 2
seconds. When the preset indicator illuminates, a beep will sound, indicating
memorization is complete. To retrieve a previously set station, select the memory
bank where the preset was set, then press the corresponding station select button.
PR eS et A · B · C BU ttoN
Press the PReS et A·B·C button until you reach the desired setting. The radio is
equipped with three separate banks, each with six station presets. You may store
any combination of FM, AM or SAT* radio presets on each bank.
CD/AUX BU ttoN
Press the CD/AUX button to play a CD loaded into the CD changer. Press the
CD/AUX button again to play a compatible device such as an MP3 player when it
is plugged into the auxiliary jack (cable not included).
01
FM/AM/SAT* RADIO WITH CD CHANGER (if so equipped)
Refer to the Owner’s Manual for detailed information regarding the audio system.
* SAT presets are only available on SAT equipped vehicles.
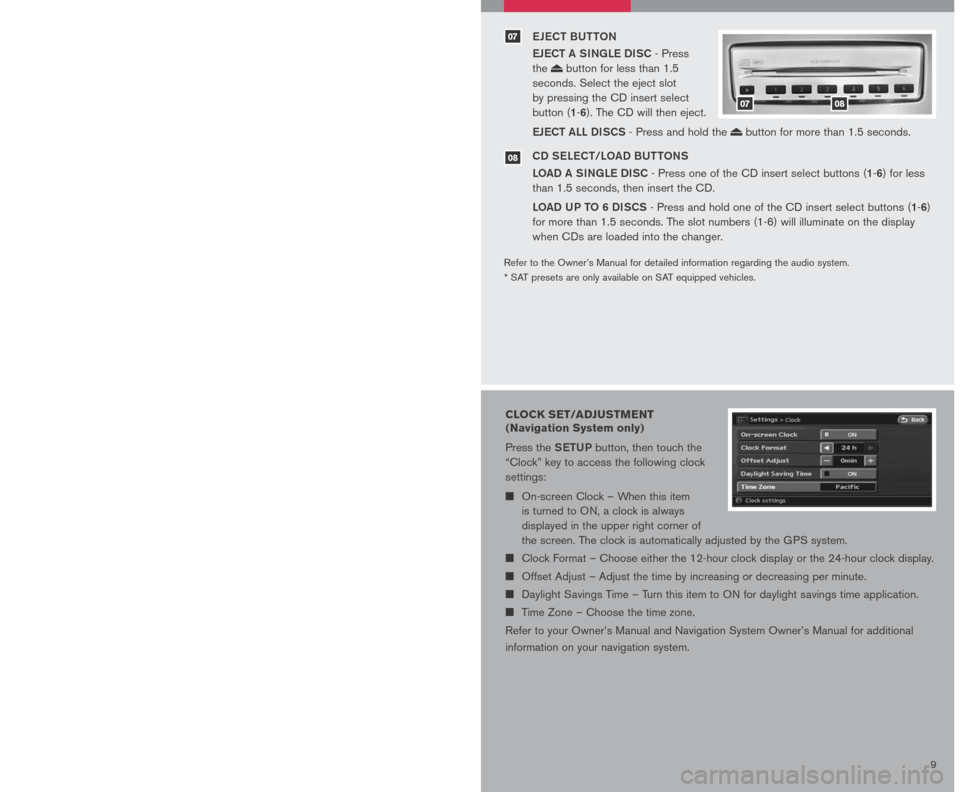
eJe C t BU ttoN
e JeC t A SINGL e DISC
- Press
the button for less than 1.5
seconds. Select the eject slot
by pressing the CD insert select
button (1-6). The CD will then eject.
e JeC t ALL DISCS
- Press and hold the button for more than 1.5 seconds.
CD S eLe C t/L oAD BU ttoNS
L o AD A SINGL e DISC
- Press one of the CD insert select buttons (1-6) for less
than 1.5 seconds, then insert the CD.
Lo AD UP to 6 DISCS
- Press and hold one of the CD insert select buttons (1-6)
for more than 1.5 seconds. The slot numbers (1-6) will illuminate on the display
when CDs are loaded into the changer.
07
08
0708
03
05
04
06
02
CLOCK SET/ADJUSTMENT
(Navigation System only)
Press the SetUP button, then touch the
“Clock” key to access the following clock
settings:
On-screen Clock – When this item
is turned to ON, a clock is always
displayed in the upper right corner of
the screen. The clock is automatically adjusted by the GPS system.
Clock Format – Choose either the 12-hour clock display or the 24-hour clock display.
Offset Adjust – Adjust the time by increasing or decreasing per minute.
Daylight Savings Time – Turn this item to ON for daylight savings time application.
Time Zone – Choose the time zone.
Refer to your Owner’s Manual and Navigation System Owner’s Manual for additional
information on your navigation system.
Page 11 of 28
89
0102
03
0405
06
RADIo BU ttoN
Pressing the RADIo button will change the band to either FM, AM, or SAT* radio
stations.
See K /tR ACK /CA t BU tto N
To scan quickly through each broadcasting station, press the See K/tRACK/
CA t
button.
To skip from one track to another on a CD, press the See K/tRACK/CA t
button.
tUNING AND AUDI o C oNtR o L KN oB
To manually tune the radio, turn the tUNe.
FoLDe R knob. To adjust the Bass,
Treble, Balance and Fade, press the AUDIo knob until the desired mode
appears in the display. Then turn the tUNe.
FoLDe R knob to adjust to the
desired level.
While playing an MP3 CD turn the tUNe.
FoLDe R knob right or left to skip
forward or backward through the available folders. This function will only
operate on an MP3 CD with multiple folders.
S tA tIo N AND CD S eLe C t BU ttoNS
To store a station in the preset you must first select A, B, or C memory bank by
pressing the PReS et A·B·C button and tune to the desired FM, AM or SAT*
station. Then press and hold the desired station select button for at least 2
seconds. When the preset indicator illuminates, a beep will sound, indicating
memorization is complete. To retrieve a previously set station, select the memory
bank where the preset was set, then press the corresponding station select button.
PR eS et A · B · C BU ttoN
Press the PReS et A·B·C button until you reach the desired setting. The radio is
equipped with three separate banks, each with six station presets. You may store
any combination of FM, AM or SAT* radio presets on each bank.
CD/AUX BU ttoN
Press the CD/AUX button to play a CD loaded into the CD changer. Press the
CD/AUX button again to play a compatible device such as an MP3 player when it
is plugged into the auxiliary jack (cable not included).
01
FM/AM/SAT* RADIO WITH CD CHANGER (if so equipped)
Refer to the Owner’s Manual for detailed information regarding the audio system.
* SAT presets are only available on SAT equipped vehicles.
eJe C t BU ttoN
e JeC t A SINGL e DISC
- Press
the button for less than 1.5
seconds. Select the eject slot
by pressing the CD insert select
button (1-6). The CD will then eject.
e JeC t ALL DISCS
- Press and hold the button for more than 1.5 seconds.
CD S eLe C t/L oAD BU ttoNS
L o AD A SINGL e DISC
- Press one of the CD insert select buttons (1-6) for less
than 1.5 seconds, then insert the CD.
Lo AD UP to 6 DISCS
- Press and hold one of the CD insert select buttons (1-6)
for more than 1.5 seconds. The slot numbers (1-6) will illuminate on the display
when CDs are loaded into the changer.
07
08
0708
03
05
04
06
02
CLOCK SET/ADJUSTMENT
(Navigation System only)
Press the SetUP button, then touch the
“Clock” key to access the following clock
settings:
On-screen Clock – When this item
is turned to ON, a clock is always
displayed in the upper right corner of
the screen. The clock is automatically adjusted by the GPS system.
Clock Format – Choose either the 12-hour clock display or the 24-hour clock display.
Offset Adjust – Adjust the time by increasing or decreasing per minute.
Daylight Savings Time – Turn this item to ON for daylight savings time application.
Time Zone – Choose the time zone.
Refer to your Owner’s Manual and Navigation System Owner’s Manual for additional
information on your navigation system.
Page 12 of 28
TRUNK SECURITY
tRUNK LID CANC eL SWI tCH (if so equipped)
When the cancel switch (located inside the glove
box) is oFF, the trunk lid cannot be opened with the
trunk lid opener, the trunk request switch button or
the Intelligent Key button.
It can be opened by using the Emergency
Inside Trunk Release.
1011
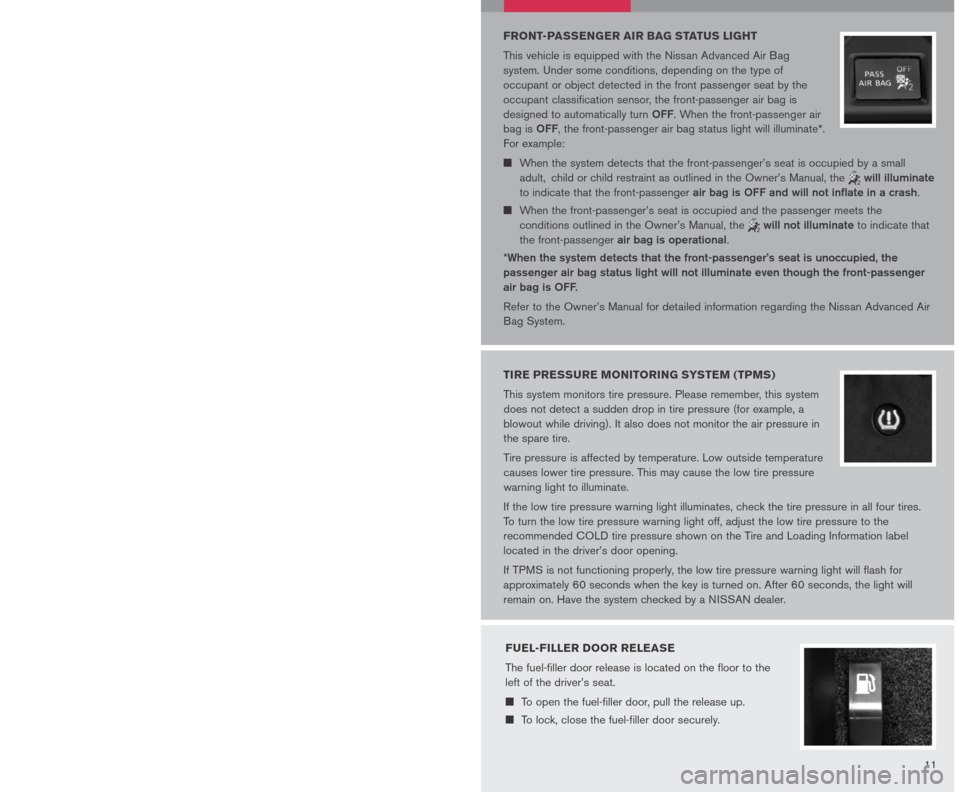
FRONT-PASSENGER AIR BAG STATUS LIGHT
This vehicle is equipped with the Nissan Advanced Air Bag
system. Under some conditions, depending on the type of
occupant or object detected in the front passenger seat by the
occupant classification sensor, the front-passenger air bag is
designed to automatically turn oFF. When the front-passenger air
bag is oFF, the front-passenger air bag status light will illuminate*.
For example:
When the system detects that the front-passenger’s seat is occupied by a small
adult, child or child restraint as outlined in the Owner’s Manual, the
will illuminate
to indicate that the front-passenger air bag is oFF and will not inflate in a crash.
When the front-passenger’s seat is occupied and the passenger meets the
conditions outlined in the Owner’s Manual, the will not illuminate to indicate that
the front-passenger air bag is operational.
*When the system detects that the front-passenger’s seat is unoccupied, the
passenger air bag status light will not illuminate even though the front-passenger
air bag is oFF.
Refer to the Owner’s Manual for detailed information regarding the Nissan Advanced Air
Bag System.
TIRE PRESSURE MONITORING SYSTEM (TPMS)
This system monitors tire pressure. Please remember, this system
does not detect a sudden drop in tire pressure (for example, a
blowout while driving). It also does not monitor the air pressure in
the spare tire.
Tire pressure is affected by temperature. Low outside temperature
causes lower tire pressure. This may cause the low tire pressure
warning light to illuminate.
If the low tire pressure warning light illuminates, check the tire pressure in all four tires.
To turn the low tire pressure warning light off, adjust the low tire pressure to the
recommended COLD tire pressure shown on the Tire and Loading Information label
located in the driver’s door opening.
If TPMS is not functioning properly, the low tire pressure warning light will flash for
approximately 60 seconds when the key is turned on. After 60 seconds, the light will
remain on. Have the system checked by a NISSAN dealer.
FUEL-FILLER DOOR RELEASE
The fuel-filler door release is located on the floor to the
left of the driver’s seat.
To open the fuel-filler door, pull the release up.
To lock, close the fuel-filler door securely.
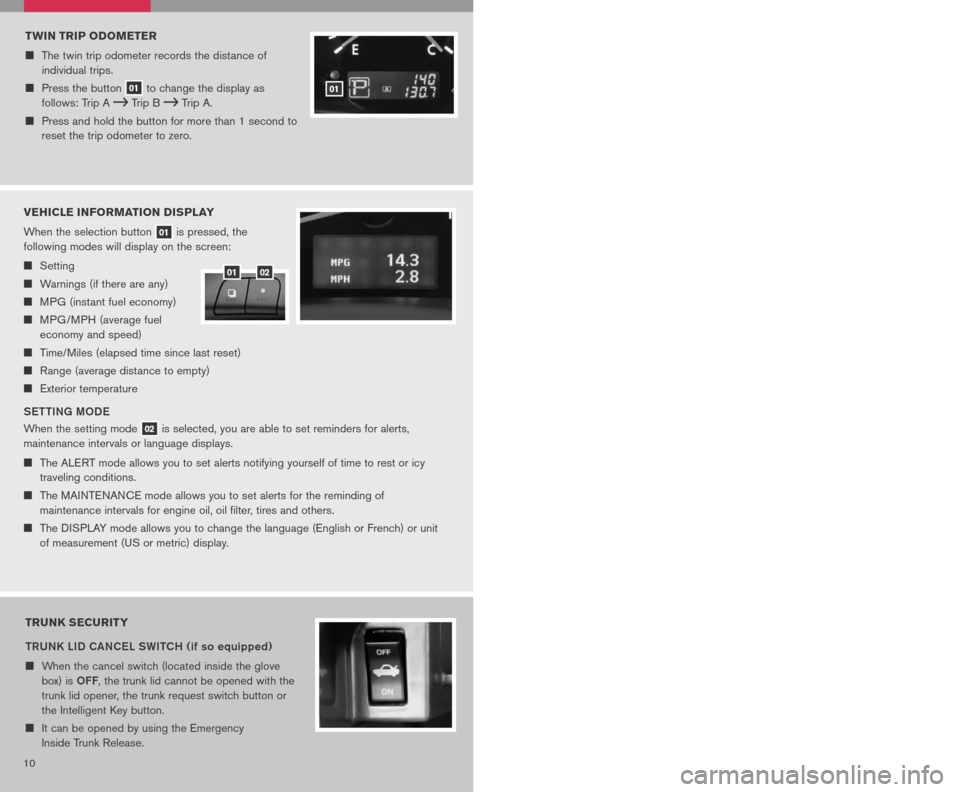
TWIN TRIP ODOMETER
The twin trip odometer records the distance of
individual trips.
Press the button 01 to change the display as
follows: Trip A Trip B Trip A.
Press and hold the button for more than 1 second to
reset the trip odometer to zero.
01
VEHICLE INFORMATION DISPLAY
When the selection button 01 is pressed, the
following modes will display on the screen:
Setting
Warnings (if there are any)
MPG (instant fuel economy)
MPG/MPH (average fuel
economy and speed)
Time/Miles (elapsed time since last reset)
Range (average distance to empty)
Exterior temperature
S ett ING M oDe
When the setting mode 02 is selected, you are able to set reminders for alerts,
maintenance intervals or language displays.
The ALERT mode allows you to set alerts notifying yourself of time to rest or icy
traveling conditions.
The MAINTENANCE mode allows you to set alerts for the reminding of
maintenance intervals for engine oil, oil filter, tires and others.
The DISPLAY mode allows you to change the language (English or French) or unit
of measurement (US or metric) display.
0102
Page 13 of 28
TRUNK SECURITY
tRUNK LID CANC eL SWI tCH (if so equipped)
When the cancel switch (located inside the glove
box) is oFF, the trunk lid cannot be opened with the
trunk lid opener, the trunk request switch button or
the Intelligent Key button.
It can be opened by using the Emergency
Inside Trunk Release.
1011
FRONT-PASSENGER AIR BAG STATUS LIGHT
This vehicle is equipped with the Nissan Advanced Air Bag
system. Under some conditions, depending on the type of
occupant or object detected in the front passenger seat by the
occupant classification sensor, the front-passenger air bag is
designed to automatically turn oFF. When the front-passenger air
bag is oFF, the front-passenger air bag status light will illuminate*.
For example:
When the system detects that the front-passenger’s seat is occupied by a small
adult, child or child restraint as outlined in the Owner’s Manual, the
will illuminate
to indicate that the front-passenger air bag is oFF and will not inflate in a crash.
When the front-passenger’s seat is occupied and the passenger meets the
conditions outlined in the Owner’s Manual, the will not illuminate to indicate that
the front-passenger air bag is operational.
*When the system detects that the front-passenger’s seat is unoccupied, the
passenger air bag status light will not illuminate even though the front-passenger
air bag is oFF.
Refer to the Owner’s Manual for detailed information regarding the Nissan Advanced Air
Bag System.
TIRE PRESSURE MONITORING SYSTEM (TPMS)
This system monitors tire pressure. Please remember, this system
does not detect a sudden drop in tire pressure (for example, a
blowout while driving). It also does not monitor the air pressure in
the spare tire.
Tire pressure is affected by temperature. Low outside temperature
causes lower tire pressure. This may cause the low tire pressure
warning light to illuminate.
If the low tire pressure warning light illuminates, check the tire pressure in all four tires.
To turn the low tire pressure warning light off, adjust the low tire pressure to the
recommended COLD tire pressure shown on the Tire and Loading Information label
located in the driver’s door opening.
If TPMS is not functioning properly, the low tire pressure warning light will flash for
approximately 60 seconds when the key is turned on. After 60 seconds, the light will
remain on. Have the system checked by a NISSAN dealer.
FUEL-FILLER DOOR RELEASE
The fuel-filler door release is located on the floor to the
left of the driver’s seat.
To open the fuel-filler door, pull the release up.
To lock, close the fuel-filler door securely.
TWIN TRIP ODOMETER
The twin trip odometer records the distance of
individual trips.
Press the button 01 to change the display as
follows: Trip A Trip B Trip A.
Press and hold the button for more than 1 second to
reset the trip odometer to zero.
01
VEHICLE INFORMATION DISPLAY
When the selection button 01 is pressed, the
following modes will display on the screen:
Setting
Warnings (if there are any)
MPG (instant fuel economy)
MPG/MPH (average fuel
economy and speed)
Time/Miles (elapsed time since last reset)
Range (average distance to empty)
Exterior temperature
S ett ING M oDe
When the setting mode 02 is selected, you are able to set reminders for alerts,
maintenance intervals or language displays.
The ALERT mode allows you to set alerts notifying yourself of time to rest or icy
traveling conditions.
The MAINTENANCE mode allows you to set alerts for the reminding of
maintenance intervals for engine oil, oil filter, tires and others.
The DISPLAY mode allows you to change the language (English or French) or unit
of measurement (US or metric) display.
0102