stop start NISSAN ALTIMA HYBRID 2009 L32A / 4.G User Guide
[x] Cancel search | Manufacturer: NISSAN, Model Year: 2009, Model line: ALTIMA HYBRID, Model: NISSAN ALTIMA HYBRID 2009 L32A / 4.GPages: 353, PDF Size: 4.18 MB
Page 181 of 353

When the RADIO button is pressed while the
ignition switch is in the ACC or ON position, the
radio will come on at the station last played.
If a compact disc is playing when the RADIO
button is pressed, the compact disc will auto-
matically be turned off and the last radio station
played will come on.
The FM stereo indicator, ST, illuminates during
FM stereo reception. When the stereo broadcast
signal is weak, the radio automatically changes
from stereo to monaural reception.
TUNE/FF·REW (tuning)
button:
Press the TUNE/FF·REW button
orfor manual tuning. To move quickly through the
channels, hold the tuning buttons down.
SEEK (tuning) button:
Press the SEEK/TRACK button
orto tune from high to low or low to high frequen-
cies and stop at the next broadcasting station.
SCAN (tuning) button:
Press the SCAN button. SCAN illuminates in the
display window. Scan tuning begins from low to
high frequencies. Scan tuning stops for 5 sec-
onds at each broadcasting station that has suffi-cient signal strength. When scanning, SCAN
blinks in the display. Pressing the SCAN button
again during this 5 second period stops scan
tuning and the radio remains tuned to that station.
Station memory operations:
18 stations can be set for the FM and AM radio to
the A, B and C preset button in any combination
of AM or FM stations.
1. Press the PRESET A·B·C button to change
between storage banks. The radio displays
the icon A, B or C to indicate which set of
presets are active.
2. Tune to the desired station using manual
TUNE or SEEK tuning. Press and hold any of
the desired station memory buttons (1 – 6)
until a beep sound is heard. (The radio mutes
when the select button is pressed.)
3. The channel indicator will then come on and
the sound will resume. Programming is now
complete.
4. Other buttons can be set in the same man-
ner.
If the battery cable is disconnected, or if the fuse
opens, the radio memory will be canceled. In that
case, reset the desired stations.
Compact disc (CD) player operation
Place the ignition switch in the ACC or ON
position, and carefully insert the compact disc
into the slot with the label side up. The compact
disc is automatically pulled into the slot and starts
to play.
If the radio is already operating, it automatically
turns off and the compact disc begins to play.
CD button:
When the CD button is pressed with a compact
disc loaded and the radio playing, the radio turns
off and the last used compact disc starts to play.
TUNE/FF·REW (Fast For-
ward, Rewind) button:
When the TUNE/FF·REW button
oris pressed while the compact disc is playing, the
compact disc plays at an increased speed while
fast forwarding or rewinding. When the button is
released, the compact disc returns to normal play
speed.
SEEK/TRACK button:
When
is pressed while the compact disc
is playing, the next track following the present
one starts to play from the beginning.
Press
several times to skip several tracks.
4-22Monitor, climate, audio, phone and voice recognition systems
ZREVIEW COPYÐ2009 Altima Hybrid Electric
(ahv)
Owners ManualÐCanadian_French(fr_can)
06/16/08Ðdebbie
X
Page 186 of 353

TUNE/FF·REW (tuning)
button:
Press the TUNE/FF·REW button
orfor manual tuning. To move quickly through the
channels, hold the tuning buttons down.
SEEK (tuning) button:
Press the SEEK/TRACK button
orto tune from high to low or low to high frequen-
cies and stop at the next broadcasting station.
SCAN (tuning) button:
Press the SCAN button. SCAN illuminates in the
display window. Scan tuning begins from low to
high frequencies. Scan tuning stops for 5 sec-
onds at each broadcasting station that has suffi-
cient signal strength. When scanning, SCAN
blinks in the display. Pressing the SCAN button
again during this 5 second period stops scan
tuning and the radio remains tuned to that station.
Station memory operations:
18 stations can be set for the FM and AM radio to
the A, B and C preset button in any combination
of AM or FM stations.
1. Press the PRESET A·B·C button to change
between storage banks. The radio displaysthe icon A, B or C to indicate which set of
presets are active.
2. Tune to the desired station using manual
TUNE or SEEK tuning. Press and hold any of
the desired station memory buttons (1 – 6)
until a beep sound is heard. (The radio mutes
when the select button is pressed.)
3. The channel indicator will then come on and
the sound will resume. Programming is now
complete.
4. Other buttons can be set in the same man-
ner.
If the battery cable is disconnected, or if the fuse
opens, the radio memory will be canceled. In that
case, reset the desired stations.
Radio data system (RDS):
RDS stands for Radio Data System, and is a data
information service transmitted by some radio
stations on the FM band (not AM band) . Cur-
rently, most RDS stations are in large cities, but
many stations are now considering broadcasting
RDS data.
RDS can display:
cStation call sign, such as “WHFR 98.3”.
cStation name, such as “The Groove”.cMusic or programming type such as “Clas-
sical”, “Country”, or “Rock”.
If the station broadcasts RDS information, the
RDS icon is displayed.
Compact disc (CD) changer operation
Place the ignition switch in the ACC or ON
position and insert the compact disc into the slot
with the label side facing up. The compact disc
will be guided automatically into the slot and start
playing. To insert the disc, first press the
button.
If the radio is already operating, it will automati-
cally turn off and the compact disc will play.
If the system has been turned off while the com-
pact disc was playing, pressing the PWR button
will start the compact disc.
Do not use 3.1 in (8 cm) diameter compact discs
in the CD changer.
CD load button:
To insert a CD in the CD changer, press
the
load button for less than 1.5 seconds.
Select the loading slot by pressing the CD insert
select button (1 – 6) , then insert the CD.
To insert 6 CDs to the CD changer, press
the
load button for more than 1.5 seconds.
Monitor, climate, audio, phone and voice recognition systems4-27
ZREVIEW COPYÐ2009 Altima Hybrid Electric
(ahv)
Owners ManualÐCanadian_French(fr_can)
06/16/08Ðdebbie
X
Page 192 of 353

SEEK/TRACK (tuning)
button:
Press the SEEK/TRACK button
orfor less than 1.5 seconds to tune from high to low
or low to high frequencies and stop at the next
broadcasting station.
“Scan” (tuning) key:
Touch the “Scan” key. SCAN illuminates in the
display window. Scan tuning begins from low to
high frequencies. Scan tuning stops for 5 sec-
onds at each broadcasting station that has suffi-
cient signal strength. Touching the “Scan” key
again during this 5 second period stops scan
tuning and the radio remains tuned to that station.
Station memory operations:
18 stations can be set for the FM, AM or SAT
(Satellite if so equipped) radio to the A, B and C
preset button in any combination of FM, AM or
SAT stations.
1. Press the A·B·C button or the “Preset” key to
select preset channel A, B or C.
2. Press the RADIO button to select the de-
sired FM, AM or SAT station band.
3. Tune to the desired station using manual
tuning, seek tuning or scan tuning. Press
and hold any of the desired station memory(1 – 6) buttons until a beep sound is heard
(the station will now appear in one of the 1 –
6 keys on the screen)
4. The channel indicator will then come on and
the sound will resume. Memorizing is now
complete.
5. Other buttons can be set in the same man-
ner.
If the battery cable is disconnected, or if the fuse
blows, the radio memory will be canceled. In that
case, reset the desired stations.
Radio data system (RDS):
RDS stands for Radio Data System, and is a data
information service transmitted by some radio
stations on the FM band (not AM band) . Cur-
rently, most RDS stations are in large cities, but
many stations are now considering broadcasting
RDS data.
RDS can display:
cStation call sign, such as “WHFR 98.3”.
cStation name, such as “The Groove”.
cMusic or programming type such as “Clas-
sical”, “Country” or “Rock”.
If the station broadcasts RDS information, the
RDS icon is displayed.
Compact disc (CD) changer operation
With the ignition switch in the ACC or ON posi-
tion, press one of the CD changer (1 – 6) but-
tons. Once the CD slot has open insert the
compact disc into the slot with the label side
facing up. The compact disc will be guided auto-
matically into the slot and start playing.
If the radio is already operating, it will automati-
cally turn off and the compact disc will play.
If the system has been turned off while the com-
pact disc was playing, pressing the ON·OFF/
VOL control knob will start the compact disc.
Loading buttons:
1 Disc Load:
cPress one of the CD changer (1 – 6) select
buttons for less than 1.5 seconds, then in-
sert the CD.
cWhile in CD mode press one of the station
and CD select (1 – 6) buttons on the radio,
then insert the CD.
cWhile in CD mode press one of the CD (1 –
6) keys on the screen, then insert the CD.
All Disc Load:
cPress and hold one of the CD changer (1 –
6) buttons for more than 1.5 seconds.
Monitor, climate, audio, phone and voice recognition systems4-33
ZREVIEW COPYÐ2009 Altima Hybrid Electric
(ahv)
Owners ManualÐCanadian_French(fr_can)
06/16/08Ðdebbie
X
Page 193 of 353

The slot numbers (1 – 6) will illuminate on the
display when CDs are loaded into the changer.
When one of the CD changer (1 – 6) buttons is
pressed with the compact disc loaded but the
radio playing, the radio will automatically be
turned off and the compact disc will start to play.
DISC button:
When the DISC button is pressed with the sys-
tem off and the compact disc loaded, the system
will turn on and the compact disc will start to play.
When the DISC button is pressed with the com-
pact disc loaded with the radio playing, the radio
will automatically be turned off and the compact
disc will start to play.
TUNE·FOLDER knob:
While playing an MP3 CD to skip through folders
turn the TUNE·FOLDER knob right or left to skip
forward or backward through the available fold-
ers.
This function will only operate on an MP3 CD with
multiple folders.
“Folder” key:
While playing an MP3 CD you can select a track
inside a folder. Touch the “Folder” key; a list
screen displays. Touch one of the folder select
keys; another list screen displays. Touch one ofthe file select keys; the system will start playing
that track in the selected folder.
SEEK/TRACK button:
When the SEEK/TRACK
button is
pressed for less than 1.5 seconds while a com-
pact disc is playing, the track being played re-
turns to its beginning. Press several times to skip
back through tracks. The compact disc will go
back the number of times the button is pressed.
When the SEEK/TRACK
button is
pressed for less than 1.5 seconds while the
compact disc is playing, the next track will start to
play from its beginning. Press several times to
skip through tracks. The compact disc will ad-
vance the number of times the button is pressed.
(When the last track on the compact disc is
skipped through, the first track will be played.)
When pressing the SEEK/TRACK
(fast
forward) or
(rewind) button for more than
1.5 seconds, the CD being played will fast for-
ward or rewind. When the button is released, the
CD will return to normal play speed.
“Track” key:
While playing a CD or an MP3 CD you can select
a track or file on the disc. Touch the “Track” key, alist screen displays. Touch one of the track or file
select keys, the system will start playing that track
or file.
CD select buttons:
To play another CD that has been loaded:
cTouch one of the CD select (1–6) keys on
the touch-screen or
cPress one of the station and CD select (1 –
6) buttons on the radio or
cPress one of the CD changer (1 – 6) select
buttons.
“Scan” key:
While listening to a CD, touch the “Scan” key to
preview the first 10 seconds of each track on the
current CD playing. Touching the “Scan” key
during this 10 second period stops the scan and
the CD remains on that track.
“Repeat” key:
When the “Repeat” key is touched while a com-
pact disc is played, the play pattern can be
changed as follows:
CD:
1 DISC RPT!1 TRACK RPT
4-34Monitor, climate, audio, phone and voice recognition systems
ZREVIEW COPYÐ2009 Altima Hybrid Electric
(ahv)
Owners ManualÐCanadian_French(fr_can)
06/16/08Ðdebbie
X
Page 230 of 353
c. You notice a change in the sound of
the exhaust system.
d. You have had an accident involving
damage to the exhaust system, un-
derbody, or rear of the vehicle.
THREE-WAY CATALYST
The three-way catalyst is an emission control
device installed in the exhaust system. Exhaust
gases in the three-way catalyst are burned at
high temperatures to help reduce pollutants.
WARNING
cThe exhaust gas and the exhaust sys-
tem are very hot. Keep people, animals
or flammable materials away from the
exhaust system components.
cDo not stop or park the vehicle over
flammable materials such as dry grass,
waste paper or rags. They may ignite
and cause a fire.
CAUTION
cDo not use leaded gasoline. Deposits
from leaded gasoline will seriously re-
duce the three-way catalyst’s ability to
help reduce exhaust pollutants.cKeep your engine tuned up. Malfunc-
tions in the ignition, fuel injection, or
electrical systems can cause overrich
fuel flow into the three-way catalyst,
causing it to overheat. Do not keep driv-
ing if the engine misfires, or if notice-
able loss of performance or other un-
usual operating conditions are
detected. Have the vehicle inspected
promptly by a NISSAN dealer.
cAvoid driving with an extremely low fuel
level. Running out of fuel could cause
the engine to misfire, damaging the
three-way catalyst.
cDo not race the engine while warming it
up.
cDo not push or tow your vehicle to start
the engine.
TIRE PRESSURE MONITORING
SYSTEM (TPMS)
Each tire, including the spare (if provided) ,
should be checked monthly when cold and in-
flated to the inflation pressure recommended by
the vehicle manufacturer on the vehicle placard
or tire inflation pressure label. (If your vehicle has
tires of a different size than the size indicated on
the vehicle placard or tire inflation pressure label,you should determine the proper tire inflation
pressure for those tires.)
As an added safety feature, your vehicle has been
equipped with a Tire Pressure Monitoring System
(TPMS) that illuminates a low tire pressure telltale
when one or more of your tires is significantly
under-inflated. Accordingly, when the low tire
pressure telltale illuminates, you should stop and
check your tires as soon as possible, and inflate
them to the proper pressure. Driving on a signifi-
cantly under-inflated tire causes the tire to over-
heat and can lead to tire failure. Under-inflation
also reduces fuel efficiency and tire tread life, and
may affect the vehicle’s handling and stopping
ability.
Please note that the TPMS is not a substitute for
proper tire maintenance, and it is the driver’s
responsibility to maintain correct tire pressure,
even if under-inflation has not reached the level to
trigger illumination of the TPMS low tire pressure
telltale.
Your vehicle has also been equipped with a
TPMS malfunction indicator to indicate when the
system is not operating properly. The TPMS mal-
function indicator is combined with the low tire
pressure telltale. When the system detects a
malfunction, the telltale will flash for approxi-
mately one minute and then remain continuously
illuminated. This sequence will continue upon
Starting and driving5-3
ZREVIEW COPYÐ2009 Altima Hybrid Electric
(ahv)
Owners ManualÐCanadian_French(fr_can)
06/16/08Ðdebbie
X
Page 231 of 353
subsequent vehicle start-ups as long as the mal-
function exists. When the malfunction indicator is
illuminated, the system may not be able to detect
or signal low tire pressure as intended. TPMS
malfunctions may occur for a variety of reasons,
including the installation of replacement or alter-
nate tires or wheels on the vehicle that prevent
the TPMS from functioning properly. Always
check the TPMS malfunction telltale after replac-
ing one or more tires or wheels on your vehicle to
ensure that the replacement or alternate tires and
wheels allow the TPMS to continue to function
properly.
Additional information:
cThe TPMS does not monitor the tire
pressure of the spare tire.
cThe TPMS will activate only when the vehicle
is driven at speeds above 16 MPH (25 km/
h) . Also, this system may not detect a sud-
den drop in tire pressure (for example a flat
tire while driving) .
cThe low tire pressure warning light does not
automatically turn off when the tire pressure
is adjusted. After all 4 tires are inflated to the
recommended pressure, the vehicle must be
driven at speeds above 16 MPH (25 km/h)
to activate the TPMS and turn off the low tire
pressure warning light. Use a tire pressure
gauge to check the tire pressure.cTire pressure rises and falls depending on
the heat caused by the vehicle’s operation
and the outside temperature. Low outside
temperature can lower the temperature of
the air inside the tire which can cause a
lower tire inflation pressure. This may cause
the low tire pressure warning light to illumi-
nate. If the warning light illuminates in low
ambient temperature, check the tire pres-
sure for all four tires.
cThe Tire and Loading Information label (also
referred to as the vehicle placard or tire
inflation pressure label ) is located in the
driver’s door opening.
cYou can also check the pressure of all tires
(except the spare tire) on the display screen.
The order of the tire pressure figures dis-
played on the screen does not correspond
with the actual order of the tire position. See
“Tire pressure information” in the “Display
screen, heater, air conditioner and audio and
phone systems” section.
For additional information, see “Low tire pressure
warning light” in the “Instruments and controls”
section and “Tire Pressure Monitoring System
(TPMS)” in the “In case of emergency” section.WARNING
cIf the low tire pressure warning light
illuminates while driving, avoid sudden
steering maneuvers or abrupt braking,
reduce vehicle speed, pull off the road
to a safe location and stop the vehicle
as soon as possible. Driving with under-
inflated tires may permanently damage
the tires and increase the likelihood of
tire failure. Serious vehicle damage
could occur and may lead to an acci-
dent and could result in serious per-
sonal injury. Check the tire pressure for
all four tires. Adjust the tire pressure to
the recommended COLD tire pressure
shown on the Tire and Loading Informa-
tion label to turn the low tire pressure
warning light OFF. If you have a flat tire,
replace it with a spare tire as soon as
possible. (See “Flat tire” in the “In case
of emergency” section for changing a
flat tire.)
5-4Starting and driving
ZREVIEW COPYÐ2009 Altima Hybrid Electric
(ahv)
Owners ManualÐCanadian_French(fr_can)
06/16/08Ðdebbie
X
Page 233 of 353
OFF-ROAD RECOVERY
While driving, the right side or left side wheels
may unintentionally leave the road surface. If this
occurs, maintain control of the vehicle by follow-
ing the procedure below. Please note that this
procedure is only a general guide. The vehicle
must be driven as appropriate based on the con-
ditions of the vehicle, road and traffic.
1. Remain calm and do not overreact.
2. Do not apply the brakes.
3. Maintain a firm grip on the steering wheel
with both hands and try to hold a straight
course.
4. When appropriate , slowly release the accel-
erator pedal to gradually slow the vehicle.
5. If there is nothing in the way, steer the ve-
hicle to follow the road while vehicle speed
is reduced. Do not attempt to drive the ve-
hicle back onto the road surface until vehicle
speed is reduced.
6. When it is safe to do so, gradually turn the
steering wheel until both tires return to the
road surface. When all tires are on the road
surface, steer the vehicle to stay in the ap-
propriate driving lane.cIf you decide that it is not safe to return the
vehicle to the road surface based on vehicle,
road or traffic conditions, gradually slow the
vehicle to a stop in a safe place off the road.
RAPID AIR PRESSURE LOSS
Rapid air pressure loss or a “blow-out” can occur
if the tire is punctured or is damaged due to
hitting a curb or pothole. Rapid air pressure loss
can also be caused by driving on under-inflated
tires.
Rapid air pressure loss can affect the handling
and stability of the vehicle, especially at highway
speeds.
Help prevent rapid air pressure loss by maintain-
ing the correct air pressure and visually inspect
the tires for wear and damage. See “Wheels and
tires” in the “Maintenance and do-it-yourself”
section of this manual. If a tire rapidly loses air
pressure or “blows-out” while driving, maintain
control of the vehicle by following the procedure
below. Please note that this procedure is only a
general guide. The vehicle must be driven as
appropriate based on the conditions of the ve-
hicle, road and traffic.
WARNING
The following actions can increase the
chance of losing control of the vehicle if
there is a sudden loss of tire air pressure.
Losing control of the vehicle may cause a
collision and result in personal injury.
cThe vehicle generally moves or pulls in
the direction of the flat tire.
cDo not rapidly apply the brakes.
cDo not rapidly release the accelerator
pedal.
cDo not rapidly turn the steering wheel.
1. Remain calm and do not overreact.
2. Maintain a firm grip on the steering wheel
with both hands and try to hold a straight
course.
3. When appropriate, slowly release the accel-
erator pedal to gradually slow the vehicle.
4. Gradually steer the vehicle to a safe location
off the road and away from traffic if possible.
5. Lightly apply the brake pedal to gradually
stop the vehicle.
6. Turn on the hazard warning flashers and
either contact a roadside emergency service
to change the tire or see “Changing a flat
tire” in the “In case of emergency” section of
this Owner’s Manual.
5-6Starting and driving
ZREVIEW COPYÐ2009 Altima Hybrid Electric
(ahv)
Owners ManualÐCanadian_French(fr_can)
06/16/08Ðdebbie
X
Page 237 of 353

2. Place the ignition switch in the OFF or
LOCK position, and wait approximately 10
seconds.
3. Repeat steps 1 and 2.
4. Restart the engine while holding the device
(which may have caused the interference)
separate from the registered key.
If the no start condition re-occurs, NISSAN rec-
ommends placing the registered key on a sepa-
rate key ring to avoid interference from other
devices.cMake sure the area around the vehicle is
clear.
cCheck fluid levels such as engine oil, cool-
ant, brake fluid, and window washer fluid as
frequently as possible, or at least whenever
you refuel.
cCheck that all windows and lights are clean.
cVisually inspect tires for their appearance
and condition. Also check tires for proper
inflation.
cLock all doors.
cPosition seat and adjust head restraints.
cAdjust inside and outside mirrors.
cFasten seat belts and ask all passengers to
do likewise.
cCheck the operation of warning lights when
the ignition switch is pushed to the ON
position. See “Warning/indicator lights and
audible reminders” in the “Instruments and
controls” section of this manual.1. Apply the parking brake.
2. Move the shift selector to P (Park) .
The Hybrid System is designed not to
operate if the shift selector is not in the
P (Park) position.
3. Place the ignition switch in the ON position.
Depress the brake pedal and push the igni-
tion switch to start the Hybrid System. The
READY light will illuminate on the meter.
NOTE:
When starting the Hybrid System at very
low outside temperatures, the READY light
will flash and it may take longer for the
READY light to illuminate.
cThe engine may not start even with the
READY light illuminated. Once the
READY light is illuminated you may begin
driving the vehicle.
cYou may hear a sound in the engine com-
partment when the brake pedal is de-
pressed with the Hybrid System off. This
does not indicate a problem.
cWhen the Hybrid System is started or
stopped, you may hear a sound coming
from the high voltage battery located un-
der the rear seats. This does not indicate
a problem.
BEFORE STARTING THE HYBRID
SYSTEMSTARTING THE HYBRID SYSTEM
5-10Starting and driving
ZREVIEW COPYÐ2009 Altima Hybrid Electric
(ahv)
Owners ManualÐCanadian_French(fr_can)
06/16/08Ðdebbie
X
Page 238 of 353
cWhen the Hybrid System is started or
stopped, or while the vehicle is idling, you
may hear a sound coming from the trans-
mission. This does not indicate a prob-
lem.
cWhen the gasoline engine is started or
stopped with the Hybrid System on, you
may feel a vibration and hear a rattling
sound. This does not indicate a problem.
4. To turn off the Hybrid System, shift the shift
selector to the P (Park) position and place
the ignition switch to the OFF position.ELECTRONICALLY CONTROLLED
CONTINUOUSLY VARIABLE
TRANSMISSION (eCVT)
WARNING
cDo not attempt to test the vehicle on a
dynamometer (such as the dynamom-
eters used by some states for emissions
testing) , or similar equipment. Doing so
may cause damage to the drivetrain or
the high voltage battery. Make sure you
inform test facility personnel that your
vehicle is a hybrid. Using the wrong test
equipment may result in drivetrain dam-
age or unexpected vehicle movement
which could result in serious vehicle
damage or personal injury.
cDo not depress the accelerator pedal
while shifting from P (Park) or N (Neu-
tral) to R (Reverse) , D (Drive) or B
(Brake) . Always depress the brake
pedal until shifting is completed. Fail-
ure to do so could cause you to lose
control and have an accident.
cNever shift to P (Park) or R (Reverse)
while the vehicle is moving. This could
cause an accident.
CAUTION
When stopping the vehicle on an uphill
grade, do not hold the vehicle by depress-
ing the accelerator pedal. The foot brake
should be used for this purpose.
The eCVT in your vehicle is electronically con-
trolled to produce maximum power and smooth
operation.
The recommended operating procedures for this
transmission are shown on the following pages.
Follow these procedures for maximum vehicle
performance and driving enjoyment.
Starting the vehicle
1. After starting the Hybrid System, fully de-
press the foot brake pedal before moving the
shift selector out of the P (Park) position.
2. Keep the foot brake pedal depressed and
move the shift selector into a driving gear.
3. Release the foot brake, then gradually start
the vehicle in motion.
4. Stop the vehicle completely before shifting
the selector to the P (Park) position.
The eCVT is designed so the foot brake
pedal MUST be depressed before shifting
from P (Park) to any drive position while
the ignition switch is in the ON position.
DRIVING THE VEHICLE
Starting and driving5-11
ZREVIEW COPYÐ2009 Altima Hybrid Electric
(ahv)
Owners ManualÐCanadian_French(fr_can)
06/16/08Ðdebbie
X
Page 239 of 353
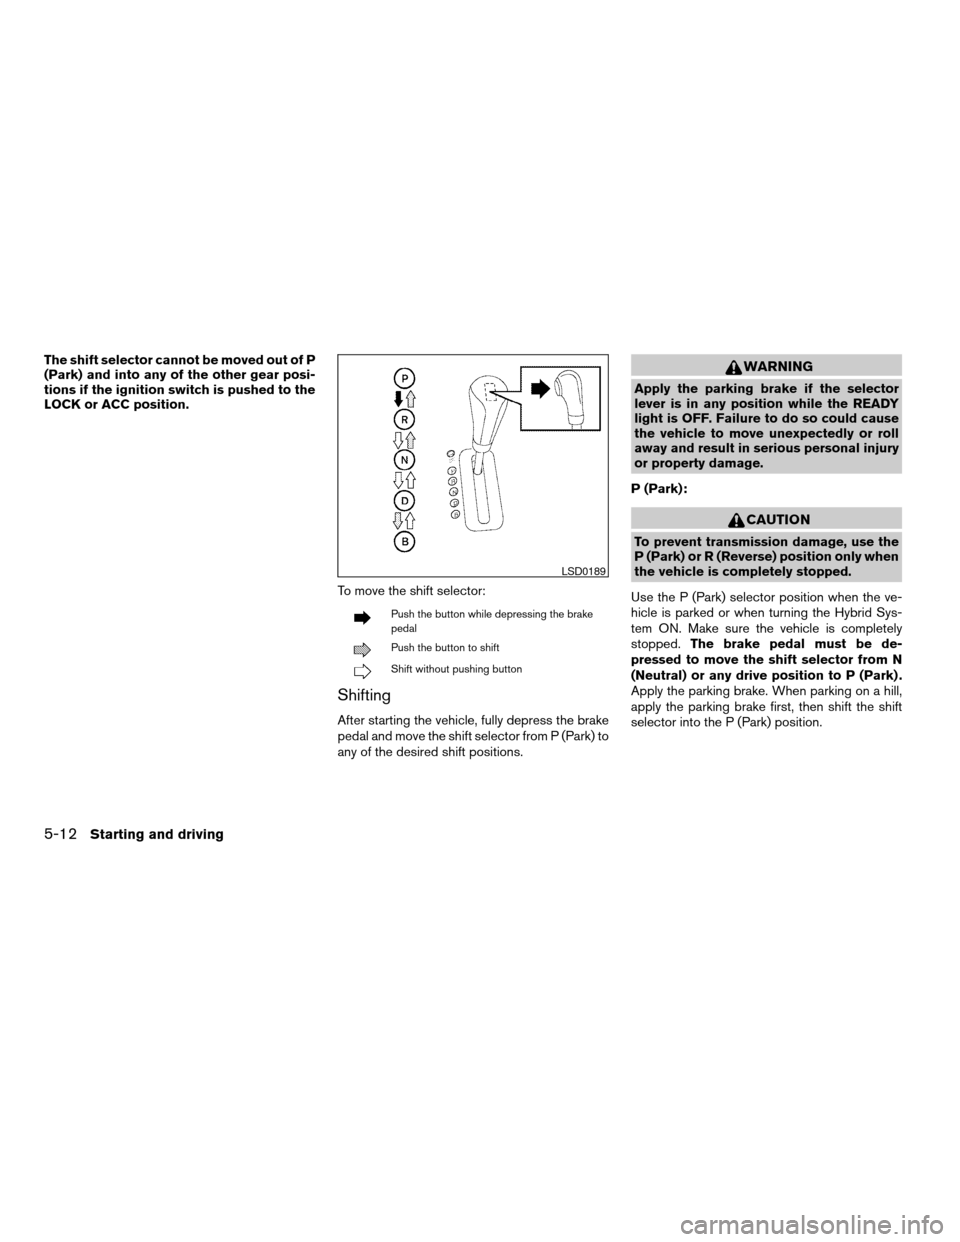
The shift selector cannot be moved out of P
(Park) and into any of the other gear posi-
tions if the ignition switch is pushed to the
LOCK or ACC position.
To move the shift selector:
Push the button while depressing the brake
pedal
Push the button to shift
Shift without pushing button
Shifting
After starting the vehicle, fully depress the brake
pedal and move the shift selector from P (Park) to
any of the desired shift positions.
WARNING
Apply the parking brake if the selector
lever is in any position while the READY
light is OFF. Failure to do so could cause
the vehicle to move unexpectedly or roll
away and result in serious personal injury
or property damage.
P (Park):
CAUTION
To prevent transmission damage, use the
P (Park) or R (Reverse) position only when
the vehicle is completely stopped.
Use the P (Park) selector position when the ve-
hicle is parked or when turning the Hybrid Sys-
tem ON. Make sure the vehicle is completely
stopped.The brake pedal must be de-
pressed to move the shift selector from N
(Neutral) or any drive position to P (Park) .
Apply the parking brake. When parking on a hill,
apply the parking brake first, then shift the shift
selector into the P (Park) position.
LSD0189
5-12Starting and driving
ZREVIEW COPYÐ2009 Altima Hybrid Electric
(ahv)
Owners ManualÐCanadian_French(fr_can)
06/16/08Ðdebbie
X