child restraint NISSAN ARMADA 2004 1.G Owner's Manual
[x] Cancel search | Manufacturer: NISSAN, Model Year: 2004, Model line: ARMADA, Model: NISSAN ARMADA 2004 1.GPages: 344, PDF Size: 5.67 MB
Page 65 of 344
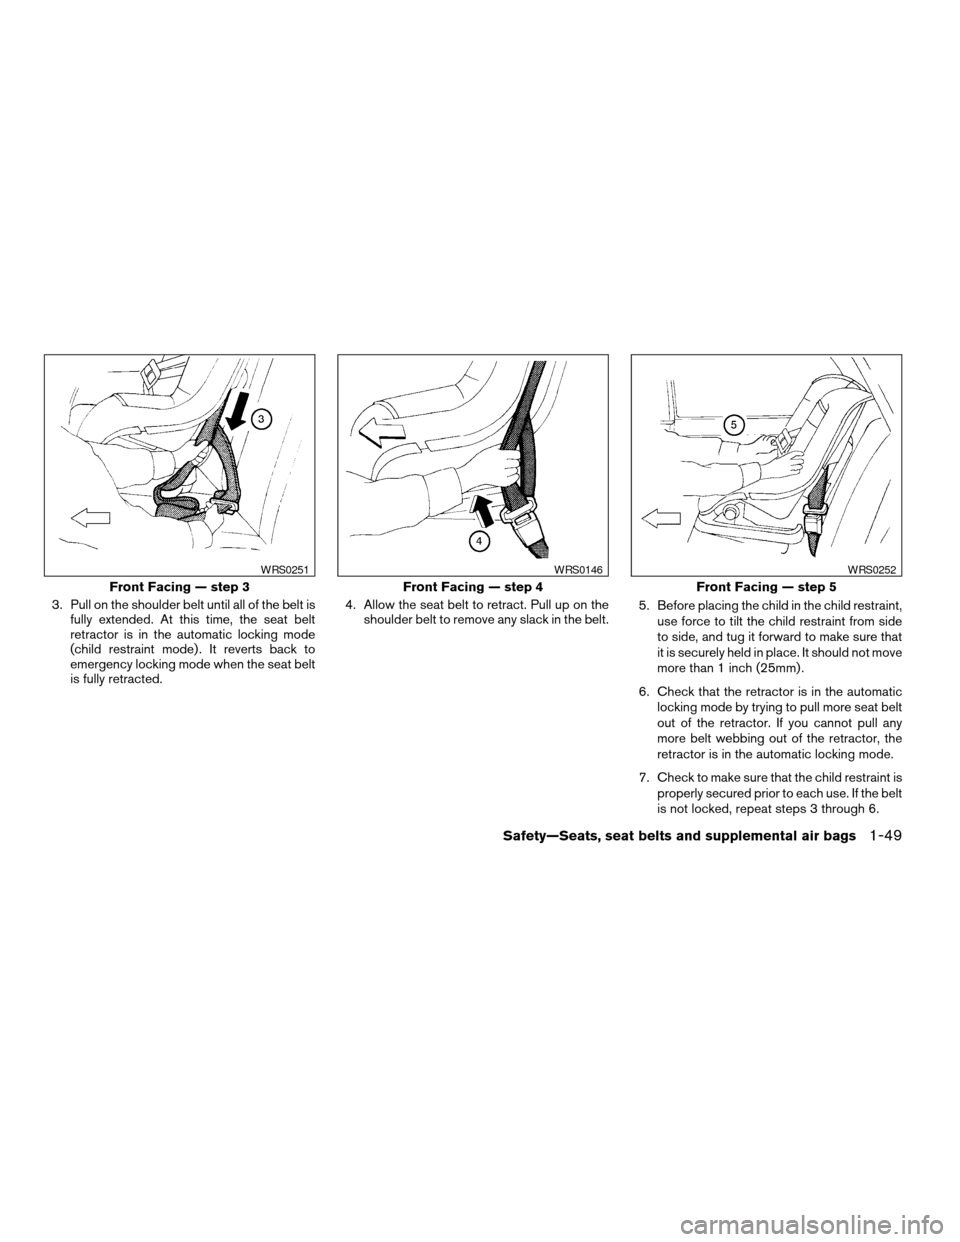
3. Pull on the shoulder belt until all of the belt is
fully extended. At this time, the seat belt
retractor is in the automatic locking mode
(child restraint mode) . It reverts back to
emergency locking mode when the seat belt
is fully retracted.4. Allow the seat belt to retract. Pull up on the
shoulder belt to remove any slack in the belt.5. Before placing the child in the child restraint,
use force to tilt the child restraint from side
to side, and tug it forward to make sure that
it is securely held in place. It should not move
more than 1 inch (25mm) .
6. Check that the retractor is in the automatic
locking mode by trying to pull more seat belt
out of the retractor. If you cannot pull any
more belt webbing out of the retractor, the
retractor is in the automatic locking mode.
7. Check to make sure that the child restraint is
properly secured prior to each use. If the belt
is not locked, repeat steps 3 through 6.
Front Facing — step 3
WRS0251
Front Facing — step 4
WRS0146
Front Facing — step 5
WRS0252
Safety—Seats, seat belts and supplemental air bags1-49
ZREVIEW COPY:Ð2004 Pathfinder Armada
(wzw)
Owners Manual(owners)ÐUSA English(nna)
01/14/04Ðtbrooks
X
Page 66 of 344
After the child restraint is removed and the seat
belt is fully retracted, the automatic locking mode
(child restraint mode) is canceled.
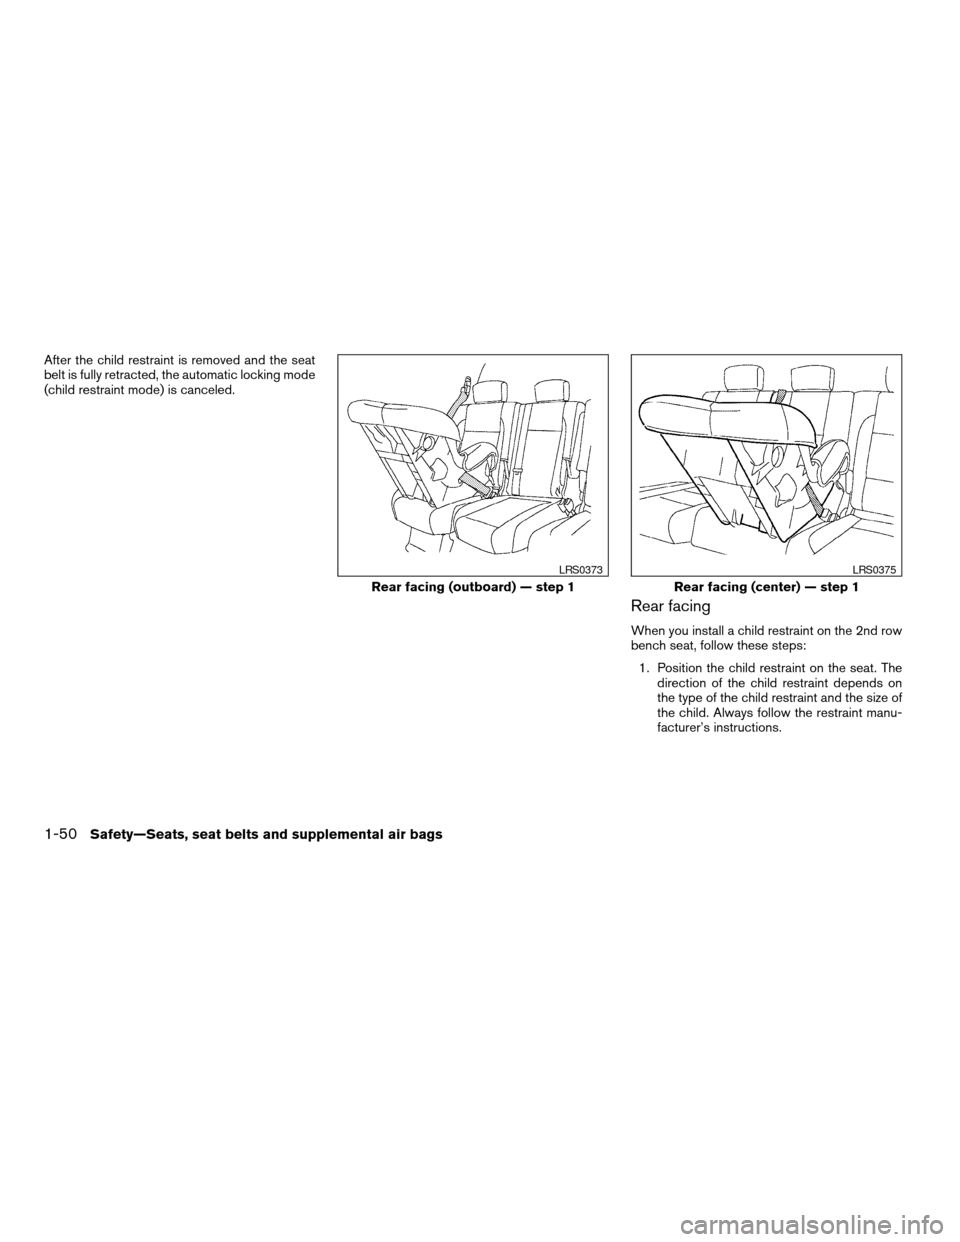
Rear facing
When you install a child restraint on the 2nd row
bench seat, follow these steps:
1. Position the child restraint on the seat. The
direction of the child restraint depends on
the type of the child restraint and the size of
the child. Always follow the restraint manu-
facturer’s instructions.
Rear facing (outboard) — step 1
LRS0373
Rear facing (center) — step 1
LRS0375
1-50Safety—Seats, seat belts and supplemental air bags
ZREVIEW COPY:Ð2004 Pathfinder Armada
(wzw)
Owners Manual(owners)ÐUSA English(nna)
01/14/04Ðtbrooks
X
Page 67 of 344
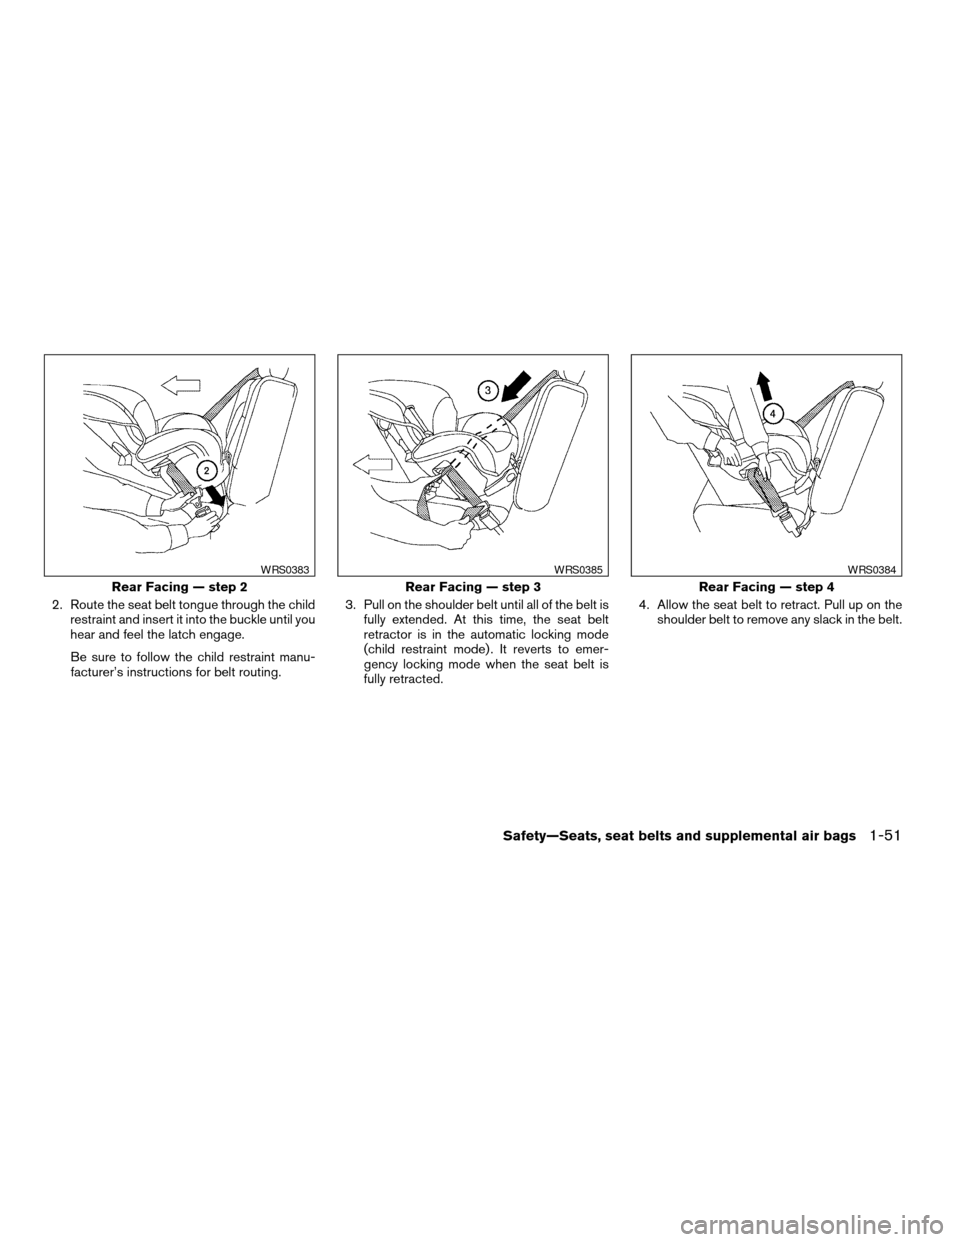
2. Route the seat belt tongue through the child
restraint and insert it into the buckle until you
hear and feel the latch engage.
Be sure to follow the child restraint manu-
facturer’s instructions for belt routing.3. Pull on the shoulder belt until all of the belt is
fully extended. At this time, the seat belt
retractor is in the automatic locking mode
(child restraint mode) . It reverts to emer-
gency locking mode when the seat belt is
fully retracted.4. Allow the seat belt to retract. Pull up on the
shoulder belt to remove any slack in the belt.
Rear Facing — step 2
WRS0383
Rear Facing — step 3
WRS0385
Rear Facing — step 4
WRS0384
Safety—Seats, seat belts and supplemental air bags1-51
ZREVIEW COPY:Ð2004 Pathfinder Armada
(wzw)
Owners Manual(owners)ÐUSA English(nna)
01/14/04Ðtbrooks
X
Page 68 of 344
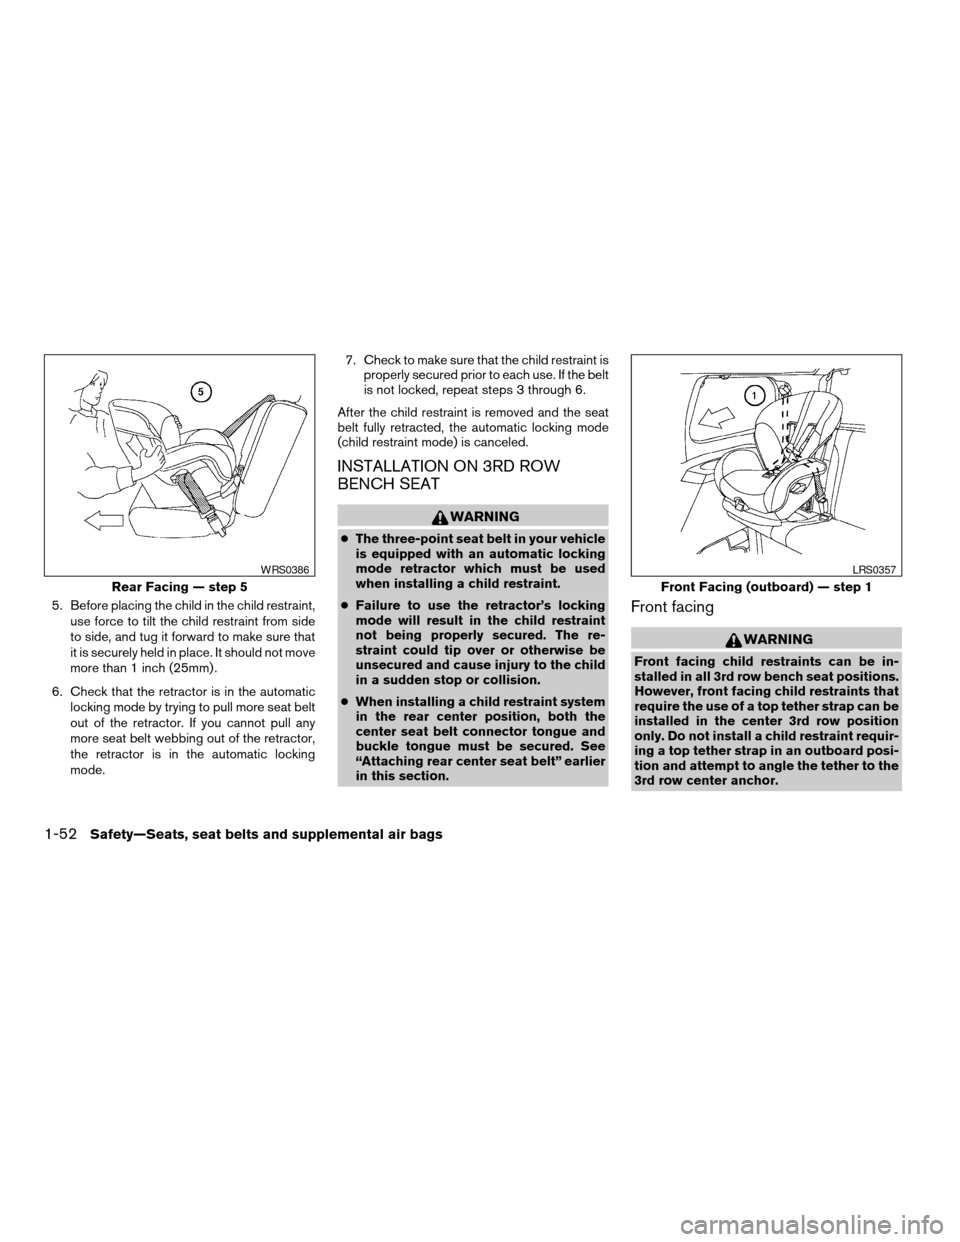
5. Before placing the child in the child restraint,
use force to tilt the child restraint from side
to side, and tug it forward to make sure that
it is securely held in place. It should not move
more than 1 inch (25mm) .
6. Check that the retractor is in the automatic
locking mode by trying to pull more seat belt
out of the retractor. If you cannot pull any
more seat belt webbing out of the retractor,
the retractor is in the automatic locking
mode.7. Check to make sure that the child restraint is
properly secured prior to each use. If the belt
is not locked, repeat steps 3 through 6.
After the child restraint is removed and the seat
belt fully retracted, the automatic locking mode
(child restraint mode) is canceled.
INSTALLATION ON 3RD ROW
BENCH SEAT
WARNING
cThe three-point seat belt in your vehicle
is equipped with an automatic locking
mode retractor which must be used
when installing a child restraint.
cFailure to use the retractor’s locking
mode will result in the child restraint
not being properly secured. The re-
straint could tip over or otherwise be
unsecured and cause injury to the child
in a sudden stop or collision.
cWhen installing a child restraint system
in the rear center position, both the
center seat belt connector tongue and
buckle tongue must be secured. See
“Attaching rear center seat belt” earlier
in this section.
Front facing
WARNING
Front facing child restraints can be in-
stalled in all 3rd row bench seat positions.
However, front facing child restraints that
require the use of a top tether strap can be
installed in the center 3rd row position
only. Do not install a child restraint requir-
ing a top tether strap in an outboard posi-
tion and attempt to angle the tether to the
3rd row center anchor.
Rear Facing — step 5
WRS0386
Front Facing (outboard) — step 1
LRS0357
1-52Safety—Seats, seat belts and supplemental air bags
ZREVIEW COPY:Ð2004 Pathfinder Armada
(wzw)
Owners Manual(owners)ÐUSA English(nna)
01/14/04Ðtbrooks
X
Page 69 of 344
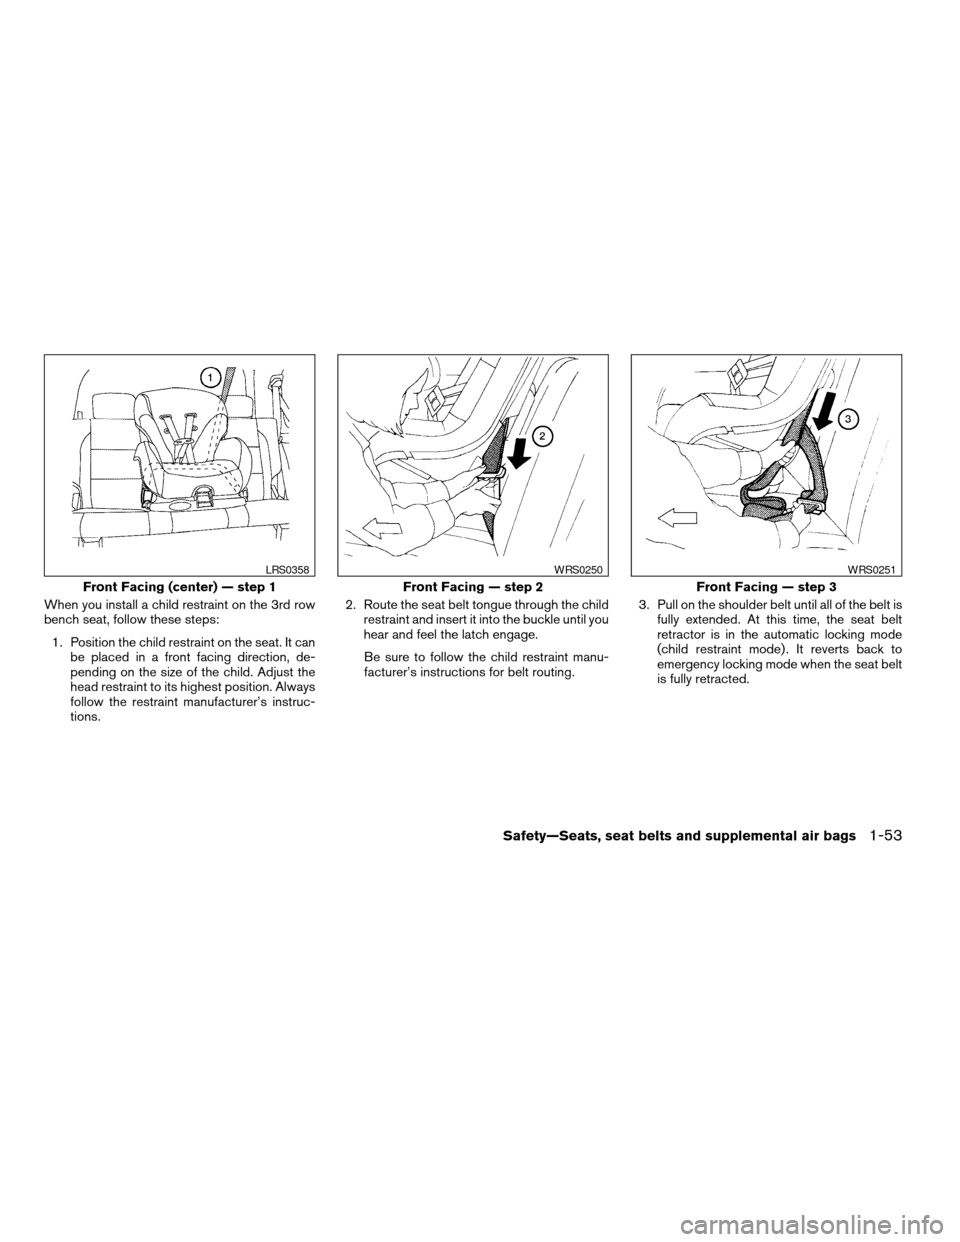
When you install a child restraint on the 3rd row
bench seat, follow these steps:
1. Position the child restraint on the seat. It can
be placed in a front facing direction, de-
pending on the size of the child. Adjust the
head restraint to its highest position. Always
follow the restraint manufacturer’s instruc-
tions.2. Route the seat belt tongue through the child
restraint and insert it into the buckle until you
hear and feel the latch engage.
Be sure to follow the child restraint manu-
facturer’s instructions for belt routing.3. Pull on the shoulder belt until all of the belt is
fully extended. At this time, the seat belt
retractor is in the automatic locking mode
(child restraint mode) . It reverts back to
emergency locking mode when the seat belt
is fully retracted.
Front Facing (center) — step 1
LRS0358
Front Facing — step 2
WRS0250
Front Facing — step 3
WRS0251
Safety—Seats, seat belts and supplemental air bags1-53
ZREVIEW COPY:Ð2004 Pathfinder Armada
(wzw)
Owners Manual(owners)ÐUSA English(nna)
01/14/04Ðtbrooks
X
Page 70 of 344
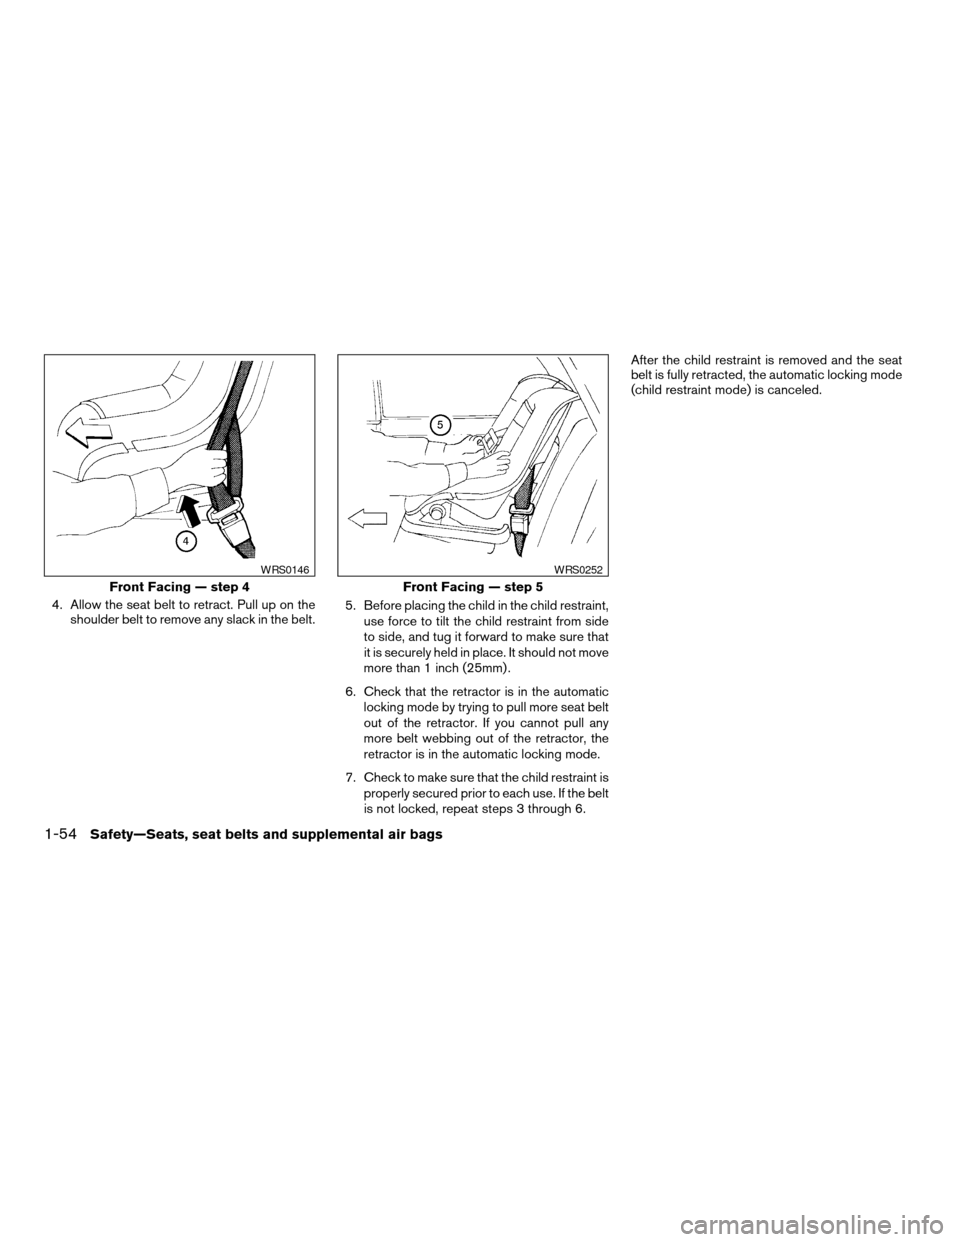
4. Allow the seat belt to retract. Pull up on the
shoulder belt to remove any slack in the belt.5. Before placing the child in the child restraint,
use force to tilt the child restraint from side
to side, and tug it forward to make sure that
it is securely held in place. It should not move
more than 1 inch (25mm) .
6. Check that the retractor is in the automatic
locking mode by trying to pull more seat belt
out of the retractor. If you cannot pull any
more belt webbing out of the retractor, the
retractor is in the automatic locking mode.
7. Check to make sure that the child restraint is
properly secured prior to each use. If the belt
is not locked, repeat steps 3 through 6.After the child restraint is removed and the seat
belt is fully retracted, the automatic locking mode
(child restraint mode) is canceled.
Front Facing — step 4
WRS0146
Front Facing — step 5
WRS0252
1-54Safety—Seats, seat belts and supplemental air bags
ZREVIEW COPY:Ð2004 Pathfinder Armada
(wzw)
Owners Manual(owners)ÐUSA English(nna)
01/14/04Ðtbrooks
X
Page 71 of 344
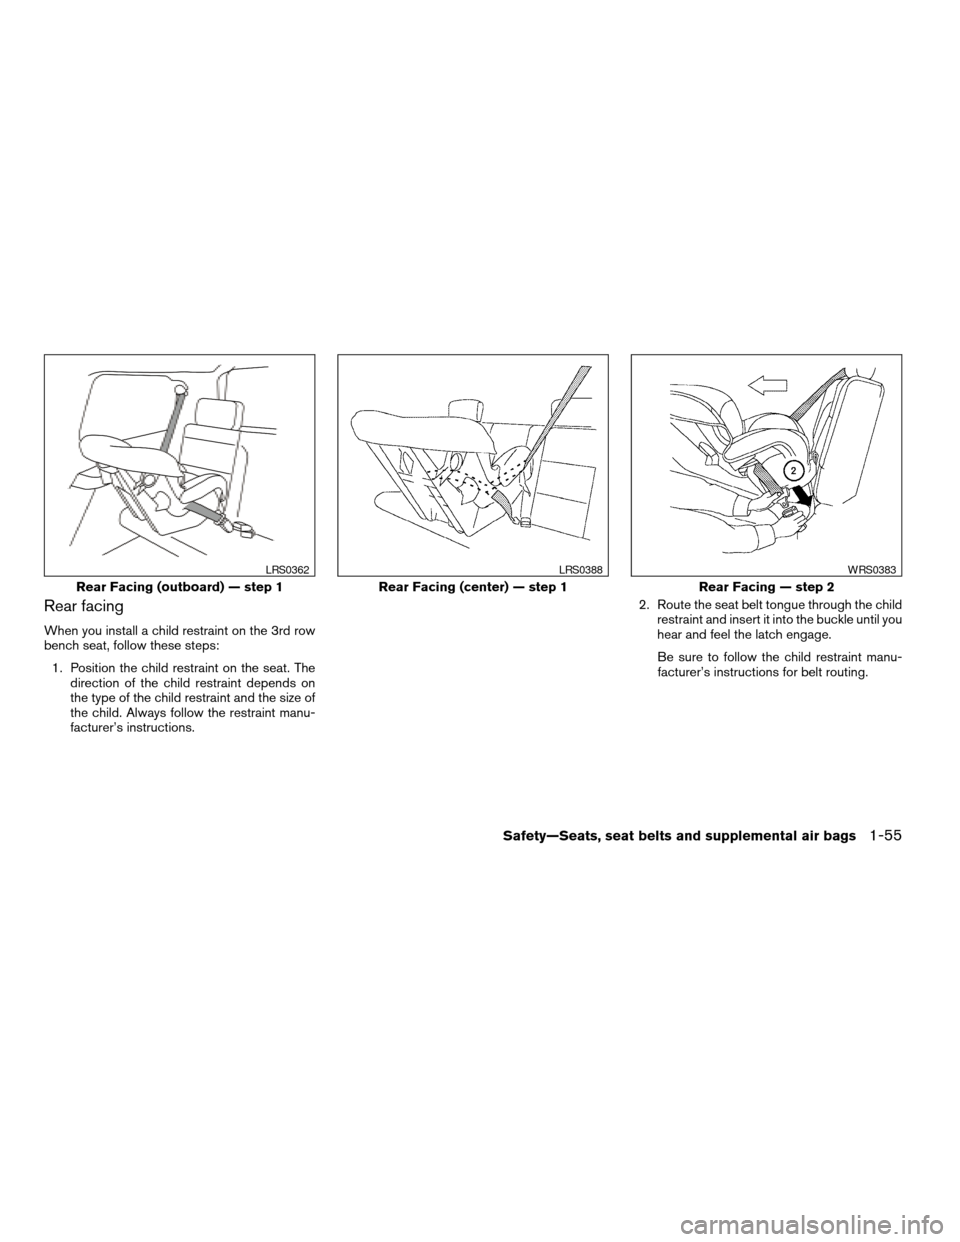
Rear facing
When you install a child restraint on the 3rd row
bench seat, follow these steps:
1. Position the child restraint on the seat. The
direction of the child restraint depends on
the type of the child restraint and the size of
the child. Always follow the restraint manu-
facturer’s instructions.2. Route the seat belt tongue through the child
restraint and insert it into the buckle until you
hear and feel the latch engage.
Be sure to follow the child restraint manu-
facturer’s instructions for belt routing.
Rear Facing (outboard) — step 1
LRS0362
Rear Facing (center) — step 1
LRS0388
Rear Facing — step 2
WRS0383
Safety—Seats, seat belts and supplemental air bags1-55
ZREVIEW COPY:Ð2004 Pathfinder Armada
(wzw)
Owners Manual(owners)ÐUSA English(nna)
01/14/04Ðtbrooks
X
Page 72 of 344
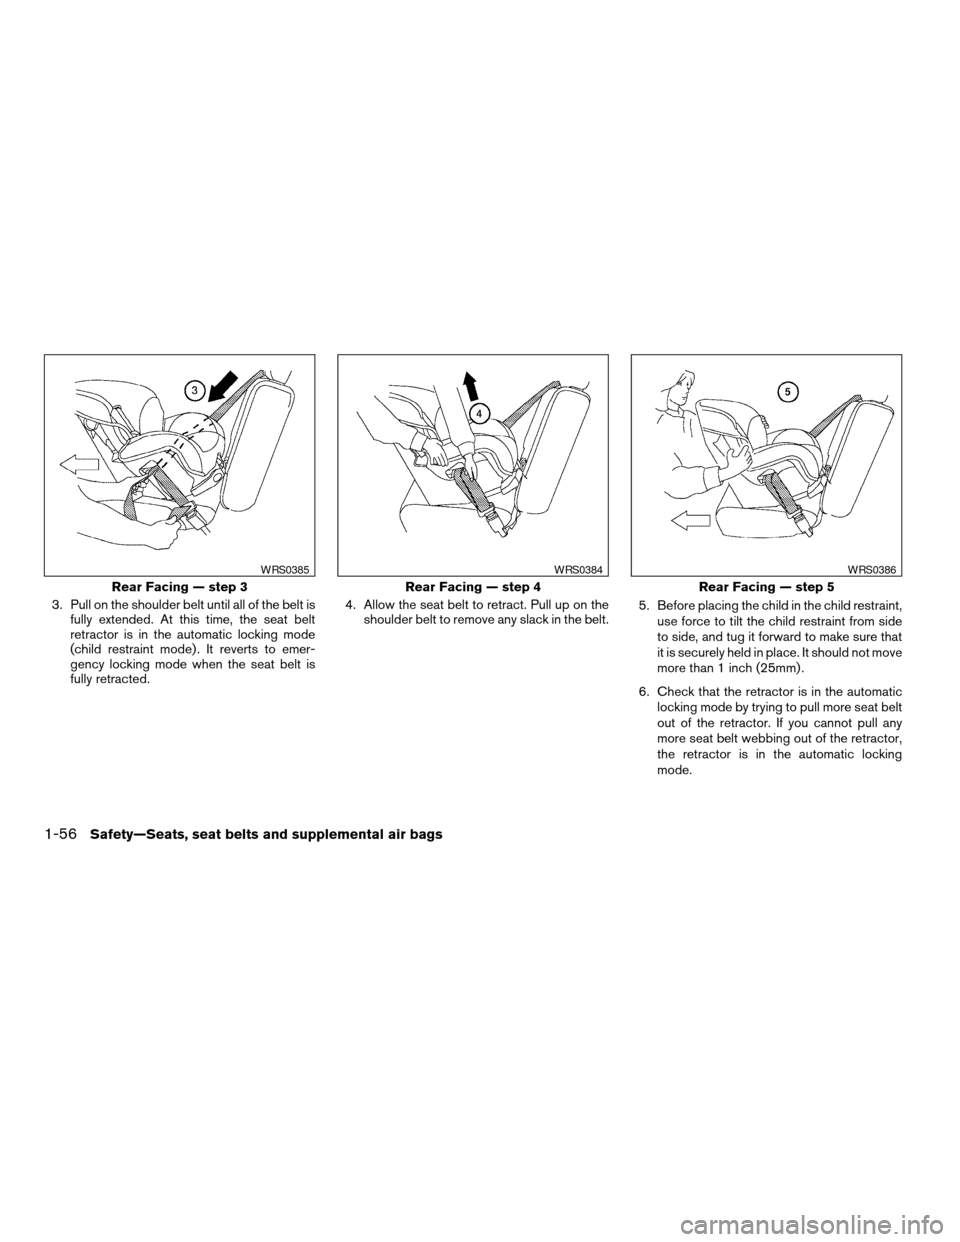
3. Pull on the shoulder belt until all of the belt is
fully extended. At this time, the seat belt
retractor is in the automatic locking mode
(child restraint mode) . It reverts to emer-
gency locking mode when the seat belt is
fully retracted.4. Allow the seat belt to retract. Pull up on the
shoulder belt to remove any slack in the belt.5. Before placing the child in the child restraint,
use force to tilt the child restraint from side
to side, and tug it forward to make sure that
it is securely held in place. It should not move
more than 1 inch (25mm) .
6. Check that the retractor is in the automatic
locking mode by trying to pull more seat belt
out of the retractor. If you cannot pull any
more seat belt webbing out of the retractor,
the retractor is in the automatic locking
mode.
Rear Facing — step 3
WRS0385
Rear Facing — step 4
WRS0384
Rear Facing — step 5
WRS0386
1-56Safety—Seats, seat belts and supplemental air bags
ZREVIEW COPY:Ð2004 Pathfinder Armada
(wzw)
Owners Manual(owners)ÐUSA English(nna)
01/14/04Ðtbrooks
X
Page 73 of 344
7. Check to make sure that the child restraint is
properly secured prior to each use. If the belt
is not locked, repeat steps 3 through 6.
After the child restraint is removed and the seat
belt fully retracted, the automatic locking mode
(child restraint mode) is canceled.
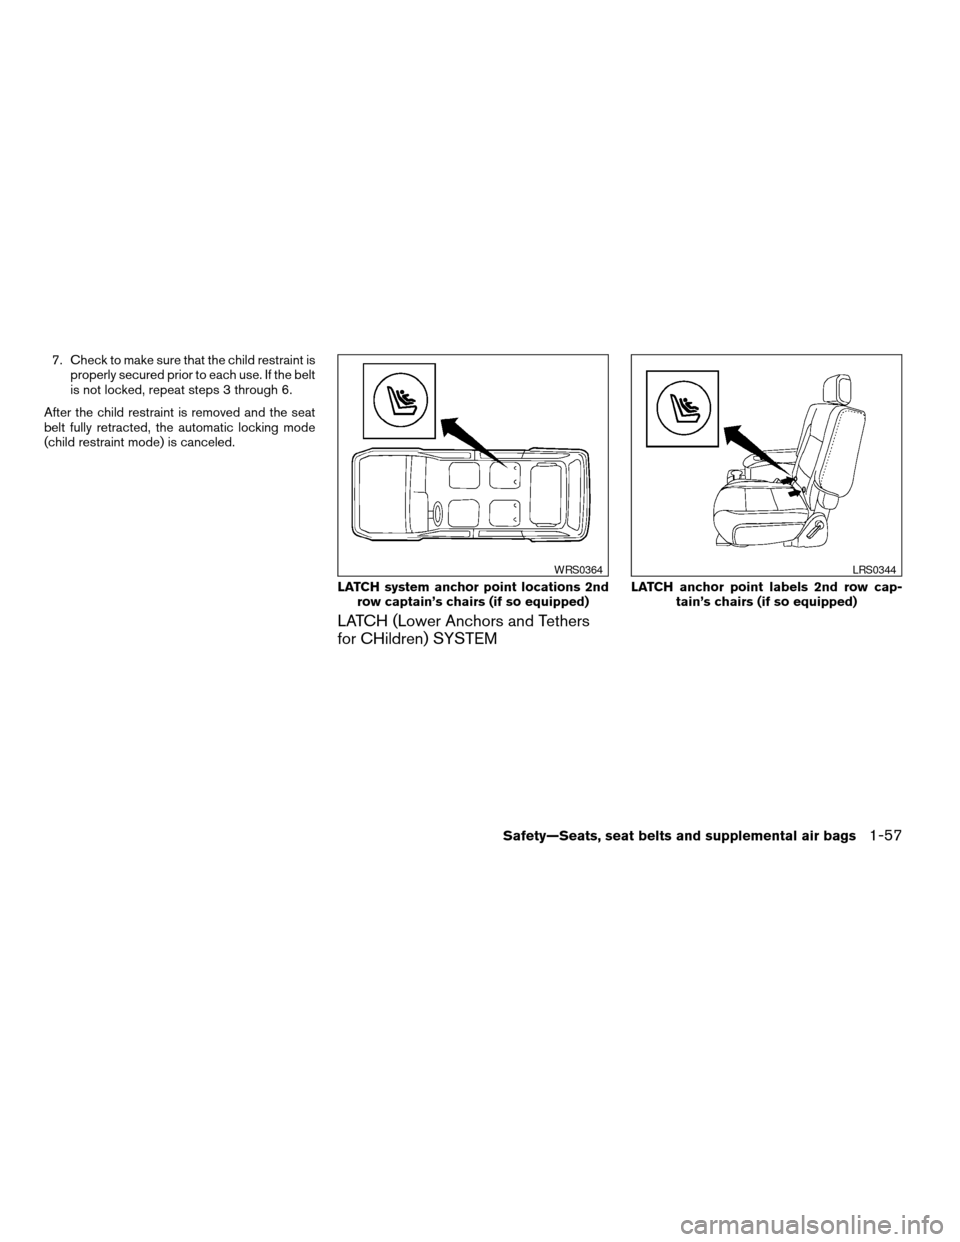
LATCH (Lower Anchors and Tethers
for CHildren) SYSTEM
LATCH system anchor point locations 2nd
row captain’s chairs (if so equipped)
WRS0364
LATCH anchor point labels 2nd row cap-
tain’s chairs (if so equipped)
LRS0344
Safety—Seats, seat belts and supplemental air bags1-57
ZREVIEW COPY:Ð2004 Pathfinder Armada
(wzw)
Owners Manual(owners)ÐUSA English(nna)
01/14/04Ðtbrooks
X
Page 74 of 344
WARNING
cAttach LATCH system compatible child
restraints only at the locations shown. If
a child restraint is not secured properly,
your child could be seriously injured or
killed in an accident.
cThe LATCH system anchors are de-
signed to withstand only those loads
imposed by correctly fitted child re-
straints. Under no circumstance are
they to be used for adult seat belts or
harnesses.Some child restraints include two rigid or
webbing-mounted attachments that can be con-
nected to two anchors located at certain seating
positions in your vehicle. This system is known as
the LATCH (Lower Anchors and Tethers for CHil-
dren) system. This system may also be referred to
as the ISOFIX or ISOFIX compatible system.
With this system, you do not have to use a vehicle
seat belt to secure the child restraint. Your vehicle
is equipped with special anchor points that are
used with LATCH system compatible child re-
straints. Check your child restraint for a label
stating that it is compatible with the LATCH sys-
tem. This information may also be in the child
restraint owner’s manual. If you have such a child
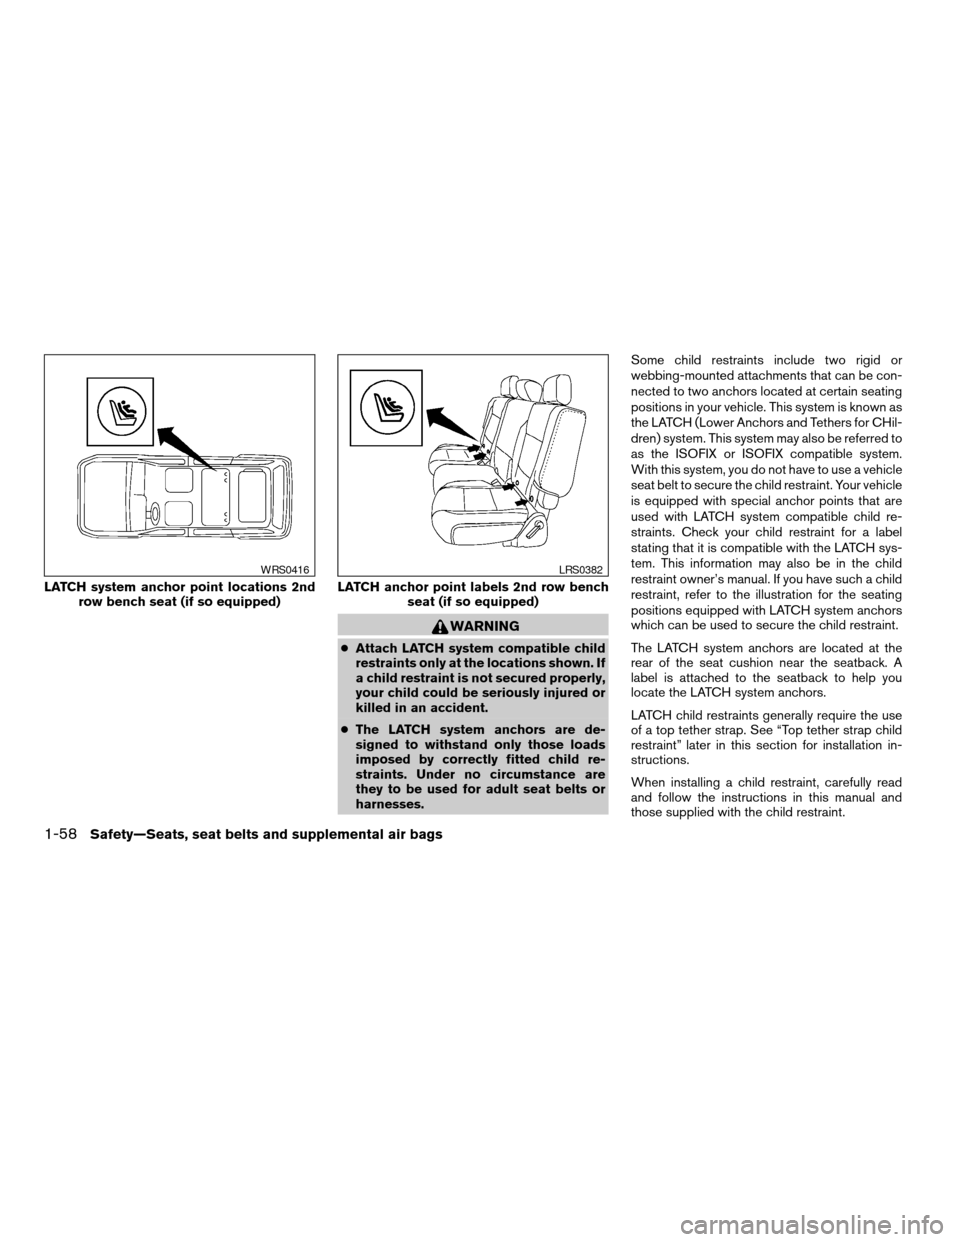
restraint, refer to the illustration for the seating
positions equipped with LATCH system anchors
which can be used to secure the child restraint.
The LATCH system anchors are located at the
rear of the seat cushion near the seatback. A
label is attached to the seatback to help you
locate the LATCH system anchors.
LATCH child restraints generally require the use
of a top tether strap. See “Top tether strap child
restraint” later in this section for installation in-
structions.
When installing a child restraint, carefully read
and follow the instructions in this manual and
those supplied with the child restraint.
LATCH system anchor point locations 2nd
row bench seat (if so equipped)
WRS0416
LATCH anchor point labels 2nd row bench
seat (if so equipped)
LRS0382
1-58Safety—Seats, seat belts and supplemental air bags
ZREVIEW COPY:Ð2004 Pathfinder Armada
(wzw)
Owners Manual(owners)ÐUSA English(nna)
01/14/04Ðtbrooks
X