ECO mode NISSAN ARMADA 2005 1.G Service Manual
[x] Cancel search | Manufacturer: NISSAN, Model Year: 2005, Model line: ARMADA, Model: NISSAN ARMADA 2005 1.GPages: 352, PDF Size: 6.46 MB
Page 299 of 352

If you have a flat tire, see the “In case of
emergency” section of this manual.
TIRE PRESSURE
Tire inflation pressure
Check the tire pressures (including the spare)
often and always prior to long distance trips. The
recommended tire pressure specifications are
shown on the FMVSS label or the Tire and Load-
ing Information label (if so equipped) under the
9Recommended Cold Tire Inflation Pressure9
heading. The Tire and Loading Information label
is affixed to the driver side center pillar. Tire
pressures should be checked regularly because:
cMost tires naturally lose air over time.
cTires can lose air suddenly when driven over
potholes or other objects or if the vehicle
strikes a curb while parking.
The tire pressures should be checked when the
tires are cold. The tires are considered COLD
after the vehicle has been parked for 3 or more
hours, or driven less than 1 mile (1.6 km) at
moderate speeds.
Incorrect tire pressure, including under in-
flation, may adversely affect tire life and
vehicle handling.
License plate light
LDI0384
Rear combination light
WDI0403
WHEELS AND TIRES
Maintenance and do-it-yourself8-31
ZREVIEW COPYÐ2005 Armada(wzw)
Owners ManualÐUSA_English(nna)
11/18/04Ðtbrooks
X
Page 301 of 352

Tire and loading information label (for
US) (if so equipped)
s1Seating capacity: The maximum number of
occupants that should be seated in the ve-
hicle.
s2Vehicle load limit: See loading information in
the Technical and consumer information
section.
s3Original tire size: The size of the tires origi-
nally installed on the vehicle at the factory.
s4Recommended cold tire inflation pressure:
Inflate the tires to this pressure when the
tires are cold. Tires are considered COLD
after the vehicle has been parked for 3 or
more hours, or driven less than 1 mile (1.6
km) at moderate speeds. The recommended
cold tire inflation is set by the manufacturer
to provide the best balance of tire wear and
vehicle handling characteristics based on
the vehicles GVWR.
s5Tire size – refer to “Tire labeling” later in this
section.
s6ands7Spare tire size or compact spare tire
size (if so equipped) .
Type A
LDI0392
Maintenance and do-it-yourself8-33
ZREVIEW COPYÐ2005 Armada(wzw)
Owners ManualÐUSA_English(nna)
11/18/04Ðtbrooks
X
Page 302 of 352

Tire and loading information label (for
US)
s1Seating capacity: The maximum number of
occupants that should be seated in the ve-
hicle.
s2Vehicle load limit: See loading information in
the Technical and consumer information
section.
s3Recommended cold tire inflation pressure:
Inflate the tires to this pressure when the
tires are cold. Tires are considered COLD
after the vehicle has been parked for 3 or
more hours, or driven less than 1 mile (1.6
km) at moderate speeds. The recommended
cold tire inflation is set by the manufacturer
to provide the best balance of tire wear and
vehicle handling characteristics based on
the vehicles GVWR.
s4Original tire size: The size of the tires origi-
nally installed on the vehicle at the factory.
s5Spare tire size or compact spare tire size (if
so equipped) .
Type B
LDI0434
8-34Maintenance and do-it-yourself
ZREVIEW COPYÐ2005 Armada(wzw)
Owners ManualÐUSA_English(nna)
11/18/04Ðtbrooks
X
Page 306 of 352

TYPES OF TIRES
WARNING
cWhen changing or replacing tires, be
sure all four tires are of the same type
(i.e., Summer, All Season or Snow) and
construction. A NISSAN dealer may be
able to help you with information about
tire type, size, speed rating and
availability.
cReplacement tires may have a lower
speed rating than the factory equipped
tires, and may not match the potential
maximum vehicle speed. Never exceed
the maximum speed rating of the tire.
cFor additional information regarding
tires, refer to “Important Tire Safety In-
formation” (US) or “Tire Safety Informa-
tion” (Canada) in the Warranty Informa-
tion Booklet.
All season tires
NISSAN specifies All Season tires on some mod-
els to provide good performance all year, includ-
ing snowy and icy road conditions. All Season
tires are identified by ALL SEASON and/or M&S
on the tire sidewall. Snow tires have better snow
traction than All Season tires and may be more
appropriate in some areas.
Summer tires
NISSAN specifies summer tires on some models
to provide superior performance on dry roads.
Summer tire performance is substantially re-
duced in snow and ice. Summer tires do not have
the tire traction rating “M&S” on the tire sidewall.
If you plan to operate your vehicle in snowy or icy
conditions, NISSAN recommends the use of
SNOW tires or ALL SEASON tires on all four
wheels.
Snow tires
If snow tires are needed, it is necessary to select
tires equivalent in size and load rating to the
original equipment tires. If you do not, it can
adversely affect the safety and handling of your
vehicle.
Generally, snow tires have lower speed ratings
than factory equipped tires and may not match
the potential maximum vehicle speed. Never ex-
ceed the maximum speed rating of the tire.
If you install snow tires, they must be the same
size, brand, construction and tread pattern on all
four wheels.
For additional traction on icy roads, studded tires
may be used. However, some U.S. states and
Canadian provinces prohibit their use. Check
local, state and provincial laws before installingstudded tires. Skid and traction capabilities of
studded snow tires on wet or dry surfaces may be
poorer than that of non-studded snow tires.
TIRE CHAINS
Use of tire chains may be prohibited according to
location. Check the local laws before installing
tire chains. When installing tire chains, make sure
they are the proper size for the tires on your
vehicle and are installed according to the chain
manufacturer’s suggestions.Use only SAE
class “S” chains.Class9S9chains are used on
vehicles with restricted tire to vehicle clearance.
Vehicles that can use Class “S” chains are de-
signed to meet the minimum clearances between
the tire and the closest vehicle suspension or
body component required to accommodate the
use of a winter traction device (tire chains or
cables) . The minimum clearances are determined
using the factory equipped tire size. Other types
may damage your vehicle. Use chain tensioners
when recommended by the tire chain manufac-
turer to ensure a tight fit. Loose end links of the
tire chain must be secured or removed to prevent
the possibility of whipping action damage to the
fenders or underbody. If possible, avoid fully load-
ing your vehicle when using tire chains. In addi-
tion, drive at a reduced speed. Otherwise, your
vehicle may be damaged and/or vehicle handling
and performance may be adversely affected.
8-38Maintenance and do-it-yourself
ZREVIEW COPYÐ2005 Armada(wzw)
Owners ManualÐUSA_English(nna)
11/18/04Ðtbrooks
X
Page 326 of 352

temperatures on graded roads can affect engine
performance and cause overheating. The engine
protection mode, which helps reduce the chance
of engine damage, could activate and automati-
cally decrease engine power. Vehicle speed may
decrease under high load. Plan your trip carefully
to account for trailer and vehicle load, weather
and road conditions.
WARNING
Overheating can result in reduced engine
power and vehicle speed. The reduced
speed may be lower than other traffic,
which could increase the chance of a col-
lision. Be especially careful when driving.
Pull to the side of the road to a safe area.
Allow the engine to cool and return to
normal operation. See “If your vehicle
overheats” in the “In case of emergency”
section of this manual.
CAUTION
Vehicle damage resulting from improper
towing procedures are not covered by
NISSAN warranties.
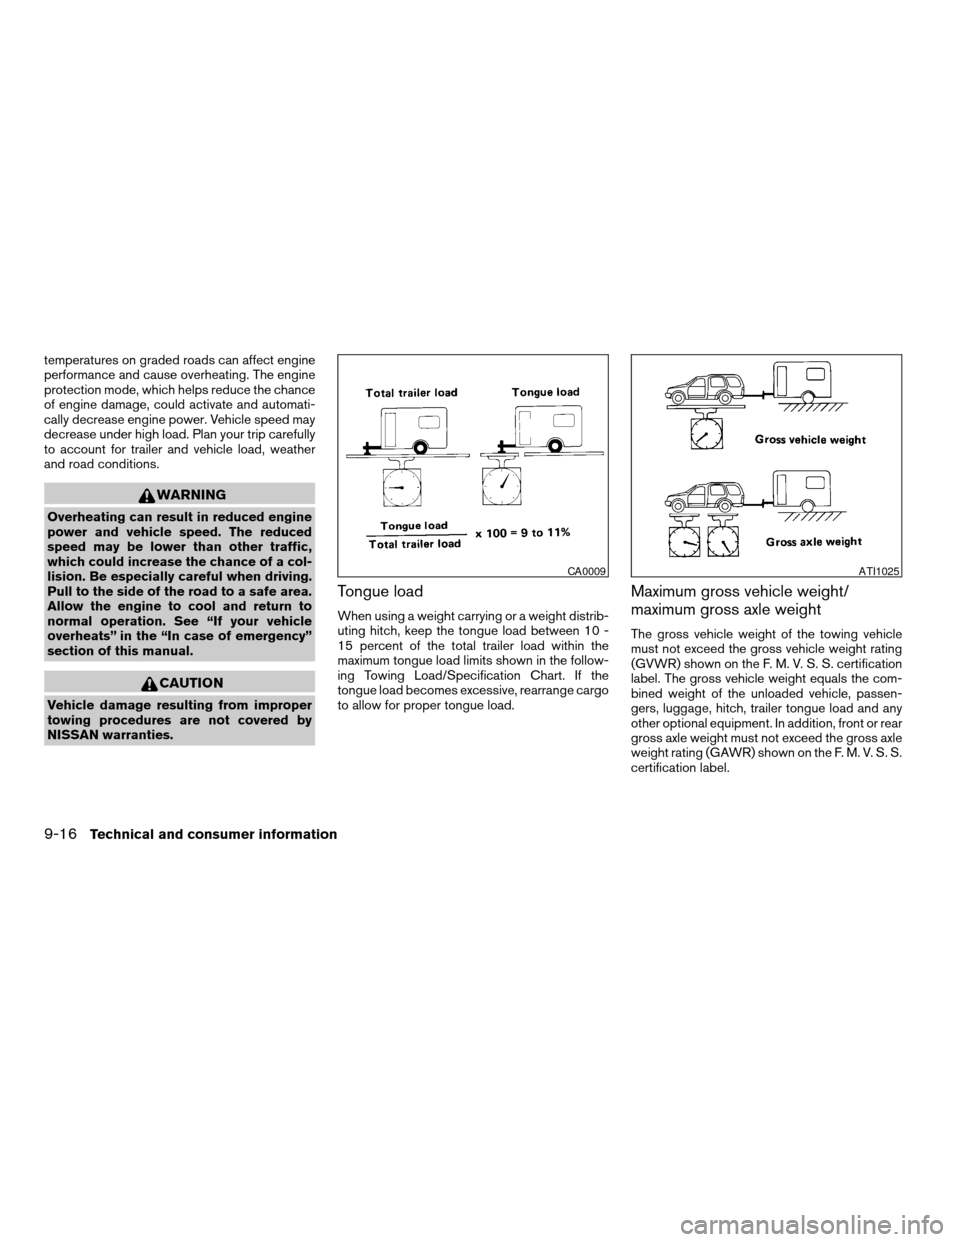
Tongue load
When using a weight carrying or a weight distrib-
uting hitch, keep the tongue load between 10 -
15 percent of the total trailer load within the
maximum tongue load limits shown in the follow-
ing Towing Load/Specification Chart. If the
tongue load becomes excessive, rearrange cargo
to allow for proper tongue load.
Maximum gross vehicle weight/
maximum gross axle weight
The gross vehicle weight of the towing vehicle
must not exceed the gross vehicle weight rating
(GVWR) shown on the F. M. V. S. S. certification
label. The gross vehicle weight equals the com-
bined weight of the unloaded vehicle, passen-
gers, luggage, hitch, trailer tongue load and any
other optional equipment. In addition, front or rear
gross axle weight must not exceed the gross axle
weight rating (GAWR) shown on the F. M. V. S. S.
certification label.
CA0009ATI1025
9-16Technical and consumer information
ZREVIEW COPYÐ2005 Armada(wzw)
Owners ManualÐUSA_English(nna)
11/18/04Ðtbrooks
X
Page 332 of 352

4. Peel off the tape and connect the jumper
harness to the connector
s2.
5. Release the parking brake.
6. Install the aftermarket electric trailer brake
controller according to the manufacturer’s
instructions.
Pre-towing tips
cBe certain your vehicle maintains a level
position when a loaded and/or unloaded
trailer is hitched. Do not drive the vehicle if it
has an abnormal nose-up or nose-down
condition; check for improper tongue load,
overload, worn suspension or other possible
causes of either condition.cAlways secure items in the trailer to prevent
load shift while driving.
cLoad the trailer so approximately 60% of the
trailer load is in the front half and 40% is in
the back half.
cCheck your hitch, trailer tire pressure, ve-
hicle tire pressure, trailer light operation, and
trailer wheel lug nuts every time you attach a
trailer to the vehicle.
cBe certain your rearview mirrors conform to
all federal, state or local regulations. If not,
install any mirrors required for towing before
driving the vehicle.
Trailer towing tips
In order to gain skill and an understanding of the
vehicle’s behavior, you should practice turning,
stopping and backing up in an area which is free
from traffic. Steering stability and braking perfor-
mance will be somewhat different than under
normal driving conditions.
cAlways secure items in the trailer to prevent
load shift while driving.
cAvoid abrupt starts, acceleration or stops.
cAvoid sharp turns or lane changes.
cAlways drive your vehicle at a moderate
speed.cWhen backing up, hold the bottom of the
steering wheel with one hand. Move your
hand in the direction in which you want the
trailer to go. Make small corrections and
back up slowly. If possible, have someone
guide you when you are backing up.
cAlways block the wheels on both vehicle and
trailer when parking. Parking on a slope is
not recommended; however, if you must do
so, first block the wheels and apply the park-
ing brake, and then move the transmission
shift selector lever into the P (Park) position.
If you move the shift selector lever to the P
(Park) position before blocking the wheels
and applying the parking brake, transmission
damage could occur.
cWhen going down a hill, shift into a lower
gear and use the engine braking effect.
When going up a long grade, downshift the
transmission to a lower gear and reduce
speed to reduce chances of engine over-
loading and/or overheating. However, for
long steep grades, do not stay in 1st gear
when driving above 35 MPH (56 km/h) or
2nd gear when driving above 58 MPH (93
km/h) .
cIf the engine coolant rises to an extremely
high temperature when the air conditioner
system is on, turn off the air conditioner.
LTI0116
9-22Technical and consumer information
ZREVIEW COPYÐ2005 Armada(wzw)
Owners ManualÐUSA_English(nna)
11/18/04Ðtbrooks
X
Page 333 of 352

Coolant heat can be additionally vented by
opening the windows, switching the fan
control to high and setting the temperature
control to the HOT position.
cTrailer towing requires more fuel than normal
circumstances.
cAvoid towing a trailer for your vehicle’s first
500 miles (805 km) .
cFor the first 500 miles (805 km) that you do
tow, do not drive over 50 MPH (80 km/h) .
cHave your vehicle serviced more often than
at intervals specified in the recommended
Maintenance Schedule in the “NISSAN Ser-
vice and Maintenance Guide”.
cWhen making a turn, your trailer wheels will
be closer to the inside of the turn than your
vehicle wheels. To compensate for this,
make a larger than normal turning radius
during the turn.
cCrosswinds and rough roads will adversely
affect vehicle/trailer handling, possibly caus-
ing vehicle sway. When being passed by
larger vehicles, be prepared for possible
changes in crosswinds that could affect ve-
hicle handling. If swaying does occur, firmly
grip the steering wheel, steer straight ahead,
and immediately (but gradually) reduce ve-
hicle speed. This combination will help sta-
bilize the vehicle. Never increase speed.cBe careful when passing other vehicles.
Passing while towing a trailer requires con-
siderably more distance than normal pass-
ing. Remember, the length of the trailer must
also pass the other vehicle before you can
safely change lanes.
cTo maintain engine braking efficiency and
electrical charging performance, do not use
overdrive.
cAvoid holding the brake pedal down too long
or too frequently. This could cause the
brakes to overheat, resulting in reduced
braking efficiency.
cIncrease your following distance to allow for
greater stopping distances while towing a
trailer. Anticipate stops and brake gradually
cDo not use cruise control while towing a
trailer.
cSome states or provinces have specific
speed limits for vehicles that are towing trail-
ers. Obey the local speed limits.
cCheck your hitch, trailer wiring harness con-
nections, and trailer wheel lug nuts after 50
miles (80 km) of travel and at every break.cWhen stopped in traffic for long periods of
time in hot weather, put the vehicle in the P
(Park) position.
When towing a trailer, final drive gear oil
should be replaced and transmission
oil/fluid should be changed more fre-
quently. For additional information, see the
“Maintenance and do-it-yourself” section
earlier in this manual.
Tow mode
Tow mode should be used when pulling a heavy
trailer or hauling a heavy load. Press the tow
button to activate the tow mode. The tow indica-
tor in the instrument panel illuminates when the
tow mode is selected. Press the Tow button
again to turn the tow mode OFF. The Tow mode is
automatically cancelled when the key is turned
OFF.
The Tow mode does the following:
cReduces transmissions shifts when pulling a
trailer or hauling a load.
cProvides similar shift feel to driver when the
vehicle is towing.
Technical and consumer information9-23
ZREVIEW COPYÐ2005 Armada(wzw)
Owners ManualÐUSA_English(nna)
11/18/04Ðtbrooks
X
Page 334 of 352

The Tow mode should be used when the vehicle
and trailer weight is at least 75% of the vehicle’s
GCWR. Tow mode is most useful in the following
driving conditions when towing a heavy trailer or
hauling a heavy load:
cRolling terrain.
cStop and go traffic.
cBusy parking lots.
Driving the vehicle in the Tow mode with no
trailer/load or light trailer/light load will not cause
any damage. However, fuel economy may be
reduced and the transmission/engine driving
characteristics may feel unusual.
When towing a trailer, final drive gear oil
should be replaced and transmission
oil/fluid should be changed more fre-
quently. For additional information, see the
“Maintenance and do-it-yourself” section
earlier in this manual.
FLAT TOWING
Towing your vehicle with all four wheels on the
ground is sometimes called flat towing. This
method is sometimes used when towing a vehicle
behind a recreational vehicle, such as a motor
home.
CAUTION
cFailure to follow these guidelines can
result in severe transmission damage.
cWhenever flat towing your vehicle, al-
ways tow forward, never backward.
cDO NOT tow any automatic transmis-
sion vehicle with all four wheels on the
ground (flat towing) . Doing so WILL
DAMAGE internal transmission parts
due to lack of transmission lubrication.
cFor emergency towing procedures refer
to “Towing recommended by NISSAN”
in the “In case of emergency” section of
this manual.
Automatic Transmission
To tow a vehicle equipped with an automatic
transmission, an appropriate vehicle dollyMUST
be placed under the towed vehicle’s drive
wheels.Alwaysfollow the dolly manufacturer’s
recommendations when using their product.
WARNING
Do not use this vehicle for snowplowing.
Installing a snowplow may affect vehicle
handling. This may cause the driver to lose
control of the vehicle and could result in
serious vehicle damage or personal injury.
SNOW PLOW
9-24Technical and consumer information
ZREVIEW COPYÐ2005 Armada(wzw)
Owners ManualÐUSA_English(nna)
11/18/04Ðtbrooks
X
Page 337 of 352

WARNING
Always drive the vehicle in a safe and
prudent manner according to traffic con-
ditions and obey all traffic laws.
1. Start the engine when the engine coolant
temperature gauge needle points to C. Al-
low the engine to idle until the gauge needle
points between the C and H (normal oper-
ating temperature) .
2. Accelerate the vehicle to 55 MPH (88
km/h) , then quickly release the accelerator
pedal completely and keep it released for at
least 10 seconds.
3. Quickly depress the accelerator pedal for a
moment, then drive the vehicle at a speed of
53 - 60 MPH (86 - 96 km/h) for at least 9
minutes.
4. Stop the vehicle.
5. Accelerate the vehicle to 35 MPH (55 km/h)
and maintain the speed for 20 seconds.
6. Repeat steps 4 through 5 at least 10 times.
7. Accelerate the vehicle to 55 MPH (88 km/h)
and maintain the speed for at least 3 min-
utes.8. Stop the vehicle. Place the transmission se-
lector lever in the P (Park) or N (Neutral)
position.
9. Turn the engine off.
10. Repeat steps1-8atleast one more time.
If steps 1 through 7 are interrupted, repeat the
preceding step. Any safe driving mode is accept-
able between steps. Do not stop the engine until
step 7 is completed.Your vehicle is equipped with a variety of comput-
ers that monitor and control a number of systems
to optimize performance and help service techni-
cians with diagnosis and repair. Depending on
the equipment on your vehicle, some of the com-
puters monitor emission control systems, braking
systems and air bag systems, just to name a few.
Some data about vehicle operation may be
stored in the computers for use during servicing.
Other data may be stored if a crash event occurs.
For example, air bag readiness, air bag perfor-
mance, and seat belt use by the driver or passen-
ger may be recorded, depending on vehicle
equipment. These types of systems are some-
times called Event Data Recorders.
Special equipment can be used to access the
electronic data that may be stored in the vehicle’s
computers (sounds are not recorded) . NISSAN
and NISSAN dealers have equipment to access
some of this data; others may also have this
equipment. The data may be retrieved during
routine vehicle servicing or for special research. It
might also be accessed with the consent of the
vehicle owner or lessee, in response to a request
by law enforcement, or as otherwise required or
permitted by law.
EVENT DATA RECORDERS
Technical and consumer information9-27
ZREVIEW COPYÐ2005 Armada(wzw)
Owners ManualÐUSA_English(nna)
11/18/04Ðtbrooks
X
Page 342 of 352

CD changer (See audio system)........4-34
Check engine indicator light
(See malfunction indicator lamp).......2-17
Child restraint with top tether strap......1-44
Child restraints.......1-17, 1-18, 1-25, 1-42
Precautions on child restraints . . .1-25, 1-50
Top tether strap anchor point locations . .1-45
Child safety rear door lock............3-5
Chimes, audible reminders...........2-19
Cigarette lighter.................2-32
Cleaning exterior and interior..........7-2
Clock......................4-32
(models with navigation system)......4-10
Clock set
Control panel buttons...........4-10
Cold weather driving..............5-28
Compass display.................2-8
Console box...............2-34, 2-40
Control panel buttons..............4-2
Controls
Audio controls (steering wheel)......4-37
Heater and air conditioner
controls................4-15, 4-24
Rear audio controls.............4-39
Rear seat air conditioner..........4-27
Coolant
Capacities and recommended
fuel/lubricants.................9-2
Changing engine coolant..........8-8
Checking engine coolant level........8-7
Engine coolant temperature gauge.....2-5
Corrosion protection...............7-5
Cruise control..................5-14
Cup holders...................2-38
Curtain side-impact and rollover air bag . . .1-68D
Daytime running light system
(Canada only)..................2-26
Defroster switch
Rear window and outside mirror defroster
switch....................2-24
Digital video disc DVD.............4-40
Dimensions and weights.............9-8
Display controls (see control panel buttons) . .4-2
Door locks....................3-3
Door open warning light............2-14
Drive belts....................8-14
Drive positioner, Automatic...........3-19
Driving
Cold weather driving............5-28
Driving with automatic transmission.....5-9
Precautions when starting and driving . . .5-2
E
Economy - fuel.................5-16
Emission control information label.......9-10
Emission control system warranty.......9-26
Engine
Before starting the engine..........5-8
Capacities and recommended
fuel/lubricants.................9-2
Changing engine coolant..........8-8
Changing engine oil.............8-9
Changing engine oil filter..........8-10
Checking engine coolant level........8-7
Checking engine oil level..........8-8
Engine compartment check locations. . . .8-7Engine coolant temperature gauge.....2-5
Engine cooling system............8-7
Engine oil...................8-8
Engine oil and oil filter recommendation . .9-4
Engine oil viscosity..............9-5
Engine serial number............9-10
Engine specifications.............9-7
Starting the engine..............5-9
Engine oil pressure gauge............2-6
English/Metric button..............4-10
Control panel buttons...........4-10
ENTER button..................4-2
Enter button
Control panel buttons............4-2
Event data recorders..............9-27
Exhaust gas (Carbon monoxide)........5-2
Eyeglass case..................2-35
F
Flashers
(See hazard warning flasher switch)......2-28
Flat tire......................6-2
Floor mat positioning aid.............7-4
Fluid
Brake fluid..................8-11
Capacities and recommended
fuel/lubricants.................9-2
Engine coolant................8-7
Engine oil...................8-8
Power steering fluid.............8-11
Window washer fluid............8-12
F.M.V.S.S. certification label..........9-10
Fog light switch.................2-28
10-2
ZREVIEW COPYÐ2005 Armada(wzw)
Owners ManualÐUSA_English(nna)
12/02/04Ðdebbie
X