jump start NISSAN ARMADA 2005 1.G Owners Manual
[x] Cancel search | Manufacturer: NISSAN, Model Year: 2005, Model line: ARMADA, Model: NISSAN ARMADA 2005 1.GPages: 352, PDF Size: 6.46 MB
Page 249 of 352

6 In case of emergency
Flat tire...........................................6-2
Low tire pressure warning system................6-2
Changing a flat tire.............................6-2
Jump starting.....................................6-7
Push starting......................................6-9If your vehicle overheats............................6-9
Towing your vehicle...............................6-10
Towing recommended by NISSAN..............6-11
Vehicle recovery (freeing a stuck vehicle).........6-12
ZREVIEW COPYÐ2005 Armada(wzw)
Owners ManualÐUSA_English(nna)
11/18/04Ðtbrooks
X
Page 255 of 352

4. Lower the vehicle slowly until the tire
touches the ground. Then, with the wheel
nut wrench, tighten the wheel nuts securely
in the sequence illustrated. Lower the ve-
hicle completely.
WARNING
cIncorrect wheel nuts or improperly
tightened wheel nuts can cause the
wheel to become loose or come off.
This could cause an accident.
cDo not use oil or grease on the wheel
studs or nuts. This could cause the nuts
to become loose.
Retighten the wheel nuts after the vehicle
has been driven for 600 miles (1,000 km)
(also in cases of a flat tire, etc.) . As soon as
possible, tighten the wheel nuts to the
specified torque with a torque wrench.
Wheel nut tightening torque:
98 ft-lb (133 N·m)
The wheel nuts must be kept tightened to
specification at all times. It is recom-
mended that wheel nuts be tightened to
specifications at each lubrication interval.
Adjust tire pressure to the COLD pressure.COLD pressure: After vehicle has been
parked for three hours or more or driven
less than 1 mile (1.6 km) .
COLD tire pressures are shown on the Tire
and Loading Information label affixed to
the driver side center pillar.
5. Securely store the flat tire and jacking equip-
ment in the vehicle.
WARNING
cAlways make sure that the spare tire
and jacking equipment are properly se-
cured after use. Such items can become
dangerous projectiles in an accident or
sudden stop.
cThe spare tire is designed for emer-
gency use. See specific instructions un-
der the heading “Wheels and tires” in
the “Maintenance and do-it-yourself”
section of this manual.To start your engine with a booster battery, the
instructions and precautions below must be fol-
lowed.
WARNING
cIf done incorrectly, jump starting can
lead to a battery explosion, resulting in
severe injury or death. It could also
damage your vehicle.
cExplosive hydrogen gas is always
present in the vicinity of the battery.
Keep all sparks and flames away from
the battery.
cDo not allow battery fluid to come into
contact with eyes, skin, clothing or
painted surfaces. Battery fluid is a cor-
rosive sulfuric acid solution which can
cause severe burns. If the fluid should
come into contact with anything, imme-
diately flush the contacted area with
water.
cKeep battery out of the reach of
children.
cThe booster battery must be rated at 12
volts. Use of an improperly rated battery
can damage your vehicle.
JUMP STARTING
In case of emergency6-7
ZREVIEW COPYÐ2005 Armada(wzw)
Owners ManualÐUSA_English(nna)
11/18/04Ðtbrooks
X
Page 256 of 352

cWhenever working on or near a battery,
always wear suitable eye protectors (for
example, goggles or industrial safety
spectacles) and remove rings, metal
bands, or any other jewelry. Do not lean
over the battery when jump starting.
cDo not attempt to jump start a frozen
battery. It could explode and cause se-
rious injury.
cYour vehicle has an automatic engine
cooling fan. It could come on at any
time. Keep hands and other objects
away from it.
WARNING
Always follow the instructions below.
Failure to do so could result in damage to
the charging system and cause personal
injury.
1. If the booster battery is in another vehicle,
position the two vehicles to bring their bat-
teries near each other.
Do not allow the two vehicles to touch.
2. Apply the parking brake. Shift the transmis-
sion into P (Park) . Switch off all unnecessary
electrical systems (lights, heater, air condi-
tioner, etc.) .3. Remove vent caps on the battery (if so
equipped) . Cover the battery with an old
cloth to reduce explosion hazard.
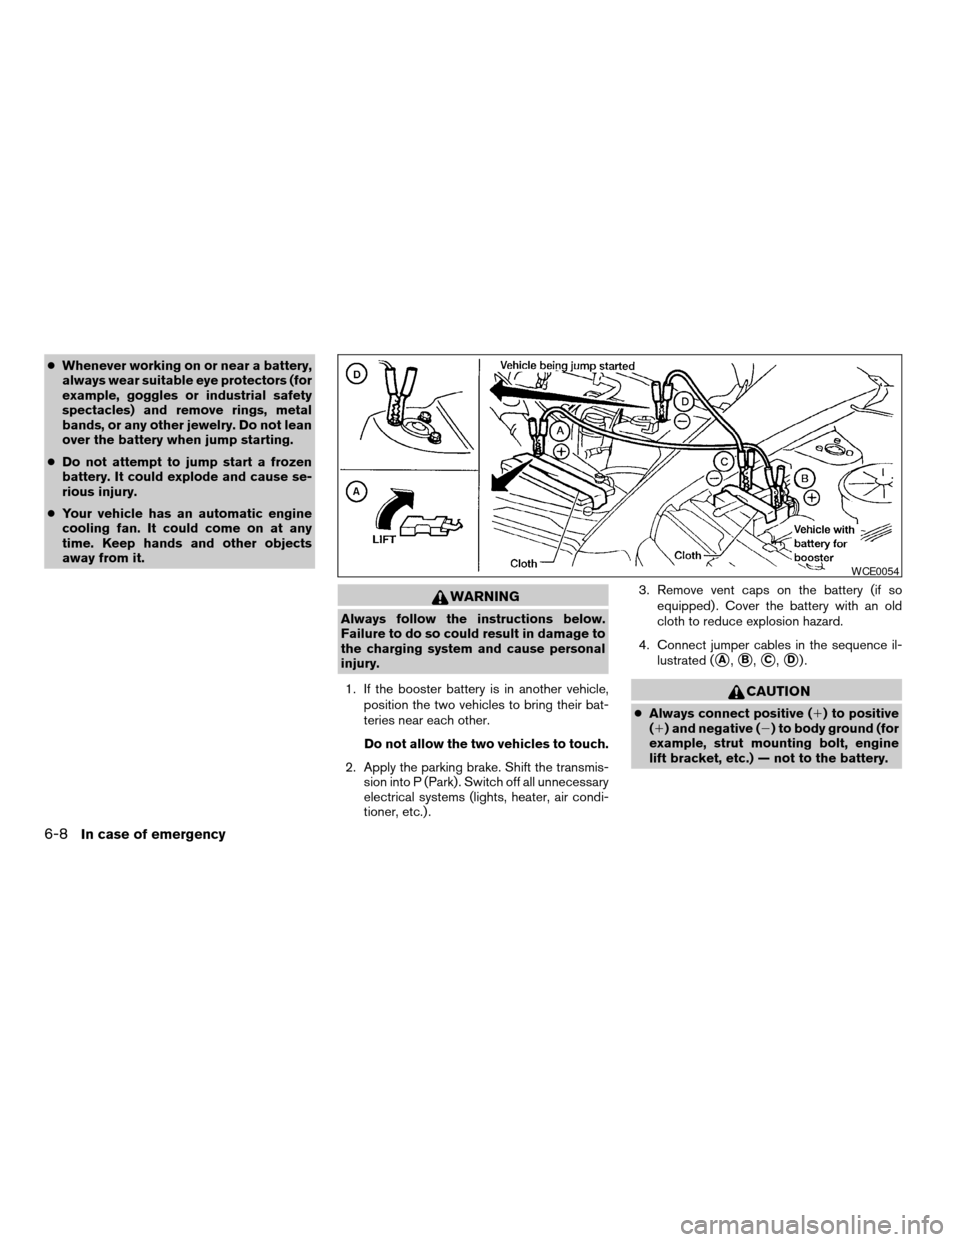
4. Connect jumper cables in the sequence il-
lustrated (
sA,sB,sC,sD).
CAUTION
cAlways connect positive (1) to positive
(1) and negative (2) to body ground (for
example, strut mounting bolt, engine
lift bracket, etc.) — not to the battery.
WCE0054
6-8In case of emergency
ZREVIEW COPYÐ2005 Armada(wzw)
Owners ManualÐUSA_English(nna)
11/18/04Ðtbrooks
X
Page 257 of 352

cMake sure the jumper cables do not
touch moving parts in the engine com-
partment and that the cable clamps do
not contact any other metal.
5. Start the engine of the booster vehicle and
let it run for a few minutes.
6. Keep the engine speed of the booster ve-
hicle at about 2,000 rpm, and start the en-
gine of the vehicle being jump started.
CAUTION
Do not keep the starter motor engaged for
more than 10 seconds. If the engine does
not start right away, turn the key off and
wait 3 to 4 seconds before trying again.
7. After starting the engine, carefully discon-
nect the negative cable and then the positive
cable.
8. Replace the vent caps (if so equipped) . Be
sure to dispose of the cloth used to cover
the vent holes as it may be contaminated
with corrosive acid.
CAUTION
Automatic transmission models cannot
be push-started or tow-started. Attempt-
ing to do so may cause transmission
damage.
WARNING
cDo not continue to drive if your vehicle
overheats. Doing so could cause engine
damage or a vehicle fire.
cTo avoid the danger of being scalded,
never remove the radiator or coolant
reservoir cap while the engine is still
hot. When the radiator or coolant reser-
voir cap is removed, pressurized hot
water will spurt out, possibly causing
serious injury.
cDo not open the hood if steam is com-
ing out.
If your vehicle is overheating (indicated by an
extremely high temperature gauge reading and
the illumination of the engine oil pressure/engine
coolant temperature high indicator light) , or if you
feel a lack of engine power, detect abnormal
noise, etc. take the following steps.
1. Move the vehicle safely off the road, apply
the parking brake and move the shift lever to
P (Park) .
Do not stop the engine.
2. Turn off the air conditioner. Open all the
windows, move the heater or air conditioner
temperature control to maximum hot and fan
control to high speed.
PUSH STARTING IF YOUR VEHICLE OVERHEATS
In case of emergency6-9
ZREVIEW COPYÐ2005 Armada(wzw)
Owners ManualÐUSA_English(nna)
11/18/04Ðtbrooks
X
Page 269 of 352

8 Maintenance and do-it-yourself
Maintenance requirements..........................8-2
General maintenance..............................8-2
Explanation of general maintenance items.........8-2
Maintenance precautions...........................8-5
Engine compartment check locations................8-6
Engine cooling system.............................8-7
Checking engine coolant level...................8-7
Changing engine coolant........................8-8
Engine oil.........................................8-8
Checking engine oil level........................8-8
Changing engine oil............................8-9
Changing engine oil filter.......................8-10
5-speed automatic transmission fluid...............8-11
Power steering fluid...............................8-11
Brake fluid.......................................8-11
Brake fluid....................................8-12
Window washer fluid.............................8-12
Window washer fluid reservoir..................8-12
Battery..........................................8-13
Jump starting.................................8-14
Drive belts.......................................8-14
Spark plugs......................................8-15
Replacing spark plugs.........................8-15Air cleaner.......................................8-16
In-cabin microfilter.............................8-16
Windshield wiper blades..........................8-17
Cleaning.....................................8-17
Replacing....................................8-18
Parking brake and brake pedal.....................8-20
Checking parking brake........................8-20
Checking brake pedal..........................8-20
Brake booster.................................8-21
Fuses...........................................8-21
Engine compartment...........................8-22
Passenger compartment.......................8-23
Battery replacement..............................8-24
Lights...........................................8-25
Headlights....................................8-25
Fog lights (if so equipped)......................8-26
Exterior and interior lights.......................8-27
Wheels and tires.................................8-31
Tire pressure..................................8-31
Tire labeling...................................8-35
Types of tires..................................8-38
Tire chains....................................8-38
Changing wheels and tires.....................8-39
ZREVIEW COPYÐ2005 Armada(wzw)
Owners ManualÐUSA_English(nna)
11/18/04Ðtbrooks
X
Page 282 of 352

2. Check the fluid level in each cell If it is
necessary to add fluid, add only distilled
water to bring the level up to the bottom of
the filler opening.Do not overfill.Vehicles operated in high temperatures or under
severe conditions require frequent checks of the
battery fluid level.
JUMP STARTING
If jump starting is necessary, see “Jump starting”
in the “In case of emergency” section of this
manual. If the engine does not start by jump
starting, the battery may have to be replaced.
Contact a NISSAN dealer.
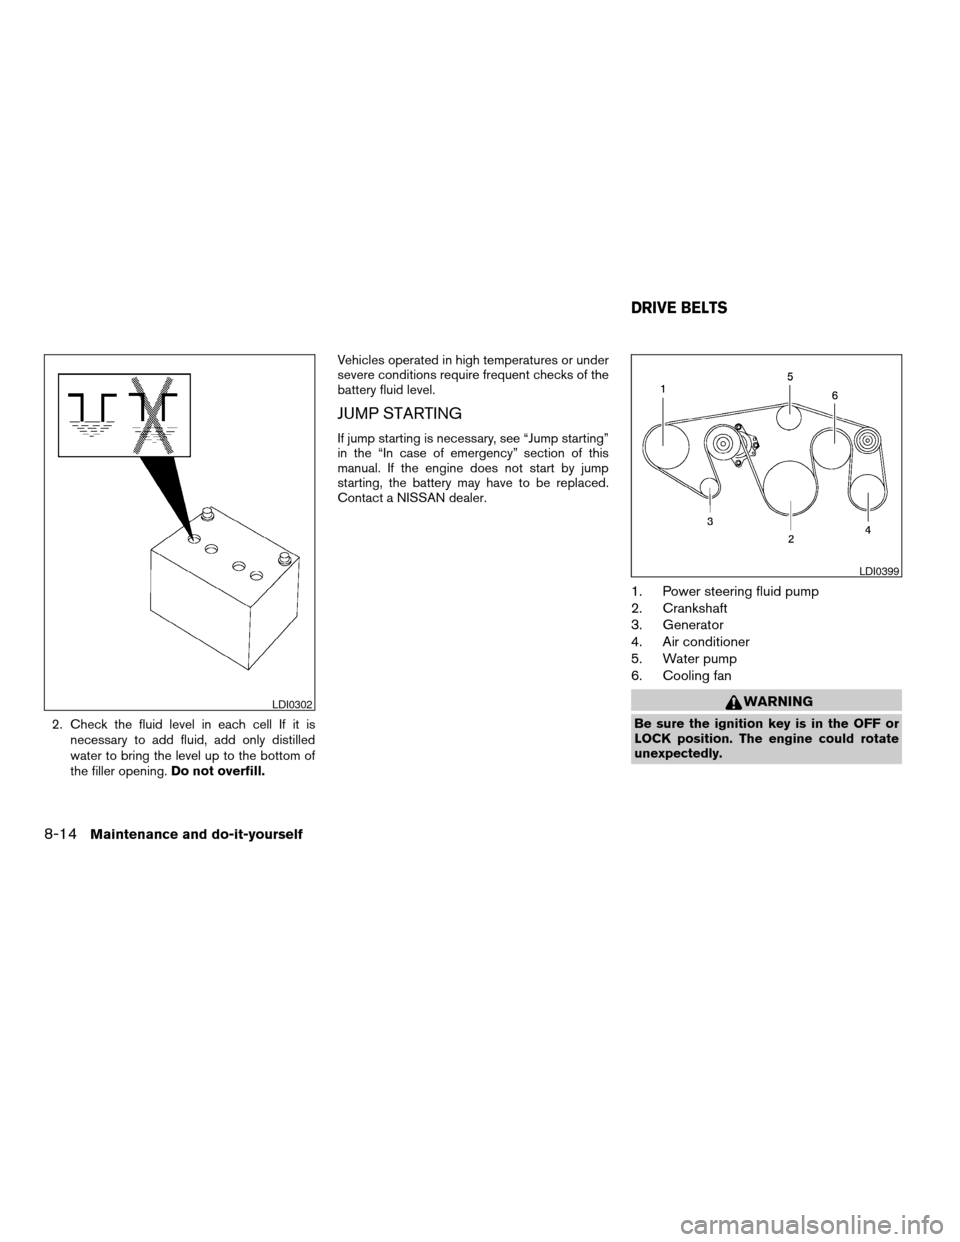
1. Power steering fluid pump
2. Crankshaft
3. Generator
4. Air conditioner
5. Water pump
6. Cooling fan
WARNING
Be sure the ignition key is in the OFF or
LOCK position. The engine could rotate
unexpectedly.
LDI0302
LDI0399
DRIVE BELTS
8-14Maintenance and do-it-yourself
ZREVIEW COPYÐ2005 Armada(wzw)
Owners ManualÐUSA_English(nna)
11/18/04Ðtbrooks
X
Page 332 of 352

4. Peel off the tape and connect the jumper
harness to the connector
s2.
5. Release the parking brake.
6. Install the aftermarket electric trailer brake
controller according to the manufacturer’s
instructions.
Pre-towing tips
cBe certain your vehicle maintains a level
position when a loaded and/or unloaded
trailer is hitched. Do not drive the vehicle if it
has an abnormal nose-up or nose-down
condition; check for improper tongue load,
overload, worn suspension or other possible
causes of either condition.cAlways secure items in the trailer to prevent
load shift while driving.
cLoad the trailer so approximately 60% of the
trailer load is in the front half and 40% is in
the back half.
cCheck your hitch, trailer tire pressure, ve-
hicle tire pressure, trailer light operation, and
trailer wheel lug nuts every time you attach a
trailer to the vehicle.
cBe certain your rearview mirrors conform to
all federal, state or local regulations. If not,
install any mirrors required for towing before
driving the vehicle.
Trailer towing tips
In order to gain skill and an understanding of the
vehicle’s behavior, you should practice turning,
stopping and backing up in an area which is free
from traffic. Steering stability and braking perfor-
mance will be somewhat different than under
normal driving conditions.
cAlways secure items in the trailer to prevent
load shift while driving.
cAvoid abrupt starts, acceleration or stops.
cAvoid sharp turns or lane changes.
cAlways drive your vehicle at a moderate
speed.cWhen backing up, hold the bottom of the
steering wheel with one hand. Move your
hand in the direction in which you want the
trailer to go. Make small corrections and
back up slowly. If possible, have someone
guide you when you are backing up.
cAlways block the wheels on both vehicle and
trailer when parking. Parking on a slope is
not recommended; however, if you must do
so, first block the wheels and apply the park-
ing brake, and then move the transmission
shift selector lever into the P (Park) position.
If you move the shift selector lever to the P
(Park) position before blocking the wheels
and applying the parking brake, transmission
damage could occur.
cWhen going down a hill, shift into a lower
gear and use the engine braking effect.
When going up a long grade, downshift the
transmission to a lower gear and reduce
speed to reduce chances of engine over-
loading and/or overheating. However, for
long steep grades, do not stay in 1st gear
when driving above 35 MPH (56 km/h) or
2nd gear when driving above 58 MPH (93
km/h) .
cIf the engine coolant rises to an extremely
high temperature when the air conditioner
system is on, turn off the air conditioner.
LTI0116
9-22Technical and consumer information
ZREVIEW COPYÐ2005 Armada(wzw)
Owners ManualÐUSA_English(nna)
11/18/04Ðtbrooks
X
Page 343 of 352

Front air bag system
(See supplemental restraint system).....1-63
Front seats....................1-2
Fuel
Capacities and recommended
fuel/lubricants.................9-2
Fuel economy................5-16
Fuel filler cap................3-14
Fuel filler lid.................3-14
Fuel filler lid and cap............3-14
Fuel gauge..................2-6
Fuel octane rating..............9-3
Fuel recommendation............9-3
FUEL ECON button...............4-4
Fuel Econ button
Control panel buttons............4-4
Fuses......................8-21
Fusible links...................8-23
G
Garage door opener, HomeLinkTUniversal
Transceiver...................2-52
Gascap.....................3-14
Gauge
Automatic transmission fluid temperature
gauge.....................2-7
Engine coolant temperature gauge.....2-5
Engine oil pressure gauge..........2-6
Fuel gauge..................2-6
Odometer...................2-4
Speedometer.................2-4
Tachometer..................2-5
Trip odometer.................2-4
Voltmeter...................2-7General maintenance..............8-2
Glass hatch...................3-14
Glove box....................2-35
H
Hazard warning flasher switch.........2-28
Head restraints..................1-8
Active head restraint.............1-9
Headlight and turn signal switch........2-24
Headphones (See NISSAN mobile
entertainment system).............4-43
Heated seats..................2-29
Heater
Heater and air conditioner
controls................4-15, 4-24
Heater operation...........4-16, 4-25
Rear seat air conditioner..........4-27
HomeLinkTUniversal Transceiver.......2-52
Hood release...................3-9
Hook
Luggage hook................2-42
Horn.......................2-29
I
Ignition switch..................5-7
Immobilizer system..........2-21, 3-2, 5-8
Important vehicle information label.......9-10
In-cabin microfilter...............8-16
Increasing fuel economy............5-16
Indicator lights and audible reminders
(See warning/indicator lights and audible
reminders)....................2-12Inside automatic anti-glare mirror.......3-18
Instrument brightness control.........2-27
Instrument panel..............0-6, 2-2
Interior light...................2-50
ISOFIX child restraints.............1-42
J
Jump starting...................6-7
K
Key ........................3-2
Keyless entry system
(See remote keyless entry system).......3-5
L
Labels
Air conditioner specification label.....9-11
Emission control information label.....9-10
Engine serial number............9-10
F.M.V.S.S. certification label........9-10
Vehicle identification number (VIN) plate . .9-9
Warning labels (for SRS)..........1-70
LATCH (Lower Anchors and Tethers for CHildren)
System......................1-42
License plate
Installing the license plate.........9-11
Light
Air bag warning light.........1-71, 2-16
Brake light (See stop light).........8-27
Bulb check/instrument panel........2-12
10-3
ZREVIEW COPYÐ2005 Armada(wzw)
Owners ManualÐUSA_English(nna)
12/02/04Ðdebbie
X
Page 345 of 352

Precautions
Maintenance precautions..........8-5
On-pavement and off-road driving
precautions..................5-3
Precautions on child restraints . . .1-25, 1-50
Precautions on seat belt usage......1-15
Precautions on supplemental restraint
system....................1-56
Precautions when starting and driving . . .5-2
Pre-tensioner seat belt system.........1-69
PREV button...................4-3
Prev button
Control panel buttons............4-3
Programmable features...........4-3, 4-7
Push starting...................6-9
R
Radio
Car phone or CB radio...........4-50
Compact Disc (CD) changer.......4-34
Rear audio controls.............4-39
Steering wheel audio control switch. . . .4-37
Readiness for inspection maintenance (I/M)
test........................9-26
Rear audio controls...............4-39
Rear center seat belt..............1-21
Rear power windows..............2-46
Rear seat air conditioner............4-27
Rear sonar system off switch.........2-30
Rear view monitor................4-12
Rear window and outside mirror defroster
switch......................2-24
Rear window wiper and washer switches . . .2-23Recorders
Event data..................9-27
Refrigerant recommendation..........9-6
Registering your vehicle in another country. . .9-9
Remote controller (See NISSAN mobile
entertainment system).............4-42
Remote keyless entry system..........3-5
Reporting safety defects (US only)......9-26
Roof rack....................2-44
S
Safety
Child safety rear door lock..........3-5
Child seat belts...........1-25, 1-50
Reporting safety defects (US only). . . .9-26
Screen (See NISSAN mobile entertainment
system).....................4-42
Seat adjustment
Front manual seat adjustment........1-2
Front power seat adjustment........1-4
Second row bench seats..........1-7
Second row captain’s chair.........1-5
Seat belt
Child safety.................1-17
Infants and small children.........1-18
Injured Person................1-19
Larger children...............1-18
Precautions on seat belt usage......1-15
Pregnant women..............1-19
Pre-tensioner seat belt system.......1-69
Rear center seat belt............1-21
Seat belt extenders.............1-24
Seat belt maintenance...........1-25
Seat belts..................1-15Shoulder belt height adjustment......1-24
Three-point type with retractor.......1-19
Seat belt warning light.............2-16
Seatback pockets................2-36
Seats
Adjustment..................1-2
Automatic drive positioner.........3-19
Front seats..................1-2
Heated seats................2-29
Manual front seat adjustment........1-2
Second row captain’s chair adjustment.....1-5
Security indicator light..........1-65, 2-18
Security system (Nissan vehicle immobilizer
system) , engine start.........2-21, 3-2, 5-8
Self-adjusting brakes..............8-20
Service manual order form...........9-28
Servicing air conditioner............4-27
Setting button
SETTING button...............4-7
Shift lock release................5-13
Shifting
Automatic transmission...........5-11
Shoulder belt height adjustment........1-24
Side air bag system (See supplemental side air
bag, curtain and rollover air bag systems). . .1-68
Spark plug replacement............8-15
Speedometer...................2-4
SRS warning label...............1-70
Starting
Before starting the engine..........5-8
Jump starting.................6-7
Precautions when starting and driving . . .5-2
Push starting.................6-9
Starting the engine..............5-9
Startup Screen
Control panel buttons............4-3
10-5
ZREVIEW COPYÐ2005 Armada(wzw)
Owners ManualÐUSA_English(nna)
12/02/04Ðdebbie
X