manual radio set NISSAN ARMADA 2005 1.G Owners Manual
[x] Cancel search | Manufacturer: NISSAN, Model Year: 2005, Model line: ARMADA, Model: NISSAN ARMADA 2005 1.GPages: 352, PDF Size: 6.46 MB
Page 168 of 352

4 Display screen, heater, air conditioner
and audio systems
Control panel buttons (if so equipped)...............4-2
Names of the components.......................4-3
How to use joystick and âENTERâ button..........4-3
How to use âPREVâ button......................4-3
Setting up the start-up screen...................4-3
How to use the âTRIPâ button....................4-4
How to use the âSETTINGâ button................4-7
Setting the display (Audio or HVAC display):......4-7
button..................................4-12
Rearview monitor (if so equipped)..................4-12
How to read the displayed lines.................4-12
Adjusting the screen...........................4-13
Operating tips.................................4-13
Ventilators.......................................4-14
Heater and air conditioner (manual).................4-15
Controls......................................4-15
Heater operation..............................4-16
Air conditioner operation.......................4-18
Air flow charts.................................4-19
Heater and air conditioner (automatic)
(if so equipped)..................................4-24
Automatic operation...........................4-24
Manual operation..............................4-25Rear control button............................4-26
Operating tips.................................4-26
Rear seat air conditioner..........................4-27
Controls......................................4-27
Servicing air conditioner...........................4-27
Audio system....................................4-28
Radio........................................4-28
FM radio reception............................4-28
AM radio reception............................4-28
Satellite radio reception (if so equipped).........4-28
Audio operation precautions....................4-29
FM-AM-SAT radio with compact disc
changer (Type A and B) (if so equipped).........4-31
CD care and cleaning..........................4-37
Steering wheel switch for audio control
(if so equipped)...............................4-37
Rear audio controls (if so equipped).............4-39
Antenna......................................4-40
NISSAN mobile entertainment system (MES)
(if so equipped)..................................4-40
Digital video disc (DVD) player controls..........4-41
Remote control................................4-42
Flip-down screen..............................4-42
ZREVIEW COPYĂ2005 Armada(wzw)
Owners ManualĂUSA_English(nna)
11/18/04Ătbrooks
X
Page 181 of 352

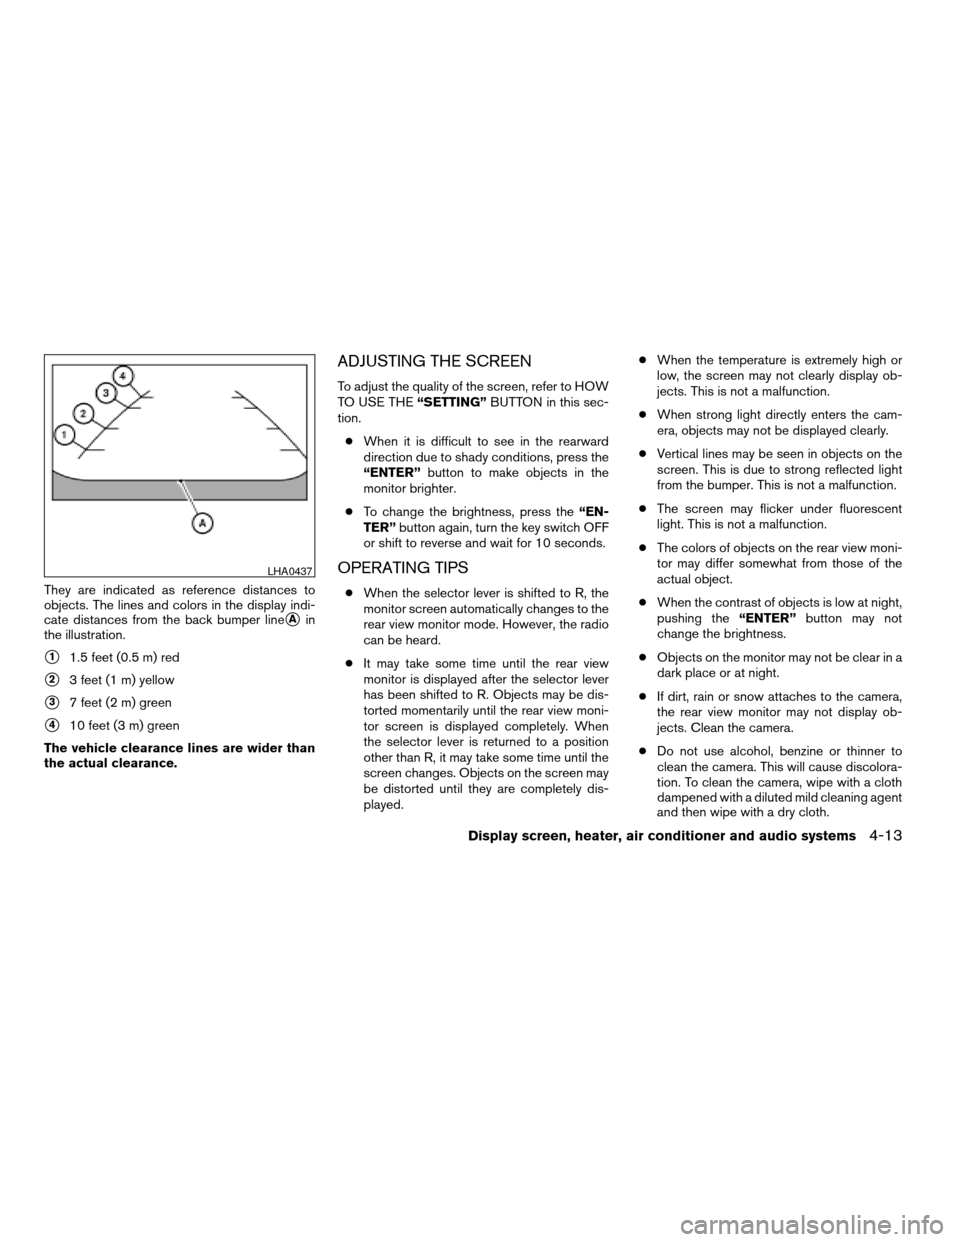
They are indicated as reference distances to
objects. The lines and colors in the display indi-
cate distances from the back bumper line
sAin
the illustration.
s11.5 feet (0.5 m) red
s23 feet (1 m) yellow
s37 feet (2 m) green
s410 feet (3 m) green
The vehicle clearance lines are wider than
the actual clearance.
ADJUSTING THE SCREEN
To adjust the quality of the screen, refer to HOW
TO USE THEâSETTINGâBUTTON in this sec-
tion.
cWhen it is difficult to see in the rearward
direction due to shady conditions, press the
âENTERâbutton to make objects in the
monitor brighter.
cTo change the brightness, press theâEN-
TERâbutton again, turn the key switch OFF
or shift to reverse and wait for 10 seconds.
OPERATING TIPS
cWhen the selector lever is shifted to R, the
monitor screen automatically changes to the
rear view monitor mode. However, the radio
can be heard.
cIt may take some time until the rear view
monitor is displayed after the selector lever
has been shifted to R. Objects may be dis-
torted momentarily until the rear view moni-
tor screen is displayed completely. When
the selector lever is returned to a position
other than R, it may take some time until the
screen changes. Objects on the screen may
be distorted until they are completely dis-
played.cWhen the temperature is extremely high or
low, the screen may not clearly display ob-
jects. This is not a malfunction.
cWhen strong light directly enters the cam-
era, objects may not be displayed clearly.
cVertical lines may be seen in objects on the
screen. This is due to strong reflected light
from the bumper. This is not a malfunction.
cThe screen may flicker under fluorescent
light. This is not a malfunction.
cThe colors of objects on the rear view moni-
tor may differ somewhat from those of the
actual object.
cWhen the contrast of objects is low at night,
pushing theâENTERâbutton may not
change the brightness.
cObjects on the monitor may not be clear in a
dark place or at night.
cIf dirt, rain or snow attaches to the camera,
the rear view monitor may not display ob-
jects. Clean the camera.
cDo not use alcohol, benzine or thinner to
clean the camera. This will cause discolora-
tion. To clean the camera, wipe with a cloth
dampened with a diluted mild cleaning agent
and then wipe with a dry cloth.
LHA0437
Display screen, heater, air conditioner and audio systems4-13
ZREVIEW COPYĂ2005 Armada(wzw)
Owners ManualĂUSA_English(nna)
11/18/04Ătbrooks
X
Page 198 of 352

1. SEEK/TRACK change button
2. TUNE/REW/FF button
3. PAUSE/MUTE button
4. PROG/RPT button
5. PRESET A-B-C select button6. CD play button
7. RADIO button
8. AUX button
9. REAR AV button
10.
speaker control button11. LOAD button
12. CD insert slot
13. CD eject button
14. POWER/VOLUME control knob
15. Station and CD select buttons (1 - 6)
16. Tuning and AUDIO control knob
(BASS, MID, TREBLE, FADE and BAL-
ANCE)
Type A
LHA0384
4-30Display screen, heater, air conditioner and audio systems
ZREVIEW COPYĂ2005 Armada(wzw)
Owners ManualĂUSA_English(nna)
11/18/04Ătbrooks
X
Page 199 of 352

1. SEEK/TRACK change button
2. TUNE/REW/FF button
3. Display
4. PAUSE/MUTE button
5. PROG/RPT button6. H/M button (clock set buttons)
7. PRESET A-B-C select button
8. CD play button
9. RADIO button
10. AUX button11.
speaker control button
12. REAR AV button
13. LOAD button
14. CD insert slot
15. CD eject button
16. POWER/VOLUME control knob
17. Station and CD select buttons (1 - 6)
18. Tuning and AUDIO control knob
(BASS, MID, TREBLE, FADE and BAL-
ANCE)
FM-AM-SAT RADIO WITH
COMPACT DISC CHANGER (Type A
and B) (if so equipped)
No satellite radio reception is available and âNO
SATâ is displayed when the RADIO button is
pressed to access satellite radio stations unless
optional satellite receiver and antenna are in-
stalled (retrofit unavailable without factory satel-
lite radio pre-wiring) , and an XMTor SIRIUSâ˘
satellite radio service subscription is active.
Audio main operation
POWER/VOLUME control:
Turn the ignition key to ACC or ON, and then
push the POWER/VOLUME control knob while
Type B
LHA0385
Display screen, heater, air conditioner and audio systems4-31
ZREVIEW COPYĂ2005 Armada(wzw)
Owners ManualĂUSA_English(nna)
11/18/04Ătbrooks
X
Page 200 of 352

the system is off to call up the mode (radio or CD)
which was playing immediately before the system
was turned off.
To turn the system off, press the
POWER/VOLUME control knob.
Turn the POWER/VOLUME control knob to ad-
just the volume.
This vehicle has speed sensitive control volume
(SSV) for audio. The audio volume changes as
the driving speed changes.
AUDIO knob (BASS, MIDRANGE, TREBLE,
FADE, BALANCE and SSV if so equipped):
Press the AUDIO knob to change the mode as
follows:
BASS!MID!TREBLE!FADE!BALANCE
!SSV (if so equipped)
To adjust Bass, Mid (Midrange) , Treble, Fade and
Balance, press the AUDIO knob until the desired
mode appears in the display. Turn the Tuning
knob to adjust Bass and Treble to the desired
level. You can also use the Tuning knob to adjust
Fader and Balance modes. Fader adjusts the
sound level between the front and rear speakers
and Balance adjusts the sound between the right
and left speakers.
To change the SSV mode to OFF, LOW, MID or
HIGH, turn the Tuning knob to the right or left.Once you have adjusted the sound quality to the
desired level, press the AUDIO knob repeatedly
until the radio or CD display reappears. Other-
wise, the radio or CD display will automatically
reappear after about 10 seconds.
Clock set (type B only)
1. Press and hold the H button to advance
hours.
2. Press and hold the M button to advance
minutes.
For setting the clock on type A audio systems see
âAdjusting the timeâ on page 4-10.
Display CD text:
To change the text displayed while playing a CD,
press the AUDIO knob until âDisplay Modeâ ap-
pears.
Turn the Tuning knob within 2 seconds. The text
will change as follows:
Track numberĂ!Track titleĂ!Disc titleĂ!
Track number
Display satellite radio text (if so equipped):
To change the text displayed while listening to
satellite radio, press the AUDIO knob until âDis-
play Modeâ appears.Turn the Tuning knob within 2 seconds. The text
will change as follows:
Channel numberĂ!Channel nameĂ!Artist
Ă!TitleĂ!Channel number
Pause/mute button:
To mute or pause the audio sound, push the
PAUSE/MUTE button.
To release the mute or pause, push the button
again.
FM/AM/SAT radio operation
FM/AM/SAT band select:
Pushing the RADIO button will change the band
as follows:
AMĂ!FM or SAT (Satellite)
When the RADIO button is pushed while the
ignition switch is in the ACC or ON position, the
radio will come on at the station last played.
The last station played will also come on when
the POWER/VOLUME control knob is de-
pressed to ON.
No satellite radio reception is available and âNO
SATâ is displayed when the RADIO button is
pressed to access satellite radio stations unless
optional satellite receiver and antenna are in-
stalled (retrofit unavailable without factory satel-
4-32Display screen, heater, air conditioner and audio systems
ZREVIEW COPYĂ2005 Armada(wzw)
Owners ManualĂUSA_English(nna)
11/18/04Ătbrooks
X
Page 201 of 352

lite radio pre-wiring) , and an XMTor SIRIUSâ˘
satellite radio service subscription is active.
If a compact disc is playing when the RADIO
button is pushed, the compact disc will automati-
cally be turned off and the last radio station
played will come on.
The FM stereo indicator ST will glow during FM
stereo reception. When the stereo broadcast
signal is weak, the radio will automatically change
from stereo to monaural reception.
TUNE (Tuning):
WARNING
The radio should not be tuned while driv-
ing so full attention may be given to ve-
hicle operation.
To manually tune the radio, push the TUNE button
(
or) or turn the tuning knob to right
or left.
To move quickly through the channels, hold either
the
orbutton down for more than
1.5 seconds.
SEEK tuning:
Push the SEEK/TRACK button (
or)
for less than 1.5 seconds to tune from high to low
or low to high frequencies and stop at the next
broadcasting station.
SCAN tuning:
Push the
orbutton for more than
1.5 seconds to stop at each broadcasting station
for 5 seconds. Pushing the button again during
this 5 second period will stop SCAN tuning and
the radio will remain tuned to that station. If
the
orbutton is not pushed within 5
seconds, SCAN tuning moves to the next station.
Station memory operations:
18 stations can be set for the FM, AM and SAT
(Satellite-if so equipped) radio to the A, B and C
preset button in any combination of FM, AM or
SAT stations.
1. Choose preset channel A, B or C using the
preset select button.
2. Select the desired FM, AM or SAT station
band.
3. Tune to the desired station using manual,
SEEK or SCAN tuning. Push and hold any of
the desired station memory buttons (1 â 6)
until a beep sound is heard.4. The channel indicator will then come on and
the sound will resume. Memorizing is now
complete.
5. Other buttons can be set in the same man-
ner.
If the battery cable is disconnected, or if the fuse
blows, the radio memory will be canceled. In that
case, reset the desired stations.
Radio data system (RDS):
RDS stands for Radio Data System, and is a data
information service transmitted by some radio
stations on the FM band (not AM band) and/or
SAT radio encoded within a regular radio broad-
cast. Currently, most RDS stations are in large
cities, but many stations are now considering
broadcasting RDS data.
RDS can display:
cStation call sign, such as âWHFR 98.3â.
cStation name, such as âThe Grooveâ.
cMusic or programming type such as âClas-
sicalâ, âCountryâ, or âRockâ.
cTraffic reports about delays or construction.
If the station broadcasts RDS information, the
RDS icon is displayed.
Display screen, heater, air conditioner and audio systems4-33
ZREVIEW COPYĂ2005 Armada(wzw)
Owners ManualĂUSA_English(nna)
11/18/04Ătbrooks
X
Page 206 of 352

MODE select switch
Push the mode select switch to change the mode
in the following sequence: PRESET A, PRESET
B or PRESET C radio stations, CD and DVD (if so
equipped) .
Volume control switch
Push the volume control switch up or down to
increase or decrease the volume.
Tuning
Memory change (radio):
Push the tuning switch (
or) for less
than 1.5 seconds to change the radio frequency.
Seek tuning (radio):
Push the tuning switch (
or) for
more than 1.5 seconds to seek the next or previ-
ous radio station.
FF, REW:
Push the tuning switch (
or) for less
1.5 seconds to return to the beginning of the
present program or skip to the next program.
Push several times to skip back or skip through
programs.To stop the FF or REW function, press the
orbutton for less than 1.5 seconds again.
When playing a CD in the CD changer (if so
equipped) , push the tuning switch (
or) for more than 1.5 seconds to change
between discs when multiple CDs are loaded.
4-38Display screen, heater, air conditioner and audio systems
ZREVIEW COPYĂ2005 Armada(wzw)
Owners ManualĂUSA_English(nna)
11/18/04Ătbrooks
X
Page 207 of 352

1. VOL (volume) control button
2. MODE select button
3.
speaker control button
4. NEXT button
5. SEEK button
6. Headphone jacks7. Infrared headphone transmitter lens*
*Red transmitters will be visible when
infrared headphones are on.
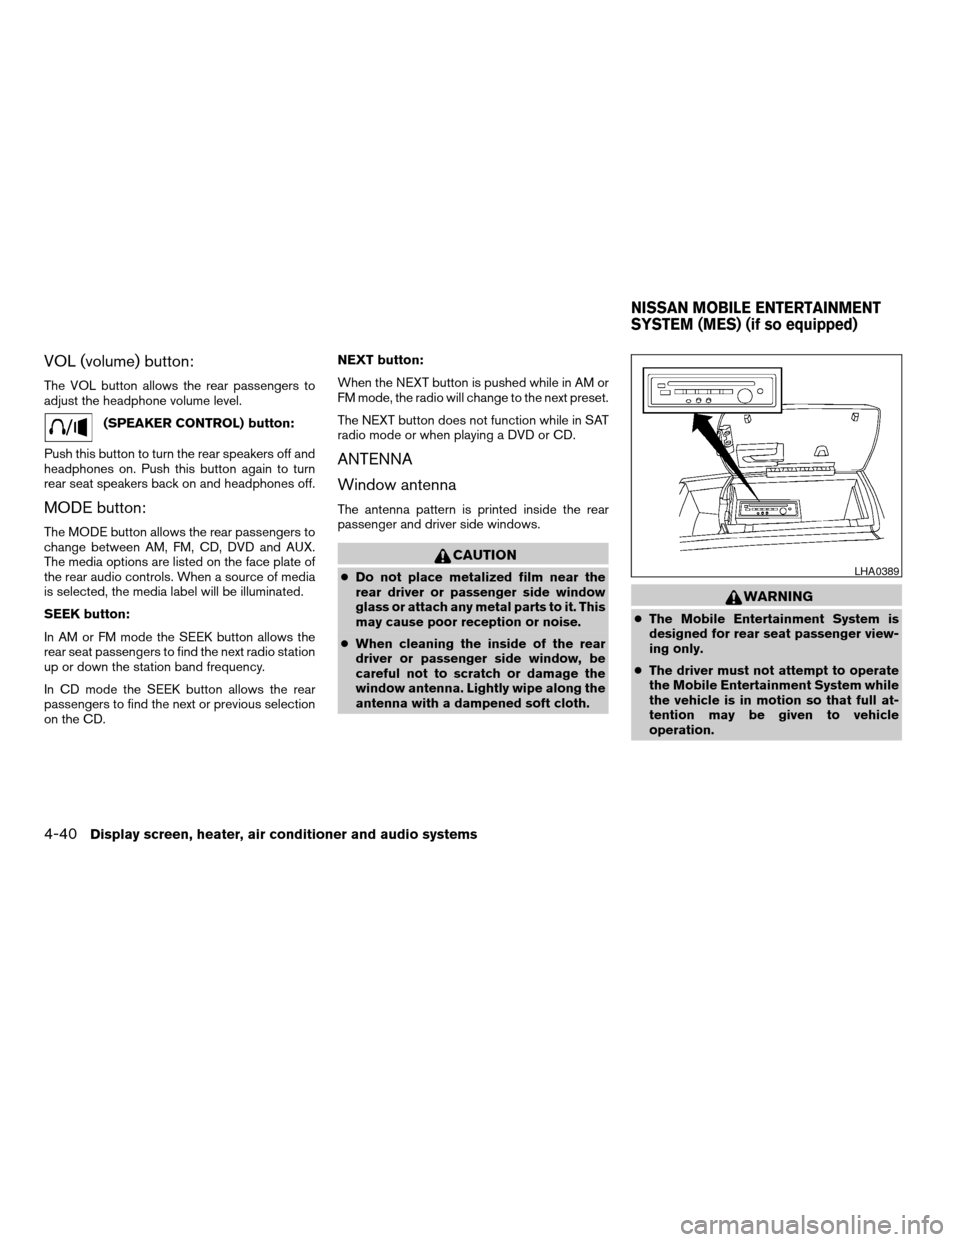
REAR AUDIO CONTROLS (if so
equipped)
Push the REAR AV button on the front radio
control panel to turn the rear controls on. Push
the button again to turn rear controls off.
The headphones symbol illuminates on the front
display when the rear audio controls are on. Two
headphone jacks are provided so two rear seat
passengers may listen to the audio system pri-
vately.
The rear volume controls can only increase the
volume to the level at which the front radio volume
control is set.
One or two infrared headphones are included if
the vehicle is equipped with the DVD entertain-
ment system. Most portable radio headphones
work with the rear audio controls.
For vehicles equipped with the FM/AM/SAT radio
with compact disc player, if the rear passengers
turn off the rear speakers and are using head-
phones they may choose to listen to a different
media than the front passengers. The rear pas-
sengers can listen to the radio while the front
passengers can listen to the same thing, a CD or
SAT radio (if so equipped) .
LHA0322
Display screen, heater, air conditioner and audio systems4-39
ZREVIEW COPYĂ2005 Armada(wzw)
Owners ManualĂUSA_English(nna)
11/18/04Ătbrooks
X
Page 208 of 352

VOL (volume) button:
The VOL button allows the rear passengers to
adjust the headphone volume level.
(SPEAKER CONTROL) button:
Push this button to turn the rear speakers off and
headphones on. Push this button again to turn
rear seat speakers back on and headphones off.
MODE button:
The MODE button allows the rear passengers to
change between AM, FM, CD, DVD and AUX.
The media options are listed on the face plate of
the rear audio controls. When a source of media
is selected, the media label will be illuminated.
SEEK button:
In AM or FM mode the SEEK button allows the
rear seat passengers to find the next radio station
up or down the station band frequency.
In CD mode the SEEK button allows the rear
passengers to find the next or previous selection
on the CD.NEXT button:
When the NEXT button is pushed while in AM or
FM mode, the radio will change to the next preset.
The NEXT button does not function while in SAT
radio mode or when playing a DVD or CD.
ANTENNA
Window antenna
The antenna pattern is printed inside the rear
passenger and driver side windows.
CAUTION
cDo not place metalized film near the
rear driver or passenger side window
glass or attach any metal parts to it. This
may cause poor reception or noise.
cWhen cleaning the inside of the rear
driver or passenger side window, be
careful not to scratch or damage the
window antenna. Lightly wipe along the
antenna with a dampened soft cloth.
WARNING
cThe Mobile Entertainment System is
designed for rear seat passenger view-
ing only.
cThe driver must not attempt to operate
the Mobile Entertainment System while
the vehicle is in motion so that full at-
tention may be given to vehicle
operation.
LHA0389
NISSAN MOBILE ENTERTAINMENT
SYSTEM (MES) (if so equipped)
4-40Display screen, heater, air conditioner and audio systems
ZREVIEW COPYĂ2005 Armada(wzw)
Owners ManualĂUSA_English(nna)
11/18/04Ătbrooks
X
Page 216 of 352

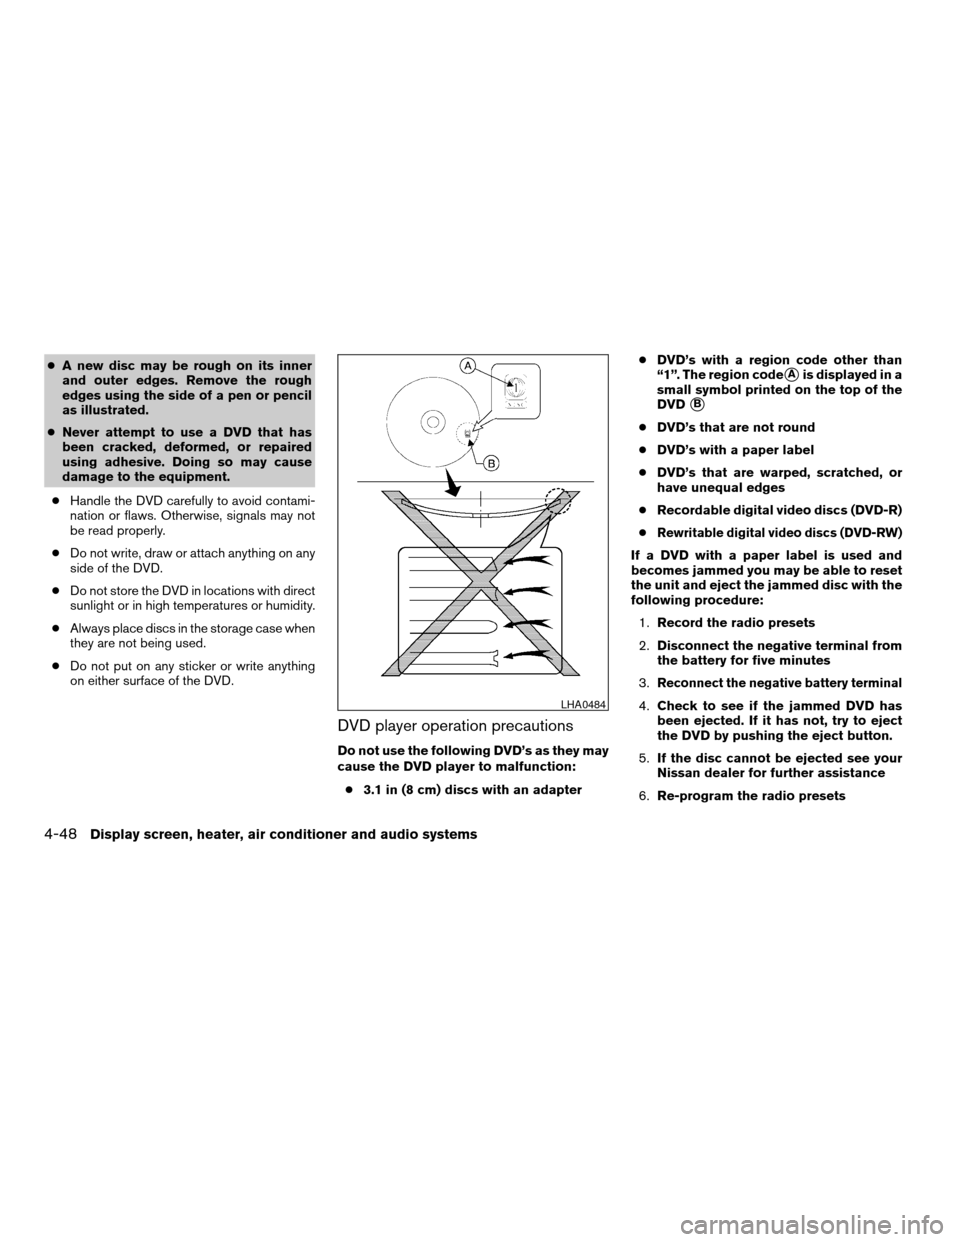
cA new disc may be rough on its inner
and outer edges. Remove the rough
edges using the side of a pen or pencil
as illustrated.
cNever attempt to use a DVD that has
been cracked, deformed, or repaired
using adhesive. Doing so may cause
damage to the equipment.
cHandle the DVD carefully to avoid contami-
nation or flaws. Otherwise, signals may not
be read properly.
cDo not write, draw or attach anything on any
side of the DVD.
cDo not store the DVD in locations with direct
sunlight or in high temperatures or humidity.
cAlways place discs in the storage case when
they are not being used.
cDo not put on any sticker or write anything
on either surface of the DVD.
DVD player operation precautions
Do not use the following DVDâs as they may
cause the DVD player to malfunction:
c3.1 in (8 cm) discs with an adaptercDVDâs with a region code other than
â1â. The region code
sAis displayed in a
small symbol printed on the top of the
DVD
sB
cDVDâs that are not round
cDVDâs with a paper label
cDVDâs that are warped, scratched, or
have unequal edges
cRecordable digital video discs (DVD-R)
c
Rewritable digital video discs (DVD-RW)
If a DVD with a paper label is used and
becomes jammed you may be able to reset
the unit and eject the jammed disc with the
following procedure:
1.Record the radio presets
2.Disconnect the negative terminal from
the battery for five minutes
3.
Reconnect the negative battery terminal
4.Check to see if the jammed DVD has
been ejected. If it has not, try to eject
the DVD by pushing the eject button.
5.If the disc cannot be ejected see your
Nissan dealer for further assistance
6.Re-program the radio presetsLHA0484
4-48Display screen, heater, air conditioner and audio systems
ZREVIEW COPYĂ2005 Armada(wzw)
Owners ManualĂUSA_English(nna)
11/18/04Ătbrooks
X