suspension NISSAN ARMADA 2005 1.G Owners Manual
[x] Cancel search | Manufacturer: NISSAN, Model Year: 2005, Model line: ARMADA, Model: NISSAN ARMADA 2005 1.GPages: 352, PDF Size: 6.46 MB
Page 102 of 352

orAnti-lock brake warning lightLow fuel warning lightorFront passenger air bag status
light
Automatic transmission check warning lightLow tire pressure warning lightHigh beam indicator light (Blue)
Automatic transmission park warning light
(model)Low windshield washer fluid warning lightMalfunction indicator lamp (MIL)
orBrake warning lightSeat belt warning light and chimeSecurity indicator light (NVIS)
Charge warning lightSupplemental air bag warning lightSlip indicator light
Check suspension warning light (if so
equipped)Automatic transmission position indicator lightTransfer 4LO position indicator light
(model)
Door open warning lightCruise main switch indicator lightTurn signal/hazard indicator lights
Engine oil pressure low/engine coolant tem-
perature high warning lightCruise set switch indicator lightVehicle dynamic control off indicator light
4WD warning light (model)4WD shift indicator light (model)
CHECKING BULBS
With all doors closed, apply the parking brake
and turn the ignition key to the ON position
without starting the engine. The following lights
will come on:
,or,,,,
The following lights come on briefly and then go
off:
or,,,,,
,,,
If any light fails to come on, it may indicate
a burned-out bulb or an open circuit in the
electrical system. Have the system repaired
promptly.
WARNING/INDICATOR LIGHTS AND
AUDIBLE REMINDERS
2-12Instruments and controls
ZREVIEW COPYÐ2005 Armada(wzw)
Owners ManualÐUSA_English(nna)
11/18/04Ðtbrooks
X
Page 104 of 352
WARNING
cYour brake system may not be working
properly if the warning light is on. Driv-
ing could be dangerous. If you judge it
to be safe, drive carefully to the nearest
service station for repairs. Otherwise,
have your vehicle towed because driv-
ing it could be dangerous.
cPressing the brake pedal with the en-
gine stopped and/or a low brake fluid
level may increase your stopping dis-
tance and braking will require greater
pedal effort as well as pedal travel.
cIf the brake fluid level is below the
MINIMUM or MIN mark on the brake
fluid reservoir, do not drive until the
brake system has been checked at a
NISSAN dealer.
Charge warning light
If this light comes on while the engine is running,
it may indicate the charging system is not func-
tioning properly. Turn the engine off and check
the generator belt. If the belt is loose, broken,
missing, or if the light remains on, see a NISSAN
dealer immediately.
CAUTION
Do not continue driving if the generator
belt is loose, broken or missing.
Check suspension warning
light (if so equipped)
This light may indicate a malfunction in the auto-
leveling suspension.
For additional information, refer to “Jacking up
vehicle and removing the damaged tire” in the “In
case of emergency” section of this manual.
Door open warning light
This light comes on when any of the doors are not
closed securely while the ignition key is in the ON
position.
Engine oil pressure
low/Engine coolant
temperature high warning
light
This light warns of low engine oil pressure or high
engine coolant temperature.
If the light flickers or comes on during normal
driving, pull off the road in a safe area, stop the
engine and allow it to cool. If the light remains on
after checking the oil and coolant, stop the en-gineimmediatelyand call a NISSAN dealer or
other authorized repair shop.
This light is not designed to indicate a low
oil or low coolant level.Check the oil level
with the dipstick and check the coolant level on
the reservoir. See “Engine oil” and “Checking
engine coolant level” in the “Maintenance and
do-it-yourself” section of this manual. Also see “If
your vehicle overheats” in the “In case of emer-
gency” section of this manual.
CAUTION
cRunning the engine with the engine oil
pressure warning light on could cause
serious damage to the engine almost
immediately. Such damage is not cov-
ered by warranty. Turn off the engine as
soon as it is safe to do so.
cIf the gauge indicates engine coolant
temperature over the normal range,
stop the vehicle as soon as safely pos-
sible. If the engine is overheated, con-
tinued operation of the vehicle may se-
riously damage the engine. See “If your
vehicle overheats” in the “In case of
emergency” section for immediate ac-
tion required.
2-14Instruments and controls
ZREVIEW COPYÐ2005 Armada(wzw)
Owners ManualÐUSA_English(nna)
11/18/04Ðtbrooks
X
Page 245 of 352
cIf brake related parts such as brake
pads, rotors and calipers are not stan-
dard equipment or are extremely dete-
riorated, the vehicle dynamic control
system may not operate properly and
the vehicle dynamic control off indica-
tor light may come on.
cDo not modify the vehicle’s suspension.
If suspension parts such as shock ab-
sorbers, struts, springs, stabilizer bars
and bushings are not NISSAN approved
for your vehicle or are extremely dete-
riorated the vehicle dynamic control
system may not operate properly. This
could adversely affect vehicle handling
performance, and the VDC OFF indica-
tor light may come on.
cWhen driving on extremely inclined sur-
faces such as higher banked corners,
the vehicle dynamic control system may
not operate properly and the VDC OFF
indicator light may come on. Do not
drive on these types of roads.
cWhen driving on an unstable surface
such as a turntable, ferry, elevator or
ramp, the vehicle dynamic control off
indicator light may illuminate. This is
not a malfunction. Restart the engine
after driving onto a stable surfacecIf wheels or tires other than the recom-
mended ones are used, the vehicle dy-
namic control system may not operate
properly and the vehicle dynamic con-
trol off indicator light may come on.
cThe vehicle dynamic control system is
not a substitute for winter tires or tire
chains on a snow covered road.
WARNING
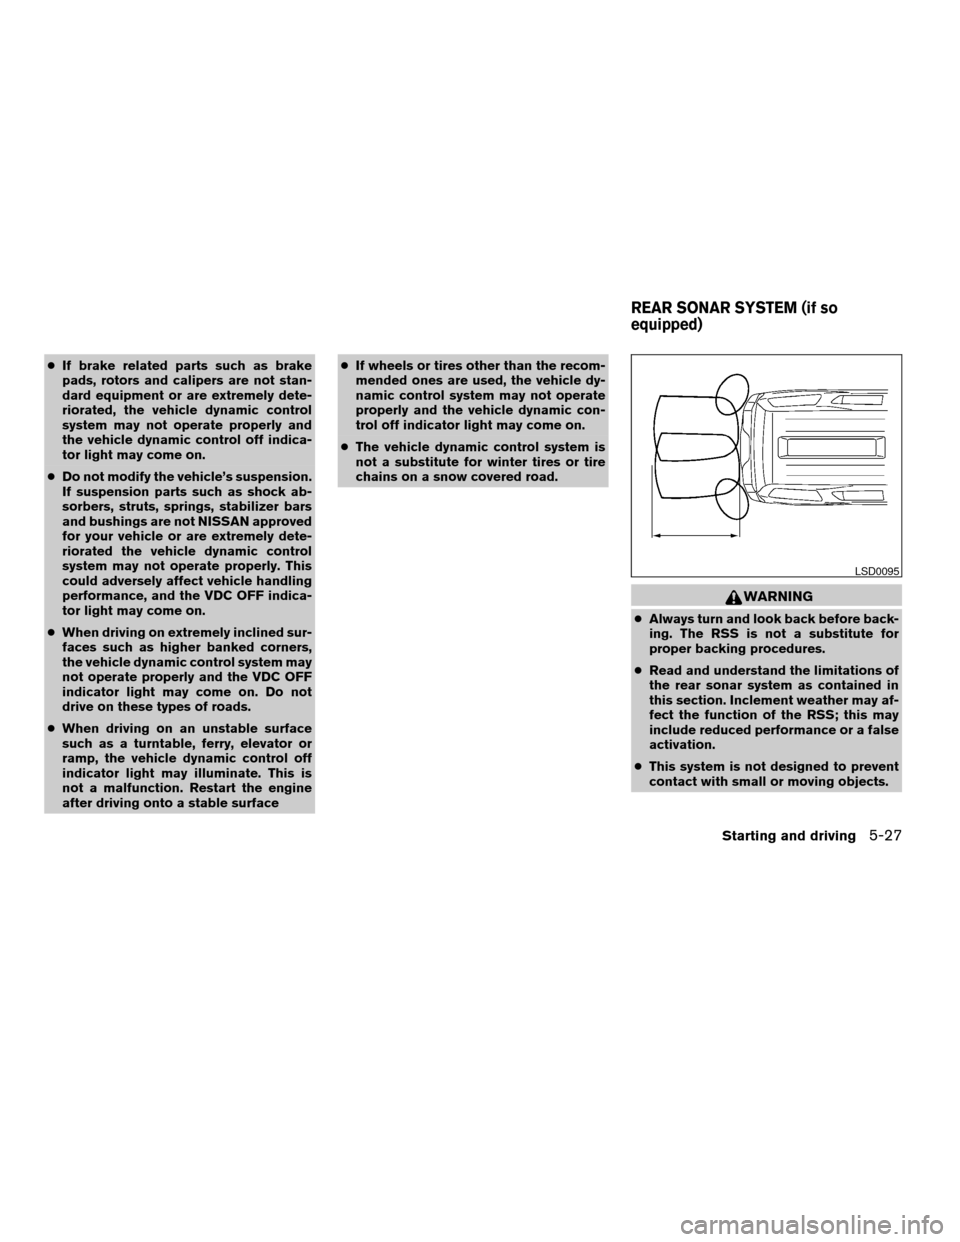
cAlways turn and look back before back-
ing. The RSS is not a substitute for
proper backing procedures.
cRead and understand the limitations of
the rear sonar system as contained in
this section. Inclement weather may af-
fect the function of the RSS; this may
include reduced performance or a false
activation.
cThis system is not designed to prevent
contact with small or moving objects.
LSD0095
REAR SONAR SYSTEM (if so
equipped)
Starting and driving5-27
ZREVIEW COPYÐ2005 Armada(wzw)
Owners ManualÐUSA_English(nna)
12/02/04Ðdebbie
X
Page 247 of 352
For details, see ‘‘Changing engine coolant’’ in the
‘‘Maintenance and do-it-yourself’’ section of this
manual.
TIRE EQUIPMENT
1. SUMMER tires have a tread designed to
provide superior performance on dry pave-
ment. However, the performance of these
tires will be substantially reduced in snowy
and icy conditions. If you operate your ve-
hicle on snowy or icy roads, NISSAN recom-
mends the use of MUD & SNOW or ALL
SEASON TIRES on all four wheels. Please
consult a NISSAN dealer for the tire type,
size, speed rating and availability informa-
tion.
2. For additional traction on icy roads, studded
tires may be used. However, some U.S.
states and Canadian provinces prohibit their
use. Check local, state and provincial laws
before installing studded tires.
Skid and traction capabilities of studded
snow tires on wet or dry surfaces may be
poorer than that of non-studded snow tires.
3. Tire chains may be used.
Use of tire chains may be prohibited accord-
ing to location. Check the local laws before
installing tire chains. When installing tire
chains, make sure they are of proper size forthe tires on your vehicle and are installed
according to the chain manufacturer’s sug-
gestions.Use only SAE Class “S”
chains.Class “S” chains are used on ve-
hicles with restricted tire to vehicle clear-
ance. Vehicles that can use Class “S” chains
are designed to meet the minimum clear-
ances between the tire and the closest ve-
hicle suspension or body component re-
quired to accommodate the use of a winter
traction device (tire chains or cables) . The
minimum clearances are determined using
the factory equipped tire size. Other types
may damage your vehicle. Use chain ten-
sioners when recommended by the tire
chain manufacturer to ensure a tight fit.
Loose end links of the tire chain must be
secured or removed to prevent the possibil-
ity of whipping action damage to the fenders
or underbody. If possible, avoid fully loading
your vehicle when using tire chains. In addi-
tion, drive at a reduced speed. Otherwise,
your vehicle may be damaged and/or vehicle
handling and performance may be adversely
affected.
Never install tire chains on spare tires. Do
not use tire chains on dry roads.
SPECIAL WINTER EQUIPMENT
It is recommended that the following items be
carried in the vehicle during winter:
cA scraper and stiff-bristled brush to remove
ice and snow from the windows and wiper
blades.
cA sturdy, flat board to be placed under the
jack to give it firm support.
cA shovel to dig the vehicle out of snowdrifts.
cExtra window washer fluid to refill the reser-
voir tank.
DRIVING ON SNOW OR ICE
WARNING
cWet ice (32°F, 0°C and freezing rain) ,
very cold snow or ice can be slick and
very hard to drive on. The vehicle will
have much less traction or “grip” under
these conditions. Try to avoid driving on
wet ice until the road is salted or
sanded.
cWhatever the condition, drive with cau-
tion. Accelerate and slow down with
care. If accelerating or downshifting too
fast, the drive wheels will lose even
more traction.
Starting and driving5-29
ZREVIEW COPYÐ2005 Armada(wzw)
Owners ManualÐUSA_English(nna)
12/02/04Ðdebbie
X
Page 253 of 352
cDo not start or run the engine while ve-
hicle is on the jack. It may cause the
vehicle to move. This is especially true for
vehicles with limited slip differentials.
cDo not allow passengers to stay in the
vehicle while it is on the jack.
cNever run the engine with a wheel(s) off
the ground. It may cause the vehicle to
move.
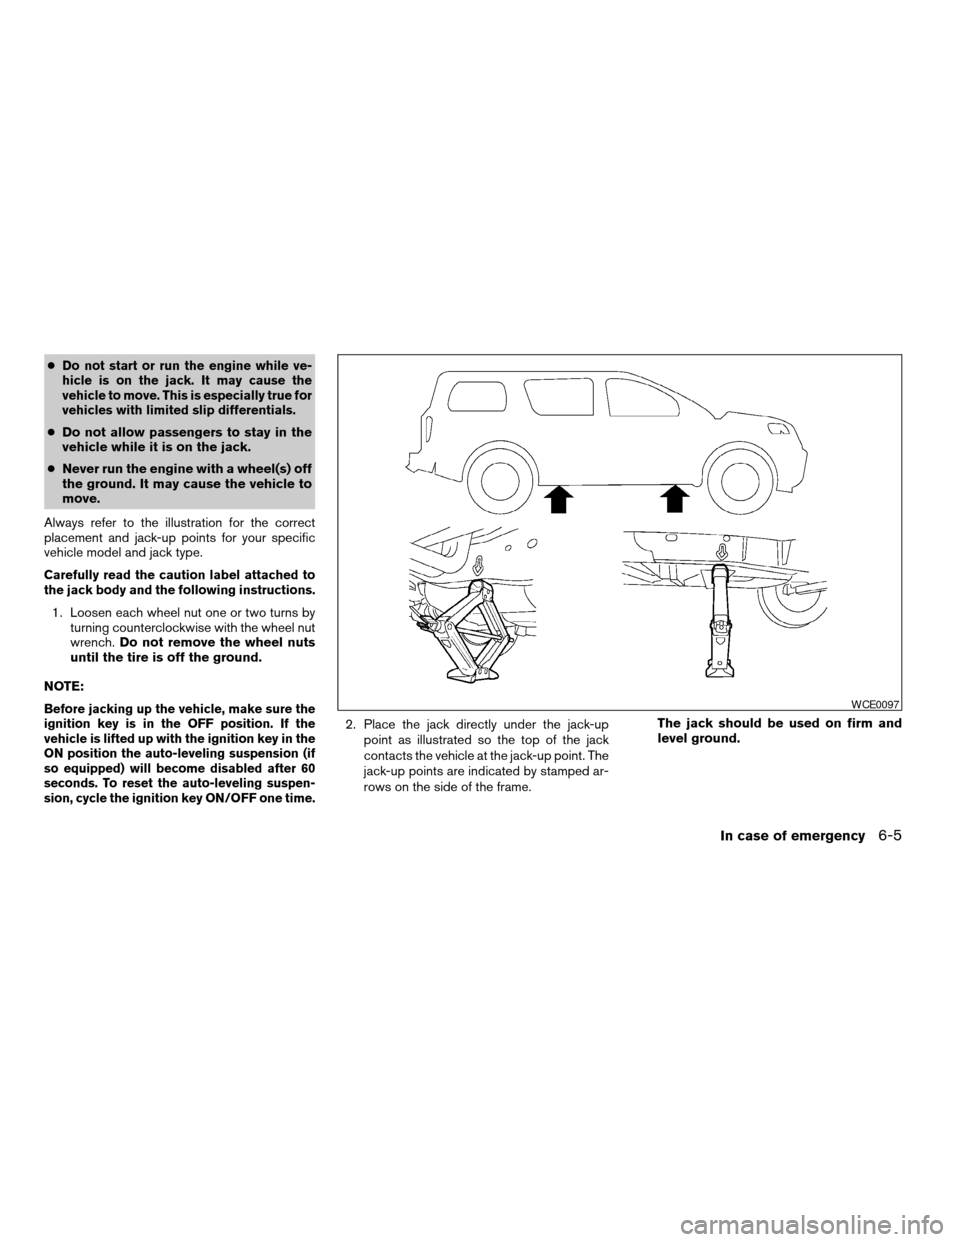
Always refer to the illustration for the correct
placement and jack-up points for your specific
vehicle model and jack type.
Carefully read the caution label attached to
the jack body and the following instructions.
1. Loosen each wheel nut one or two turns by
turning counterclockwise with the wheel nut
wrench.Do not remove the wheel nuts
until the tire is off the ground.
NOTE:
Before jacking up the vehicle, make sure the
ignition key is in the OFF position. If the
vehicle is lifted up with the ignition key in the
ON position the auto-leveling suspension (if
so equipped) will become disabled after 60
seconds. To reset the auto-leveling suspen-
sion, cycle the ignition key ON/OFF one time.2. Place the jack directly under the jack-up
point as illustrated so the top of the jack
contacts the vehicle at the jack-up point. The
jack-up points are indicated by stamped ar-
rows on the side of the frame.The jack should be used on firm and
level ground.
WCE0097
In case of emergency6-5
ZREVIEW COPYÐ2005 Armada(wzw)
Owners ManualÐUSA_English(nna)
11/18/04Ðtbrooks
X
Page 265 of 352
UNDERBODY
In areas where road salt is used in winter, it is
necessary to clean the underbody regularly in
order to prevent dirt and salt from building up and
causing the acceleration of corrosion on the un-
derbody and suspension. Before the winter pe-
riod and again in the spring, the underseal must
be checked and, if necessary, retreated.
GLASS
Use glass cleaner to remove smoke and dust film
from the glass surfaces. It is normal for glass to
become coated with a film after the vehicle is
parked in the hot sun. Glass cleaner and a soft
cloth will easily remove this film.
CAUTION
When cleaning the inside of the windows,
do not use sharp-edged tools, abrasive
cleaners or chlorine-based disinfectant
cleaners. They could damage the electri-
cal conductors, radio antenna elements or
rear window defroster elements.
ALUMINUM ALLOY WHEELS
Wash the wheels regularly, especially during win-
ter months in areas where road salt is used. If not
removed, road salt can discolor the wheels.
CHROME PARTS
Clean all chrome parts regularly with a non-
abrasive chrome polish to maintain the finish.Occasionally remove loose dust from the interior
trim, plastic parts and seats using a vacuum
cleaner or soft brush. Wipe the vinyl and leather
surfaces with a clean, soft cloth dampened in
mild soap solution, then wipe clean with a dry,
soft cloth. Before using any fabric protector, read
the manufacturer’s recommendations. Some fab-
ric protectors contain chemicals that may stain or
bleach the seat material.
Use a cloth dampened only with water to clean
the meter and gauge lens.
CAUTION
cNever use benzine, thinner or any simi-
lar material.
cSmall dirt particles can be abrasive and
damaging to leather surfaces and
should be removed promptly. Do not
use saddle soap, polishes, oils, clean-
ing fluids, solvents, detergents or
ammonia-based cleaners as they may
damage the leather’s natural finish.
cNever use fabric protectors unless rec-
ommended by the manufacturer.
cDo not use glass or plastic cleaner on
meter or gauge lens covers. It may dam-
age the lens cover.
CLEANING INTERIOR
Appearance and care7-3
ZREVIEW COPYÐ2005 Armada(wzw)
Owners ManualÐUSA_English(nna)
11/18/04Ðtbrooks
X
Page 306 of 352
TYPES OF TIRES
WARNING
cWhen changing or replacing tires, be
sure all four tires are of the same type
(i.e., Summer, All Season or Snow) and
construction. A NISSAN dealer may be
able to help you with information about
tire type, size, speed rating and
availability.
cReplacement tires may have a lower
speed rating than the factory equipped
tires, and may not match the potential
maximum vehicle speed. Never exceed
the maximum speed rating of the tire.
cFor additional information regarding
tires, refer to “Important Tire Safety In-
formation” (US) or “Tire Safety Informa-
tion” (Canada) in the Warranty Informa-
tion Booklet.
All season tires
NISSAN specifies All Season tires on some mod-
els to provide good performance all year, includ-
ing snowy and icy road conditions. All Season
tires are identified by ALL SEASON and/or M&S
on the tire sidewall. Snow tires have better snow
traction than All Season tires and may be more
appropriate in some areas.
Summer tires
NISSAN specifies summer tires on some models
to provide superior performance on dry roads.
Summer tire performance is substantially re-
duced in snow and ice. Summer tires do not have
the tire traction rating “M&S” on the tire sidewall.
If you plan to operate your vehicle in snowy or icy
conditions, NISSAN recommends the use of
SNOW tires or ALL SEASON tires on all four
wheels.
Snow tires
If snow tires are needed, it is necessary to select
tires equivalent in size and load rating to the
original equipment tires. If you do not, it can
adversely affect the safety and handling of your
vehicle.
Generally, snow tires have lower speed ratings
than factory equipped tires and may not match
the potential maximum vehicle speed. Never ex-
ceed the maximum speed rating of the tire.
If you install snow tires, they must be the same
size, brand, construction and tread pattern on all
four wheels.
For additional traction on icy roads, studded tires
may be used. However, some U.S. states and
Canadian provinces prohibit their use. Check
local, state and provincial laws before installingstudded tires. Skid and traction capabilities of
studded snow tires on wet or dry surfaces may be
poorer than that of non-studded snow tires.
TIRE CHAINS
Use of tire chains may be prohibited according to
location. Check the local laws before installing
tire chains. When installing tire chains, make sure
they are the proper size for the tires on your
vehicle and are installed according to the chain
manufacturer’s suggestions.Use only SAE
class “S” chains.Class9S9chains are used on
vehicles with restricted tire to vehicle clearance.
Vehicles that can use Class “S” chains are de-
signed to meet the minimum clearances between
the tire and the closest vehicle suspension or
body component required to accommodate the
use of a winter traction device (tire chains or
cables) . The minimum clearances are determined
using the factory equipped tire size. Other types
may damage your vehicle. Use chain tensioners
when recommended by the tire chain manufac-
turer to ensure a tight fit. Loose end links of the
tire chain must be secured or removed to prevent
the possibility of whipping action damage to the
fenders or underbody. If possible, avoid fully load-
ing your vehicle when using tire chains. In addi-
tion, drive at a reduced speed. Otherwise, your
vehicle may be damaged and/or vehicle handling
and performance may be adversely affected.
8-38Maintenance and do-it-yourself
ZREVIEW COPYÐ2005 Armada(wzw)
Owners ManualÐUSA_English(nna)
11/18/04Ðtbrooks
X
Page 332 of 352

4. Peel off the tape and connect the jumper
harness to the connector
s2.
5. Release the parking brake.
6. Install the aftermarket electric trailer brake
controller according to the manufacturer’s
instructions.
Pre-towing tips
cBe certain your vehicle maintains a level
position when a loaded and/or unloaded
trailer is hitched. Do not drive the vehicle if it
has an abnormal nose-up or nose-down
condition; check for improper tongue load,
overload, worn suspension or other possible
causes of either condition.cAlways secure items in the trailer to prevent
load shift while driving.
cLoad the trailer so approximately 60% of the
trailer load is in the front half and 40% is in
the back half.
cCheck your hitch, trailer tire pressure, ve-
hicle tire pressure, trailer light operation, and
trailer wheel lug nuts every time you attach a
trailer to the vehicle.
cBe certain your rearview mirrors conform to
all federal, state or local regulations. If not,
install any mirrors required for towing before
driving the vehicle.
Trailer towing tips
In order to gain skill and an understanding of the
vehicle’s behavior, you should practice turning,
stopping and backing up in an area which is free
from traffic. Steering stability and braking perfor-
mance will be somewhat different than under
normal driving conditions.
cAlways secure items in the trailer to prevent
load shift while driving.
cAvoid abrupt starts, acceleration or stops.
cAvoid sharp turns or lane changes.
cAlways drive your vehicle at a moderate
speed.cWhen backing up, hold the bottom of the
steering wheel with one hand. Move your
hand in the direction in which you want the
trailer to go. Make small corrections and
back up slowly. If possible, have someone
guide you when you are backing up.
cAlways block the wheels on both vehicle and
trailer when parking. Parking on a slope is
not recommended; however, if you must do
so, first block the wheels and apply the park-
ing brake, and then move the transmission
shift selector lever into the P (Park) position.
If you move the shift selector lever to the P
(Park) position before blocking the wheels
and applying the parking brake, transmission
damage could occur.
cWhen going down a hill, shift into a lower
gear and use the engine braking effect.
When going up a long grade, downshift the
transmission to a lower gear and reduce
speed to reduce chances of engine over-
loading and/or overheating. However, for
long steep grades, do not stay in 1st gear
when driving above 35 MPH (56 km/h) or
2nd gear when driving above 58 MPH (93
km/h) .
cIf the engine coolant rises to an extremely
high temperature when the air conditioner
system is on, turn off the air conditioner.
LTI0116
9-22Technical and consumer information
ZREVIEW COPYÐ2005 Armada(wzw)
Owners ManualÐUSA_English(nna)
11/18/04Ðtbrooks
X