wiring NISSAN ARMADA 2005 1.G Owners Manual
[x] Cancel search | Manufacturer: NISSAN, Model Year: 2005, Model line: ARMADA, Model: NISSAN ARMADA 2005 1.GPages: 352, PDF Size: 6.46 MB
Page 83 of 352
Other supplemental front air bag precau-
tions
WARNING
cDo not place any objects on the steer-
ing wheel pad or on the instrument
panel. Also, do not place any objects
between any occupant and the steering
wheel or instrument panel. Such ob-
jects may become dangerous projec-
tiles and cause injury if the supplemen-
tal front air bag inflates.
cImmediately after inflation, several
front air bag system components will be
hot. Do not touch them; you may se-
verely burn yourself.
cNo unauthorized changes should be
made to any components or wiring of
the supplemental air bag system. This is
to prevent accidental inflation of the
supplemental air bag or damage to the
supplemental air bag system.
cDo not make unauthorized changes to
your vehicle’s electrical system, sus-
pension system or front end structure.
This could affect proper operation of
the supplemental front air bag system.cTampering with the supplemental front
air bag system may result in serious
personal injury. Tampering includes
changes to the steering wheel and the
instrument panel assembly by placing
material over the steering wheel pad
and above the instrument panel or by
installing additional trim material
around the air bag system.
cModifying or tampering with the front
passenger seat may result in serious
personal injury. For example, do not
change the front seats by placing mate-
rial on the seat cushion or by installing
additional trim material, such as seat
covers, on the seat that are not specifi-
cally designed to assure proper air bag
operation. Additionally, do not stow any
objects under the front passenger seat
or the seat cushion and seatback. Such
objects may interfere with the proper
operation of the occupant classifica-
tion system (weight sensor) .
cNo unauthorized changes should be
made to any components or wiring of
the seat belt system. This may affect the
supplemental front air bag system.
Tampering with the seat belt system
may result in serious personal injury.cWork on and around the supplemental
front air bag system should be done by
a NISSAN dealer. Installation of electri-
cal equipment should also be done by a
NISSAN dealer. The Supplemental Re-
straint System (SRS) wiring should not
be modified or disconnected. Unautho-
rized electrical test equipment and
probing devices should not be used on
the air bag system.
cA cracked windshield should be re-
placed immediately by a qualified re-
pair facility. A cracked windshield could
affect the function of the supplemental
air bag system.
cThe SRS wiring harness connectors are
yellow and orange for easy
identification.
When selling your vehicle, we request that you
inform the buyer about the supplemental front air
bag system and guide the buyer to the appropri-
ate sections in this Owner’s Manual.
Safety—Seats, seat belts and supplemental restraint system1-67
ZREVIEW COPYÐ2005 Armada(wzw)
Owners ManualÐUSA_English(nna)
11/18/04Ðtbrooks
X
Page 85 of 352
WARNING
cDo not place any objects near the seat-
back of the front seats. Also, do not
place any objects (an umbrella, bag,
etc.) between the front door finisher
and the front seat. Such objects may
become dangerous projectiles and
cause injury if the supplemental side air
bag inflates.
cRight after inflation, several side air bag
and curtain side-impact and rollover air
bag system components will be hot. Do
not touch them; you may severely burn
yourself.
cNo unauthorized changes should be
made to any components or wiring of
the side air bag and curtain air bag
system. This is to prevent accidental
inflation of the side air bag and curtain
air bag or damage to the side air bag
and curtain air bag system.
cDo not make unauthorized changes to
your vehicle’s electrical system, sus-
pension system or side panel. This
could affect proper operation of the
supplemental curtain air bag system.cTampering with the supplemental side
air bag system may result in serious
personal injury. For example, do not
change the front seats by placing mate-
rial near the seatbacks or by installing
additional trim material, such as seat
covers, around the side air bag.
cWork around and on the curtain air bag
system should be done by a NISSAN
dealer. Installation of electrical equip-
ment should also be done by a NISSAN
dealer. The SRS wiring harnesses*
should not be modified or discon-
nected. Unauthorized electrical test
equipment and probing devices should
not be used on the side air bag or cur-
tain air bag system.
* The SRS wiring harness or connectors are
yellow or orange for easy identification.
When selling your vehicle, we request that you
inform the buyer about the supplemental side air
bag and curtain air bag system and guide the
buyer to the appropriate sections in this Owner’s
Manual.
Pre-tensioner seat belt system (Front
seats)
WARNING
cThe pre-tensioner seat belt cannot be
reused after activation. It must be re-
placed together with the retractor and
buckle as a unit.
cIf the vehicle becomes involved in a
frontal collision but the pre-tensioner is
not activated, be sure to have the pre-
tensioner system checked and, if nec-
essary, replaced by your NISSAN
dealer.
cNo unauthorized changes should be
made to any components or wiring of
the pre-tensioner seat belt system. This
is to prevent accidental activation of
the pre-tensioner seat belt or damage
to the pre-tensioner seat belt operation.
Tampering with the pre-tensioner seat
belt system may result in serious per-
sonal injury.
Safety—Seats, seat belts and supplemental restraint system1-69
ZREVIEW COPYÐ2005 Armada(wzw)
Owners ManualÐUSA_English(nna)
11/18/04Ðtbrooks
X
Page 87 of 352
SUPPLEMENTAL AIR BAG
WARNING LIGHT
The supplemental air bag warning light,
displayingin the instrument panel, moni-
tors the circuits of the supplemental front air bag,
supplemental side-impact air bag and curtain
side-impact and rollover air bag and pre-
tensioner seat belt systems. The circuits moni-
tored by the supplemental air bag warning light
are the diagnosis sensor unit, crash zone sensor,
satellite sensors, rollover sensor, front air bag
modules, side air bag modules, curtain air bag
modules, pre-tensioner seat belts and all related
wiring.When the ignition key is in the ON or START
position, the supplemental air bag warning light
illuminates for about 7 seconds and then turns
off. This means the system is operational.
If any of the following conditions occur, the
supplemental front air bag, supplemental side air
bag, curtain air bag and pre-tensioner seat belt
systems need servicing:
cThe supplemental air bag warning light re-
mains on after approximately 7 seconds.
cThe supplemental air bag warning light
flashes intermittently.
cThe supplemental air bag warning light does
not come on at all.
Under these conditions, the supplemental front
air bag, supplemental side air bags and curtain air
bag or pre-tensioner seat belt systems may not
operate properly. It must be checked and re-
paired. Take your vehicle to the nearest NISSAN
dealer.
WARNING
If the supplemental air bag warning light
is on, it could mean that the supplemental
front air bag, supplemental side air bag,
curtain air bag systems and/or pre-
tensioner seat belt systems will not oper-
ate in an accident. To help avoid injury to
yourself or others, have your vehicle
checked by a NISSAN dealer as soon as
possible.
Repair and replacement procedure
The supplemental front air bags, supplemental
side air bags, curtain air bags and pre-tensioner
seat belts are designed to inflate on a one-time-
only basis. As a reminder, unless it is damaged,
the supplemental air bag warning light remains
illuminated after inflation has occurred. Repair
and replacement of these supplemental air bag
systems should be done only by a NISSAN
dealer.
When maintenance work is required on the ve-
hicle, the supplemental front air bags, supple-
mental side air bags, curtain air bags, pre-
tensioner seat belts and related parts should be
pointed out to the person performing the mainte-
nance. The ignition key should always be in the
LOCK position when working under the hood or
inside the vehicle.LRS0100
Safety—Seats, seat belts and supplemental restraint system1-71
ZREVIEW COPYÐ2005 Armada(wzw)
Owners ManualÐUSA_English(nna)
11/18/04Ðtbrooks
X
Page 199 of 352

1. SEEK/TRACK change button
2. TUNE/REW/FF button
3. Display
4. PAUSE/MUTE button
5. PROG/RPT button6. H/M button (clock set buttons)
7. PRESET A-B-C select button
8. CD play button
9. RADIO button
10. AUX button11.
speaker control button
12. REAR AV button
13. LOAD button
14. CD insert slot
15. CD eject button
16. POWER/VOLUME control knob
17. Station and CD select buttons (1 - 6)
18. Tuning and AUDIO control knob
(BASS, MID, TREBLE, FADE and BAL-
ANCE)
FM-AM-SAT RADIO WITH
COMPACT DISC CHANGER (Type A
and B) (if so equipped)
No satellite radio reception is available and “NO
SAT” is displayed when the RADIO button is
pressed to access satellite radio stations unless
optional satellite receiver and antenna are in-
stalled (retrofit unavailable without factory satel-
lite radio pre-wiring) , and an XMTor SIRIUS™
satellite radio service subscription is active.
Audio main operation
POWER/VOLUME control:
Turn the ignition key to ACC or ON, and then
push the POWER/VOLUME control knob while
Type B
LHA0385
Display screen, heater, air conditioner and audio systems4-31
ZREVIEW COPYÐ2005 Armada(wzw)
Owners ManualÐUSA_English(nna)
11/18/04Ðtbrooks
X
Page 201 of 352
lite radio pre-wiring) , and an XMTor SIRIUS™
satellite radio service subscription is active.
If a compact disc is playing when the RADIO
button is pushed, the compact disc will automati-
cally be turned off and the last radio station
played will come on.
The FM stereo indicator ST will glow during FM
stereo reception. When the stereo broadcast
signal is weak, the radio will automatically change
from stereo to monaural reception.
TUNE (Tuning):
WARNING
The radio should not be tuned while driv-
ing so full attention may be given to ve-
hicle operation.
To manually tune the radio, push the TUNE button
(
or) or turn the tuning knob to right
or left.
To move quickly through the channels, hold either
the
orbutton down for more than
1.5 seconds.
SEEK tuning:
Push the SEEK/TRACK button (
or)
for less than 1.5 seconds to tune from high to low
or low to high frequencies and stop at the next
broadcasting station.
SCAN tuning:
Push the
orbutton for more than
1.5 seconds to stop at each broadcasting station
for 5 seconds. Pushing the button again during
this 5 second period will stop SCAN tuning and
the radio will remain tuned to that station. If
the
orbutton is not pushed within 5
seconds, SCAN tuning moves to the next station.
Station memory operations:
18 stations can be set for the FM, AM and SAT
(Satellite-if so equipped) radio to the A, B and C
preset button in any combination of FM, AM or
SAT stations.
1. Choose preset channel A, B or C using the
preset select button.
2. Select the desired FM, AM or SAT station
band.
3. Tune to the desired station using manual,
SEEK or SCAN tuning. Push and hold any of
the desired station memory buttons (1 – 6)
until a beep sound is heard.4. The channel indicator will then come on and
the sound will resume. Memorizing is now
complete.
5. Other buttons can be set in the same man-
ner.
If the battery cable is disconnected, or if the fuse
blows, the radio memory will be canceled. In that
case, reset the desired stations.
Radio data system (RDS):
RDS stands for Radio Data System, and is a data
information service transmitted by some radio
stations on the FM band (not AM band) and/or
SAT radio encoded within a regular radio broad-
cast. Currently, most RDS stations are in large
cities, but many stations are now considering
broadcasting RDS data.
RDS can display:
cStation call sign, such as “WHFR 98.3”.
cStation name, such as “The Groove”.
cMusic or programming type such as “Clas-
sical”, “Country”, or “Rock”.
cTraffic reports about delays or construction.
If the station broadcasts RDS information, the
RDS icon is displayed.
Display screen, heater, air conditioner and audio systems4-33
ZREVIEW COPYÐ2005 Armada(wzw)
Owners ManualÐUSA_English(nna)
11/18/04Ðtbrooks
X
Page 220 of 352
WARNING
cDo not leave children or adults who
would normally require the assistance
of others alone in your vehicle. Pets
should also not be left alone. They
could accidentally injure themselves or
others through inadvertent operation of
the vehicle. Also, on hot, sunny days,
temperatures in a closed vehicle could
quickly become high enough to cause
severe or possibly fatal injuries to
people or animals.
cProperly secure all cargo with ropes or
straps to help prevent it from sliding or
shifting. Do not place cargo higher than
the seatbacks. In a sudden stop or col-
lision, unsecured cargo could cause
personal injury.
EXHAUST GAS (carbon monoxide)
WARNING
cDo not breathe exhaust gases; they
contain colorless and odorless carbon
monoxide. Carbon monoxide is danger-
ous. It can cause unconsciousness or
death.cIf you suspect that exhaust fumes are
entering the vehicle, drive with all win-
dows fully open, and have the vehicle
inspected immediately.
cDo not run the engine in closed spaces
such as a garage.
cDo not park the vehicle with the engine
running for any extended length of time.
cKeep the back door and rear vent win-
dows closed while driving, otherwise
exhaust gases could be drawn into the
passenger compartment. If you must
drive with the back door or rear vent
windows open, follow these
precautions:
1. Open all the windows.
2. Set the
air recirculation but-
ton to off and the fan control dial to
high to circulate the air.
cIf electrical wiring or other cable con-
nections must pass to a trailer through
the seal on the back door or the body,
follow the manufacturer’s recommen-
dation to prevent carbon monoxide en-
try into the vehicle.cThe exhaust system and body should be
inspected by a qualified mechanic
whenever:
a. The vehicle is raised for service.
b. You suspect that exhaust fumes are
entering into the passenger
compartment.
c. You notice a change in the sound of
the exhaust system.
d. You have had an accident involving
damage to the exhaust system, un-
derbody, or rear of the vehicle.
THREE-WAY CATALYST
The three-way catalyst is an emission control
device installed in the exhaust system. Exhaust
gases in the three-way catalyst are burned at
high temperatures to help reduce pollutants.
WARNING
cThe exhaust gas and the exhaust sys-
tem are very hot. Keep people, animals
or flammable materials away from the
exhaust system components.
PRECAUTIONS WHEN STARTING
AND DRIVING
5-2Starting and driving
ZREVIEW COPYÐ2005 Armada(wzw)
Owners ManualÐUSA_English(nna)
11/18/04Ðtbrooks
X
Page 331 of 352
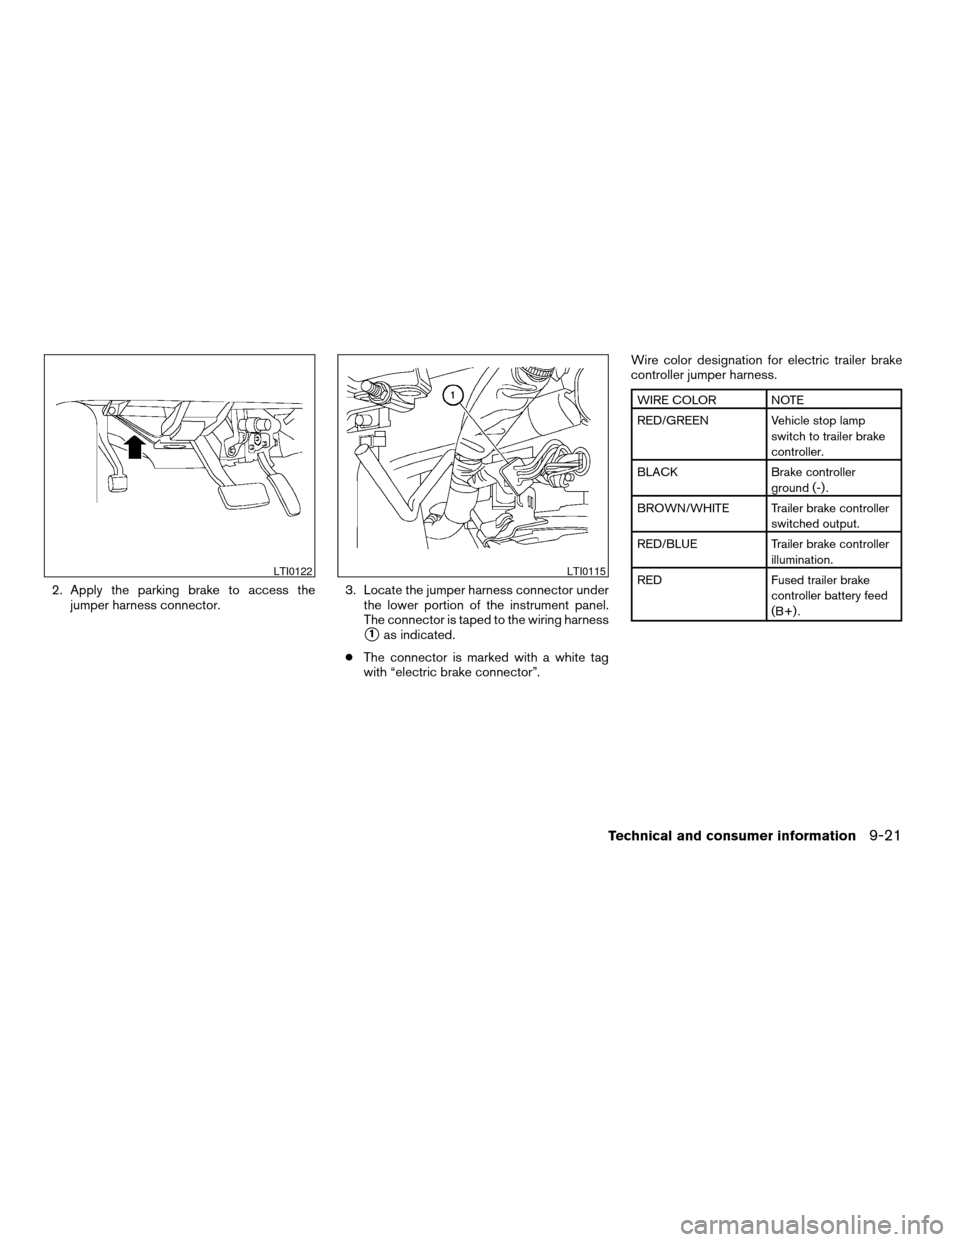
2. Apply the parking brake to access the
jumper harness connector.3. Locate the jumper harness connector under
the lower portion of the instrument panel.
The connector is taped to the wiring harness
s1as indicated.
cThe connector is marked with a white tag
with “electric brake connector”.Wire color designation for electric trailer brake
controller jumper harness.
WIRE COLOR NOTE
RED/GREEN Vehicle stop lamp
switch to trailer brake
controller.
BLACK Brake controller
ground (-) .
BROWN/WHITE Trailer brake controller
switched output.
RED/BLUE Trailer brake controller
illumination.
RED Fused trailer brake
controller battery feed
(B+) .
LTI0122LTI0115
Technical and consumer information9-21
ZREVIEW COPYÐ2005 Armada(wzw)
Owners ManualÐUSA_English(nna)
11/18/04Ðtbrooks
X
Page 333 of 352

Coolant heat can be additionally vented by
opening the windows, switching the fan
control to high and setting the temperature
control to the HOT position.
cTrailer towing requires more fuel than normal
circumstances.
cAvoid towing a trailer for your vehicle’s first
500 miles (805 km) .
cFor the first 500 miles (805 km) that you do
tow, do not drive over 50 MPH (80 km/h) .
cHave your vehicle serviced more often than
at intervals specified in the recommended
Maintenance Schedule in the “NISSAN Ser-
vice and Maintenance Guide”.
cWhen making a turn, your trailer wheels will
be closer to the inside of the turn than your
vehicle wheels. To compensate for this,
make a larger than normal turning radius
during the turn.
cCrosswinds and rough roads will adversely
affect vehicle/trailer handling, possibly caus-
ing vehicle sway. When being passed by
larger vehicles, be prepared for possible
changes in crosswinds that could affect ve-
hicle handling. If swaying does occur, firmly
grip the steering wheel, steer straight ahead,
and immediately (but gradually) reduce ve-
hicle speed. This combination will help sta-
bilize the vehicle. Never increase speed.cBe careful when passing other vehicles.
Passing while towing a trailer requires con-
siderably more distance than normal pass-
ing. Remember, the length of the trailer must
also pass the other vehicle before you can
safely change lanes.
cTo maintain engine braking efficiency and
electrical charging performance, do not use
overdrive.
cAvoid holding the brake pedal down too long
or too frequently. This could cause the
brakes to overheat, resulting in reduced
braking efficiency.
cIncrease your following distance to allow for
greater stopping distances while towing a
trailer. Anticipate stops and brake gradually
cDo not use cruise control while towing a
trailer.
cSome states or provinces have specific
speed limits for vehicles that are towing trail-
ers. Obey the local speed limits.
cCheck your hitch, trailer wiring harness con-
nections, and trailer wheel lug nuts after 50
miles (80 km) of travel and at every break.cWhen stopped in traffic for long periods of
time in hot weather, put the vehicle in the P
(Park) position.
When towing a trailer, final drive gear oil
should be replaced and transmission
oil/fluid should be changed more fre-
quently. For additional information, see the
“Maintenance and do-it-yourself” section
earlier in this manual.
Tow mode
Tow mode should be used when pulling a heavy
trailer or hauling a heavy load. Press the tow
button to activate the tow mode. The tow indica-
tor in the instrument panel illuminates when the
tow mode is selected. Press the Tow button
again to turn the tow mode OFF. The Tow mode is
automatically cancelled when the key is turned
OFF.
The Tow mode does the following:
cReduces transmissions shifts when pulling a
trailer or hauling a load.
cProvides similar shift feel to driver when the
vehicle is towing.
Technical and consumer information9-23
ZREVIEW COPYÐ2005 Armada(wzw)
Owners ManualÐUSA_English(nna)
11/18/04Ðtbrooks
X
Page 338 of 352

A genuine NISSAN Service Manual is the best
source of service and repair information for your
vehicle. Filled with wiring diagrams, illustrations
and step-by-step diagnostic and adjustment pro-
cedures, this manual is the same one used by the
factory trained technicians working at NISSAN
dealerships. Also available are genuine NISSAN
Owner’s Manuals, and genuine NISSAN Service
and Owner’s Manuals for older NISSAN models.
For USA
For current pricing and availability of genuine
NISSAN Service Manualsfor the 2000 model
year and later contact:
Tweddle Litho Company
1-800-450-9491
www.nissan-techinfo.com
For current pricing and availability of genuine
NISSAN Service Manualsfor the 1999 model
year and prior, see a NISSAN dealer, or contact:
Resolve Corporation
20770 Westwood Road
Strongsville, OH 44136
1-800-247-5321
OWNER’S MANUAL/SERVICE
MANUAL ORDER INFORMATION
9-28Technical and consumer information
ZREVIEW COPYÐ2005 Armada(wzw)
Owners ManualÐUSA_English(nna)
11/18/04Ðtbrooks
X