NISSAN ARMADA 2007 1.G Owners Manual
Manufacturer: NISSAN, Model Year: 2007, Model line: ARMADA, Model: NISSAN ARMADA 2007 1.GPages: 344, PDF Size: 5.35 MB
Page 151 of 344
FUEL-FILLER CAP
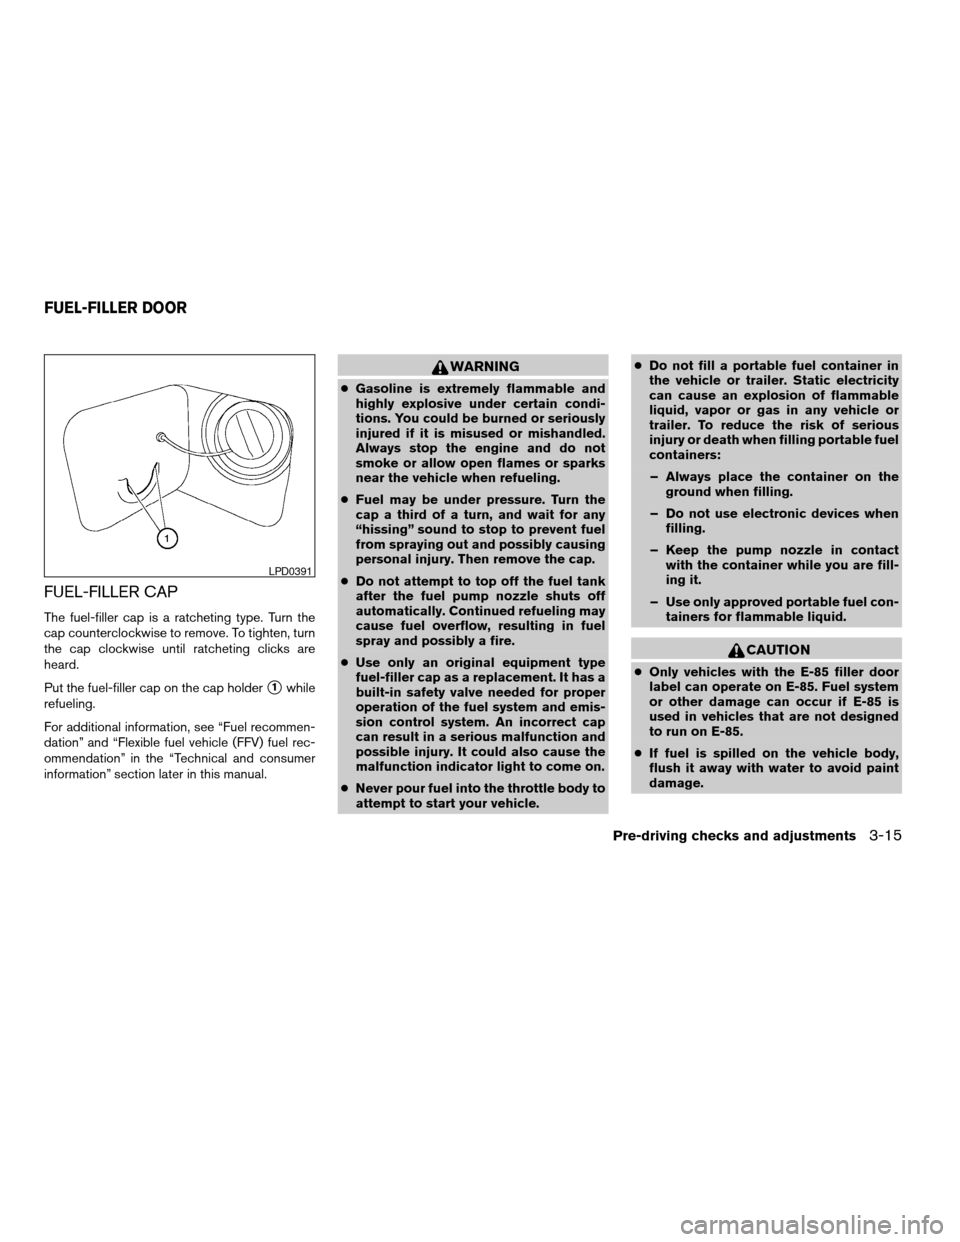
The fuel-filler cap is a ratcheting type. Turn the
cap counterclockwise to remove. To tighten, turn
the cap clockwise until ratcheting clicks are
heard.
Put the fuel-filler cap on the cap holder
s1while
refueling.
For additional information, see “Fuel recommen-
dation” and “Flexible fuel vehicle (FFV) fuel rec-
ommendation” in the “Technical and consumer
information” section later in this manual.
WARNING
cGasoline is extremely flammable and
highly explosive under certain condi-
tions. You could be burned or seriously
injured if it is misused or mishandled.
Always stop the engine and do not
smoke or allow open flames or sparks
near the vehicle when refueling.
cFuel may be under pressure. Turn the
cap a third of a turn, and wait for any
“hissing” sound to stop to prevent fuel
from spraying out and possibly causing
personal injury. Then remove the cap.
cDo not attempt to top off the fuel tank
after the fuel pump nozzle shuts off
automatically. Continued refueling may
cause fuel overflow, resulting in fuel
spray and possibly a fire.
cUse only an original equipment type
fuel-filler cap as a replacement. It has a
built-in safety valve needed for proper
operation of the fuel system and emis-
sion control system. An incorrect cap
can result in a serious malfunction and
possible injury. It could also cause the
malfunction indicator light to come on.
cNever pour fuel into the throttle body to
attempt to start your vehicle.cDo not fill a portable fuel container in
the vehicle or trailer. Static electricity
can cause an explosion of flammable
liquid, vapor or gas in any vehicle or
trailer. To reduce the risk of serious
injury or death when filling portable fuel
containers:
– Always place the container on the
ground when filling.
– Do not use electronic devices when
filling.
– Keep the pump nozzle in contact
with the container while you are fill-
ing it.
– Use only approved portable fuel con-
tainers for flammable liquid.
CAUTION
cOnly vehicles with the E-85 filler door
label can operate on E-85. Fuel system
or other damage can occur if E-85 is
used in vehicles that are not designed
to run on E-85.
cIf fuel is spilled on the vehicle body,
flush it away with water to avoid paint
damage.
LPD0391
FUEL-FILLER DOOR
Pre-driving checks and adjustments3-15
ZREVIEW COPYÐ2007 Armada(wzw)
Owners ManualÐUSA_English(nna)
07/08/06Ðtbrooks
X
Page 152 of 344
cTighten until the fuel-filler cap clicks.
Failure to tighten the fuel-filler cap
properly may cause the
mal-
function indicator light (MIL) to illumi-
nate. If the
light illuminates be-
cause the fuel-filler cap is loose or
missing, tighten or install the cap and
continue to drive the vehicle.
The
light should turn off after a
few driving trips. If the
light
does not turn off after a few driving
trips, have the vehicle inspected by a
NISSAN dealer.
cFor additional information, see the
“Malfunction indicator light (MIL)” in
the “Instruments and Controls” section
earlier in this manual.
TILT OPERATION
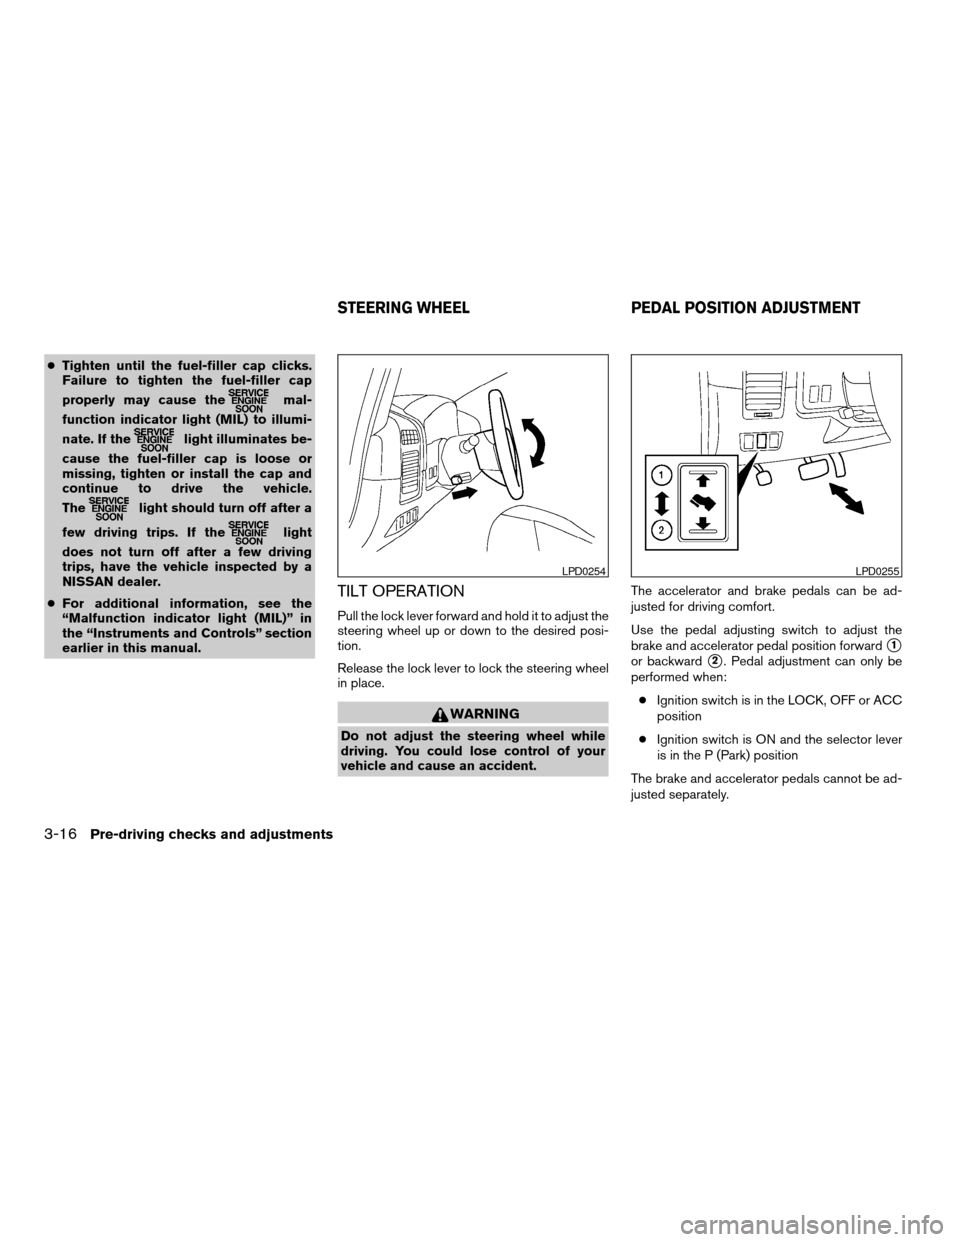
Pull the lock lever forward and hold it to adjust the
steering wheel up or down to the desired posi-
tion.
Release the lock lever to lock the steering wheel
in place.
WARNING
Do not adjust the steering wheel while
driving. You could lose control of your
vehicle and cause an accident.The accelerator and brake pedals can be ad-
justed for driving comfort.
Use the pedal adjusting switch to adjust the
brake and accelerator pedal position forward
s1
or backwards2. Pedal adjustment can only be
performed when:
cIgnition switch is in the LOCK, OFF or ACC
position
cIgnition switch is ON and the selector lever
is in the P (Park) position
The brake and accelerator pedals cannot be ad-
justed separately.
LPD0254LPD0255
STEERING WHEEL PEDAL POSITION ADJUSTMENT
3-16Pre-driving checks and adjustments
ZREVIEW COPYÐ2007 Armada(wzw)
Owners ManualÐUSA_English(nna)
07/08/06Ðtbrooks
X
Page 153 of 344
CAUTION
Do not adjust the pedal position with your
foot on the pedal.
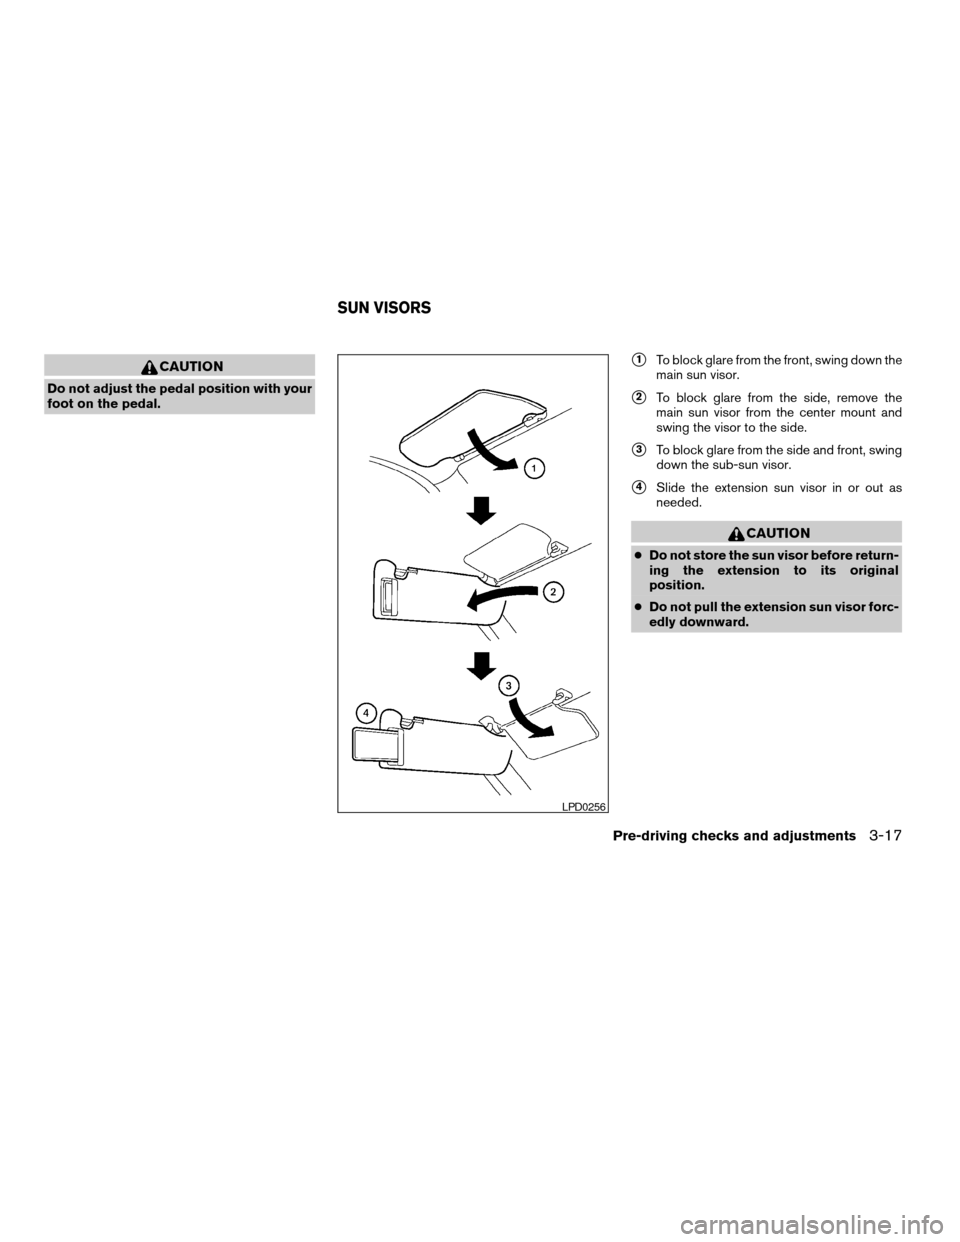
s1To block glare from the front, swing down the
main sun visor.
s2To block glare from the side, remove the
main sun visor from the center mount and
swing the visor to the side.
s3To block glare from the side and front, swing
down the sub-sun visor.
s4Slide the extension sun visor in or out as
needed.
CAUTION
cDo not store the sun visor before return-
ing the extension to its original
position.
cDo not pull the extension sun visor forc-
edly downward.
LPD0256
SUN VISORS
Pre-driving checks and adjustments3-17
ZREVIEW COPYÐ2007 Armada(wzw)
Owners ManualÐUSA_English(nna)
07/08/06Ðtbrooks
X
Page 154 of 344

VANITY MIRRORS
To access the vanity mirror, pull the sun visor
down and flip open the mirror cover. The vanity
mirror will illuminate when the mirror cover is
open.
AUTOMATIC ANTI-GLARE
REARVIEW MIRROR
The inside mirror is designed so that it automati-
cally dims according to the intensity of the head-
lights of the vehicle following you. The automatic
anti-glare feature operates only when the ignition
switch is in the ON position.
The indicator light
s1will illuminate when the
automatic anti-glare feature is operating.
To turn off the anti-glare feature, push the
button. The indicator light will turn off.
To turn on the anti-glare feature again, push
the
button.The indicator light will turn on.NOTE:
Do not hang any objects over the sensors
s2or apply glass cleaner to the sensors.
Doing so will reduce the sensitivity of the
sensors, resulting in improper operation.
LPD0257WPD0331
MIRRORS
3-18Pre-driving checks and adjustments
ZREVIEW COPYÐ2007 Armada(wzw)
Owners ManualÐUSA_English(nna)
07/08/06Ðtbrooks
X
Page 155 of 344
OUTSIDE MIRRORS
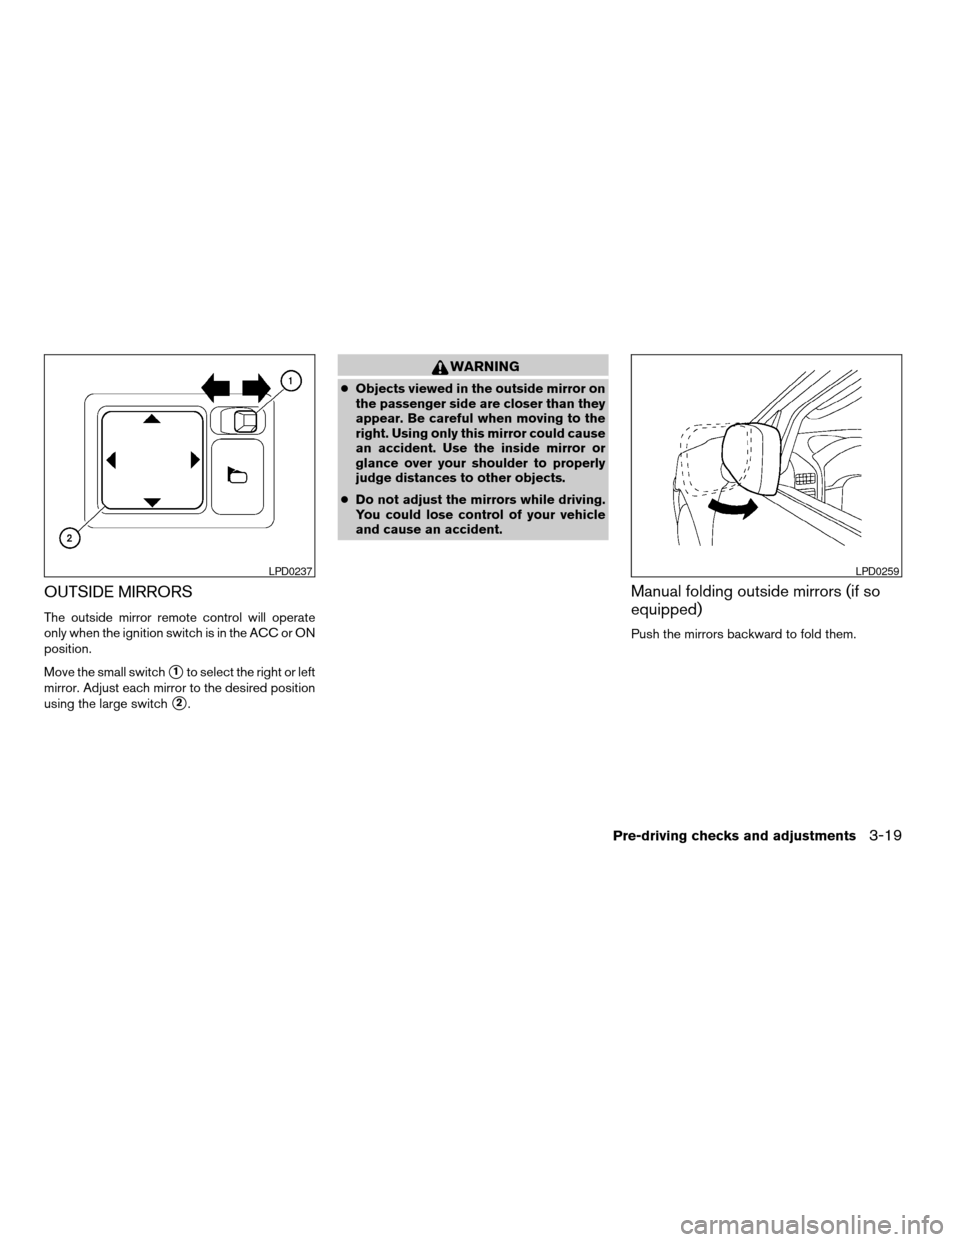
The outside mirror remote control will operate
only when the ignition switch is in the ACC or ON
position.
Move the small switch
s1to select the right or left
mirror. Adjust each mirror to the desired position
using the large switch
s2.
WARNING
cObjects viewed in the outside mirror on
the passenger side are closer than they
appear. Be careful when moving to the
right. Using only this mirror could cause
an accident. Use the inside mirror or
glance over your shoulder to properly
judge distances to other objects.
cDo not adjust the mirrors while driving.
You could lose control of your vehicle
and cause an accident.
Manual folding outside mirrors (if so
equipped)
Push the mirrors backward to fold them.
LPD0237LPD0259
Pre-driving checks and adjustments3-19
ZREVIEW COPYÐ2007 Armada(wzw)
Owners ManualÐUSA_English(nna)
07/08/06Ðtbrooks
X
Page 156 of 344
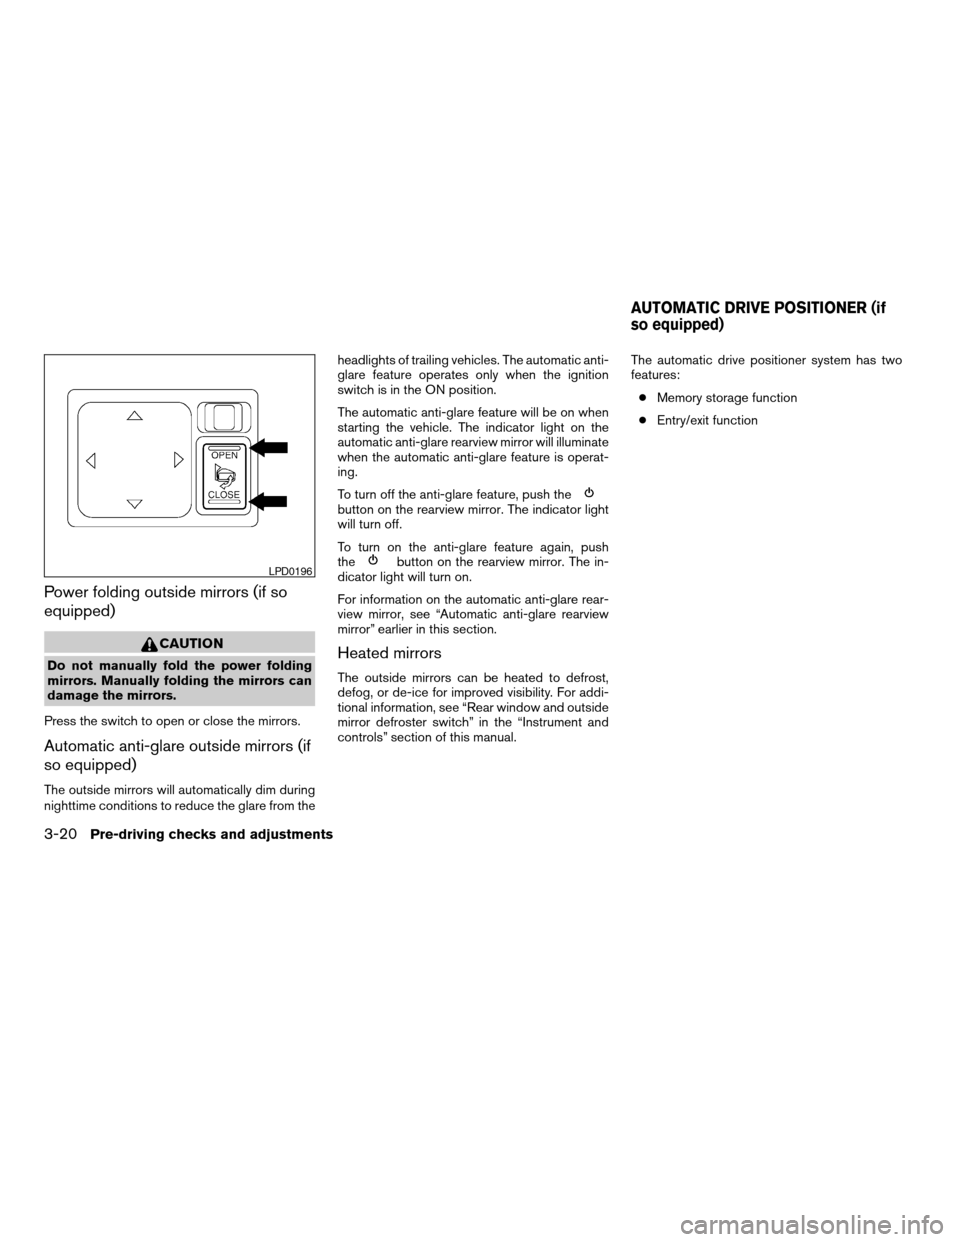
Power folding outside mirrors (if so
equipped)
CAUTION
Do not manually fold the power folding
mirrors. Manually folding the mirrors can
damage the mirrors.
Press the switch to open or close the mirrors.
Automatic anti-glare outside mirrors (if
so equipped)
The outside mirrors will automatically dim during
nighttime conditions to reduce the glare from theheadlights of trailing vehicles. The automatic anti-
glare feature operates only when the ignition
switch is in the ON position.
The automatic anti-glare feature will be on when
starting the vehicle. The indicator light on the
automatic anti-glare rearview mirror will illuminate
when the automatic anti-glare feature is operat-
ing.
To turn off the anti-glare feature, push the
button on the rearview mirror. The indicator light
will turn off.
To turn on the anti-glare feature again, push
the
button on the rearview mirror. The in-
dicator light will turn on.
For information on the automatic anti-glare rear-
view mirror, see “Automatic anti-glare rearview
mirror” earlier in this section.
Heated mirrors
The outside mirrors can be heated to defrost,
defog, or de-ice for improved visibility. For addi-
tional information, see “Rear window and outside
mirror defroster switch” in the “Instrument and
controls” section of this manual.The automatic drive positioner system has two
features:
cMemory storage function
cEntry/exit function
LPD0196
AUTOMATIC DRIVE POSITIONER (if
so equipped)
3-20Pre-driving checks and adjustments
ZREVIEW COPYÐ2007 Armada(wzw)
Owners ManualÐUSA_English(nna)
07/08/06Ðtbrooks
X
Page 157 of 344

MEMORY STORAGE FUNCTION
Two positions for the driver’s seat, accelerator
and brake pedals, and outside mirrors can be
stored in the automatic drive positioner memory.
Follow these procedures to use the memory sys-
tem.
1. Set the automatic transmission selector le-
ver to the P (Park) position.
2. Turn the ignition ON.3. Adjust the driver’s seat, accelerator and
brake pedals, and outside mirrors to the
desired positions by manually operating
each adjusting switch. For additional infor-
mation, see “Seats” in the “Safety—Seats,
seat belts and supplemental restraint sys-
tem” section and “Pedal position adjust-
ment” and “Outside mirrors” earlier in this
section.
During this step, do not turn the ignition to
any position other than ON.
4. Push the SET switch and, within 5 seconds,
push the memory switch (1 or 2) fully for at
least 1 second.
The indicator light for the pushed memory
switch will come on and stay on for approxi-
mately 5 seconds after pushing the switch.
After the indicator light goes off, the se-
lected positions are stored in the selected
memory (1 or 2) .
If a new memory is stored in the same memory
switch, the previous memory will be deleted.
Linking a keyfob to a stored memory
position
Each keyfob can be linked to a stored memory
position (memory switch 1 or 2) with the follow-
ing procedure.1. Follow the steps for storing a memory posi-
tion.
2. While the indicator light for the memory
switch being set is illuminated for 5 sec-
onds, press the
button on the keyfob.
The indicator light will blink. After the indica-
tor light goes off, the keyfob is linked to that
memory setting.
With the key removed from the ignition switch,
press the
button on the keyfob. The driv-
er’s seat, accelerator and brake pedals, and out-
side mirrors will move to the memorized position.
NOTE:
If a new memory position is saved to the
memory switch, the keyfob automatically
re-links.
Confirming memory storage
cTurn the ignition ON and push the SET
switch. If the main memory has not been
stored, the indicator light will come on for
approximately 0.5 seconds. When the
memory has stored the position, the indica-
tor light will stay on for approximately 5 sec-
onds.
cIf the battery cable is disconnected, or if the
fuse opens, the memory storage function will
be canceled and must be restarted before a
LPD0260
Pre-driving checks and adjustments3-21
ZREVIEW COPYÐ2007 Armada(wzw)
Owners ManualÐUSA_English(nna)
07/08/06Ðtbrooks
X
Page 158 of 344

stored memory position can be set again.
Drive the vehicle over 25 MPH (40 km/h) to
restart the memory storage function. You
can also restart the memory storage function
using the following procedure.
1. Connect the battery cable or replace the
fuse.
2. Open and close the driver’s door more than
two times with the ignition key in the LOCK
position.
Once the memory storage function has been
restarted, you can store a memory position.
See “Memory storage function” earlier in this
section.
Selecting the memorized position
Set the automatic transmission selector lever to
the P (Park) position, then:
cWithin 45 seconds of opening the driver’s
door, push the memory switch (1 or 2) fully
for at least 1 second, or
cTurn the ignition switch to the ON position
and push the memory switch (1 or 2) fully for
at least 1 second.
The driver’s seat, accelerator and brake pedals,
and outside mirrors will move to the memorized
position with the indicator light blinking, and then
the light will stay on for approximately 5 seconds.
ENTRY/EXIT FUNCTION
This system is designed so that the driver’s seat
will automatically move when the automatic
transmission selector lever is in the P (Park)
position. This allows the driver to get into and out
of the driver’s seat more easily.
The driver’s seat will slide backward:
cWhen the key is removed from the ignition
switch and the driver’s door is opened.
cWhen the driver’s door is opened with the
ignition key turned to LOCK.
cWhen the ignition key is turned from ACC to
LOCK with the driver’s door open.
The driver’s seat will return to the previous posi-
tion:
cWhen the key is inserted into the ignition
switch and the driver’s door is closed.
cWhen the driver’s door is closed with the key
turned to LOCK.
cWhen the key is turned from ACC to ON
while the automatic transmission selector
lever is in the P (Park) position.
The entry/exit function can be adjusted or can-
celed. For vehicles with navigation system, see
“Vehicle electronic systems” in the “Display
screen, heater, air conditioner and audio sys-tems” section of this manual. For vehicles without
navigation system, see your NISSAN dealer.Restarting the entry/exit function
If the battery cable is disconnected or if the fuse
opens, the entry/exit function will be disabled.
Drive the vehicle over 25 MPH (40 km/h) to
restart the entry/exit function. You can also restart
the entry/exit function using the following proce-
dure.
1. Connect the battery cable or replace the
fuse.
2. Open and close the driver’s door more than
two times with the ignition key in the LOCK
position.
The entry/exit function should now work properly.
SYSTEM OPERATION
The automatic drive positioner system will not
work or will stop operating under the following
conditions:
cWhen the vehicle speed is above 4 MPH (7
km/h) .
cWhen any of the memory switches are
pushed while the automatic drive positioner
is operating.
3-22Pre-driving checks and adjustments
ZREVIEW COPYÐ2007 Armada(wzw)
Owners ManualÐUSA_English(nna)
07/08/06Ðtbrooks
X
Page 159 of 344

cWhen the adjusting switch for the driver’s
seat is turned on while the automatic drive
positioner is operating.
cWhen the memory switch (1 or 2) is not
pushed and held for at least 1 second.
cWhen the seat has been already moved to
the memorized position.
cWhen no seat position is stored in the
memory switch.
cWhen the automatic transmission selector
lever is moved from P (Park) to any other
position.
cWhen the driver’s door remains open more
than 45 seconds and the ignition switch is
not in the ON position.
The automatic drive positioner system can be
adjusted and canceled. For vehicles with naviga-
tion system, see “Vehicle electronic systems” in
the “Display screen, heater, air conditioner and
audio systems” section of this manual. For ve-
hicles without navigation system, see your
NISSAN dealer.
Pre-driving checks and adjustments3-23
ZREVIEW COPYÐ2007 Armada(wzw)
Owners ManualÐUSA_English(nna)
07/08/06Ðtbrooks
X
Page 160 of 344

3-24Pre-driving checks and adjustments
MEMO