change time NISSAN ARMADA 2007 1.G Quick Reference Guide
[x] Cancel search | Manufacturer: NISSAN, Model Year: 2007, Model line: ARMADA, Model: NISSAN ARMADA 2007 1.GPages: 14, PDF Size: 1.28 MB
Page 3 of 14

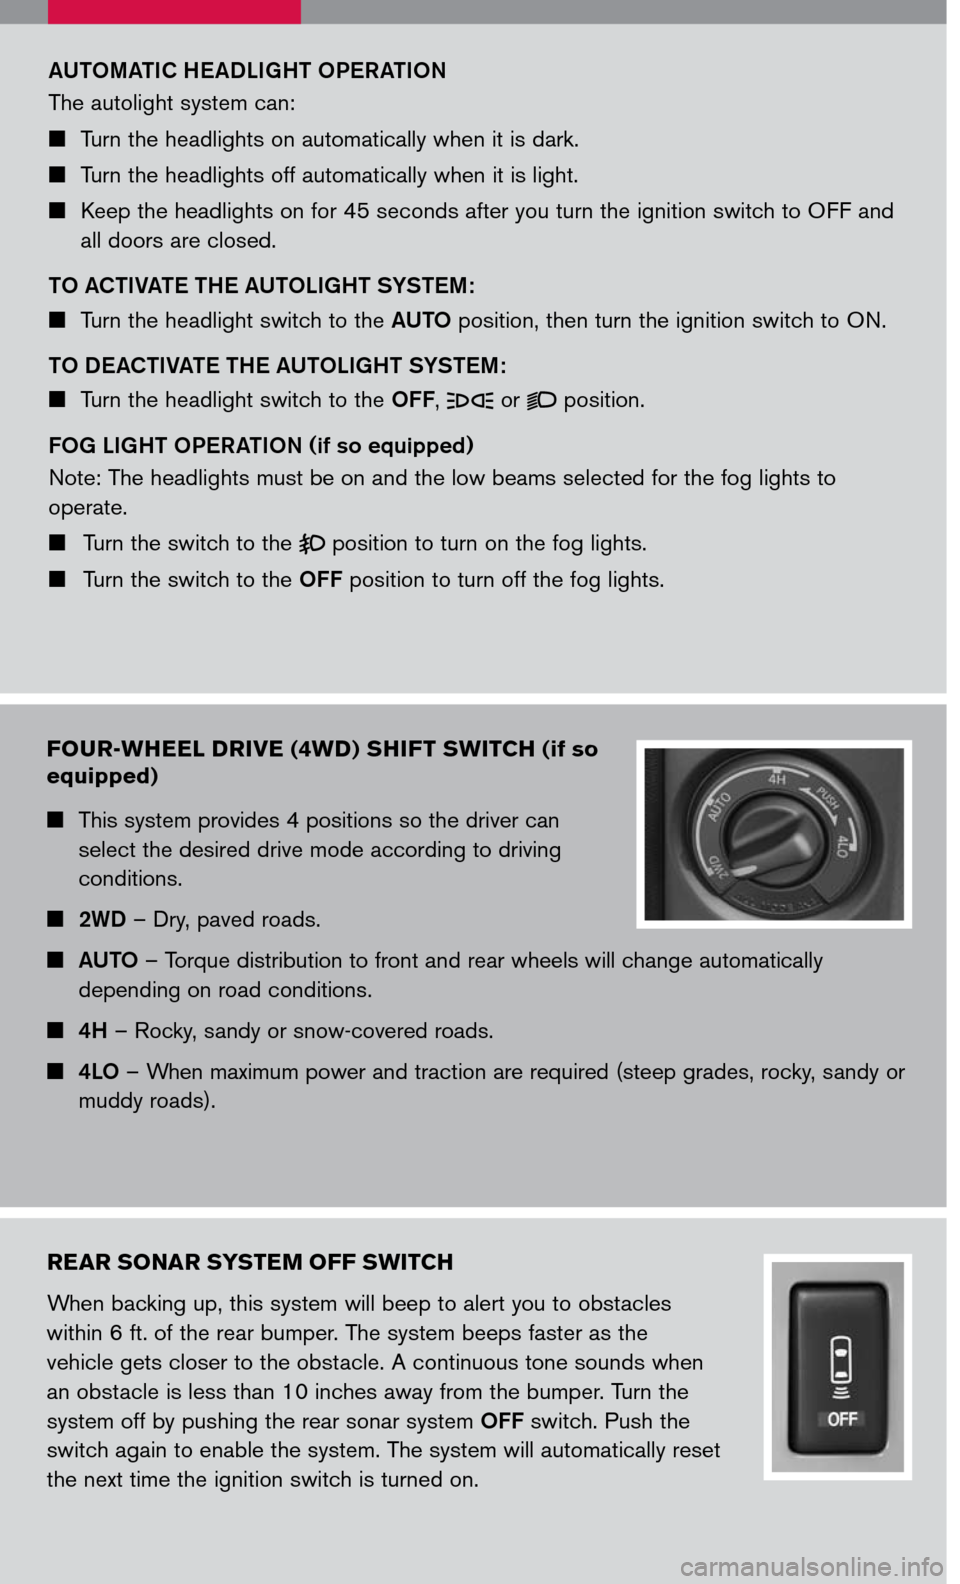
HEADLIGHT AND TURN SIGNAL CONTROL
HEADLIGHT SWITCH
Turn the headlight switch to the position to turn
on the front parking, tail, license plate and instrument
panel lights.
Turn the headlight switch to the position to turn on
the headlights. All other lights remain on.
HIGH BEAM
Push the headlight switch forward to select the high beam function. The blue
indicator light illuminates. Pull the headlight switch back to the original position to
select the low beam. The blue indicator light goes off.
Pull and release the headlight switch to flash the headlight high beams on and off.
TURN SIGNAL SWITCH
Move the headlight control switch up or down to signal the turning direction. When
the turn is completed, the turn signals cancel automatically.
To signal a lane change, move the headlight control switch up or down to the point
where the indicator light begins to flash, but the headlight control switch does not
latch.
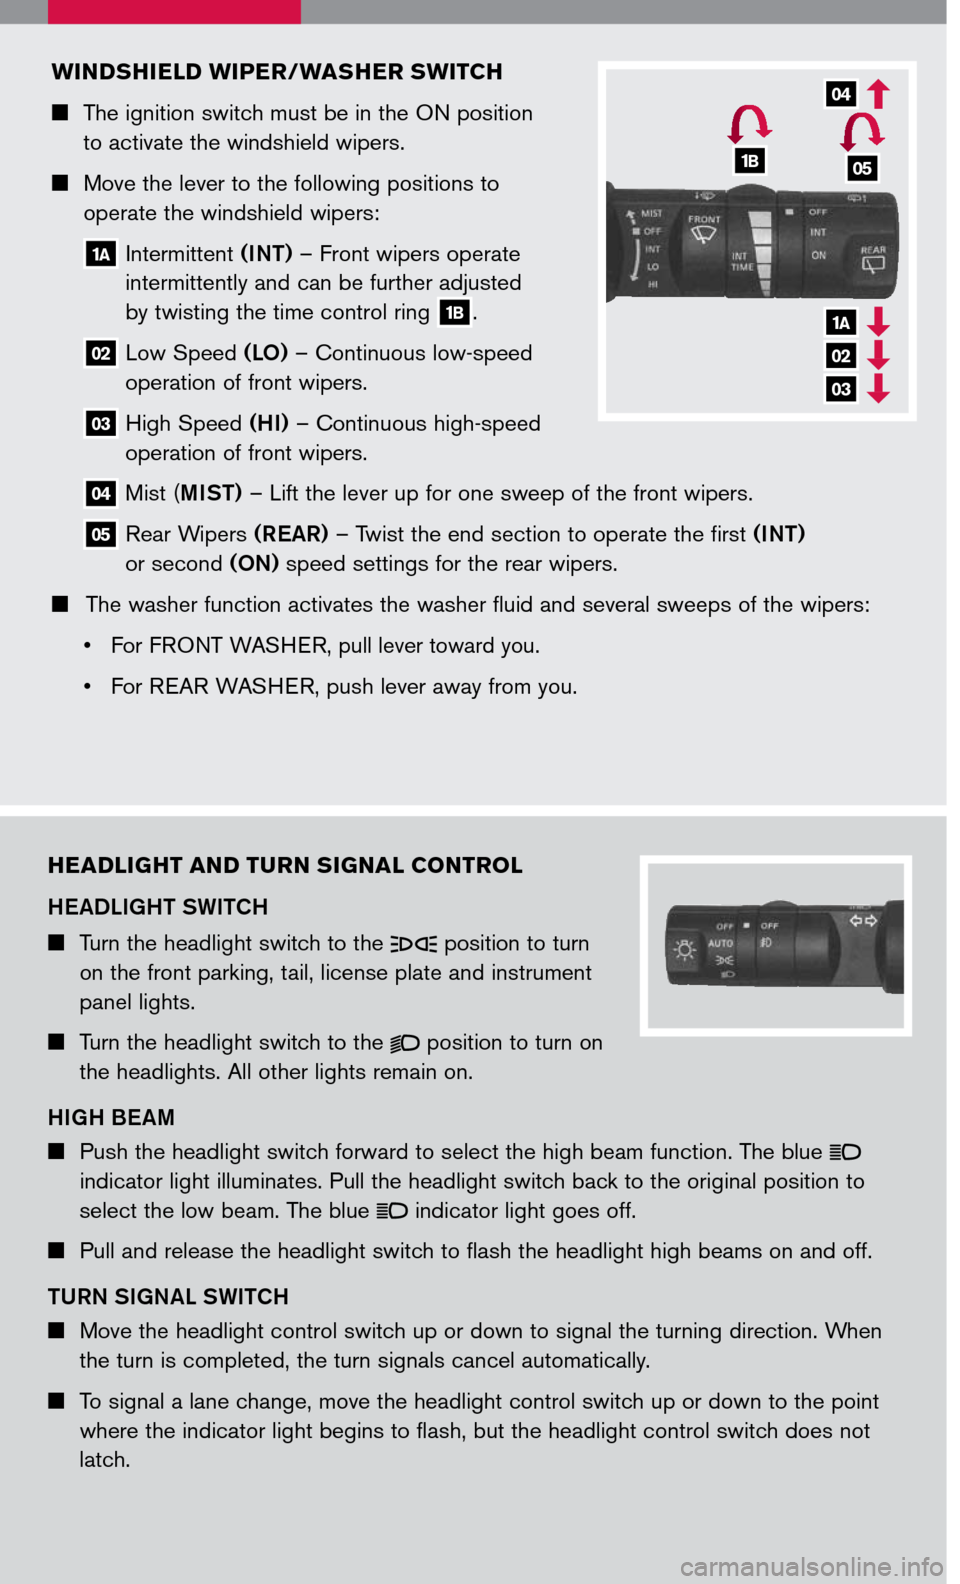
WINDSHIELD WIPER/WASHER SWITCH
The ignition switch must be in the ON position
to activate the windshield wipers.
Move the lever to the following positions to
operate the windshield wipers:
1A Intermittent (INT) – Front wipers operate
intermittently and can be further adjusted
by twisting the time control ring 1B.
02 Low Speed (LO) – Continuous low-speed
operation of front wipers.
03 High Speed (HI) – Continuous high-speed
operation of front wipers.
04 Mist (MIST) – Lift the lever up for one sweep of the front wipers.
05 Rear Wipers (REAR) – Twist the end section to operate the first (INT)
or second (ON) speed settings for the rear wipers.
The washer function activates the washer fluid and several sweeps of the wipers:
• For F
RONT WASHER, pull lever toward you.
• For REAR WASHER, push lever away from you.
1A
02
03
04
1B05
Page 4 of 14

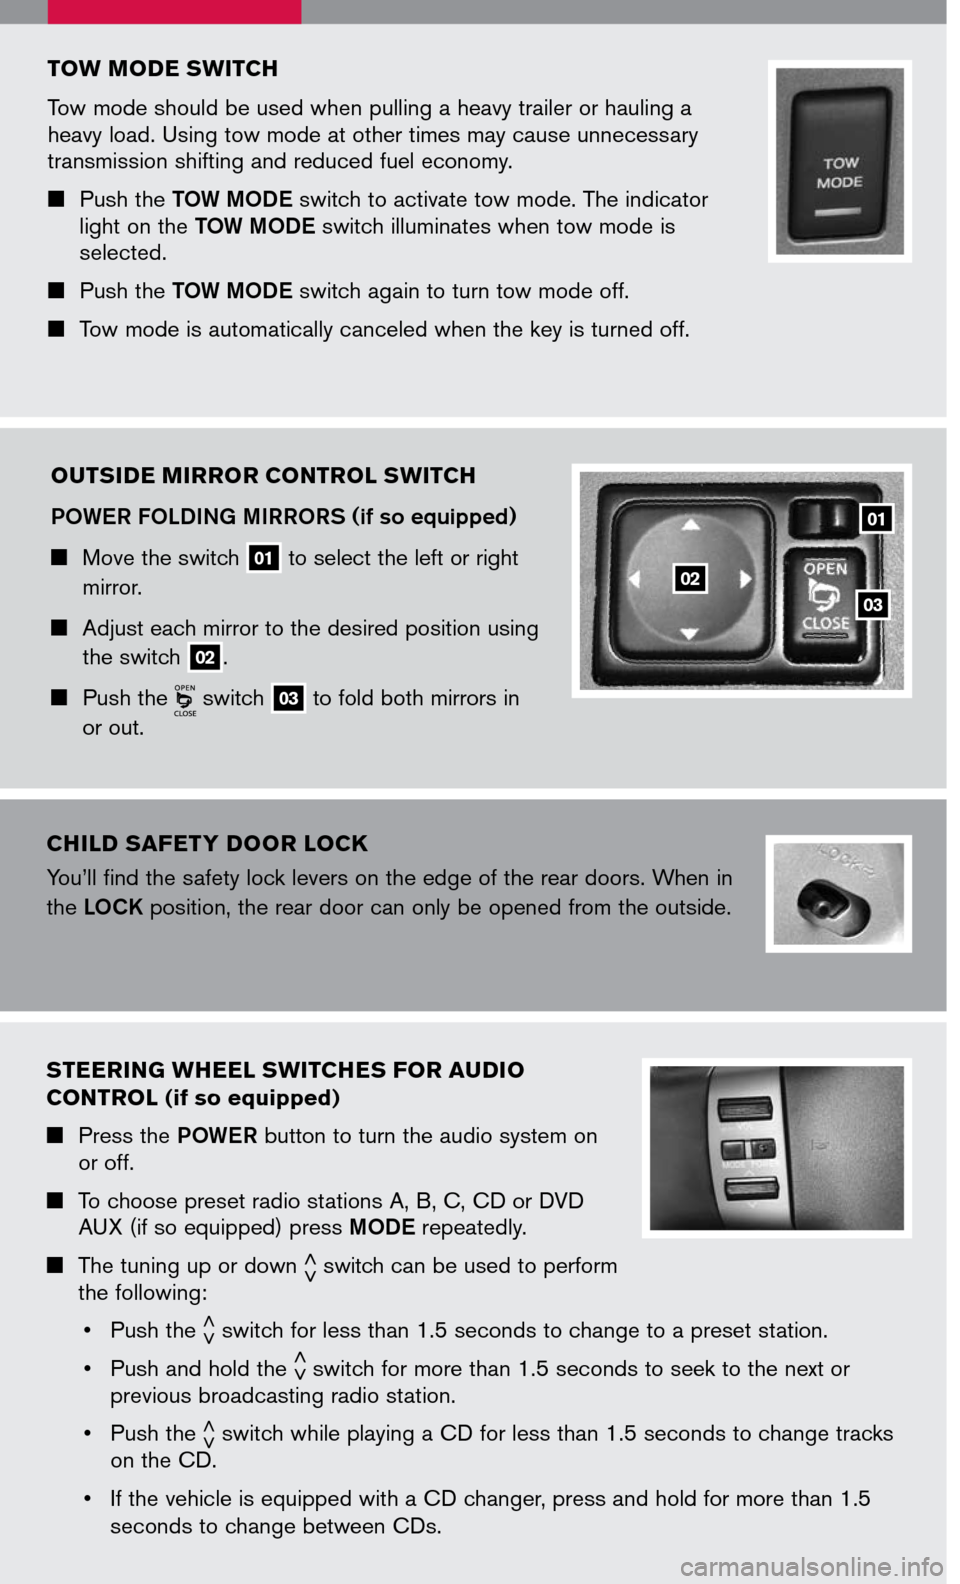
FOUR-WHEEL DRIVE (4WD) SHIFT SWITCH (if so
equipped)
This system provides 4 positions so the driver can
select the desired drive mode according to driving
conditions.
2WD – Dry, paved roads.
AUTO – Torque distribution to front and rear wheels will change automatically
depending on road conditions.
4H – Rocky, sandy or snow-covered roads.
4LO – When maximum power and traction are required (steep grades, rocky, sandy or
muddy roads).
REAR SONAR SYSTEM OFF SWITCH
When backing up, this system will beep to alert you to obstacles
within 6 ft. of the rear bumper. The system beeps faster as the
vehicle gets closer to the obstacle. A continuous tone sounds when
an obstacle is less than 10 inches away from the bumper. Turn the
system off by pushing the rear sonar system OFF switch. Push the
switch again to enable the system. The system will automatically reset
the next time the ignition switch is turned on.
AUTOMATIC HEADLIGHT OPERATION
The autolight system can:
Turn the headlights on automatically when it is dark.
Turn the headlights off automatically when it is light.
Keep the headlights on for 45 seconds after you turn the ignition switch to OFF and
all doors are closed.
TO ACTIVATE THE AUTOLIGHT SYSTEM :
Turn the headlight switch to the AUTO position, then turn the ignition switch to ON.
TO DEACTIVATE THE AUTOLIGHT SYSTEM :
Turn the headlight switch to the OFF, or position.
FOG LIGHT OPERATION (if so equipped)
Note: The headlights must be on and the low beams selected for the fog lights to
operate.
Turn the switch to the position to turn on the fog lights.
Turn the switch to the OFF position to turn off the fog lights.
Page 5 of 14

TOW MODE SWITCH
Tow mode should be used when pulling a heavy trailer or hauling a heavy load. Using tow mode at other times may cause unnecessary transmission shifting and reduced fuel economy.
Push the TOW MODE switch to activate tow mode. The indicator light on the TOW MODE switch illuminates when tow mode is selected.
Push the TOW MODE switch again to turn tow mode off.
Tow mode is automatically canceled when the key is turned off.
OUTSIDE MIRROR CONTROL SWITCH
POWER FOLDING MIRRORS (if so equipped)
Move the switch 01 to select the left or right
mirror.
Adjust each mirror to the desired position using
the switch 02.
Push the switch 03 to fold both mirrors in
or out.
03
01
02
STEERING WHEEL SWITCHES FOR AUDIO
CONTROL (if so equipped)
Press the POWER button to turn the audio system on or off.
To choose preset radio stations A, B, C, CD or DVD AUX (if so equipped) press MODE repeatedly.
The tuning up or down < >switch can be used to perform the following:
• Push the
< >switch for less than 1.5 seconds to change to a preset station.
• Push and hold the
< >switch for more than 1.5 seconds to seek to the next or previous broadcasting radio station.
• Push the
< >switch while playing a CD for less than 1.5 seconds to change tracks on the CD.
• If the vehicle is equipped with a CD changer, press and hold for more than 1.5
seconds to change between CDs.
CHILD SAFET Y DOOR LOCK
You’ll find the safety lock levers on the edge of the rear doors. When in
the LOCK position, the rear door can only be opened from the outside.
Page 9 of 14

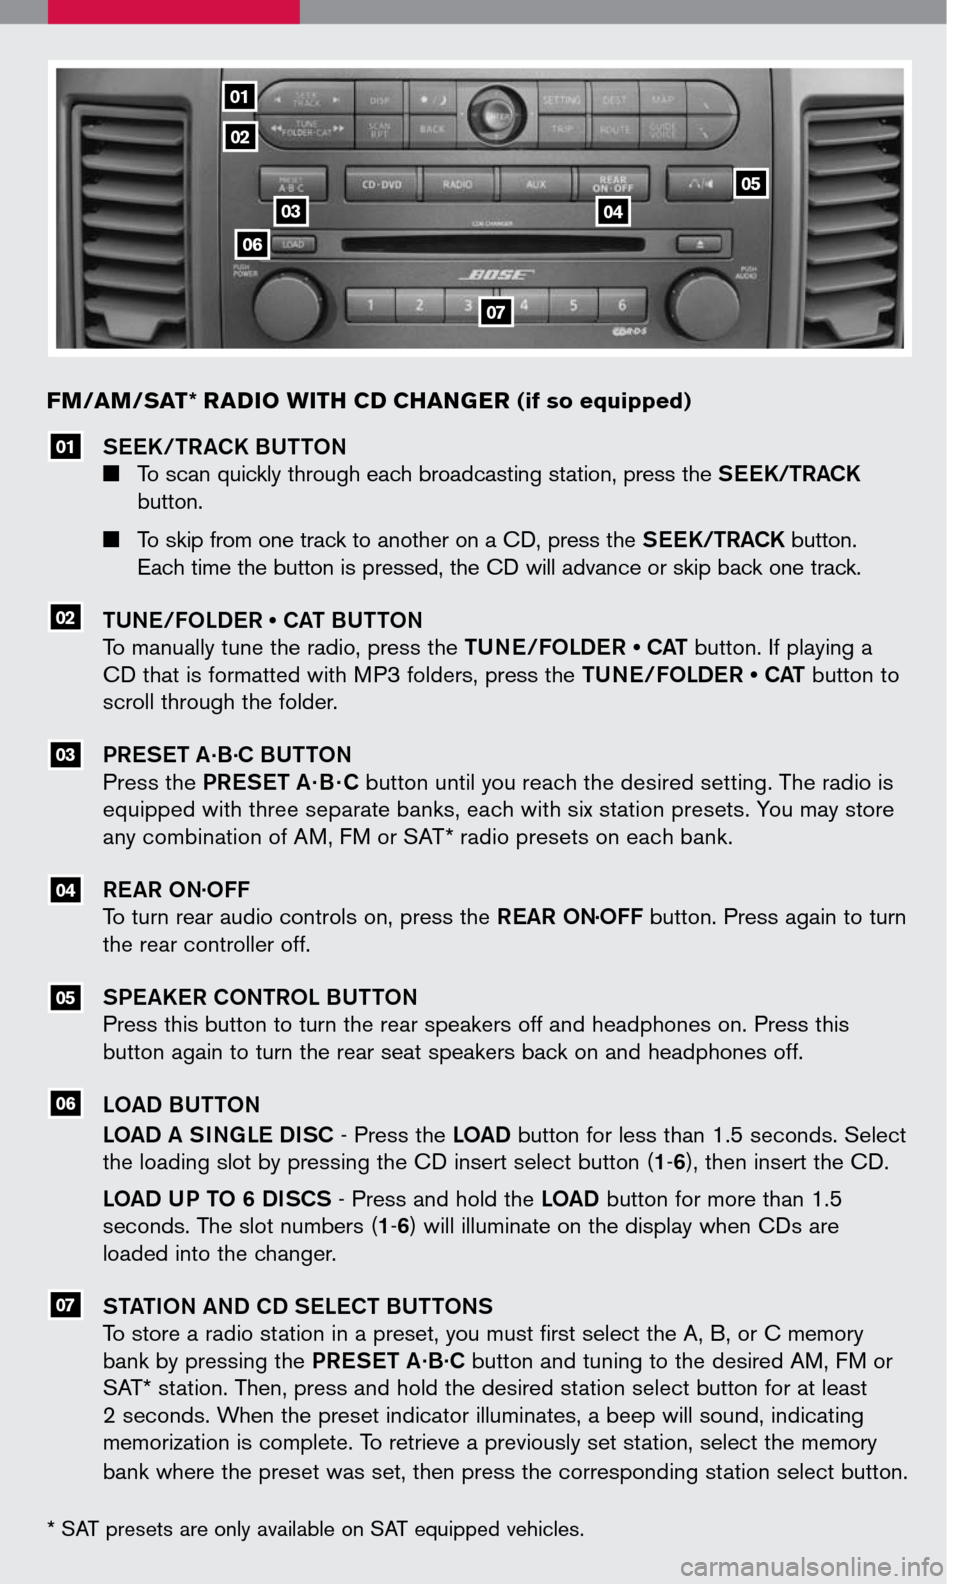
SEEK/TRACK BUTTON
To scan quickly through each broadcasting station, press the SEEK/TRACK
button.
To skip from one track to another on a CD, press the SEEK/TRACK button.
Each time the button is pressed, the CD will advance or skip back one track.
TUNE/FOLDER • CAT BUTTON
To manually tune the radio, press the TUNE/FOLDER • CAT button. If playing a
CD that is formatted with MP3 folders, press the TUNE/FOLDER • CAT button to
scroll through the folder.
PRESET A.B.C BUTTON
Press the PRESET A · B · C button until you reach the desired setting. The radio is
equipped with three separate banks, each with six station presets. You may store
any combination of AM, FM or SAT* radio presets on each bank.
REAR ON.OFF
To turn rear audio controls on, press the REAR ON.OFF button. Press again to turn
the rear controller off.
SPEAKER CONTROL BUTTON
Press this button to turn the rear speakers off and headphones on. Press this
button again to turn the rear seat speakers back on and headphones off.
LOAD BUTTON
LOAD A SINGLE DISC - Press the LOAD button for less than 1.5 seconds. Select
the loading slot by pressing the CD insert select button (1-6), then insert the CD.
LOAD UP TO 6 DISCS - Press and hold the LOAD button for more than 1.5
seconds. The slot numbers (1-6) will illuminate on the display when CDs are
loaded into the changer.
STATION AND CD SELECT BUTTONS
To store a radio station in a preset, you must first select the A, B, or C memory
bank by pressing the PRESET A.B.C button and tuning to the desired AM, FM or
SAT* station. Then, press and hold the desired station select button for at least
2 seconds. When the preset indicator illuminates, a beep will sound, indicating
memorization is complete. To retrieve a previously set station, select the memory
bank where the preset was set, then press the corresponding station select button.
FM/AM/SAT* RADIO WITH CD CHANGER (if so equipped)
05
04
07
06
03
02
01
01
02
0304
06
07
05
* SAT presets are only available on SAT equipped vehicles.