center console NISSAN ARMADA 2009 Owners Manual
[x] Cancel search | Manufacturer: NISSAN, Model Year: 2009, Model line: ARMADA, Model: NISSAN ARMADA 2009Pages: 465, PDF Size: 6.33 MB
Page 27 of 465
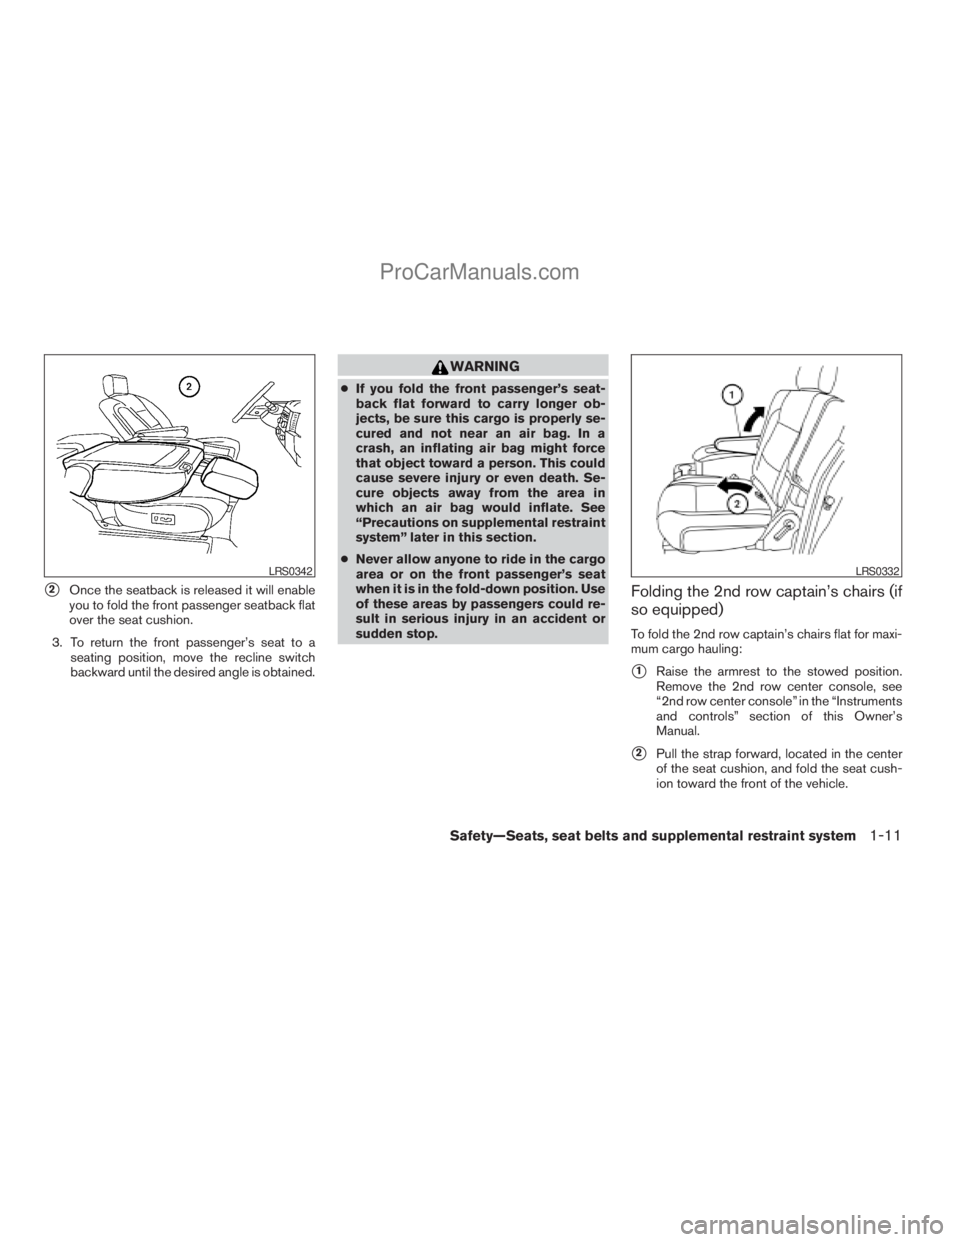
s2Once the seatback is released it will enable
you to fold the front passenger seatback flat
over the seat cushion.
3. To return the front passenger’s seat to a
seating position, move the recline switch
backward until the desired angle is obtained.
WARNING
cIf you fold the front passenger’s seat-
back flat forward to carry longer ob-
jects, be sure this cargo is properly se-
cured and not near an air bag. In a
crash, an inflating air bag might force
that object toward a person. This could
cause severe injury or even death. Se-
cure objects away from the area in
which an air bag would inflate. See
“Precautions on supplemental restraint
system” later in this section.
cNever allow anyone to ride in the cargo
area or on the front passenger’s seat
when it is in the fold-down position. Use
of these areas by passengers could re-
sult in serious injury in an accident or
sudden stop.
Folding the 2nd row captain’s chairs (if
so equipped)
To fold the 2nd row captain’s chairs flat for maxi-
mum cargo hauling:
s1Raise the armrest to the stowed position.
Remove the 2nd row center console, see
“2nd row center console” in the “Instruments
and controls” section of this Owner’s
Manual.
s2Pull the strap forward, located in the center
of the seat cushion, and fold the seat cush-
ion toward the front of the vehicle.
LRS0342LRS0332
Safety—Seats, seat belts and supplemental restraint system1-11
ZREVIEW COPYÐ2009 Armada(wzw)
Owners ManualÐUSA_English(nna)
02/26/08Ðdebbie
X
ProCarManuals.com
Page 31 of 465
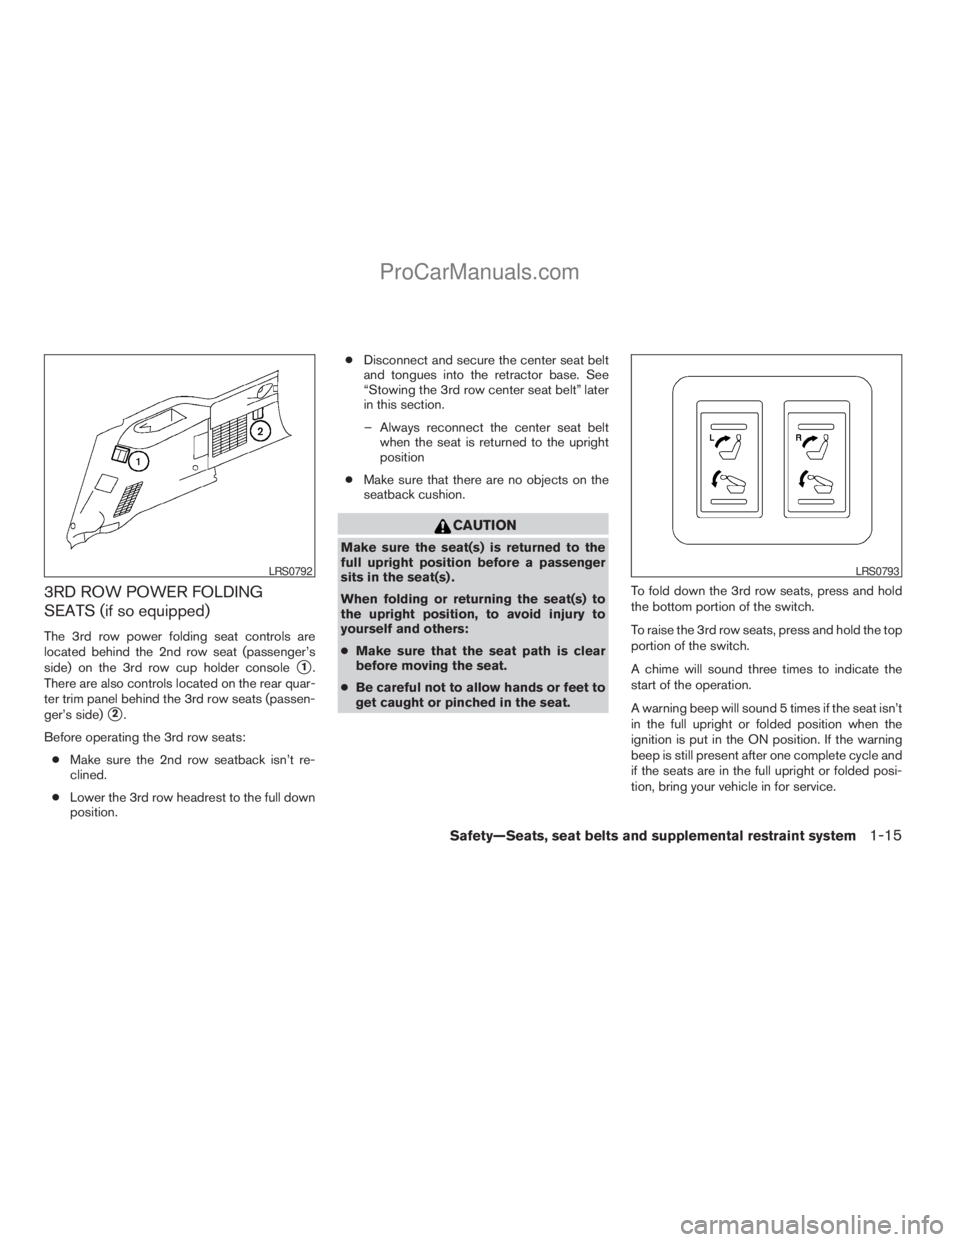
3RD ROW POWER FOLDING
SEATS (if so equipped)
The 3rd row power folding seat controls are
located behind the 2nd row seat (passenger’s
side) on the 3rd row cup holder console
s1.
There are also controls located on the rear quar-
ter trim panel behind the 3rd row seats (passen-
ger’s side)
s2.
Before operating the 3rd row seats:
cMake sure the 2nd row seatback isn’t re-
clined.
cLower the 3rd row headrest to the full down
position.cDisconnect and secure the center seat belt
and tongues into the retractor base. See
“Stowing the 3rd row center seat belt” later
in this section.
– Always reconnect the center seat belt
when the seat is returned to the upright
position
cMake sure that there are no objects on the
seatback cushion.
CAUTION
Make sure the seat(s) is returned to the
full upright position before a passenger
sits in the seat(s) .
When folding or returning the seat(s) to
the upright position, to avoid injury to
yourself and others:
cMake sure that the seat path is clear
before moving the seat.
cBe careful not to allow hands or feet to
get caught or pinched in the seat.To fold down the 3rd row seats, press and hold
the bottom portion of the switch.
To raise the 3rd row seats, press and hold the top
portion of the switch.
A chime will sound three times to indicate the
start of the operation.
A warning beep will sound 5 times if the seat isn’t
in the full upright or folded position when the
ignition is put in the ON position. If the warning
beep is still present after one complete cycle and
if the seats are in the full upright or folded posi-
tion, bring your vehicle in for service.
LRS0792LRS0793
Safety—Seats, seat belts and supplemental restraint system1-15
ZREVIEW COPYÐ2009 Armada(wzw)
Owners ManualÐUSA_English(nna)
02/26/08Ðdebbie
X
ProCarManuals.com
Page 83 of 465
Map pockets..................................2-44
Seatback pocket..............................2-44
Overhead console.............................2-44
Cup holders..................................2-45
2nd row center console (if so equipped).........2-47
Cargo area storage bin.........................2-48
Luggage hooks................................2-49
Roof rack.....................................2-50
Windows........................................2-52
Power windows...............................2-52
Power vent windows (if so equipped)............2-54
Manual vent windows..........................2-54
Moonroof (if so equipped).........................2-55
Automatic moonroof...........................2-55
Interior light......................................2-56Console light..................................2-57
Personal lights...................................2-58
Map lights.......................................2-58
Cargo light......................................2-58
HomeLinkTuniversal transceiver (if so equipped).....2-59
Programming HomeLinkT.......................2-59
Programming HomeLinkTfor Canadian
customers....................................2-61
Operating the HomeLinkTuniversal
transceiver....................................2-61
Programming trouble-diagnosis.................2-61
Clearing the programmed information............2-61
Reprogramming a single HomeLinkTbutton......2-61
If your vehicle is stolen.........................2-62
ZREVIEW COPYÐ2009 Armada(wzw)
Owners ManualÐUSA_English(nna)
02/26/08Ðdebbie
X
ProCarManuals.com
Page 119 of 465
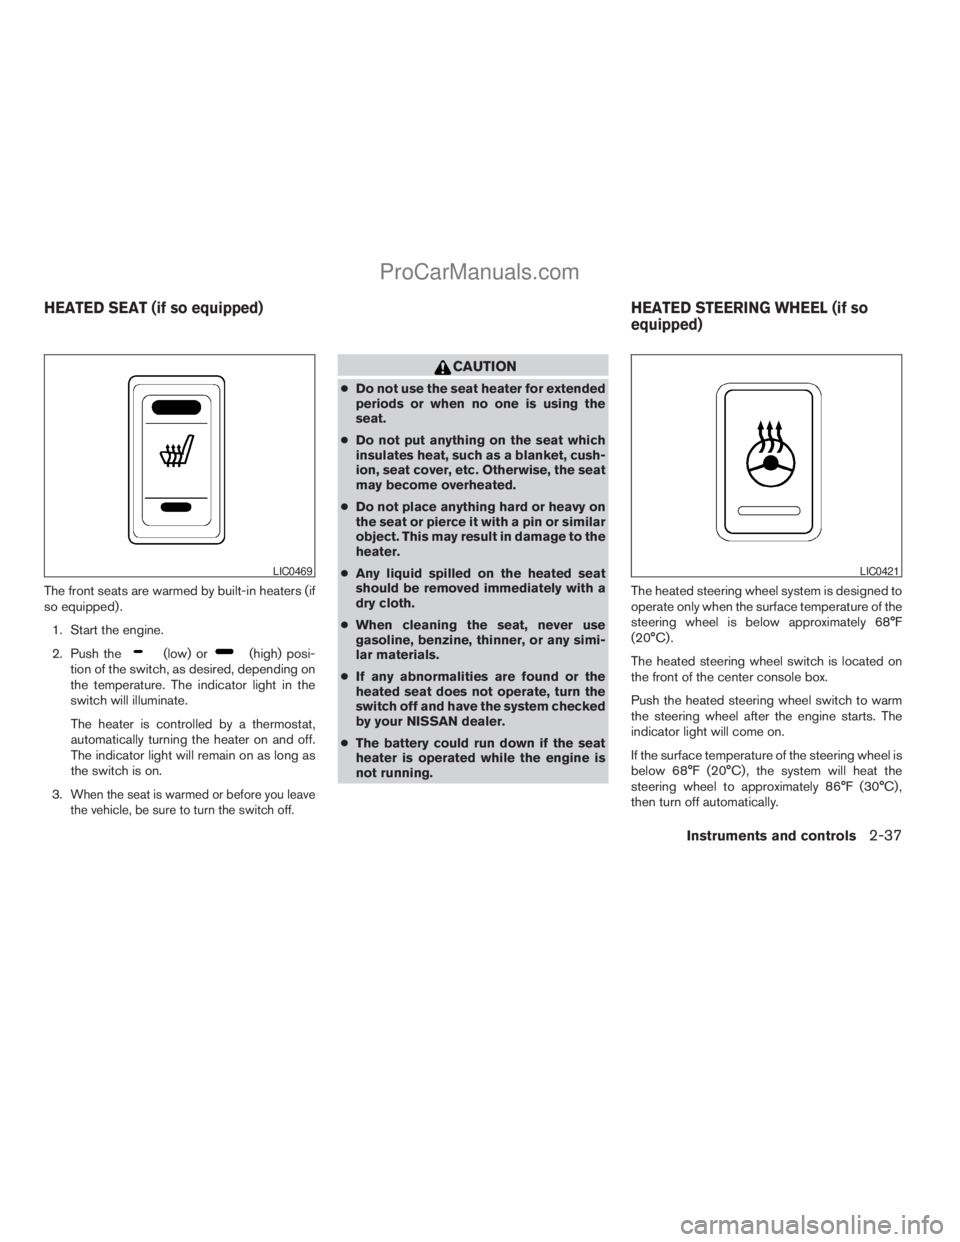
The front seats are warmed by built-in heaters (if
so equipped) .
1. Start the engine.
2. Push the
(low) or(high) posi-
tion of the switch, as desired, depending on
the temperature. The indicator light in the
switch will illuminate.
The heater is controlled by a thermostat,
automatically turning the heater on and off.
The indicator light will remain on as long as
the switch is on.
3.
When the seat is warmed or before you leave
the vehicle, be sure to turn the switch off.
CAUTION
cDo not use the seat heater for extended
periods or when no one is using the
seat.
cDo not put anything on the seat which
insulates heat, such as a blanket, cush-
ion, seat cover, etc. Otherwise, the seat
may become overheated.
cDo not place anything hard or heavy on
the seat or pierce it with a pin or similar
object. This may result in damage to the
heater.
cAny liquid spilled on the heated seat
should be removed immediately with a
dry cloth.
cWhen cleaning the seat, never use
gasoline, benzine, thinner, or any simi-
lar materials.
cIf any abnormalities are found or the
heated seat does not operate, turn the
switch off and have the system checked
by your NISSAN dealer.
cThe battery could run down if the seat
heater is operated while the engine is
not running.The heated steering wheel system is designed to
operate only when the surface temperature of the
steering wheel is below approximately 68°F
(20°C) .
The heated steering wheel switch is located on
the front of the center console box.
Push the heated steering wheel switch to warm
the steering wheel after the engine starts. The
indicator light will come on.
If the surface temperature of the steering wheel is
below 68°F (20°C) , the system will heat the
steering wheel to approximately 86°F (30°C) ,
then turn off automatically.
LIC0469LIC0421
HEATED SEAT (if so equipped) HEATED STEERING WHEEL (if so
equipped)
Instruments and controls2-37
ZREVIEW COPYÐ2009 Armada(wzw)
Owners ManualÐUSA_English(nna)
02/27/08Ðtbrooks
X
ProCarManuals.com
Page 123 of 465
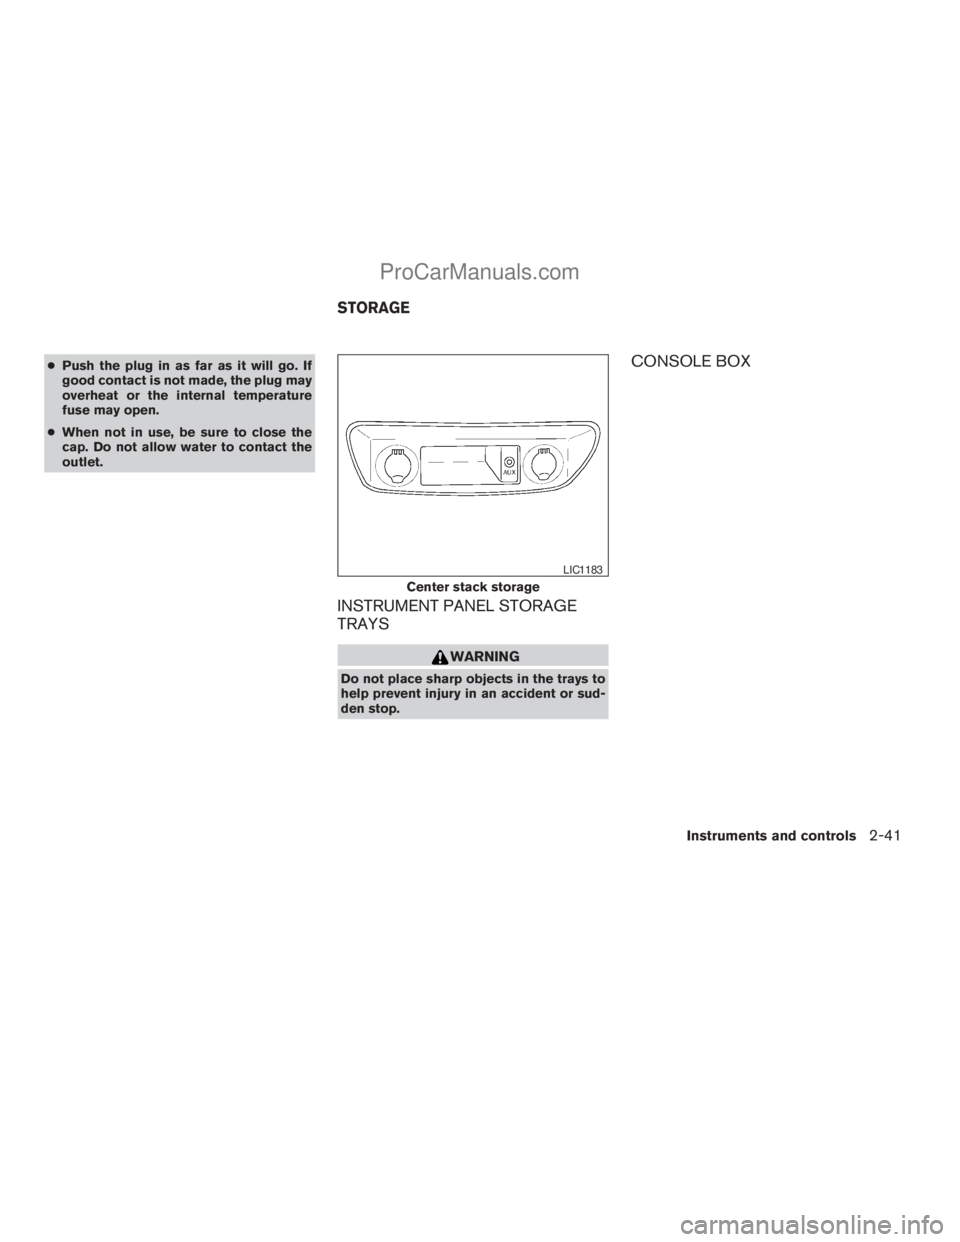
cPush the plug in as far as it will go. If
good contact is not made, the plug may
overheat or the internal temperature
fuse may open.
cWhen not in use, be sure to close the
cap. Do not allow water to contact the
outlet.
INSTRUMENT PANEL STORAGE
TRAYS
WARNING
Do not place sharp objects in the trays to
help prevent injury in an accident or sud-
den stop.
CONSOLE BOX
Center stack storage
LIC1183
STORAGE
Instruments and controls2-41
ZREVIEW COPYÐ2009 Armada(wzw)
Owners ManualÐUSA_English(nna)
02/26/08Ðdebbie
X
ProCarManuals.com
Page 128 of 465
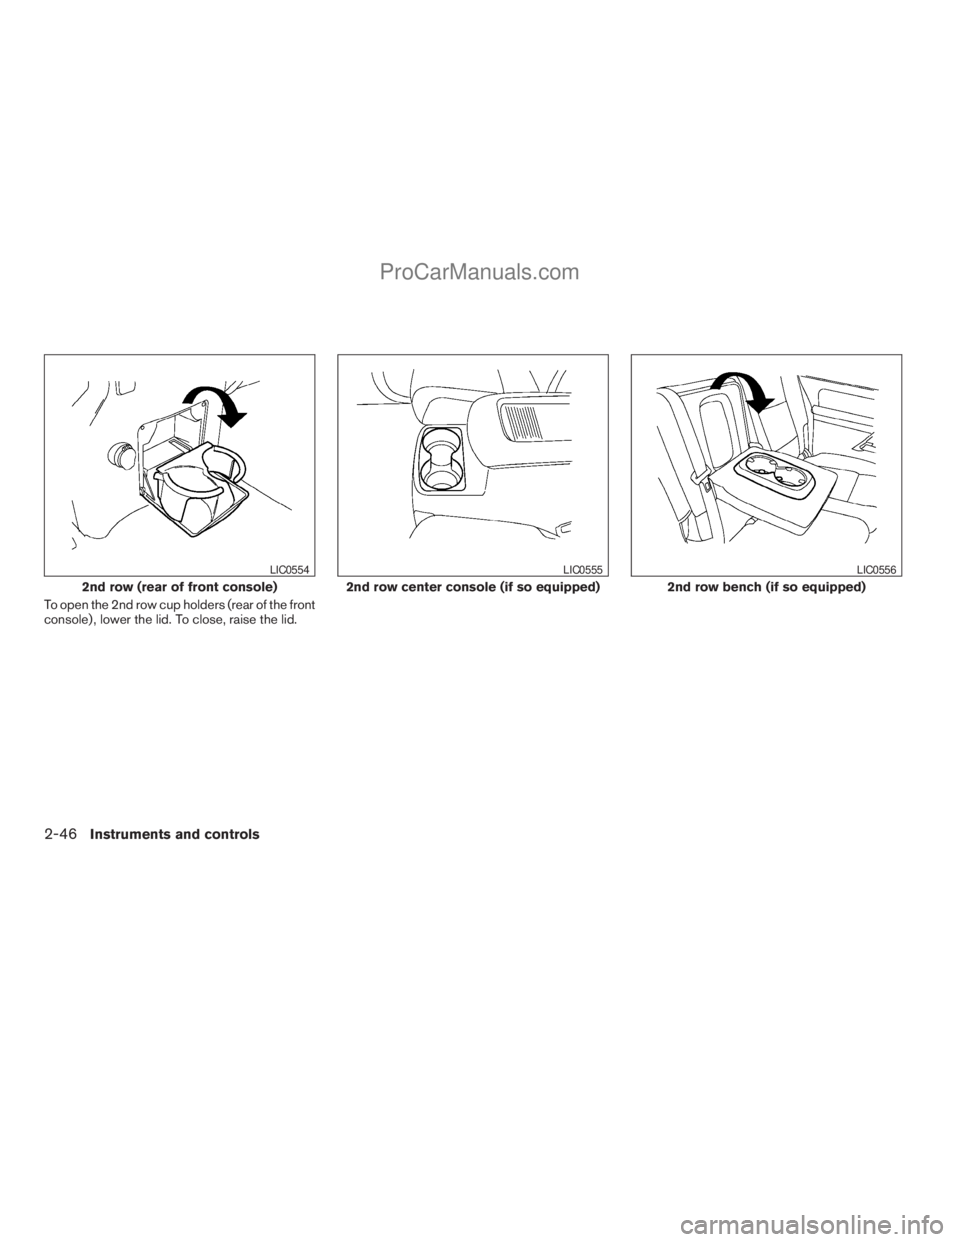
To open the 2nd row cup holders (rear of the front
console) , lower the lid. To close, raise the lid.
2nd row (rear of front console)
LIC0554
2nd row center console (if so equipped)
LIC0555
2nd row bench (if so equipped)
LIC0556
2-46Instruments and controls
ZREVIEW COPYÐ2009 Armada(wzw)
Owners ManualÐUSA_English(nna)
02/26/08Ðdebbie
X
ProCarManuals.com
Page 129 of 465
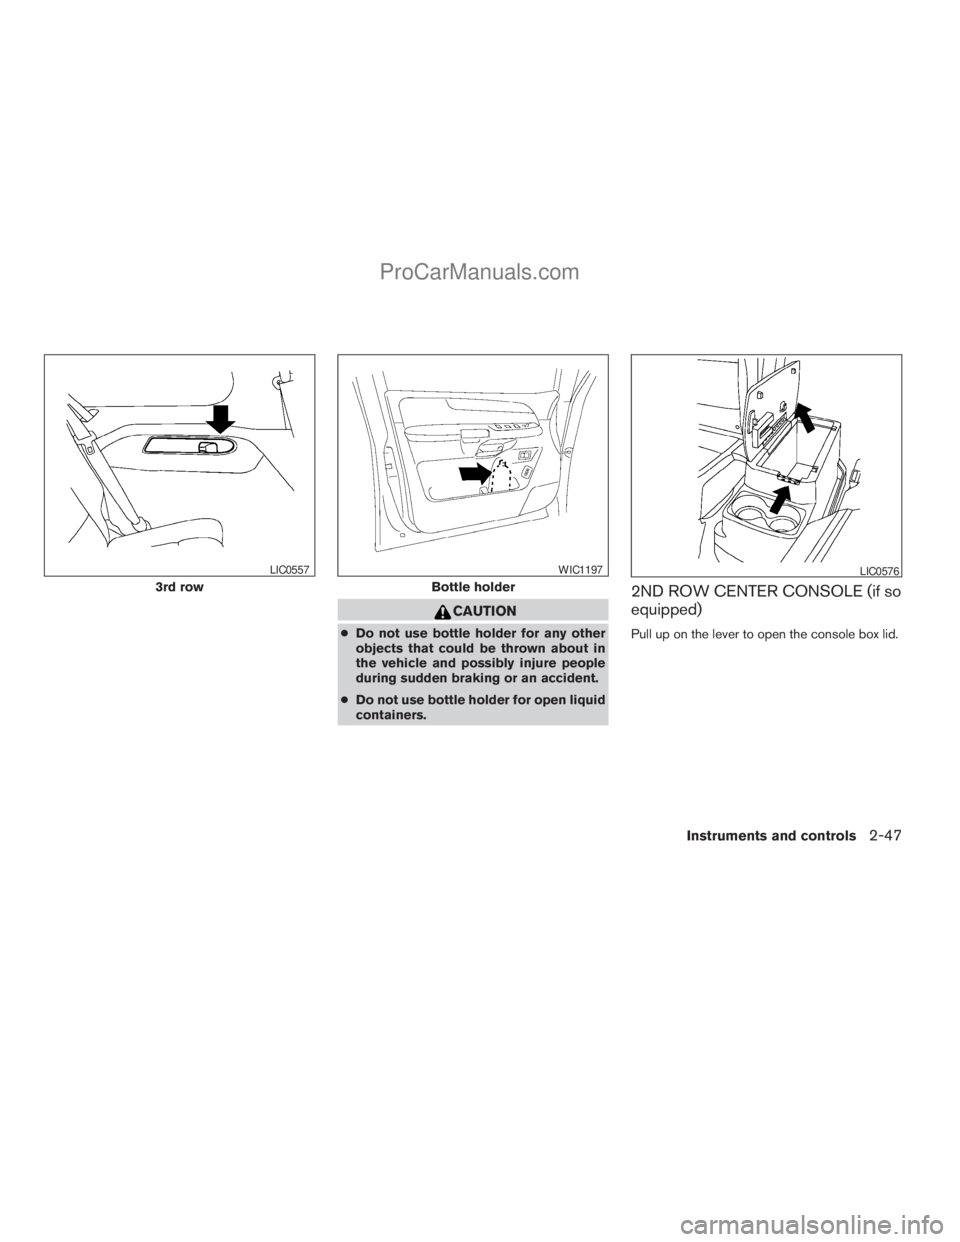
CAUTION
cDo not use bottle holder for any other
objects that could be thrown about in
the vehicle and possibly injure people
during sudden braking or an accident.
cDo not use bottle holder for open liquid
containers.
2ND ROW CENTER CONSOLE (if so
equipped)
Pull up on the lever to open the console box lid.
3rd row
LIC0557
Bottle holder
WIC1197LIC0576
Instruments and controls2-47
ZREVIEW COPYÐ2009 Armada(wzw)
Owners ManualÐUSA_English(nna)
02/26/08Ðdebbie
X
ProCarManuals.com
Page 130 of 465
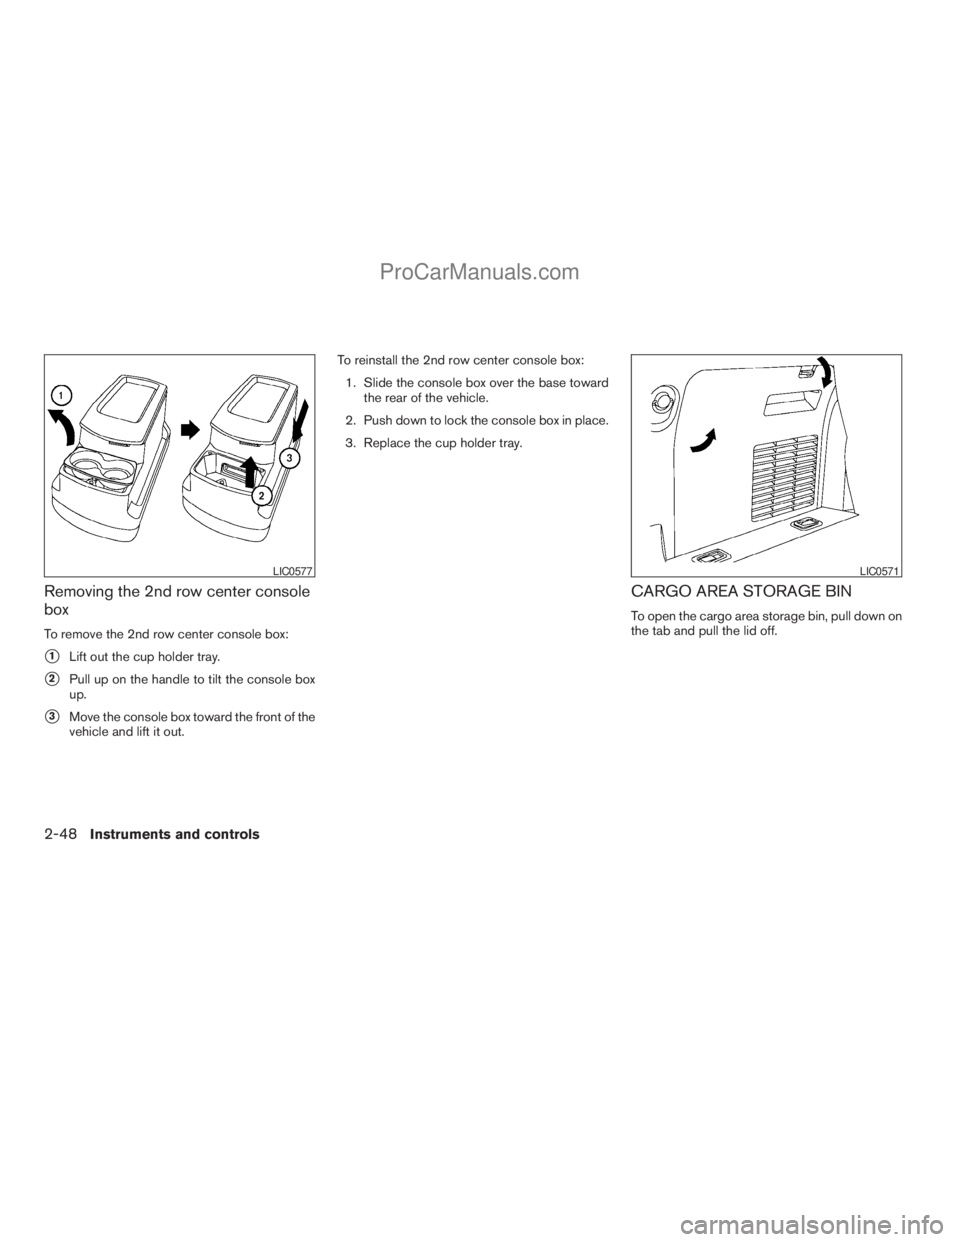
Removing the 2nd row center console
box
To remove the 2nd row center console box:
s1Lift out the cup holder tray.
s2Pull up on the handle to tilt the console box
up.
s3Move the console box toward the front of the
vehicle and lift it out.To reinstall the 2nd row center console box:
1. Slide the console box over the base toward
the rear of the vehicle.
2. Push down to lock the console box in place.
3. Replace the cup holder tray.
CARGO AREA STORAGE BIN
To open the cargo area storage bin, pull down on
the tab and pull the lid off.
LIC0577LIC0571
2-48Instruments and controls
ZREVIEW COPYÐ2009 Armada(wzw)
Owners ManualÐUSA_English(nna)
02/26/08Ðdebbie
X
ProCarManuals.com
Page 140 of 465
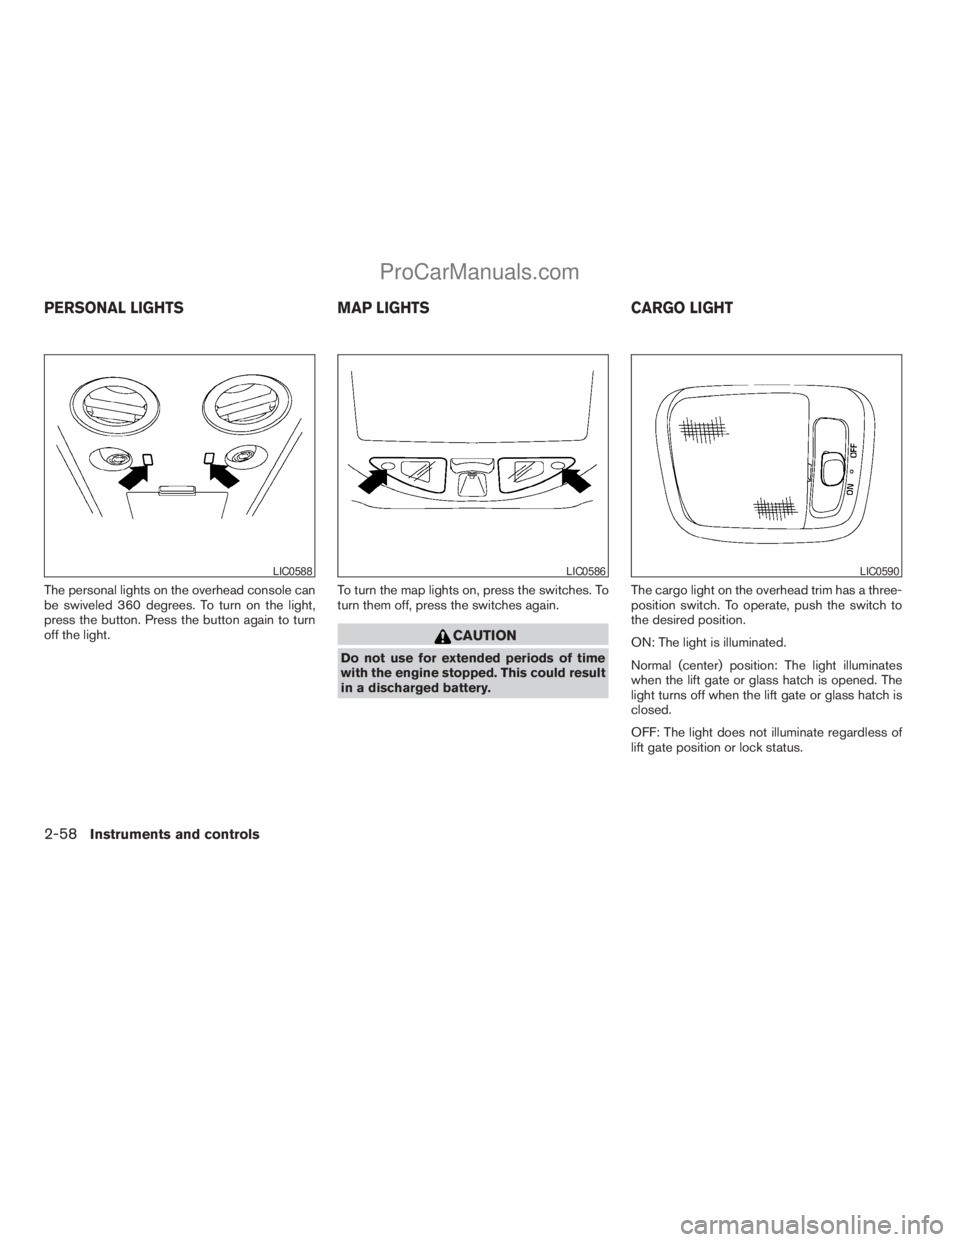
The personal lights on the overhead console can
be swiveled 360 degrees. To turn on the light,
press the button. Press the button again to turn
off the light.To turn the map lights on, press the switches. To
turn them off, press the switches again.
CAUTION
Do not use for extended periods of time
with the engine stopped. This could result
in a discharged battery.The cargo light on the overhead trim has a three-
position switch. To operate, push the switch to
the desired position.
ON: The light is illuminated.
Normal (center) position: The light illuminates
when the lift gate or glass hatch is opened. The
light turns off when the lift gate or glass hatch is
closed.
OFF: The light does not illuminate regardless of
lift gate position or lock status.
LIC0588LIC0586LIC0590
PERSONAL LIGHTS MAP LIGHTS CARGO LIGHT
2-58Instruments and controls
ZREVIEW COPYÐ2009 Armada(wzw)
Owners ManualÐUSA_English(nna)
02/26/08Ðdebbie
X
ProCarManuals.com
Page 265 of 465
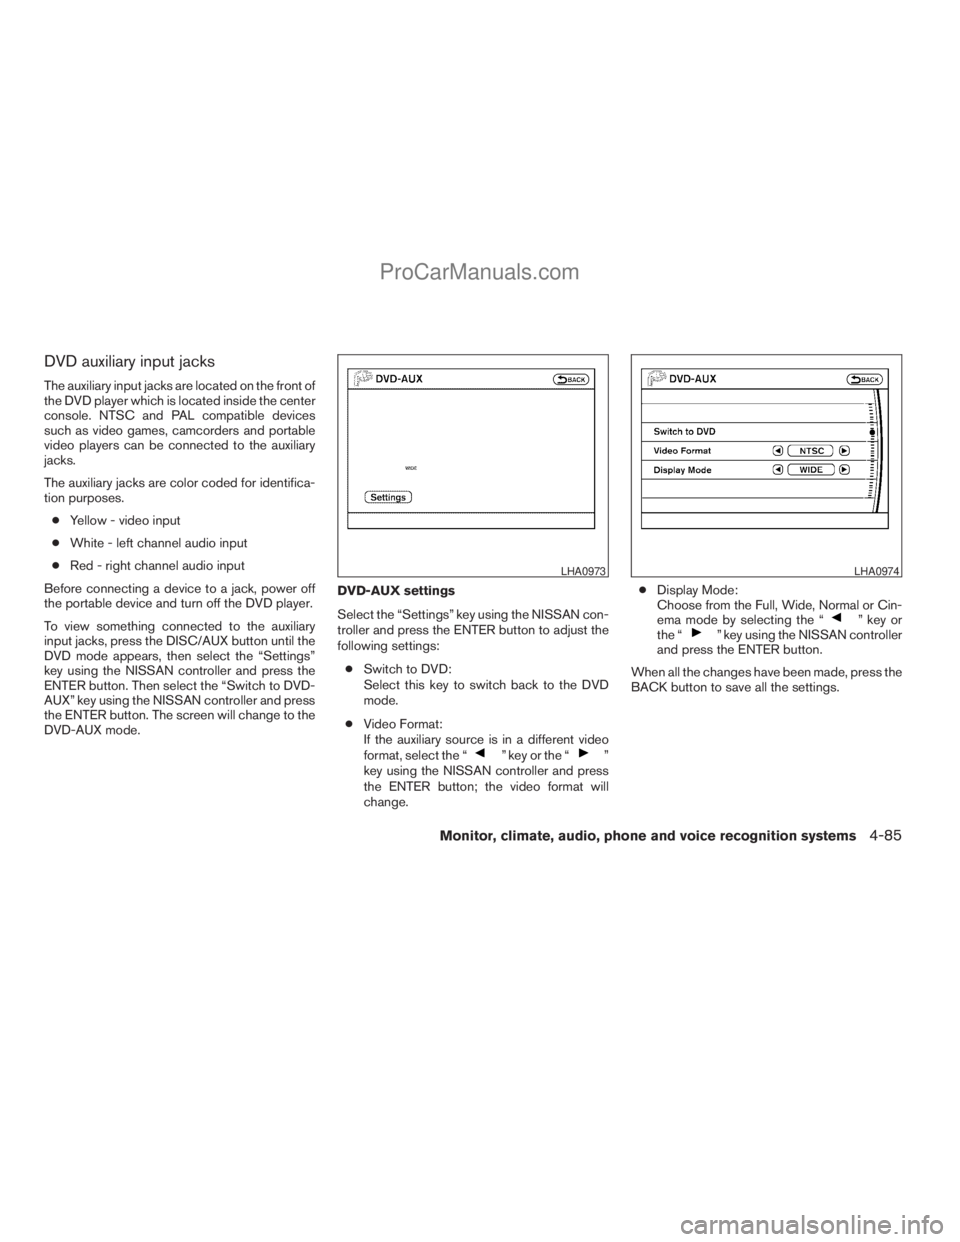
DVD auxiliary input jacks
The auxiliary input jacks are located on the front of
the DVD player which is located inside the center
console. NTSC and PAL compatible devices
such as video games, camcorders and portable
video players can be connected to the auxiliary
jacks.
The auxiliary jacks are color coded for identifica-
tion purposes.
cYellow - video input
cWhite - left channel audio input
cRed - right channel audio input
Before connecting a device to a jack, power off
the portable device and turn off the DVD player.
To view something connected to the auxiliary
input jacks, press the DISC/AUX button until the
DVD mode appears, then select the “Settings”
key using the NISSAN controller and press the
ENTER button. Then select the “Switch to DVD-
AUX” key using the NISSAN controller and press
the ENTER button. The screen will change to the
DVD-AUX mode.DVD-AUX settings
Select the “Settings” key using the NISSAN con-
troller and press the ENTER button to adjust the
following settings:
cSwitch to DVD:
Select this key to switch back to the DVD
mode.
cVideo Format:
If the auxiliary source is in a different video
format, select the “
” key or the “”
key using the NISSAN controller and press
the ENTER button; the video format will
change.cDisplay Mode:
Choose from the Full, Wide, Normal or Cin-
ema mode by selecting the “
” key or
the “” key using the NISSAN controller
and press the ENTER button.
When all the changes have been made, press the
BACK button to save all the settings.
LHA0973LHA0974
Monitor, climate, audio, phone and voice recognition systems4-85
ZREVIEW COPYÐ2009 Armada(wzw)
Owners ManualÐUSA_English(nna)
02/26/08Ðdebbie
X
ProCarManuals.com