display NISSAN ARMADA 2012 1.G 06IT Navigation Manual
[x] Cancel search | Manufacturer: NISSAN, Model Year: 2012, Model line: ARMADA, Model: NISSAN ARMADA 2012 1.GPages: 235, PDF Size: 5.14 MB
Page 19 of 235
Push
screen or a scrolled map screen is displayed to
display the menu corresponding to that screen.
This menu allows you to quickly use helpful
functions, such as setting a destination easily
and searching for Points of Interest nearby.
To select a menu item, use the method
described in “Menu screen types and how to
operate”.
INFO:
With the touch operation, the same screen can
be displayed by touching [Map Menu] located
on the map screen.
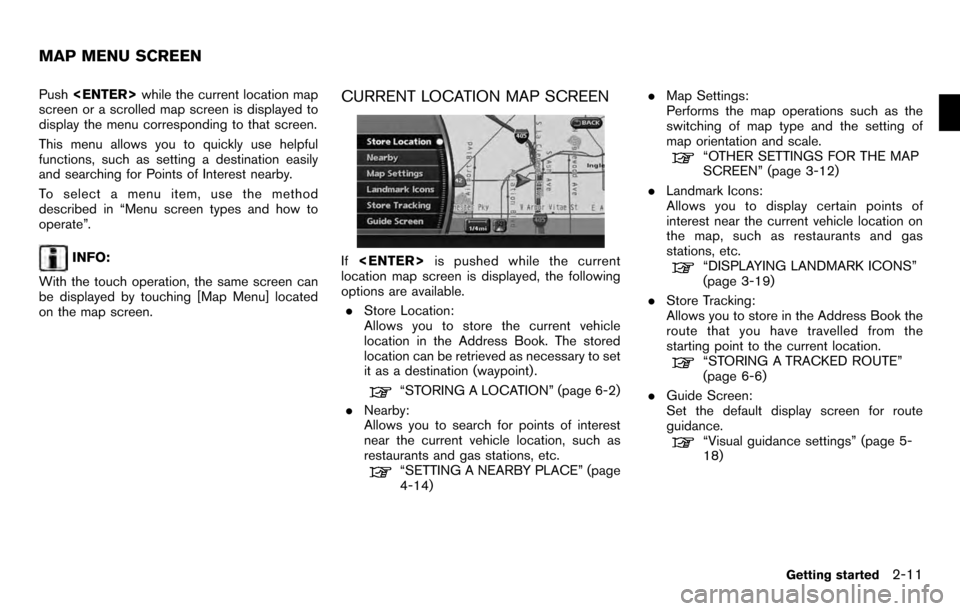
CURRENT LOCATION MAP SCREEN
If
location map screen is displayed, the following
options are available.
. Store Location:
Allows you to store the current vehicle
location in the Address Book. The stored
location can be retrieved as necessary to set
it as a destination (waypoint) .
“STORING A LOCATION” (page 6-2)
. Nearby:
Allows you to search for points of interest
near the current vehicle location, such as
restaurants and gas stations, etc.
“SETTING A NEARBY PLACE” (page
4-14) .
Map Settings:
Performs the map operations such as the
switching of map type and the setting of
map orientation and scale.
“OTHER SETTINGS FOR THE MAP
SCREEN” (page 3-12)
. Landmark Icons:
Allows you to display certain points of
interest near the current vehicle location on
the map, such as restaurants and gas
stations, etc.
“DISPLAYING LANDMARK ICONS”
(page 3-19)
. Store Tracking:
Allows you to store in the Address Book the
route that you have travelled from the
starting point to the current location.
“STORING A TRACKED ROUTE”
(page 6-6)
. Guide Screen:
Set the default display screen for route
guidance.
“Visual guidance settings” (page 5-
18)
MAP MENU SCREEN
Getting started2-11
Page 20 of 235
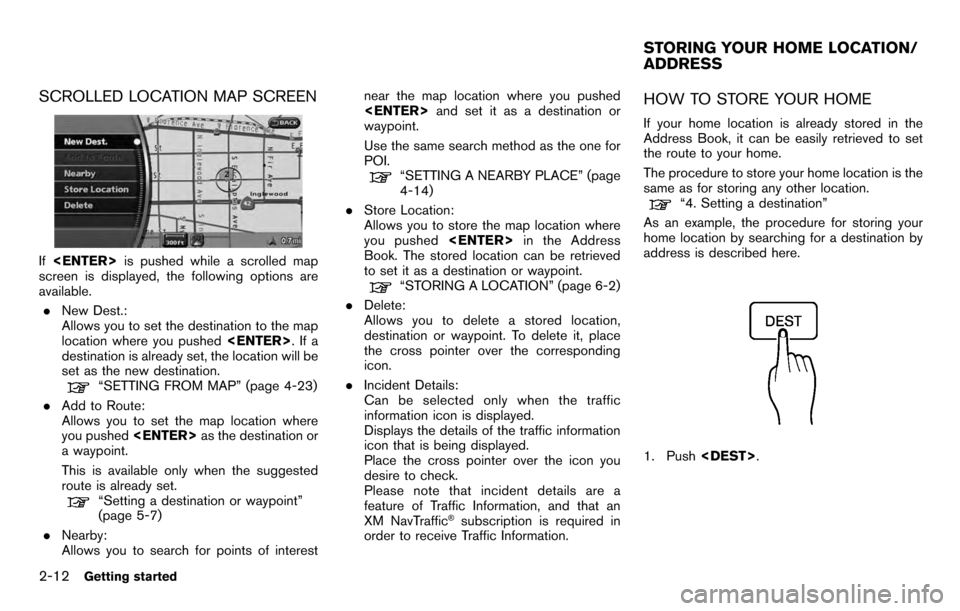
SCROLLED LOCATION MAP SCREEN
If
screen is displayed, the following options are
available.
. New Dest.:
Allows you to set the destination to the map
location where you pushed
destination is already set, the location will be
set as the new destination.
“SETTING FROM MAP” (page 4-23)
. Add to Route:
Allows you to set the map location where
you pushed
a waypoint.
This is available only when the suggested
route is already set.
“Setting a destination or waypoint”
(page 5-7)
. Nearby:
Allows you to search for points of interest near the map location where you pushed
and set it as a destination or
waypoint.
Use the same search method as the one for
POI.
“SETTING A NEARBY PLACE” (page
4-14)
. Store Location:
Allows you to store the map location where
you pushed
Book. The stored location can be retrieved
to set it as a destination or waypoint.
“STORING A LOCATION” (page 6-2)
. Delete:
Allows you to delete a stored location,
destination or waypoint. To delete it, place
the cross pointer over the corresponding
icon.
. Incident Details:
Can be selected only when the traffic
information icon is displayed.
Displays the details of the traffic information
icon that is being displayed.
Place the cross pointer over the icon you
desire to check.
Please note that incident details are a
feature of Traffic Information, and that an
XM NavTraffic
®subscription is required in
order to receive Traffic Information.
HOW TO STORE YOUR HOME
If your home location is already stored in the
Address Book, it can be easily retrieved to set
the route to your home.
The procedure to store your home location is the
same as for storing any other location.
“4. Setting a destination”
As an example, the procedure for storing your
home location by searching for a destination by
address is described here.
1. Push
STORING YOUR HOME LOCATION/
ADDRESS
2-12Getting started
Page 21 of 235
![NISSAN ARMADA 2012 1.G 06IT Navigation Manual 2. Highlight [Home Location (Add New)] andpush <ENTER> .
3. A confirmation message is displayed. Con-
firm the contents of the message, highlight
[Yes] and push <ENTER>.
4. Highlight [Street Address] NISSAN ARMADA 2012 1.G 06IT Navigation Manual 2. Highlight [Home Location (Add New)] andpush <ENTER> .
3. A confirmation message is displayed. Con-
firm the contents of the message, highlight
[Yes] and push <ENTER>.
4. Highlight [Street Address]](/img/5/280/w960_280-20.png)
2. Highlight [Home Location (Add New)] andpush
3. A confirmation message is displayed. Con-
firm the contents of the message, highlight
[Yes] and push
4. Highlight [Street Address] and push
displayed.
5. Enter the address of your home, highlight
[OK] and push
The map screen is displayed.
“SETTING A STREET ADDRESS”
(page 4-4)
6. Pushing the directional buttons, adjust your home location if necessary.
7. After adjusting the location, push
8. A message is displayed and your home
location is stored.
9. Push
Page 23 of 235
![NISSAN ARMADA 2012 1.G 06IT Navigation Manual 5. Highlight [By Name] and push<ENTER>.
A character input screen is displayed.
6. Highlight [List] and push <ENTER>.
A list screen is displayed.
INFO:
You can enter the city name and facility
name to NISSAN ARMADA 2012 1.G 06IT Navigation Manual 5. Highlight [By Name] and push<ENTER>.
A character input screen is displayed.
6. Highlight [List] and push <ENTER>.
A list screen is displayed.
INFO:
You can enter the city name and facility
name to](/img/5/280/w960_280-22.png)
5. Highlight [By Name] and push
A character input screen is displayed.
6. Highlight [List] and push
A list screen is displayed.
INFO:
You can enter the city name and facility
name to narrow down your search.
The number of narrowed down points are
displayed in the “Matches” column.
7. Highlight the preferred airport from the list and push
INFO:
.By selecting [By Dist.], you can sort the
list by the shortest distance.
.The position of the selected location is
displayed in the preview on the right
side of the screen.
8. The selected destination is displayed at the
center of the map. Highlight [Start] after
confirming the location of the displayed
destination, and push
INFO:
.The system sets the destination to the
selected location and starts calculating
a route.
.Even after setting a destination, you can
adjust the location of the destination,
store the route, etc. if necessary.
“OPERATIONS AFTER SETTING
A DESTINATION” (page 4-24)
Getting started2-15
Page 25 of 235
![NISSAN ARMADA 2012 1.G 06IT Navigation Manual 3. A confirmation message is displayed. High-light [Yes] and push <ENTER>.
INFO:
If a route is cancelled, [Cancel Route] changes
to [Resume Route].
Highlight [Resume Route] and push <ENTER>
to reactiv NISSAN ARMADA 2012 1.G 06IT Navigation Manual 3. A confirmation message is displayed. High-light [Yes] and push <ENTER>.
INFO:
If a route is cancelled, [Cancel Route] changes
to [Resume Route].
Highlight [Resume Route] and push <ENTER>
to reactiv](/img/5/280/w960_280-24.png)
3. A confirmation message is displayed. High-light [Yes] and push
INFO:
If a route is cancelled, [Cancel Route] changes
to [Resume Route].
Highlight [Resume Route] and push
to reactivate the cancelled route.
This is available only until a new route is set.
Getting started2-17
Page 26 of 235
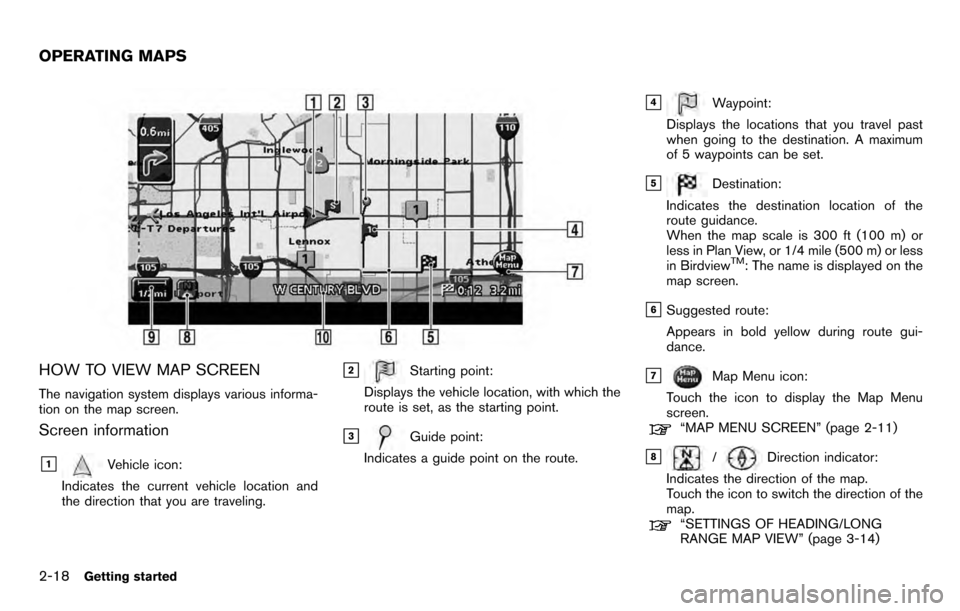
HOW TO VIEW MAP SCREEN
The navigation system displays various informa-
tion on the map screen.
Screen information
&1Vehicle icon:
Indicates the current vehicle location and
the direction that you are traveling.
&2Starting point:
Displays the vehicle location, with which the
route is set, as the starting point.
&3Guide point:
Indicates a guide point on the route.
&4Waypoint:
Displays the locations that you travel past
when going to the destination. A maximum
of 5 waypoints can be set.
&5Destination:
Indicates the destination location of the
route guidance.
When the map scale is 300 ft (100 m) or
less in Plan View, or 1/4 mile (500 m) or less
in Birdview
TM: The name is displayed on the
map screen.
&6Suggested route:
Appears in bold yellow during route gui-
dance.
&7Map Menu icon:
Touch the icon to display the Map Menu
screen.
“MAP MENU SCREEN” (page 2-11)
&8/Direction indicator:
Indicates the direction of the map.
Touch the icon to switch the direction of the
map.
“SETTINGS OF HEADING/LONG
RANGE MAP VIEW” (page 3-14)
OPERATING MAPS
2-18Getting started
Page 27 of 235
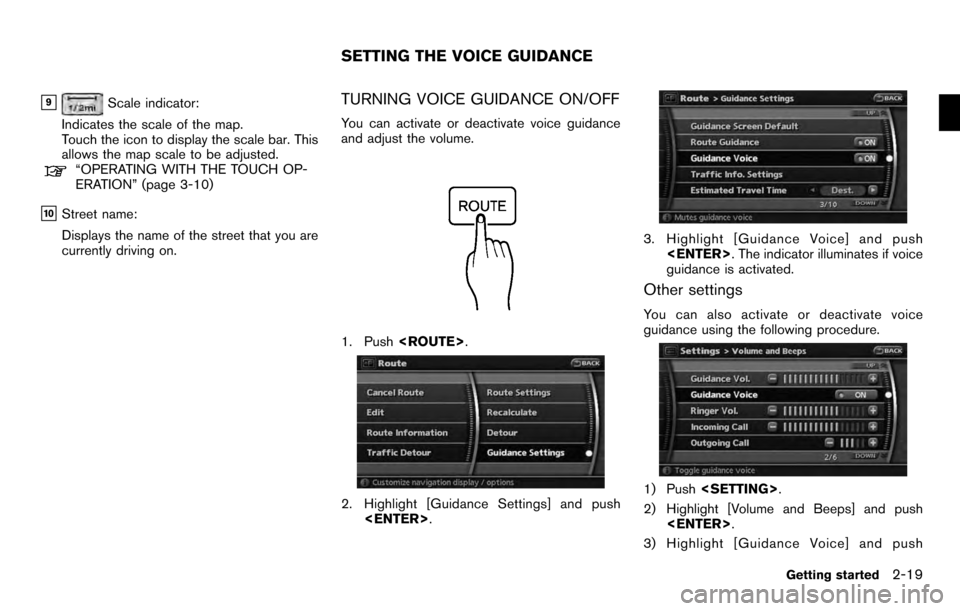
&9Scale indicator:
Indicates the scale of the map.
Touch the icon to display the scale bar. This
allows the map scale to be adjusted.
“OPERATING WITH THE TOUCH OP-
ERATION” (page 3-10)
&10Street name:
Displays the name of the street that you are
currently driving on.
TURNING VOICE GUIDANCE ON/OFF
You can activate or deactivate voice guidance
and adjust the volume.
1. Push
2. Highlight [Guidance Settings] and push
3. Highlight [Guidance Voice] and push
guidance is activated.
Other settings
You can also activate or deactivate voice
guidance using the following procedure.
1) Push
2) Highlight [Volume and Beeps] and push
3) Highlight [Guidance Voice] and push
SETTING THE VOICE GUIDANCE
Getting started2-19
Page 29 of 235
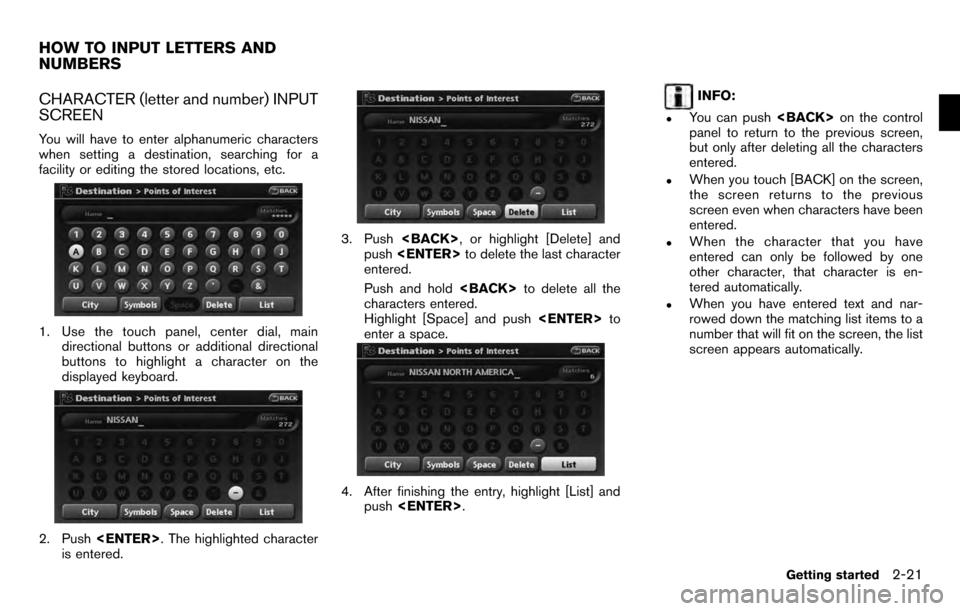
CHARACTER (letter and number) INPUT
SCREEN
You will have to enter alphanumeric characters
when setting a destination, searching for a
facility or editing the stored locations, etc.
1. Use the touch panel, center dial, maindirectional buttons or additional directional
buttons to highlight a character on the
displayed keyboard.
2. Push
is entered.
3. Push
push
entered.
Push and hold
characters entered.
Highlight [Space] and push
enter a space.
4. After finishing the entry, highlight [List] and push
INFO:
.You can push
panel to return to the previous screen,
but only after deleting all the characters
entered.
.When you touch [BACK] on the screen,
the screen returns to the previous
screen even when characters have been
entered.
.When the character that you have
entered can only be followed by one
other character, that character is en-
tered automatically.
.When you have entered text and nar-
rowed down the matching list items to a
number that will fit on the screen, the list
screen appears automatically.
HOW TO INPUT LETTERS AND
NUMBERS
Getting started2-21
Page 30 of 235
![NISSAN ARMADA 2012 1.G 06IT Navigation Manual .Symbol keys are displayed by high-
lighting [Symbols] and pushing
<ENTER>. Alphabet keys are displayed
by highlighting [A-Z] and pushing
<ENTER> .
Symbol input screen
PHONE NUMBER INPUT SCREEN
You ca NISSAN ARMADA 2012 1.G 06IT Navigation Manual .Symbol keys are displayed by high-
lighting [Symbols] and pushing
<ENTER>. Alphabet keys are displayed
by highlighting [A-Z] and pushing
<ENTER> .
Symbol input screen
PHONE NUMBER INPUT SCREEN
You ca](/img/5/280/w960_280-29.png)
.Symbol keys are displayed by high-
lighting [Symbols] and pushing
by highlighting [A-Z] and pushing
Symbol input screen
PHONE NUMBER INPUT SCREEN
You can enter a phone number as a search
method to look for a point of interest.
INFO:
Only the locations included in the database in
the map data can be searched by the phone
number.
1. Use the touch panel, center dial, main directional buttons or additional directional
buttons to highlight a number on the
displayed keyboard.
2. Push
entered.
3. Push
push
entered.
Push and hold
numbers entered.
4. After finishing the entry, highlight [Map] and push
2-22Getting started
Page 31 of 235
![NISSAN ARMADA 2012 1.G 06IT Navigation Manual INFO:
. You can push <BACK>on the control
panel to return to the previous screen, but
only after deleting all the numbers entered.
. When you touch [BACK] on the screen, the
screen returns to the prev NISSAN ARMADA 2012 1.G 06IT Navigation Manual INFO:
. You can push <BACK>on the control
panel to return to the previous screen, but
only after deleting all the numbers entered.
. When you touch [BACK] on the screen, the
screen returns to the prev](/img/5/280/w960_280-30.png)
INFO:
. You can push
panel to return to the previous screen, but
only after deleting all the numbers entered.
. When you touch [BACK] on the screen, the
screen returns to the previous screen even
when numbers have been entered.NISSAN VOICE RECOGNITION
NISSAN Voice Recognition allows hands-free
operation of the navigation system and other
systems equipped on this vehicle, in one of two
modes, Standard Mode or Alternate Command
Mode. In Standard Mode, you can operate
Phone and Information.
The commands that are available are always
shown on the display and announced by the
system. You can complete your desired opera-
tion by simply following the prompts given by the
system. In Standard Mode, hands–free opera-
tion of Audio, Climate Control and Display is not
available through Voice Recognition.
For U.S. customers, Standard Mode is selected
by default. For Canadian customers, Alternate
Command Mode is the default mode.
INFO:
. For the voice commands for the audio, air
conditioner and other systems, refer to the
Owner’s Manual of your vehicle. The follow-
ing sections refer only to the navigation,
phone, and information systems.
. When the system language is set to
“Franc¸ ais” (French) the available commands
and functions differ from those available
when using the system in English.
Using the system
Initialization:
When the ignition switch is pushed to the ON
position, NISSAN Voice Recognition is initia-
lized, which may take up to one minute. When
completed, the system is ready to accept voice
commands. If
initialization completes, the display will show the
message: “Phonetic data downloading. Please
wait.”
Before starting
To get the best recognition performance from
NISSAN Voice Recognition, observe the follow-
ing:
. The interior of the vehicle should be as quiet
as possible. Close the windows to eliminate
the surrounding noises (traffic noise and
vibration sounds, etc.) , which may prevent
the system from correctly recognizing the
voice commands.
. Wait until the tone sounds before speaking a
command.
. Speak in a natural conversational voice
without pausing between words.
. If the air conditioner is set to “Auto”, the fan
speed is automatically lowered so that your
commands can be recognized more easily.
NISSAN VOICE RECOGNITION
Getting started2-23