steering NISSAN ARMADA 2012 1.G 06IT Navigation Manual
[x] Cancel search | Manufacturer: NISSAN, Model Year: 2012, Model line: ARMADA, Model: NISSAN ARMADA 2012 1.GPages: 235, PDF Size: 5.14 MB
Page 106 of 235
condition illuminates.
4. When the current location map screen or route setting screen is displayed, the system
recalculates a route with the set conditions.
Available conditions
.Fastest Route:
Prioritizes by the fastest time.
. Minimize Freeway:
Minimizes the use of freeways.
. Shortest Route:
Prioritizes by the shortest route.
INFO:
Only one of these conditions can be utilized at a
time.
Voice command
1. Push
switch.
2. After the tone sounds, speak a command.
To set the conditions for the route calculation
(Alternate command mode):
“Fastest Route”
“Minimize Freeway”
“Shortest Route”
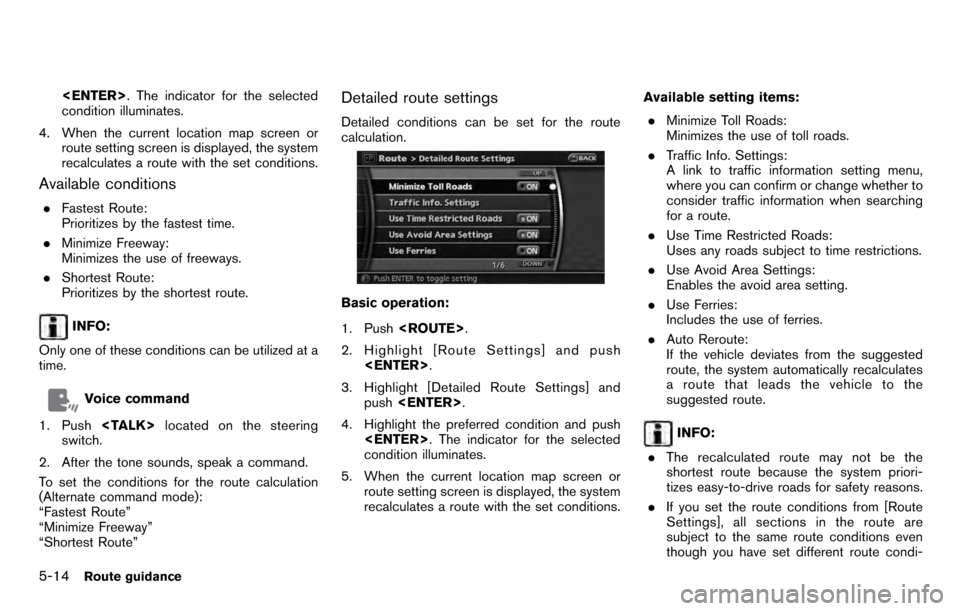
Detailed route settings
Detailed conditions can be set for the route
calculation.
Basic operation:
1. Push
2. Highlight [Route Settings] and push
3. Highlight [Detailed Route Settings] and push
4. Highlight the preferred condition and push
condition illuminates.
5. When the current location map screen or route setting screen is displayed, the system
recalculates a route with the set conditions. Available setting items:
. Minimize Toll Roads:
Minimizes the use of toll roads.
. Traffic Info. Settings:
A link to traffic information setting menu,
where you can confirm or change whether to
consider traffic information when searching
for a route.
. Use Time Restricted Roads:
Uses any roads subject to time restrictions.
. Use Avoid Area Settings:
Enables the avoid area setting.
. Use Ferries:
Includes the use of ferries.
. Auto Reroute:
If the vehicle deviates from the suggested
route, the system automatically recalculates
a route that leads the vehicle to the
suggested route.
INFO:
. The recalculated route may not be the
shortest route because the system priori-
tizes easy-to-drive roads for safety reasons.
. If you set the route conditions from [Route
Settings], all sections in the route are
subject to the same route conditions even
though you have set different route condi-
5-14Route guidance
Page 108 of 235
Voice command
1. Push
switch.
2. After the tone sounds, speak a command.
To turn on/off the traffic information system:
“Traffic Info.” (Alternate command mode)
“Information” “Traffic Info.” (Standard mode)
RECALCULATE ROUTE
You can manually search for the route again after
changing the search condition. When the
vehicle deviates from the suggested route, the
route from the current location to the destination
is automatically searched again.
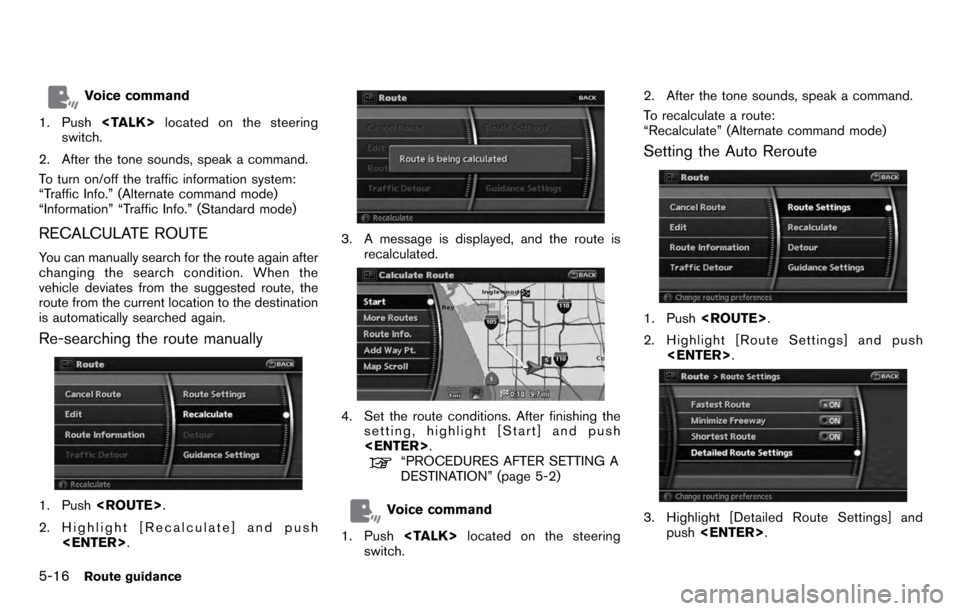
Re-searching the route manually
1. Push
2. Highlight [Recalculate] and push
3. A message is displayed, and the route is
recalculated.
4. Set the route conditions. After finishing thesetting, highlight [Start] and push
“PROCEDURES AFTER SETTING A
DESTINATION” (page 5-2)
Voice command
1. Push
switch. 2. After the tone sounds, speak a command.
To recalculate a route:
“Recalculate” (Alternate command mode)
Setting the Auto Reroute
1. Push
2. Highlight [Route Settings] and push
3. Highlight [Detailed Route Settings] and
push
5-16Route guidance
Page 109 of 235
![NISSAN ARMADA 2012 1.G 06IT Navigation Manual 4. Highlight [Auto Reroute] and push<ENTER> . The indicator for the selected
condition illuminates. When the current
location map screen or route setting screen
is displayed, the system recalculates a NISSAN ARMADA 2012 1.G 06IT Navigation Manual 4. Highlight [Auto Reroute] and push<ENTER> . The indicator for the selected
condition illuminates. When the current
location map screen or route setting screen
is displayed, the system recalculates a](/img/5/280/w960_280-108.png)
4. Highlight [Auto Reroute] and push
condition illuminates. When the current
location map screen or route setting screen
is displayed, the system recalculates a route
with the set conditions.
“Detailed route settings” (page 5-14)
SETTING A DETOUR ROUTE
If you want to detour from the suggested route,
you can calculate a route detouring for a
specified distance.
1. Push
2. Highlight [Detour] and push
3. Highlight a detour distance and push
After calculating the detour, the system displays
the detour route on the map.
INFO:
. When the vehicle has deviated from the
suggested route, [Detour] cannot be se- lected.
. If the system cannot calculate a detour with
the specified conditions, it displays the
previous suggested route.
. If the vehicle is traveling very fast, the detour
route may start from a location that the
vehicle has already passed.
Voice command
1. Push
switch.
2. After the tone sounds, speak a command.
To set a detour route:
“Detour” (Alternate command mode)
ROUTE GUIDANCE SETTINGS
You can set various guidance information to be
displayed during route guidance and activate or
deactivate route and/or voice guidance.
Route guidance5-17
Page 113 of 235
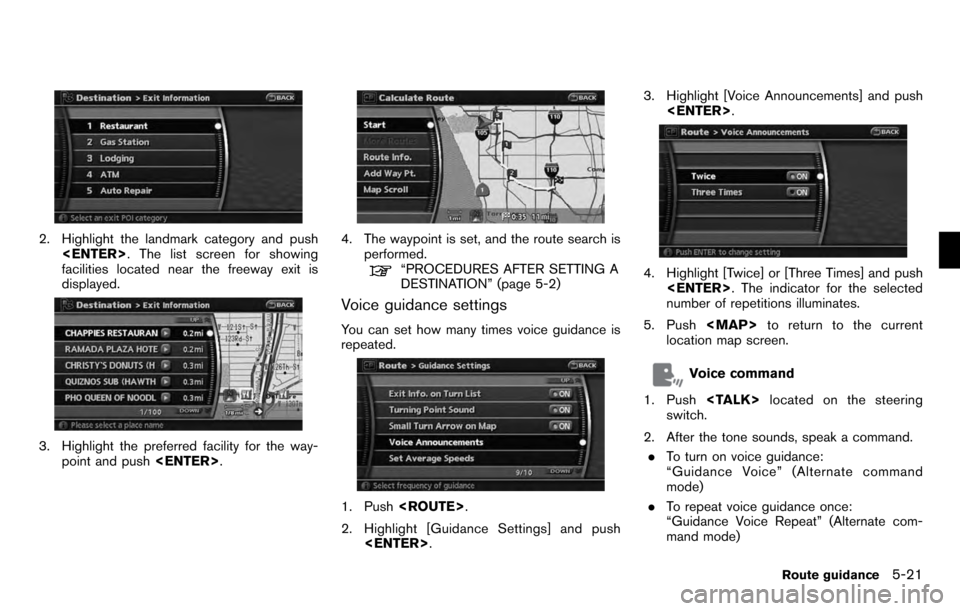
2. Highlight the landmark category and push
facilities located near the freeway exit is
displayed.
3. Highlight the preferred facility for the way- point and push
4. The waypoint is set, and the route search is
performed.
“PROCEDURES AFTER SETTING A
DESTINATION” (page 5-2)
Voice guidance settings
You can set how many times voice guidance is
repeated.
1. Push
2. Highlight [Guidance Settings] and push
4. Highlight [Twice] or [Three Times] and push
number of repetitions illuminates.
5. Push
Page 122 of 235
INFO:
The location is stored in the first available
position number in the Address Book list.
Voice command
1. Push
switch.
2. After the tone sounds, speak a command.
To store a current location:
“Store Location” (Alternate command mode)
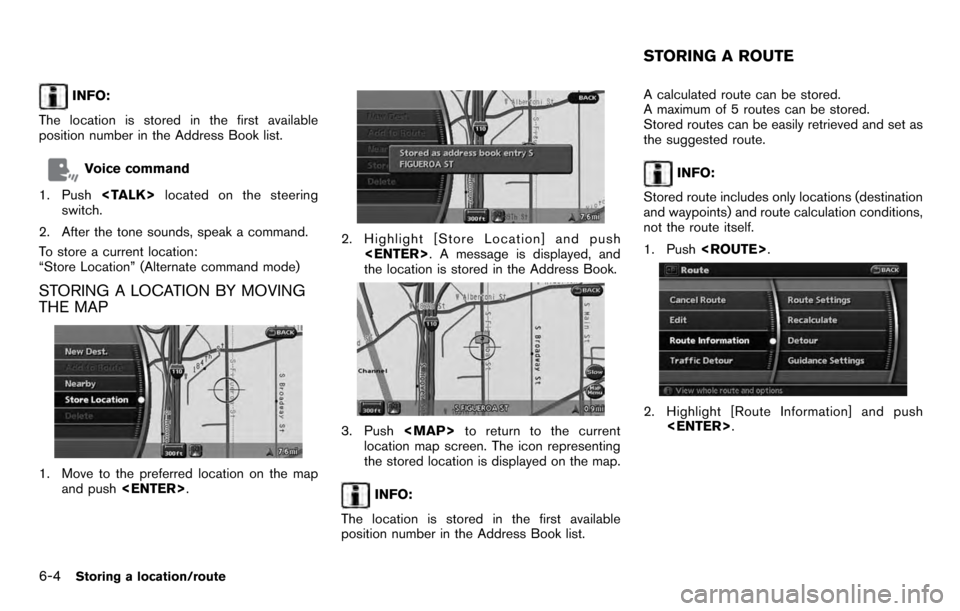
STORING A LOCATION BY MOVING
THE MAP
1. Move to the preferred location on the map and push
2. Highlight [Store Location] and push
the location is stored in the Address Book.
3. Push
Page 146 of 235
.Traffic Info. Settings:
Allows you to confirm or change the settings
for the traffic information related functions.
“Traffic Information Settings” (page 5-
15)
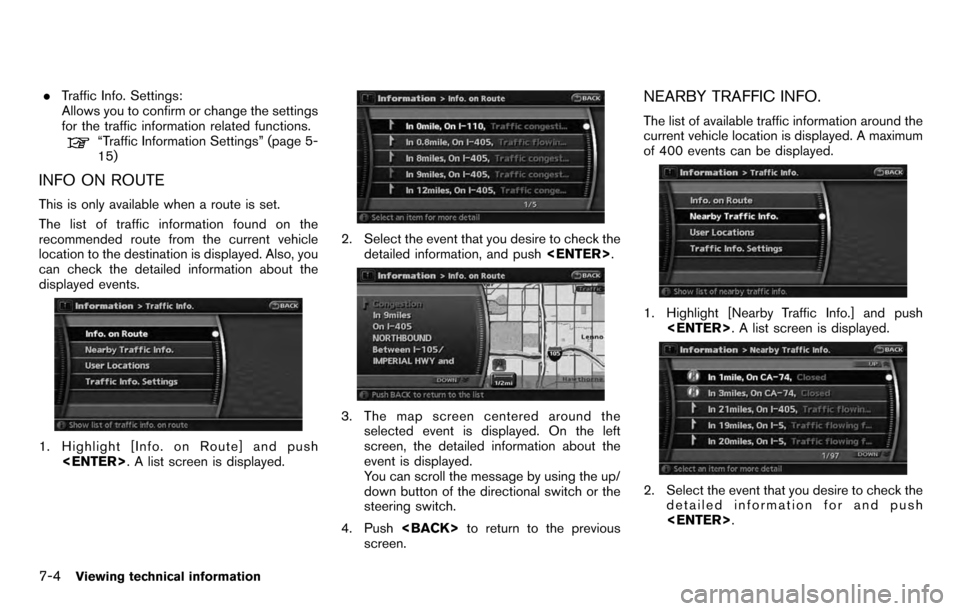
INFO ON ROUTE
This is only available when a route is set.
The list of traffic information found on the
recommended route from the current vehicle
location to the destination is displayed. Also, you
can check the detailed information about the
displayed events.
1. Highlight [Info. on Route] and push
2. Select the event that you desire to check the
detailed information, and push
3. The map screen centered around the
selected event is displayed. On the left
screen, the detailed information about the
event is displayed.
You can scroll the message by using the up/
down button of the directional switch or the
steering switch.
4. Push
screen.
NEARBY TRAFFIC INFO.
The list of available traffic information around the
current vehicle location is displayed. A maximum
of 400 events can be displayed.
1. Highlight [Nearby Traffic Info.] and push
2. Select the event that you desire to check the
detailed information for and push
7-4Viewing technical information
Page 147 of 235
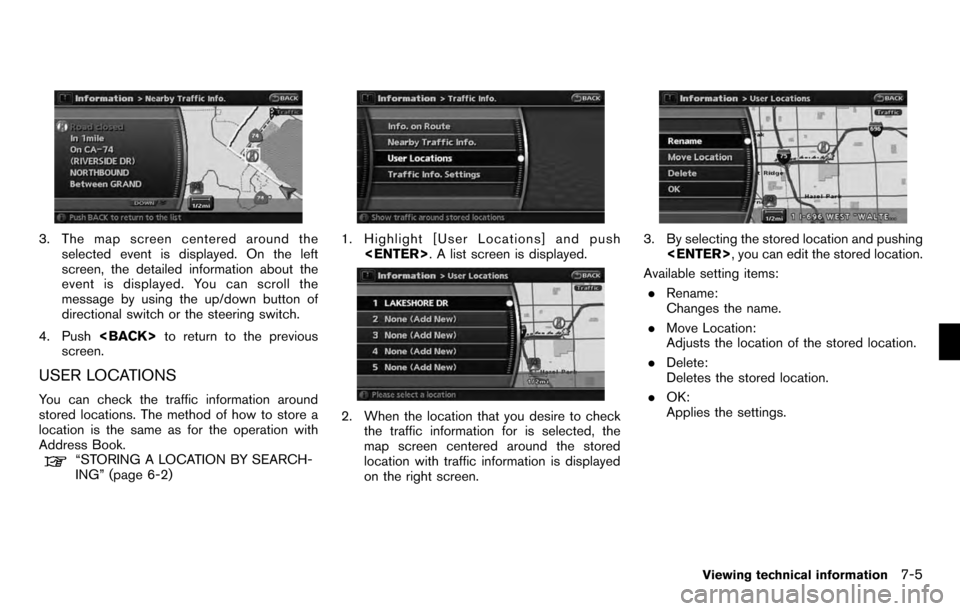
3. The map screen centered around theselected event is displayed. On the left
screen, the detailed information about the
event is displayed. You can scroll the
message by using the up/down button of
directional switch or the steering switch.
4. Push
screen.
USER LOCATIONS
You can check the traffic information around
stored locations. The method of how to store a
location is the same as for the operation with
Address Book.
“STORING A LOCATION BY SEARCH-
ING” (page 6-2)
1. Highlight [User Locations] and push
2. When the location that you desire to check
the traffic information for is selected, the
map screen centered around the stored
location with traffic information is displayed
on the right screen.
3. By selecting the stored location and pushing
Available setting items: . Rename:
Changes the name.
. Move Location:
Adjusts the location of the stored location.
. Delete:
Deletes the stored location.
. OK:
Applies the settings.
Viewing technical information7-5
Page 150 of 235
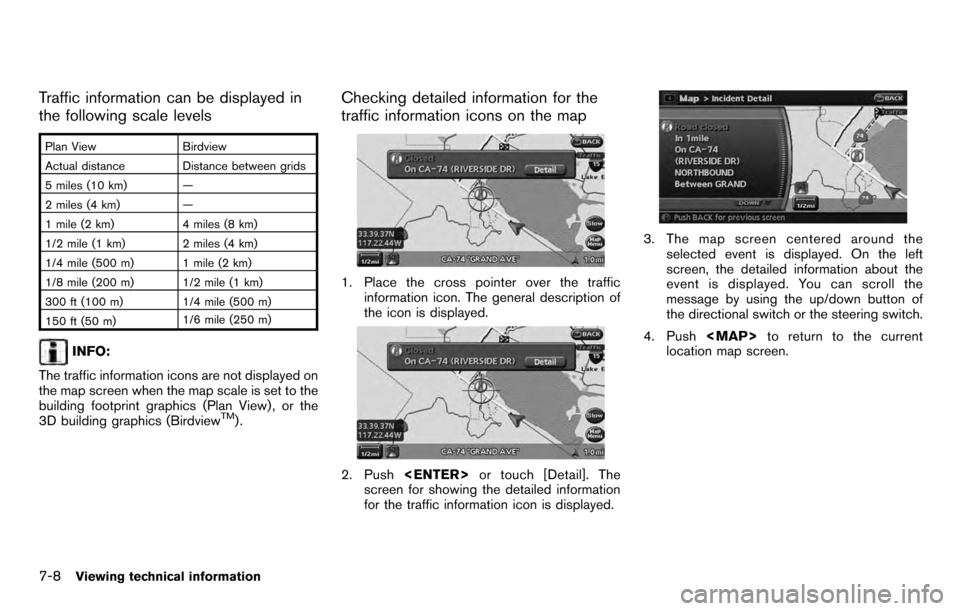
Traffic information can be displayed in
the following scale levels
Plan ViewBirdview
Actual distance Distance between grids
5 miles (10 km) —
2 miles (4 km) —
1 mile (2 km) 4 miles (8 km)
1/2 mile (1 km) 2 miles (4 km)
1/4 mile (500 m) 1 mile (2 km)
1/8 mile (200 m) 1/2 mile (1 km)
300 ft (100 m) 1/4 mile (500 m)
150 ft (50 m) 1/6 mile (250 m)
INFO:
The traffic information icons are not displayed on
the map screen when the map scale is set to the
building footprint graphics (Plan View) , or the
3D building graphics (Birdview
TM).
Checking detailed information for the
traffic information icons on the map
1. Place the cross pointer over the traffic information icon. The general description of
the icon is displayed.
2. Push
screen for showing the detailed information
for the traffic information icon is displayed.
3. The map screen centered around the
selected event is displayed. On the left
screen, the detailed information about the
event is displayed. You can scroll the
message by using the up/down button of
the directional switch or the steering switch.
4. Push
Page 168 of 235
![NISSAN ARMADA 2012 1.G 06IT Navigation Manual 1. Highlight [Voice Recognition Settings] andpush <ENTER> .
2. You can confirm the page by scrolling the screen using the up and down switches of
the main directional buttons or the center
dial.
USING NISSAN ARMADA 2012 1.G 06IT Navigation Manual 1. Highlight [Voice Recognition Settings] andpush <ENTER> .
2. You can confirm the page by scrolling the screen using the up and down switches of
the main directional buttons or the center
dial.
USING](/img/5/280/w960_280-167.png)
1. Highlight [Voice Recognition Settings] andpush
2. You can confirm the page by scrolling the screen using the up and down switches of
the main directional buttons or the center
dial.
USING THE SYSTEM
Initialization
When the ignition switch is pushed to the ON
position, NISSAN Voice Recognition is initia-
lized, which may take up to one minute. When
completed, the system is ready to accept voice
commands. If
initialization completes, the display will show the
message: “Phonetic data downloading. Please
wait.”
BEFORE STARTING
To get the best recognition performance from
NISSAN Voice Recognition, observe the follow-
ing:
. The interior of the vehicle should be as quiet
as possible. Close the windows to eliminate
the surrounding noises (traffic noise and
vibration sounds, etc.) , which may prevent
the system from correctly recognizing the
voice commands.
. Wait until the tone sounds before speaking a
command.
. Speak in a natural conversational voice
without pausing between words.
. If the air conditioner is set to “Auto”, the fan
speed is automatically lowered so that your
commands can be recognized more easily.
GIVING VOICE COMMANDS
1. Push
switch.
2. A list of commands appears on the screen, and the system provides the voice menu
prompt “Would you like to access Phone,
Navigation, Information or Help?”.
3. After the tone sounds and the icon on the
9-4Voice recognition
Page 169 of 235
![NISSAN ARMADA 2012 1.G 06IT Navigation Manual screen changes from []to[], speak
a command.
4. Continue to follow the voice menu prompts and speak after the tone sounds until your
desired operation is completed.
Operating tips
.Say a command after NISSAN ARMADA 2012 1.G 06IT Navigation Manual screen changes from []to[], speak
a command.
4. Continue to follow the voice menu prompts and speak after the tone sounds until your
desired operation is completed.
Operating tips
.Say a command after](/img/5/280/w960_280-168.png)
screen changes from []to[], speak
a command.
4. Continue to follow the voice menu prompts and speak after the tone sounds until your
desired operation is completed.
Operating tips
.Say a command after the tone.
. Commands that are available are always
shown on the display and spoken through
voice menu prompts. Commands other than
those that are displayed are not accepted.
Please follow the prompts given by the
system.
. If the command is not recognized, the
system announces, “Please say again”.
Repeat the command in a clear voice.
. Push
previous screen.
. If you want to cancel the command, push
and hold
cancelled” will be announced.
. When you do not say a command, the
system pauses the operation. Push
. If you want to adjust the volume of the
system feedback, push the volume control
buttons [+] or [−] on the steering switch or
use the audio system volume knob while the system is making an announcement.
How to speak numbers
NISSAN Voice Recognition requires a certain
way to speak numbers when giving voice
commands. Refer to the following examples.
General rule:
Only single digits 0 (zero) to 9 can be used. (For
example, if you would like to say 500, “five zero
zero” can be used, but “five hundred” cannot.
Examples:
1-800-662-6200
“One eight zero zero six six two six two zero
zero”
Improving Recognition of Phone numbers:
You can improve the recognition of phone
numbers by saying the phone number in 3
groups of numbers. For example, when you try to
call 800-662-6200, say “Eight Zero Zero” first,
and the system will then ask you for the next
three digits. Then, say “Six Six Two”. After
recognition, the system will then ask for the last
4 digits. Say, “Six Two Zero Zero”. Using this
method of phone digit entry can improve
recognition performance.
INFO:
When speaking a house number, speak the
number “0” as “zero”. If the letter “O” is included
in the house number, it will not be recognized as
the number “0” even if you speak “oh” instead of
“zero”. You can only say zero for “0”.
Voice recognition9-5