transmission NISSAN ARMADA 2017 2.G User Guide
[x] Cancel search | Manufacturer: NISSAN, Model Year: 2017, Model line: ARMADA, Model: NISSAN ARMADA 2017 2.GPages: 614, PDF Size: 2.87 MB
Page 194 of 614
4. The outside mirror surfaces move down-ward.
When one of the following conditions has
occurred, the outside mirror surfaces will return
to their original positions.
. The shift lever is moved to any position other
than R (Reverse) .
. The outside mirror control switch is set to
the center position.
. The ignition switch is placed in the OFF
position.
Automatic anti-glare (if so equipped)
The outside rearview mirrors are designed so
that its automatically change reflection accord-
ing to the intensity of the headlights of the
vehicle following you.
The anti-glare system will be automatically
turned on when the ignition switch is placed in
the ON position.SIC4448
VANITY MIRROR
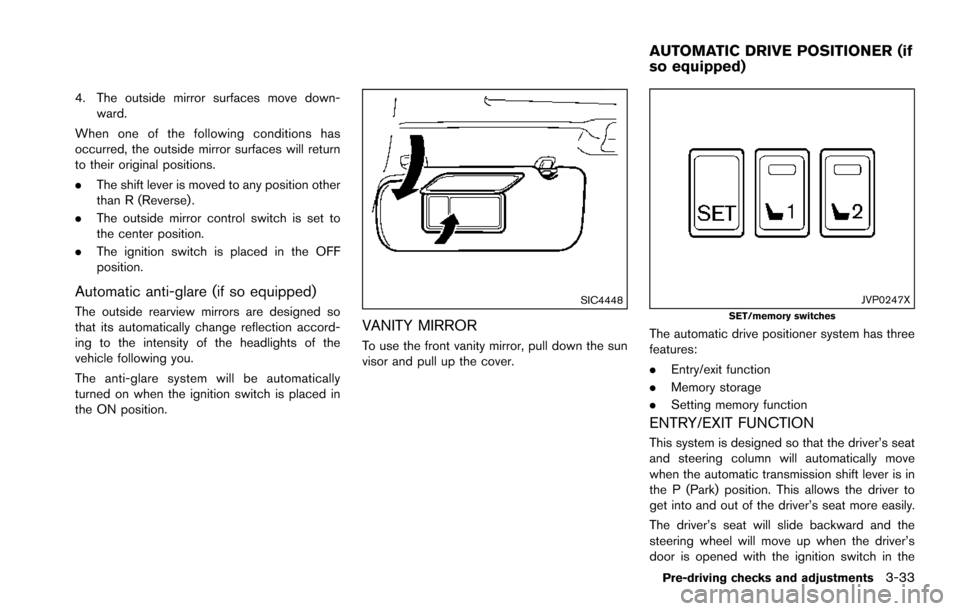
To use the front vanity mirror, pull down the sun
visor and pull up the cover.
JVP0247XSET/memory switches
The automatic drive positioner system has three
features:
.Entry/exit function
. Memory storage
. Setting memory function
ENTRY/EXIT FUNCTION
This system is designed so that the driver’s seat
and steering column will automatically move
when the automatic transmission shift lever is in
the P (Park) position. This allows the driver to
get into and out of the driver’s seat more easily.
The driver’s seat will slide backward and the
steering wheel will move up when the driver’s
door is opened with the ignition switch in the
Pre-driving checks and adjustments3-33
AUTOMATIC DRIVE POSITIONER (if
so equipped)
Page 342 of 614
5 Starting and driving
Precautions when starting and driving ................................ 5-4Exhaust gas (carbon monoxide) ...................................... 5-4
Three-way catalyst .............................................................. 5-4
Tire Pressure Monitoring System (TPMS) .................... 5-5
Avoiding collision and rollover ......................................... 5-8
On-pavement and off-road driving precautions .......... 5-9
Off-road recovery ................................................................ 5-9
Rapid air pressure loss ...................................................... 5-9
Drinking alcohol/drugs and driving .............................. 5-10
Driving safety precautions .............................................. 5-10
Push-button ignition switch ................................................. 5-12 Operating range for engine start function ................. 5-13
Push-button ignition switch positions ......................... 5-14
Emergency engine shut off ............................................ 5-14
Intelligent Key battery discharge .................................. 5-15
Before starting the engine ................................................... 5-15
Starting the engine ................................................................ 5-16 Remote start (if so equipped) ....................................... 5-16
Driving the vehicle ................................................................. 5-17 Engine protection mode ................................................. 5-17
Automatic transmission ................................................... 5-18
Parking brake ........................................................................\
.. 5-22
Lane Departure Warning (LDW)/Lane Departure
Prevention (LDP) (if so equipped) .................................... 5-23 LDW system operation ................................................... 5-24 Turning the LDW system ON/OFF ............................ 5-25
How to enable/disable the LDW system ................. 5-26
LDP system operation .................................................. 5-26
Turning the LDP system ON/OFF ............................. 5-28
How to enable/disable the LDP system .................. 5-28
LDW/LDP system limitations ...................................... 5-29
System temporarily unavailable .................................. 5-31
System malfunction ....................................................... 5-32
System maintenance ..................................................... 5-32
Blind Spot Warning (BSW) (if so equipped) ................ 5-33
BSW system operation ................................................ 5-35
Turning the BSW system ON/OFF ........................... 5-36
How to enable/disable the BSW system ................ 5-36
BSW system limitations ............................................... 5-37
BSW driving situations ................................................. 5-38
System temporarily unavailable .................................. 5-41
System malfunction ....................................................... 5-41
System maintenance ..................................................... 5-42
Blind Spot Intervention
Š(BSI) (if so equipped) ........... 5-43
BSI system operation .................................................... 5-45
Turning the BSI system ON/OFF ............................... 5-46
How to enable/disable the BSI system ................... 5-47
BSI system limitations ................................................... 5-47
BSI driving situations .................................................... 5-49
System temporarily unavailable .................................. 5-54
Page 352 of 614
.Do not drive across steep slopes.
Instead drive either straight up or
straight down the slopes. Off-road
vehicles can tip over sideways much
more easily than they can forward or
backward.
. Many hills are too steep for any
vehicle. If you drive up them, you
may stall. If you drive down them,
you may not be able to control your
speed. If you drive across them, you
may roll over.
. Do not shift ranges while driving on
downhill grades as this could cause
loss of control of the vehicle.
. Stay alert when driving to the top of
a hill. At the top there could be a
drop-off or other hazard that could
cause an accident.
. If your engine stalls or you cannot
make it to the top of a steep hill,
never attempt to turn around. Your
vehicle could tip or roll over. Always
back straight down in R (Reverse)
range. Never back down in N (Neu-
tral) , using only the brake, as this
could cause loss of control. .
Heavy braking going down a hill
could cause your brakes to overheat
and fade, resulting in loss of control
and an accident. Apply brakes
lightly and use a low range to
control your speed.
. Unsecured cargo can be thrown
around when driving over rough
terrain. Properly secure all cargo
so it will not be thrown forward
and cause injury to you or your
passengers.
. To avoid raising the center of gravity
excessively, do not exceed the rated
capacity of the roof rack (if so
equipped) and evenly distribute the
load. Secure heavy loads in the
cargo area as far forward and as
low as possible. Do not equip the
vehicle with tires larger than speci-
fied in this manual. This could cause
your vehicle to roll over.
. Do not grip the inside or spokes of
the steering wheel when driving off-
road. The steering wheel could
move suddenly and injure your
hands. Instead drive with your fin-
gers and thumbs on the outside of
the rim. .
Before operating the vehicle, ensure
that the driver and all passengers
have their seat belts fastened.
. Always drive with the floor mats in
place as the floor may became hot.
. Lower your speed when encounter-
ing strong crosswinds. With a higher
center of gravity, your NISSAN is
more affected by strong side winds.
Slower speeds ensure better vehicle
control.
. Do not drive beyond the perfor-
mance capability of the tires, even
with 4WD engaged.
. For 4WD equipped vehicles, do not
attempt to raise two wheels off the
ground and shift the transmission to
any drive or reverse position with
the engine running. Doing so may
result in drivetrain damage or un-
expected vehicle movement which
could result in serious vehicle da-
mage or personal injury.
. Do not attempt to test a 4WD
equipped vehicle on a 2-wheel dy-
namometer (such as the dynam-
ometers used by some states for
emissions testing) , or similar equip-
Starting and driving5-11
Page 358 of 614
1. Make sure that the Intelligent Key is on you.
2. Depress the brake pedal.
3. Push the ignition switch once to the ONposition.
For additional information about the remote
engine start function, see “Remote engine start”
(P.3-19) .ENGINE PROTECTION MODE
The engine has an engine protection mode to
reduce the chance of damage if the coolant
temperature becomes too high (for example,
when climbing steep grades in high temperature
with heavy loads, such as when towing a trailer) .
When the engine temperature reaches a certain
level:
. The engine coolant temperature gauge will
move toward the H position.
. Engine power may be reduced.
. The air conditioning cooling function may be
automatically turned OFF for a short time
(the blower will continue to operate) .
Engine power and, under some conditions,
vehicle speed will decrease. Vehicle speed can
be controlled with the accelerator pedal, but the
vehicle may not accelerate at the desired speed.
The transmission will downshift or upshift as it
reaches prescribed shift points. You can also
shift manually.
As driving conditions change and engine cool-
ant temperature is reduced, vehicle speed can
be increased using the accelerator pedal, and
air conditioning cooling function will automati-
cally be turned back ON. If:
1. The engine coolant temperature is not
reduced.
2. The air conditioning cooling function does not turn back ON.
3. The engine oil pressure warning light
illuminates or engine coolant temperature
gauge does not return to the normal range
from the H position, this may indicate a
malfunction. Move the vehicle off the road to
a safe area and allow the engine to cool. If
after checking the oil and coolant, the
remains on or engine coolant temperature
does not return to the normal range, do not
continue to drive. It is recommended you
contact a NISSAN dealer.
The Malfunction Indicator Light (MIL)
may
also come ON. You do not need to have your
vehicle towed, unless it remains on, but have it
inspected soon. It is recommended you contact
a NISSAN dealer for this service. See “Warning
lights, indicator lights and audible reminders”
(P.2-10) .
WARNING
Overheating can result in reduced en-
gine power and vehicle speed. The
Starting and driving5-17
DRIVING THE VEHICLE
Page 359 of 614
5-18Starting and driving
reduced speed may be lower than other
traffic, which could increase the chance
of a collision. Be especially careful
when driving. If the vehicle cannot
maintain a safe driving speed, pull to
the side of the road in a safe area.
Allow the engine to cool and return to
normal operation. See“If your vehicle
overheats” (P.6-14) .
CAUTION
Running the engine with the engine oil
pressure warning light on could cause
serious damage to the engine almost
immediately. Such damage is not cov-
ered by warranty. Turn off the engine as
soon as it is safe to do so.
AUTOMATIC TRANSMISSION
7 speed automatic transmission
The automatic transmission in your vehicle is
electronically controlled by a transmission con-
trol module to produce maximum efficiency and
smooth operation.
Shown on the following pages are the recom-
mended operating procedures for this transmis-
sion. Follow these procedures for maximum
vehicle performance and driving enjoyment.
Starting the vehicle
After starting the engine, fully depress the foot
brake pedal and push the shift lever button
before shifting the shift lever to the R (Reverse) ,
N (Neutral) , D (Drive) or Manual shift mode
position. Be sure the vehicle is fully stopped
before attempting to shift the shift lever.
This automatic transmission model is de-
signed so that the foot brake pedal must
be depressed before shifting from P (Park)
to any drive position while the ignition
switch position is ON.
The shift lever cannot be moved out of the
P (Park) position and into any of the other
gear positions if the ignition switch is
pushed to the LOCK, OFF or ACC position. 1. Keep the foot brake pedal depressed and
push the shift lever button to shift into a
driving gear.
2. Release the parking brake and foot brake, then gradually start the vehicle in motion.
WARNING
.Do not depress the accelerator
pedal while shifting from P (Park)
or N (Neutral) to R (Reverse) , D
(Drive) or manual shift mode. Al-
ways depress the brake pedal until
shifting is completed. Failure to do
so could cause you to lose control
and have an accident.
. Cold engine idle speed is high, so
use caution when shifting into a
forward or reverse gear before the
engine has warmed up.
. Never shift to either the P (Park) or
R (Reverse) position while the vehi-
cle is moving forward and P (Park) ,
D (Drive) position or manual shift
mode while the vehicle is moving
rearward. This could cause an acci-
dent or damage the transmission.
Page 360 of 614
.Do not downshift abruptly on slip-
pery roads. This may cause a loss of
control.
CAUTION
.Except in an emergency, do not shift
to the N (Neutral) position while
driving. Coasting with the transmis-
sion in the N (Neutral) position may
cause serious damage to the trans-
mission.
. To avoid possible damage to your
vehicle; when stopping the vehicle
on an uphill grade, do not hold the
vehicle by depressing the accelera-
tor pedal. The foot brake should be
used for this purpose.
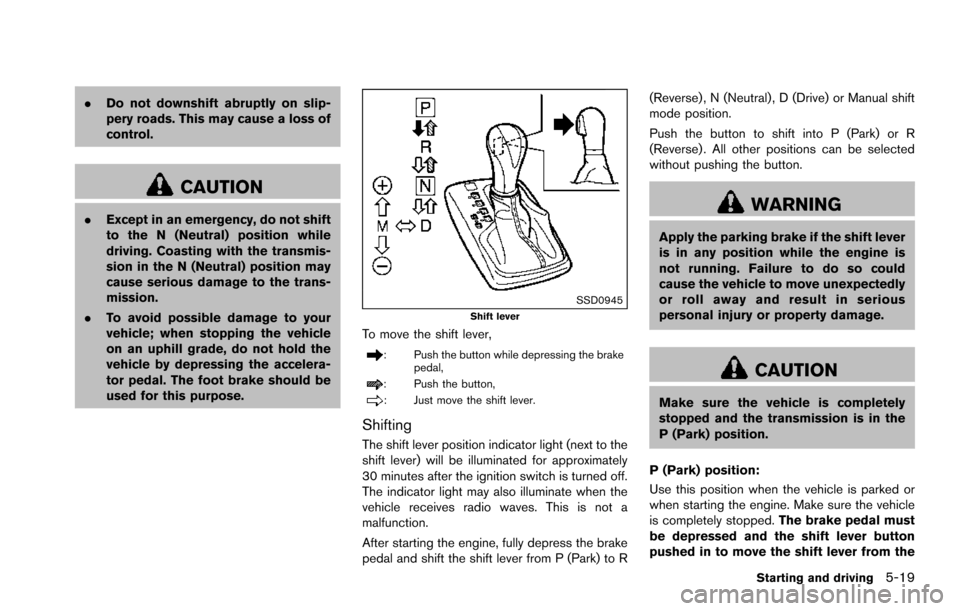
SSD0945Shift lever
To move the shift lever,
: Push the button while depressing the brake
pedal,
: Push the button,
: Just move the shift lever.
Shifting
The shift lever position indicator light (next to the
shift lever) will be illuminated for approximately
30 minutes after the ignition switch is turned off.
The indicator light may also illuminate when the
vehicle receives radio waves. This is not a
malfunction.
After starting the engine, fully depress the brake
pedal and shift the shift lever from P (Park) to R (Reverse) , N (Neutral) , D (Drive) or Manual shift
mode position.
Push the button to shift into P (Park) or R
(Reverse) . All other positions can be selected
without pushing the button.
WARNING
Apply the parking brake if the shift lever
is in any position while the engine is
not running. Failure to do so could
cause the vehicle to move unexpectedly
or roll away and result in serious
personal injury or property damage.
CAUTION
Make sure the vehicle is completely
stopped and the transmission is in the
P (Park) position.
P (Park) position:
Use this position when the vehicle is parked or
when starting the engine. Make sure the vehicle
is completely stopped. The brake pedal must
be depressed and the shift lever button
pushed in to move the shift lever from the
Starting and driving5-19
Page 361 of 614
5-20Starting and driving
N (Neutral) position or any drive position to
the P (Park) position.Apply the parking brake.
When parking on a hill, apply the parking brake
first, then move the shift lever to the P (Park)
position.
CAUTION
Use this position only when the vehicle
is completely stopped.
R (Reverse):
Use this position to back up. Always be sure the
vehicle is completely stopped before selecting
the R (Reverse) position. The brake pedal
must be depressed and the shift lever
button pushed in to move the shift lever
from the P (Park) position, the N (Neutral)
position or any drive position to the R
(Reverse) position.
N (Neutral):
Neither forward nor reverse gear is engaged.
The engine can be started in this position. You
may shift to the N (Neutral) position and restart a
stalled engine while the vehicle is moving.
D (Drive):
Use this position for all normal forward driving.
Manual shift mode
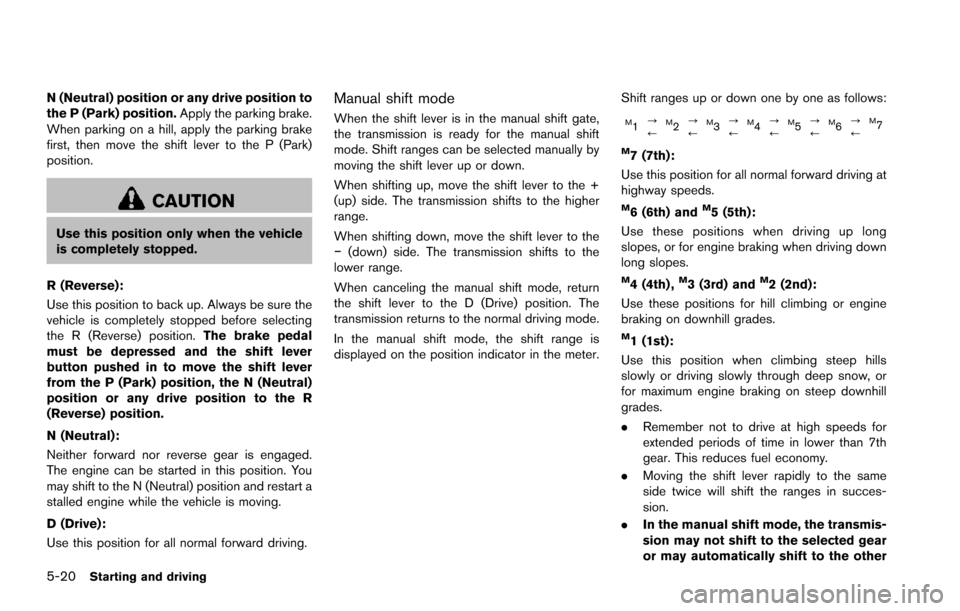
When the shift lever is in the manual shift gate,
the transmission is ready for the manual shift
mode. Shift ranges can be selected manually by
moving the shift lever up or down.
When shifting up, move the shift lever to the +
(up) side. The transmission shifts to the higher
range.
When shifting down, move the shift lever to the
í (down) side. The transmission shifts to the
lower range.
When canceling the manual shift mode, return
the shift lever to the D (Drive) position. The
transmission returns to the normal driving mode.
In the manual shift mode, the shift range is
displayed on the position indicator in the meter. Shift ranges up or down one by one as follows:M1
?
/M2?
/M3?
/M4?
/M5?
/M6?
/M7
M7 (7th):
Use this position for all normal forward driving at
highway speeds.
M6 (6th) andM5 (5th):
Use these positions when driving up long
slopes, or for engine braking when driving down
long slopes.
M4 (4th) ,M3 (3rd) andM2 (2nd):
Use these positions for hill climbing or engine
braking on downhill grades.
M1 (1st):
Use this position when climbing steep hills
slowly or driving slowly through deep snow, or
for maximum engine braking on steep downhill
grades.
. Remember not to drive at high speeds for
extended periods of time in lower than 7th
gear. This reduces fuel economy.
. Moving the shift lever rapidly to the same
side twice will shift the ranges in succes-
sion.
. In the manual shift mode, the transmis-
sion may not shift to the selected gear
or may automatically shift to the other
Page 362 of 614
gear. This helps maintain driving per-
formance and reduces the chance of
vehicle damage or loss of control.
. When the transmission does not shift
to the selected gear, the Automatic
Transmission (AT) position indicator
light (in the vehicle information dis-
play) will blink and the buzzer will
sound.
. In the manual shift mode, the transmis-
sion automatically shifts down to 1st
gear before the vehicle comes to a
stop. When accelerating again, it is
necessary to shift up to the desired
range.
Accelerator downshift — In D (Drive)
position —
For passing or hill climbing, fully depress the
accelerator pedal to the floor. This shifts the
transmission down into the lower gear, depend-
ing on the vehicle speed.
Fail-safe
When the fail-safe operation occurs, note that
the transmission will be locked in any of the
forward gears according to the condition.
If the vehicle is driven under extreme
conditions, such as excessive wheel spin-
ning and subsequent hard braking, the fail-safe system may be activated. This will
occur even if all electrical circuits are
functioning properly. In this case, push
the switch to the OFF position and wait for
3 seconds. Then push the ignition switch
back to the ON position. The vehicle
should return to its normal operating
condition. If it does not return to its normal
operating condition, have the transmission
checked and repaired, if necessary. It is
recommended you visit a NISSAN dealer
for this service.
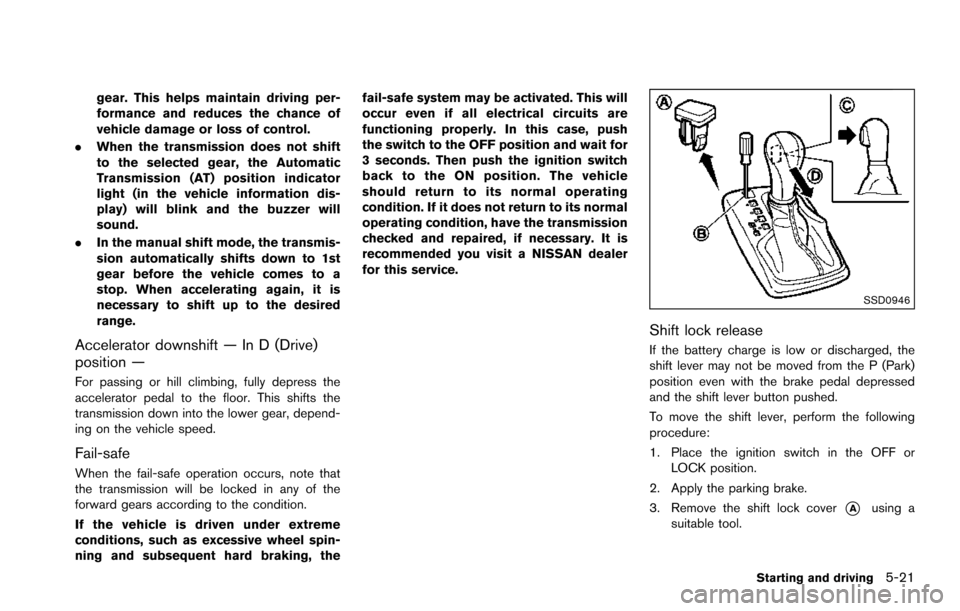
SSD0946
Shift lock release
If the battery charge is low or discharged, the
shift lever may not be moved from the P (Park)
position even with the brake pedal depressed
and the shift lever button pushed.
To move the shift lever, perform the following
procedure:
1. Place the ignition switch in the OFF or
LOCK position.
2. Apply the parking brake.
3. Remove the shift lock cover
*Ausing a
suitable tool.
Starting and driving5-21
Page 363 of 614
5-22Starting and driving
4. Push down the shift lock*Bas illustrated.
5. Push the shift lever button
*Cand move the
shift lever to N (Neutral) position
*Dwhile
holding down the shift lock.
The vehicle may be moved to the desired
location.
If the lever cannot be moved out of P (Park) ,
have the automatic transmission system
checked as soon as possible. It is recom-
mended you visit a NISSAN dealer for this
service.WARNING
. Be sure the parking brake is fully
released before driving. Failure to
do so can cause brake failure and
lead to an accident.
. Do not release the parking brake
from outside the vehicle.
. Do not use the gear shift in place of
the parking brake. When parking, be
sure the parking brake is fully
engaged.
. To help avoid risk of injury or death
through unintended operation of
the vehicle and/or its systems, do
not leave children, people who re-
quire the assistance of others or
pets unattended in your vehicle.
Additionally, the temperature inside
a closed vehicle on a warm day can
quickly become high enough to
cause a significant risk of injury or
death to people and pets.
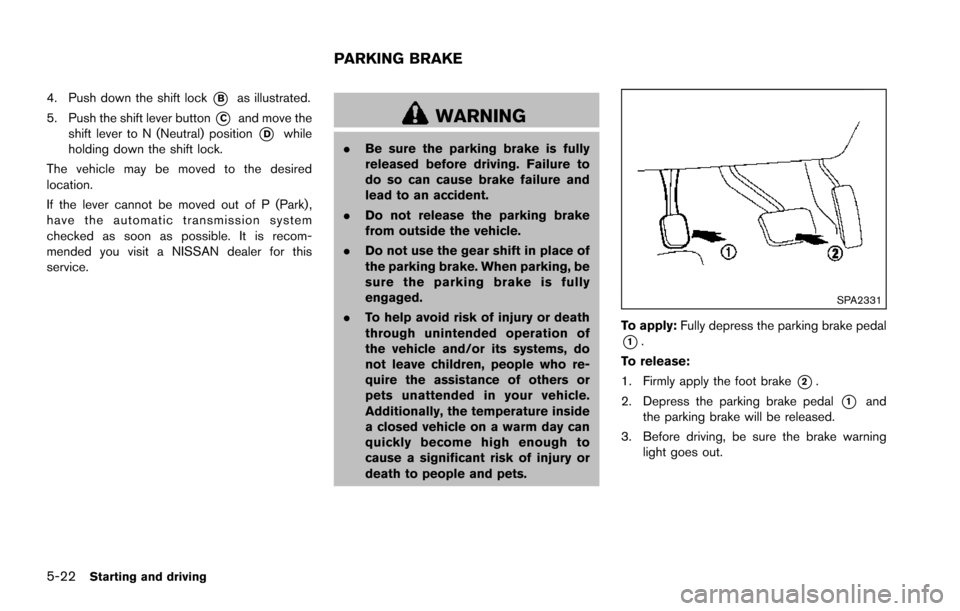
SPA2331
To apply: Fully depress the parking brake pedal
*1.
To release:
1. Firmly apply the foot brake
*2.
2. Depress the parking brake pedal
*1and
the parking brake will be released.
3. Before driving, be sure the brake warning light goes out.
PARKING BRAKE
Page 465 of 614
5-124Starting and driving
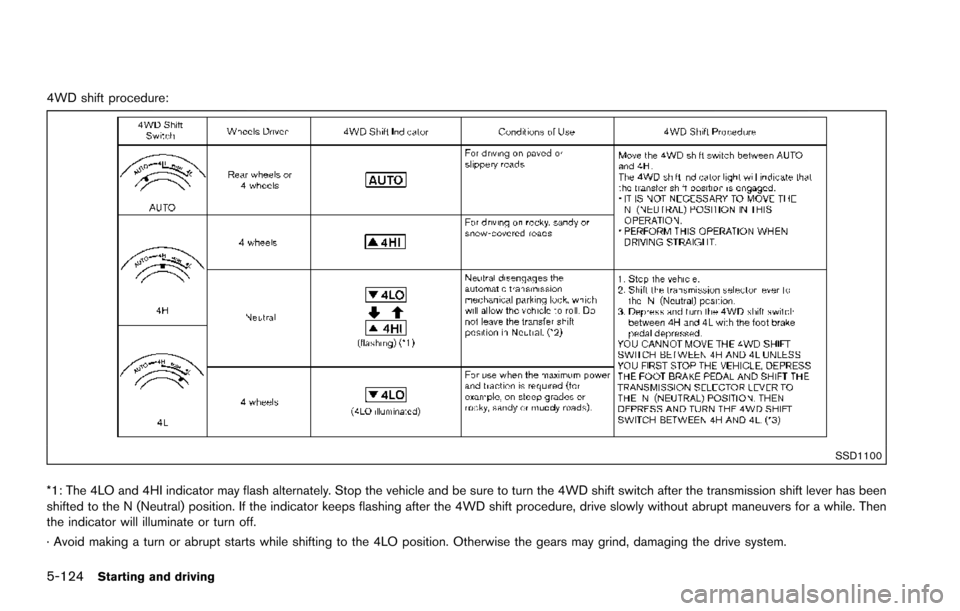
4WD shift procedure:
SSD1100
*1: The 4LO and 4HI indicator may flash alternately. Stop the vehicle and be sure to turn the 4WD shift switch after the transmission shift lever has been
shifted to the N (Neutral) position. If the indicator keeps flashing after the 4WD shift procedure, drive slowly without abrupt maneuvers for a while. Then
the indicator will illuminate or turn off.
· Avoid making a turn or abrupt starts while shifting to the 4LO position. Otherwise the gears may grind, damaging the drive system.