NISSAN ARMADA 2017 2.G Owners Manual
Manufacturer: NISSAN, Model Year: 2017, Model line: ARMADA, Model: NISSAN ARMADA 2017 2.GPages: 614, PDF Size: 2.87 MB
Page 501 of 614
6-18In case of emergency
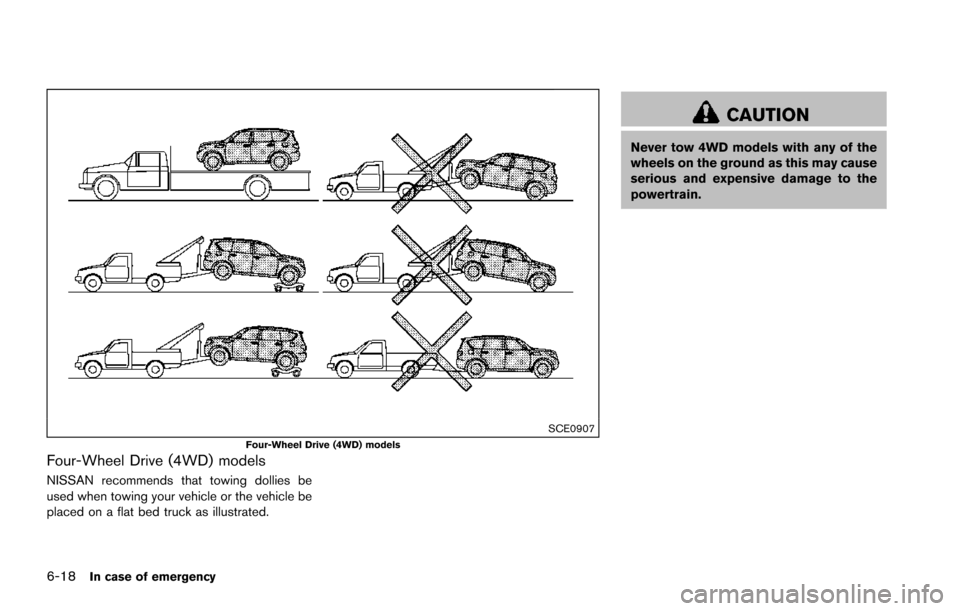
SCE0907Four-Wheel Drive (4WD) models
Four-Wheel Drive (4WD) models
NISSAN recommends that towing dollies be
used when towing your vehicle or the vehicle be
placed on a flat bed truck as illustrated.
CAUTION
Never tow 4WD models with any of the
wheels on the ground as this may cause
serious and expensive damage to the
powertrain.
Page 502 of 614
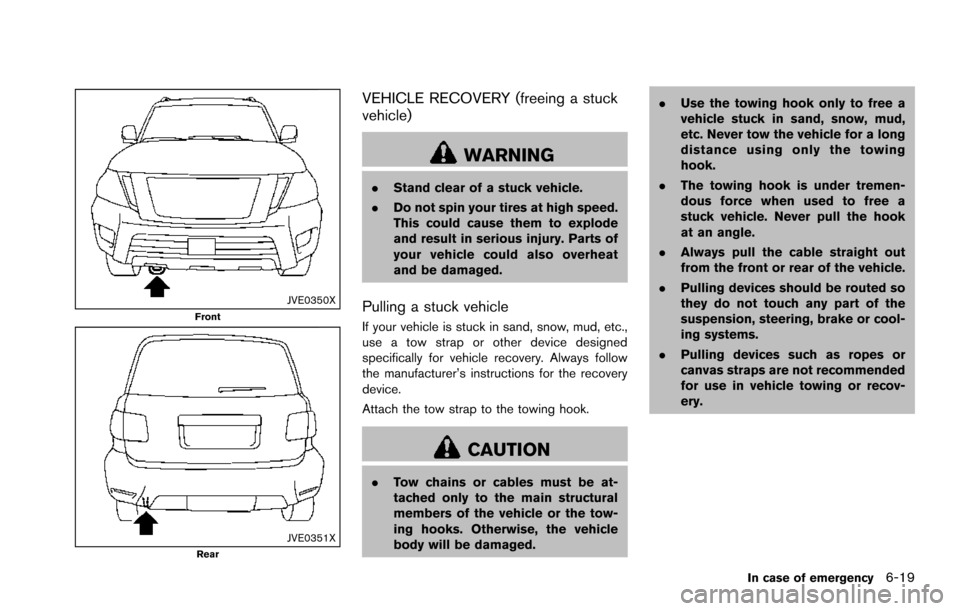
JVE0350XFront
JVE0351XRear
VEHICLE RECOVERY (freeing a stuck
vehicle)
WARNING
.Stand clear of a stuck vehicle.
. Do not spin your tires at high speed.
This could cause them to explode
and result in serious injury. Parts of
your vehicle could also overheat
and be damaged.
Pulling a stuck vehicle
If your vehicle is stuck in sand, snow, mud, etc.,
use a tow strap or other device designed
specifically for vehicle recovery. Always follow
the manufacturer’s instructions for the recovery
device.
Attach the tow strap to the towing hook.
CAUTION
.Tow chains or cables must be at-
tached only to the main structural
members of the vehicle or the tow-
ing hooks. Otherwise, the vehicle
body will be damaged. .
Use the towing hook only to free a
vehicle stuck in sand, snow, mud,
etc. Never tow the vehicle for a long
distance using only the towing
hook.
. The towing hook is under tremen-
dous force when used to free a
stuck vehicle. Never pull the hook
at an angle.
. Always pull the cable straight out
from the front or rear of the vehicle.
. Pulling devices should be routed so
they do not touch any part of the
suspension, steering, brake or cool-
ing systems.
. Pulling devices such as ropes or
canvas straps are not recommended
for use in vehicle towing or recov-
ery.
In case of emergency6-19
Page 503 of 614
6-20In case of emergency
Rocking a stuck vehicle
If your vehicle is stuck in sand, snow, mud, etc.,
use the following procedure:
1. Turn off the Vehicle Dynamic Control (VDC)system.
2. Make sure the area in front and behind the vehicle is clear of obstructions.
3. Turn the steering wheel right and left to clear an area around the front tires.
4. Slowly rock the vehicle forward and back- ward.
.Shift back and forth between R (Reverse)and D (Drive) .
.Apply the accelerator as little as possibleto maintain the rocking motion.
.Release the accelerator pedal before
shifting between R and D.
.Do not spin the tires above 35 MPH (55 km/h) .
5. If the vehicle cannot be freed after a few tries, contact a professional towing service
to remove the vehicle. This section describes the procedure for manu-
ally shifting the vehicle into the 4WD mode (4L
position) in case of an emergency.
WHEN 4WD WARNING LIGHT ILLU-
MINATES
If the 4WD warning light illuminates while
driving, there may be a malfunction in the
4WD system. Stop the vehicle and have the
vehicle checked as soon as possible. It is
recommended you contact a NISSAN dealer
for this service. (See “NISSAN all-mode 4WD
�Š”
(P.5-123) .)
When the vehicle is stuck on an uneven road
(desert, mud, etc.) and the 4WD warning light is
illuminated, be sure to place the 4WD shift
switch in the 4L position. If only the rear wheels
are spinning, this means that the transfer has not
switched to the 4L position electrically.
If this situation occurs, contact a dealer or road
assistance service for help. If an immediate
service is not available, perform the following
procedure to switch to the 4L position manually
and free the vehicle.
CAUTION
Only perform this procedure in an
emergency. If the vehicle is driven for a long period
of time over a long distance with a
component detached, foreign material
such as water, sand, etc. may enter from
the opening and this may cause a
malfunction in the drivetrain system.
After freeing a vehicle that has become
stuck, it is recommended you contact a
NISSAN dealer for inspection and re-
pair.
WARNING
.
Ensure your safety before perform-
ing the operations. The vehicle may
move unexpectedly.
. Place the ignition switch in the OFF
position, apply the parking brake
and let the vehicle cool down.
. Do not perform the following proce-
dure immediately after driving the
vehicle. Parts such as exhaust com-
ponents, the transmission, etc. are
very hot and may cause a burn
injury.
. Make sure that the parts that will be
operated as well as related parts
FOUR-WHEEL DRIVE (4WD)
MANUAL SHIFTING (4WD models)
Page 504 of 614
cool down before performing the
operation.
. Burrs or projecting portions of me-
tal components may cause unex-
pected injury to your fingers or
arms. Pay special attention in re-
gard to your safety while removing
and installing these parts. Wear
work gloves and protective arm
covers.
CAUTION
While removing and installing the parts,
prevent the removed parts from getting
dirty with water, dirt or sand. Protect
the parts using a cover such as a clean
cloth, etc.
OPERATING PROCEDURE
Place the ignition switch in the OFF position and
apply the parking brake. Let the vehicle cool
down before performing the following proce-
dure.
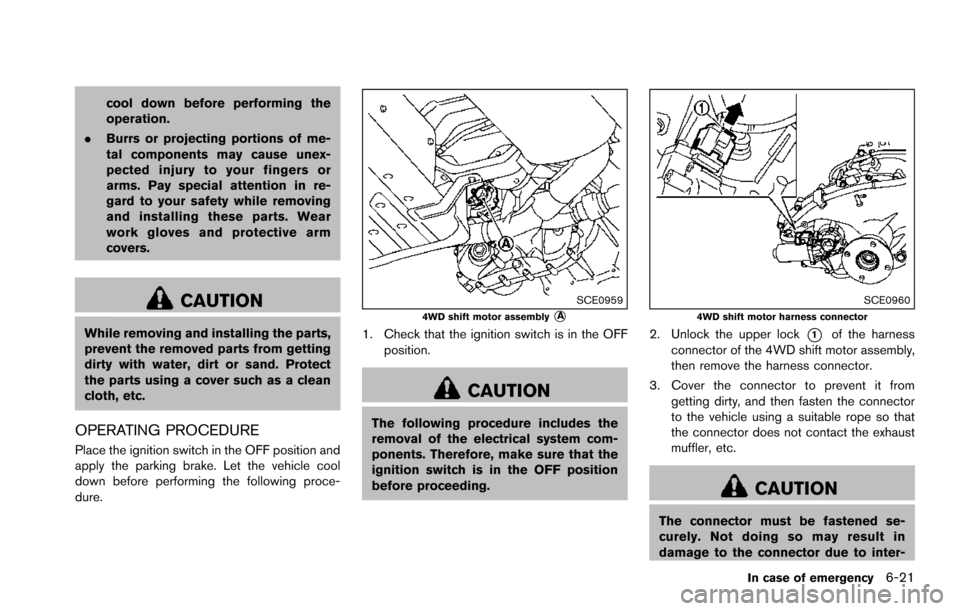
SCE09594WD shift motor assembly*A
1. Check that the ignition switch is in the OFF
position.
CAUTION
The following procedure includes the
removal of the electrical system com-
ponents. Therefore, make sure that the
ignition switch is in the OFF position
before proceeding.
SCE09604WD shift motor harness connector
2. Unlock the upper lock*1of the harness
connector of the 4WD shift motor assembly,
then remove the harness connector.
3. Cover the connector to prevent it from getting dirty, and then fasten the connector
to the vehicle using a suitable rope so that
the connector does not contact the exhaust
muffler, etc.
CAUTION
The connector must be fastened se-
curely. Not doing so may result in
damage to the connector due to inter-
In case of emergency6-21
Page 505 of 614
6-22In case of emergency
ference with other parts.
SCE0961
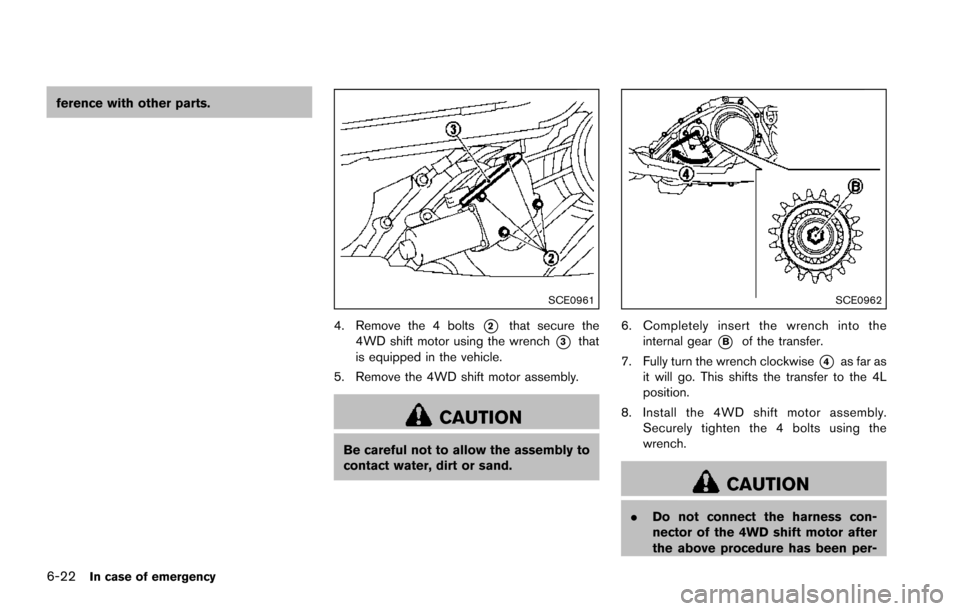
4. Remove the 4 bolts*2that secure the
4WD shift motor using the wrench
*3that
is equipped in the vehicle.
5. Remove the 4WD shift motor assembly.
CAUTION
Be careful not to allow the assembly to
contact water, dirt or sand.
SCE0962
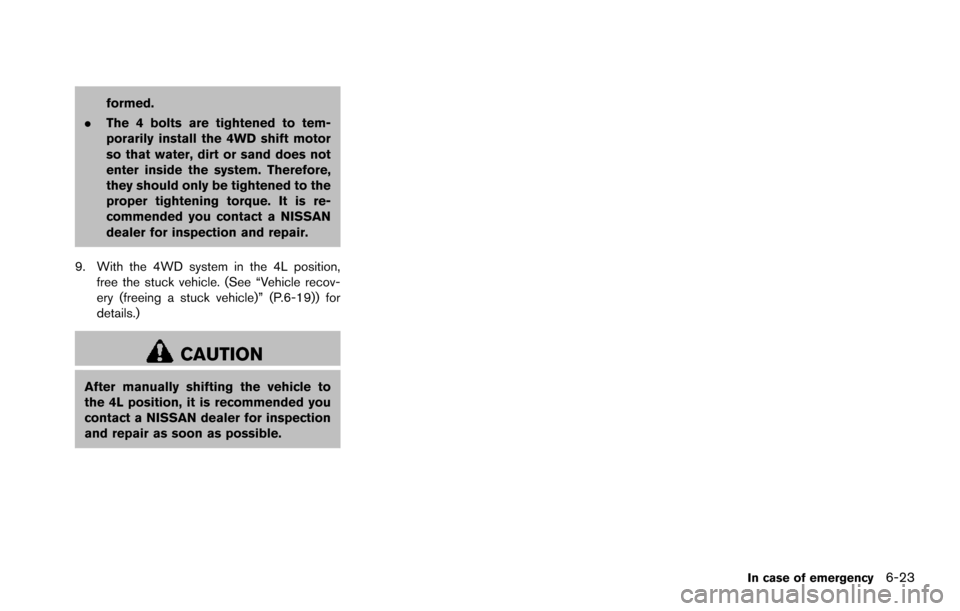
6. Completely insert the wrench into the internal gear
*Bof the transfer.
7. Fully turn the wrench clockwise
*4as far as
it will go. This shifts the transfer to the 4L
position.
8. Install the 4WD shift motor assembly. Securely tighten the 4 bolts using the
wrench.
CAUTION
.Do not connect the harness con-
nector of the 4WD shift motor after
the above procedure has been per-
Page 506 of 614
formed.
. The 4 bolts are tightened to tem-
porarily install the 4WD shift motor
so that water, dirt or sand does not
enter inside the system. Therefore,
they should only be tightened to the
proper tightening torque. It is re-
commended you contact a NISSAN
dealer for inspection and repair.
9. With the 4WD system in the 4L position, free the stuck vehicle. (See “Vehicle recov-
ery (freeing a stuck vehicle)” (P.6-19)) for
details.)
CAUTION
After manually shifting the vehicle to
the 4L position, it is recommended you
contact a NISSAN dealer for inspection
and repair as soon as possible.
In case of emergency6-23
Page 507 of 614

6-24In case of emergency
MEMO
Page 508 of 614
7 Appearance and care
Cleaning exterior ....................................................................... 7-2Washing ........................................................................\
......... 7-2
Waxing ........................................................................\
........... 7-2
Removing spots ................................................................... 7-3
Underbody ........................................................................\
..... 7-3
Glass ........................................................................\
.............. 7-3
Wheels ........................................................................\
........... 7-3
Chrome parts ....................................................................... 7-4
Tire dressing ........................................................................\
. 7-4 Cleaning interior ....................................................................... 7-4
Air fresheners ..................................................................... 7-5
Floor mats ........................................................................\
... 7-5
Seat belts ........................................................................\
.... 7-6
Corrosion protection ................................................................ 7-7 Most common factors contributing to
vehicle corrosion ............................................................... 7-7
Environmental factors influence the rate
of corrosion ........................................................................\
7-7
To protect your vehicle from corrosion ....................... 7-7
Page 509 of 614
7-2Appearance and care
In order to maintain the appearance of your
vehicle, it is important to take proper care of it.
To protect the paint surface, wash your vehicle
as soon as you can:
.after a rainfall to prevent possible damage
from acid rain
. after driving on coastal roads
. when contaminants such as soot, bird
droppings, tree sap, metal particles or bugs
get on the paint surface
. when dust or mud builds up on the surface
Whenever possible, store or park your vehicle
inside a garage or in a covered area.
When it is necessary to park outside, park in a
shady area or protect the vehicle with a body
cover.
Be careful not to scratch the paint surface
when putting on or removing the body
cover.
WASHING
Wash dirt off the vehicle with a wet sponge and
plenty of water. Clean the vehicle thoroughly
using a mild soap, a special vehicle soap or
general purpose dishwashing liquid mixed with
clean, lukewarm (never hot) water.
CAUTION
. Do not use car washes that use acid
in the detergent. Some car washes,
especially brushless ones, use some
acid for cleaning. The acid may react
with some plastic vehicle compo-
nents, causing them to crack. This
could affect their appearance, and
also could cause them not to func-
tion properly. Always check with
your car wash to confirm that acid
is not used.
. Do not wash the vehicle with strong
household soap, strong chemical
detergents, gasoline or solvents.
. Do not wash the vehicle in direct
sunlight or while the vehicle body is
hot, as the surface may become
water-spotted.
. Avoid using tight-napped or rough
cloths, such as washing mitts. Care
must be taken when removing
caked-on dirt or other foreign sub-
stances so the paint surface is not
scratched or damaged.
. Lock all doors before going through
automatic car wash. Locking doors helps prevent fuel-filler door from
opening and becoming damaged.
Rinse the vehicle again with plenty of clean
water.
Inside flanges, seams and folds on the doors,
hatches and hood are particularly vulnerable to
the effects of road salt. Therefore, these areas
must be regularly cleaned. Make sure that the
drain holes in the lower edge of the door are
open. Spray water under the body and in the
wheel wells to loosen the dirt and wash away
road salt.
Avoid leaving water spots on the paint surface
by using a damp chamois to dry the vehicle.
WAXING
Regular waxing protects the paint surface and
helps retain new vehicle appearance. Polishing
is recommended to remove built-up wax residue
and to avoid a weathered appearance before
reapplying wax.
A NISSAN dealer can assist you in choosing the
proper product.
. Wax your vehicle only after a thorough
washing. Follow the instructions supplied
with the wax.
. Do not use a wax containing any abrasives,
cutting compounds or cleaners that may
CLEANING EXTERIOR
Page 510 of 614
damage the vehicle finish.
Machine compound or aggressive polishing on a
base coat/clear coat paint finish may dull the
finish or leave swirl marks.
REMOVING SPOTS
Remove tar and oil spots, industrial dust,
insects, and tree sap as quickly as possible
from the paint surface to avoid lasting damage
or staining. Special cleaning products are
available at a NISSAN dealer or any automotive
accessory stores.
UNDERBODY
In areas where road salt is used in winter, the
underbody must be cleaned regularly. This will
prevent dirt and salt from building up and
causing the acceleration of corrosion on the
underbody and suspension. Before the winter
period and again in the spring, the underseal
must be checked and, if necessary, re-treated.
GLASS
Use glass cleaner to remove smoke and dust
film from the glass surfaces. It is normal for glass
to become coated with a film after the vehicle is
parked in the hot sun. Glass cleaner and a soft
cloth will easily remove this film.
CAUTION
When cleaning the inside of the win-
dows, do not use sharp-edged tools,
abrasive cleaners or chlorine-based
disinfectant cleaners. They could da-
mage the electrical conductors, radio
antenna elements or rear window
defroster elements.
WHEELS
Wash the wheels when washing the vehicle to
maintain their appearance.
. Clean the inner side of the wheels when the
wheel is changed or the underside of the
vehicle is washed.
. Inspect wheel rims regularly for dents or
corrosion. Such damage may cause loss of
pressure or poor seal at the tire bead.
. NISSAN recommends that the road wheels
be waxed to protect against road salt in
areas where it is used during winter.
CAUTION
Do not use abrasive cleaners when
washing the wheels.
Aluminum alloy wheels
Wash regularly with a sponge dampened in a
mild soap solution, especially during winter
months in areas where road salt is used. Salt
could discolor the wheels if not removed.
CAUTION
Follow the directions below to avoid
staining or discoloring the wheels:
.Do not use a cleaner that uses
strong acid or alkali contents to
clean the wheels.
. Do not apply wheel cleaners to the
wheels when they are hot. The
wheel temperature should be the
same as ambient temperature.
. Rinse the wheel to completely re-
move the cleaner within 15 minutes
after the cleaner is applied.
Bright wheels (if so equipped)
The bright wheels use a different coating
process than typical aluminum alloy wheel and
they are not plated wheels. These wheels are
clear-coated and require the following special
cleaning. They should be regularly washed with
a soft sponge soaked in a lot of water. After
Appearance and care7-3