NISSAN ARMADA 2019 Owner´s Manual
Manufacturer: NISSAN, Model Year: 2019, Model line: ARMADA, Model: NISSAN ARMADA 2019Pages: 536, PDF Size: 2.56 MB
Page 271 of 536
terrain.
. Do not drive across steep slopes.
Instead drive either straight up or
straight down the slopes. Off-
road vehicles can tip over side-
ways much more easily than they
can forward or backward.
. Many hills are too steep for any
vehicle. If you drive up them, you
may stall. If you drive down them,
you may not be able to control
your speed. If you drive across
them, you may roll over.
. Do not shift ranges while driving
on downhill grades as this could
cause loss of control of the vehi-
cle.
. Stay alert when driving to the top
of a hill. At the top there could be
a drop-off or other hazard that
could cause an accident.
. If your engine stalls or you cannot
make it to the top of a steep hill,
never attempt to turn around.
Your vehicle could tip or roll over.
Always back straight down in R
(Reverse) range. Never back down
in N (Neutral), using only the
brake, as this could cause loss of
control. .
Heavy braking going down a hill
could cause your brakes to over-
heat and fade, resulting in loss of
control and an accident. Apply
brakes lightly and use a low
range to control your speed.
. Unsecured cargo can be thrown
around when driving over rough
terrain. Properly secure all cargo
so it will not be thrown forward
and cause injury to you or your
passengers.
. To avoid raising the center of
gravity excessively, do not exceed
the rated capacity of the roof rack
(if so equipped) and evenly dis-
tribute the load. Secure heavy
loads in the cargo area as far
forward and as low as possible.
Do not equip the vehicle with tires
larger than specified in this man-
ual. This could cause your vehicle
to roll over.
. Do not grip the inside or spokes
of the steering wheel when driv-
ing off-road. The steering wheel
could move suddenly and injure
your hands. Instead drive with
your fingers and thumbs on the
outside of the rim. .
Before operating the vehicle, en-
sure that the driver and all pas-
sengers have their seat belts
fastened.
. Always drive with the floor mats
in place as the floor may became
hot.
. Lower your speed when encoun-
tering strong crosswinds. With a
higher center of gravity, your
NISSAN is more affected by
strong side winds. Slower speeds
ensure better vehicle control.
. Do not drive beyond the perfor-
mance capability of the tires,
even with 4WD engaged.
. For 4WD equipped vehicles, do
not attempt to raise two wheels
off the ground and shift the
transmission to any drive or re-
verse position with the engine
running. Doing so may result in
drivetrain damage or unexpected
vehicle movement which could
result in serious vehicle damage
or personal injury.
. Do not attempt to test a 4WD
equipped vehicle on a 2-wheel
dynamometer (such as the dy-
namometers used by some
states for emissions testing), or
Starting and driving5-11
Page 272 of 536
5-12Starting and driving
similar equipment even if the
other two wheels are raised off
the ground. Make sure you inform
test facility personnel that your
vehicle is equipped with 4WD
before it is placed on a dynam-
ometer. Using the wrong test
equipment may result in drive-
train damage or unexpected ve-
hicle movement which could
result in serious vehicle damage
or personal injury (4WD models).
. When a wheel is off the ground
due to an unlevel surface, do not
spin the wheel excessively.
. Accelerating quickly, sharp steer-
ing maneuvers or sudden braking
may cause loss of control.
. If at all possible, avoid sharp
turning maneuvers, particularly
at high speeds. Your vehicle has
a higher center of gravity than a
conventional passenger car. The
vehicle is not designed for cor-
nering at the same speeds as
conventional passenger cars.
Failure to operate this vehicle
correctly could result in loss of
control and/or a rollover acci-
dent. .
Always use tires of the same type,
size, brand, construction (bias,
bias-belted or radial), and tread
pattern on all four wheels. Install
tire chains on the rear wheels
when driving on slippery roads
and drive carefully.
. Be sure to check the brakes im-
mediately after driving in mud or
water. See “Brake system” (P.5-
135) for wet brakes.
. Avoid parking your vehicle on
steep hills. If you get out of the
vehicle and it rolls forward, back-
ward or sideways, you could be
injured.
. Whenever you drive off-road
through sand, mud or water as
deep as the wheel hub, more
frequent maintenance may be
required. See the maintenance
schedule shown in the "9. Main-
tenance and schedules" section.
. Spinning the rear wheels on slip-
pery surfaces may cause the 4WD
warning light to flash. The 4WD
system may also automatically
switch from the 4WD mode to
the 2WD mode. This could reduce
traction. Be especially careful
when towing a trailer (4WD mod- els).
Page 273 of 536
WARNING
Do not operate the push-button
ignition switch while driving the ve-
hicle except in an emergency. (The
engine will stop when the ignition
switch is pushed 3 consecutive times
or the ignition switch is pushed and
held for more than 2 seconds.) If the
engine stops while the vehicle is
being driven, this could lead to a
crash and serious injury.
Before operating the push-button igni-
tion switch, be sure to move the shift
lever to the P (Park) position.
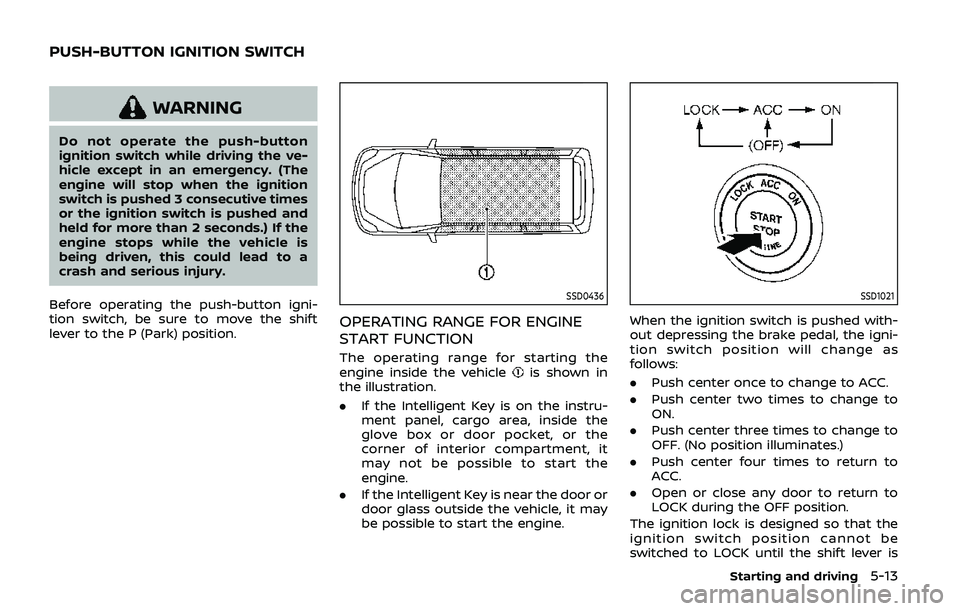
SSD0436
OPERATING RANGE FOR ENGINE
START FUNCTION
The operating range for starting the
engine inside the vehicleis shown in
the illustration.
. If the Intelligent Key is on the instru-
ment panel, cargo area, inside the
glove box or door pocket, or the
corner of interior compartment, it
may not be possible to start the
engine.
. If the Intelligent Key is near the door or
door glass outside the vehicle, it may
be possible to start the engine.
SSD1021
When the ignition switch is pushed with-
out depressing the brake pedal, the igni-
tion switch position will change as
follows:
.Push center once to change to ACC.
. Push center two times to change to
ON.
. Push center three times to change to
OFF. (No position illuminates.)
. Push center four times to return to
ACC.
. Open or close any door to return to
LOCK during the OFF position.
The ignition lock is designed so that the
ignition switch position cannot be
switched to LOCK until the shift lever is
Starting and driving5-13
PUSH-BUTTON IGNITION SWITCH
Page 274 of 536
5-14Starting and driving
moved to the P (Park) position.
When the ignition switch cannot be
pushed toward the LOCK position, pro-
ceed as follows:
1. Move the shift lever into the P (Park)position.
2. Push the ignition switch to the OFF position. The ignition switch position
indicator will not illuminate.
3. Open the door. The ignition switch will change to the LOCK position.
The shift lever can be moved from the P
(Park) position if the ignition switch is in
the ON position and the brake pedal is
depressed.
If the battery of the vehicle is dis-
charged, the push-button ignition
switch cannot be turned from the LOCK
position.
Some indicators and warnings for opera-
tion are displayed on the vehicle informa-
tion display between the speedometer
and tachometer. (See “Vehicle informa-
tion display” (P.2-20).)PUSH-BUTTON IGNITION SWITCH
POSITIONS
LOCK (Normal parking position)
The ignition switch can only be locked in
this position.
The ignition switch will be unlocked when
it is pushed to the ACC position while
carrying the Intelligent Key.
ACC (Accessories)
This position activates electrical acces-
sories such as the radio, when the engine
is not running.
ACC has a battery saver feature that will
turn the ignition switch to the OFF posi-
tion after a period of time under the
following conditions:
. all doors are closed.
. shift lever is in P (Park).
. turn signal/hazard indicator lights are
not flashing.
The battery saver feature will be can-
celled if any of the following occur:
. any door is opened.
. shift lever is moved out of P (Park).
. ignition switch changes position.
ON (Normal operating position)
This position turns on the ignition system
and electrical accessories.
ON has a battery saver feature that will
turn the ignition switch to the OFF posi-
tion, if the vehicle is not running, after
some time under the following condi-
tions:
.all doors are closed.
. shift lever is in P (Park).
. turn signal/hazard indicator lights are
not flashing.
The battery saver feature will be can-
celled if any of the following occur:
. any door is opened.
. shift lever is moved out of P (Park).
. ignition switch changes position.
OFF
The engine can be turned off in the
position.
The ignition lock is designed so that the
ignition switch cannot be switched to the
LOCK position until the shift lever is
moved to the P (Park) position.
Page 275 of 536
CAUTION
Do not leave the vehicle with the
push-button ignition switch in ACC or
ON positions when the engine is not
running for an extended period. This
can discharge the battery.
EMERGENCY ENGINE SHUT OFF
To shut off the engine in an emergency
situation while driving, perform the fol-
lowing procedure:
.Rapidly push the push-button ignition
switch 3 consecutive times in less
than 1.5 seconds, or
. Push and hold the push-button igni-
tion switch for more than 2 seconds.
JVS0404X
INTELLIGENT KEY BATTERY DIS-
CHARGE
If the battery of the Intelligent Key is
discharged, or environmental conditions
interfere with the Intelligent Key opera-
tion, start the engine according to the
following procedure:
1. Move the shift lever to the P (Park)
position.
2. Firmly apply the foot brake.
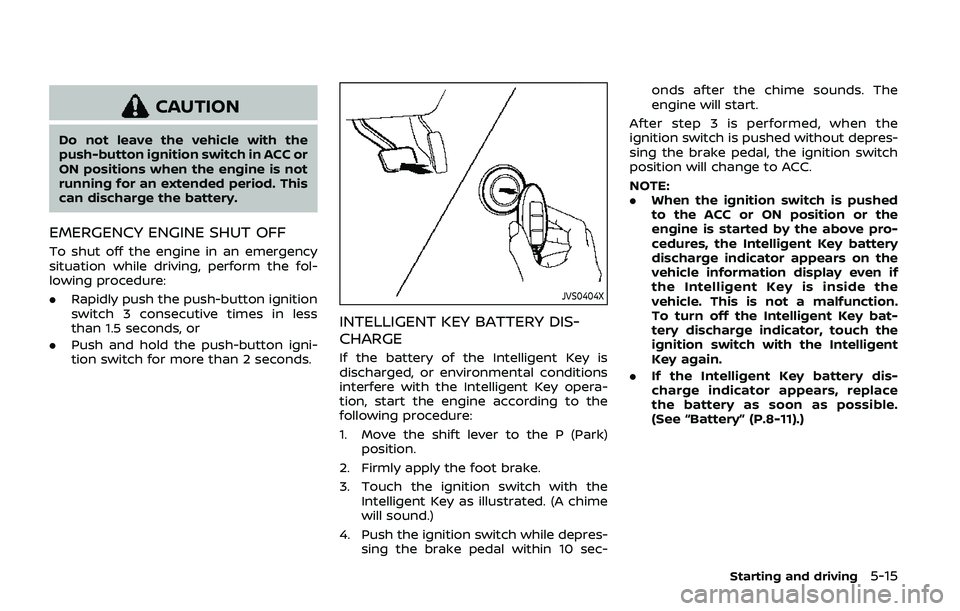
3. Touch the ignition switch with the Intelligent Key as illustrated. (A chime
will sound.)
4. Push the ignition switch while depres- sing the brake pedal within 10 sec- onds after the chime sounds. The
engine will start.
After step 3 is performed, when the
ignition switch is pushed without depres-
sing the brake pedal, the ignition switch
position will change to ACC.
NOTE:
. When the ignition switch is pushed
to the ACC or ON position or the
engine is started by the above pro-
cedures, the Intelligent Key battery
discharge indicator appears on the
vehicle information display even if
the Intelligent Key is inside the
vehicle. This is not a malfunction.
To turn off the Intelligent Key bat-
tery discharge indicator, touch the
ignition switch with the Intelligent
Key again.
. If the Intelligent Key battery dis-
charge indicator appears, replace
the battery as soon as possible.
(See “Battery” (P.8-11).)
Starting and driving5-15
Page 276 of 536
5-16Starting and driving
.Make sure the area around the vehicle
is clear.
. Check fluid levels such as engine oil,
coolant, brake fluid and window
washer fluid as frequently as possible,
or at least whenever you refuel.
. Check that all windows and lights are
clean.
. Visually inspect tires for their appear-
ance and condition. Also check tires
for proper inflation.
. Lock all doors.
. Position seat and adjust head re-
straints/headrests.
. Adjust inside and outside mirrors.
. Fasten seat belts and ask all passen-
gers to do likewise.
. Check the operation of warning lights
when the ignition switch is pushed to
the ON position. (See “Warning lights,
indicator lights and audible remin-
ders” (P.2-10).) 1. Apply the parking brake.
2. Move the shift lever to the P (Park) or N
(Neutral) position. (P is recommended.)
The starter is designed not to operate
unless the shift lever is in either of the
above positions.
3. Push the ignition switch to the ON position. Firmly depress the brake
pedal and push the ignition switch to
start the engine.
To start the engine immediately, push
and release the ignition switch while
depressing the brake pedal with the
ignition switch in any position.
.If the engine is very hard to start inextremely cold weather or when
restarting, depress the accelerator
pedal a little (approximately 1/3 to
the floor) and while holding, crank
the engine. Release the accelerator
pedal when the engine starts.
.If the engine is very hard to startbecause it is flooded, depress the
accelerator pedal all the way to the
floor and hold it. Push the ignition
switch to the ON position to start
cranking the engine. After 5 or 6
seconds, stop cranking by pushing
the ignition switch to OFF. After
cranking the engine, release the
accelerator pedal. Crank the engine
with your foot off the accelerator pedal
by depressing the brake
pedal and pushing the push-button
ignition switch to start the engine.
If the engine starts, but fails to run,
repeat the above procedure.
CAUTION
Do not operate the starter for more
than 15 seconds at a time. If the
engine does not start, push the
ignition switch to OFF and wait 10
seconds before cranking again,
otherwise the starter could be da-
maged.
4. Warm-up
Allow the engine to idle for at least 30
seconds after starting. Do not race the
engine while warming it up. Drive at
moderate speed for a short distance
first, especially in cold weather. In cold
weather, keep the engine running for
a minimum of 2 - 3 minutes before
shutting it off. Starting and stopping
the engine over a short period of time
may make the vehicle more difficult to
start.
When racing the engine up to 4,000
rpm or more under the no load
condition, the engine will enter the
BEFORE STARTING THE ENGINE STARTING THE ENGINE
Page 277 of 536
fuel cut mode.
5. To stop the engine, shift the shift lever to the P (Park) position and push the
ignition switch to the OFF position.
In preparation for the next engine start,
the engine may have a slightly delayed
shutoff after placing the ignition switch in
the OFF position, depending on the driv-
ing conditions.
NOTE:
Care should be taken to avoid situations
that can lead to potential battery dis-
charge and potential no-start condi-
tions such as:
1. Installation or extended use of elec-
tronic accessories that consume
battery power when the engine is
not running (Phone chargers, GPS,
DVD players, etc.)
2. Vehicle is not driven regularly and/
or only driven short distances.
In these cases, the battery may need to
be charged to maintain battery health.
REMOTE ENGINE START (if so
equipped)
Vehicles started with the remote engine
start function require the ignition switch
to be placed in the ON position before the
shift lever can be moved from the P (Park)
position. To place the ignition switch in the ON position, perform the following
steps:
1. Make sure that the Intelligent Key is
on you.
2. Firmly depress the brake pedal.
3. Push the ignition switch once to the ON position.
For additional information about the
remote engine start function, see “Re-
mote engine start” (P.3-19).
ENGINE PROTECTION MODE
The engine has an engine protection
mode to reduce the chance of damage
if the coolant temperature becomes too
high (for example, when climbing steep
grades in high temperature with heavy
loads, such as when towing a trailer).
When the engine temperature reaches a
certain level:
. The engine coolant temperature
gauge will move toward the H posi-
tion.
. Engine power may be reduced.
. The air conditioning cooling function
may be automatically turned OFF for a
short time (the blower will continue to
operate).
Engine power and, under some condi-
tions, vehicle speed will decrease. Vehicle
speed can be controlled with the accel-
erator pedal, but the vehicle may not
accelerate at the desired speed. The
transmission will downshift or upshift as
it reaches prescribed shift points. You can
also shift manually.
As driving conditions change and engine
coolant temperature is reduced, vehicle
speed can be increased using the accel-
erator pedal, and air conditioning cooling
function will automatically be turned
back ON.
Starting and driving5-17
DRIVING THE VEHICLE
Page 278 of 536
5-18Starting and driving
If:
1. The engine coolant temperature is notreduced.
2. The air conditioning cooling function does not turn back ON.
3. The engine oil pressure warning light
illuminates or engine coolant
temperature gauge does not return
to the normal range from the H
position, this may indicate a malfunc-
tion. Move the vehicle off the road to a
safe area and allow the engine to cool.
If after checking the oil and coolant,
the
remains on or engine coolant
temperature does not return to the
normal range, do not continue to
drive. It is recommended you contact
a NISSAN dealer.
The Malfunction Indicator Light (MIL)
may also come ON. You do not need to
have your vehicle towed, unless it re-
mains on, but have it inspected soon. It is
recommended you contact a NISSAN
dealer for this service. See “Warning lights,
indicator lights and audible reminders”
(P.2-10).
WARNING
Overheating can result in reduced
engine power and vehicle speed.
The reduced speed may be lower
than other traffic, which could in-
crease the chance of a collision. Be
especially careful when driving. If the
vehicle cannot maintain a safe driv-
ing speed, pull to the side of the road
in a safe area. Allow the engine to
cool and return to normal operation.
See “If your vehicle overheats” (P.6-
14).
CAUTION
Running the engine with the engine
oil pressure warning light on could
cause serious damage to the engine
almost immediately. Such damage is
not covered by warranty. Turn off the
engine as soon as it is safe to do so.
AUTOMATIC TRANSMISSION
7 speed automatic transmission
The automatic transmission in your vehi-
cle is electronically controlled by a trans-
mission control module to produce
maximum efficiency and smooth opera-
tion.
Shown on the following pages are the
recommended operating procedures for
this transmission. Follow these proce-
dures for maximum vehicle performance
and driving enjoyment.
Starting the vehicle
After starting the engine, fully depress the
foot brake pedal and push the shift lever
button before shifting the shift lever to
the R (Reverse), N (Neutral), D (Drive) or
Manual shift mode position. Be sure the
vehicle is fully stopped before attempting
to shift the shift lever.
This automatic transmission model is
designed so that the foot brake pedal
must be depressed before shifting from
P (Park) to any drive position while the
ignition switch position is ON.
The shift lever cannot be moved out of
the P (Park) position and into any of the
other gear positions if the ignition
switch is pushed to the LOCK, OFF or
ACC position.
Page 279 of 536
1. Keep the foot brake pedal depressedand push the shift lever button to shift
into a driving gear.
2. Release the parking brake and foot brake, then gradually start the vehicle
in motion.
WARNING
.Do not depress the accelerator
pedal while shifting from P (Park)
or N (Neutral) to R (Reverse), D
(Drive) or manual shift mode. Al-
ways depress the brake pedal
until shifting is completed. Failure
to do so could cause you to lose
control and have an accident.
. Cold engine idle speed is high, so
use caution when shifting into a
forward or reverse gear before
the engine has warmed up.
. Never shift to either the P (Park)
or R (Reverse) position while the
vehicle is moving forward and P
(Park), D (Drive) position or man-
ual shift mode while the vehicle is
moving rearward. This could
cause an accident or damage
the transmission. .
Do not downshift abruptly on
slippery roads. This may cause a
loss of control.
CAUTION
.Except in an emergency, do not
shift to the N (Neutral) position
while driving. Coasting with the
transmission in the N (Neutral)
position may cause serious da-
mage to the transmission.
. To avoid possible damage to your
vehicle; when stopping the vehi-
cle on an uphill grade, do not hold
the vehicle by depressing the
accelerator pedal. The foot brake
should be used for this purpose.
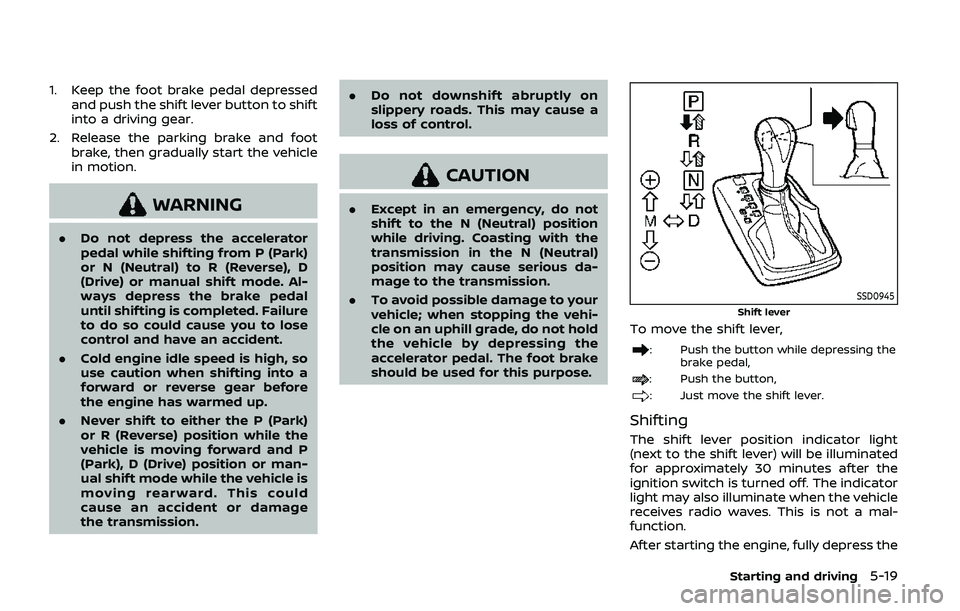
SSD0945
Shift lever
To move the shift lever,
: Push the button while depressing the
brake pedal,
: Push the button,
: Just move the shift lever.
Shifting
The shift lever position indicator light
(next to the shift lever) will be illuminated
for approximately 30 minutes after the
ignition switch is turned off. The indicator
light may also illuminate when the vehicle
receives radio waves. This is not a mal-
function.
After starting the engine, fully depress the
Starting and driving5-19
Page 280 of 536
5-20Starting and driving
brake pedal and shift the shift lever from
P (Park) to R (Reverse), N (Neutral), D
(Drive) or Manual shift mode position.
Push the button to shift into P (Park) or R
(Reverse). All other positions can be
selected without pushing the button.
WARNING
Apply the parking brake if the shift
lever is in any position while the
engine is not running. Failure to do
so could cause the vehicle to move
unexpectedly or roll away and result
in serious personal injury or property
damage.
CAUTION
Make sure the vehicle is completely
stopped and the transmission is in
the P (Park) position.
P (Park) position:
Use this position when the vehicle is
parked or when starting the engine. Make
sure the vehicle is completely stopped.
The brake pedal must be depressed and
the shift lever button pushed in to move the shift lever from the N (Neutral)
position or any drive position to the P
(Park) position.
Apply the parking brake.
When parking on a hill, apply the parking
brake first, then move the shift lever to
the P (Park) position.
CAUTION
Use this position only when the
vehicle is completely stopped.
R (Reverse):
Use this position to back up. Always be
sure the vehicle is completely stopped
before selecting the R (Reverse) position.
The brake pedal must be depressed and
the shift lever button pushed in to move
the shift lever from the P (Park) posi-
tion, the N (Neutral) position or any
drive position to the R (Reverse) posi-
tion.
N (Neutral):
Neither forward nor reverse gear is en-
gaged. The engine can be started in this
position. You may shift to the N (Neutral)
position and restart a stalled engine while
the vehicle is moving. D (Drive):
Use this position for all normal forward
driving.
Manual shift mode
When the shift lever is in the manual shift
gate, the transmission is ready for the
manual shift mode. Shift ranges can be
selected manually by moving the shift
lever up or down.
When shifting up, move the shift lever to
the + (up) side. The transmission shifts to
the higher range.
When shifting down, move the shift lever
to the − (down) side. The transmission
shifts to the lower range.
When canceling the manual shift mode,
return the shift lever to the D (Drive)
position. The transmission returns to the
normal driving mode.
In the manual shift mode, the shift range
is displayed on the position indicator in
the meter.