ignition NISSAN ARMADA 2019 Owner´s Manual
[x] Cancel search | Manufacturer: NISSAN, Model Year: 2019, Model line: ARMADA, Model: NISSAN ARMADA 2019Pages: 536, PDF Size: 2.56 MB
Page 386 of 536
5-126Starting and driving
.If it is difficult to free the vehicle,
repeat forward and backward move-
ment to increase the movement.
. If the vehicle is stuck deep in mud, tire
chains may be effective.
CAUTION
.Do not spin the tires excessively.
Tires will sink deep into the mud,
making it difficult to free the
vehicle.
. Avoid shifting gears with the en-
gine running at high speeds as
this may cause malfunction.
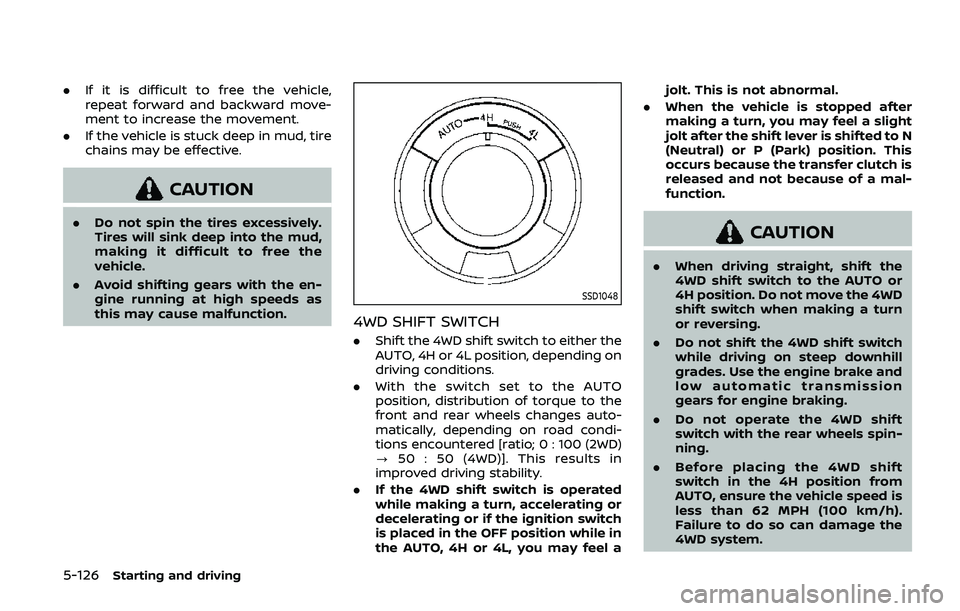
SSD1048
4WD SHIFT SWITCH
.Shift the 4WD shift switch to either the
AUTO, 4H or 4L position, depending on
driving conditions.
. With the switch set to the AUTO
position, distribution of torque to the
front and rear wheels changes auto-
matically, depending on road condi-
tions encountered [ratio; 0 : 100 (2WD)
? 50 : 50 (4WD)]. This results in
improved driving stability.
. If the 4WD shift switch is operated
while making a turn, accelerating or
decelerating or if the ignition switch
is placed in the OFF position while in
the AUTO, 4H or 4L, you may feel a jolt. This is not abnormal.
. When the vehicle is stopped after
making a turn, you may feel a slight
jolt after the shift lever is shifted to N
(Neutral) or P (Park) position. This
occurs because the transfer clutch is
released and not because of a mal-
function.
CAUTION
.When driving straight, shift the
4WD shift switch to the AUTO or
4H position. Do not move the 4WD
shift switch when making a turn
or reversing.
. Do not shift the 4WD shift switch
while driving on steep downhill
grades. Use the engine brake and
low automatic transmission
gears for engine braking.
. Do not operate the 4WD shift
switch with the rear wheels spin-
ning.
. Before placing the 4WD shift
switch in the 4H position from
AUTO, ensure the vehicle speed is
less than 62 MPH (100 km/h).
Failure to do so can damage the
4WD system.
Page 387 of 536
.Never shift the 4WD shift switch
between 4L and 4H while driving.
. Engine idling speed is high while
warming up the engine. Be espe-
cially careful when starting or
driving on slippery surfaces with
the 4WD shift switch in AUTO.
SSD1058
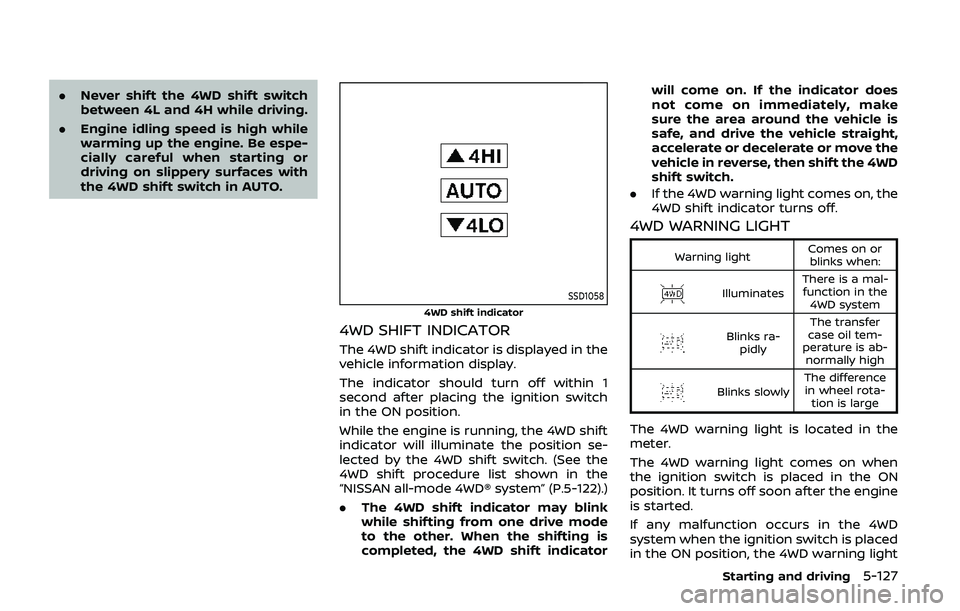
4WD shift indicator
4WD SHIFT INDICATOR
The 4WD shift indicator is displayed in the
vehicle information display.
The indicator should turn off within 1
second after placing the ignition switch
in the ON position.
While the engine is running, the 4WD shift
indicator will illuminate the position se-
lected by the 4WD shift switch. (See the
4WD shift procedure list shown in the
“NISSAN all-mode 4WD® system” (P.5-122).)
.The 4WD shift indicator may blink
while shifting from one drive mode
to the other. When the shifting is
completed, the 4WD shift indicator will come on. If the indicator does
not come on immediately, make
sure the area around the vehicle is
safe, and drive the vehicle straight,
accelerate or decelerate or move the
vehicle in reverse, then shift the 4WD
shift switch.
. If the 4WD warning light comes on, the
4WD shift indicator turns off.
4WD WARNING LIGHT
Warning light Comes on or
blinks when:
Illuminates There is a mal-
function in the 4WD system
Blinks ra- pidly The transfer
case oil tem-
perature is ab- normally high
Blinks slowly The difference
in wheel rota- tion is large
The 4WD warning light is located in the
meter.
The 4WD warning light comes on when
the ignition switch is placed in the ON
position. It turns off soon after the engine
is started.
If any malfunction occurs in the 4WD
system when the ignition switch is placed
in the ON position, the 4WD warning light
Starting and driving5-127
Page 391 of 536
Turn the wheels toward the side of
the road so the vehicle will move away
from the center of the road if it moves.
4. Push the ignition switch to the OFF position.
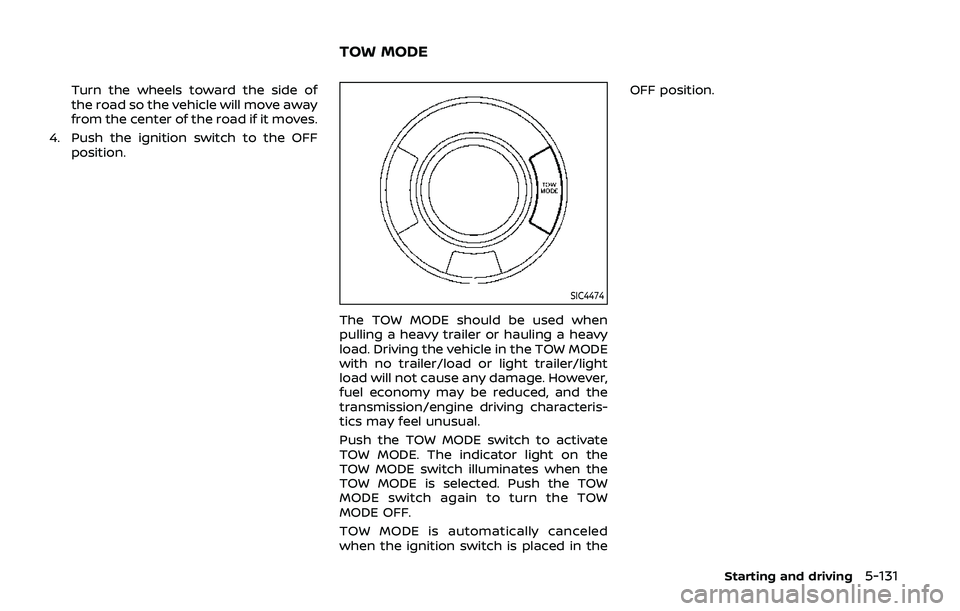
SIC4474
The TOW MODE should be used when
pulling a heavy trailer or hauling a heavy
load. Driving the vehicle in the TOW MODE
with no trailer/load or light trailer/light
load will not cause any damage. However,
fuel economy may be reduced, and the
transmission/engine driving characteris-
tics may feel unusual.
Push the TOW MODE switch to activate
TOW MODE. The indicator light on the
TOW MODE switch illuminates when the
TOW MODE is selected. Push the TOW
MODE switch again to turn the TOW
MODE OFF.
TOW MODE is automatically canceled
when the ignition switch is placed in the OFF position.
Starting and driving5-131
TOW MODE
Page 398 of 536
5-138Starting and driving
The Vehicle Dynamic Control (VDC) sys-
tem uses various sensors to monitor
driver inputs and vehicle motion. Under
certain driving conditions, the VDC sys-
tem helps to perform the following func-
tions.
.Controls brake pressure to reduce
wheel slip on one slipping drive wheel
so power is transferred to a non
slipping drive wheel on the same axle.
. Controls brake pressure and engine
output to reduce drive wheel slip
based on vehicle speed (traction con-
trol function).
. Controls brake pressure at individual
wheels and engine output to help the
driver maintain control of the vehicle
in the following conditions:
— understeer (vehicle tends to not
follow the steered path despite
increased steering input)
— oversteer (vehicle tends to spin due to certain road or driving condi-
tions).
The VDC system can help the driver to
maintain control of the vehicle, but it
cannot prevent loss of vehicle control in
all driving situations.
When the VDC system operates, the VDC
warning light
in the instrument panel
flashes so note the following: .
The road may be slippery or the
system may determine some action
is required to help keep the vehicle on
the steered path.
. You may feel a pulsation in the brake
pedal and hear a noise or vibration
from under the hood. This is normal
and indicates that the VDC system is
working properly.
. Adjust your speed and driving to the
road conditions.
If a malfunction occurs in the system, the
VDC warning light
illuminates in the
instrument panel. The VDC system auto-
matically turns off.
The VDC OFF switch is used to turn off the
VDC system. The VDC off indicator
illuminates to indicate the VDC system is
off. When the VDC switch is used to turn
off the system, the VDC system still
operates to prevent one drive wheel from
slipping by transferring power to a non
slipping drive wheel. The VDC warning
light
flashes if this occurs. All other
VDC functions are off, and the VDC
warning light
will not flash. The VDC
system is automatically reset to on when
the ignition switch is placed in the OFF
position then back to the ON position.
When the 4L position is selected with the
4WD shift switch, the VDC system is
disabled and the VDC off indicator light illuminates (for 4WD models).
See “Vehicle Dynamic Control (VDC) warn-
ing light” (P.2-17) and “Vehicle Dynamic
Control (VDC) off indicator light” (P.2-20).
The computer has a built-in diagnostic
feature that tests the system each time
you start the engine and move the vehicle
forward or in reverse at a slow speed.
When the self-test occurs, you may hear a
“clunk” noise and/or feel a pulsation in the
brake pedal. This is normal and is not an
indication of a malfunction.
WARNING
.
The VDC system is designed to
help improve driving stability but
does not prevent accidents due
to abrupt steering operation at
high speeds or by careless or
dangerous driving techniques.
Reduce vehicle speed and be
especially careful when driving
and cornering on slippery sur-
faces and always drive carefully.
. Do not modify the vehicle’s sus-
pension. If suspension parts such
as shock absorbers, struts,
springs, stabilizer bars, bushings
and wheels are not NISSAN re-
commended for your vehicle or
VEHICLE DYNAMIC CONTROL (VDC) SYSTEM
Page 404 of 536
6-2In case of emergency
SIC2574
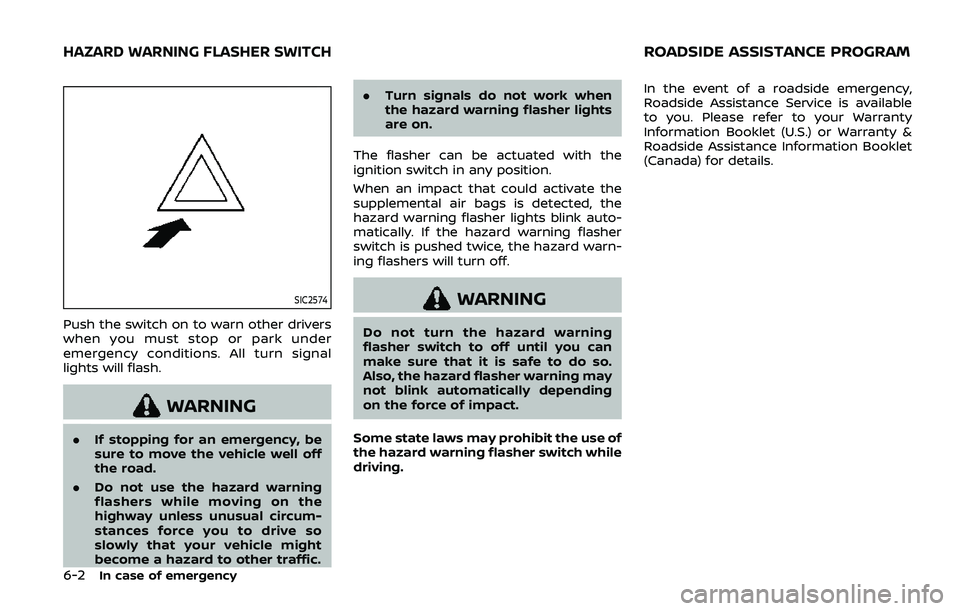
Push the switch on to warn other drivers
when you must stop or park under
emergency conditions. All turn signal
lights will flash.
WARNING
.If stopping for an emergency, be
sure to move the vehicle well off
the road.
. Do not use the hazard warning
flashers while moving on the
highway unless unusual circum-
stances force you to drive so
slowly that your vehicle might
become a hazard to other traffic. .
Turn signals do not work when
the hazard warning flasher lights
are on.
The flasher can be actuated with the
ignition switch in any position.
When an impact that could activate the
supplemental air bags is detected, the
hazard warning flasher lights blink auto-
matically. If the hazard warning flasher
switch is pushed twice, the hazard warn-
ing flashers will turn off.
WARNING
Do not turn the hazard warning
flasher switch to off until you can
make sure that it is safe to do so.
Also, the hazard flasher warning may
not blink automatically depending
on the force of impact.
Some state laws may prohibit the use of
the hazard warning flasher switch while
driving. In the event of a roadside emergency,
Roadside Assistance Service is available
to you. Please refer to your Warranty
Information Booklet (U.S.) or Warranty &
Roadside Assistance Information Booklet
(Canada) for details.
HAZARD WARNING FLASHER SWITCHROADSIDE ASSISTANCE PROGRAM
Page 405 of 536
To shut off the engine in an emergency
situation while driving, perform the fol-
lowing procedure:
.Rapidly push the push-button ignition
switch 3 consecutive times in less
than 1.5 seconds, or
. Push and hold the push-button igni-
tion switch for more than 2 seconds.TIRE PRESSURE MONITORING SYS-
TEM (TPMS)
This vehicle is equipped with the Tire
Pressure Monitoring System (TPMS). It
monitors tire pressure of all tires except
the spare. When the low tire pressure
warning light is lit and the CHECK TIRE
PRESSURE warning appears in the vehicle
information display, one or more of your
tires is significantly under-inflated. If the
vehicle is being driven with low tire
pressure, the TPMS will activate and warn
you of it by the low tire pressure warning
light. This system will activate only when
the vehicle is driven at speeds above 16
MPH (25 km/h). For more details, see “Low
tire pressure warning light” (P.2-15) and
“Tire Pressure Monitoring System (TPMS)”
(P.5-5).
WARNING
.If the low tire pressure warning
light illuminates or Low Pressure
information is displayed on the
monitor screen while driving,
avoid sudden steering maneu-
vers or abrupt braking, reduce
vehicle speed, pull off the road
to a safe location and stop the
vehicle as soon as possible. Driv-
ing with under-inflated tires may permanently damage the tires
and increase the likelihood of tire
failure. Serious vehicle damage
could occur and may lead to an
accident and could result in ser-
ious personal injury. Check the
tire pressure for all four tires.
Adjust the tire pressure to the
recommended COLD tire pressure
shown on the Tire and Loading
Information label to turn the low
tire pressure warning light OFF. If
the light still illuminates while
driving after adjusting the tire
pressure, a tire may be flat. If
you have a flat tire, replace it with
a spare tire as soon as possible.
. Since the spare tire is not
equipped with the TPMS, when a
spare tire is mounted or a wheel
is replaced, the TPMS will not
function and the low tire pressure
warning light will flash for ap-
proximately 1 minute. The light
will remain on after 1 minute.
Have your tires replaced and/or
TPMS system reset as soon as
possible. It is recommended you
visit a NISSAN dealer for these
services.
. Replacing tires with those not
originally specified by NISSAN
In case of emergency6-3
EMERGENCY ENGINE SHUT OFF FLAT TIRE
Page 411 of 536
SCE0876
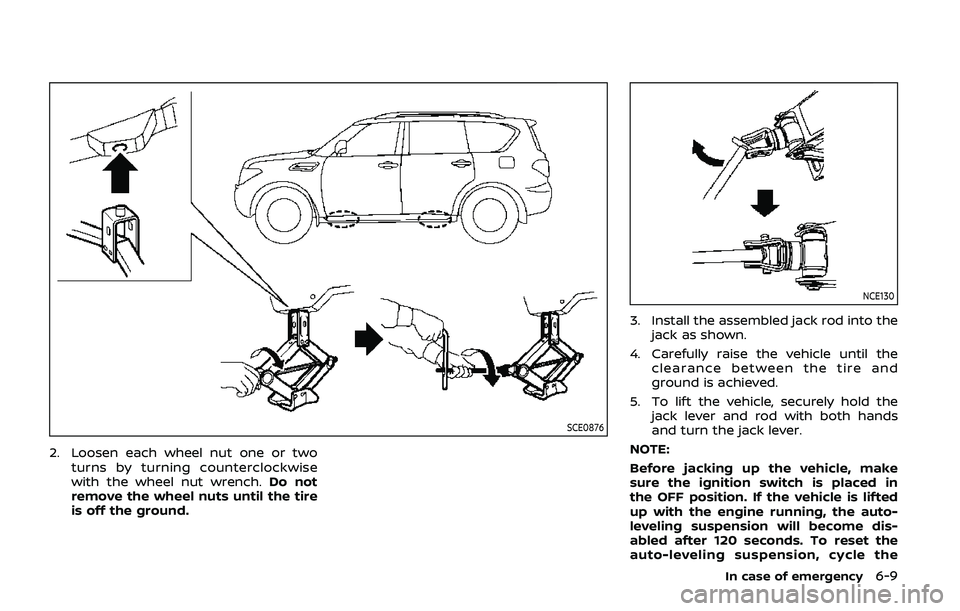
2. Loosen each wheel nut one or twoturns by turning counterclockwise
with the wheel nut wrench. Do not
remove the wheel nuts until the tire
is off the ground.
NCE130
3. Install the assembled jack rod into the
jack as shown.
4. Carefully raise the vehicle until the clearance between the tire and
ground is achieved.
5. To lift the vehicle, securely hold the jack lever and rod with both hands
and turn the jack lever.
NOTE:
Before jacking up the vehicle, make
sure the ignition switch is placed in
the OFF position. If the vehicle is lifted
up with the engine running, the auto-
leveling suspension will become dis-
abled after 120 seconds. To reset the
auto-leveling suspension, cycle the
In case of emergency6-9
Page 412 of 536
6-10In case of emergency
ignition switch ON/OFF one time.
SCE0910
Installing the spare tire
1. Clean any mud or dirt from the sur-face between the wheel and hub.
2. Carefully put the spare tire on and tighten the wheel nuts finger tight.
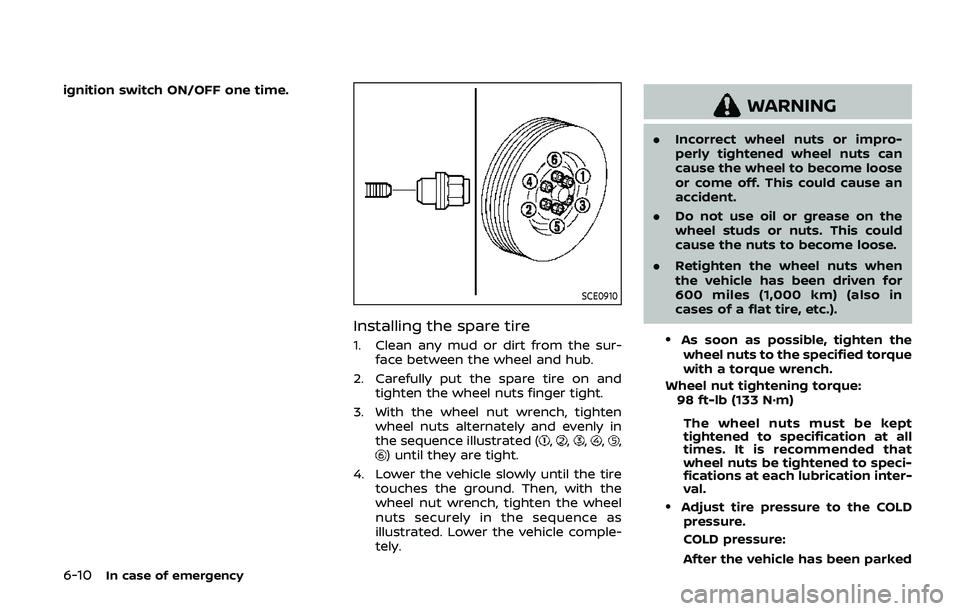
3. With the wheel nut wrench, tighten wheel nuts alternately and evenly in
the sequence illustrated (
,,,,,) until they are tight.
4. Lower the vehicle slowly until the tire touches the ground. Then, with the
wheel nut wrench, tighten the wheel
nuts securely in the sequence as
illustrated. Lower the vehicle comple-
tely.
WARNING
.Incorrect wheel nuts or impro-
perly tightened wheel nuts can
cause the wheel to become loose
or come off. This could cause an
accident.
. Do not use oil or grease on the
wheel studs or nuts. This could
cause the nuts to become loose.
. Retighten the wheel nuts when
the vehicle has been driven for
600 miles (1,000 km) (also in
cases of a flat tire, etc.).
.As soon as possible, tighten the
wheel nuts to the specified torque
with a torque wrench.
Wheel nut tightening torque: 98 ft-lb (133 N·m)
The wheel nuts must be kept
tightened to specification at all
times. It is recommended that
wheel nuts be tightened to speci-
fications at each lubrication inter-
val.
.Adjust tire pressure to the COLDpressure.
COLD pressure:
After the vehicle has been parked
Page 415 of 536
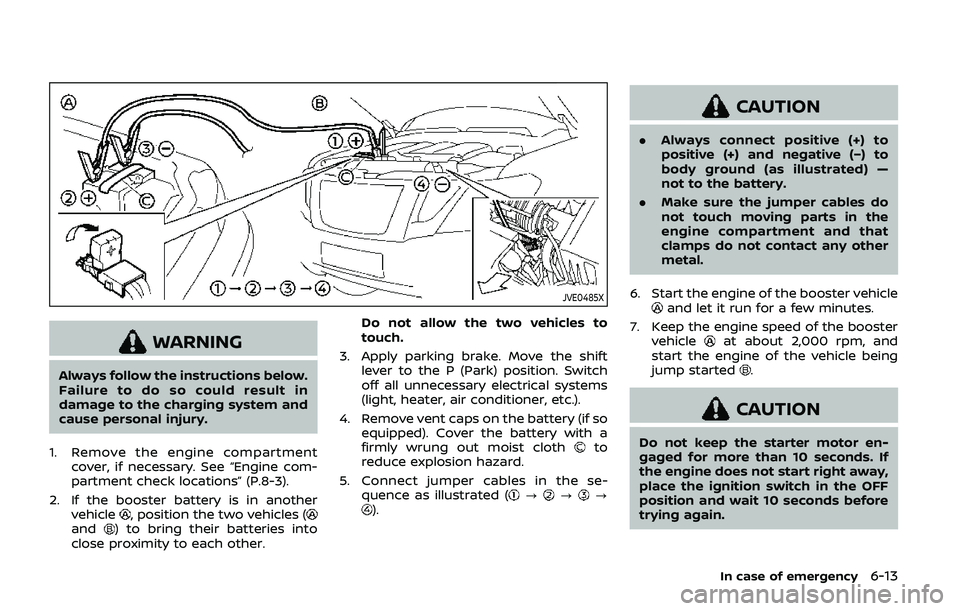
JVE0485X
WARNING
Always follow the instructions below.
Failure to do so could result in
damage to the charging system and
cause personal injury.
1. Remove the engine compartment cover, if necessary. See “Engine com-
partment check locations” (P.8-3).
2. If the booster battery is in another vehicle
, position the two vehicles (and) to bring their batteries into
close proximity to each other. Do not allow the two vehicles to
touch.
3. Apply parking brake. Move the shift lever to the P (Park) position. Switch
off all unnecessary electrical systems
(light, heater, air conditioner, etc.).
4. Remove vent caps on the battery (if so equipped). Cover the battery with a
firmly wrung out moist cloth
to
reduce explosion hazard.
5. Connect jumper cables in the se- quence as illustrated (
???).
CAUTION
.Always connect positive (+) to
positive (+) and negative (−) to
body ground (as illustrated) —
not to the battery.
. Make sure the jumper cables do
not touch moving parts in the
engine compartment and that
clamps do not contact any other
metal.
6. Start the engine of the booster vehicle
and let it run for a few minutes.
7. Keep the engine speed of the booster vehicle
at about 2,000 rpm, and
start the engine of the vehicle being
jump started
.
CAUTION
Do not keep the starter motor en-
gaged for more than 10 seconds. If
the engine does not start right away,
place the ignition switch in the OFF
position and wait 10 seconds before
trying again.
In case of emergency6-13
Page 419 of 536
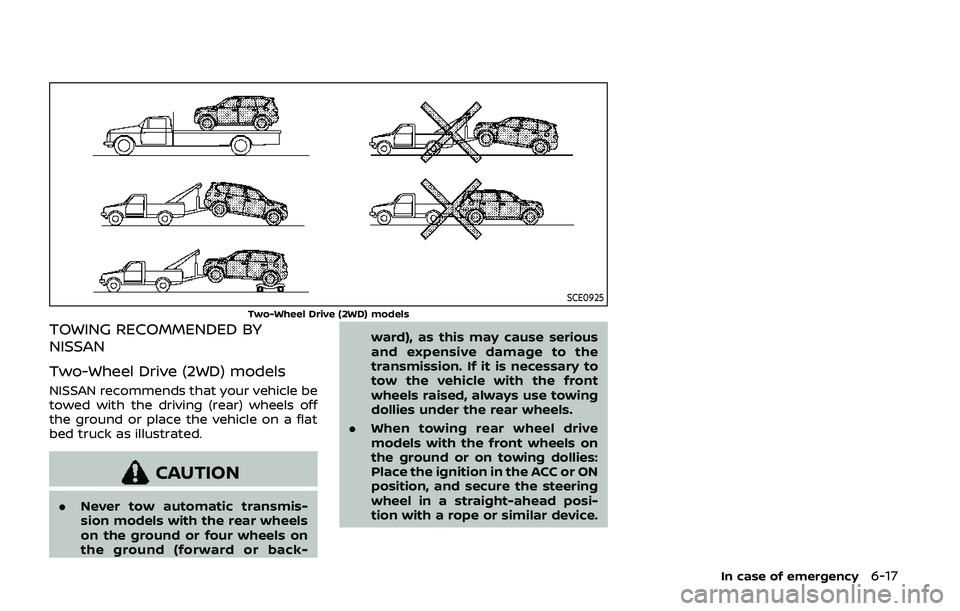
SCE0925
Two-Wheel Drive (2WD) models
TOWING RECOMMENDED BY
NISSAN
Two-Wheel Drive (2WD) models
NISSAN recommends that your vehicle be
towed with the driving (rear) wheels off
the ground or place the vehicle on a flat
bed truck as illustrated.
CAUTION
.Never tow automatic transmis-
sion models with the rear wheels
on the ground or four wheels on
the ground (forward or back- ward), as this may cause serious
and expensive damage to the
transmission. If it is necessary to
tow the vehicle with the front
wheels raised, always use towing
dollies under the rear wheels.
. When towing rear wheel drive
models with the front wheels on
the ground or on towing dollies:
Place the ignition in the ACC or ON
position, and secure the steering
wheel in a straight-ahead posi-
tion with a rope or similar device.
In case of emergency6-17