audio NISSAN ARMADA 2019 Owner´s Manual
[x] Cancel search | Manufacturer: NISSAN, Model Year: 2019, Model line: ARMADA, Model: NISSAN ARMADA 2019Pages: 536, PDF Size: 2.56 MB
Page 7 of 536
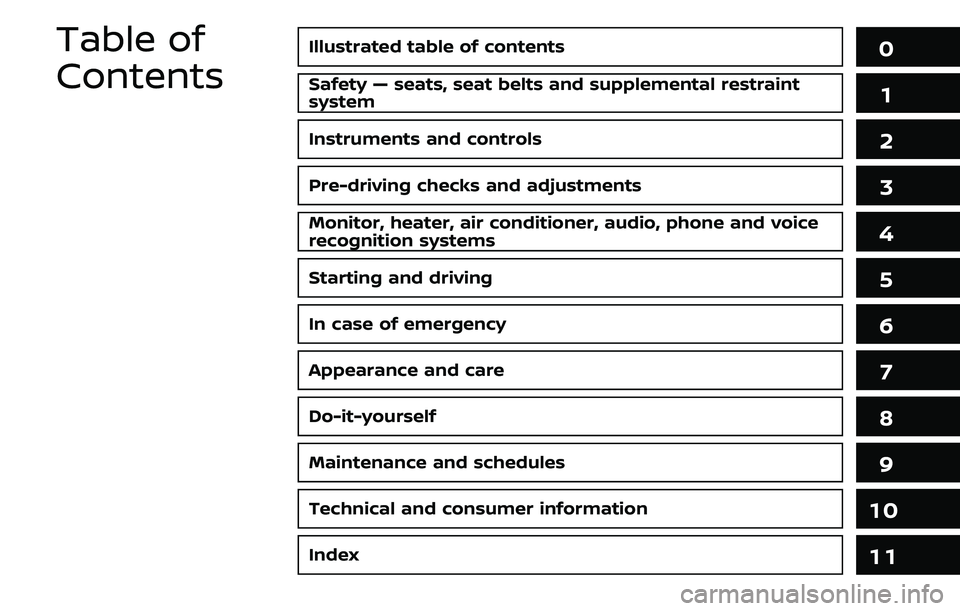
Illustrated table of contents0
Safety — seats, seat belts and supplemental restraint
system1
Instruments and controls
Pre-driving checks and adjustments
Monitor, heater, air conditioner, audio, phone and voice
recognition systems
Starting and driving
In case of emergency
Appearance and care
Do-it-yourself
Maintenance and schedules
Technical and consumer information
2
3
4
5
6
7
8
9
10
Table of
Contents
Index11
Page 14 of 536
0-6Illustrated table of contents
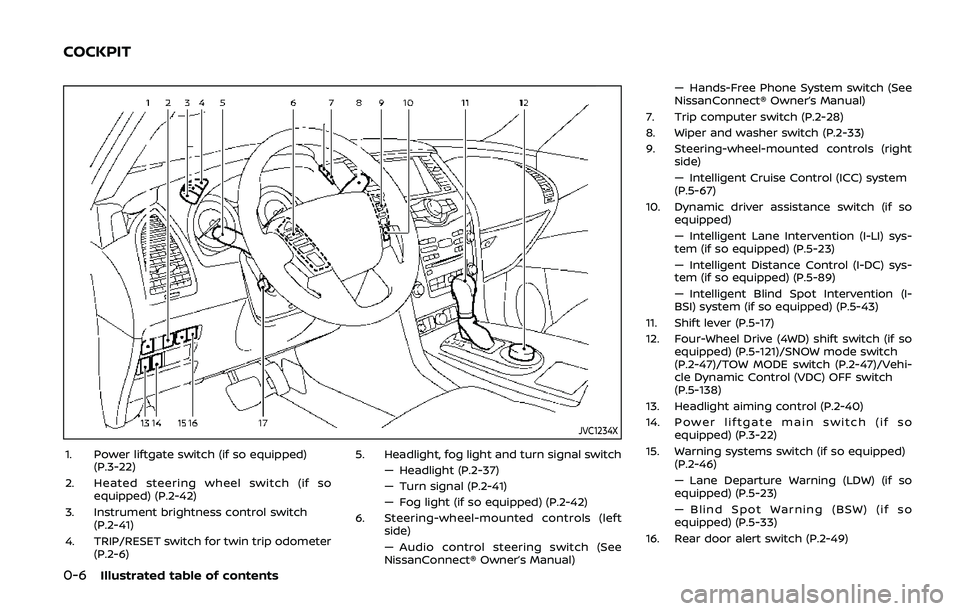
JVC1234X
1. Power liftgate switch (if so equipped)(P.3-22)
2. Heated steering wheel switch (if so equipped) (P.2-42)
3. Instrument brightness control switch (P.2-41)
4. TRIP/RESET switch for twin trip odometer (P.2-6) 5. Headlight, fog light and turn signal switch
— Headlight (P.2-37)
— Turn signal (P.2-41)
— Fog light (if so equipped) (P.2-42)
6. Steering-wheel-mounted controls (left side)
— Audio control steering switch (See
NissanConnect® Owner’s Manual) — Hands-Free Phone System switch (See
NissanConnect® Owner’s Manual)
7. Trip computer switch (P.2-28)
8. Wiper and washer switch (P.2-33)
9. Steering-wheel-mounted controls (right side)
— Intelligent Cruise Control (ICC) system
(P.5-67)
10. Dynamic driver assistance switch (if so equipped)
— Intelligent Lane Intervention (I-LI) sys-
tem (if so equipped) (P.5-23)
— Intelligent Distance Control (I-DC) sys-
tem (if so equipped) (P.5-89)
— Intelligent Blind Spot Intervention (I-
BSI) system (if so equipped) (P.5-43)
11. Shift lever (P.5-17)
12. Four-Wheel Drive (4WD) shift switch (if so equipped) (P.5-121)/SNOW mode switch
(P.2-47)/TOW MODE switch (P.2-47)/Vehi-
cle Dynamic Control (VDC) OFF switch
(P.5-138)
13. Headlight aiming control (P.2-40)
14. Power liftgate main switch (if so equipped) (P.3-22)
15. Warning systems switch (if so equipped) (P.2-46)
— Lane Departure Warning (LDW) (if so
equipped) (P.5-23)
— Blind Spot Warning (BSW) (if so
equipped) (P.5-33)
16. Rear door alert switch (P.2-49)
COCKPIT
Page 16 of 536
0-8Illustrated table of contents
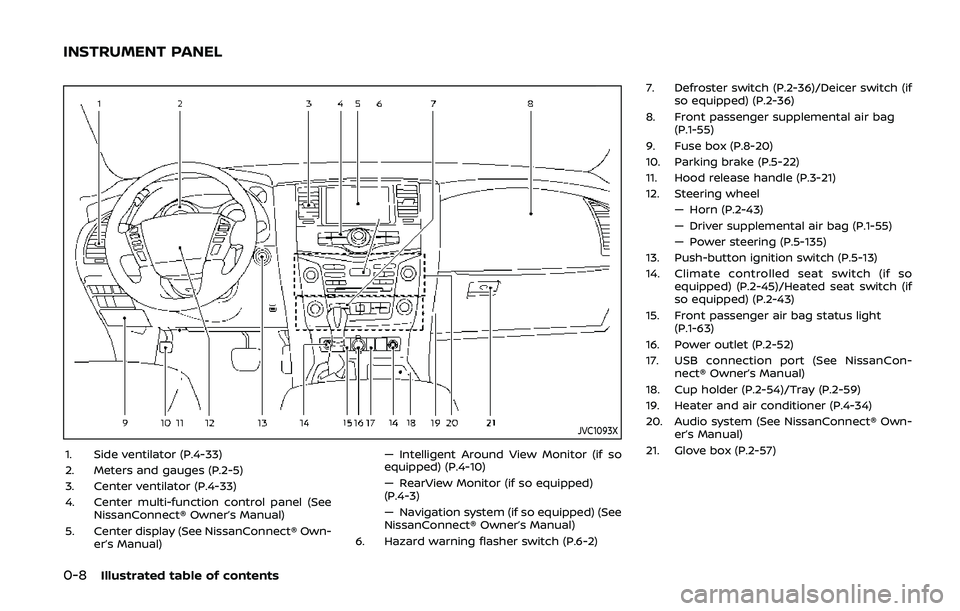
JVC1093X
1. Side ventilator (P.4-33)
2. Meters and gauges (P.2-5)
3. Center ventilator (P.4-33)
4. Center multi-function control panel (SeeNissanConnect® Owner’s Manual)
5. Center display (See NissanConnect® Own- er’s Manual) — Intelligent Around View Monitor (if so
equipped) (P.4-10)
— RearView Monitor (if so equipped)
(P.4-3)
— Navigation system (if so equipped) (See
NissanConnect® Owner’s Manual)
6. Hazard warning flasher switch (P.6-2) 7. Defroster switch (P.2-36)/Deicer switch (if
so equipped) (P.2-36)
8. Front passenger supplemental air bag (P.1-55)
9. Fuse box (P.8-20)
10. Parking brake (P.5-22)
11. Hood release handle (P.3-21)
12. Steering wheel — Horn (P.2-43)
— Driver supplemental air bag (P.1-55)
— Power steering (P.5-135)
13. Push-button ignition switch (P.5-13)
14. Climate controlled seat switch (if so equipped) (P.2-45)/Heated seat switch (if
so equipped) (P.2-43)
15. Front passenger air bag status light (P.1-63)
16. Power outlet (P.2-52)
17. USB connection port (See NissanCon- nect® Owner’s Manual)
18. Cup holder (P.2-54)/Tray (P.2-59)
19. Heater and air conditioner (P.4-34)
20. Audio system (See NissanConnect® Own- er’s Manual)
21. Glove box (P.2-57)
INSTRUMENT PANEL
Page 33 of 536
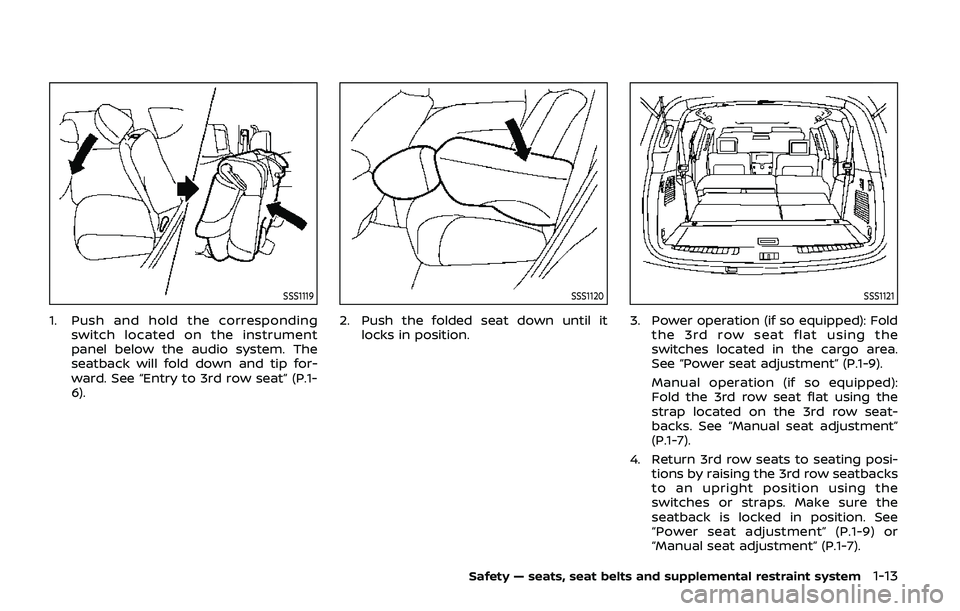
SSS1119
1. Push and hold the correspondingswitch located on the instrument
panel below the audio system. The
seatback will fold down and tip for-
ward. See “Entry to 3rd row seat” (P.1-
6).
SSS1120
2. Push the folded seat down until itlocks in position.
SSS1121
3. Power operation (if so equipped): Foldthe 3rd row seat flat using the
switches located in the cargo area.
See “Power seat adjustment” (P.1-9).
Manual operation (if so equipped):
Fold the 3rd row seat flat using the
strap located on the 3rd row seat-
backs. See “Manual seat adjustment”
(P.1-7).
4. Return 3rd row seats to seating posi- tions by raising the 3rd row seatbacks
to an upright position using the
switches or straps. Make sure the
seatback is locked in position. See
“Power seat adjustment” (P.1-9) or
“Manual seat adjustment” (P.1-7).
Safety — seats, seat belts and supplemental restraint system1-13
Page 97 of 536
JVC1234X
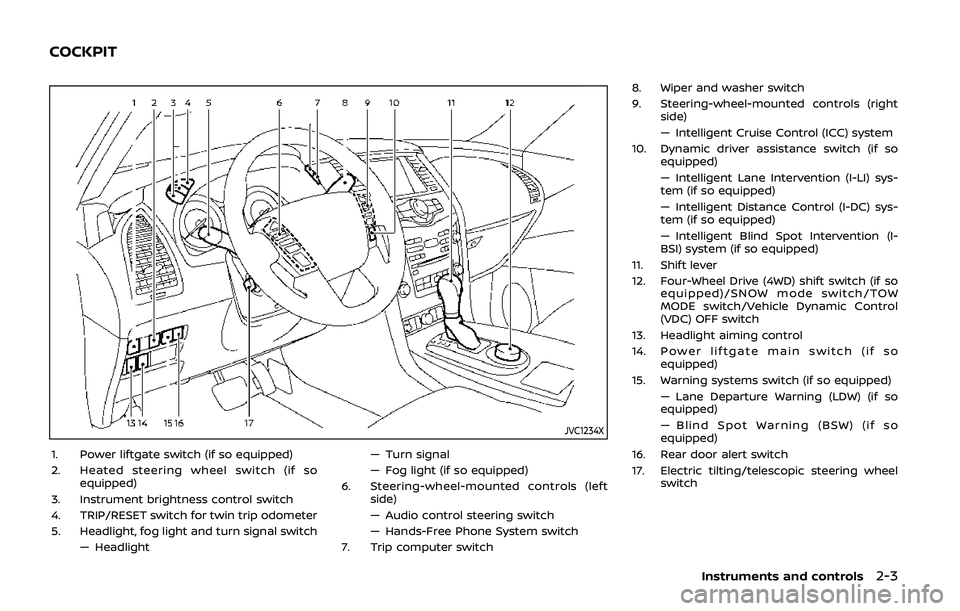
1. Power liftgate switch (if so equipped)
2. Heated steering wheel switch (if soequipped)
3. Instrument brightness control switch
4. TRIP/RESET switch for twin trip odometer
5. Headlight, fog light and turn signal switch — Headlight — Turn signal
— Fog light (if so equipped)
6. Steering-wheel-mounted controls (left side)
— Audio control steering switch
— Hands-Free Phone System switch
7. Trip computer switch 8. Wiper and washer switch
9. Steering-wheel-mounted controls (right
side)
— Intelligent Cruise Control (ICC) system
10. Dynamic driver assistance switch (if so equipped)
— Intelligent Lane Intervention (I-LI) sys-
tem (if so equipped)
— Intelligent Distance Control (I-DC) sys-
tem (if so equipped)
— Intelligent Blind Spot Intervention (I-
BSI) system (if so equipped)
11. Shift lever
12. Four-Wheel Drive (4WD) shift switch (if so equipped)/SNOW mode switch/TOW
MODE switch/Vehicle Dynamic Control
(VDC) OFF switch
13. Headlight aiming control
14. Power liftgate main switch (if so equipped)
15. Warning systems switch (if so equipped) — Lane Departure Warning (LDW) (if so
equipped)
— Blind Spot Warning (BSW) (if so
equipped)
16. Rear door alert switch
17. Electric tilting/telescopic steering wheel switch
Instruments and controls2-3
COCKPIT
Page 98 of 536
2-4Instruments and controls
JVC1093X
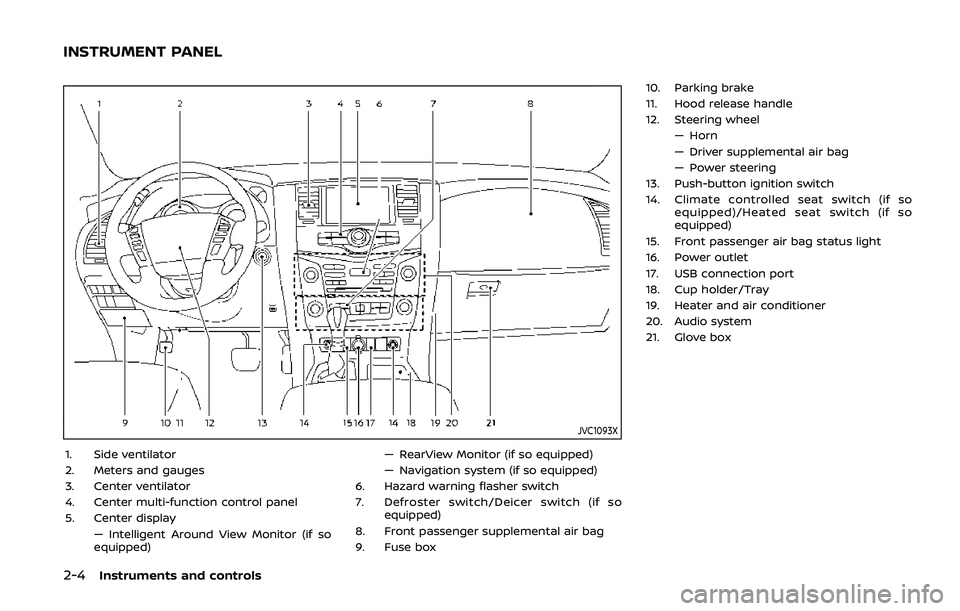
1. Side ventilator
2. Meters and gauges
3. Center ventilator
4. Center multi-function control panel
5. Center display— Intelligent Around View Monitor (if so
equipped) — RearView Monitor (if so equipped)
— Navigation system (if so equipped)
6. Hazard warning flasher switch
7. Defroster switch/Deicer switch (if so equipped)
8. Front passenger supplemental air bag
9. Fuse box 10. Parking brake
11. Hood release handle
12. Steering wheel
— Horn
— Driver supplemental air bag
— Power steering
13. Push-button ignition switch
14. Climate controlled seat switch (if so equipped)/Heated seat switch (if so
equipped)
15. Front passenger air bag status light
16. Power outlet
17. USB connection port
18. Cup holder/Tray
19. Heater and air conditioner
20. Audio system
21. Glove box
INSTRUMENT PANEL
Page 124 of 536
2-30Instruments and controls
.UNIT
Select this submenu to choose the
unit.
. EFFECTS
Select this submenu to turn on and off
the needle sweep function when
starting the engine.
7. Warning check
SKIP:
Push the
switchto move to the
warning check mode.
Push the
switchto select other
menus.
DETAIL:
This item is available only when a warning
is displayed.
Select this menu to see the details of
warnings.SIC2133
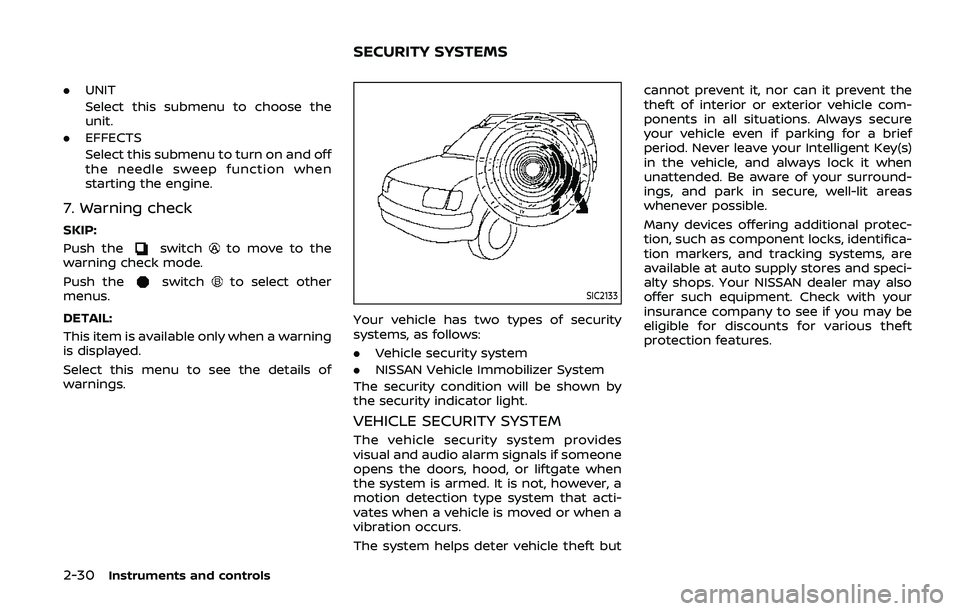
Your vehicle has two types of security
systems, as follows:
. Vehicle security system
. NISSAN Vehicle Immobilizer System
The security condition will be shown by
the security indicator light.
VEHICLE SECURITY SYSTEM
The vehicle security system provides
visual and audio alarm signals if someone
opens the doors, hood, or liftgate when
the system is armed. It is not, however, a
motion detection type system that acti-
vates when a vehicle is moved or when a
vibration occurs.
The system helps deter vehicle theft but cannot prevent it, nor can it prevent the
theft of interior or exterior vehicle com-
ponents in all situations. Always secure
your vehicle even if parking for a brief
period. Never leave your Intelligent Key(s)
in the vehicle, and always lock it when
unattended. Be aware of your surround-
ings, and park in secure, well-lit areas
whenever possible.
Many devices offering additional protec-
tion, such as component locks, identifica-
tion markers, and tracking systems, are
available at auto supply stores and speci-
alty shops. Your NISSAN dealer may also
offer such equipment. Check with your
insurance company to see if you may be
eligible for discounts for various theft
protection features.
SECURITY SYSTEMS
Page 182 of 536
3-8Pre-driving checks and adjustments
affect the system function.
. Do not drop the Intelligent Key.
. Do not strike the Intelligent Key
sharply against another object.
. Do not change or modify the
Intelligent Key.
. Wetting may damage the Intelli-
gent Key. If the Intelligent Key
gets wet, immediately wipe until
it is completely dry.
. If the outside temperature is be-
low 14°F (−10°C), the battery of the
Intelligent Key may not function
properly.
. Do not place the Intelligent Key
for an extended period in an area
where temperatures exceed
140°F (60°C).
. Do not attach the Intelligent Key
with a key holder that contains a
magnet.
. Do not place the Intelligent Key
near equipment that produces a
magnetic field, such as a TV,
audio equipment and personal
computers.
If an Intelligent Key is lost or stolen,
NISSAN recommends erasing the ID code
of that Intelligent Key from the vehicle. This may prevent the unauthorized use of
the Intelligent Key to operate the vehicle.
For information regarding the erasing
procedure, it is recommended that you
contact a NISSAN dealer.
Page 216 of 536
3-42Pre-driving checks and adjustments
Confirming memory storage
.Push the ignition switch to the ON
position and push the SET switch. If
the main memory has not been
stored, the indicator light will come
on for approximately 0.5 second.
When the memory has stored in posi-
tion, the indicator light will stay on for
approximately 5 seconds.
. If the battery cable is disconnected, or
if the fuse opens, the memory will be
canceled. In this case, reset the de-
sired position using the previous pro-
cedure.
. If optional Intelligent Keys are added
to your vehicle, the memory storage
procedure to switch 1 or 2 and linking
Intelligent Key procedure to a stored
memory position should be per-
formed again for each Intelligent Key.
For additional Intelligent Key informa-
tion, see “Keys” (P.3-2).
Selecting the memorized position
1. Move the shift lever to the P (Park)
position.
2. Use one of the following methods to move the driver’s seat, the outside
mirrors and the steering wheel.
.Push the memory switch (1 or 2)fully for at least 1 second. The driver’s seat, steering column and
outside mirrors will move to the
memorized position or to the exit
position when the entry/exit function
is set to active with the indicator light
flashing, and then the light will stay on
for approximately 5 seconds.
SETTING MEMORY FUNCTION
The status of the following settings can
be linked to the Intelligent Key and the
memorized settings can be available for
each Intelligent Key.
.
Air conditioner system
. Navigation system (if so equipped)
. Audio system
To use the memory function, lock the
doors with the Intelligent Key that is
linked to the settings.
To enable the memorized settings:
1. Carry the Intelligent Key that is linked to the settings, and unlock the doors
by pushing the driver’s door handle
request switch or “UNLOCK”
but-
ton on the Intelligent Key.
2. Place the ignition switch in the ON position. “Connection with the key has
been done” will be displayed on the
screen and the memorized settings
are available (only when a new Intel-
ligent Key is used).
SYSTEM OPERATION
The automatic drive positioner system
will not work or will stop operating under
the following conditions:
.When the vehicle speed is above 0
MPH (0 km/h) or 4 MPH (7 km/h) for
some limited functions such linking an
Intelligent Key to the vehicle when the
power source is turned on from off or
during the Exit function.
. When any of the memory switches are
pushed while the automatic drive
positioner is operating.
. When the adjusting switch for the
driver’s seat and steering column is
turned on while the automatic drive
positioner is operating.
. When the seat has already been
moved to the memorized position.
. When no seat position is stored in the
memory switch.
. When the shift lever is moved from the
P (Park) position to any other position.
Page 217 of 536
4 Monitor, heater, air conditioner, audio,phone and voice recognition systems
NissanConnect® Owner’s Manual .................................... 4-2
Safety note ........................................................................\
................ 4-2
RearView Monitor (if so equipped) ................................. 4-3
RearView Monitor system operation ..................... 4-4
How to read the displayed lines ................................ 4-4
Difference between predictive and
actual distances ...................................................................... 4-4
How to park with predictive course lines .......... 4-6
Sonar indicator ........................................................................\
4-7
Adjusting the screen ........................................................... 4-7
Predictive course line settings .................................... 4-8
RearView Monitor system limitations .................... 4-8
System maintenance .......................................................... 4-9
Intelligent Around View Monitor (if
so equipped) ........................................................................\
.......... 4-10 Intelligent Around View Monitor
system operation ................................................................ 4-11
How to adjust the screen view ................................ 4-19
Intelligent Around View Monitor settings ....... 4-19
Intelligent Around View Monitor
system limitations .............................................................. 4-21
System maintenance ....................................................... 4-23
Camera aiding sonar function (models with
Intelligent Around View Monitor) .................................. 4-24 Sonar system operation ................................................ 4-25 Turning on and off the sonar function .......... 4-25
Sonar system limitations ........................................... 4-26
System temporarily unavailable ........................... 4-27
System maintenance .................................................... 4-27
Moving Object Detection (MOD) ................................... 4-28 MOD system operation ................................................ 4-29
Turning on and off the MOD system ............... 4-30
MOD system limitations .............................................. 4-31
System maintenance .................................................... 4-32
Ventilators ........................................................................\
.............. 4-33
Center ventilators ............................................................ 4-33
Side ventilators .................................................................. 4-33
Rear ventilators .................................................................. 4-33
Heater and air conditioner ................................................ 4-34 Automatic air conditioner ......................................... 4-35
Rear automatic air conditioning system ....... 4-38
Operating tips ..................................................................... 4-42
Linking Intelligent Key (if so equipped) ........... 4-42
In-cabin microfilter .......................................................... 4-42
Servicing air conditioner ............................................. 4-42
Antenna ........................................................................\
.................... 4-42 Window antenna ............................................................... 4-42
Satellite antenna ............................................................... 4-43
Car phone or CB radio ......................................................... 4-43