NISSAN ARMADA 2021 Owner´s Manual
Manufacturer: NISSAN, Model Year: 2021, Model line: ARMADA, Model: NISSAN ARMADA 2021Pages: 603, PDF Size: 3.16 MB
Page 561 of 603

MEMO
Page 562 of 603

FUEL INFORMATION
VK56VD engine
NISSAN recommends the use of unleaded
premium gasoline with an octane rating
of at least 91 AKI (Anti-Knock Index)
number (Research octane number 96).
If unleaded premium gasoline is not
available, you may use unleaded regular
gasoline with an octane rating of at least
87 AKI number (Research octane number
91), but you may notice a decrease in
performance.
CAUTION
.Using a fuel other than that spe-
cified could adversely affect the
emission control systems, and
may also affect warranty cover-
age.
. Under no circumstances should a
leaded gasoline be used, because
this will damage the three way
catalyst.
. Do not use E-15 or E-85 fuel in
your vehicle. Your vehicle is not
designed to run on E-15 or E-85
fuel. Using E-15 or E-85 fuel in a vehicle not specifically designed
for E-15 or E-85 fuel can adversely
affect the emission control de-
vices and systems of the vehicle.
Damage caused by such fuel is
not covered by the NISSAN new
vehicle limited warranty.
. Do not use fuel that contains the
octane booster methylcyclopen-
tadienyl manganese tricarbonyl
(MMT). Using fuel containing
MMT may adversely affect vehicle
performance and vehicle emis-
sions. Not all fuel dispensers are
labeled to indicate MMT content,
so you may have to consult your
gasoline retailer for more details.
Note that Federal and California
laws prohibit the use of MMT in
reformulated gasoline.
. U.S. government regulations re-
quire ethanol dispensing pumps
to be identified by a small,
square, orange and black label
with the common abbreviation or
the appropriate percentage for
that region.
ENGINE OIL RECOMMENDATION:
See “Capacities and recommended fluids/
lubricants” (P.10-2) for engine oil and oil
filter recommendation.
COLD TIRE PRESSURES:
The label is typically located on the driver
side center pillar or on the driver’s door.
For additional information, see “Wheels
and tires” (P.8-28).
NEW VEHICLE BREAK-IN PROCE-
DURES RECOMMENDATION:
During the first 1,200 miles (2,000 km) of
vehicle use, follow the recommendations
outlined in the “Break-in schedule” (P.5-
123). Follow these recommendations for
the future reliability and economy of your
new vehicle.
GAS STATION INFORMATION
Page 563 of 603

Page 564 of 603

Y62-D
Printing : November 2020
Publication No.: Printed in the U.S.A. OM21E0 0Y62U0
Page 565 of 603
The information contained within this supplement revises or adds the following information to
the 2021 NISSAN Armada Owner’s Manual.
“Rear Seat Infotainment (RSI)” in the “Monitor, heater, air conditioner, audio, phone and voice
recognition systems” section of the Owner’s Manual.
Please read carefully and keep in the vehicle.
Printing: November 2020
Publication No. SU21E0 0Y62U0
OWNER’S MANUAL SUPPLEMENT
Page 566 of 603
WARNING
•It is unlawful in most jurisdictions for
a person to drive a motor vehicle
which is equipped with a television
monitor or screen that is visible, di-
rectly or indirectly, to the driver while
operating the vehicle. In the interest
of safety, the unit should never be
installed where it will be directly or
indirectly visible, by the operator of
the motor vehicle.
•If your vehicle is equipped with a
wireless rear seat audio system or
any other wireless infrared device,
make sure it is powered off when op-
erating the RSI system. If both sys-
tems are powered on at the same
time, the two systems may obstruct
each other, possibly creating unde-
sirable audio interference through
the wireless headphones.
•For safety reasons when changing
discs, it is recommended that the ve-
hicle is not in motion, and that you do
not allow children to unfasten safety
belts to change discs or make any
adjustments to the system. System
adjustments can be accomplished
using the remote control, while
safety belts remain fastened.•Enjoy your RSI system but remember
that safety of all passengers remains
the number one priority. Devices in-
stalled in the USB, HDMI, or head-
phone jack may protrude and create
a potential eye impact hazard for un-
belted passengers during a vehicle
accident. To reduce the risk of injury,
use only SD cards (hidden on lef t side
of driver side monitor) or low-profile
USB storage devices.
CAUTION
•Do not touch the inner pins of the
jacks on the front panel. Electrostatic
discharge may cause permanent
damage to the device.
•The LCD display screen is not touch-
screen. Do not put pressure or add
suction cups on the screen.
•Caution children to avoid touching or
scratching the screen, as it may be-
come dirty or damaged.•Be sure to run the vehicle engine
while using the system. Using this
system without running the engine
can result in battery drain. To avoid
the risk of battery drain, please re-
member to turn off the system when
the vehicle is not in use.
WELCOME
Thank you for purchasing this advanced
Rear Seat Infotainment (RSI) system with
built-in Wi-Fi. Before operating this system,
read this section thoroughly and retain it
for future reference.
System features
• Twin 8-inch Color TFT-LCD Panels with
1024x600 Resolution
• Internal Wi-Fi Network
• Bluetooth® 4.1 Audio Streaming
• Miracast®/Smart View Capability
• SmartStream Content Sharing
• USB 2.0 Port, SDXC Card Input
• HDMI 1.4 Input with MHL 2.0 Support
• Exclusive Slingplayer® Application
• 3.5mm Stereo Headphone Output
• Front Panel Capacitive Touch Controls
• Infrared Wireless Headphones
REAR SEAT INFOTAINMENT (RSI) (if
so equipped)
Page 567 of 603
• Full-Function Slimline Remote Control
• Monitor Screen Sharing
GETTING STARTED
Turning the monitor on or off
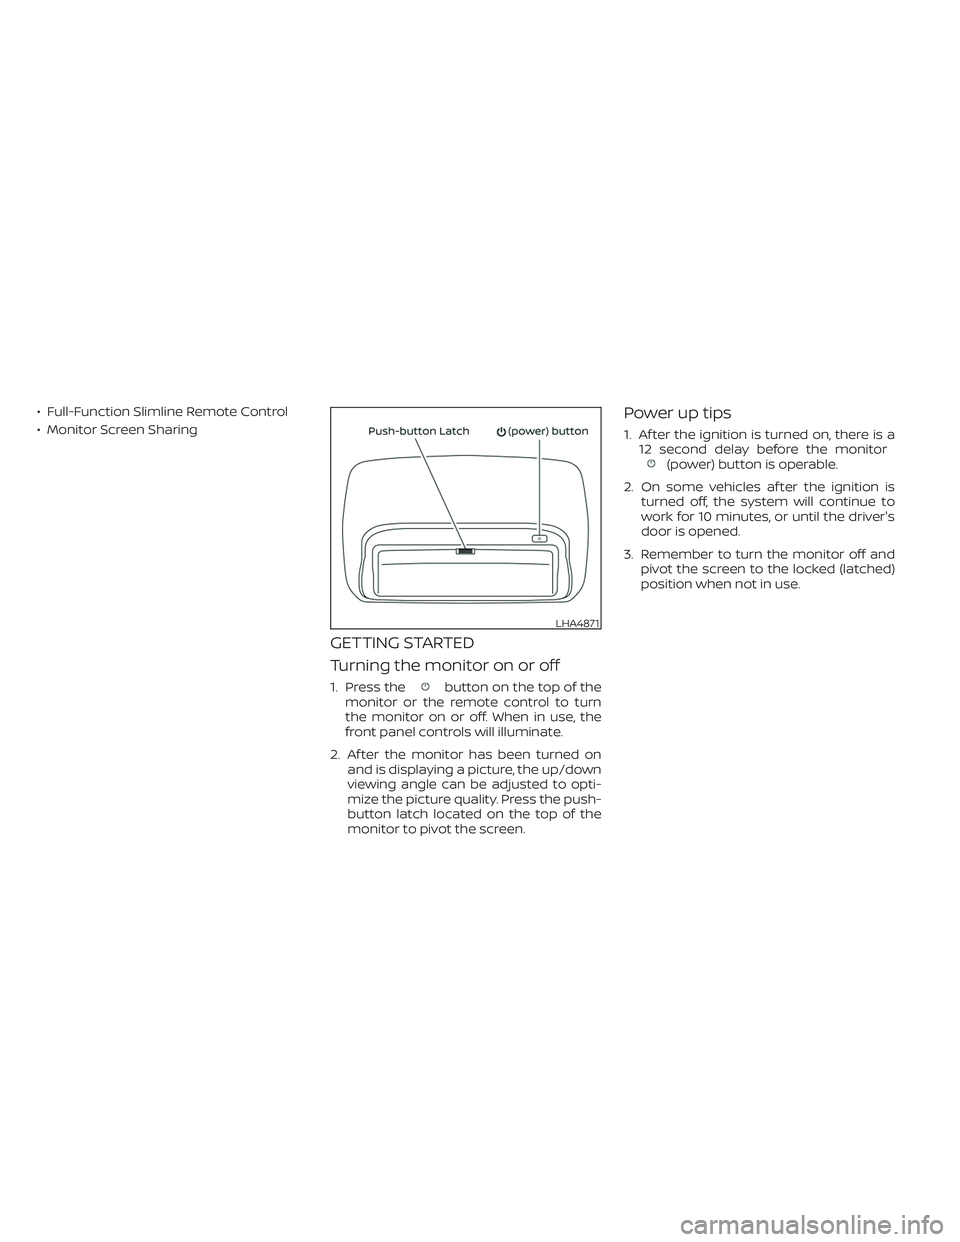
1. Press thebutton on the top of the
monitor or the remote control to turn
the monitor on or off. When in use, the
front panel controls will illuminate.
2. Af ter the monitor has been turned on
and is displaying a picture, the up/down
viewing angle can be adjusted to opti-
mize the picture quality. Press the push-
button latch located on the top of the
monitor to pivot the screen.
Power up tips
1. Af ter the ignition is turned on, there is a
12 second delay before the monitor
(power) button is operable.
2. On some vehicles af ter the ignition is
turned off, the system will continue to
work for 10 minutes, or until the driver's
door is opened.
3. Remember to turn the monitor off and
pivot the screen to the locked (latched)
position when not in use.
LHA4871
Page 568 of 603
Audio options
Wireless headphones
Each monitor includes a built-in dual chan-
nel infrared transmitter for use with wire-
less headphones. The wireless head-
phones must be used within a line of sight
from the transmitter as infrared signals, like
visible light, travel only in a straight line.
How to use the wireless headphones
When placing the headphones on your
head, make sure to observe the lef t and
right orientation. The headphones must be
oriented correctly (facing forward) to re-
ceive the audio signal. Press the
(power) button on the headphones,
then select channel “A” to listen to monitor
A, or channel “B” to listen to monitor B. Ad-
just the audio level using the volume con-
trol on each headphone.
Wired headphones
There is a 3.5mm stereo headphone out-
put on each monitor which can be used
with most standard stereo headphones
(wired headphones sold separately).
Bluetooth® streaming audio
To listen to audio throughout the entire ve-
hicle, the system includes the ability tostream audio over a Bluetooth® connec-
tion to the vehicle’s stereo system.
When monitor A is selected as the source
to stream from, the audio output to the
wireless and wired headphones will be dis-
abled (only on monitor A). To use the wire-
less or wired headphones with monitor A,
you must turn off the Bluetooth® stream-
ing feature. To enable/disable Bluetooth®
streaming, navigate to the “SETTINGS”
menu, or press
on the remote control
during content playback. For additional in-
formation, see “Settings” in this section.
Media compatibility
For a list of compatible media formats for
this system, see “Storage device format-
ting” in this section.
• The metadata or file information of some
audio and video files may not be correctly
displayed.
• It is not possible to play content that is
protected by DRM (Digital Rights Manage-
ment).
• There may be a delay before playback
begins when using USB flash drives or SD
cards with complex folder hierarchies or
many files.• Some audio, video, and image files may
be incompatible with this system due to
file characteristics, file format, recording
sof tware used, directory structure,
and/or the type of audio/video encoding
used.
Storage device formatting
This system is compatible with several
types of formatting for USB flash drives and
SD cards. Refer to the documentation that
comes with your storage device for more
details on how to format.
FAT32 - USB and SDHC
Good for smaller capacity storage devices,
but individual files on the drive must be
<4GB. This format is good for music and
images.
EX-FAT - USB and SDXC
Better choice for larger capacity storage
devices with files that are >4GB. This format
is better for larger files such as full-length
movies.
NTFS - USB and SDXC
Best choice for very large capacity storage
devices - with no limitations on file size. This
format can be used for all file sizes.
Page 569 of 603
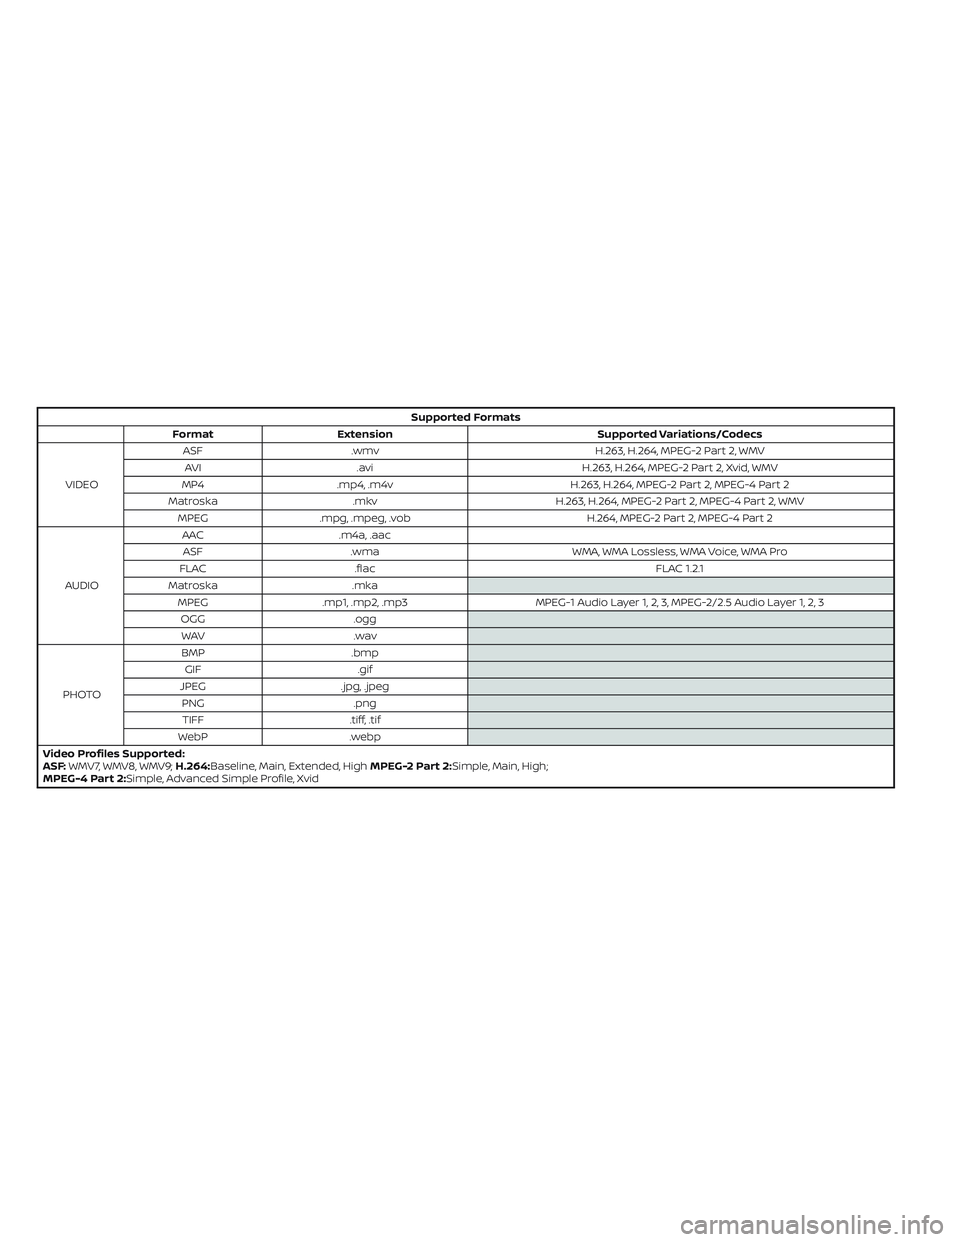
Supported Formats
Format Extension Supported Variations/Codecs
VIDEOASF .wmv H.263, H.264, MPEG-2 Part 2, WMV
AVI .avi H.263, H.264, MPEG-2 Part 2, Xvid, WMV
MP4 .mp4, .m4v H.263, H.264, MPEG-2 Part 2, MPEG-4 Part 2
Matroska .mkv H.263, H.264, MPEG-2 Part 2, MPEG-4 Part 2, WMV
MPEG .mpg, .mpeg, .vob H.264, MPEG-2 Part 2, MPEG-4 Part 2
AUDIOAAC .m4a, .aac
ASF .wma WMA, WMA Lossless, WMA Voice, WMA Pro
FLAC .flac FLAC 1.2.1
Matroska .mka
MPEG .mp1, .mp2, .mp3 MPEG-1 Audio Layer 1, 2, 3, MPEG-2/2.5 Audio Layer 1, 2, 3
OGG .ogg
WAV .wav
PHOTOBMP .bmp
GIF .gif
JPEG .jpg, .jpeg
PNG .png
TIFF .tiff, .tif
WebP .webp
Video Profiles Supported:
ASF:WMV7, WMV8, WMV9;H.264:Baseline, Main, Extended, HighMPEG-2 Part 2:Simple, Main, High;
MPEG-4 Part 2:Simple, Advanced Simple Profile, Xvid
Page 570 of 603
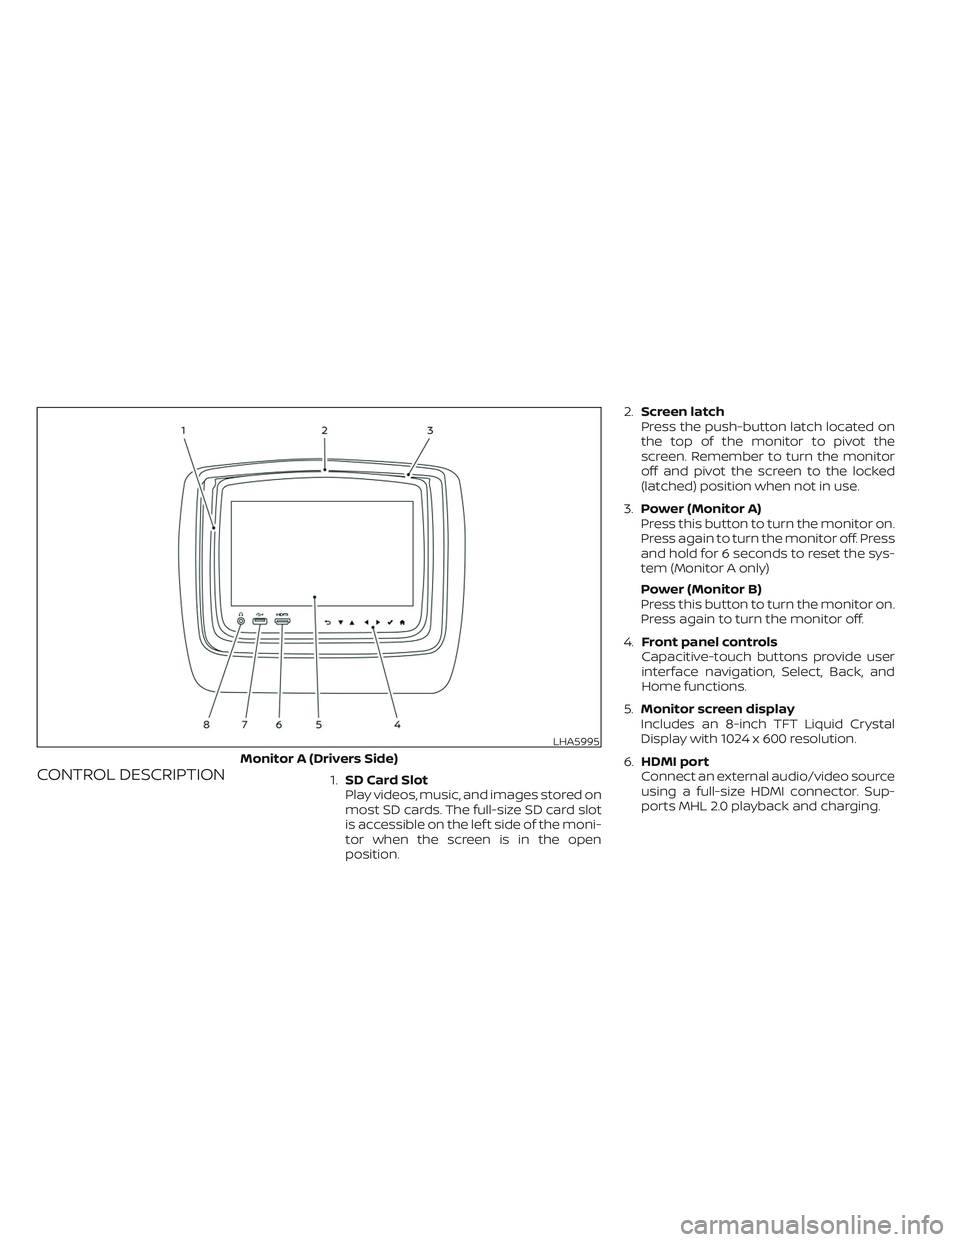
CONTROL DESCRIPTION1.SD Card Slot
Play videos, music, and images stored on
most SD cards. The full-size SD card slot
is accessible on the lef t side of the moni-
tor when the screen is in the open
position.2.Screen latch
Press the push-button latch located on
the top of the monitor to pivot the
screen. Remember to turn the monitor
off and pivot the screen to the locked
(latched) position when not in use.
3.Power (Monitor A)
Press this button to turn the monitor on.
Press again to turn the monitor off. Press
and hold for 6 seconds to reset the sys-
tem (Monitor A only)
Power (Monitor B)
Press this button to turn the monitor on.
Press again to turn the monitor off.
4.Front panel controls
Capacitive-touch buttons provide user
interface navigation, Select, Back, and
Home functions.
5.Monitor screen display
Includes an 8-inch TFT Liquid Crystal
Display with 1024 x 600 resolution.
6.HDMI port
Connect an external audio/video source
using a full-size HDMI connector. Sup-
ports MHL 2.0 playback and charging.
LHA5995
Monitor A (Drivers Side)