child lock NISSAN ARMADA 2023 User Guide
[x] Cancel search | Manufacturer: NISSAN, Model Year: 2023, Model line: ARMADA, Model: NISSAN ARMADA 2023Pages: 604, PDF Size: 2.97 MB
Page 67 of 604
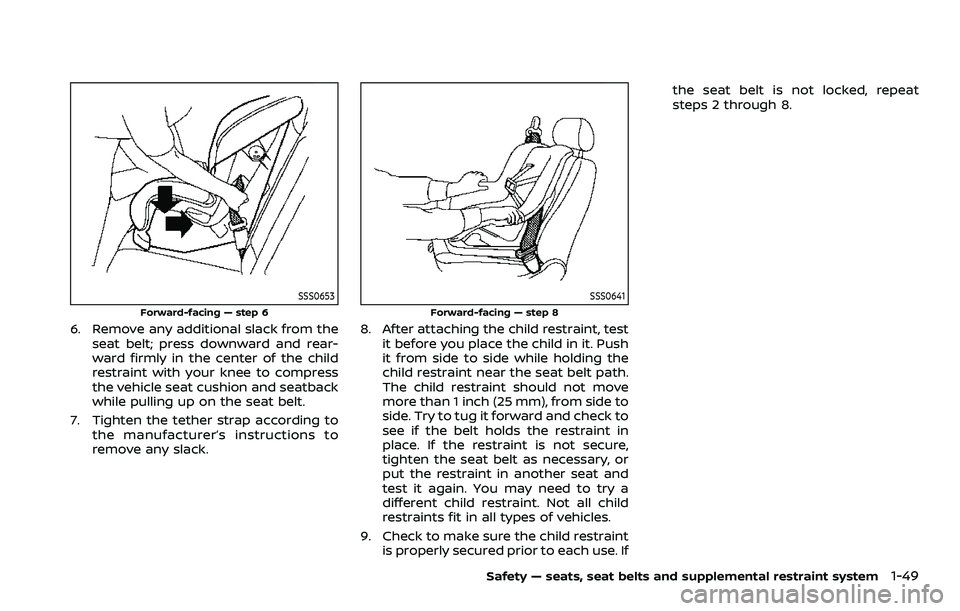
SSS0653
Forward-facing — step 6
6. Remove any additional slack from theseat belt; press downward and rear-
ward firmly in the center of the child
restraint with your knee to compress
the vehicle seat cushion and seatback
while pulling up on the seat belt.
7. Tighten the tether strap according to the manufacturer’s instructions to
remove any slack.
SSS0641
Forward-facing — step 8
8. After attaching the child restraint, testit before you place the child in it. Push
it from side to side while holding the
child restraint near the seat belt path.
The child restraint should not move
more than 1 inch (25 mm), from side to
side. Try to tug it forward and check to
see if the belt holds the restraint in
place. If the restraint is not secure,
tighten the seat belt as necessary, or
put the restraint in another seat and
test it again. You may need to try a
different child restraint. Not all child
restraints fit in all types of vehicles.
9. Check to make sure the child restraint is properly secured prior to each use. If the seat belt is not locked, repeat
steps 2 through 8.
Safety — seats, seat belts and supplemental restraint system1-49
Page 70 of 604
1-52Safety — seats, seat belts and supplemental restraint system
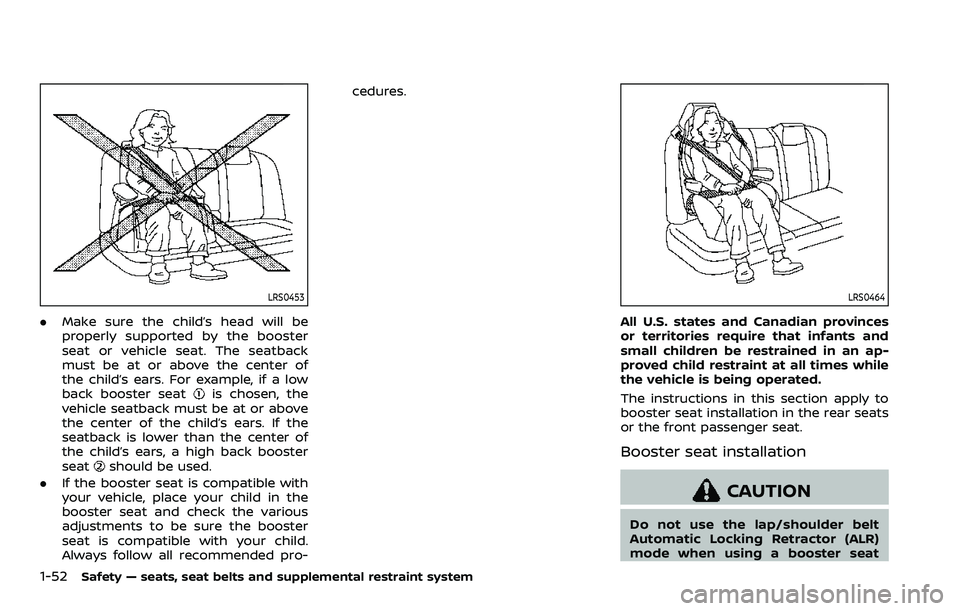
LRS0453
.Make sure the child’s head will be
properly supported by the booster
seat or vehicle seat. The seatback
must be at or above the center of
the child’s ears. For example, if a low
back booster seat
is chosen, the
vehicle seatback must be at or above
the center of the child’s ears. If the
seatback is lower than the center of
the child’s ears, a high back booster
seat
should be used.
. If the booster seat is compatible with
your vehicle, place your child in the
booster seat and check the various
adjustments to be sure the booster
seat is compatible with your child.
Always follow all recommended pro- cedures.
LRS0464
All U.S. states and Canadian provinces
or territories require that infants and
small children be restrained in an ap-
proved child restraint at all times while
the vehicle is being operated.
The instructions in this section apply to
booster seat installation in the rear seats
or the front passenger seat.
Booster seat installation
CAUTION
Do not use the lap/shoulder belt
Automatic Locking Retractor (ALR)
mode when using a booster seat
Page 84 of 604
1-66Safety — seats, seat belts and supplemental restraint system
Precautions:
.Make sure that there are no objects
weighing over 9.1 lbs (4 kg) hanging on
the seat or placed in the seatback
pocket.
. Make sure that a child restraint or
other object is not pressing against
the rear of the seatback.
. Make sure that a rear passenger is not
pushing or pulling on the back of the
front passenger seat.
. Make sure that the front passenger
seat or seatback is not forced back
against an object on the seat or floor
behind it.
. Make sure that there is no object
placed under the front passenger
seat.
Steps:
1. Adjust the seat as outlined. (See “Seats” (P.1-3).) Sit upright, leaning
against the seatback, and centered
on the seat cushion with your feet
comfortably extended to the floor.
2. Make sure there are no objects on your lap.
3. Fasten the seat belt as outlined. (See “Seat belts” (P.1-20).)
4. Remain in this position for 30 seconds allowing the system to classify the front passenger before the vehicle is
put into motion.
5. Ensure proper classification by check- ing the front passenger air bag status
light.
NOTE:
This vehicle’s occupant classification
sensor system locks the classification
during driving so it is important that
you confirm that the front passenger is
properly classified prior to driving. Also,
the occupant classification sensor sys-
tem may recalculate the weight of the
occupant when the vehicle comes to a
stop (i.e. stop light, stop sign, etc.), so
the front passenger seat occupant
should continue to remain seated as
outlined above.
Troubleshooting:If you think the front passenger air bag
status light is incorrect:
1. If the light is ON with no front passenger and no objects on the front passenger
seat:
This may be due to the following condi-
tions that may be interfering with the
weight sensors:
.An object weighing over 9.1 lbs (4 kg)
hanging on the seat or placed in the
seatback pocket. .
A child restraint or other object press-
ing against the rear of the seatback.
. A rear passenger pushing or pulling
on the back of the front passenger
seat.
. Forcing the front seat or seatback
against an object on the seat or floor
behind it.
. An object placed under the front
passenger seat.
. An object placed between the seat
cushion and center console or be-
tween the seat cushion and the door.
If the vehicle is moving, please come to a
stop when it is safe to do so. Check and
correct any of the above conditions.
Restart the vehicle and wait 1 minute.
NOTE:
A system check will be performed dur-
ing which the front passenger air bag
status light will remain lit for about 7
seconds initially.
If the light is still ON after this, it is
recommended that the vehicle be
checked by a NISSAN dealer as soon as
possible.
2. If the light is ON with an adult occupying the front passenger seat:
.Occupant is a small adult — the front
passenger air bag status light is func-
tioning as intended. The front passen-
Page 170 of 604
2-76Instruments and controls
.Never allow children to operate
the power window. Improper op-
eration by children could lead to
an accident. Depress the window
lock button since children or
other persons could be caught in
the power window and this may
cause serious damage.
. When operating the power win-
dows, let children know it and
make sure that their hands, arms,
etc. are not placed near the
power windows. Otherwise they
may be caught in the power
windows.
. Make sure that the ignition switch
is in the OFF position and do not
leave the Intelligent Key and chil-
dren unattended inside the vehi-
cle. They could unknowingly
activate switches or controls. Un-
attended children could become
involved in serious accidents.
. To help avoid risk of injury or
death through unintended opera-
tion of the vehicle and or its
systems, including entrapment
in windows or inadvertent door
lock activation, do not leave chil-
dren, people who require the
assistance of others or pets un-
attended in your vehicle. Addi- tionally, the temperature inside a
closed vehicle on a warm day can
quickly become high enough to
cause a significant risk of injury
or death to people and pets.
The power windows operate when the
ignition switch is in the ON position, or for
a period of time after the ignition switch is
placed in the OFF position. If the driver’s
or front passenger’s door is opened dur-
ing this period of time, power to the
windows is canceled.
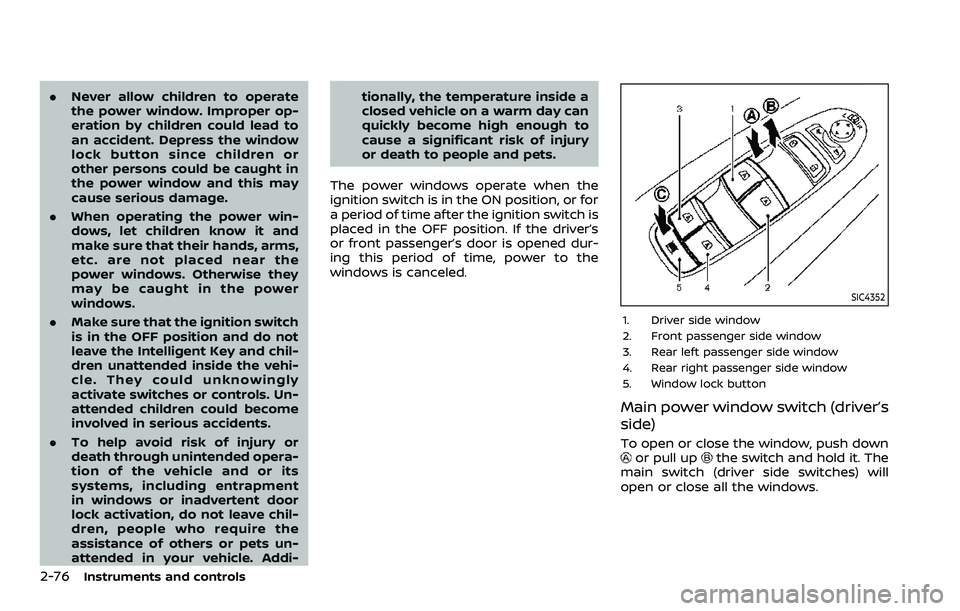
SIC4352
1. Driver side window
2. Front passenger side window
3. Rear left passenger side window
4. Rear right passenger side window
5. Window lock button
Main power window switch (driver’s
side)
To open or close the window, push downor pull upthe switch and hold it. The
main switch (driver side switches) will
open or close all the windows.
Page 189 of 604
3 Pre-driving checks and adjustments
Keys ........................................................................\
................................. 3-2Intelligent Key ........................................................................\
... 3-2
Valet hand-off ........................................................................\
... 3-4
Doors ........................................................................\
.............................. 3-4 Locking with mechanical key ...................................... 3-4
Opening and closing windows with the
mechanical key ........................................................................\
3-5
Locking with inside lock knob ..................................... 3-5
Locking with power door lock switch ................... 3-5
Automatic door locks ......................................................... 3-6
Child safety rear door lock ........................................... 3-6
Intelligent Key system .............................................................. 3-7 Intelligent Key operating range ................................. 3-9
Door locks/unlocks precaution .................................. 3-9
Intelligent Key operation .............................................. 3-10
Battery saver system ....................................................... 3-12
Warning signals .................................................................... 3-12
Troubleshooting guide ................................................... 3-13
Remote keyless entry system ......................................... 3-15 How to use remote keyless entry system ...... 3-16
Remote engine start (if so equipped) ....................... 3-19 Remote engine start operating range ............... 3-19
Remote starting the engine ....................................... 3-19
Extending engine run time ......................................... 3-20 Canceling a remote engine start ........................ 3-20
Conditions the remote engine start will
not work ........................................................................\
.......... 3-20
Hood ........................................................................\
............................ 3-21
Liftgate ........................................................................\
...................... 3-22 Operating manual liftgate ......................................... 3-22
Operating power liftgate (if so equipped) ...... 3-22
Auto closure ........................................................................\
3-25
Liftgate release lever ..................................................... 3-26
Fuel-filler door ........................................................................\
..... 3-26
Opening the fuel-filler door ...................................... 3-26
Fuel-filler cap ....................................................................... 3-26
Tilt/telescopic steering ........................................................ 3-29
Electric operation ............................................................. 3-29
Sun visors ........................................................................\
................ 3-29
Mirrors ........................................................................\
........................ 3-30
Inside mirror ........................................................................\
. 3-30
Outside mirrors .................................................................. 3-38
Vanity mirror ........................................................................\
3-40
Memory seat (if so equipped) ......................................... 3-40
Entry/exit function .......................................................... 3-40
Memory storage ................................................................ 3-41
Setting memory function ........................................... 3-42
System operation ............................................................. 3-42
Page 192 of 604
3-4Pre-driving checks and adjustments
CAUTION
Always carry the mechanical key
installed in the Intelligent Key.
VALET HAND-OFF
When you have to leave a key with a valet,
give them the Intelligent Key itself and
keep the mechanical key with you to
protect your belongings.
To prevent the glove box from being
opened during valet hand-off, follow the
procedures below.
1. Remove the mechanical key from theIntelligent Key.
2. Lock the glove box with the mechan- ical key.
3. Hand the Intelligent Key to the valet, keeping the mechanical key in your
pocket or bag for insertion into the
Intelligent Key when you retrieve your
vehicle.
See “Storage” (P.2-69).
WARNING
. Always have the doors locked
while driving. Along with the use
of seat belts, this provides great-
er safety in the event of an
accident by helping to prevent
persons from being thrown from
the vehicle. This also helps keep
children and others from unin-
tentionally opening the doors,
and will help keep out intruders.
. Before opening any door, always
look for and avoid oncoming
traffic.
. To help avoid risk of injury or
death through unintended opera-
tion of the vehicle and or its
systems, including entrapment
in windows or inadvertent door
lock activation, do not leave chil-
dren, people who require the
assistance of others or pets un-
attended in your vehicle. Addi-
tionally, the temperature inside a
closed vehicle on a warm day can
quickly become high enough to
cause a significant risk of injury
or death to people and pets.
SPA2457B
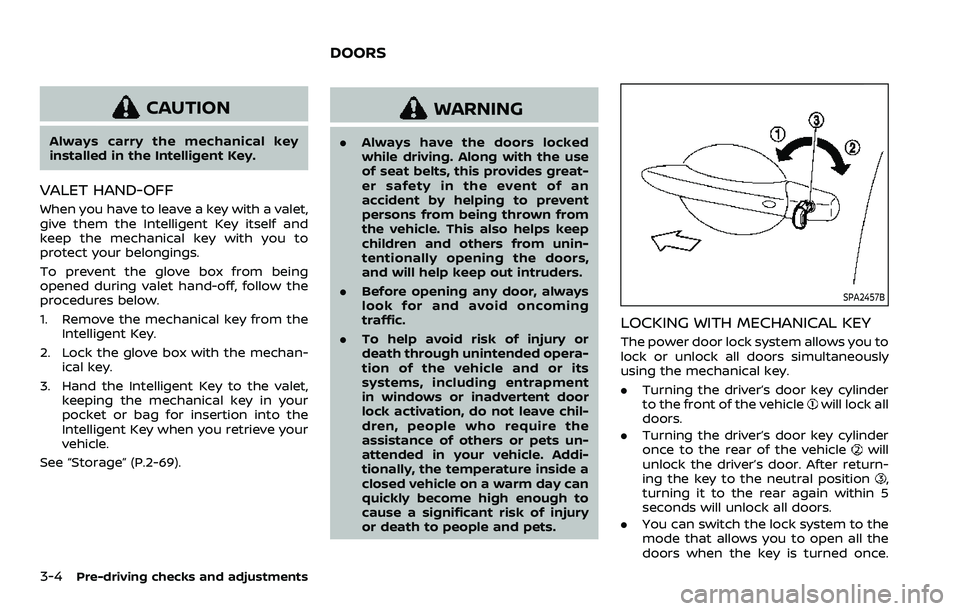
LOCKING WITH MECHANICAL KEY
The power door lock system allows you to
lock or unlock all doors simultaneously
using the mechanical key.
.Turning the driver’s door key cylinder
to the front of the vehicle
will lock all
doors.
. Turning the driver’s door key cylinder
once to the rear of the vehicle
will
unlock the driver’s door. After return-
ing the key to the neutral position
,
turning it to the rear again within 5
seconds will unlock all doors.
. You can switch the lock system to the
mode that allows you to open all the
doors when the key is turned once.
DOORS
Page 194 of 604
3-6Pre-driving checks and adjustments
Lockout protection
When the power door lock switch (driver
or front passenger) is moved to the lock
position with any door open, all doors will
lock and unlock automatically. With the
Intelligent Key left in the vehicle and any
door open, all doors will unlock automa-
tically and a chime will sound after the
door is closed.
These functions help to prevent the
Intelligent Key from being accidentally
locked inside the vehicle.
AUTOMATIC DOOR LOCKS
.All doors lock automatically when the
vehicle speed reaches 15 MPH (24
km/h).
. All doors unlock automatically when
the ignition switch is placed in the OFF
position or when the shift lever is
moved to the P (Park) position, if
selected.
The automatic unlock function can be
deactivated or activated. To deactivate
or activate the automatic door unlock
system, perform the following procedure:
1. Close all doors.
2. Place the ignition switch in the ON
position.
3. Within 20 seconds of performing Step 2, push and hold the power door lock switch to the
position (UNLOCK)
for more than 5 seconds.
4. When activated, the hazard indicator will flash twice. When deactivated, the
hazard indicator will flash once.
5. The ignition switch must be placed in the OFF and ON position again be-
tween each setting change.
When the automatic door unlock system
is deactivated, the doors do not unlock
when the ignition switch is placed in the
OFF position. To unlock the door manu-
ally, use the inside lock knob or the power
door lock switch (driver’s or front passen-
ger’s side).
SPA2745
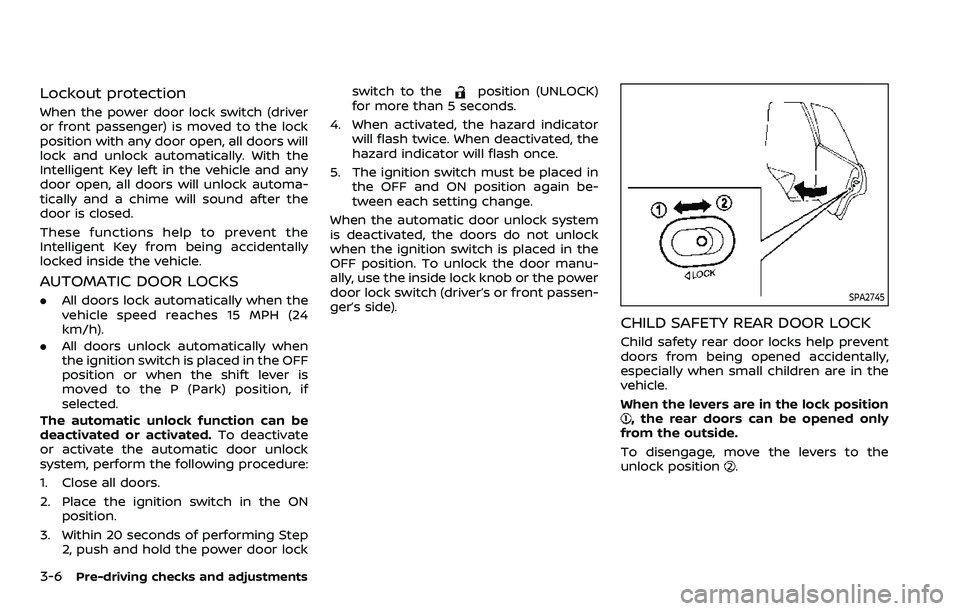
CHILD SAFETY REAR DOOR LOCK
Child safety rear door locks help prevent
doors from being opened accidentally,
especially when small children are in the
vehicle.
When the levers are in the lock position
, the rear doors can be opened only
from the outside.
To disengage, move the levers to the
unlock position
.
Page 210 of 604
3-22Pre-driving checks and adjustments
WARNING
.Always be sure the liftgate has
been closed securely to prevent it
from opening while driving.
. Do not drive with the liftgate
open. This could allow dangerous
exhaust gases to be drawn into
the vehicle. See “Exhaust gas
(carbon monoxide)” (P.5-4).
. Do not leave children unattended
inside the vehicle. They could
unknowingly activate switches
or controls. Unattended children
could become involved in serious
accidents.
. Always be sure that hands and
feet are clear of the door frame to
avoid injury while closing the
liftgate.
WAD0268X
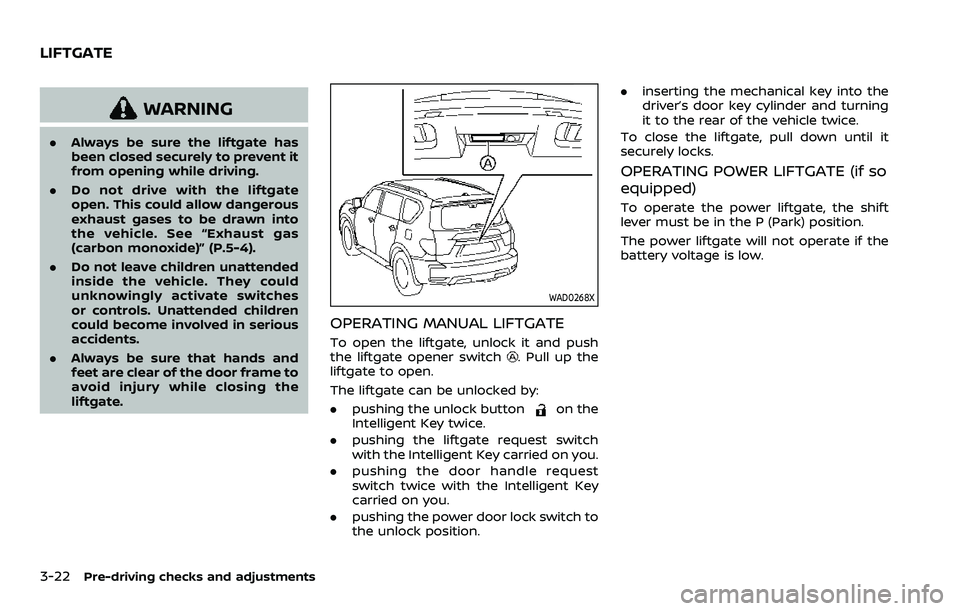
OPERATING MANUAL LIFTGATE
To open the liftgate, unlock it and push
the liftgate opener switch. Pull up the
liftgate to open.
The liftgate can be unlocked by:
. pushing the unlock button
on the
Intelligent Key twice.
. pushing the liftgate request switch
with the Intelligent Key carried on you.
. pushing the door handle request
switch twice with the Intelligent Key
carried on you.
. pushing the power door lock switch to
the unlock position. .
inserting the mechanical key into the
driver’s door key cylinder and turning
it to the rear of the vehicle twice.
To close the liftgate, pull down until it
securely locks.
OPERATING POWER LIFTGATE (if so
equipped)
To operate the power liftgate, the shift
lever must be in the P (Park) position.
The power liftgate will not operate if the
battery voltage is low.
LIFTGATE
Page 214 of 604
3-26Pre-driving checks and adjustments
CAUTION
.The liftgate will automatically
close from a partly open position.
To avoid pinching, keep hands
and fingers away from liftgate
opening.
. Do not let children operate the
liftgate.
SPA2751
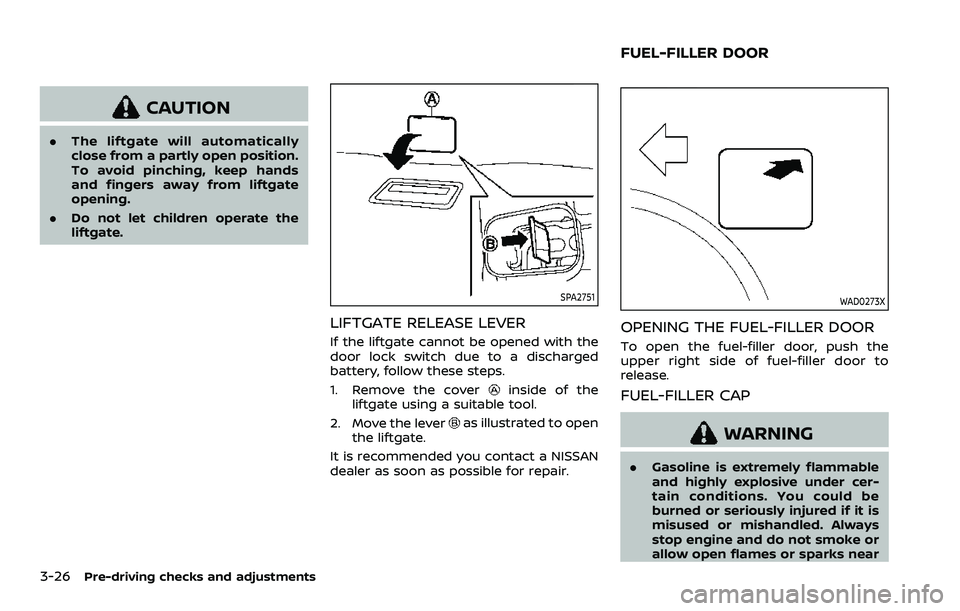
LIFTGATE RELEASE LEVER
If the liftgate cannot be opened with the
door lock switch due to a discharged
battery, follow these steps.
1. Remove the cover
inside of the
liftgate using a suitable tool.
2. Move the lever
as illustrated to open
the liftgate.
It is recommended you contact a NISSAN
dealer as soon as possible for repair.
WAD0273X
OPENING THE FUEL-FILLER DOOR
To open the fuel-filler door, push the
upper right side of fuel-filler door to
release.
FUEL-FILLER CAP
WARNING
. Gasoline is extremely flammable
and highly explosive under cer-
tain conditions. You could be
burned or seriously injured if it is
misused or mishandled. Always
stop engine and do not smoke or
allow open flames or sparks near
FUEL-FILLER DOOR
Page 281 of 604
6.HDMI port
Connect an external audio/video
source using a full-size HDMI connec-
tor. Supports MHL 2.0 playback and
charging.
7. USB 2.0 port
Play videos, music, and images stored
on most USB devices. Provides up to 2
amps of output to charge most mo-
bile devices.
8. Headphone output jack
Connect wired headphones using a
1/8 in (3.5 mm) stereo connector.
CAUTION
.Do not use any harsh solvents or
chemicals when cleaning the
monitor.
. Do not use any abrasive cleaners
that may scratch the screen. Use
only a lightly dampened lint free
cloth to wipe the screen if it is
dirty.
. The LCD display screen is not
touchscreen. Do not put pressure
or add suction cups on the
screen. .
Caution children to avoid touch-
ing or scratching the screen, as it
may become dirty or damaged.
. Place the monitor in the fully
closed position when not in use.
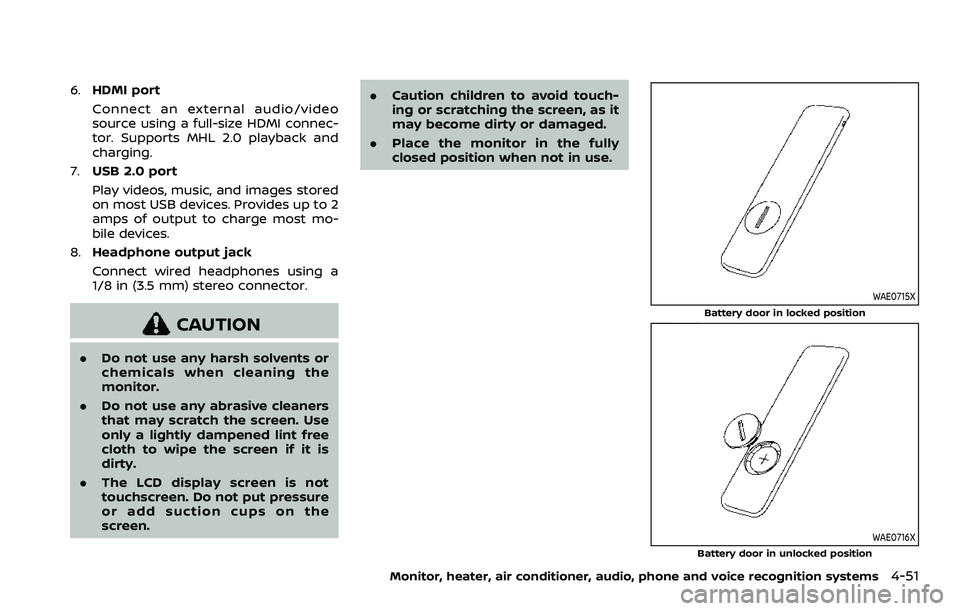
WAE0715X
Battery door in locked position
WAE0716X
Battery door in unlocked position
Monitor, heater, air conditioner, audio, phone and voice recognition systems4-51