headlights NISSAN ARMADA 2023 User Guide
[x] Cancel search | Manufacturer: NISSAN, Model Year: 2023, Model line: ARMADA, Model: NISSAN ARMADA 2023Pages: 604, PDF Size: 2.97 MB
Page 156 of 604
2-62Instruments and controls
(See “42. Rear Door Alert is activated” (P.2-
34).)
CAUTION
.Use power outlet with the engine
running to avoid discharging the
vehicle battery.
. Avoid using power outlet when
the air conditioner, headlights or
rear window defroster is on.
. Before inserting or disconnecting
a plug, be sure the electrical
accessory being used is turned
OFF.
. When not in use, be sure to close
the cap. Do not allow water or any
liquid to contact the outlet.
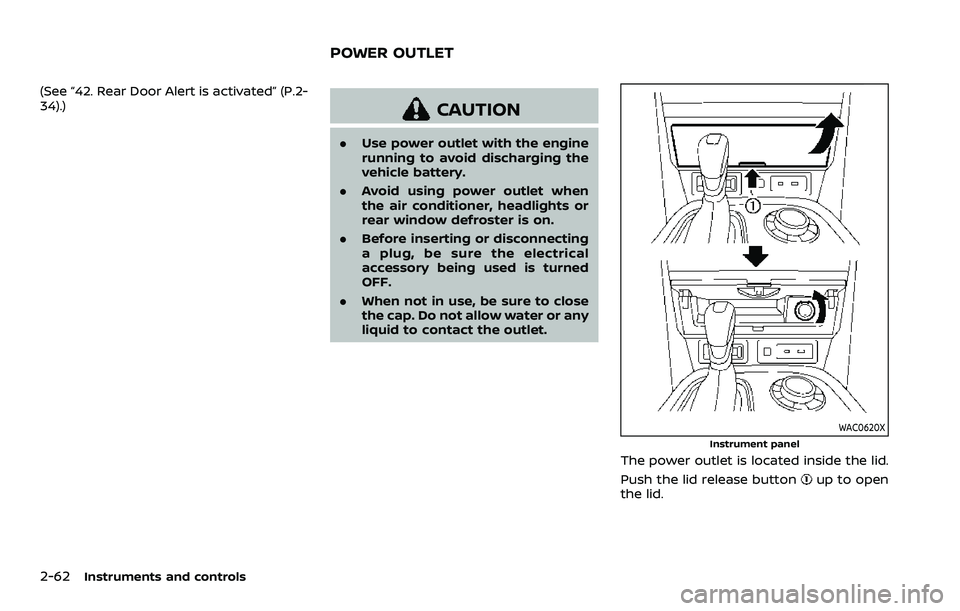
WAC0620XInstrument panel
The power outlet is located inside the lid.
Push the lid release button
up to open
the lid.
POWER OUTLET
Page 176 of 604
2-82Instruments and controls
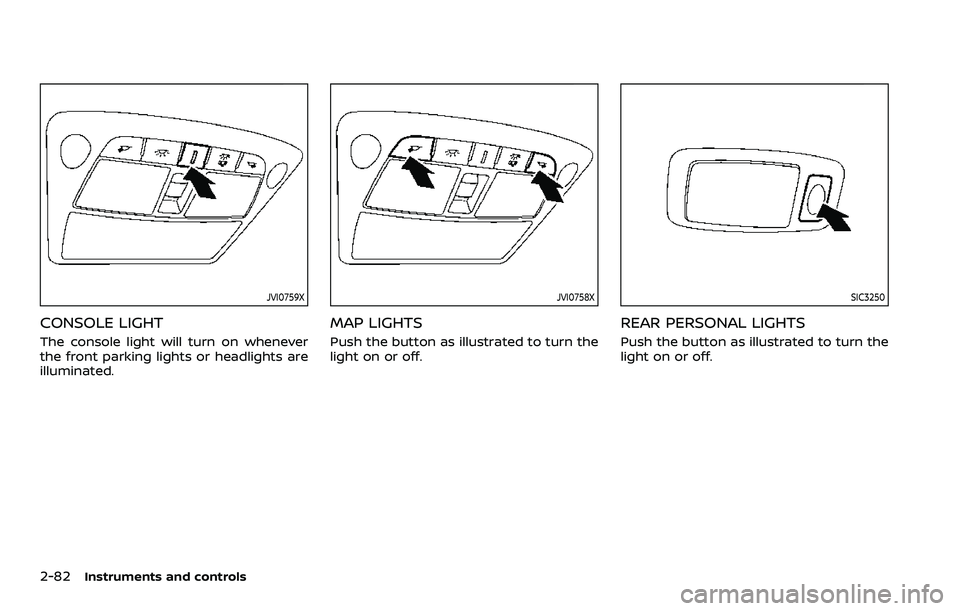
JVI0759X
CONSOLE LIGHT
The console light will turn on whenever
the front parking lights or headlights are
illuminated.
JVI0758X
MAP LIGHTS
Push the button as illustrated to turn the
light on or off.
SIC3250
REAR PERSONAL LIGHTS
Push the button as illustrated to turn the
light on or off.
Page 218 of 604
3-30Pre-driving checks and adjustments
CAUTION
.Do not store the main sun visor
before storing the extension sun
visor.
. Do not pull the extension sun
visor forcedly downward.
1. To block out glare from the front, swing down the main sun visor
.
2. To block glare from the side, remove the main sun visor from the center
mount and swing it to the side
.
3. Draw out the extension sun visor
from the main sun visor to block from
further glare.
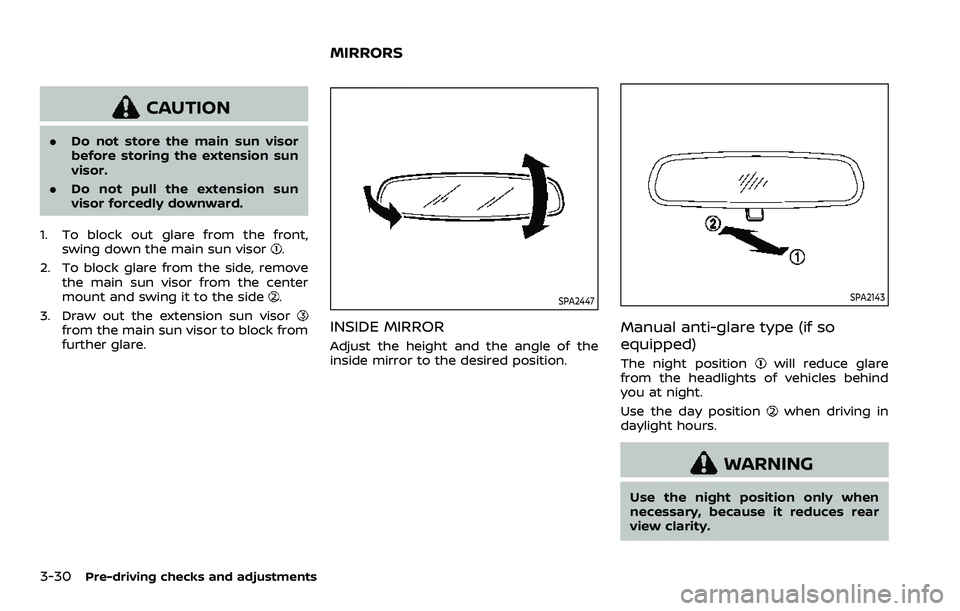
SPA2447
INSIDE MIRROR
Adjust the height and the angle of the
inside mirror to the desired position.
SPA2143
Manual anti-glare type (if so
equipped)
The night positionwill reduce glare
from the headlights of vehicles behind
you at night.
Use the day position
when driving in
daylight hours.
WARNING
Use the night position only when
necessary, because it reduces rear
view clarity.
MIRRORS
Page 219 of 604
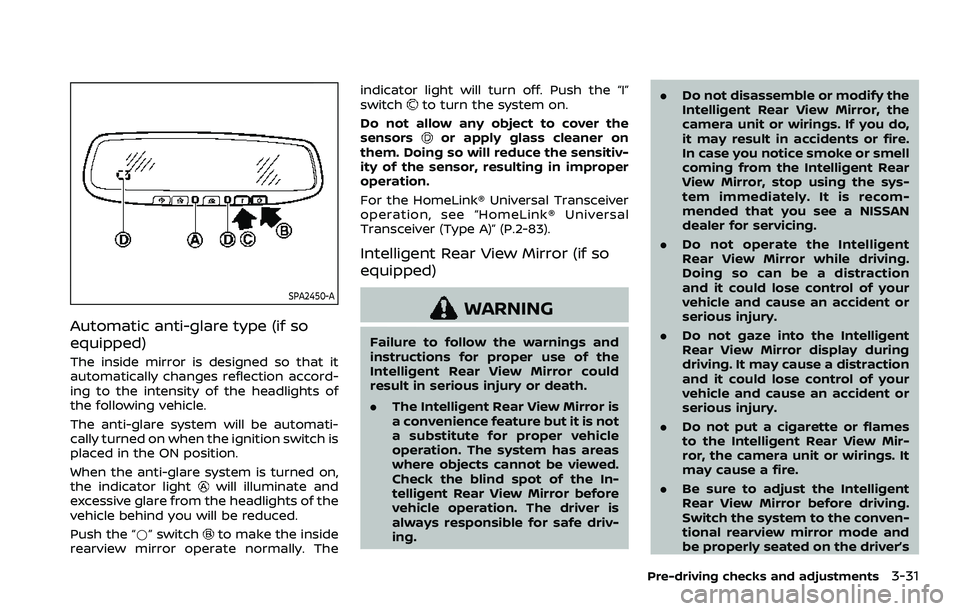
SPA2450-A
Automatic anti-glare type (if so
equipped)
The inside mirror is designed so that it
automatically changes reflection accord-
ing to the intensity of the headlights of
the following vehicle.
The anti-glare system will be automati-
cally turned on when the ignition switch is
placed in the ON position.
When the anti-glare system is turned on,
the indicator light
will illuminate and
excessive glare from the headlights of the
vehicle behind you will be reduced.
Push the “*” switch
to make the inside
rearview mirror operate normally. The indicator light will turn off. Push the “I”
switch
to turn the system on.
Do not allow any object to cover the
sensors
or apply glass cleaner on
them. Doing so will reduce the sensitiv-
ity of the sensor, resulting in improper
operation.
For the HomeLink® Universal Transceiver
operation, see “HomeLink® Universal
Transceiver (Type A)” (P.2-83).
Intelligent Rear View Mirror (if so
equipped)
WARNING
Failure to follow the warnings and
instructions for proper use of the
Intelligent Rear View Mirror could
result in serious injury or death.
. The Intelligent Rear View Mirror is
a convenience feature but it is not
a substitute for proper vehicle
operation. The system has areas
where objects cannot be viewed.
Check the blind spot of the In-
telligent Rear View Mirror before
vehicle operation. The driver is
always responsible for safe driv-
ing. .
Do not disassemble or modify the
Intelligent Rear View Mirror, the
camera unit or wirings. If you do,
it may result in accidents or fire.
In case you notice smoke or smell
coming from the Intelligent Rear
View Mirror, stop using the sys-
tem immediately. It is recom-
mended that you see a NISSAN
dealer for servicing.
. Do not operate the Intelligent
Rear View Mirror while driving.
Doing so can be a distraction
and it could lose control of your
vehicle and cause an accident or
serious injury.
. Do not gaze into the Intelligent
Rear View Mirror display during
driving. It may cause a distraction
and it could lose control of your
vehicle and cause an accident or
serious injury.
. Do not put a cigarette or flames
to the Intelligent Rear View Mir-
ror, the camera unit or wirings. It
may cause a fire.
. Be sure to adjust the Intelligent
Rear View Mirror before driving.
Switch the system to the conven-
tional rearview mirror mode and
be properly seated on the driver’s
Pre-driving checks and adjustments3-31
Page 224 of 604
3-36Pre-driving checks and adjustments
WAD0197X
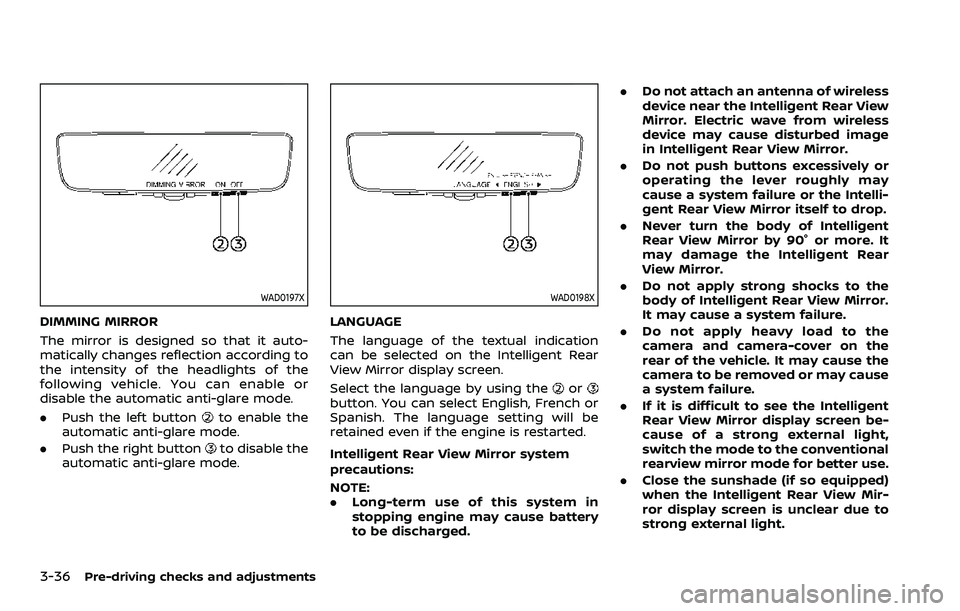
DIMMING MIRROR
The mirror is designed so that it auto-
matically changes reflection according to
the intensity of the headlights of the
following vehicle. You can enable or
disable the automatic anti-glare mode.
.Push the left button
to enable the
automatic anti-glare mode.
. Push the right button
to disable the
automatic anti-glare mode.
WAD0198X
LANGUAGE
The language of the textual indication
can be selected on the Intelligent Rear
View Mirror display screen.
Select the language by using the
orbutton. You can select English, French or
Spanish. The language setting will be
retained even if the engine is restarted.
Intelligent Rear View Mirror system
precautions:
NOTE:
. Long-term use of this system in
stopping engine may cause battery
to be discharged. .
Do not attach an antenna of wireless
device near the Intelligent Rear View
Mirror. Electric wave from wireless
device may cause disturbed image
in Intelligent Rear View Mirror.
. Do not push buttons excessively or
operating the lever roughly may
cause a system failure or the Intelli-
gent Rear View Mirror itself to drop.
. Never turn the body of Intelligent
Rear View Mirror by 90° or more. It
may damage the Intelligent Rear
View Mirror.
. Do not apply strong shocks to the
body of Intelligent Rear View Mirror.
It may cause a system failure.
. Do not apply heavy load to the
camera and camera-cover on the
rear of the vehicle. It may cause the
camera to be removed or may cause
a system failure.
. If it is difficult to see the Intelligent
Rear View Mirror display screen be-
cause of a strong external light,
switch the mode to the conventional
rearview mirror mode for better use.
. Close the sunshade (if so equipped)
when the Intelligent Rear View Mir-
ror display screen is unclear due to
strong external light.
Page 225 of 604
JVP0559X
Flicker image (example)
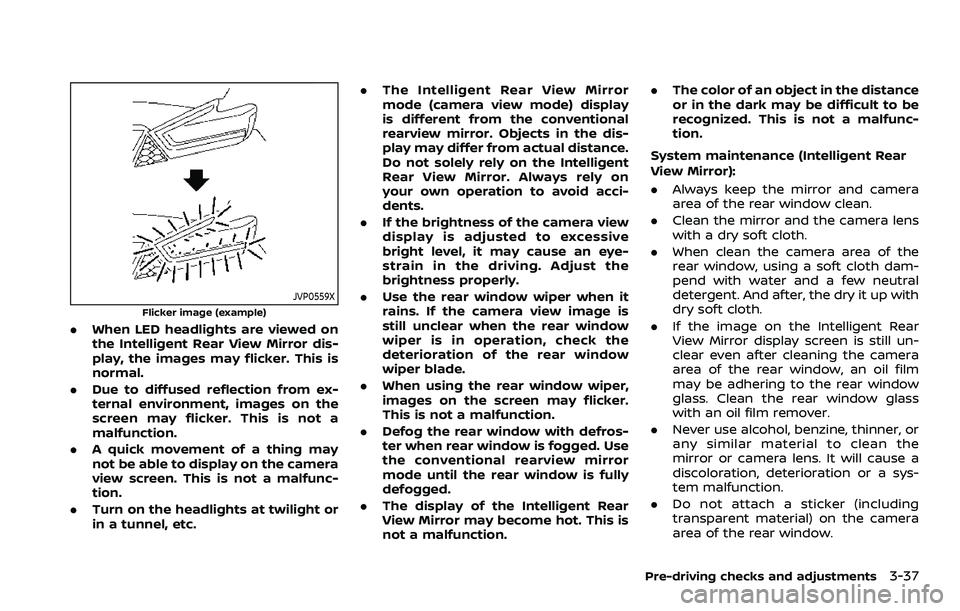
.When LED headlights are viewed on
the Intelligent Rear View Mirror dis-
play, the images may flicker. This is
normal.
. Due to diffused reflection from ex-
ternal environment, images on the
screen may flicker. This is not a
malfunction.
. A quick movement of a thing may
not be able to display on the camera
view screen. This is not a malfunc-
tion.
. Turn on the headlights at twilight or
in a tunnel, etc. .
The Intelligent Rear View Mirror
mode (camera view mode) display
is different from the conventional
rearview mirror. Objects in the dis-
play may differ from actual distance.
Do not solely rely on the Intelligent
Rear View Mirror. Always rely on
your own operation to avoid acci-
dents.
. If the brightness of the camera view
display is adjusted to excessive
bright level, it may cause an eye-
strain in the driving. Adjust the
brightness properly.
. Use the rear window wiper when it
rains. If the camera view image is
still unclear when the rear window
wiper is in operation, check the
deterioration of the rear window
wiper blade.
. When using the rear window wiper,
images on the screen may flicker.
This is not a malfunction.
. Defog the rear window with defros-
ter when rear window is fogged. Use
the conventional rearview mirror
mode until the rear window is fully
defogged.
. The display of the Intelligent Rear
View Mirror may become hot. This is
not a malfunction. .
The color of an object in the distance
or in the dark may be difficult to be
recognized. This is not a malfunc-
tion.
System maintenance (Intelligent Rear
View Mirror):
. Always keep the mirror and camera
area of the rear window clean.
. Clean the mirror and the camera lens
with a dry soft cloth.
. When clean the camera area of the
rear window, using a soft cloth dam-
pend with water and a few neutral
detergent. And after, the dry it up with
dry soft cloth.
. If the image on the Intelligent Rear
View Mirror display screen is still un-
clear even after cleaning the camera
area of the rear window, an oil film
may be adhering to the rear window
glass. Clean the rear window glass
with an oil film remover.
. Never use alcohol, benzine, thinner, or
any similar material to clean the
mirror or camera lens. It will cause a
discoloration, deterioration or a sys-
tem malfunction.
. Do not attach a sticker (including
transparent material) on the camera
area of the rear window.
Pre-driving checks and adjustments3-37
Page 227 of 604

SPA2738
Power foldable outside mirrors
CAUTION
.Do not touch the mirrors while
they are moving. Your hand may
be pinched, and the mirror may
malfunction.
. Do not drive with the mirrors
stored. You will be unable to see
behind the vehicle.
. If the mirrors were folded or
unfolded by hand, there is a
chance that the mirror will move
forward or backward during driv- ing. If the mirrors were folded or
unfolded by hand, be sure to
adjust them again electrically be-
fore driving.
The outside mirror remote control oper-
ates when the ignition switch is in the
ACC or ON position.
To fold the outside mirrors, push the
outside mirror folding switch to the
“CLOSE” position
. To unfold, push to
the “OPEN” position.
If mirrors are manually operated or
bumped, the mirror body can become
loose at the pivot point. To correct
electronic mirror operation, cycle the
mirrors by pushing “CLOSE” until comple-
tely closed, then push “OPEN” until the
mirrors are in the open position.
Reverse tilt-down feature (if so
equipped)
When backing up the vehicle, the right
and left outside mirrors will turn down-
ward automatically to provide better rear
visibility.
1. Place the ignition switch in the ON position.
2. Move the shift lever to the R (Reverse) position. 3. Choose either the right or left outside
mirror by operating the outside mirror
control switch.
4. The outside mirror surfaces move downward.
When one of the following conditions has
occurred, the outside mirror surfaces will
return to their original positions.
. The shift lever is moved to any posi-
tion other than R (Reverse).
. The outside mirror control switch is
set to the center position.
. The ignition switch is placed in the
OFF position.
Automatic anti-glare (if so
equipped)
The outside rearview mirrors are de-
signed so that its automatically change
reflection according to the intensity of
the headlights of the vehicle following
you.
The anti-glare system will be automati-
cally turned on when the ignition switch is
placed in the ON position.
Pre-driving checks and adjustments3-39
Page 336 of 604
5-24Starting and driving
WAF0780X
WAC0215X
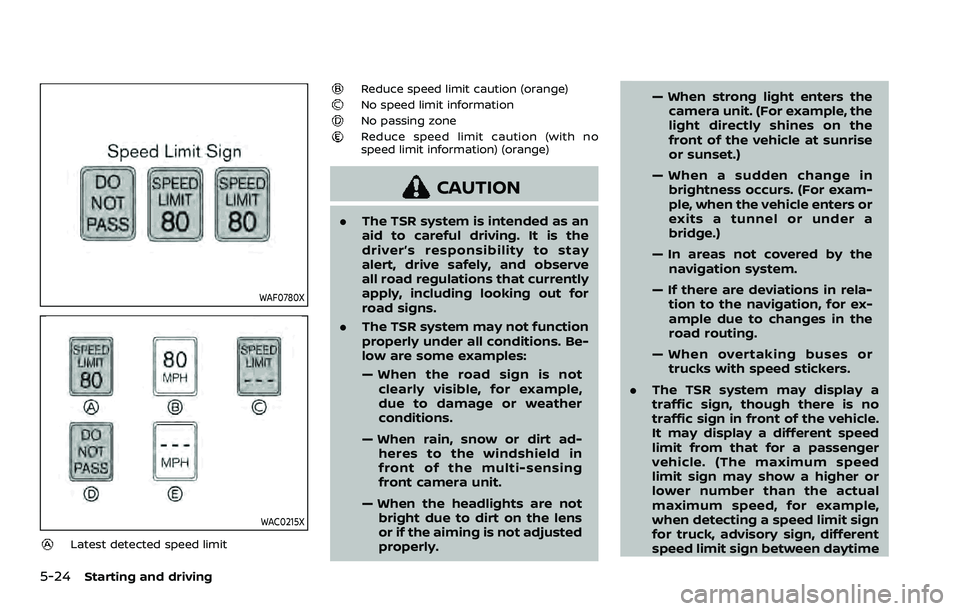
Latest detected speed limit
Reduce speed limit caution (orange)No speed limit informationNo passing zoneReduce speed limit caution (with no
speed limit information) (orange)
CAUTION
.The TSR system is intended as an
aid to careful driving. It is the
driver’s responsibility to stay
alert, drive safely, and observe
all road regulations that currently
apply, including looking out for
road signs.
. The TSR system may not function
properly under all conditions. Be-
low are some examples:
— When the road sign is not
clearly visible, for example,
due to damage or weather
conditions.
— When rain, snow or dirt ad- heres to the windshield in
front of the multi-sensing
front camera unit.
— When the headlights are not bright due to dirt on the lens
or if the aiming is not adjusted
properly. — When strong light enters the
camera unit. (For example, the
light directly shines on the
front of the vehicle at sunrise
or sunset.)
— When a sudden change in brightness occurs. (For exam-
ple, when the vehicle enters or
exits a tunnel or under a
bridge.)
— In areas not covered by the navigation system.
— If there are deviations in rela- tion to the navigation, for ex-
ample due to changes in the
road routing.
— When overtaking buses or trucks with speed stickers.
. The TSR system may display a
traffic sign, though there is no
traffic sign in front of the vehicle.
It may display a different speed
limit from that for a passenger
vehicle. (The maximum speed
limit sign may show a higher or
lower number than the actual
maximum speed, for example,
when detecting a speed limit sign
for truck, advisory sign, different
speed limit sign between daytime
Page 342 of 604
5-30Starting and driving
— When the vehicle’s travelingdirection does not align with
the lane marker.
— When traveling close to the vehicle in front of you, which
obstructs the lane camera
unit detection range.
— When rain, snow, dirt or object adheres to the windshield in
front of the lane camera unit.
— When the headlights are not bright due to dirt on the lens
or if the aiming is not adjusted
properly.
— When strong light enters the lane camera unit. (For exam-
ple, the light directly shines on
the front of the vehicle at
sunrise or sunset.)
— When a sudden change in brightness occurs. (For exam-
ple, when the vehicle enters or
exits a tunnel or under a
bridge.)SYSTEM TEMPORARILY UNAVAIL-
ABLE
Condition A:
If the vehicle is parked in direct sunlight
under high temperature conditions (over
approximately 104°F (40°C)) and then
started, the LDW system may be deacti-
vated automatically, the LDW indicator
will flash and the following message will
appear in the vehicle information display.
. “Not Available: High Camera Temp”
When the interior temperature is reduced,
the LDW system will resume operating
automatically and the LDW indicator will
stop flashing.
Condition B:
The warning function of the LDW system
is not designed to work under the follow-
ing conditions:
. When you operate the lane change
signal and change traveling lanes in
the direction of the signal. (The LDW
system will become operable again
approximately 2 seconds after the
lane change signal is turned off.)
. When the vehicle speed lowers to less
than approximately 37 MPH (60 km/h).
Action to take:
After the above conditions have finished
and the necessary operating conditions are satisfied, the LDW system will resume.
SYSTEM MALFUNCTION
If the LDW system malfunctions, it will
cancel automatically and “Malfunction”
warning message will appear in the
vehicle information display. If the warning
message appears, pull off the road to a
safe location and stop the vehicle. Place
the ignition switch in the OFF position
and restart the engine. If the warning
message continues to appear, have the
system checked. It is recommended that
you visit a NISSAN dealer for this service.
Page 347 of 604
activating your turn signal or, for
example, if a construction zone
directs traffic to cross an existing
lane marker. If this occurs you
may need to apply corrective
steering to complete your lane
change.
. Because the I-LI may not activate
under the road, weather, and lane
marker conditions described in
this section, it may not activate
every time your vehicle begins to
leave its lane and you will need to
apply corrective steering.
. The I-LI system will not operate at
speeds below approximately 37
MPH (60 km/h) or if it cannot
detect lane markers.
. When the I-LI system is operating,
avoid excessive or sudden steer-
ing maneuvers. Otherwise, you
could lose control of the vehicle.
. Do not use the I-LI system under
the following conditions as it may
not function properly:
— During bad weather (rain, fog,
snow, etc.).
— When driving on slippery roads, such as on ice or snow. — When driving on winding or
uneven roads.
— When there is a lane closure due to road repairs.
— When driving in a makeshift or temporary lane.
— When driving on roads where the lane width is too narrow.
— When driving without normal tire conditions (for example,
tire wear, low tire pressure,
installation of spare tire, tire
chains, non-standard wheels).
— When the vehicle is equipped with non-original brake parts
or suspension parts.
— When towing a trailer or other vehicle.
— On roads where there are multiple parallel lane markers;
lane markers that are faded or
not painted clearly; yellow
painted lane markers; non-
standard lane markers; or
lane markers covered with
water, dirt, snow, etc.
— On roads where discontinued lane markers are still detect-
able. — On roads where there are
sharp curves.
— On roads where there are sharply contrasting objects,
such as shadows, snow,
water, wheel ruts, seams or
lines remaining after road re-
pairs. (The I-LI system could
detect these items as lane
markers.)
— On roads where the traveling lane merges or separates.
— When the vehicle’s traveling direction does not align with
the lane marker.
— When traveling close to the vehicle in front of you, which
obstructs the lane camera
unit detection range.
— When rain, snow or dirt ad- heres to the windshield in
front of the lane camera unit.
— When the headlights are not bright due to dirt on the lens
or if the aiming is not adjusted
properly.
— When strong light enters the lane camera unit. (For exam-
ple, the light directly shines on
Starting and driving5-35