key NISSAN ARMADA 2023 Owners Manual
[x] Cancel search | Manufacturer: NISSAN, Model Year: 2023, Model line: ARMADA, Model: NISSAN ARMADA 2023Pages: 604, PDF Size: 2.97 MB
Page 11 of 604
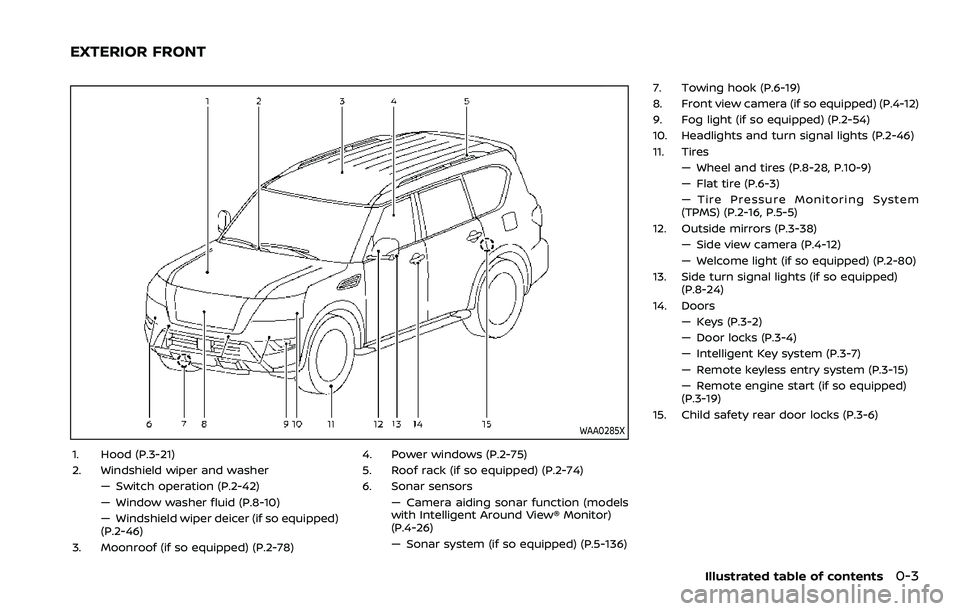
WAA0285X
1. Hood (P.3-21)
2. Windshield wiper and washer— Switch operation (P.2-42)
— Window washer fluid (P.8-10)
— Windshield wiper deicer (if so equipped)
(P.2-46)
3. Moonroof (if so equipped) (P.2-78) 4. Power windows (P.2-75)
5. Roof rack (if so equipped) (P.2-74)
6. Sonar sensors
— Camera aiding sonar function (models
with Intelligent Around View® Monitor)
(P.4-26)
— Sonar system (if so equipped) (P.5-136) 7. Towing hook (P.6-19)
8. Front view camera (if so equipped) (P.4-12)
9. Fog light (if so equipped) (P.2-54)
10. Headlights and turn signal lights (P.2-46)
11. Tires
— Wheel and tires (P.8-28, P.10-9)
— Flat tire (P.6-3)
— Tire Pressure Monitoring System
(TPMS) (P.2-16, P.5-5)
12. Outside mirrors (P.3-38) — Side view camera (P.4-12)
— Welcome light (if so equipped) (P.2-80)
13. Side turn signal lights (if so equipped) (P.8-24)
14. Doors — Keys (P.3-2)
— Door locks (P.3-4)
— Intelligent Key system (P.3-7)
— Remote keyless entry system (P.3-15)
— Remote engine start (if so equipped)
(P.3-19)
15. Child safety rear door locks (P.3-6)
Illustrated table of contents0-3
EXTERIOR FRONT
Page 12 of 604
0-4Illustrated table of contents
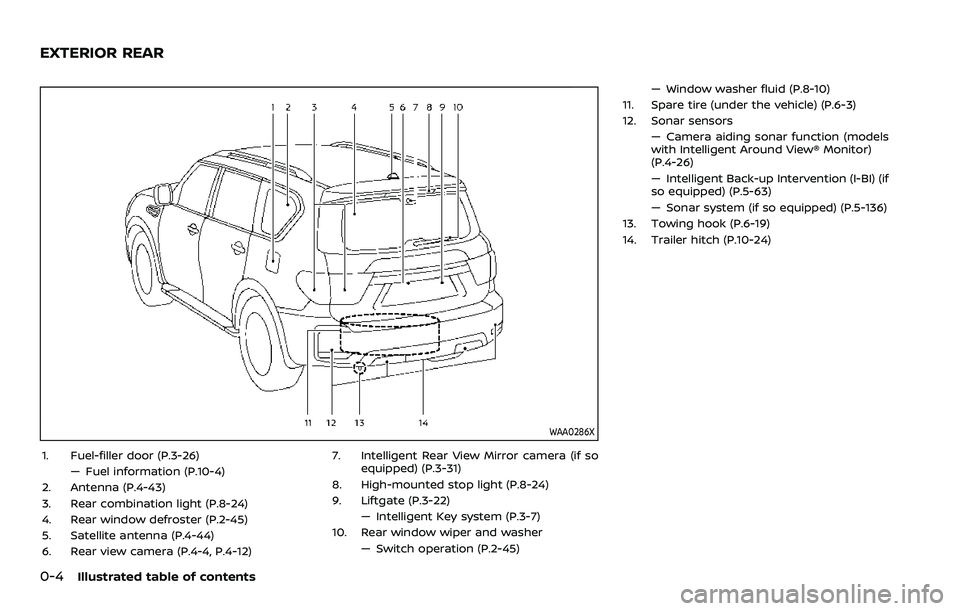
WAA0286X
1. Fuel-filler door (P.3-26)— Fuel information (P.10-4)
2. Antenna (P.4-43)
3. Rear combination light (P.8-24)
4. Rear window defroster (P.2-45)
5. Satellite antenna (P.4-44)
6. Rear view camera (P.4-4, P.4-12) 7. Intelligent Rear View Mirror camera (if so
equipped) (P.3-31)
8. High-mounted stop light (P.8-24)
9. Liftgate (P.3-22) — Intelligent Key system (P.3-7)
10. Rear window wiper and washer
— Switch operation (P.2-45) — Window washer fluid (P.8-10)
11. Spare tire (under the vehicle) (P.6-3)
12. Sonar sensors — Camera aiding sonar function (models
with Intelligent Around View® Monitor)
(P.4-26)
— Intelligent Back-up Intervention (I-BI) (if
so equipped) (P.5-63)
— Sonar system (if so equipped) (P.5-136)
13. Towing hook (P.6-19)
14. Trailer hitch (P.10-24)
EXTERIOR REAR
Page 41 of 604
JVR0183X
WARNING
Do not allow children to play with the
seat belts. Most seating positions are
equipped with Automatic Locking
Retractor (ALR) mode seat belts. If
the seat belt becomes wrapped
around a child’s neck with the ALR
mode activated, the child can be
seriously injured or killed if the seat
belt retracts and becomes tight. This
can occur even if the vehicle is
parked. Unbuckle the seat belt to
release the child. For the center of
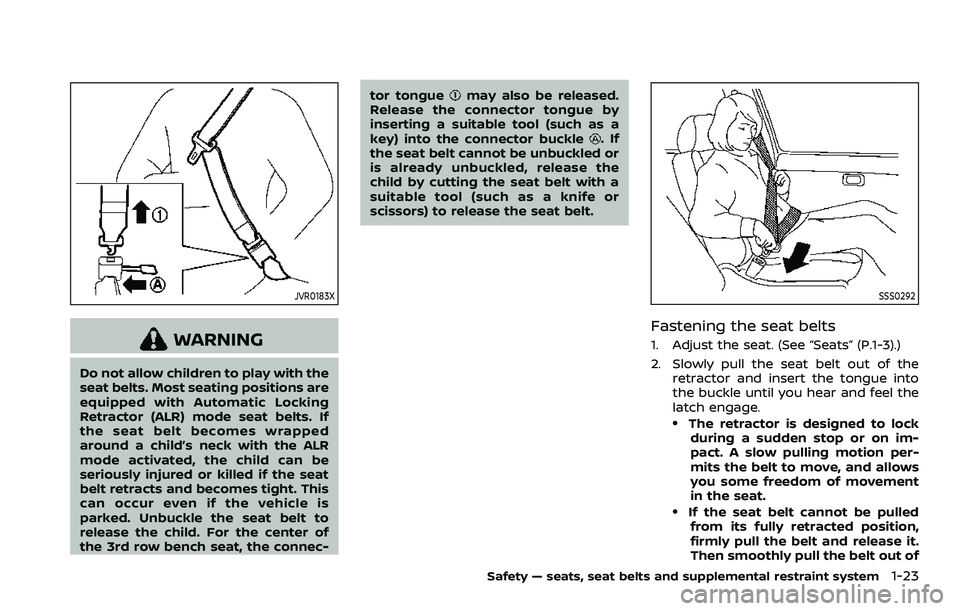
the 3rd row bench seat, the connec-tor tongue
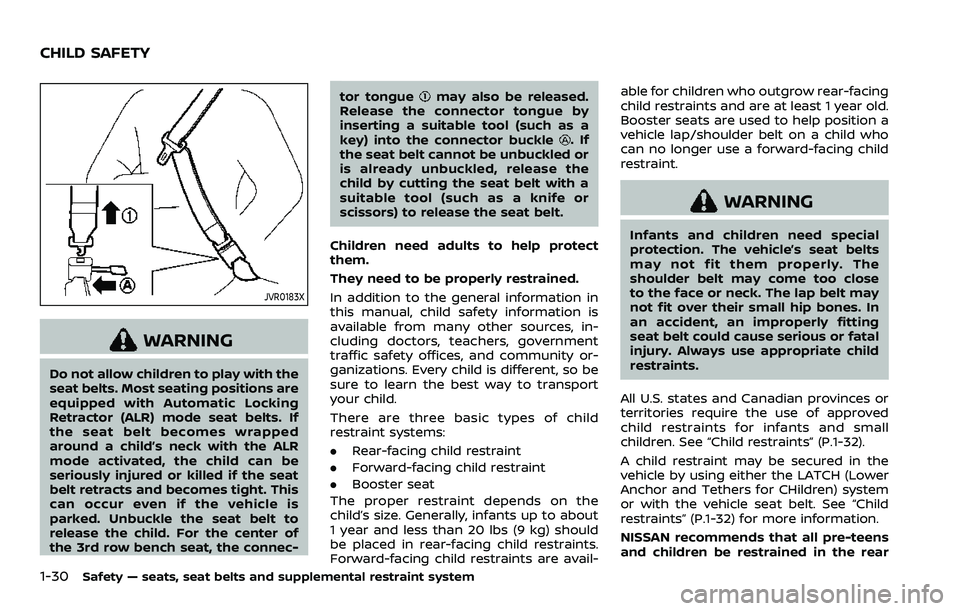
may also be released.
Release the connector tongue by
inserting a suitable tool (such as a
key) into the connector buckle
.If
the seat belt cannot be unbuckled or
is already unbuckled, release the
child by cutting the seat belt with a
suitable tool (such as a knife or
scissors) to release the seat belt.
SSS0292
Fastening the seat belts
1. Adjust the seat. (See “Seats” (P.1-3).)
2. Slowly pull the seat belt out of the retractor and insert the tongue into
the buckle until you hear and feel the
latch engage.
.The retractor is designed to lockduring a sudden stop or on im-
pact. A slow pulling motion per-
mits the belt to move, and allows
you some freedom of movement
in the seat.
.If the seat belt cannot be pulledfrom its fully retracted position,
firmly pull the belt and release it.
Then smoothly pull the belt out of
Safety — seats, seat belts and supplemental restraint system1-23
Page 45 of 604
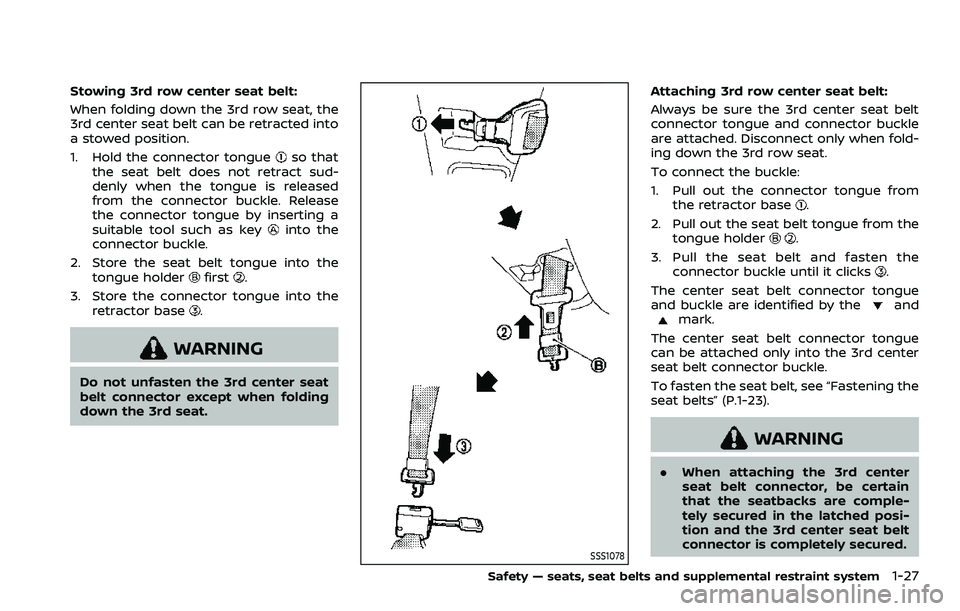
Stowing 3rd row center seat belt:
When folding down the 3rd row seat, the
3rd center seat belt can be retracted into
a stowed position.
1. Hold the connector tongue
so that
the seat belt does not retract sud-
denly when the tongue is released
from the connector buckle. Release
the connector tongue by inserting a
suitable tool such as key
into the
connector buckle.
2. Store the seat belt tongue into the tongue holder
first.
3. Store the connector tongue into the retractor base
.
WARNING
Do not unfasten the 3rd center seat
belt connector except when folding
down the 3rd seat.
SSS1078
Attaching 3rd row center seat belt:
Always be sure the 3rd center seat belt
connector tongue and connector buckle
are attached. Disconnect only when fold-
ing down the 3rd row seat.
To connect the buckle:
1. Pull out the connector tongue fromthe retractor base
.
2. Pull out the seat belt tongue from the tongue holder
.
3. Pull the seat belt and fasten the connector buckle until it clicks
.
The center seat belt connector tongue
and buckle are identified by the
andmark.
The center seat belt connector tongue
can be attached only into the 3rd center
seat belt connector buckle.
To fasten the seat belt, see “Fastening the
seat belts” (P.1-23).
WARNING
. When attaching the 3rd center
seat belt connector, be certain
that the seatbacks are comple-
tely secured in the latched posi-
tion and the 3rd center seat belt
connector is completely secured.
Safety — seats, seat belts and supplemental restraint system1-27
Page 48 of 604
1-30Safety — seats, seat belts and supplemental restraint system
JVR0183X
WARNING
Do not allow children to play with the
seat belts. Most seating positions are
equipped with Automatic Locking
Retractor (ALR) mode seat belts. If
the seat belt becomes wrapped
around a child’s neck with the ALR
mode activated, the child can be
seriously injured or killed if the seat
belt retracts and becomes tight. This
can occur even if the vehicle is
parked. Unbuckle the seat belt to
release the child. For the center of
the 3rd row bench seat, the connec-tor tongue
may also be released.
Release the connector tongue by
inserting a suitable tool (such as a
key) into the connector buckle
.If
the seat belt cannot be unbuckled or
is already unbuckled, release the
child by cutting the seat belt with a
suitable tool (such as a knife or
scissors) to release the seat belt.
Children need adults to help protect
them.
They need to be properly restrained.
In addition to the general information in
this manual, child safety information is
available from many other sources, in-
cluding doctors, teachers, government
traffic safety offices, and community or-
ganizations. Every child is different, so be
sure to learn the best way to transport
your child.
There are three basic types of child
restraint systems:
. Rear-facing child restraint
. Forward-facing child restraint
. Booster seat
The proper restraint depends on the
child’s size. Generally, infants up to about
1 year and less than 20 lbs (9 kg) should
be placed in rear-facing child restraints.
Forward-facing child restraints are avail- able for children who outgrow rear-facing
child restraints and are at least 1 year old.
Booster seats are used to help position a
vehicle lap/shoulder belt on a child who
can no longer use a forward-facing child
restraint.
WARNING
Infants and children need special
protection. The vehicle’s seat belts
may not fit them properly. The
shoulder belt may come too close
to the face or neck. The lap belt may
not fit over their small hip bones. In
an accident, an improperly fitting
seat belt could cause serious or fatal
injury. Always use appropriate child
restraints.
All U.S. states and Canadian provinces or
territories require the use of approved
child restraints for infants and small
children. See “Child restraints” (P.1-32).
A child restraint may be secured in the
vehicle by using either the LATCH (Lower
Anchor and Tethers for CHildren) system
or with the vehicle seat belt. See “Child
restraints” (P.1-32) for more information.
NISSAN recommends that all pre-teens
and children be restrained in the rear
CHILD SAFETY
Page 104 of 604
2-10Instruments and controls
the dipstick to check the oil level.
(See “Engine oil” (P.8-6).)
. If the gauge does not move with
the proper amount of engine oil,
have the vehicle checked. It is
recommended you visit a NISSAN
dealer for this service. Continued
vehicle operation in such a con-
dition could cause serious da-
mage to the engine.
WAC0220X
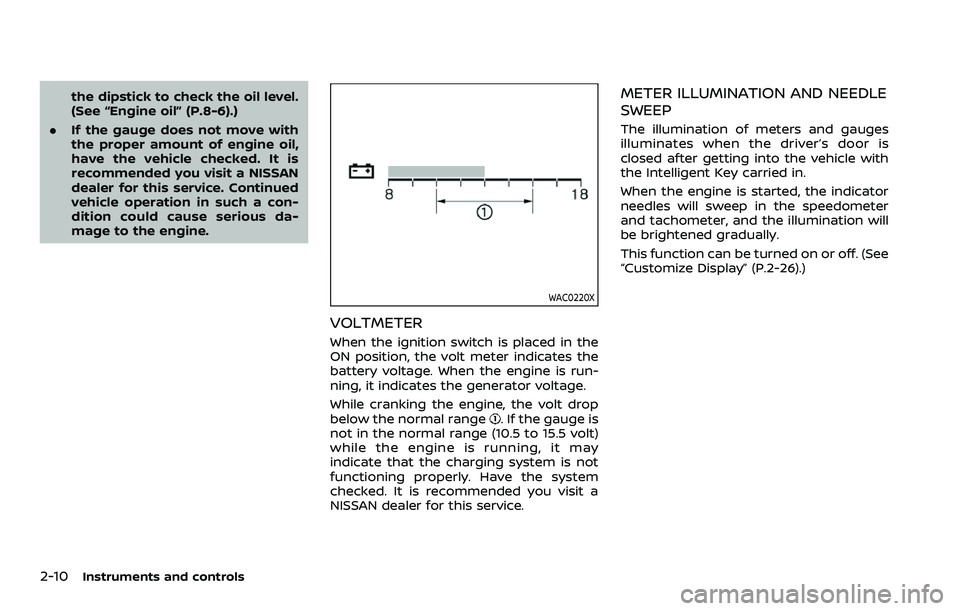
VOLTMETER
When the ignition switch is placed in the
ON position, the volt meter indicates the
battery voltage. When the engine is run-
ning, it indicates the generator voltage.
While cranking the engine, the volt drop
below the normal range
. If the gauge is
not in the normal range (10.5 to 15.5 volt)
while the engine is running, it may
indicate that the charging system is not
functioning properly. Have the system
checked. It is recommended you visit a
NISSAN dealer for this service.
METER ILLUMINATION AND NEEDLE
SWEEP
The illumination of meters and gauges
illuminates when the driver’s door is
closed after getting into the vehicle with
the Intelligent Key carried in.
When the engine is started, the indicator
needles will sweep in the speedometer
and tachometer, and the illumination will
be brightened gradually.
This function can be turned on or off. (See
“Customize Display” (P.2-26).)
Page 114 of 604
2-20Instruments and controls
AUDIBLE REMINDERS
Door lock warning chime
When the chime sounds, be sure to check
both the vehicle and the Intelligent Key.
(See “Troubleshooting guide” (P.3-13).)
Light reminder chime
A chime will sound when the driver side
door is opened with the headlight switch
in the
orposition and the ignition
switch in the ACC, OFF or LOCK position.
Turn the headlight switch to the OFF (if so
equipped) or the AUTO position when you
leave the vehicle.
Parking brake reminder chime
The chime will sound if the vehicle is
driven at more than 4 MPH (7 km/h) with
the parking brake applied. Stop the vehi-
cle and release the parking brake.
Brake pad wear warning
The disc brake pads have audible wear
warnings. When a brake pad requires
replacement, it will make a high pitched
scraping sound when the vehicle is in
motion. This scraping sound will first
occur only when the brake pedal is
depressed. After more wear of the brake
pad, the sound will always be heard even
if the brake pedal is not depressed. Have the brakes checked as soon as possible if
the warning sound is heard.
JVI1272X
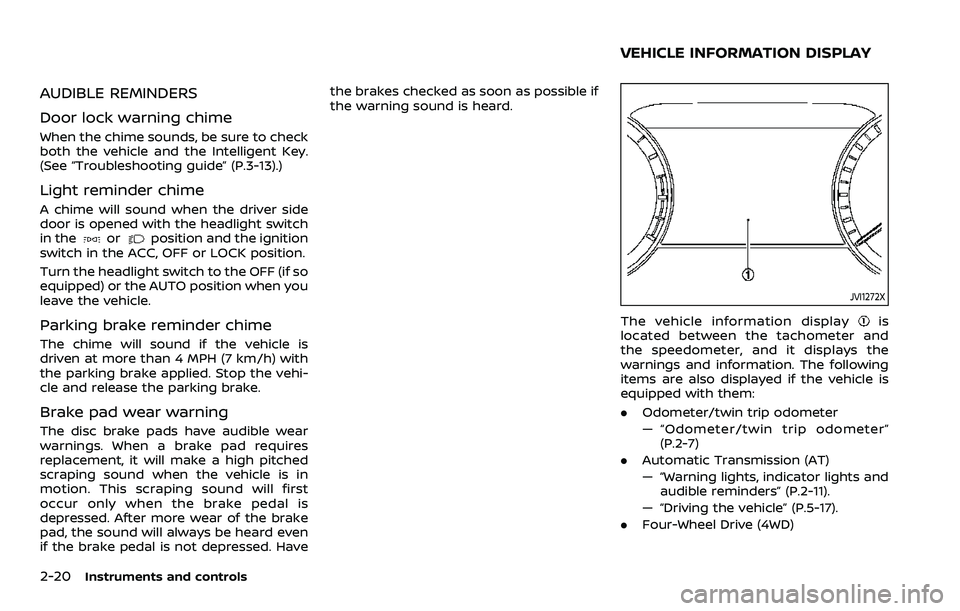
The vehicle information displayis
located between the tachometer and
the speedometer, and it displays the
warnings and information. The following
items are also displayed if the vehicle is
equipped with them:
. Odometer/twin trip odometer
— “Odometer/twin trip odometer”
(P.2-7)
. Automatic Transmission (AT)
— “Warning lights, indicator lights and
audible reminders” (P.2-11).
— “Driving the vehicle” (P.5-17).
. Four-Wheel Drive (4WD)
VEHICLE INFORMATION DISPLAY
Page 115 of 604
— “NISSAN all-mode 4WD®” (P.5-124).
. Intelligent Back-up Intervention (I-BI)
— “Intelligent Back-up Intervention (I-
BI)” (P.5-63).
. Intelligent Cruise Control (ICC)
— “Intelligent Cruise Control (ICC)”
(P.5-74).
. Intelligent Key system
— “Intelligent Key system” (P.3-7).
— “Push-button ignition switch” (P.5-
13).
. Automatic Emergency Braking (AEB)
with pedestrian detection
— “Automatic Emergency Braking
(AEB) with pedestrian detection
system” (P.5-96).
. Intelligent Forward Collision Warning
(I-FCW)
— “Intelligent Forward Collision Warn-
ing (I-FCW)” (P.5-106).
. Lane Departure Warning (LDW)
— “Lane Departure Warning (LDW)”
(P.5-26).
. Intelligent Lane Intervention (I-LI)
— “Intelligent Lane Intervention (I-LI)”
(P.5-31).
. Intelligent Blind Spot Intervention (I-
BSI)
— “Intelligent Blind Spot Intervention
(I-BSI)” (P.5-46). .
Blind Spot Warning (BSW)
— “Blind Spot Warning (BSW)” (P.5-38).
. Rear Automatic Braking (RAB)
— “Rear Automatic Braking (RAB)” (P.5-
116).
. Intelligent Driver Alertness (I-DA)
— “Intelligent Driver Alertness (I-DA)”
(P.5-114).
. Traffic Sign Recognition (TSR)
— “Traffic Sign Recognition (TSR)” (P.5-
23).
. Rear Cross Traffic Alert (RCTA)
— “Rear Cross Traffic Alert (RCTA)”
(P.5-57).
WAC0613X
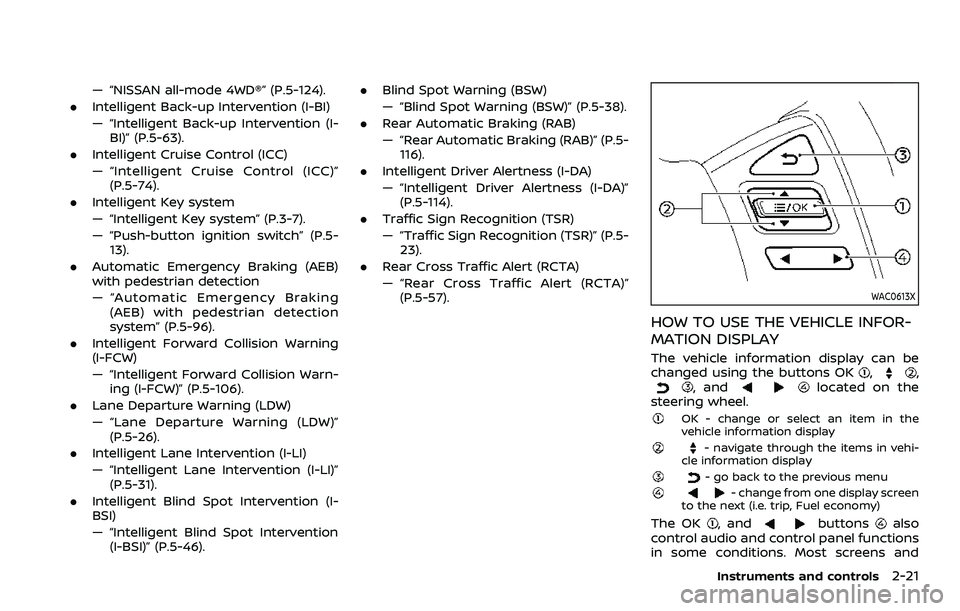
HOW TO USE THE VEHICLE INFOR-
MATION DISPLAY
The vehicle information display can be
changed using the buttons OK,,, andlocated on the
steering wheel.
OK - change or select an item in the
vehicle information display
- navigate through the items in vehi-
cle information display
- go back to the previous menu- change from one display screen
to the next (i.e. trip, Fuel economy)
The OK, andbuttonsalso
control audio and control panel functions
in some conditions. Most screens and
Instruments and controls2-21
Page 124 of 604
2-30Instruments and controls
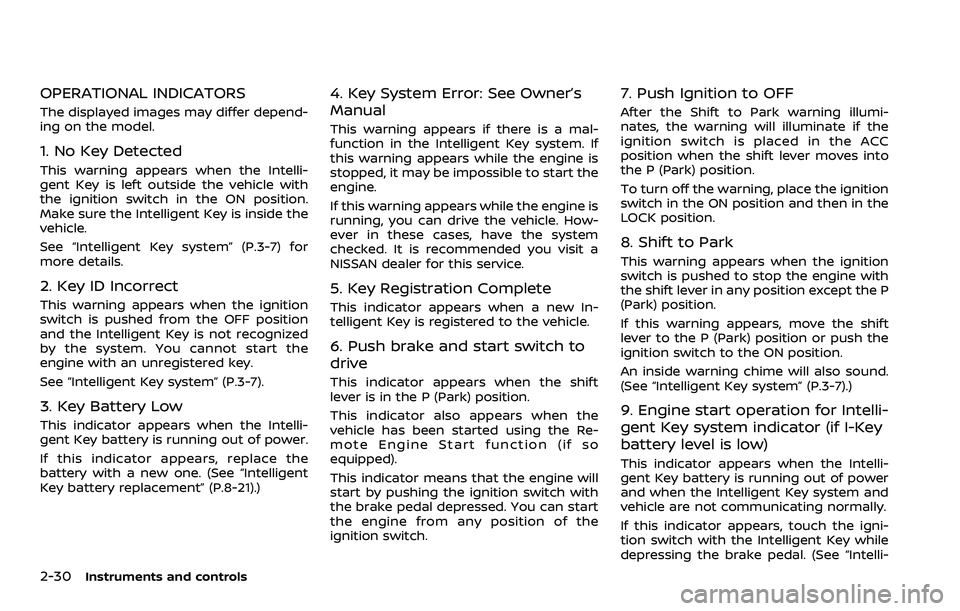
OPERATIONAL INDICATORS
The displayed images may differ depend-
ing on the model.
1. No Key Detected
This warning appears when the Intelli-
gent Key is left outside the vehicle with
the ignition switch in the ON position.
Make sure the Intelligent Key is inside the
vehicle.
See “Intelligent Key system” (P.3-7) for
more details.
2. Key ID Incorrect
This warning appears when the ignition
switch is pushed from the OFF position
and the Intelligent Key is not recognized
by the system. You cannot start the
engine with an unregistered key.
See “Intelligent Key system” (P.3-7).
3. Key Battery Low
This indicator appears when the Intelli-
gent Key battery is running out of power.
If this indicator appears, replace the
battery with a new one. (See “Intelligent
Key battery replacement” (P.8-21).)
4. Key System Error: See Owner’s
Manual
This warning appears if there is a mal-
function in the Intelligent Key system. If
this warning appears while the engine is
stopped, it may be impossible to start the
engine.
If this warning appears while the engine is
running, you can drive the vehicle. How-
ever in these cases, have the system
checked. It is recommended you visit a
NISSAN dealer for this service.
5. Key Registration Complete
This indicator appears when a new In-
telligent Key is registered to the vehicle.
6. Push brake and start switch to
drive
This indicator appears when the shift
lever is in the P (Park) position.
This indicator also appears when the
vehicle has been started using the Re-
mote Engine Start function (if so
equipped).
This indicator means that the engine will
start by pushing the ignition switch with
the brake pedal depressed. You can start
the engine from any position of the
ignition switch.
7. Push Ignition to OFF
After the Shift to Park warning illumi-
nates, the warning will illuminate if the
ignition switch is placed in the ACC
position when the shift lever moves into
the P (Park) position.
To turn off the warning, place the ignition
switch in the ON position and then in the
LOCK position.
8. Shift to Park
This warning appears when the ignition
switch is pushed to stop the engine with
the shift lever in any position except the P
(Park) position.
If this warning appears, move the shift
lever to the P (Park) position or push the
ignition switch to the ON position.
An inside warning chime will also sound.
(See “Intelligent Key system” (P.3-7).)
9. Engine start operation for Intelli-
gent Key system indicator (if I-Key
battery level is low)
This indicator appears when the Intelli-
gent Key battery is running out of power
and when the Intelligent Key system and
vehicle are not communicating normally.
If this indicator appears, touch the igni-
tion switch with the Intelligent Key while
depressing the brake pedal. (See “Intelli-
Page 125 of 604
gent Key battery discharge” (P.5-15).)
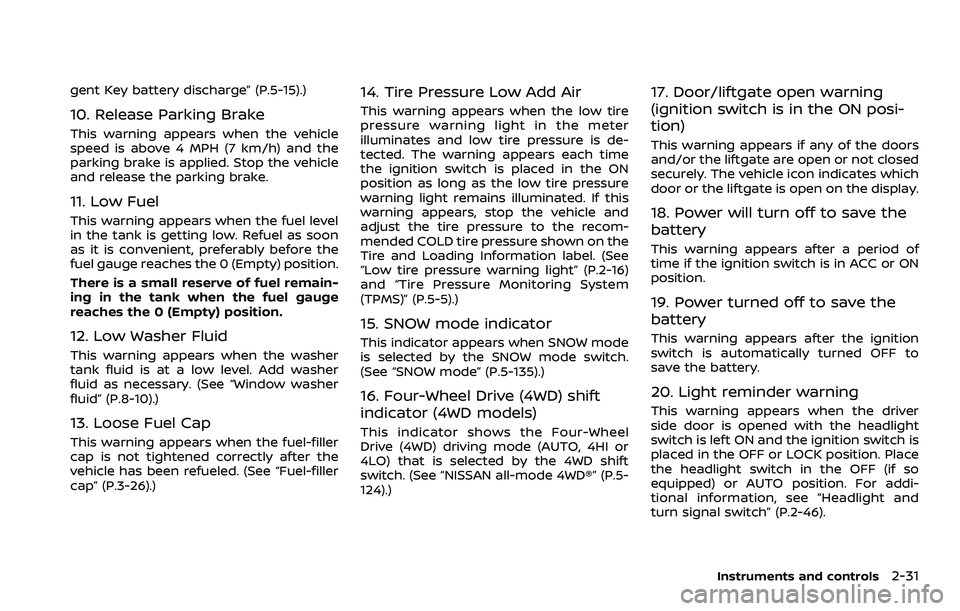
10. Release Parking Brake
This warning appears when the vehicle
speed is above 4 MPH (7 km/h) and the
parking brake is applied. Stop the vehicle
and release the parking brake.
11. Low Fuel
This warning appears when the fuel level
in the tank is getting low. Refuel as soon
as it is convenient, preferably before the
fuel gauge reaches the 0 (Empty) position.
There is a small reserve of fuel remain-
ing in the tank when the fuel gauge
reaches the 0 (Empty) position.
12. Low Washer Fluid
This warning appears when the washer
tank fluid is at a low level. Add washer
fluid as necessary. (See “Window washer
fluid” (P.8-10).)
13. Loose Fuel Cap
This warning appears when the fuel-filler
cap is not tightened correctly after the
vehicle has been refueled. (See “Fuel-filler
cap” (P.3-26).)
14. Tire Pressure Low Add Air
This warning appears when the low tire
pressure warning light in the meter
illuminates and low tire pressure is de-
tected. The warning appears each time
the ignition switch is placed in the ON
position as long as the low tire pressure
warning light remains illuminated. If this
warning appears, stop the vehicle and
adjust the tire pressure to the recom-
mended COLD tire pressure shown on the
Tire and Loading Information label. (See
“Low tire pressure warning light” (P.2-16)
and “Tire Pressure Monitoring System
(TPMS)” (P.5-5).)
15. SNOW mode indicator
This indicator appears when SNOW mode
is selected by the SNOW mode switch.
(See “SNOW mode” (P.5-135).)
16. Four-Wheel Drive (4WD) shift
indicator (4WD models)
This indicator shows the Four-Wheel
Drive (4WD) driving mode (AUTO, 4HI or
4LO) that is selected by the 4WD shift
switch. (See “NISSAN all-mode 4WD®” (P.5-
124).)
17. Door/liftgate open warning
(ignition switch is in the ON posi-
tion)
This warning appears if any of the doors
and/or the liftgate are open or not closed
securely. The vehicle icon indicates which
door or the liftgate is open on the display.
18. Power will turn off to save the
battery
This warning appears after a period of
time if the ignition switch is in ACC or ON
position.
19. Power turned off to save the
battery
This warning appears after the ignition
switch is automatically turned OFF to
save the battery.
20. Light reminder warning
This warning appears when the driver
side door is opened with the headlight
switch is left ON and the ignition switch is
placed in the OFF or LOCK position. Place
the headlight switch in the OFF (if so
equipped) or AUTO position. For addi-
tional information, see “Headlight and
turn signal switch” (P.2-46).
Instruments and controls2-31