display NISSAN CUBE 2009 User Guide
[x] Cancel search | Manufacturer: NISSAN, Model Year: 2009, Model line: CUBE, Model: NISSAN CUBE 2009Pages: 321, PDF Size: 4.99 MB
Page 101 of 321

Black plate (99,1)
Model "Z12-D" EDITED: 2009/ 1/ 28
SIC4131
Type A
ADJUSTING THE TIME
Type APush the CLOCK button
*1
to turn the clock on
or off.
1. Push and hold the CLOCK button
*1
until
the clock display starts to flash.
2. Push the SEEK/TRACK button
*2
to adjust
the hours.
3. Push the TUNE/FF·REW button*3
to
adjust the minutes.
4. Push the CLOCK button
*1
again to exit
the clock set mode.The display will return to the regular clock
display after 10 seconds.
SIC4146
Type B
Type BPush the MENU button
*1
until the CLOCK
mode appears. Then push the TUNE
*2
or
SEEK
*3
button to select “CLK-ON” or “CLK-
OFF” to turn the clock on or off.
“CLK-ON” needs to be selected before adjust-
ing the clock display.
1. Push the MENU button
*1.
2. Push the MENU button
*1
again. The clock
display starts to flash.
3. Push the TUNE
*2
or SEEK
*3
button to
adjust the hours.
4. Push the MENU button
*1
again. The
Instruments and controls
2-29
ProCarManuals.com
Page 102 of 321
Black plate (100,1)
Model "Z12-D" EDITED: 2009/ 1/ 28
display will switch to the minute adjustment
mode.
5. Push the TUNE or SEEK button to adjust the
minutes.
6. Push the MENU button again to exit the
clock mode.
The display will return to the regular clock
display after 10 seconds.
RESETTING THE TIMEBy holding down the CLOCK (type A) or MENU
(type B) button and then pushing the TUNE or
SEEK button, the time will be reset as follows.
.In case the displayed minute is in the range
of 00 - 29, the hour will stay the same and
the minute will be reset to 00.
.In case the displayed minute is in the range
of 30 - 59, the hour will be advanced by one
hour and the minute will be reset to 00.
For example, if the CLOCK or MENU and TUNE
buttons are pushed while the time is between
“8:00” and “8:29”, the display will be reset to
“8:00”. If pushed while the time is between
“8:30” and “8:59”, the display will be reset to
“9:00”. At the same time the display will return to
the previous audio mode.
SIC4132
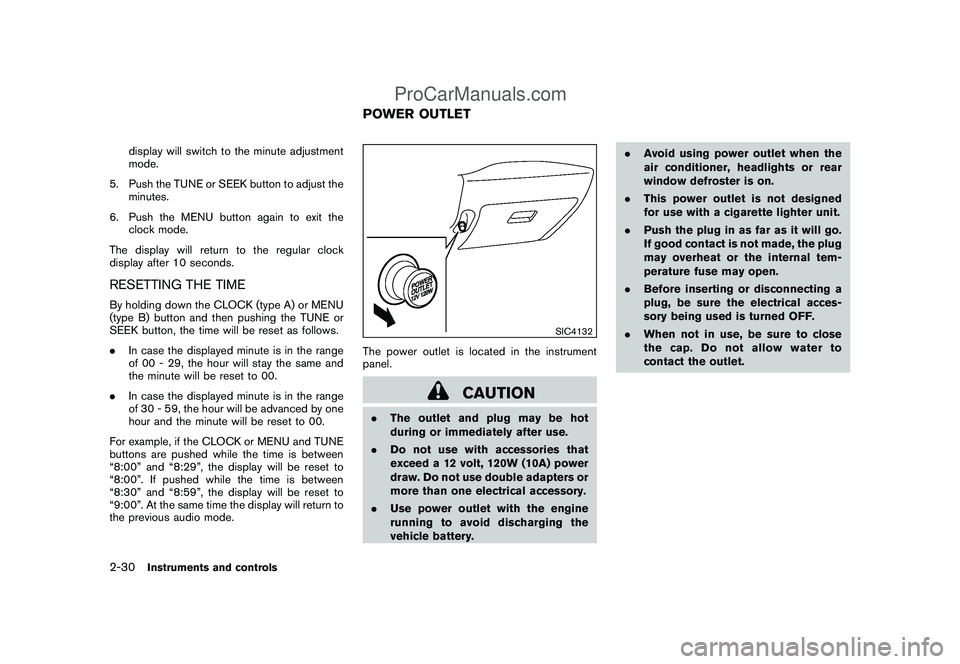
The power outlet is located in the instrument
panel.
CAUTION
.The outlet and plug may be hot
during or immediately after use.
.Do not use with accessories that
exceed a 12 volt, 120W (10A) power
draw. Do not use double adapters or
more than one electrical accessory.
.Use power outlet with the engine
running to avoid discharging the
vehicle battery..Avoid using power outlet when the
air conditioner, headlights or rear
window defroster is on.
.This power outlet is not designed
for use with a cigarette lighter unit.
.Push the plug in as far as it will go.
If good contact is not made, the plug
may overheat or the internal tem-
perature fuse may open.
.Before inserting or disconnecting a
plug, be sure the electrical acces-
sory being used is turned OFF.
.When not in use, be sure to close
the cap. Do not allow water to
contact the outlet.POWER OUTLET
2-30
Instruments and controls
ProCarManuals.com
Page 150 of 321
Black plate (148,1)
Model "Z12-D" EDITED: 2009/ 1/ 28
conditioner will automatically turn on. This will
dehumidify the air and help to defog the
windows. The A/C indicator light will illuminate
when the air conditioner automatically turns on.
The air conditioner and A/C indicator light will
remain on in all flow control modes until the A/C
button is pressed or the fan control dial is turned
to off.
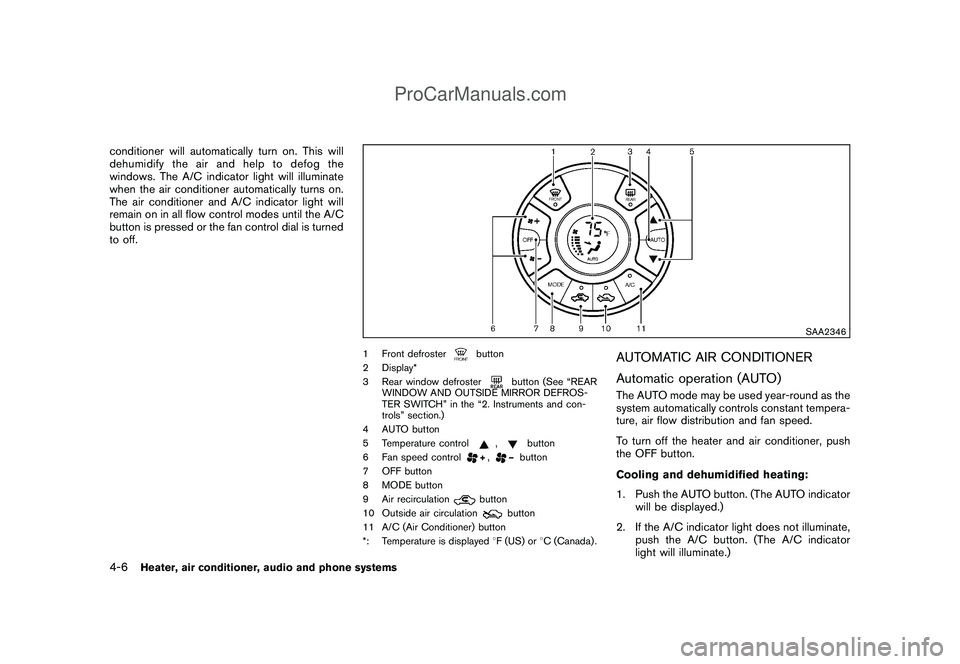
SAA2346
1 Front defroster
button
2 Display*
3 Rear window defroster
button (See “REAR
WINDOW AND OUTSIDE MIRROR DEFROS-
TER SWITCH” in the “2. Instruments and con-
trols” section.)
4 AUTO button
5 Temperature control
,
button
6 Fan speed control
,
button
7 OFF button
8 MODE button
9 Air recirculation
button
10 Outside air circulation
button
11 A/C (Air Conditioner) button
*: Temperature is displayed8F (US) or8C (Canada) .
AUTOMATIC AIR CONDITIONER
Automatic operation (AUTO)The AUTO mode may be used year-round as the
system automatically controls constant tempera-
ture, air flow distribution and fan speed.
To turn off the heater and air conditioner, push
the OFF button.
Cooling and dehumidified heating:
1. Push the AUTO button. (The AUTO indicator
will be displayed.)
2. If the A/C indicator light does not illuminate,
push the A/C button. (The A/C indicator
light will illuminate.)
4-6
Heater, air conditioner, audio and phone systems
ProCarManuals.com
Page 151 of 321
Black plate (149,1)
Model "Z12-D" EDITED: 2009/ 1/ 28
3. Push the temperature control
,
button to set the desired temperature. The
temperature range is between 608F (188C)
and 908F (328C) .
4. To set the automatic control mode, perform
one of the following operations.
.When the outside air circulation mode is
on, push and hold the outside air
circulation
button for more than
1.5 seconds.
.When the air recirculation mode is on,
push and hold the air recirculation
button for more than 1.5 seconds.
When setting the automatic control mode,
both indicator lights will blink twice indicat-
ing that the system is in the automatic
control mode.
A visible mist may be seen coming from the
ventilators in hot, humid conditions as the air is
cooled rapidly. This does not indicate a mal-
function.
Heating (A/C off):
1. Push the AUTO button. (The AUTO indicator
will be displayed.)
2. If the A/C indicator light illuminates, push the
A/C button. (The A/C indicator light will turn
off.)3. Push the temperature control
,
button to set the desired temperature. The
temperature range is between 608F (188C)
and 908F (328C) .
.Do not set the temperature lower than
the outside air temperature. Doing so
may cause the temperature to not be
controlled properly.
.If the windows fog up, use dehumidified
heating instead of the A/C off heating.
Dehumidified defrosting/defogging:
1. Push the front defroster
button. (The
indicator light will illuminate.)
2. Turn the temperature control
,
button to set the desired temperature.
.To remove moisture or fog on the front
window quickly, set the temperature to
the high temperature and the fan speed
to their maximum level.
.After the windshield is cleared, push the
front defroster
button again. (The
indicator light will turn off.)
.When the front defroster
button is
pushed, the air conditioner will auto-
matically turn on to defog the wind-
shield. The outside air circulation mode
will be selected to improve the defog-ging performance.
Manual operationThe manual mode can be used to control the
heater and air conditioner to your desired
settings.
To turn off the heater and air conditioner, push
the OFF button.
Fan speed control:
Turn the fan speed control
,
dial to
adjust the fan speed.
Air flow control:
Push the MODE button to change the air flow
mode.
— Air flows from the center and side
ventilators.— Air flows from the center and side
ventilators and foot outlets.— Air flows mainly from the foot outlets.— Air flows from the defroster outlets and
foot outlets.
Temperature control:
Push the temperature control
,
button
to set the desired temperature.
The temperature range is between 608F (188C)
Heater, air conditioner, audio and phone systems
4-7
ProCarManuals.com
Page 155 of 321
Black plate (153,1)
Model "Z12-D" EDITED: 2009/ 1/ 28
SAA0480
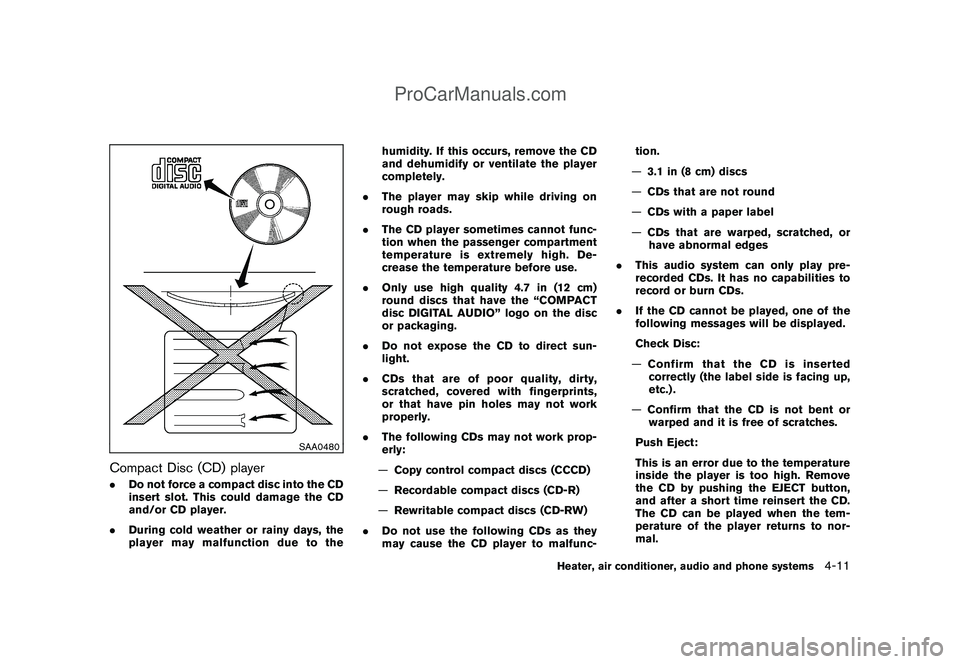
Compact Disc (CD) player.Do not force a compact disc into the CD
insert slot. This could damage the CD
and/or CD player.
.During cold weather or rainy days, the
player may malfunction due to thehumidity. If this occurs, remove the CD
and dehumidify or ventilate the player
completely.
.The player may skip while driving on
rough roads.
.The CD player sometimes cannot func-
tion when the passenger compartment
temperature is extremely high. De-
crease the temperature before use.
.Only use high quality 4.7 in (12 cm)
round discs that have the “COMPACT
disc DIGITAL AUDIO” logo on the disc
or packaging.
.Do not expose the CD to direct sun-
light.
.CDs that are of poor quality, dirty,
scratched, covered with fingerprints,
or that have pin holes may not work
properly.
.The following CDs may not work prop-
erly:
—Copy control compact discs (CCCD)
—Recordable compact discs (CD-R)
—Rewritable compact discs (CD-RW)
.Do not use the following CDs as they
may cause the CD player to malfunc-tion.
—3.1 in (8 cm) discs
—CDs that are not round
—CDs with a paper label
—CDs that are warped, scratched, or
have abnormal edges
.This audio system can only play pre-
recorded CDs. It has no capabilities to
record or burn CDs.
.If the CD cannot be played, one of the
following messages will be displayed.
Check Disc:
—Confirm that the CD is inserted
correctly (the label side is facing up,
etc.) .
—Confirm that the CD is not bent or
warped and it is free of scratches.
Push Eject:
This is an error due to the temperature
inside the player is too high. Remove
the CD by pushing the EJECT button,
and after a short time reinsert the CD.
The CD can be played when the tem-
perature of the player returns to nor-
mal.
Heater, air conditioner, audio and phone systems
4-11
ProCarManuals.com
Page 156 of 321
Black plate (154,1)
Model "Z12-D" EDITED: 2009/ 1/ 28
Unplayable Track:
The file is unplayable in this audio
system (only MP3 or WMA CD) .
Interface System for iPod
®(if so
equipped)
.Some characters used in other languages
(Chinese, Japanese, etc.) are not displayed
properly on the vehicle audio display. We
recommend using English language char-
acters with an iPod
®.
.Large video podcast files cause slow
responses in the iPod®. The vehicle audio
display may momentarily black out, but it will
soon recover.
.If the iPod
®automatically selects large video
podcast files while in the shuffle mode, the
vehicle audio display may momentarily black
out, but it will soon recover.
.Improperly plugging in the iPod
®may cause
a checkmark to be displayed on and off
(flickering) . Always make sure that the iPod
®
is connected properly.
.The iPod
®nano (2nd Generation) will
continue to fast forward or rewind if it is
disconnected during a seek operation.
.An incorrect song title may appear when the
Play Mode is changed while using the iPod
®
nano (2nd Generation) ..Audiobooks may not play in the same order
as they appear on the iPod
®.
.The iPod
®nano (1st Generation) may remain
in fast forward or rewind mode if it is
connected during a seek operation. In this
case, please manually reset the iPod
®.
.If you are using an iPod
®(3rd Generation
with Dock connector) , do not use very long
names for the song title, album name or
artist name to avoid the iPod®from resetting
itself.
.Be careful not to do the following, or the
cable could be damaged and a loss of
function may occur.
— Bend the cable excessively (1.6 in (40
mm) radius minimum) .
— Twist the cable excessively (more than
180 degrees) .
— Pull or drop the cable.
— Store objects with sharp edges in the
storage where the cable is stored.
— Spill liquids on the cable and connectors.
.Do not connect the cable to the iPod
®if the
cable and/or connectors are wet. It may
damage the iPod
®.
.If the cable and connectors are exposed towater, allow the cable and/or connectors to
dry completely before connecting the cable
to the iPod
®(wait 24 hours for it to dry) .
.If the connector is exposed to fluids other
than water, evaporative residue may cause a
short between the connector pins. In this
case, replace the cable, otherwise damage
to the iPod®and a loss of function may
occur.
.If the cable is damaged (insulation cut,
connectors cracked, contamination such as
liquids, dust, dirt, etc. in the connectors) , do
not use the cable and contact a NISSAN
dealer to replace the cable with a new one.
.When not in use for extended periods of
time, store the cable in a clean, dust free
environment at room temperature and with-
out direct sun exposure.
.Do not use the cable for any other purposes
other than its intended use in the vehicle.
.iPod
®charging is only possible for devices
that support charging via a FireWire
®con-
nection. Devices that can be charged by the
iPod player include:
—iPod
®Classic - 1st through 6th genera-
tion
—iPod®Mini - 1st and 2nd generation
4-12
Heater, air conditioner, audio and phone systems
ProCarManuals.com
Page 157 of 321
Black plate (155,1)
Model "Z12-D" EDITED: 2009/ 1/ 28
—iPod
®Nano - 1st through 3rd generation
only
—iPod®Touch - first generation only
— iPhone®- first generation only
* The iPod
®Classic and iPod
®Touch may not
charge properly in some cases.
* 12V charging is not possible on the iPhone 3G
and later models.
*iPod
®and FireWire
®are trademarks of Apple
Inc., registered in the U.S. and other countries.
Compact Disc (CD) with MP3 or WMA
(if so equipped)Explanation of terms:
.MP3 — MP3 is short for Moving Pictures
Experts Group Audio Layer 3. MP3 is the
most well-known compressed digital audio
file format. This format allows for near “CD
quality” sound, but at a fraction of the size of
normal audio files. MP3 conversion of an
audio track from CD-ROM can reduce the
file size by approximately 10:1 ratio (Sam-
pling: 44.1 kHz, Bit rate: 128 kbps) with
virtually no perceptible loss in quality. MP3
compression removes the redundant and
irrelevant parts of a sound signal that the
human ear doesn’t hear.
.WMA — Windows Media Audio (WMA) is acompressed audio format created by Micro-
soft as an alternative to MP3. The WMA
codec offers greater file compression than
the MP3 codec, enabling storage of more
digital audio tracks in the same amount of
space when compared to MP3s at the same
level of quality.
.Bit rate — Bit rate denotes the number of
bits per second used by a digital music files.
The size and quality of a compressed digital
audio file is determined by the bit rate used
when encoding the file.
.Sampling frequency — Sampling frequency
is the rate at which the samples of a signal
are converted from analog to digital (A/D
conversion) per second.
.Multisession — Multisession is one of the
methods for writing data to media. Writing
data once to the media is called a single
session, and writing more than once is
called a multisession.
.ID3/WMA Tag — The ID3/WMA tag is the
part of the encoded MP3 or WMA file that
contains information about the digital music
file such as song title, artist, album title,
encoding bit rate, track time duration, etc.
ID3 tag information is displayed on the
Album/Artist/Track title line on the display.
* Windows
®and Windows Media
®are regis-tered trademarks or trademarks of Microsoft
Corporation in the United States of America
and other countries of Microsoft Corporation
of the USA.Heater, air conditioner, audio and phone systems
4-13
ProCarManuals.com
Page 158 of 321
Black plate (156,1)
Model "Z12-D" EDITED: 2009/ 1/ 28
SAA1025
Playback order chart
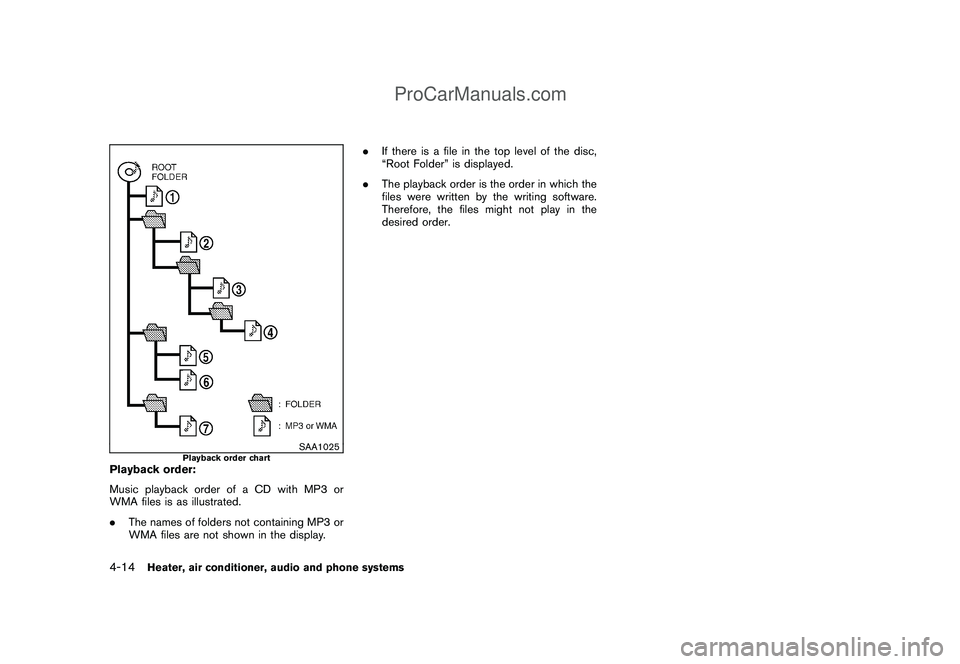
Playback order:
Music playback order of a CD with MP3 or
WMA files is as illustrated.
.The names of folders not containing MP3 or
WMA files are not shown in the display..If there is a file in the top level of the disc,
“Root Folder” is displayed.
.The playback order is the order in which the
files were written by the writing software.
Therefore, the files might not play in the
desired order.4-14
Heater, air conditioner, audio and phone systems
ProCarManuals.com
Page 159 of 321
Black plate (157,1)
Model "Z12-D" EDITED: 2009/ 1/ 28
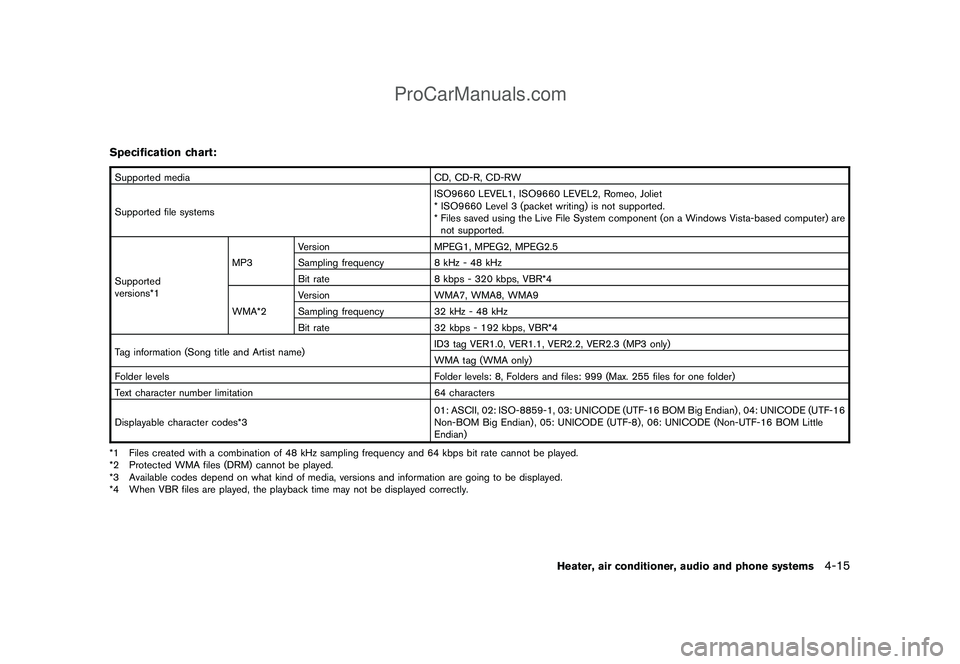
Specification chart:Supported media CD, CD-R, CD-RW
Supported file systemsISO9660 LEVEL1, ISO9660 LEVEL2, Romeo, Joliet
* ISO9660 Level 3 (packet writing) is not supported.
* Files saved using the Live File System component (on a Windows Vista-based computer) are
not supported.
Supported
versions*1MP3Version MPEG1, MPEG2, MPEG2.5
Sampling frequency 8 kHz - 48 kHz
Bit rate 8 kbps - 320 kbps, VBR*4
WMA*2Version WMA7, WMA8, WMA9
Sampling frequency 32 kHz - 48 kHz
Bit rate 32 kbps - 192 kbps, VBR*4
Tag information (Song title and Artist name)ID3 tag VER1.0, VER1.1, VER2.2, VER2.3 (MP3 only)
WMA tag (WMA only)
Folder levels Folder levels: 8, Folders and files: 999 (Max. 255 files for one folder)
Text character number limitation 64 characters
Displayable character codes*301: ASCII, 02: ISO-8859-1, 03: UNICODE (UTF-16 BOM Big Endian) , 04: UNICODE (UTF-16
Non-BOM Big Endian) , 05: UNICODE (UTF-8) , 06: UNICODE (Non-UTF-16 BOM Little
Endian)
*1 Files created with a combination of 48 kHz sampling frequency and 64 kbps bit rate cannot be played.
*2 Protected WMA files (DRM) cannot be played.
*3 Available codes depend on what kind of media, versions and information are going to be displayed.
*4 When VBR files are played, the playback time may not be displayed correctly.
Heater, air conditioner, audio and phone systems
4-15
ProCarManuals.com
Page 161 of 321
Black plate (159,1)
Model "Z12-D" EDITED: 2009/ 1/ 28
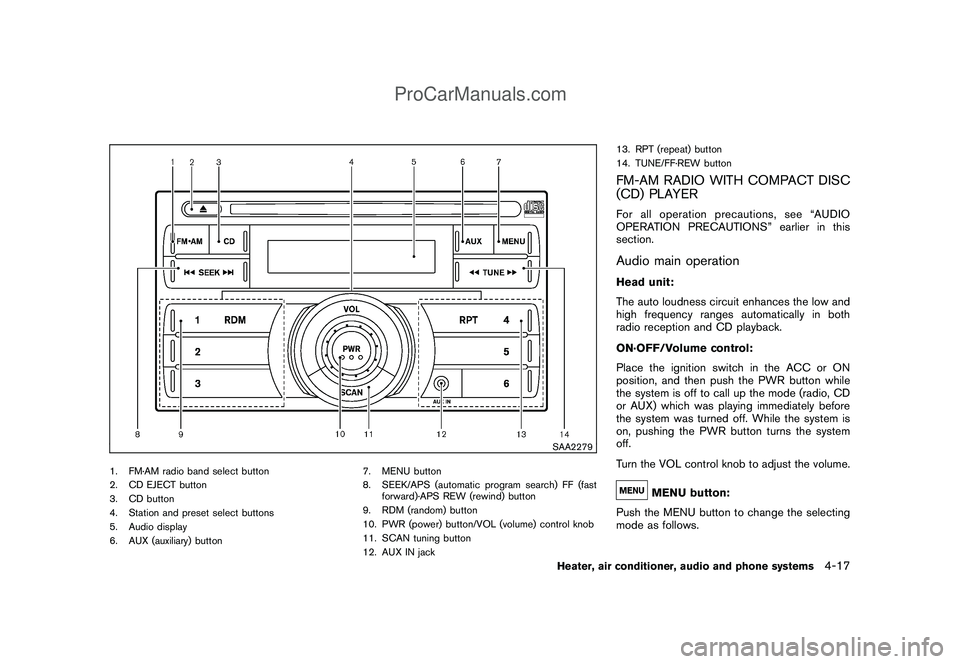
SAA2279
1. FM·AM radio band select button
2. CD EJECT button
3. CD button
4. Station and preset select buttons
5. Audio display
6. AUX (auxiliary) button7. MENU button
8. SEEK/APS (automatic program search) FF (fast
forward)·APS REW (rewind) button
9. RDM (random) button
10. PWR (power) button/VOL (volume) control knob
11. SCAN tuning button
12. AUX IN jack13. RPT (repeat) button
14. TUNE/FF·REW button
FM-AM RADIO WITH COMPACT DISC
(CD) PLAYERFor all operation precautions, see “AUDIO
OPERATION PRECAUTIONS” earlier in this
section.Audio main operationHead unit:
The auto loudness circuit enhances the low and
high frequency ranges automatically in both
radio reception and CD playback.
ON·OFF/Volume control:
Place the ignition switch in the ACC or ON
position, and then push the PWR button while
the system is off to call up the mode (radio, CD
or AUX) which was playing immediately before
the system was turned off. While the system is
on, pushing the PWR button turns the system
off.
Turn the VOL control knob to adjust the volume.
MENU button:
Push the MENU button to change the selecting
mode as follows.
Heater, air conditioner, audio and phone systems
4-17
ProCarManuals.com