buttons NISSAN CUBE 2010 3.G User Guide
[x] Cancel search | Manufacturer: NISSAN, Model Year: 2010, Model line: CUBE, Model: NISSAN CUBE 2010 3.GPages: 329, PDF Size: 2.86 MB
Page 167 of 329
Black plate (171,1)
Model "Z12-D" EDITED: 2009/ 9/ 17
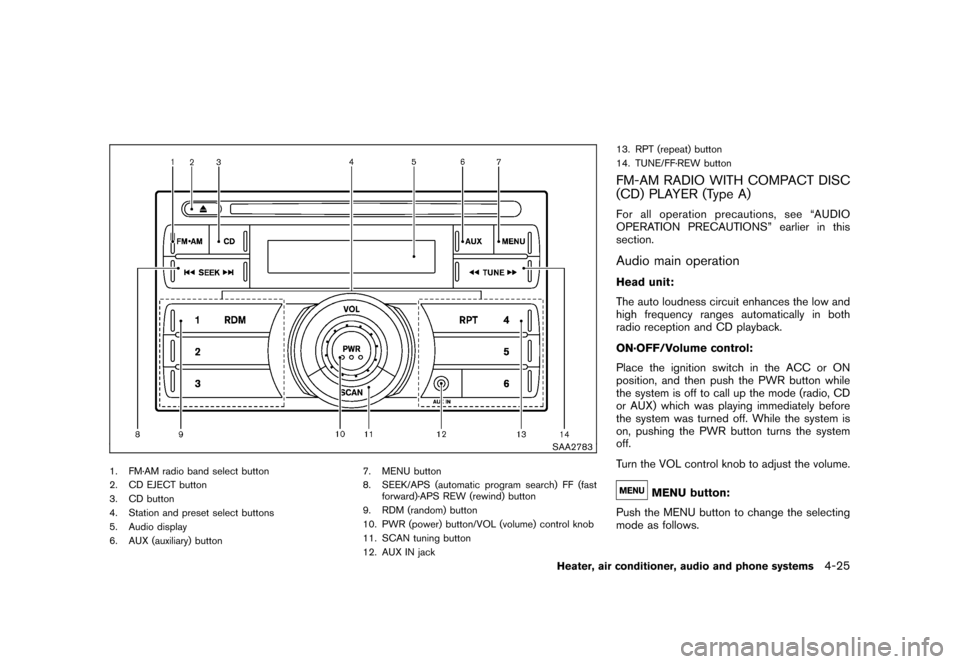
SAA2783
1. FM·AM radio band select button
2. CD EJECT button
3. CD button
4. Station and preset select buttons
5. Audio display
6. AUX (auxiliary) button7. MENU button
8. SEEK/APS (automatic program search) FF (fast
forward)·APS REW (rewind) button
9. RDM (random) button
10. PWR (power) button/VOL (volume) control knob
11. SCAN tuning button
12. AUX IN jack 13. RPT (repeat) button
14. TUNE/FF·REW button
FM-AM RADIO WITH COMPACT DISC
(CD) PLAYER (Type A)For all operation precautions, see “AUDIO
OPERATION PRECAUTIONS” earlier in this
section.Audio main operationHead unit:
The auto loudness circuit enhances the low and
high frequency ranges automatically in both
radio reception and CD playback.
ON·OFF/Volume control:
Place the ignition switch in the ACC or ON
position, and then push the PWR button while
the system is off to call up the mode (radio, CD
or AUX) which was playing immediately before
the system was turned off. While the system is
on, pushing the PWR button turns the system
off.
Turn the VOL control knob to adjust the volume.
MENU button:
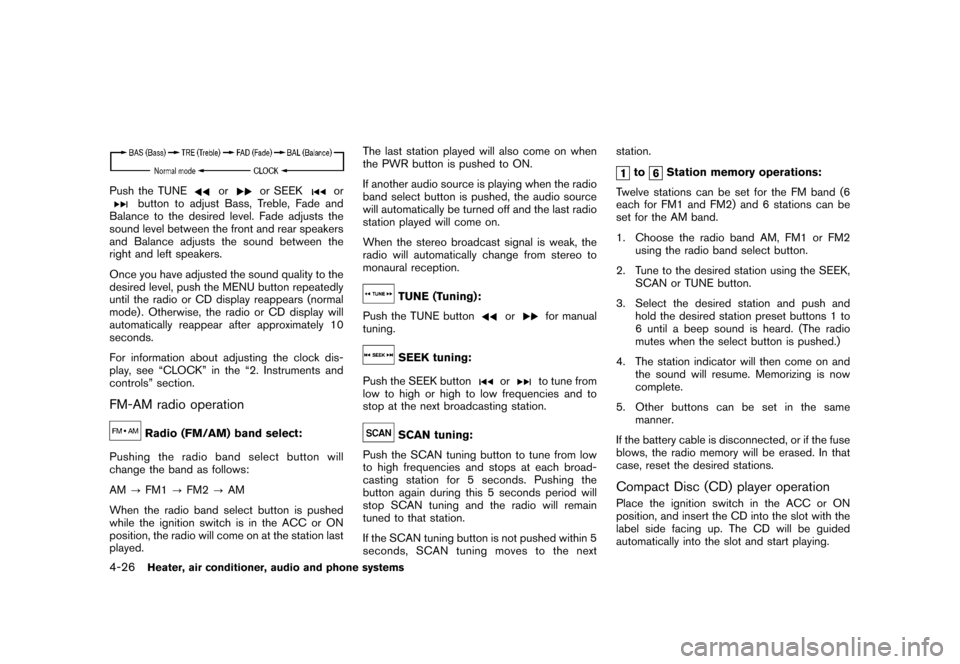
Push the MENU button to change the selecting
mode as follows.
Heater, air conditioner, audio and phone systems
4-25
Page 168 of 329
Black plate (172,1)
Model "Z12-D" EDITED: 2009/ 9/ 17
Push the TUNE
or
or SEEK
or
button to adjust Bass, Treble, Fade and
Balance to the desired level. Fade adjusts the
sound level between the front and rear speakers
and Balance adjusts the sound between the
right and left speakers.
Once you have adjusted the sound quality to the
desired level, push the MENU button repeatedly
until the radio or CD display reappears (normal
mode) . Otherwise, the radio or CD display will
automatically reappear after approximately 10
seconds.
For information about adjusting the clock dis-
play, see “CLOCK” in the “2. Instruments and
controls” section.
FM-AM radio operation
Radio (FM/AM) band select:
Pushing the radio band select button will
change the band as follows:
AM ?FM1 ?FM2 ?AM
When the radio band select button is pushed
while the ignition switch is in the ACC or ON
position, the radio will come on at the station last
played. The last station played will also come on when
the PWR button is pushed to ON.
If another audio source is playing when the radio
band select button is pushed, the audio source
will automatically be turned off and the last radio
station played will come on.
When the stereo broadcast signal is weak, the
radio will automatically change from stereo to
monaural reception.
TUNE (Tuning):
Push the TUNE button
or
for manual
tuning.
SEEK tuning:
Push the SEEK button
or
to tune from
low to high or high to low frequencies and to
stop at the next broadcasting station.
SCAN tuning:
Push the SCAN tuning button to tune from low
to high frequencies and stops at each broad-
casting station for 5 seconds. Pushing the
button again during this 5 seconds period will
stop SCAN tuning and the radio will remain
tuned to that station.
If the SCAN tuning button is not pushed within 5
seconds, SCAN tuning moves to the next station.
to
Station memory operations:
Twelve stations can be set for the FM band (6
each for FM1 and FM2) and 6 stations can be
set for the AM band.
1. Choose the radio band AM, FM1 or FM2 using the radio band select button.
2. Tune to the desired station using the SEEK, SCAN or TUNE button.
3. Select the desired station and push and hold the desired station preset buttons 1 to
6 until a beep sound is heard. (The radio
mutes when the select button is pushed.)
4. The station indicator will then come on and the sound will resume. Memorizing is now
complete.
5. Other buttons can be set in the same manner.
If the battery cable is disconnected, or if the fuse
blows, the radio memory will be erased. In that
case, reset the desired stations.
Compact Disc (CD) player operationPlace the ignition switch in the ACC or ON
position, and insert the CD into the slot with the
label side facing up. The CD will be guided
automatically into the slot and start playing.
4-26
Heater, air conditioner, audio and phone systems
Page 171 of 329
Black plate (175,1)
Model "Z12-D" EDITED: 2009/ 9/ 17
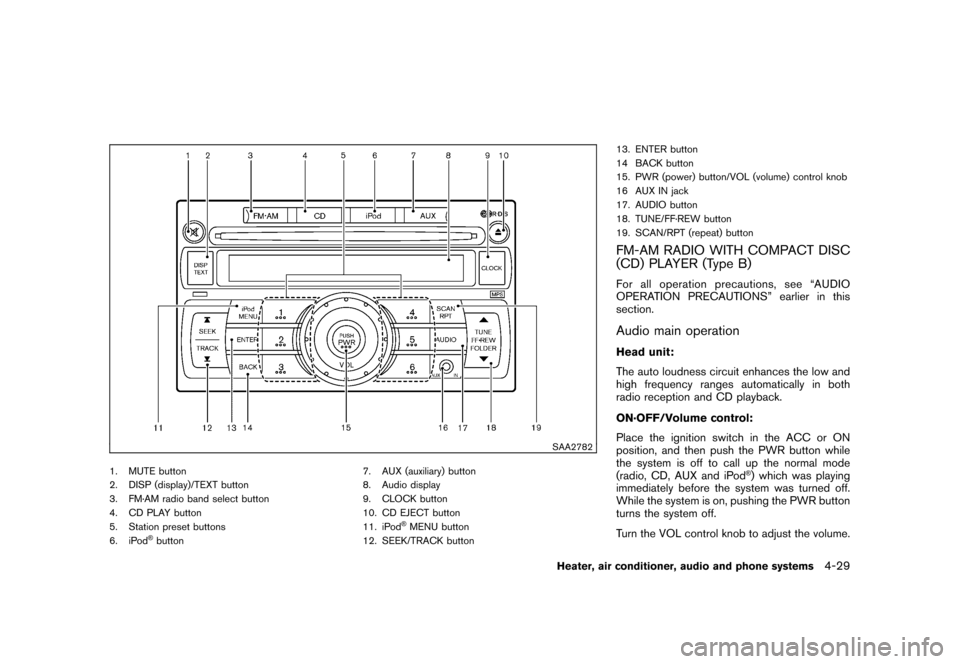
SAA2782
1. MUTE button
2. DISP (display)/TEXT button
3. FM·AM radio band select button
4. CD PLAY button
5. Station preset buttons
6. iPod
®button7. AUX (auxiliary) button
8. Audio display
9. CLOCK button
10. CD EJECT button
11. iPod
®MENU button
12. SEEK/TRACK button 13. ENTER button
14 BACK button
15. PWR (power) button/VOL (volume) control knob
16 AUX IN jack
17. AUDIO button
18. TUNE/FF·REW button
19. SCAN/RPT (repeat) button
FM-AM RADIO WITH COMPACT DISC
(CD) PLAYER (Type B)For all operation precautions, see “AUDIO
OPERATION PRECAUTIONS” earlier in this
section.Audio main operationHead unit:
The auto loudness circuit enhances the low and
high frequency ranges automatically in both
radio reception and CD playback.
ON·OFF/Volume control:
Place the ignition switch in the ACC or ON
position, and then push the PWR button while
the system is off to call up the normal mode
(radio, CD, AUX and iPod
®) which was playing
immediately before the system was turned off.
While the system is on, pushing the PWR button
turns the system off.
Turn the VOL control knob to adjust the volume.
Heater, air conditioner, audio and phone systems
4-29
Page 172 of 329
Black plate (176,1)
Model "Z12-D" EDITED: 2009/ 9/ 17
MUTE button:
Push the
button to mute the audio sound.
Push thebutton again to release the mute
setting.
AUDIO button:
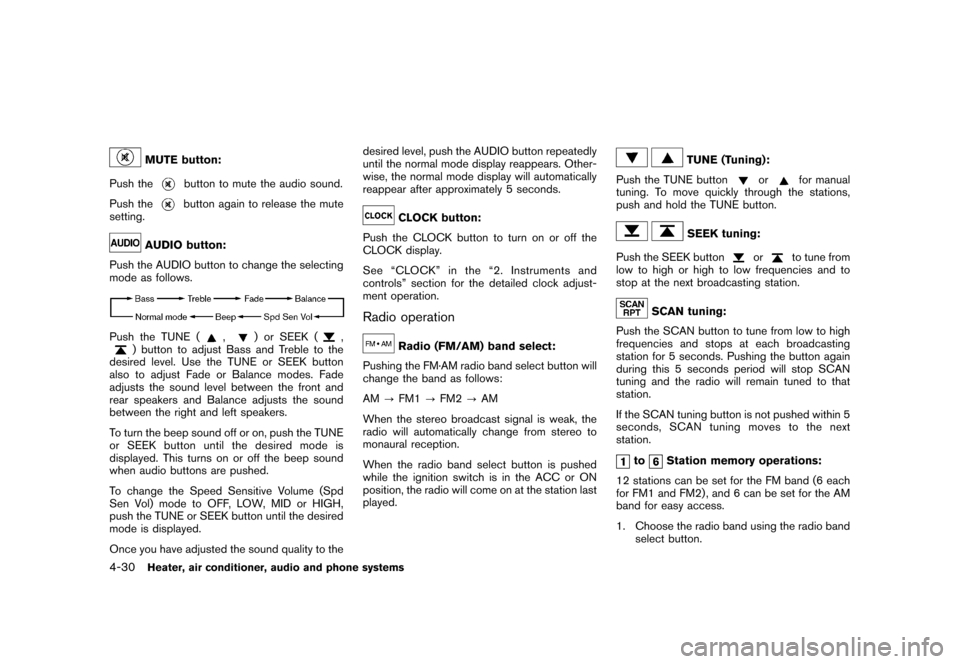
Push the AUDIO button to change the selecting
mode as follows.
Push the TUNE (
,
) or SEEK (
,
) button to adjust Bass and Treble to the
desired level. Use the TUNE or SEEK button
also to adjust Fade or Balance modes. Fade
adjusts the sound level between the front and
rear speakers and Balance adjusts the sound
between the right and left speakers.
To turn the beep sound off or on, push the TUNE
or SEEK button until the desired mode is
displayed. This turns on or off the beep sound
when audio buttons are pushed.
To change the Speed Sensitive Volume (Spd
Sen Vol) mode to OFF, LOW, MID or HIGH,
push the TUNE or SEEK button until the desired
mode is displayed.
Once you have adjusted the sound quality to the desired level, push the AUDIO button repeatedly
until the normal mode display reappears. Other-
wise, the normal mode display will automatically
reappear after approximately 5 seconds.
CLOCK button:
Push the CLOCK button to turn on or off the
CLOCK display.
See “CLOCK” in the “2. Instruments and
controls” section for the detailed clock adjust-
ment operation.
Radio operation
Radio (FM/AM) band select:
Pushing the FM·AM radio band select button will
change the band as follows:
AM ?FM1 ?FM2 ?AM
When the stereo broadcast signal is weak, the
radio will automatically change from stereo to
monaural reception.
When the radio band select button is pushed
while the ignition switch is in the ACC or ON
position, the radio will come on at the station last
played.
TUNE (Tuning):
Push the TUNE button
or
for manual
tuning. To move quickly through the stations,
push and hold the TUNE button.
SEEK tuning:
Push the SEEK button
or
to tune from
low to high or high to low frequencies and to
stop at the next broadcasting station.
SCAN tuning:
Push the SCAN button to tune from low to high
frequencies and stops at each broadcasting
station for 5 seconds. Pushing the button again
during this 5 seconds period will stop SCAN
tuning and the radio will remain tuned to that
station.
If the SCAN tuning button is not pushed within 5
seconds, SCAN tuning moves to the next
station.
to
Station memory operations:
12 stations can be set for the FM band (6 each
for FM1 and FM2) , and 6 can be set for the AM
band for easy access.
1. Choose the radio band using the radio band select button.
4-30
Heater, air conditioner, audio and phone systems
Page 173 of 329

Black plate (177,1)
Model "Z12-D" EDITED: 2009/ 9/ 17
2. Tune to the desired station using the SEEK,SCAN or TUNE button.
3. Push and hold the desired radio station preset button
to
until a beep sound is
heard. (The radio mutes when the radio
station preset button is pushed.)
4. The station indicator will then come on and the sound will resume. Memorizing is now
complete.
5. Other buttons can be set in the same manner.
If the battery cable is disconnected, or if the fuse
opens, the radio memory will be erased. In that
case, reset the desired stations.
Radio Data System (RDS):
RDS stands for Radio Data System, and is a
data information service transmitted by some
radio stations on the FM band (not AM band)
encoded within a regular radio broadcast.
Currently, most RDS stations are in large cities,
but many stations are now considering broad-
casting RDS data.
RDS can display:
. Station call sign, such as “WHFR 98.3”.
. Station name, such as “The Groove”.
. Music or programming type such as “Clas- sical”, “Country” or “Rock”.
. Traffic reports about delays or construction.
If the station broadcasts RDS information, the
RDS icon is displayed.
RADIO DISPLAY change:
When the DISP button is pushed during the FM
radio mode, the radio display will change in the
following order.
FM radio:
Frequency ↔PS/PTY
In the FM radio mode, pressing the DISP button
will switch the frequency display to the PTY
display (if available) , and if the DISP button is
not pushed again within 5 seconds, it will
automatically switch to the PS display. If PTY
is not available, pressing the DISP button will
only switch between the frequency display and
the PS display.
Compact Disc (CD) player operationPlace the ignition switch in the ACC or ON
position, and insert the CD into the slot with the
label side facing up. The CD will be guided
automatically into the slot and start playing.
After loading the disc, the number of tracks on
the disc will appear on the display. If the radio is already operating, it will auto-
matically turn off and the CD will play.
If the system has been turned off while the CD
was playing, pushing the PWR button will start
the CD.
Do not use 3.1 in (8 cm) discs.
CD PLAY:
When the CD button is pushed with the system
off and the CD loaded, the system will turn on
and the CD will start to play.
When the CD button is pushed with the CD
loaded and the radio playing, the radio will
automatically be turned off and the CD will start
to play.CD play information:
When the DISP button is pushed for less than
1.5 seconds while the CD is being played, the
disc information display will change as follows:
CD:
Heater, air conditioner, audio and phone systems
4-31
Page 175 of 329
Black plate (179,1)
Model "Z12-D" EDITED: 2009/ 9/ 17
SAA2352
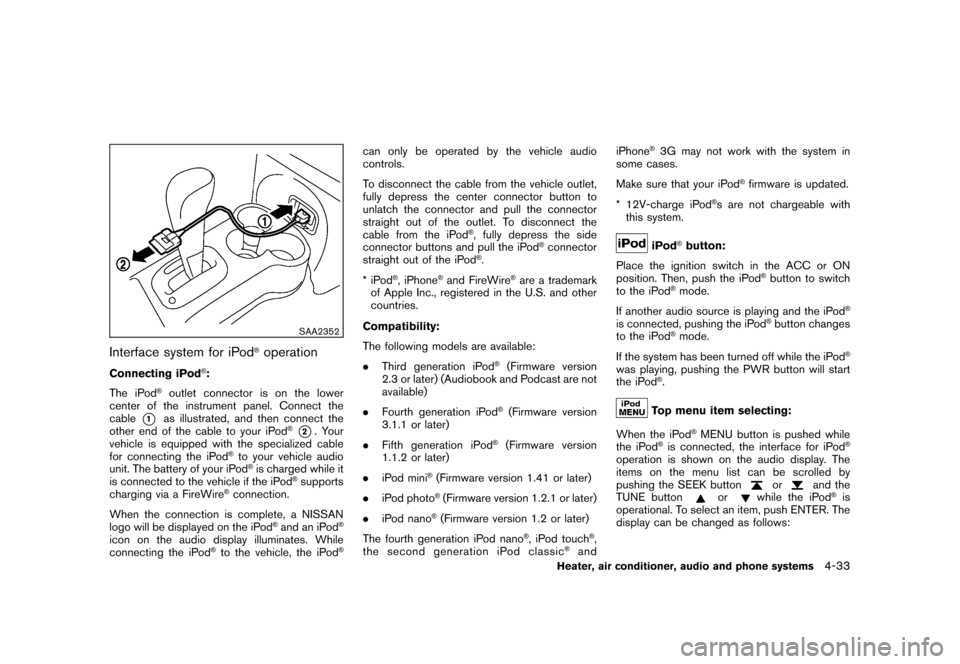
Interface system for iPod
®operation
Connecting iPod
®:
The iPod
®outlet connector is on the lower
center of the instrument panel. Connect the
cable
*1
as illustrated, and then connect the
other end of the cable to your iPod
®*2. Your
vehicle is equipped with the specialized cable
for connecting the iPod
®to your vehicle audio
unit. The battery of your iPod®is charged while it
is connected to the vehicle if the iPod
®supports
charging via a FireWire
®connection.
When the connection is complete, a NISSAN
logo will be displayed on the iPod
®and an iPod
®
icon on the audio display illuminates. While
connecting the iPod
®to the vehicle, the iPod
®
can only be operated by the vehicle audio
controls.
To disconnect the cable from the vehicle outlet,
fully depress the center connector button to
unlatch the connector and pull the connector
straight out of the outlet. To disconnect the
cable from the iPod
®, fully depress the side
connector buttons and pull the iPod
®connector
straight out of the iPod
®.
*iPod
®, iPhone
®and FireWire
®are a trademark
of Apple Inc., registered in the U.S. and other
countries.
Compatibility:
The following models are available:
. Third generation iPod
®(Firmware version
2.3 or later) (Audiobook and Podcast are not
available)
. Fourth generation iPod®(Firmware version
3.1.1 or later)
. Fifth generation iPod
®(Firmware version
1.1.2 or later)
. iPod mini
®(Firmware version 1.41 or later)
. iPod photo®(Firmware version 1.2.1 or later)
. iPod nano®(Firmware version 1.2 or later)
The fourth generation iPod nano
®, iPod touch
®,
the second generation iPod classic
®and iPhone
®3G may not work with the system in
some cases.
Make sure that your iPod
®firmware is updated.
* 12V-charge iPod
®s are not chargeable with
this system.
iPod
®button:
Place the ignition switch in the ACC or ON
position. Then, push the iPod
®button to switch
to the iPod
®mode.
If another audio source is playing and the iPod
®
is connected, pushing the iPod
®button changes
to the iPod
®mode.
If the system has been turned off while the iPod
®
was playing, pushing the PWR button will start
the iPod
®.Top menu item selecting:
When the iPod
®MENU button is pushed while
the iPod
®is connected, the interface for iPod
®
operation is shown on the audio display. The
items on the menu list can be scrolled by
pushing the SEEK button
or
and the
TUNE button
or
while the iPod
®is
operational. To select an item, push ENTER. The
display can be changed as follows:
Heater, air conditioner, audio and phone systems
4-33
Page 177 of 329
Black plate (181,1)
Model "Z12-D" EDITED: 2009/ 9/ 17
SAA2779
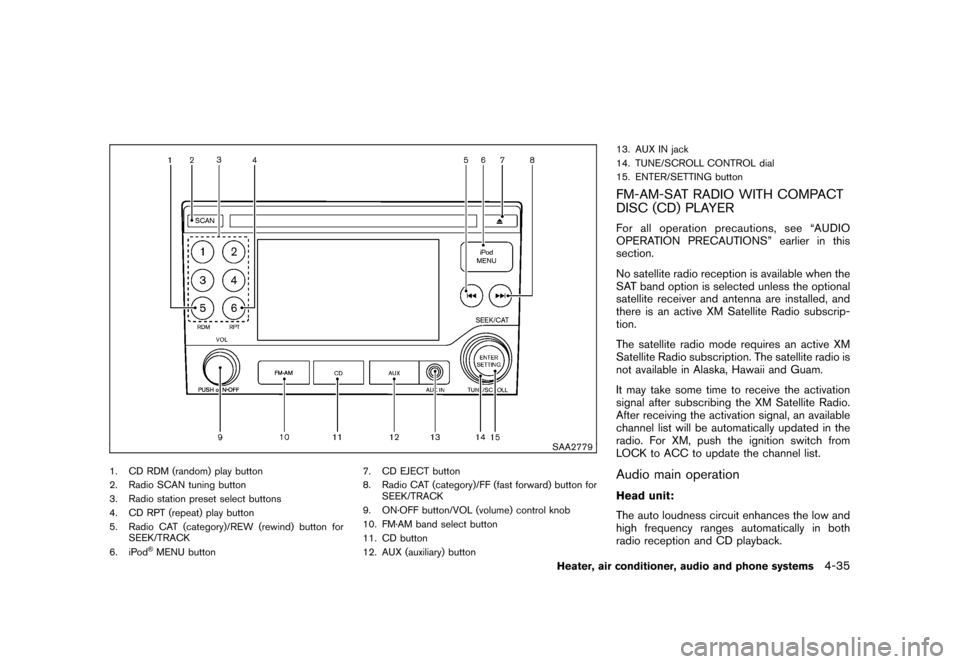
1. CD RDM (random) play button
2. Radio SCAN tuning button
3. Radio station preset select buttons
4. CD RPT (repeat) play button
5. Radio CAT (category)/REW (rewind) button forSEEK/TRACK
6. iPod
®MENU button 7. CD EJECT button
8. Radio CAT (category)/FF (fast forward) button for
SEEK/TRACK
9. ON·OFF button/VOL (volume) control knob
10. FM·AM band select button
11. CD button
12. AUX (auxiliary) button 13. AUX IN jack
14. TUNE/SCROLL CONTROL dial
15. ENTER/SETTING button
FM-AM-SAT RADIO WITH COMPACT
DISC (CD) PLAYERFor all operation precautions, see “AUDIO
OPERATION PRECAUTIONS” earlier in this
section.
No satellite radio reception is available when the
SAT band option is selected unless the optional
satellite receiver and antenna are installed, and
there is an active XM Satellite Radio subscrip-
tion.
The satellite radio mode requires an active XM
Satellite Radio subscription. The satellite radio is
not available in Alaska, Hawaii and Guam.
It may take some time to receive the activation
signal after subscribing the XM Satellite Radio.
After receiving the activation signal, an available
channel list will be automatically updated in the
radio. For XM, push the ignition switch from
LOCK to ACC to update the channel list.Audio main operationHead unit:
The auto loudness circuit enhances the low and
high frequency ranges automatically in both
radio reception and CD playback.
Heater, air conditioner, audio and phone systems
4-35
Page 179 of 329

Black plate (183,1)
Model "Z12-D" EDITED: 2009/ 9/ 17
SEEK tuning/CATEGORY
(CAT):
. For AM and FM radio
Push the SEEK button
or
to tune
from low to high or high to low frequencies
and to stop at the next broadcasting station.
. For XM Satellite Radio
Push the SEEK button
or
to tune
to the first channel of the next or previous
category.
SCAN tuning:
Push the SCAN tuning button to tune from low
to high frequencies and stop at each broad-
casting station/channel for 5 seconds. Pushing
the button again during this 5 seconds period
will stop SCAN tuning and the radio will remain
tuned to that station/channel.
If the SCAN tuning button is not pushed within 5
seconds, SCAN tuning moves to the next
station/channel.
*1
to
*6
Station memory operations:
12 stations/channels can be set for the FM band
(6 each for FM1 and FM2) , 12 for XM radio (6
each for XM1 and XM2) and 6 stations can be
set for the AM band. 1. Choose the radio band using the radio band
select button.
2. Tune to the desired station/channel using the SEEK/CAT, SCAN button or the radio
TUNE dial.
3. Push and hold the desired station preset button
*1
to*6
until the radio mutes.
4. The station indicator will then come on and the sound will resume. Memorizing is now
complete.
5. Other buttons can be set in the same manner.
If the battery cable is disconnected, or if the fuse
opens, the radio memory will be erased. In that
case, reset the desired stations/channels.
Compact Disc (CD) player operationPush the ignition switch to the ACC or ON
position and insert the Compact Disc (CD) into
the slot with the label side facing up. The CD will
be guided automatically into the slot and start
playing.
After loading the CD, the number of tracks on
the CD and the play time will appear on the
display.
If the radio is already operating, it will auto-
matically turn off and the CD will play. If the system has been turned off while the CD
was playing, pushing the ON·OFF button will
start the CD.
Do not use 3.1 in (8 cm) discs.
PLAY:
When the CD button is pushed with the system
off and the CD loaded, the system will turn on
and the CD will start to play.
When the CD button is pushed with the CD
loaded and the radio playing, the radio will
automatically be turned off and the CD will start
to play.
Next/Previous Track and Fast
Forward/Rewind:
When the(fast forward) or
(rewind)
button is pushed for more than 1.5 seconds
while the CD is being played, the CD will play
while fast forwarding or rewinding. When the
button is released, the CD will return to normal
play speed.
When the
or
button is pushed for less
than 1.5 seconds while the CD is being played,
the next track or the beginning of the current
track on the CD will be played.
Heater, air conditioner, audio and phone systems
4-37
Page 190 of 329
Black plate (194,1)
Model "Z12-D" EDITED: 2009/ 9/ 17
prompts you to enter more.
— “six six two” The system repeats the numbers and
prompts you to enter more.
— “six two zero zero”
. You can say “Star” for “*” and “Pound” for
“#” at any time in any position of the phone
number. (Available only when using the
“Special Dialing” command.)
Example: 1-555-1212 *123
— “One five five five one two one two star one two three”
. Say “pound” for “#”. Say “star” for “*”
(available when using the “Special Dialing”
command and the “Send” command during
a call) .
. Say “plus” for “+” (available only when using
the “Special Dialing” command) .
. Say “pause” for a 2 second pause (available
only when storing a phone book number) .
See “Making a call by entering a phone
number” later in this section and “LIST OF
VOICE COMMANDS” later in this section
for more information. NOTE:
For best results, say phone numbers as
single digits.
The voice command “Help” is available at any
time. Please say the “Help” command to get
information about how to use the system.
INFO
.
If you are controlling the telephone system
by voice command for the first time or do not
know the appropriate voice command,
speak “Help”. The system announces the
available commands.
. When you speak numbers, you can speak
both “zero” or “oh” for “0”.
Manual command selectionCommands can be selected manually. While the
commands are displayed on the audio screen,
select a command by operating the audio tuning
switch, and then push the
switch. Once a
command is manually selected, the voice
command function is cancelled. To return to
voice command mode, push the
switch to
cancel the current operation, and then perform
the first procedure of voice command.
SAA2351
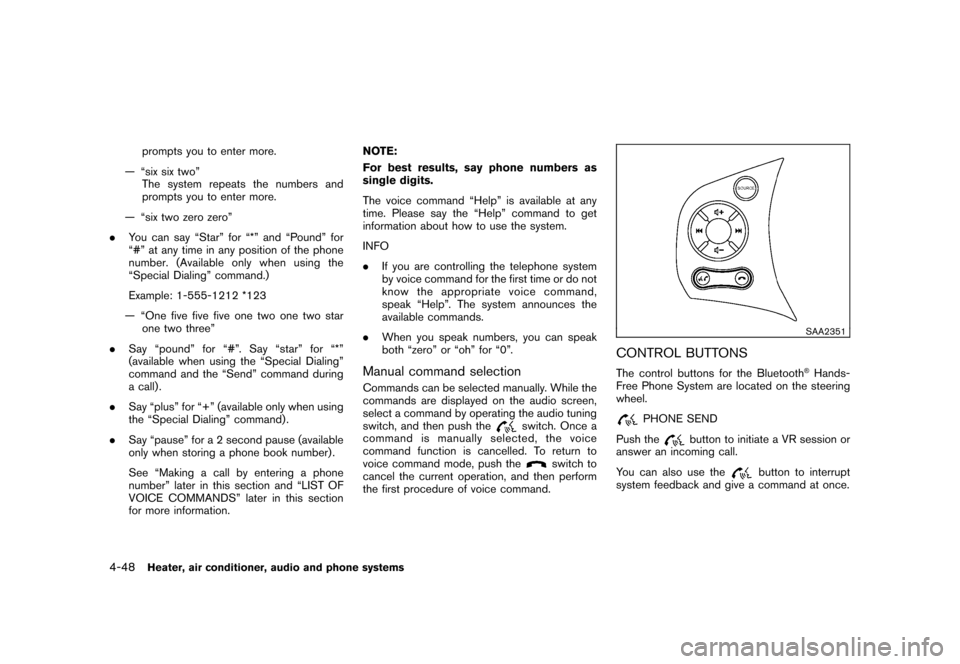
CONTROL BUTTONSThe control buttons for the Bluetooth
®Hands-
Free Phone System are located on the steering
wheel.
PHONE SEND
Push the
button to initiate a VR session or
answer an incoming call.
You can also use the
button to interrupt
system feedback and give a command at once.
4-48
Heater, air conditioner, audio and phone systems
Page 281 of 329
Black plate (285,1)
Model "Z12-D" EDITED: 2009/ 9/ 17
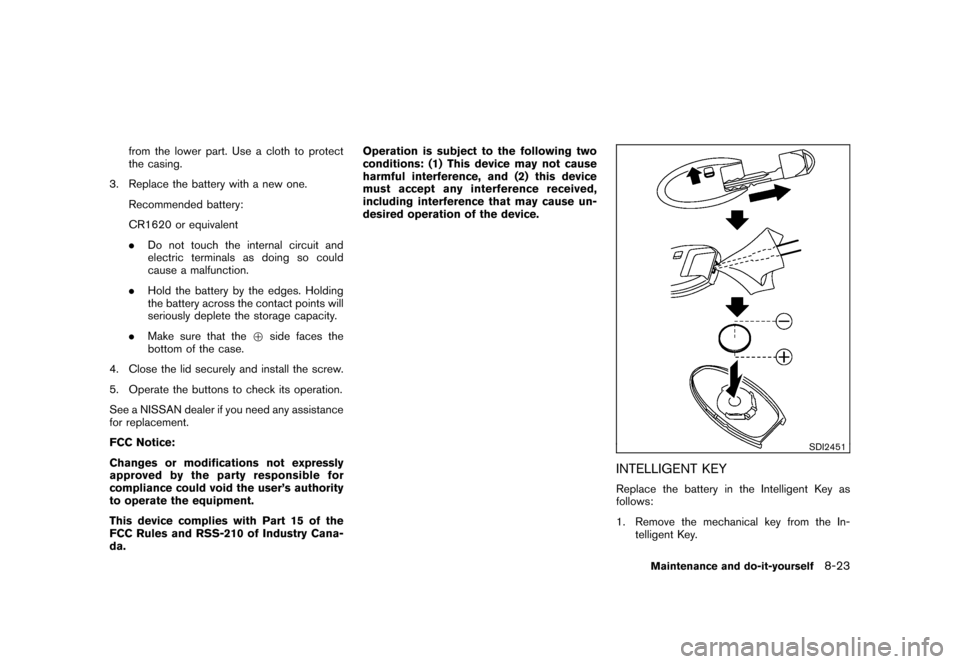
from the lower part. Use a cloth to protect
the casing.
3. Replace the battery with a new one. Recommended battery:
CR1620 or equivalent
.Do not touch the internal circuit and
electric terminals as doing so could
cause a malfunction.
. Hold the battery by the edges. Holding
the battery across the contact points will
seriously deplete the storage capacity.
. Make sure that the +side faces the
bottom of the case.
4. Close the lid securely and install the screw.
5. Operate the buttons to check its operation.
See a NISSAN dealer if you need any assistance
for replacement.
FCC Notice:
Changes or modifications not expressly
approved by the party responsible for
compliance could void the user’s authority
to operate the equipment.
This device complies with Part 15 of the
FCC Rules and RSS-210 of Industry Cana-
da. Operation is subject to the following two
conditions: (1) This device may not cause
harmful interference, and (2) this device
must accept any interference received,
including interference that may cause un-
desired operation of the device.
SDI2451
INTELLIGENT KEYReplace the battery in the Intelligent Key as
follows:
1. Remove the mechanical key from the In-
telligent Key.
Maintenance and do-it-yourself
8-23