mirror NISSAN CUBE 2014 3.G Owners Manual
[x] Cancel search | Manufacturer: NISSAN, Model Year: 2014, Model line: CUBE, Model: NISSAN CUBE 2014 3.GPages: 332, PDF Size: 2.59 MB
Page 12 of 332
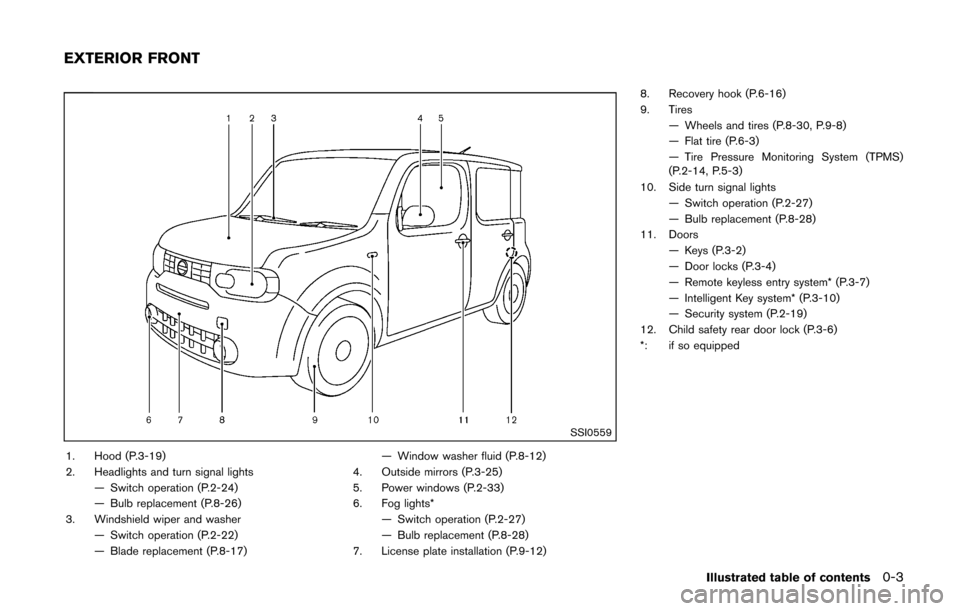
SSI0559
1. Hood (P.3-19)
2. Headlights and turn signal lights— Switch operation (P.2-24)
— Bulb replacement (P.8-26)
3. Windshield wiper and washer — Switch operation (P.2-22)
— Blade replacement (P.8-17) — Window washer fluid (P.8-12)
4. Outside mirrors (P.3-25)
5. Power windows (P.2-33)
6. Fog lights* — Switch operation (P.2-27)
— Bulb replacement (P.8-28)
7. License plate installation (P.9-12) 8. Recovery hook (P.6-16)
9. Tires
— Wheels and tires (P.8-30, P.9-8)
— Flat tire (P.6-3)
— Tire Pressure Monitoring System (TPMS)
(P.2-14, P.5-3)
10. Side turn signal lights — Switch operation (P.2-27)
— Bulb replacement (P.8-28)
11. Doors — Keys (P.3-2)
— Door locks (P.3-4)
— Remote keyless entry system* (P.3-7)
— Intelligent Key system* (P.3-10)
— Security system (P.2-19)
12. Child safety rear door lock (P.3-6)
*: if so equipped
Illustrated table of contents0-3
EXTERIOR FRONT
Page 14 of 332
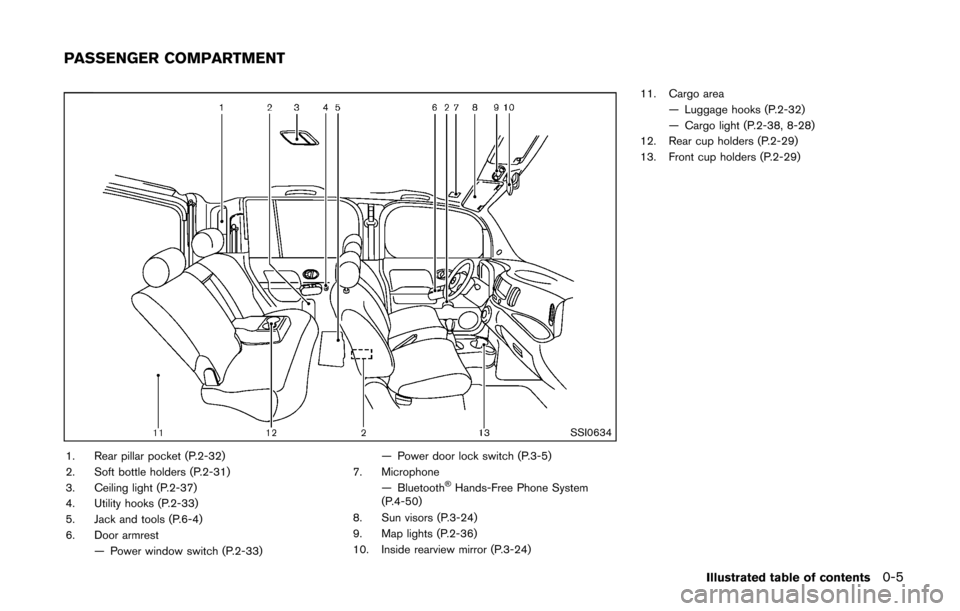
SSI0634
1. Rear pillar pocket (P.2-32)
2. Soft bottle holders (P.2-31)
3. Ceiling light (P.2-37)
4. Utility hooks (P.2-33)
5. Jack and tools (P.6-4)
6. Door armrest— Power window switch (P.2-33) — Power door lock switch (P.3-5)
7. Microphone — Bluetooth
®Hands-Free Phone System
(P.4-50)
8. Sun visors (P.3-24)
9. Map lights (P.2-36)
10. Inside rearview mirror (P.3-24) 11. Cargo area
— Luggage hooks (P.2-32)
— Cargo light (P.2-38, 8-28)
12. Rear cup holders (P.2-29)
13. Front cup holders (P.2-29)
Illustrated table of contents0-5
PASSENGER COMPARTMENT
Page 15 of 332
0-6Illustrated table of contents
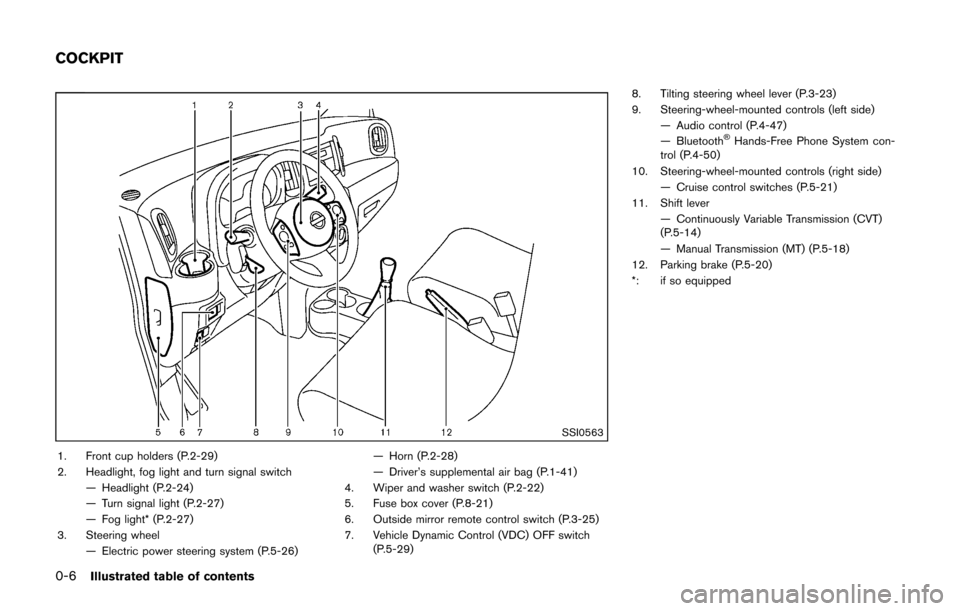
SSI0563
1. Front cup holders (P.2-29)
2. Headlight, fog light and turn signal switch— Headlight (P.2-24)
— Turn signal light (P.2-27)
— Fog light* (P.2-27)
3. Steering wheel — Electric power steering system (P.5-26) — Horn (P.2-28)
— Driver’s supplemental air bag (P.1-41)
4. Wiper and washer switch (P.2-22)
5. Fuse box cover (P.8-21)
6. Outside mirror remote control switch (P.3-25)
7. Vehicle Dynamic Control (VDC) OFF switch (P.5-29) 8. Tilting steering wheel lever (P.3-23)
9. Steering-wheel-mounted controls (left side)
— Audio control (P.4-47)
— Bluetooth
®Hands-Free Phone System con-
trol (P.4-50)
10. Steering-wheel-mounted controls (right side) — Cruise control switches (P.5-21)
11. Shift lever
— Continuously Variable Transmission (CVT)
(P.5-14)
— Manual Transmission (MT) (P.5-18)
12. Parking brake (P.5-20)
*: if so equipped
COCKPIT
Page 77 of 332
2-2Instruments and controls
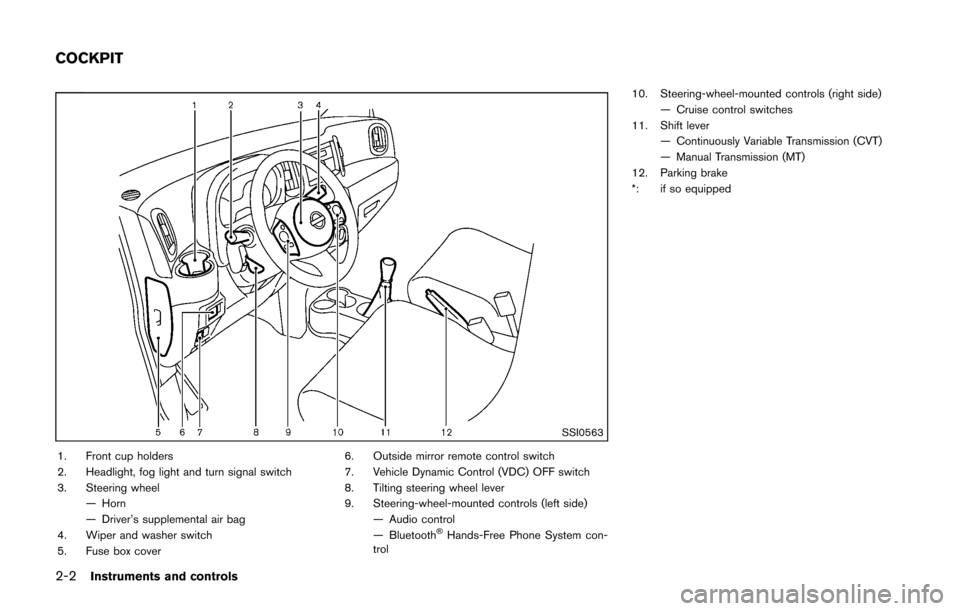
SSI0563
1. Front cup holders
2. Headlight, fog light and turn signal switch
3. Steering wheel— Horn
— Driver’s supplemental air bag
4. Wiper and washer switch
5. Fuse box cover 6. Outside mirror remote control switch
7. Vehicle Dynamic Control (VDC) OFF switch
8. Tilting steering wheel lever
9. Steering-wheel-mounted controls (left side)
— Audio control
— Bluetooth
®Hands-Free Phone System con-
trol 10. Steering-wheel-mounted controls (right side)
— Cruise control switches
11. Shift lever
— Continuously Variable Transmission (CVT)
— Manual Transmission (MT)
12. Parking brake
*: if so equipped
COCKPIT
Page 114 of 332
3 Pre-driving checks and adjustments
Keys ........................................................................\
...................... 3-2NISSAN Vehicle Immobilizer System keys ................... 3-2
Intelligent Keys (if so equipped) ..................................... 3-3
Doors ........................................................................\
.................... 3-4 Locking with key .................................................................. 3-5
Locking with inside lock knob .......................................... 3-5
Locking with power door lock switch ............................ 3-5
Automatic door locks ......................................................... 3-6
Child safety rear door lock ............................................... 3-6
Remote keyless entry system (if so equipped) ................. 3-7
How to use remote keyless entry system ..................... 3-8
Intelligent Key system (if so equipped) ............................ 3-10 Intelligent Key operating range ..................................... 3-12
Door locks/unlocks precaution .................................... 3-12
Intelligent Key operation ................................................. 3-13
Battery saver system ....................................................... 3-14 Warning lights and audible reminders ...................... 3-14
Troubleshooting guide .................................................. 3-15
How to use remote keyless entry function .............. 3-16
Hood ........................................................................\
................. 3-19
Back door ........................................................................\
........ 3-20
Fuel-filler door ........................................................................\
3-21
Opening the fuel-filler door ......................................... 3-21
Fuel-filler cap .................................................................. 3-21
Tilt steering column .............................................................. 3-23 Tilt operation ................................................................... 3-23
Sun visors ........................................................................\
........ 3-24
Mirrors ........................................................................\
............. 3-24 Inside mirror ..................................................................... 3-24
Outside mirrors ............................................................... 3-25
Vanity mirror ..................................................................... 3-26
Page 137 of 332
3-24Pre-driving checks and adjustments
SIC2872
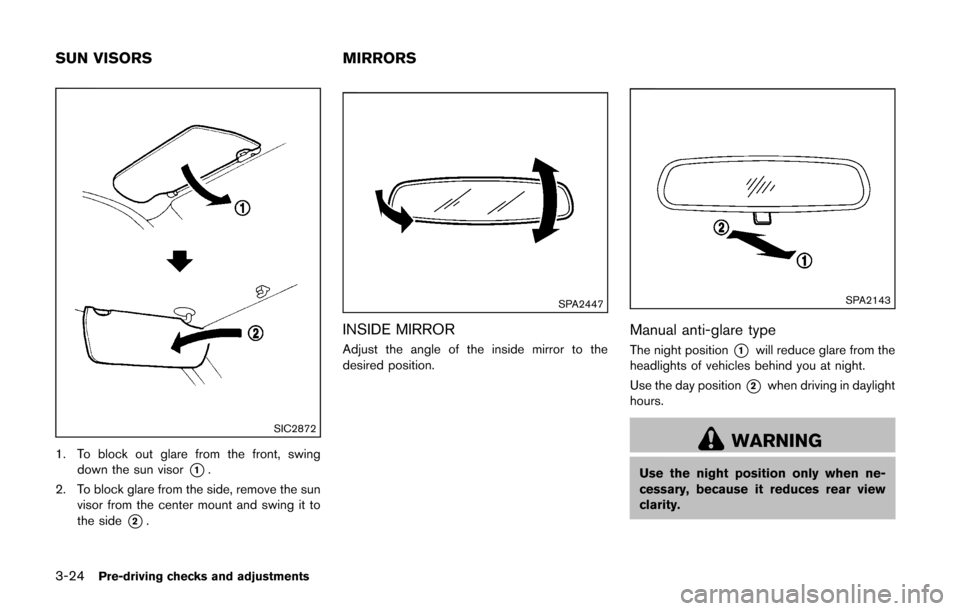
1. To block out glare from the front, swingdown the sun visor
*1.
2. To block glare from the side, remove the sun visor from the center mount and swing it to
the side
*2.
SPA2447
INSIDE MIRROR
Adjust the angle of the inside mirror to the
desired position.
SPA2143
Manual anti-glare type
The night position*1will reduce glare from the
headlights of vehicles behind you at night.
Use the day position
*2when driving in daylight
hours.
WARNING
Use the night position only when ne-
cessary, because it reduces rear view
clarity.
SUN VISORS MIRRORS
Page 138 of 332
SPA2214
OUTSIDE MIRRORS
WARNING
Objects viewed in the outside mirror on
the passenger side are closer than they
appear. Be careful when moving to the
right. Using only this mirror could cause
an accident. Use the inside mirror or
glance over your shoulder to properly
judge distances to other objects.
Adjusting outside mirrors
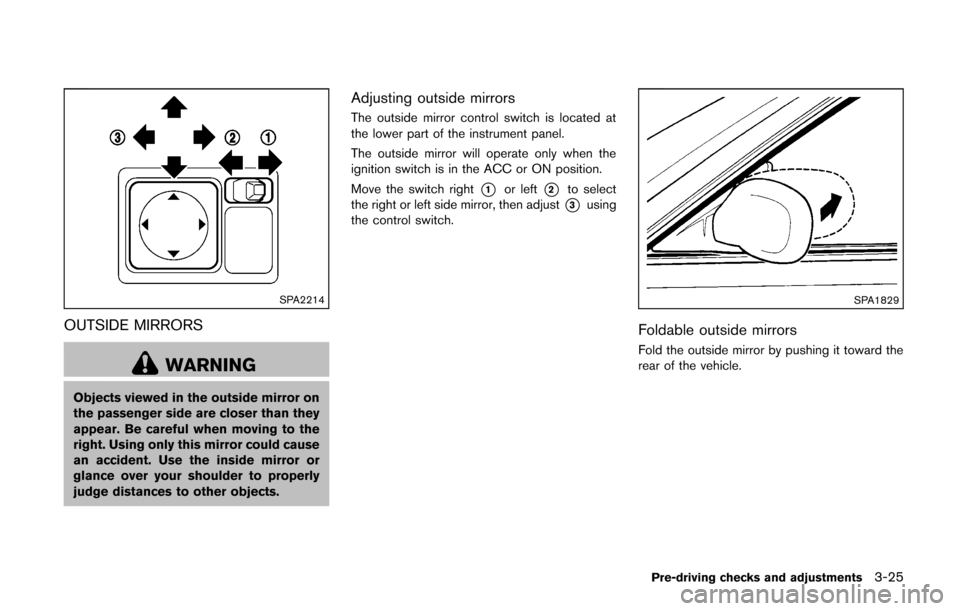
The outside mirror control switch is located at
the lower part of the instrument panel.
The outside mirror will operate only when the
ignition switch is in the ACC or ON position.
Move the switch right
*1or left*2to select
the right or left side mirror, then adjust
*3using
the control switch.
SPA1829
Foldable outside mirrors
Fold the outside mirror by pushing it toward the
rear of the vehicle.
Pre-driving checks and adjustments3-25
Page 139 of 332
3-26Pre-driving checks and adjustments
SPA1733
VANITY MIRROR
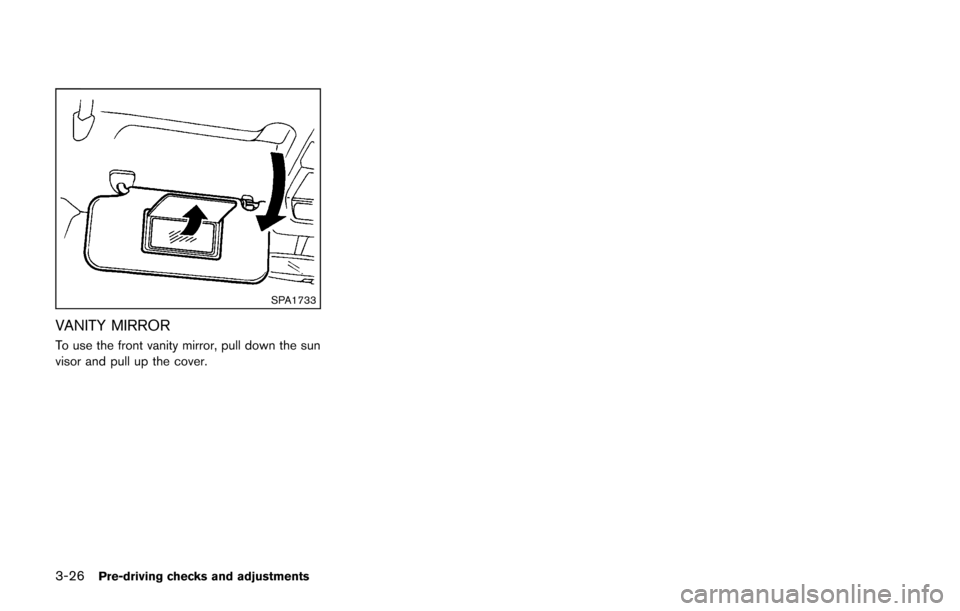
To use the front vanity mirror, pull down the sun
visor and pull up the cover.
Page 150 of 332
(such as thebutton) is pressed and held for
two seconds.
Reset all settings/memory:
Select the “Reset All Settings/Memory” key to
return all settings to default and to clear the
memory.
Traffic Info setup
Refer to the separate Navigation System Own-
er’s Manual for information regarding this item. When the shift lever is shifted into the R
(Reverse) position, the monitor display shows
the view to the rear of the vehicle.
The system is designed as an aid to the driver in
situations such as slot parking or parallel
parking.WARNING
Failure to follow the warnings and
instructions for proper use of the Rear-
View Monitor could result in serious
injury or death.
.
The RearView monitor is a conve-
nience but it is not a substitute for
proper backing. Always turn and
look out the windows, and check
mirrors to be sure that it is safe to
move before operating the vehicle.
Always back up slowly.
. The system is designed as an aid to
the driver in showing large station-
ary objects directly behind the vehi-
cle, to help avoid damaging the
vehicle.
. The system cannot completely elim-
inate blind spots and may not show
every object. .
Underneath the bumper and the
corner areas of the bumper cannot
be viewed on the RearView Monitor
because of its monitoring range
limitation. The system will not show
small objects below the bumper,
and may not show objects close to
the bumper or on the ground.
. Objects viewed in the RearView
Monitor differ from actual distance
because a wide-angle lens is used.
. Objects in the RearView Monitor
will appear visually opposite than
when viewed in the rear view and
outside mirrors
. Make sure that the back door is
securely closed when backing up.
. Do not put anything on the rear view
camera.
. When washing the vehicle with
high-pressure water, be sure not to
spray it around the camera. Other-
wise, water may enter the camera
unit causing water condensation on
the lens, a malfunction, fire or an
electric shock.
. Do not strike the camera. It is a
precision instrument. Otherwise, it
Center display, heater, air conditioner, audio and phone systems4-9
REARVIEW MONITOR (if so
equipped)
Page 217 of 332
5-12Starting and driving
After step 3 is performed, when the ignition
switch is pushed without depressing the brake
pedal, the ignition switch position will change to
ACC.
NOTE:
.When the ignition switch is pushed to
the ACC or ON position or the engine is
started by the above procedures, the
Intelligent Key system warning light
may blink in yellow even if the Intelli-
gent Key is inside the vehicle. This is
not a malfunction. To stop the warning
light from blinking, touch the ignition
switch with the Intelligent Key again.
. If the Intelligent Key system warning
light in the meter is blinking in green,
replace the battery as soon as possible.
(See “Key battery replacement” (P.8-
23) .) .
Make sure the area around the vehicle is
clear.
. Check fluid levels such as engine oil, cool-
ant, brake fluid, and window washer fluid as
frequently as possible, or at least whenever
you refuel.
. Check that all windows and lights are clean.
. Visually inspect tires for their appearance
and condition. Also check tires for proper
inflation.
. Lock all doors.
. Position seat and adjust head restraints.
. Adjust inside and outside mirrors.
. Fasten seat belts and ask all passengers to
do likewise.
. Check the operation of warning lights when
the ignition switch is placed in the ON
position. (See “Warning/indicator lights and
audible reminders” (P.2-11) .)MODELS WITHOUT INTELLIGENT KEY
SYSTEM
1. Apply the parking brake.
2.Continuously Variable Transmission
(CVT) models:
Move the shift lever to the P (Park) or N
(Neutral) position. (P is recommended.)
The starter is designed so that it does not
operate unless the shift lever is in either of
the above positions.
Manual Transmission (MT) models:
Move the shift lever to the N (Neutral)
position. Depress the clutch pedal fully to
the floor.
The starter is designed not to operate unless
the clutch pedal is fully depressed.
3. Crank the engine with your foot off the
accelerator pedal by turning the ignition
switch to START. Release the switch when
the engine starts. If the engine starts, but
fails to run, repeat the above procedure.
.If the engine is very hard to start in
extremely cold weather or when restart-
ing, depress the accelerator pedal a little
(approximately 1/3 to the floor) and hold
it and then crank the engine. Release the
accelerator pedal when the engine starts.
BEFORE STARTING THE ENGINE STARTING THE ENGINE