change time NISSAN FRONTIER 1996 D22 / 1.G Owners Manual
[x] Cancel search | Manufacturer: NISSAN, Model Year: 1996, Model line: FRONTIER, Model: NISSAN FRONTIER 1996 D22 / 1.GPages: 198, PDF Size: 1.3 MB
Page 2 of 198

ON-PAVEMENT AND OFF-ROAD DRIVING
This vehicle will handle and maneuver differently from an ordinary
passenger car because it has a higher center of gravity for off-road
use. As with other vehicles with features of this type, failure to
operate this vehicle correctly may result in loss of control or an
accident.
Be sure to read ªOn-pavement and off-road driving precautionsº and
``Avoiding collision and rollover'' in the ªStarting and drivingº section
of this manual.
MODIFICATION OF YOUR VEHICLE
This vehicle should not be modified. Modification could affect its
performance, safety or durability, and may even violate govern-
mental regulations. In addition, damage or performance prob-
lems resulting from modification may not be covered under
NISSAN warranties.
All information, specifications and illustrations in this manual are
those in effect at the time of printing. NISSAN reserves the right to
change specifications or design without notice and without obligation.
1996 NISSAN NORTH AMERICA, INC.
U.S.A.
All rights reserved. No part of this Owner's Manual may be
reproduced or stored in a retrieval system, or transmitted in any
form, or by any means, electronic, mechanical, photocopying,
recording or otherwise, without the prior written permission of
Nissan North America, Inc.
ZX
Page 15 of 198

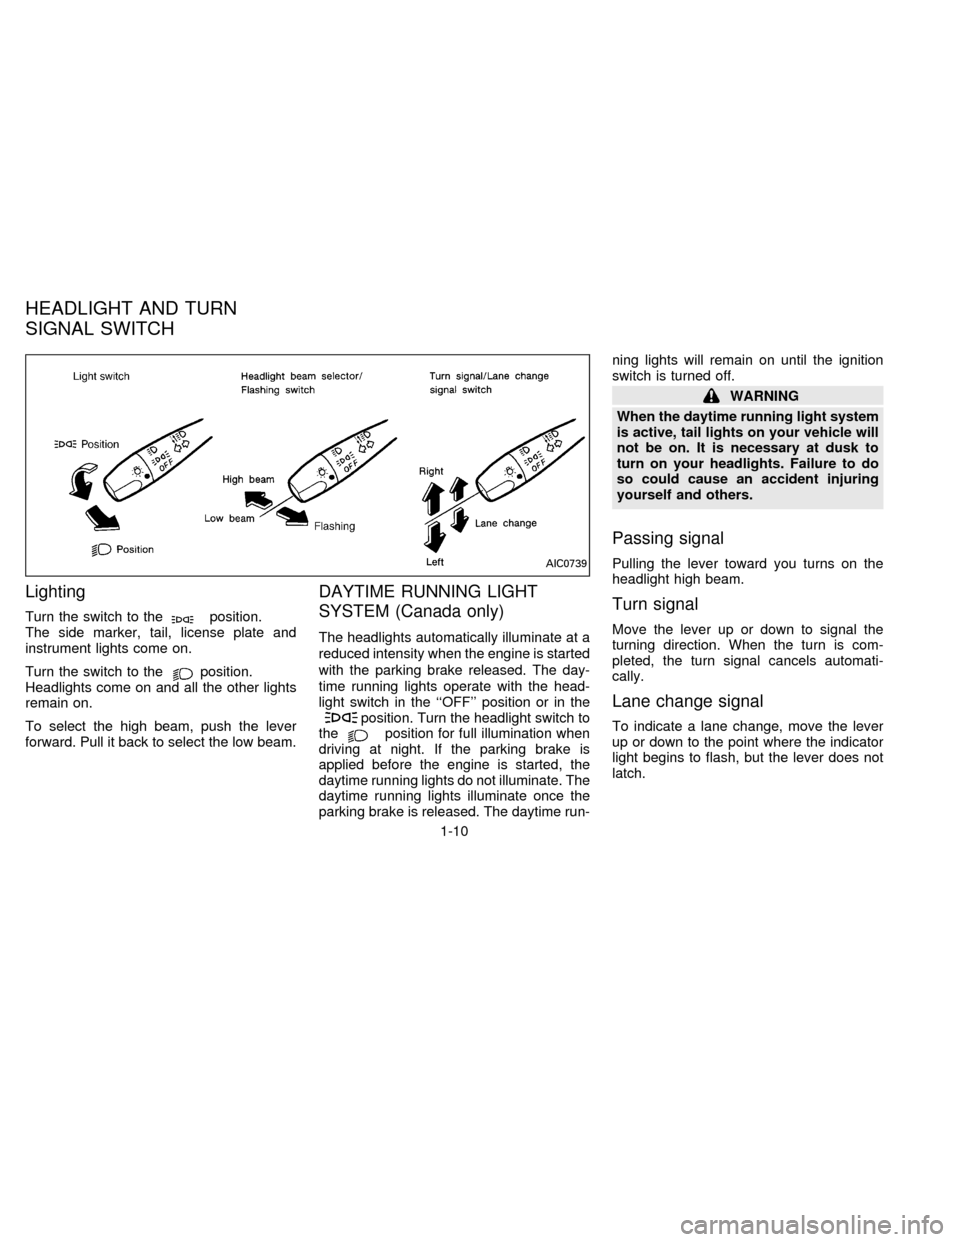
Lighting
Turn the switch to theposition.
The side marker, tail, license plate and
instrument lights come on.
Turn the switch to the
position.
Headlights come on and all the other lights
remain on.
To select the high beam, push the lever
forward. Pull it back to select the low beam.
DAYTIME RUNNING LIGHT
SYSTEM (Canada only)
The headlights automatically illuminate at a
reduced intensity when the engine is started
with the parking brake released. The day-
time running lights operate with the head-
light switch in the ``OFF'' position or in the
position. Turn the headlight switch to
theposition for full illumination when
driving at night. If the parking brake is
applied before the engine is started, the
daytime running lights do not illuminate. The
daytime running lights illuminate once the
parking brake is released. The daytime run-ning lights will remain on until the ignition
switch is turned off.
WARNING
When the daytime running light system
is active, tail lights on your vehicle will
not be on. It is necessary at dusk to
turn on your headlights. Failure to do
so could cause an accident injuring
yourself and others.
Passing signal
Pulling the lever toward you turns on the
headlight high beam.
Turn signal
Move the lever up or down to signal the
turning direction. When the turn is com-
pleted, the turn signal cancels automati-
cally.
Lane change signal
To indicate a lane change, move the lever
up or down to the point where the indicator
light begins to flash, but the lever does not
latch.
AIC0739
HEADLIGHT AND TURN
SIGNAL SWITCH
1-10
ZX
Page 67 of 198

The cassette tape automatically changes
direction to play the other side when the first
side is complete. At this time, the arrow in
the display window changes direction.
Fast forwarding or rewinding the
tape
Push either the FF (fast forward) or REW
(rewind) button for the desired direction.
The
orsymbol illuminates in the
display. To stop the FF or REW function,
press the PLAY/STOP button.
Automatic Program Search (APS)
fast forwarding or APS rewinding
the tape
Push either the APS FF or APS REW button
while the tape is playing. The tape runs
quickly, stops, then plays the next selection.
The
orsymbol illuminates in
the display.
This system searches for the blank intervals
between selections. If there is a blank inter-
val within one program or there is no interval
between programs, the system may not
stop in the desired or expected location.
Changing the direction of tape play
Push the PROG (program) select button.
The
orsymbol illuminates in the
display window to indicate which program
side is playing.
PLAY/STOP button
Push the PLAY/STOP button to stop cas-
sette tape play and turn the audio system
off. Press the PLAY/STOP button again to
resume cassette tape play.
Also use the PLAY/STOP button to resume
play when the tape is in the fast forward or
rewind mode.
Dolby NR (noise reduction)
Push theDOLBY NR button for
Dolby NR encoded tapes to reduce high
frequency tape noise. The indicator light
comes on.
Dolby NR is manufactured under license
from Dolby Laboratories Licensing Corpora-
tion. DOLBY NR and the double-D symbol
are trademarks of Dolby Laboratories Li-
censing Corporation.
If in the clock priority mode when the
button is pressed,and TAPE il-luminate in the display window for about ten
seconds. The clock mode than returns to
the display window.
Metal or chrome tape usage
The cassette player is automatically set to
high performance play when playing a metal
or chrome cassette tape. The indicator
METAL comes on when playing a metal or
chrome cassette tape.
Ejecting the cassette tape
Push the EJECT button.
The cassette tape automatically comes out.
Precautions on cassette player op-
eration
cTo maintain good quality sound, NIS-
SAN recommends using cassette
tapes of 60 minutes or shorter in
length.
cCassette tapes should be removed
from the player when not in use. Store
cassettes in their protective cases,
away from direct sunlight, heat, mois-
ture and magnetic sources.
3-14
ZX
Page 72 of 198

CASSETTE TAPE OPERATION
Turn the ignition key to ACC or ON, then
lightly insert the cassette tape into the tape
door.
The cassette tape automatically pulls into
the player. The word TAPE and an arrow
indicating tape side illuminates in the dis-
play window.
The radio turns off and the cassette tape
begins to play.
Do not force the cassette tape into the
tape door.Pressing strongly could cause player
damage.
The cassette tape automatically changes
direction to play the other side when the first
side is complete. At this time, the arrow in
the display window changes direction.
PLAY/STOP button
Push the PLAY/STOP button to resume
tape play when:
cthe tape has stopped playing.
cthe tape is in the fast forward mode.
cthe tape is in the rewind mode.
Pressing the PLAY/STOP button during
tape play stops the tape and turns the audio
system off.
Fast forwarding or rewinding the
tape
Push either the FF (fast forward) or REW
(rewind) button for the desired direction.
Automatic Program Search (APS)
fast forwarding or APS rewinding
the tape
Push either the APS FF or APS REW button
while the cassette tape is playing. The tape
runs quickly, stops, then plays the next
selection.
This system searches for the blank intervals
between selections. If there is a blank inter-
val within one program or there is no interval
between programs, the system may not
stop in the desired or expected location.
Changing the direction of tape play
Push the PROG (program) select button.
Dolby NR (noise reduction)
Push theDOLBY NR button for
DOLBY NR encoded tapes to reduce high
frequency tape noise. The indicator light
comes on.
Dolby NR is manufactured under license
from Dolby Laboratories Licensing Corpora-
tion. Dolby NR and the double-D symbol are
trademarks of Dolby Laboratories Licensing
Corporation.
AIC0713
3-19
ZX
Page 77 of 198

WARNING
Do not leave children, unreliable
adults, or pets alone in your vehicle.
They could accidentally injure them-
selves or others through inadvertent
operation of the vehicle. Also, on hot,
sunny days, temperatures in a closed
vehicle could quickly become high
enough to cause severe or possibly
fatal injuries to people or animals.
EXHAUST GAS (Carbon Monoxide)
WARNING
Do not breathe exhaust gases; they
contain colorless and odorless carbon
monoxide. Carbon monoxide is a dan-
gerous gas, and can cause uncon-
sciousness or death.
cIf you suspect that exhaust fumes
are entering the vehicle, drive with
all windows fully open, and have the
vehicle inspected immediately.
cDo not run the engine in closed
spaces such as a garage for any
longer than is absolutely necessary.cDo not park the vehicle with the
engine running for any extended
length of time.
cIf a special body, camper, or other
equipment is added for recreational
or other usage, follow the manufac-
turer's recommendation to prevent
carbon monoxide entry into the ve-
hicle. Do not occupy these areas
while the engine is running even if
the vehicle is parked. (Some recre-
ational vehicle appliances such as
stoves, refrigerator heaters, etc. may
also generate carbon monoxide.)
cThe exhaust system and body
should be inspected by a qualified
mechanic whenever:
a. The vehicle is raised for service.
b. You suspect that exhaust fumes
are entering into the passenger
compartment.
c. You notice a change in the sound
of the exhaust system.d. You have had an accident involv-
ing damage to the exhaust sys-
tem, underbody, or rear of the
vehicle.
THREE-WAY CATALYST
The three-way catalyst is an emission con-
trol device installed in the exhaust system.
Exhaust gases in the converter are burned
at high temperatures to help reduce pollut-
ants.
WARNING
cThe exhaust gas and the exhaust
system are very hot. While the en-
gine is running, keep people or flam-
mable materials away from the ex-
haust pipe.
cDo not stop or park the vehicle over
flammable materials such as dry
grass, waste paper or rags, as they
may burn easily.
To help prevent damage
cDo not use leaded gasoline. Deposits
from leaded gasoline will seriously
PRECAUTIONS WHEN
STARTING AND DRIVING
4-2
ZX
Page 83 of 198

1 (Low gear):
Use this position when climbing steep hills
slowly or driving slowly through deep snow,
sand or mud, or for maximum engine brak-
ing on steep downhill grades.
Do not down shift into the 1 position at
speeds over 62 MPH (100 km/h), and do not
exceed 30 MPH (50 km/h) in the 1 position.
Accelerator downshift
Ð In D position Ð
For rapid passing or hill climbing, fully de-
press the accelerator pedal to the floor. This
shifts the transmission down into second
gear or first gear, depending on the vehicle
speed.
Overdrive switch
ON: For normal driving, push the overdrive
switch ON
with the selector lever
in the D position. The transmission is
upshifted into OVERDRIVE as the ve-
hicle speed increases.
The overdrive does not engage until the
engine has warmed up.
OFF: For driving up and down long slopes
where engine braking would be ad-
vantageous, push the switch OFF
.When cruising at a low speed or
climbing a gentle slope, you may feeluncomfortable shift shocks as the trans-
mission shifts between 3rd and over-
drive repeatedly. In this case, set the
overdrive switch in the OFF
position.
The indicator light in the instrument
panel comes on at this time.
When driving conditions change, reset the
overdrive switch in the ONposition.
Remember not to drive at high speeds for
extended periods of time with the overdrive
switch set in the OFF
position. This
reduces fuel economy.
ASD0702
4-8
ZX
Page 130 of 198

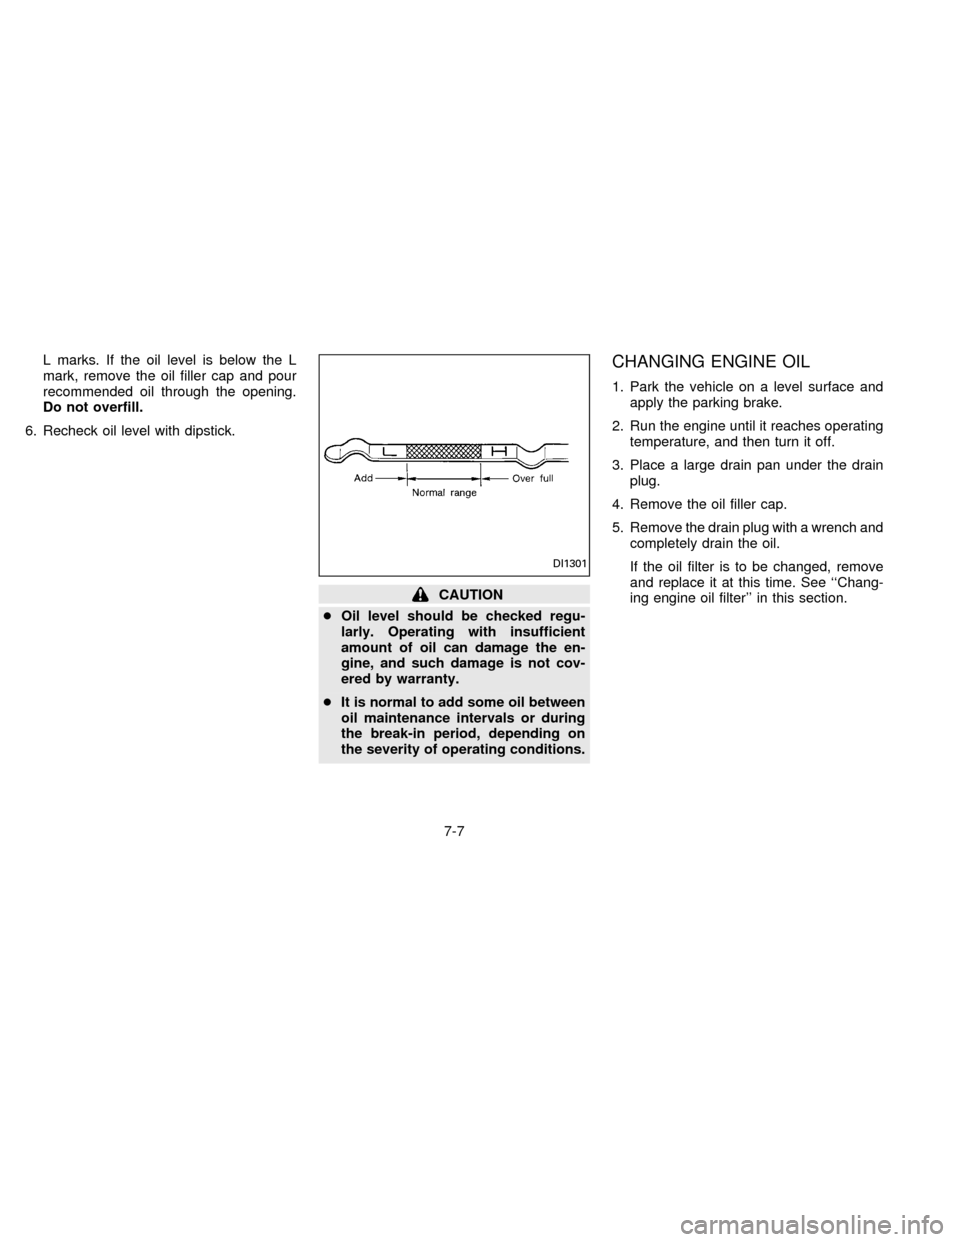
L marks. If the oil level is below the L
mark, remove the oil filler cap and pour
recommended oil through the opening.
Do not overfill.
6. Recheck oil level with dipstick.
CAUTION
cOil level should be checked regu-
larly. Operating with insufficient
amount of oil can damage the en-
gine, and such damage is not cov-
ered by warranty.
cIt is normal to add some oil between
oil maintenance intervals or during
the break-in period, depending on
the severity of operating conditions.
CHANGING ENGINE OIL
1. Park the vehicle on a level surface and
apply the parking brake.
2. Run the engine until it reaches operating
temperature, and then turn it off.
3. Place a large drain pan under the drain
plug.
4. Remove the oil filler cap.
5. Remove the drain plug with a wrench and
completely drain the oil.
If the oil filter is to be changed, remove
and replace it at this time. See ``Chang-
ing engine oil filter'' in this section.
DI1301
7-7
ZX
Page 142 of 198

Check the brake booster function with the
following steps:
1. With the engine off, press and release
the brake pedal several times. When
brake pedal movement (distance of
travel) remains the same from one pedal
application to the next, continue on to
next step.
2. While depressing the brake pedal, start
the engine. The pedal height should drop
a little.
3. With the brake pedal depressed, stop the
engine. Keeping the pedal depressed for
about 30 seconds, the pedal height
should not change.
4. Run the engine for one minute without
depressing the brake pedal, then turn it
off. Depress the brake pedal several
times. The pedal travel distance will de-
crease gradually with each depression
as the vacuum is released from the
booster.
If the brakes do not operate properly, have
the brake checked by your NISSAN dealer.Press the pedal by hand and be sure the
free travel is within the above limit. If free
travel is out of the range shown above, see
your NISSAN dealer.
ADI0727
BRAKE BOOSTER CLUTCH PEDAL
7-19
ZX
Page 169 of 198

FUEL RECOMMENDATION
All models are designed to operate on
unleaded gasoline with an octane rating
of at least 87 AKI (Anti-Knock Index)
number (Research octane number 91).
CAUTION
cUsing a fuel other than that specified
could adversely affect the emission
control devices and systems, and
could also affect the warranty
coverage.
cUnder no circumstances should a
leaded gasoline be used, since this
will damage the three-way catalyst.
Reformulated Gasoline
Some fuel suppliers are now producing re-
formulated gasolines. These gasolines are
specially designed to reduce vehicle emis-
sions. NISSAN supports efforts towards
cleaner air and suggest that you use refor-
mulated gasoline when available.
Gasoline containing oxygenates
Some fuel suppliers sell gasoline containing
oxygenates such as ethanol, MTBE andmethanol with or without advertising their
presence. Nissan does not recommend the
use of fuels of which the oxygenate content
and the fuel compatibility for your NISSAN
cannot be readily determined. If in doubt,
ask your service station manager.
If you use oxygenate-blend gasoline, please
take the following precautions as the usage
of such fuels may cause vehicle perfor-
mance problems and/or fuel system dam-
age.
cThe fuel should be unleaded and have
an octane rating no lower than that
recommended for unleaded gasoline.
cIf an oxygenate-blend, excepting a
methanol blend, is used, it should
contain no more than 10% oxygenate.
(MTBE may, however, be added up to
15%.)
cIf a methanol blend is used, it should
contain no more than 5% methanol
(methyl alcohol, wood alcohol). It
should also contain a suitable amount
of appropriate cosolvents and corro-
sion inhibitors. If not properly formu-
lated with appropriate cosolvents and
corrosion inhibitors, such methanolblends may cause fuel system dam-
age and/or vehicle performance prob-
lems. At this time, sufficient data is
not available to ensure that all metha-
nol blends are suitable for use in NIS-
SAN vehicles.
If any driveability problems such as engine
stalling and hard hot starting are experi-
enced after using oxygenate-blend fuels,
immediately change to a non-oxygenate
fuel or a fuel with a low blend of MTBE.
Take care not to spill gasoline during
refueling. Gasoline containing oxygen-
ates can cause paint damage.
After Market Fuel Additives
NISSAN does not recommend the use of
any fuel additives (i.e., fuel injector cleaner,
octane booster, intake valve deposit remov-
ers, etc.) which are sold commercially.
Many of these additives intended for gum,
varnish or deposit removal may contain
active solvents or similar ingredients that
can be harmful to the fuel system and
engine.
9-4
ZX
Page 171 of 198

ENGINE OIL AND OIL FILTER
RECOMMENDATION
Selecting the correct oil
It is essential to chose the correct quality
and viscosity oil to ensure satisfactory en-
gine life and performance. Nissan recom-
mends the use of a low friction oil (energy
conserving oil) in order to improve fuel
economy and conserve energy. Oils which
do not have the specified quality label
should not be used as they could cause
engine damage.Only those engine oils with the American
Petroleum Institute (API) CERTIFICATION
MARK on the front of the container should
be used. This type of oil supersedes the
existing API SG or SH and Energy Conserv-
ing II categories.
If you cannot find engine oil with the CERTI-
FICATION MARK, an API SG or SH and
Energy Conserving II oil with API Service
Symbol may be used. An oil with a single
designation SG or SH, or in combination with
other categories (for example, SG/CC or
SG/CD) may also be used if one with the API
CERTIFICATION MARK cannot be found.
Mineral based or synthetic type oils may be
used in your NISSAN vehicle. These oils
must however, meet the API quality and
SAE viscosity ratings specified for your ve-
hicle. Do not mix mineral based and syn-
thetic type oils in the engine at the same
time.
Oil additives
NISSAN does not recommend the use of oil
additives. The use of an oil additive is not
necessary when the proper oil type is used
and maintenance intervals are followed.
Oil which may contain foreign matter or has
been previously used should not be used.
Oil viscosity
The engine oil viscosity or thickness
changes with temperature. Because of this,
it is important that the engine oil viscosity be
selected based on the temperatures at
which the vehicle will be operated before
the next oil change. The chart ``Recom-
mended SAE viscosity number'' shows the
recommended oil viscosities for the ex-
pected ambient temperatures. Choosing an
oil viscosity other than that recommended
could cause serious engine damage.
ATI0507
9-6
ZX