change wheel NISSAN FRONTIER 1996 D22 / 1.G Owners Manual
[x] Cancel search | Manufacturer: NISSAN, Model Year: 1996, Model line: FRONTIER, Model: NISSAN FRONTIER 1996 D22 / 1.GPages: 198, PDF Size: 1.3 MB
Page 38 of 198
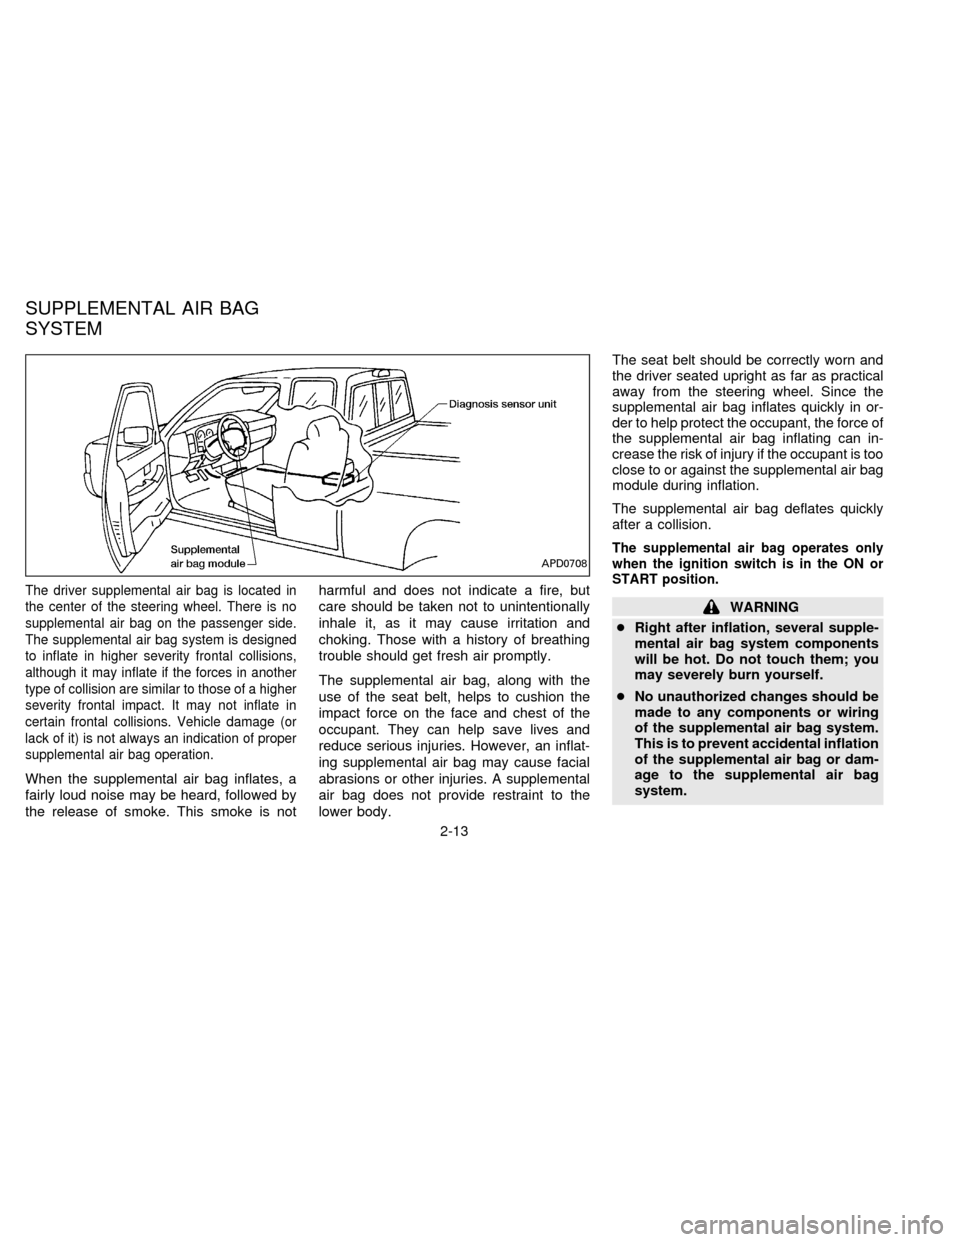
The driver supplemental air bag is located in
the center of the steering wheel. There is no
supplemental air bag on the passenger side.
The supplemental air bag system is designed
to inflate in higher severity frontal collisions,
although it may inflate if the forces in another
type of collision are similar to those of a higher
severity frontal impact. It may not inflate in
certain frontal collisions. Vehicle damage (or
lack of it) is not always an indication of proper
supplemental air bag operation.
When the supplemental air bag inflates, a
fairly loud noise may be heard, followed by
the release of smoke. This smoke is notharmful and does not indicate a fire, but
care should be taken not to unintentionally
inhale it, as it may cause irritation and
choking. Those with a history of breathing
trouble should get fresh air promptly.
The supplemental air bag, along with the
use of the seat belt, helps to cushion the
impact force on the face and chest of the
occupant. They can help save lives and
reduce serious injuries. However, an inflat-
ing supplemental air bag may cause facial
abrasions or other injuries. A supplemental
air bag does not provide restraint to the
lower body.The seat belt should be correctly worn and
the driver seated upright as far as practical
away from the steering wheel. Since the
supplemental air bag inflates quickly in or-
der to help protect the occupant, the force of
the supplemental air bag inflating can in-
crease the risk of injury if the occupant is too
close to or against the supplemental air bag
module during inflation.
The supplemental air bag deflates quickly
after a collision.
The supplemental air bag operates only
when the ignition switch is in the ON or
START position.
WARNING
cRight after inflation, several supple-
mental air bag system components
will be hot. Do not touch them; you
may severely burn yourself.
cNo unauthorized changes should be
made to any components or wiring
of the supplemental air bag system.
This is to prevent accidental inflation
of the supplemental air bag or dam-
age to the supplemental air bag
system.
APD0708
SUPPLEMENTAL AIR BAG
SYSTEM
2-13
ZX
Page 39 of 198
cTampering with the supplemental air
bag system may result in serious
personal injury. Tampering includes
changes to the steering wheel by
placing material over the steering
wheel pad or by installing additional
trim material around the supplemen-
tal air bag system.
cDo not attach any objects to the
steering wheel pad. Also, do not
place any objects between any occu-
pant and the steering wheel. Such
objects may become dangerous pro-
jectiles and cause injury if the
supplemental air bag inflates.
cWork around and on the supplemen-
tal air bag system should be done by
an authorized NISSAN dealer. Instal-
lation of electrical equipment should
also be done by an authorized NIS-
SAN dealer. The yellow SRS wiring
should not be modified or discon-
nected. Unauthorized electrical test
equipment and probing devices
should not be used on the supple-
mental air bag system.cSRS wiring harnesses are covered
with yellow insulation either just be-
fore the harness connectors or over
the complete harness for easy iden-
tification.
2-14
ZX
Page 84 of 198

Shifting with manual transmission
To change gears, fully depress the clutch
pedal, then move the gearshift lever. After
shifting, release the clutch slowly.
You cannot shift directly from 5th gear into
Reverse (R). First shift into the Neutral (N)
position, then into Reverse (R).
If it is difficult to move the shift lever into
Reverse or 1st, shift into Neutral, then re-
lease the clutch pedal. Depress the pedal
and shift into Reverse or 1st again.
Driving precautions
cDo not rest your foot on the clutch pedal
while driving. This may cause clutch
damage.
cStop your vehicle completely before shift-
ing into Reverse.
Suggested shift-up speeds
The folllowing table provides suggested speed
ranges for shifting into a higher gear. These
suggestions relate to fuel economy and vehicle
performance. Actual shift ranges should be
adjusted for specific road conditions, weather
conditions and individual driving habits.
c2-wheel drive models and 4-wheel drive
models (2H and 4H position):
Shift from MPH (km/h)
1st to 2nd 15 (25)
2nd to 3rd 25 (40)
3rd to 4th 40 (65)
4th to 5th 45 (75)
c4-wheel drive model (4L position):
Shift from MPH (km/h)
1st to 2nd 8 (13)
2nd to 3rd 12 (20)
3rd to 4th 20 (32)
4th to 5th 22 (36)
Suggested maximum speed in each
gear
Downshift to a lower gear if the engine is not
running smoothly, or if you need to accelerate.
Do not exceed the maximum suggested
speed (shown below) in any gear. For level
road driving, use the highest gear sug-
gested for that speed. Always observe
posted speed limits, and drive according to
the road conditions, which will ensure safe
operation. Do not overrev the engine when
shifting to a lower gear as it may cause
engine damage or loss of vehicle control.
Allowable maximum speed in each gear:
2-wheel drive models MPH (km/h)
1st 30 (50)
2nd 55 (90)
3rd 80 (130)
4th & 5th þ (þ)
4-wheel drive models MPH (km/h)
2H/4H position
1st 25 (40)
2nd 43 (70)
3rd 68 (110)
4th & 5th þ (þ)
4L position
1st 12 (20)
SD1017M
DRIVING WITH MANUAL
TRANSMISSION
4-9
ZX
Page 99 of 198
Tire inflation pressure
Periodically check the pressure in all tires,
including the spare, with a gauge. Adjust to
the specified pressure if necessary. Tire
pressures are shown on the tire placard
affixed to the glove box.
Tire chain
Tire chains must be installed only on the
rear wheels and not on the front wheels.
Do not drive with tire chains on paved roads
which are clear of snow. Driving with chains
in such conditions can cause damage to the
various mechanisms of the vehicle due to
some overstress. When driving on clear
paved roads, be sure to change to 2WD.
CAUTION
Do not park the vehicle over flammable
materials such as dry grass, waste pa-
per or rags, as they may burn easily.
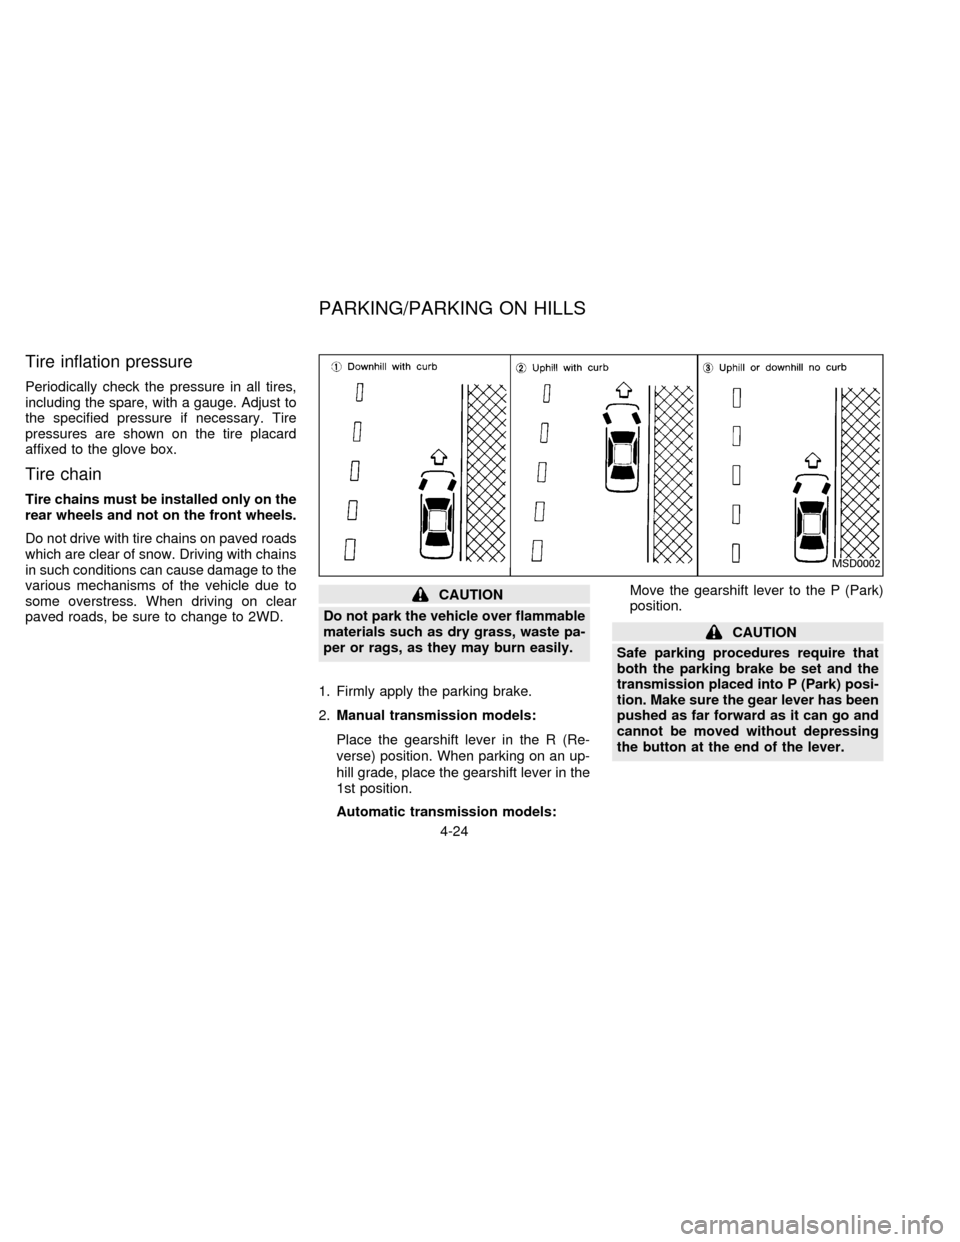
1. Firmly apply the parking brake.
2.Manual transmission models:
Place the gearshift lever in the R (Re-
verse) position. When parking on an up-
hill grade, place the gearshift lever in the
1st position.
Automatic transmission models:Move the gearshift lever to the P (Park)
position.
CAUTION
Safe parking procedures require that
both the parking brake be set and the
transmission placed into P (Park) posi-
tion. Make sure the gear lever has been
pushed as far forward as it can go and
cannot be moved without depressing
the button at the end of the lever.
MSD0002
PARKING/PARKING ON HILLS
4-24
ZX
Page 107 of 198
If you have a flat tire, follow the instructions
below:
Stopping the vehicle
1. Safely move the vehicle off the road
away from traffic.
2. Turn on the hazard warning flashers.
3. Park on a level surface and apply the
parking brake. Shift the manual transmis-
sion into Reverse (R) (automatic trans-
mission in P).
WARNING
The transfer control lever must
be in the 2H, 4H or 4L position.
Never place it in the N position. Other-
wise, the vehicle could roll unexpect-
edly even if the manual transmission is
in gear.
4. Turn off the engine.
WARNING
cMake sure that the parking brake is
securely applied and the manual
transmission is shifted into Reverse
(R) (automatic transmission in P).
cNever change tires when the vehicle
is on a slope, ice or a slippery area.
This is dangerous.
cNever change tires if oncoming traf-
fic is close to your vehicle. Wait for
professional road assistance.
cRaise the hood to warn other traffic
and to signal professional road as-
sistance personnel that you require
assistance.
cHave all passengers get out of the
vehicle and stand in a safe place
away from traffic and clear of the
vehicle.
Blocking wheels
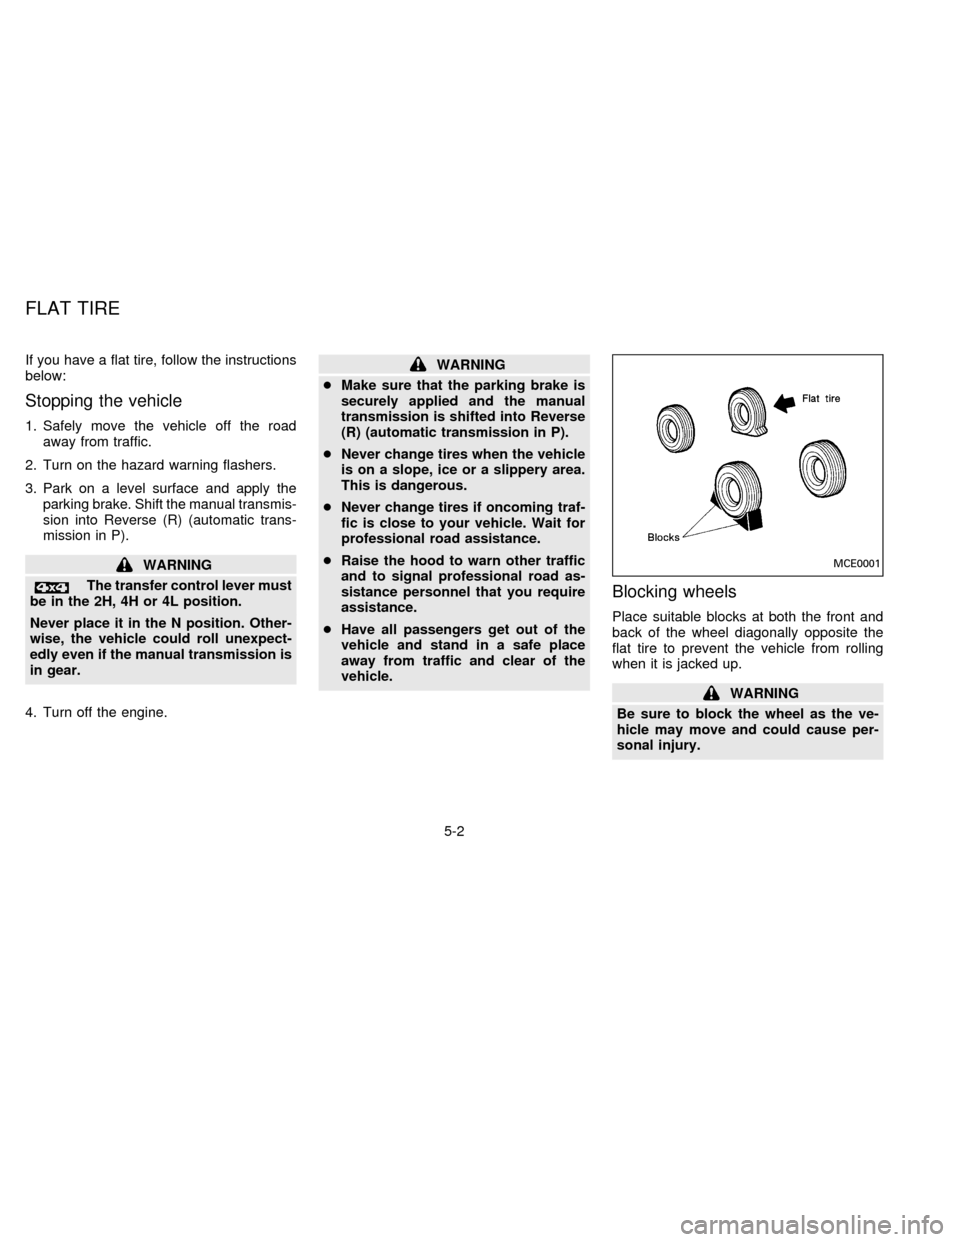
Place suitable blocks at both the front and
back of the wheel diagonally opposite the
flat tire to prevent the vehicle from rolling
when it is jacked up.
WARNING
Be sure to block the wheel as the ve-
hicle may move and could cause per-
sonal injury.
MCE0001
FLAT TIRE
5-2
ZX
Page 111 of 198
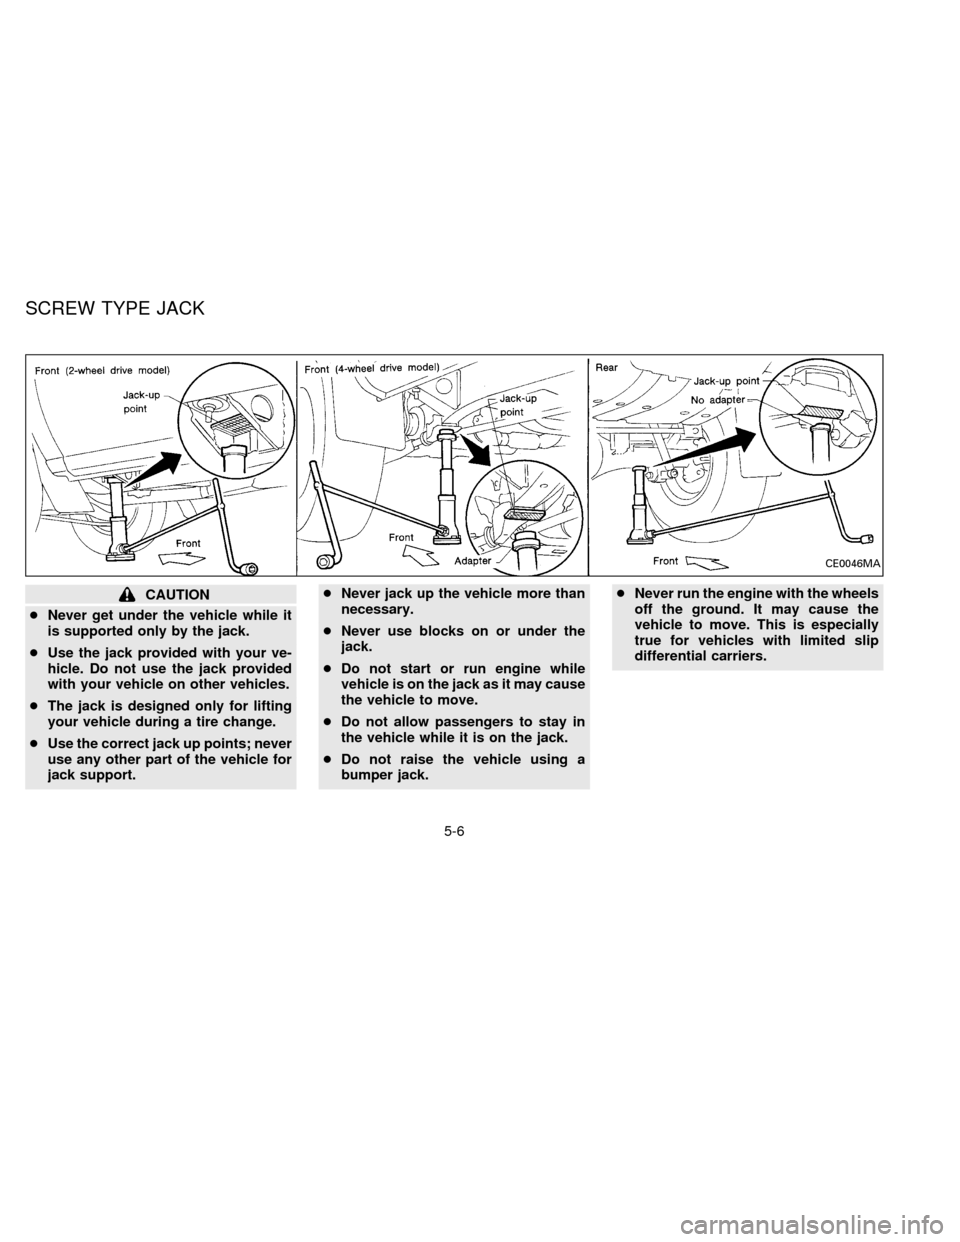
CAUTION
cNever get under the vehicle while it
is supported only by the jack.
cUse the jack provided with your ve-
hicle. Do not use the jack provided
with your vehicle on other vehicles.
cThe jack is designed only for lifting
your vehicle during a tire change.
cUse the correct jack up points; never
use any other part of the vehicle for
jack support.cNever jack up the vehicle more than
necessary.
cNever use blocks on or under the
jack.
cDo not start or run engine while
vehicle is on the jack as it may cause
the vehicle to move.
cDo not allow passengers to stay in
the vehicle while it is on the jack.
cDo not raise the vehicle using a
bumper jack.cNever run the engine with the wheels
off the ground. It may cause the
vehicle to move. This is especially
true for vehicles with limited slip
differential carriers.
CE0046MA
SCREW TYPE JACK
5-6
ZX
Page 148 of 198
snow traction than All Season tires and may
be more appropriate in some areas.
Summer tires
NISSAN specifies summer tires on some
models to provide superior performance on
dry roads. Summer tire performance in
snow and ice will be substantially reduced.
Summer tires do not have the tire traction
rating ``M&S'' on the tire sidewall.
If you plan to operate your vehicle in snowy
or icy conditions, NISSAN recommends the
use of ``SNOW'' or ``ALL SEASON'' tires on
all four wheels.
Snow tires
If snow tires are needed, it is necessary to
select tires equivalent in size and load rating
to the original equipment tires. If you do not,
it can adversely affect the safety and han-
dling of your vehicle.
Generally, snow tires will have lower speed
ratings than factory equipped tires and may
not match the potential maximum vehicle
speed. Never exceed the maximum speed
rating of the tire.
For additional traction on icy roads, studded
tires may be used. However, some prov-inces and states prohibit their use. Check
local, state and provincial laws before in-
stalling studded tires. Skid and traction ca-
pabilities of studded snow tires on wet or dry
surfaces may be poorer than that of non-
studded snow tires.
4-wheel drive model
If you install snow tires, they must be the
same size, brand, construction and tread
pattern on all four wheels.
CAUTION
ONLY use spare tires specified for each
4-wheel drive model.
Tire chains
Use of tire chains may be prohibited accord-
ing to location. Check the local laws before
installing tire chains. When installing tire
chains, make sure they are the proper size
for the tires on your vehicle and are installed
according to the chain manufacturer's sug-
gestions.Use only SAE class ``S'' chains.
Other types may damage your vehicle. Use
chain tensioners when recommended by
the tire chain manufacturer to ensure a tight
fit. Loose end links of the tire chain must besecured or removed to prevent the possibil-
ity of whipping action damage to the fenders
or undercarriage. If possible, avoid fully
loading your vehicle when using tire chains.
In addition, drive at a reduced speed. Oth-
erwise, your vehicle may be damaged
and/or vehicle handling and performance
may be adversely affected.
Never install tire chains on a TEMPORARY
USE ONLY spare tire.
Tire chains must be installed only on the
rear wheels and not on the front wheels.
Do not use tire chains on dry roads. Driving
with chains in such conditions can cause
damage to the various mechanisms of the
vehicle due to some overstress. When driv-
ing on clear paved roads, be sure to change
to 2WD.
7-25
ZX
Page 150 of 198
cImproper service for a TEMPORARY
USE ONLY spare tire may result in
serious personal injury. If it is nec-
essary to repair the TEMPORARY
USE ONLY spare tire, contact your
NISSAN dealer.
Changing tires and wheels
When replacing a tire, use the same size,
speed rating and load carrying capacity as
originally equipped. Recommended types
and sizes are shown in ``Wheel/tire size'' in
the ``Technical and consumer information''
section. The use of tires other than those
recommended or the mixed use of tires of
different brands, construction (bias, bias-
belted or radial), or tread patterns can ad-
versely affect the ride, braking, handling,
ground clearance, body-to-tire clearance,
snow chain clearance, speedometer cali-
bration, headlight aim and bumper height.
Some of these effects may lead to acci-
dents and could result in serious per-
sonal injury.
If the wheels are changed for any reason,
always replace with wheels which have the
same offset dimension. Wheels of a differ-ent offset could cause early tire wear, poor
vehicle handling characteristics and/or in-
terference with the brake discs/drums. Such
interference can lead to decreased braking
efficiency and/or early brake pad/shoe
wear.
CAUTION
Do not install a deformed wheel or tire
even if it has been repaired. Such
wheels or tires could have structural
damage and could fail without warning.
4-WHEEL DRIVE MODELS
CAUTION
Always use tires of the same size,
brand, construction (bias, bias-belted
or radial), and tread pattern on all four
wheels. Failure to do so may result in a
circumference difference between tires
on the front and rear axles which will
cause excessive tire wear and may
damage the transmission, transfer
case and differential gears.
If excessive tire wear is found, it is recom-mended that all four tires be replaced with
tires of the same size, brand, construction
and tread pattern. The tire pressure and
wheel alignment should also be checked
and corrected as necessary. Contact your
NISSAN dealer.
CAUTION
ONLY use spare tires specified for each
4-wheel drive model.
Wheel balance
Unbalanced wheels may affect vehicle han-
dling and tire life. Even with regular use,
wheels can get out of balance. Therefore,
they should be balanced as required.
Wheel balance service should be performed
with the wheels off the vehicle. Spin balanc-
ing the front wheels on the vehicle could
lead to transmission damage.
Care of wheels
cWash the wheels when washing the ve-
hicle to maintain their appearance.
cClean the inner side of the wheels when
the wheel is changed or the underside of
the vehicle is washed.
7-27
ZX
Page 156 of 198

make sure no nuts are missing, and check
for any loose nuts. Tighten if necessary.
Tire rotation*Tires should be rotated every
7,500 miles (12,000 km) for 2WD vehicles
and 3,750 miles (6,000 km) for 4WD ve-
hicles.
Wheel alignment and balanceIf the ve-
hicle should pull to either side while driving
on a straight and level road, or if you detect
uneven or abnormal tire wear, there may be
a need for wheel alignment.
If the steering wheel or seat vibrates at
normal highway speeds, wheel balancing
may be needed.
Windshield wiper blades*Check for
cracks or wear if they do not wipe properly.
Doors and engine hoodCheck that all
doors and the engine hood operate prop-
erly. Also ensure that all latches lock se-
curely. Lubricate hinges, latches, rollers and
links if necessary. Make sure that the sec-
ondary latch keeps the hood from opening
when the primary latch is released.
When driving in areas using road salt or
other corrosive materials, check lubrication
frequently.Lights*Make sure that the headlights, stop
lights, tail lights, turn signal lights, and other
lights are all operating properly and installed
securely. Also check headlight aim.
INSIDE THE VEHICLE
The maintenance items listed here should
be checked on a regular basis, such as
when performing periodic maintenance,
cleaning the vehicle, etc.
Additional information on the following
items with ``*'' is found in the ``Do-it-
yourself operations'' section.
Warning lights and chimesMake sure all
warning lights and chimes are operating
properly.
Windshield wiper and washer*Check that
the wipers and washer operate properly and
that the wipers do not streak.
Windshield defrosterCheck that the air
comes out of the defroster outlets properly
and in sufficient quantity when operating the
heater or air conditioner.
Steering wheelCheck for changes in the
steering conditions, such as excessive free-
play, hard steering or strange noises.SeatsCheck seat position controls such as
seat adjusters, seatback recliner, etc. to
ensure they operate smoothly and all
latches lock securely in every position.
Check that the head restraints move up and
down smoothly and the locks (if so
equipped) hold securely in all latched posi-
tions.
Seat beltsCheck that all parts of the seat
belt system (e.g., buckles, anchors, adjust-
ers and retractors) operate properly and
smoothly, and are installed securely. Check
the belt webbing for cuts, fraying, wear or
damage.
Accelerator pedalCheck the pedal for
smooth operation and make sure the pedal
does not catch or require uneven effort.
Keep the floor mats away from the pedal.
Clutch pedal*Make sure the pedal oper-
ates smoothly and check that it has the
proper free travel.
BrakesCheck that the brakes do not pull
the vehicle to one side when applied.
Brake pedal and booster*Check the pedal
for smooth operation and make sure it has
the proper distance under it when de-
pressed fully. Check the brake booster func-
8-3
ZX
Page 160 of 198
![NISSAN FRONTIER 1996 D22 / 1.G Owners Manual SCHEDULE 1
Abbreviations: R = Replace I = Inspect. Correct or replace if necessary. [ ]: At the mileage intervals only
MAINTENANCE OPERATIONMAINTENANCE INTERVAL
Perform at number of miles, kilometers
NISSAN FRONTIER 1996 D22 / 1.G Owners Manual SCHEDULE 1
Abbreviations: R = Replace I = Inspect. Correct or replace if necessary. [ ]: At the mileage intervals only
MAINTENANCE OPERATIONMAINTENANCE INTERVAL
Perform at number of miles, kilometers](/img/5/595/w960_595-159.png)
SCHEDULE 1
Abbreviations: R = Replace I = Inspect. Correct or replace if necessary. [ ]: At the mileage intervals only
MAINTENANCE OPERATIONMAINTENANCE INTERVAL
Perform at number of miles, kilometers
or months, whichever comes first.Miles ý 1,000 3.75 7.5 11.25 15 18.75 22.5 26.25 30 33.75 37.5 41.25 45 48.75 52.5 56.25 60
(km ý 1,000) (6) (12) (18) (24) (30) (36) (42) (48) (54) (60) (66) (72) (78) (84) (90) (96)
Months 3 6 9 12 15 18 21 24 27 30 33 36 39 42 45 48
Chassis and body maintenance
Brake lines & cablesIIII
Brake pads, discs, drums & liningsIIIIIIII
Manual & automatic transmission, transfer
& differential gear oil (exc. LSD)See NOTE (1)IIII
Limited-slip differential (LSD) gear oil See NOTE (1)IRIR
Steering gear (box) & linkage, axle & suspension partsIIIIIIII
Drive shaft boots & propeller shaft (
) IIIIIIII
Steering linkage ball joints & front suspension ball jointsIIIIIIII
Front wheel bearing grease (4x2)II
Front wheel bearing grease & free-running
hub grease (
)See NOTE (2)IRIR
Exhaust systemIIIIIIII
Supplemental air bag system See NOTE (3)
NOTE: (1) If towing a trailer, using a camper or a car-top carrier, or driving on rough or muddy roads, change (not just inspect) oil at every 30,000
miles (48,000 km) or 24 months except for LSD Change LSD gear oil every 15,000 miles (24,000 km) or 12 months.
(2) If operating frequently in water, replace grease every 3,750 miles (6,000 km) or 3 months.
(3) Inspect the supplemental air bag system 10 years after the date of manufacture noted on the F.M.V.S.S. certification label.
8-7
ZX