warning lights NISSAN FRONTIER 1997 D22 / 1.G Owners Manual
[x] Cancel search | Manufacturer: NISSAN, Model Year: 1997, Model line: FRONTIER, Model: NISSAN FRONTIER 1997 D22 / 1.GPages: 204, PDF Size: 1.45 MB
Page 8 of 204

1Instruments and controls
Meters and gauges ................................................1-2
Speedometer and odometer ..................................1-3
Tachometer (if so equipped) ..................................1-3
Engine coolant temperature gauge........................1-4
Fuel gauge .............................................................1-4
Instrument cluster clock (if so equipped) ...............1-5
Warning/indicator lights and chimes ......................1-6
Headlight and turn signal switch ..........................1-10
Daytime running light system (Canada only) .......1-10
Windshield wiper and washer switch ...................1-11
Instrument brightness control ...............................1-12Hazard warning flasher switch .............................1-12
Cigarette lighter (accessory) and ash tray ...........1-13
Cup holder (if so equipped) .................................1-13
Interior light and cargo light .................................1-14
Spotlights (if so equipped) ...................................1-14
Manual windows ...................................................1-15
Power windows (if so equipped) ..........................1-15
Automatic power window switch ..........................1-16
Rear sliding window (if so equipped) ...................1-16
Opera window (if so equipped) ............................1-17
Sunroof (if so equipped).......................................1-17
ZX
Page 13 of 204
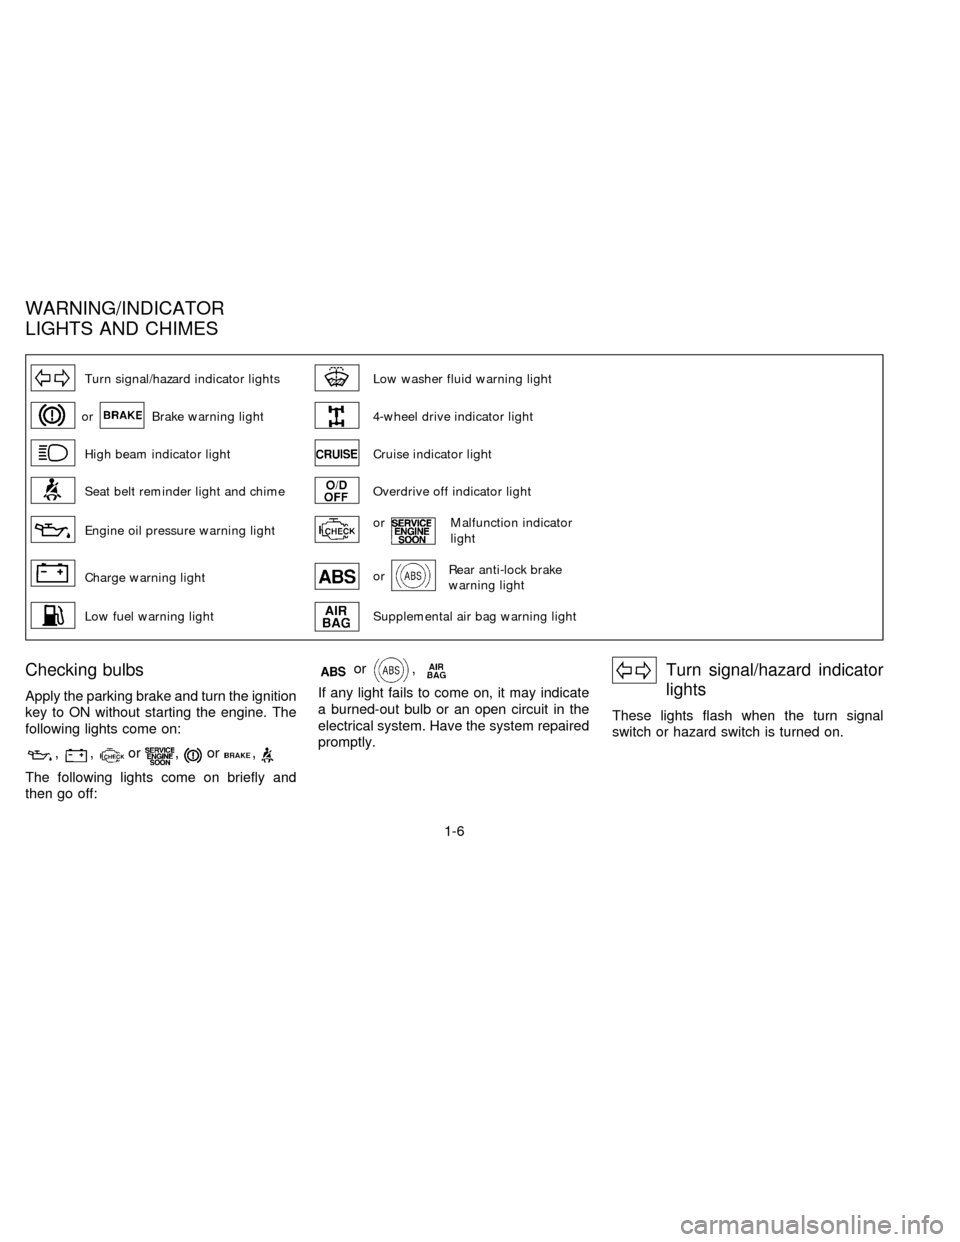
Turn signal/hazard indicator lightsLow washer fluid warning light
orBrake warning light4-wheel drive indicator light
High beam indicator lightCruise indicator light
Seat belt reminder light and chimeOverdrive off indicator light
Engine oil pressure warning lightorMalfunction indicator
light
Charge warning lightorRear anti-lock brake
warning light
Low fuel warning lightSupplemental air bag warning light
Checking bulbs
Apply the parking brake and turn the ignition
key to ON without starting the engine. The
following lights come on:
,,or,or,
The following lights come on briefly and
then go off:
or,
If any light fails to come on, it may indicate
a burned-out bulb or an open circuit in the
electrical system. Have the system repaired
promptly.
Turn signal/hazard indicator
lights
These lights flash when the turn signal
switch or hazard switch is turned on.
WARNING/INDICATOR
LIGHTS AND CHIMES
1-6
ZX
Page 18 of 204
ning lights will remain on until the ignition
switch is turned off.
WARNING
When the daytime running light system
is active, tail lights on your vehicle will
not be on. It is necessary at dusk to
turn on your headlights. Failure to do
so could cause an accident injuring
yourself and others.
Passing signal
Pulling the lever toward you turns on the
headlight high beam.
Turn signal
Move the lever up or down to signal the
turning direction. When the turn is com-
pleted, the turn signal cancels automati-
cally.
Lane change signal
To indicate a lane change, move the lever
up or down to the point where the indicator
light begins to flash, but the lever does not
latch.
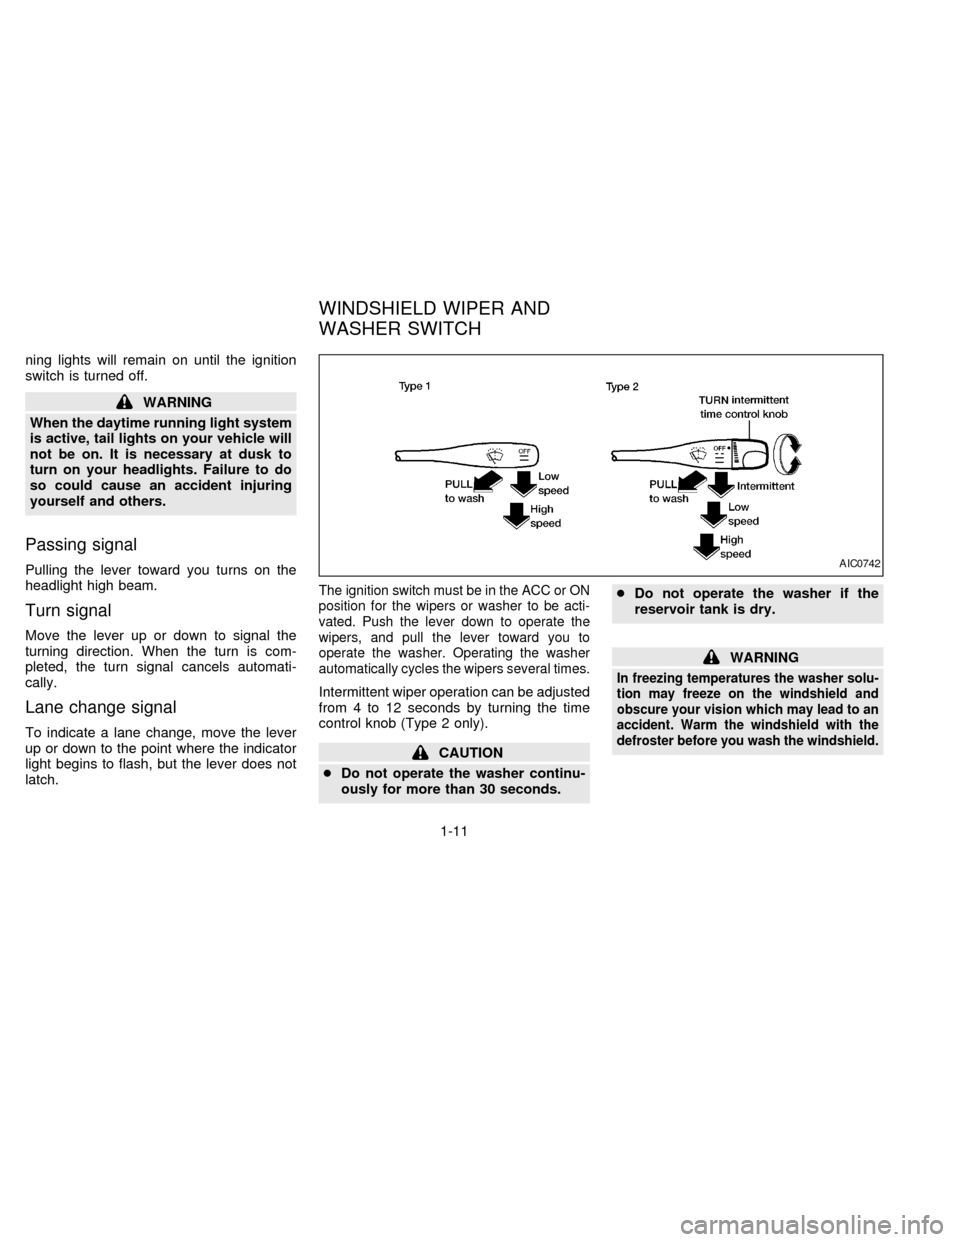
The ignition switch must be in the ACC or ON
position for the wipers or washer to be acti-
vated. Push the lever down to operate the
wipers, and pull the lever toward you to
operate the washer. Operating the washer
automatically cycles the wipers several times.
Intermittent wiper operation can be adjusted
from 4 to 12 seconds by turning the time
control knob (Type 2 only).
CAUTION
cDo not operate the washer continu-
ously for more than 30 seconds.cDo not operate the washer if the
reservoir tank is dry.
WARNING
In freezing temperatures the washer solu-
tion may freeze on the windshield and
obscure your vision which may lead to an
accident. Warm the windshield with the
defroster before you wash the windshield.
AIC0742
WINDSHIELD WIPER AND
WASHER SWITCH
1-11
ZX
Page 19 of 204
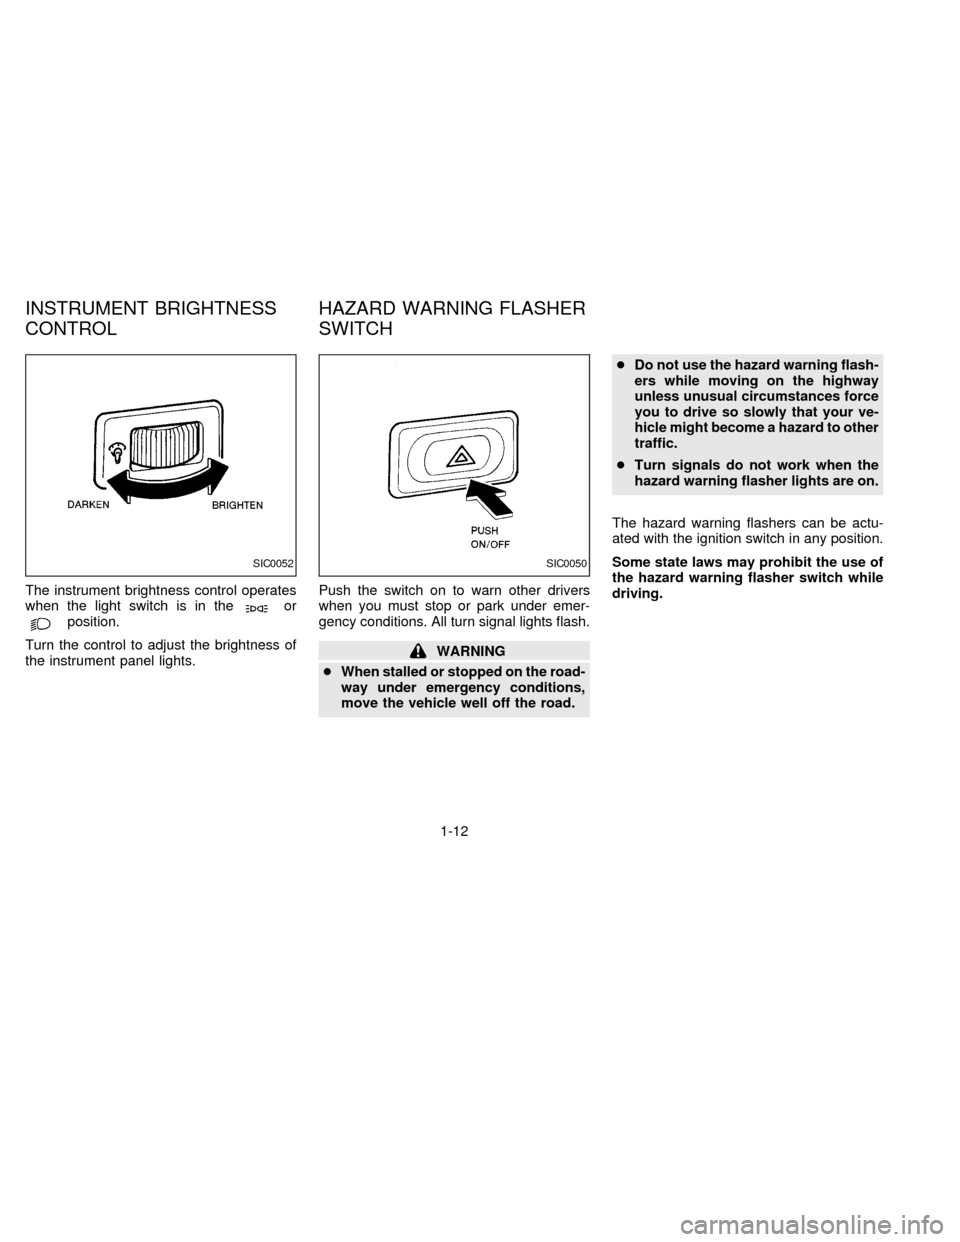
The instrument brightness control operates
when the light switch is in theorposition.
Turn the control to adjust the brightness of
the instrument panel lights.Push the switch on to warn other drivers
when you must stop or park under emer-
gency conditions. All turn signal lights flash.
WARNING
cWhen stalled or stopped on the road-
way under emergency conditions,
move the vehicle well off the road.cDo not use the hazard warning flash-
ers while moving on the highway
unless unusual circumstances force
you to drive so slowly that your ve-
hicle might become a hazard to other
traffic.
cTurn signals do not work when the
hazard warning flasher lights are on.
The hazard warning flashers can be actu-
ated with the ignition switch in any position.
Some state laws may prohibit the use of
the hazard warning flasher switch while
driving.
SIC0052SIC0050
INSTRUMENT BRIGHTNESS
CONTROLHAZARD WARNING FLASHER
SWITCH
1-12
ZX
Page 58 of 204
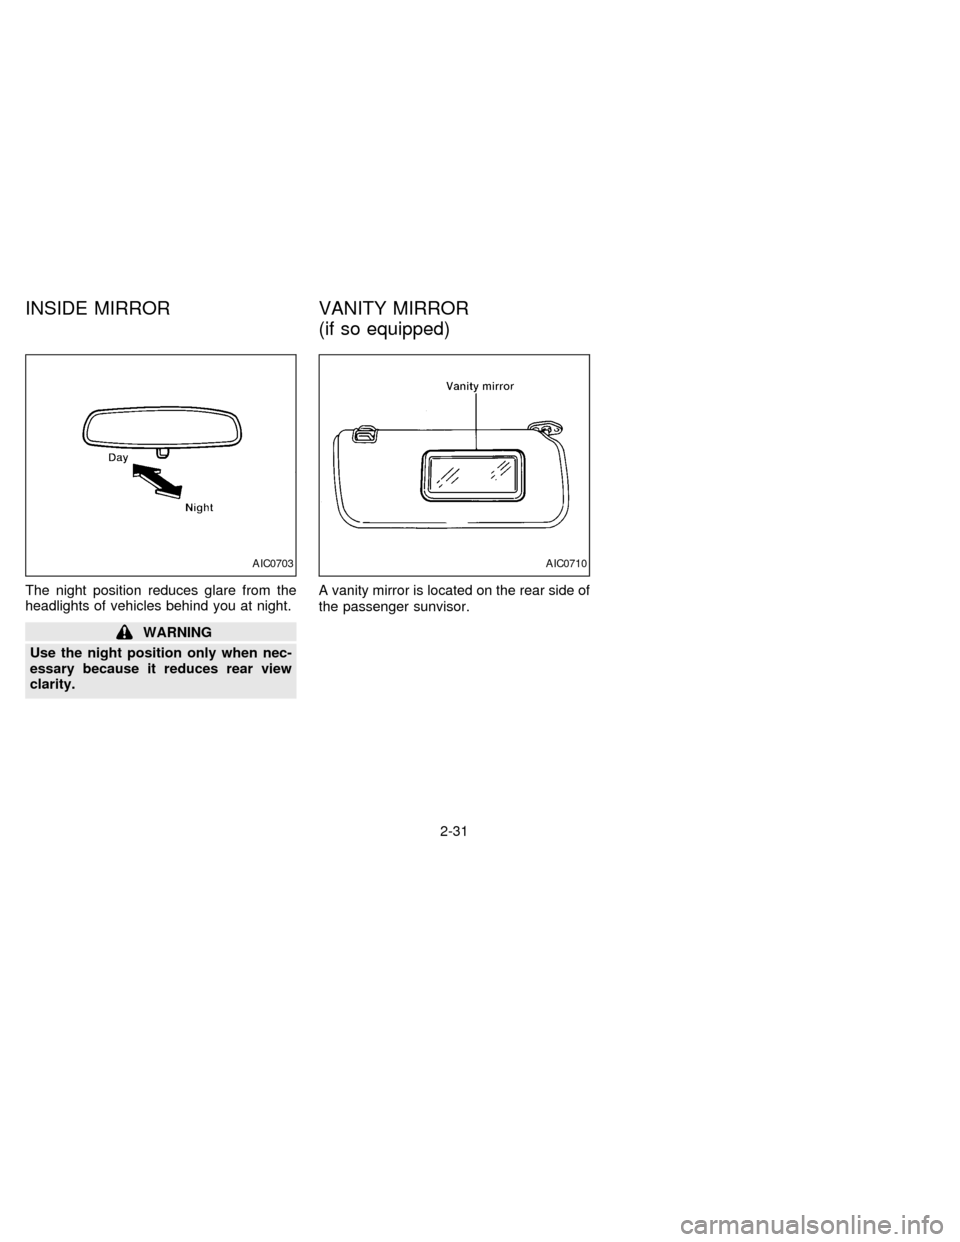
The night position reduces glare from the
headlights of vehicles behind you at night.
WARNING
Use the night position only when nec-
essary because it reduces rear view
clarity.A vanity mirror is located on the rear side of
the passenger sunvisor.
AIC0703AIC0710
INSIDE MIRROR VANITY MIRROR
(if so equipped)
2-31
ZX
Page 87 of 204
cMake sure the area around the vehicle is
clear.
cCheck fluid levels such as engine oil,
coolant, brake and clutch fluid, and win-
dow washer fluid as frequently as pos-
sible, at least whenever you refuel.
cCheck that all windows and lights are
clean.
cVisually inspect tires for their appearance
and condition. Also check tires for proper
inflation.
cLock all doors.
cPosition seat and adjust head restraints.
cAdjust inside and outside mirrors.
cFasten seat belts and ask all passengers
to do likewise.
cCheck the operation of warning lights
when key is turned to the ON (3) position.The automatic transmission in your vehicle
is electronically controlled by a microcom-
puter to produce maximum power and
smooth operation.
The recommended operating procedures
for this transmission are shown on the fol-
lowing pages. Follow these procedures for
maximum vehicle performance and driving
enjoyment.
If your vehicle is equipped with 4-wheel
drive, see ``
Transfer case shifting pro-
cedures for 4-wheel drive vehicles'' later in
this section.
Starting the vehicle
cAfter starting the engine, fully depress
the foot brake pedal and push the shift
lever button before shifting the selector
lever to the R, D, 2 or 1 position. Be sure
the vehicle is fully stopped before at-
tempting to shift the selector lever.
cKeep the foot brake pedal depressed and
push the shift lever button to shift into a
driving gear.
c
Release the parking brake and foot brake,
then gradually start the vehicle in motion.
This automatic transmission is designedso the foot brake pedal MUST be depressed
before shifting from P to any drive position
while the ignition switch is ON.
The shift lever cannot be moved out of P
and into any of the other gear positions if
the ignition key is turned to LOCK or if
the key is removed.
When the battery charge is low, the shift
lever can be moved if the ignition switch
is in the ACC position.
WARNING
cDo not depress the accelerator pedal
while shifting from P or N to R, D, 2
or 1. Always depress the brake pedal
until shifting is completed. Failure to
do so could cause you to lose con-
trol and have an accident.
cCold engine idle speed is high, so
use caution when shifting into a for-
ward or reverse gear before the en-
gine has warmed up.
cNever shift to P or R while the ve-
hicle is moving. This could cause an
accident.
BEFORE STARTING THE
ENGINEDRIVING WITH AUTOMATIC
TRANSMISSION (if so
equipped)
4-6
ZX
Page 117 of 204
To start your engine with a booster battery,
the instructions and precautions below must
be followed.
WARNING
cIf done incorrectly, jump starting can
lead to a battery explosion, resulting
in severe injury or death. It could
also damage your vehicle.
cExplosive hydrogen gas is always
present in the vicinity of the battery.
Keep all sparks and flames away
from the battery.
cDo not allow battery fluid to come
into contact with eyes, skin, cloth or
painted surfaces. Battery fluid is a
corrosive sulphuric acid solution
which can cause severe burns. If the
fluid should come into contact with
anything, immediately flush the con-
tacted area with water.
cKeep battery out of the reach of
children.
cThe booster battery must be rated at
12 volts. Use of an improperly rated
battery can damage your vehicle.c
Whenever working on or near a bat-
tery, always wear suitable eye protec-
tors (e.g., goggles or industrial safety
spectacles) and remove rings, metal
bands, or any other jewelry. Do not
lean over the battery when jump
starting.
cDo not attempt to jump start a frozen
battery. It could explode and cause
serious injury.
cYour vehicle has an automatic en-
gine cooling fan. It could come on at
any time. Keep hands and other ob-
jects away from it.
Always follow the instructions below
exactly. Failure to do so could result
in damage to the charging system and
cause personal injury.
1. If the booster battery is in another ve-
hicle, position the two vehicles to bring
their batteries into close proximity to
each other.
Do not allow the two vehicles to touch.
2. Apply the parking brake. Move the shift
lever to Neutral (N) (on automatic trans-
mission models, move the lever to P).Switch off all unnecessary electrical sys-
tems (lights, heater, air conditioner, etc.).
3. Remove vent caps on the battery (if so
equipped). Cover the battery with an old
cloth to reduce explosion hazard.
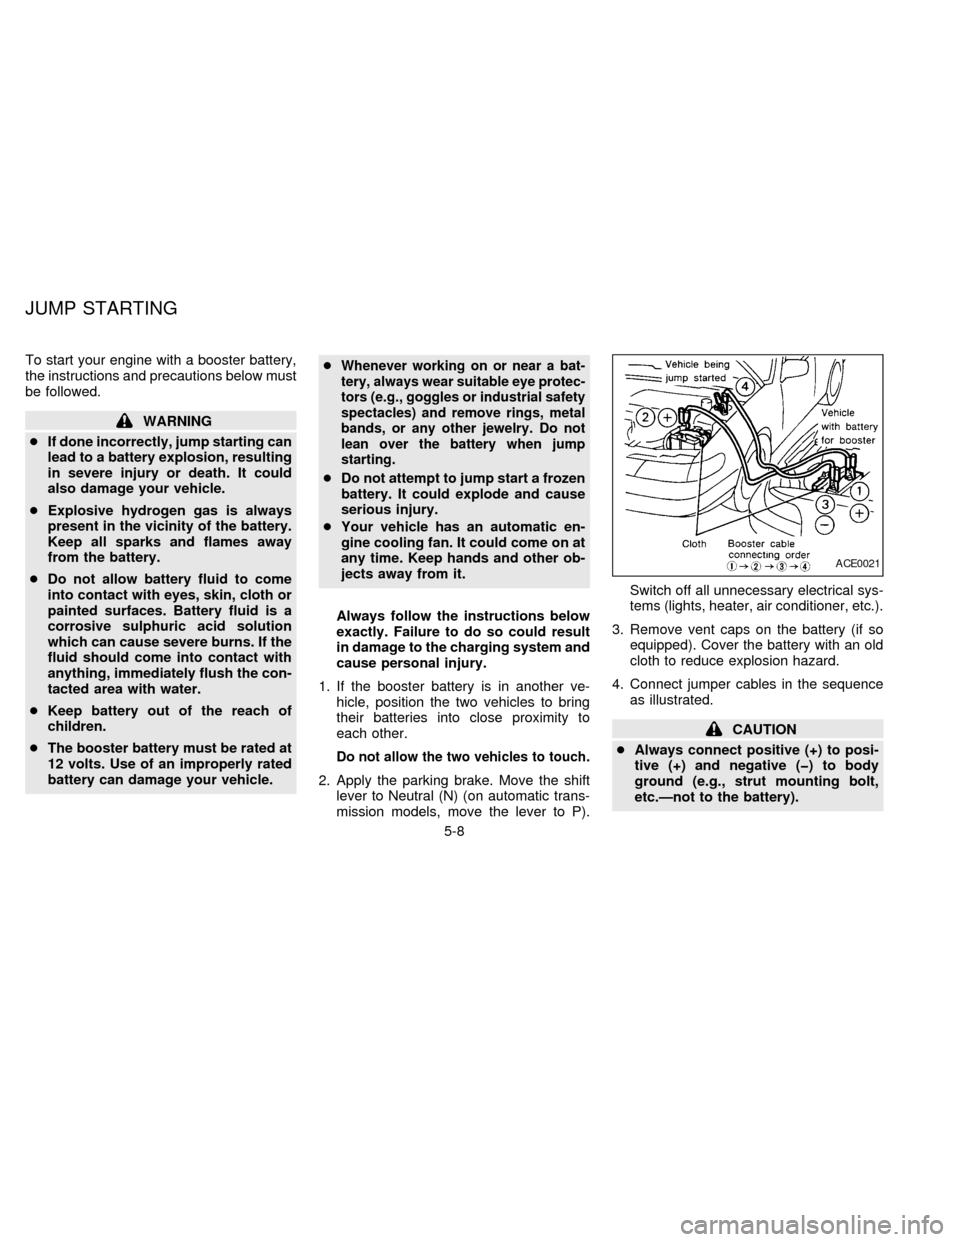
4. Connect jumper cables in the sequence
as illustrated.
CAUTION
cAlways connect positive (+) to posi-
tive (+) and negative (þ) to body
ground (e.g., strut mounting bolt,
etc.Ðnot to the battery).
ACE0021
JUMP STARTING
5-8
ZX
Page 162 of 204

make sure no nuts are missing, and check
for any loose nuts. Tighten if necessary.
Tire rotation*Tires should be rotated every
7,500 miles (12,000 km) for 2WD vehicles
and 3,750 miles (6,000 km) for 4WD ve-
hicles.
Wheel alignment and balanceIf the ve-
hicle should pull to either side while driving
on a straight and level road, or if you detect
uneven or abnormal tire wear, there may be
a need for wheel alignment.
If the steering wheel or seat vibrates at
normal highway speeds, wheel balancing
may be needed.
Windshield wiper blades*Check for
cracks or wear if they do not wipe properly.
Doors and engine hoodCheck that all
doors and the engine hood operate prop-
erly. Also ensure that all latches lock se-
curely. Lubricate hinges, latches, rollers and
links if necessary. Make sure that the sec-
ondary latch keeps the hood from opening
when the primary latch is released.
When driving in areas using road salt or
other corrosive materials, check lubrication
frequently.Lights*Make sure that the headlights, stop
lights, tail lights, turn signal lights, and other
lights are all operating properly and installed
securely. Also check headlight aim.
INSIDE THE VEHICLE
The maintenance items listed here should
be checked on a regular basis, such as
when performing periodic maintenance,
cleaning the vehicle, etc.
Additional information on the following
items with ``*'' is found in the ``Do-it-
yourself operations'' section.
Warning lights and chimesMake sure all
warning lights and chimes are operating
properly.
Windshield wiper and washer*Check that
the wipers and washer operate properly and
that the wipers do not streak.
Windshield defrosterCheck that the air
comes out of the defroster outlets properly
and in sufficient quantity when operating the
heater or air conditioner.
Steering wheelCheck for changes in the
steering conditions, such as excessive free-
play, hard steering or strange noises.SeatsCheck seat position controls such as
seat adjusters, seatback recliner, etc. to
ensure they operate smoothly and all
latches lock securely in every position.
Check that the head restraints move up and
down smoothly and the locks (if so
equipped) hold securely in all latched posi-
tions.
Seat beltsCheck that all parts of the seat
belt system (e.g., buckles, anchors, adjust-
ers and retractors) operate properly and
smoothly, and are installed securely. Check
the belt webbing for cuts, fraying, wear or
damage.
Accelerator pedalCheck the pedal for
smooth operation and make sure the pedal
does not catch or require uneven effort.
Keep the floor mats away from the pedal.
Clutch pedal*Make sure the pedal oper-
ates smoothly and check that it has the
proper free travel.
BrakesCheck that the brakes do not pull
the vehicle to one side when applied.
Brake pedal and booster*Check the pedal
for smooth operation and make sure it has
the proper distance under it when de-
pressed fully. Check the brake booster func-
8-3
ZX
Page 192 of 204
Trailer hitch
Check the towing capacity of your bumper
hitch or receiver-type frame mounted hitch.
Choose a proper hitch for your vehicle and
trailer. Make sure the trailer hitch is securely
attached to the vehicle to help avoid per-
sonal injury or property damage due to
sway caused by crosswinds, rough road
surfaces or passing trucks.
CAUTION
cSpecial hitches which include frame
reinforcements are required for tow-
ing above 2,000 lb (907 kg). Suitable
genuine NISSAN hitches for pickup
trucks are available at your NISSAN
dealer.
cDo not use axle-mounted hitches.
cDo not modify the vehicle exhaust
system, brake system, etc. when the
hitch is installed.
cTo reduce the possibility of addi-
tional damage if your vehicle is
struck from the rear, where practical,
remove the hitch when not in use.
Remove receiver when not in use.After the hitch is removed, seal the
bolt holes to prevent exhaust fumes,
water or dust from entering the pas-
senger compartment.
cCheck regularly to make sure that all
trailer hitch mounting bolts are se-
curely fastened.Tire pressures
cWhen towing a trailer, inflate the vehicle
tires to the recommended cold tire pres-
sure indicated on the tire placard (affixed
to the glove box lid).
cTrailer tire condition, size, load rating and
proper inflation pressure should be in
accordance with the trailer and tire
manufacturers' specifications.
Safety chain
Always use a suitable chain between your
vehicle and the trailer. The chain should be
crossed and should be attached to the hitch,
not to the vehicle bumper or axle. Be sure to
leave enough slack in the chain to permit
turning corners.
Trailer lights
Trailer lights should comply with Federal
and/or local regulations. For assistance in
hooking up trailer lights, contact your autho-
rized NISSAN dealer.
Trailer brakes
If your trailer is equipped with a braking
system, make sure it conforms to Federal
and/or local regulations and that it is prop-
erly installed.
WARNING
Never connect a trailer brake system
directly to the vehicle brake system.
Pre-towing tips
cBe certain your vehicle maintains a level
position when a loaded and/or unloaded
trailer is hitched. Do not drive the vehicle
if it has an abnormal nose-up or nose-
down condition; check for improper
tongue load, overload, worn suspension
or other possible causes of either condi-
tion.
cAlways secure items in the trailer to
9-21
ZX
Page 199 of 204

D
Daytime running light system (Canada
only) ........................................................... 1-10
Dimensions and weights............................ 9-11
Door locks .................................................... 2-2
Drive belts .................................................. 7-14
Driving
Auto-lock free-running hubs ................. 4-16
Cold weather driving............................. 4-27
Driving with automatic transmission ....... 4-6
Driving with manual transmission ........... 4-9
Driving your 4-wheel drive safely ......... 4-21
Manual-lock free-running hubs ............. 4-19
Precautions when starting and
driving ..................................................... 4-2
E
Economy - fuel........................................... 4-14
Emission control information label............. 9-14
Emission control system warranty ............. 9-24
Engine
Before starting the engine ...................... 4-6
Capacities and recommended fuel/
lubricants ................................................ 9-2
Changing engine coolant........................ 7-5
Changing engine oil................................ 7-7
Changing engine oil filter........................ 7-9
Checking engine coolant level ............... 7-4
Checking engine oil level ....................... 7-6Engine compartment check locations .... 7-3
Engine coolant temperature gauge ........ 1-4
Engine cooling system ........................... 7-4
Engine oil ................................................ 7-6
Engine oil and oil filter
recommendation ..................................... 9-6
Engine oil pressure warning light ........... 1-8
Engine oil viscosity ................................. 9-7
Engine serial number ........................... 9-13
Engine specifications .............................. 9-9
Starting the engine ............................... 4-10
Exhaust gas (Carbon monoxide) ................. 4-2
F
Flashers (See hazard warning flasher
switch) ........................................................ 1-12
Flat tire ......................................................... 5-2
Floor mat positioning aid ............................. 6-4
Fluid
Automatic transmission fluid (ATF) ........ 7-9
Brake fluid ..................................... 7-11, 9-3
Capacities and recommended fuel/
lubricants ................................................ 9-2
Clutch fluid ............................................ 7-11
Engine coolant ........................................ 7-4
Engine oil ................................................ 7-6
Power steering fluid .............................. 7-11
Window washer fluid ............................ 7-12
F.M.V.S.S. certification label ..................... 9-13
Front seats
Bench.................................................... 2-12Separate ................................................. 2-8
Fuel
Capacities and recommended fuel/
lubricants ................................................ 9-2
Fuel economy ....................................... 4-14
Fuel filler cap .......................................... 2-5
Fuel gauge.............................................. 1-4
Fuel octane rating................................... 9-5
Fuel recommendation ............................. 9-4
Fuses ......................................................... 7-21
G
Gauge
Engine coolant temperature gauge ........ 1-4
Fuel gauge.............................................. 1-4
Odometer ................................................ 1-3
Speedometer .......................................... 1-3
Tachometer............................................. 1-3
Trip odometer ......................................... 1-3
General maintenance .................................. 8-2
Glove box lock ............................................. 2-4
H
Hazard warning flasher switch .................. 1-12
Head restraints .......................................... 2-11
Headlight and turn signal switch ............... 1-10
Headlights .................................................. 7-21
Heater
Heater and air conditioner controls ........ 3-3
10-2
ZX