window NISSAN FRONTIER 1998 D22 / 1.G Owners Manual
[x] Cancel search | Manufacturer: NISSAN, Model Year: 1998, Model line: FRONTIER, Model: NISSAN FRONTIER 1998 D22 / 1.GPages: 224, PDF Size: 1.7 MB
Page 41 of 224

Anchor point location
An anchor point is located under the rear
window. The back panel carpet is perfo-
rated to allow access to the anchor point.
An authorized NISSAN dealer can assist
you with the installation of your child re-
straint.
ARS1087
1-34Seats, restraints and supplemental air bag systems
ZX
Page 42 of 224

2 Instruments and controls
Meters and gauges ................................................2-2
Speedometer and odometer ..................................2-3
Tachometer (if so equipped) ..................................2-5
Engine coolant temperature gauge........................2-5
Fuel gauge .............................................................2-6
Warning/indicator lights and chimes ......................2-7
Theft warning (if so equipped) .............................2-12
Headlight and turn signal switch ..........................2-14
Daytime running light system (Canada only) .......2-14
Windshield wiper and washer switch ...................2-15
Instrument brightness control ...............................2-16Hazard warning flasher switch .............................2-16
Cigarette lighter (accessory) and ash tray ...........2-17
Power point (if so equipped) ................................2-17
Cup holder (if so equipped) .................................2-18
Dome light and cargo light ...................................2-19
Map lights (if so equipped)...................................2-19
Manual windows ...................................................2-20
Power windows (if so equipped) ..........................2-20
Automatic power window switch ..........................2-21
Rear sliding window (if so equipped) ...................2-21
Sunroof (if so equipped).......................................2-22
ZX
Page 50 of 224

Passenger supplemental air
bag OFF indicator light
The passenger supplemental air bag is
equipped with an ON/OFF switch. The
switch is located in the center of the instru-
ment panel, near the ashtray. When the
switch is turned to the ON position, the
passenger supplemental air bag is enabled
and could inflate in a frontal collision. When
the switch is turned to the OFF position, the
passenger supplemental air bag is disabled
and will not inflate in a frontal collision. The
passenger supplemental air bag OFF indi-
cator light on the instrument panel illumi-
nates when the passenger supplemental air
bag ON/OFF switch is turned to the OFF
position. The driver's side supplemental air
bag always remains enabled and is not
affected by the passenger supplemental air
bag ON/OFF switch. The key for the pas-
senger supplemental air bag ON/OFF
switch should not be left in the switch.
Remove the key after turning the switch in
the desired position. Do not leave a key in
the switch. See ªPassenger supplemental
air bag ON/OFF switch and lightº in Section
1 for details.
Engine oil pressure warning
light
This light warns of low engine oil pressure. If
the light flickers or comes on during normal
driving, pull off the road in a safe area, stop
the engineimmediatelyand call an autho-
rized NISSAN dealer.
The oil pressure warning light is not
designed to indicate a low oil level. Use
the dipstick to check the oil level.See
``Engine oil'' in the ``Do-it-yourself'' section
of this manual.
CAUTION
Running the engine with the oil pres-
sure warning light on could cause seri-
ous damage to the engine almost im-
mediately. Turn off the engine as soon
as it is safe to do so.
Charge warning light
If this light comes on while the engine is
running, it may indicate a problem with the
charging system. Turn the engine off and
check the generator belt. If the belt is loose,
broken, missing or if the light remains on, see
an authorized NISSAN dealer immediately.
CAUTION
Do not continue driving if the belt is
loose, broken or missing.
Low fuel warning light
(if so equipped)
This light comes on when the fuel in the tank
is low. Refuel as soon as it is convenient,
preferably before the fuel gauge reaches E
(Empty).
There will be a small reserve of fuel
remaining in the tank when the fuel
gauge needle reaches E (Empty).
Low washer fluid warning
light (Canada only)
This light comes on when the washer tank
fluid is at a low level. Add washer fluid as
necessary. See ``Window washer fluid'' in
the ``Do-it-yourself'' section of this manual.
Instruments and controls
2-9
ZX
Page 53 of 224

The theft warning system provides visual
and audio alarm signals if parts of the
vehicle are disturbed.
How to activate the theft warning
system
1. Close all windows.
2. Remove the key from the ignition switch.
3. Close the hood and both doors.
4. Push the
button on the multi-remote
controller. Both doors lock. The hazard
lights flash twice and the horn beeps
once to indicate both doors are locked.c
When thebutton is pushed with both
doors locked, the hazard lights flash twice
and the horn beeps once as a reminder that
the doors are already locked. The horn may
or may not beep once. Refer to ``silencing
the horn beep feature'' later in this section.
The system can be activated even if the
windows are open.
5.
Confirm that the SECURITY indicator
light comes on. The SECURITY light
glows for about 30 seconds and then
begins to flash once every three seconds.
The system is now activated. If, during
this 30-second time period, the door is
unlocked by the key or the multi-remote
controller, or the ignition key is turned to
ACC or ON, the system will not activate.
cIf the key is turned slowly when lock-
ing the door, the system may not acti-
vate. Furthermore, if the key is turned
excessively to the unlock position, the
system may be deactivated when the
key is removed. If the indicator light
fails to glow for 30 seconds, unlock
the door once and lock it again.
cEven when the driver and/or passen-
gers are in the vehicle, the system willactivate with both doors, and hood
locked and ignition key off. Turn the
ignition key to ACC or ON to turn the
system off.
The theft warning system is NOT activated if
one of the following occurs:
cA door is unlocked or the ignition key is
turned to the ACC or ON position during
the 30 seconds in which the SECURITY
light stays on.
cThe SECURITY light blinks at a steady
1/2 second on - 1/2 second off rate (a
door, or the hood is open and the key is
not in the ACC or ON position). When the
ignition key is turned to the ACC or ON
position, the SECURITY light turns off.
Theft warning system operation
The theft warning system emits the follow-
ing alarm:
cThe headlights blink and the horn sounds
intermittently. In addition, the starter mo-
tor does not operate.
c
The alarm automatically turns off after 2 to
3 minutes. However, the alarm reactivates
if the vehicle is tampered with again. The
alarm can be shut off by unlocking a door
IC0005
THEFT WARNING
(if so equipped)
2-12Instruments and controls
ZX
Page 61 of 224
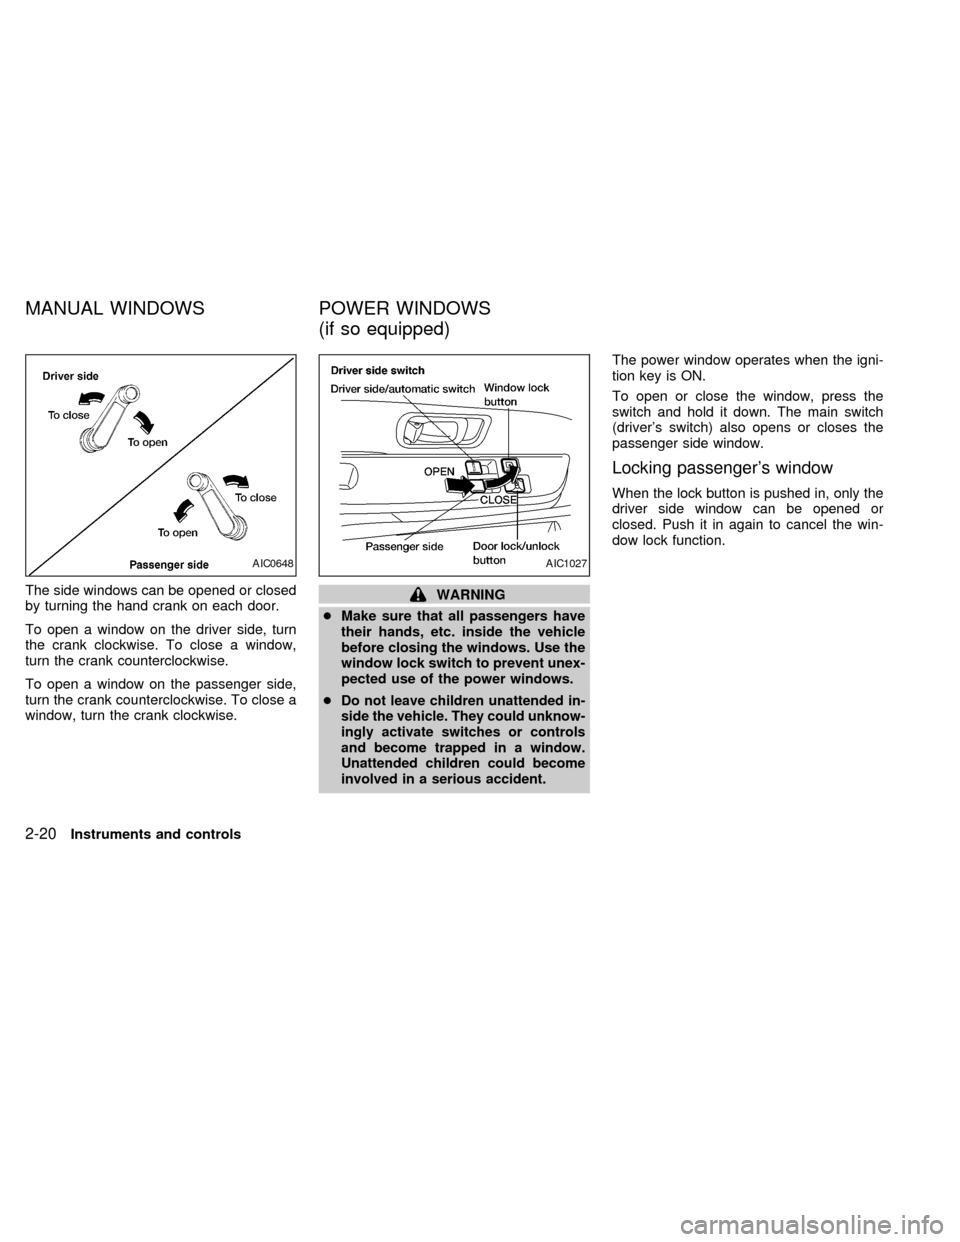
The side windows can be opened or closed
by turning the hand crank on each door.
To open a window on the driver side, turn
the crank clockwise. To close a window,
turn the crank counterclockwise.
To open a window on the passenger side,
turn the crank counterclockwise. To close a
window, turn the crank clockwise.WARNING
cMake sure that all passengers have
their hands, etc. inside the vehicle
before closing the windows. Use the
window lock switch to prevent unex-
pected use of the power windows.
c
Do not leave children unattended in-
side the vehicle. They could unknow-
ingly activate switches or controls
and become trapped in a window.
Unattended children could become
involved in a serious accident.
The power window operates when the igni-
tion key is ON.
To open or close the window, press the
switch and hold it down. The main switch
(driver's switch) also opens or closes the
passenger side window.
Locking passenger's window
When the lock button is pushed in, only the
driver side window can be opened or
closed. Push it in again to cancel the win-
dow lock function.
AIC0648AIC1027
MANUAL WINDOWS POWER WINDOWS
(if so equipped)
2-20Instruments and controls
ZX
Page 62 of 224

Passenger's switch
The passenger's switch opens or closes the
passenger's window. To open the window,
push the switch down. To close the window,
lift the switch up.
AUTOMATIC POWER WINDOW
SWITCH
To fully open the driver's side window, com-
pletely press the driver's side window switch
down and release it; it need not be held. The
window automatically opens all the way. To
stop the window, pull up on the switch while
the window is opening.Squeeze the handles of the lever, then slide
the window open.
AIC1028AIC0615AIC0745
REAR SLIDING WINDOW
(if so equipped)
Instruments and controls2-21
ZX
Page 69 of 224
MULTI-REMOTE CONTROL
SYSTEM (if so equipped)
It is possible to lock/unlock both doors, and
activate the panic alarm by using the remote
controller from outside the vehicle.
Be sure to remove the key from the
vehicle before locking the doors.
The remote controller can operate at a
distance of approximately 49 ft (15 m) from
the vehicle. The effective distance depends
on the conditions around the vehicle.
As many as four remote controllers can be
used with one vehicle. For information con-
cerning the purchase and use of additional
remote controllers, contact an authorized
NISSAN dealer.
CAUTION
Listed below are conditions or occur-
rences which will damage the remote
controller:
cDo not allow the remote controller to
become wet.
cDo not drop the remote controller.cDo not strike the remote controller
sharply against another object.
cDo not place the remote controller
for an extended period in an area
where temperatures exceed 140ÉF
(60ÉC).
Locking doors
1. Close all windows.
2. Remove the key from the ignition switch.
3. Close the hood and both doors.
4. Push the
button on the multi-remote
controller. Both doors lock. The hazard
lights flash twice and the horn beeps
once to indicate both doors are locked.
cWhen the
button is pushed with both
doors locked, the hazard lights flash
twice and the horn beeps once as a
reminder that the doors are already
locked. The horn may or may not beep
once. Refer to ªsilencing the horn beep
featureº later in this section.
3-4Pre-driving checks and adjustments
ZX
Page 82 of 224
WARNING
cThe air conditioner cooling function
operates only when the engine is
running.
cDo not leave children, unreliable
adults, or pets alone in your vehicle.
On hot sunny days, temperatures in
a closed vehicle could quickly be-
come high enough to cause severe
or possibly fatal injuries to people or
animals.
cDo not use the recirculation mode
for long periods as it may cause theinterior air to become stale and the
windows to fog up.
cPositioning of the heating or air con-
ditioning controls should not be
done while driving, so that full atten-
tion may be given to the driving
operation.
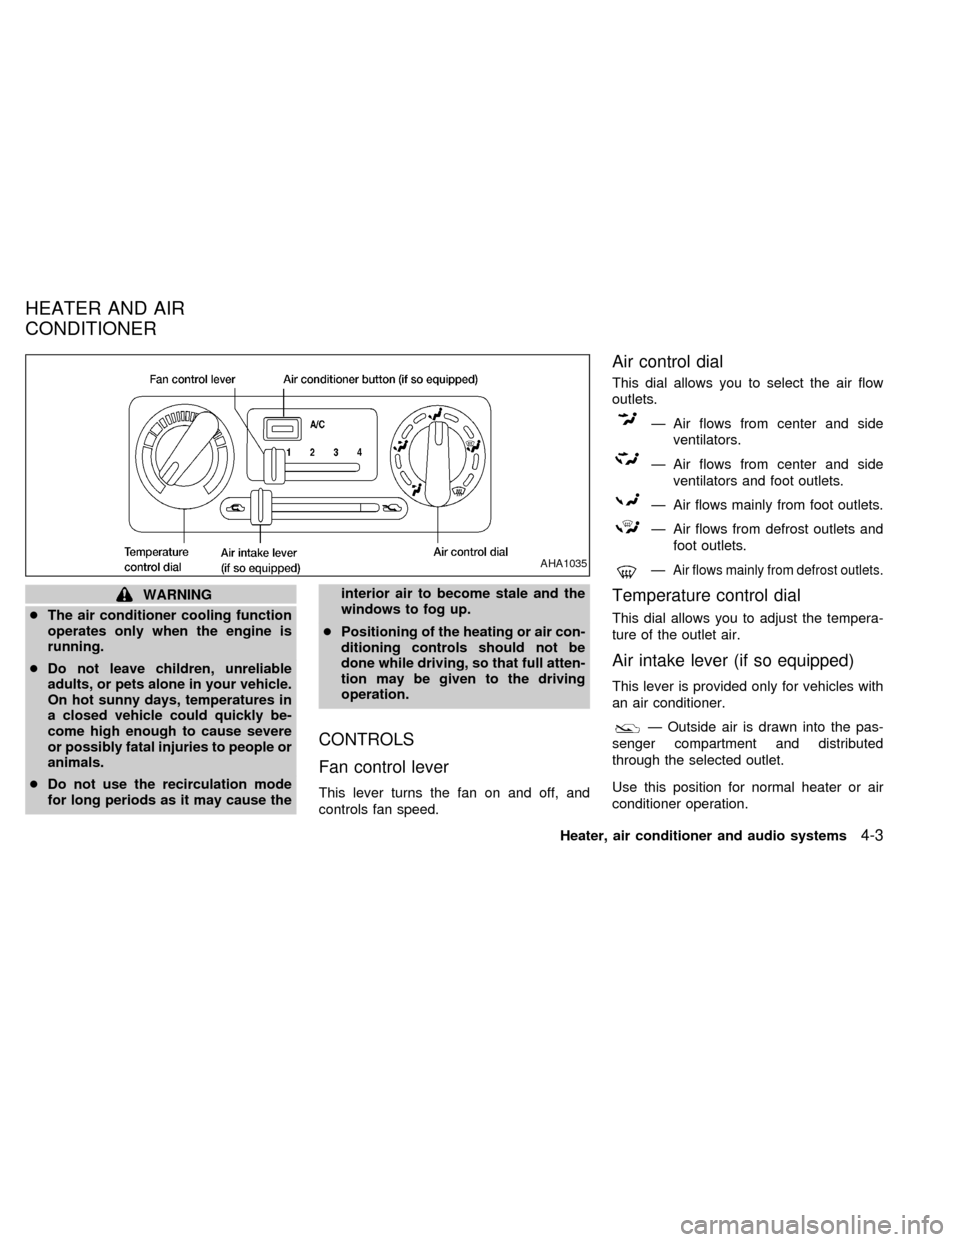
CONTROLS
Fan control lever
This lever turns the fan on and off, and
controls fan speed.
Air control dial
This dial allows you to select the air flow
outlets.
Ð Air flows from center and side
ventilators.
Ð Air flows from center and side
ventilators and foot outlets.
Ð Air flows mainly from foot outlets.
Ð Air flows from defrost outlets and
foot outlets.
ÐAir flows mainly from defrost outlets.
Temperature control dial
This dial allows you to adjust the tempera-
ture of the outlet air.
Air intake lever (if so equipped)
This lever is provided only for vehicles with
an air conditioner.
Ð Outside air is drawn into the pas-
senger compartment and distributed
through the selected outlet.
Use this position for normal heater or air
conditioner operation.
AHA1035
HEATER AND AIR
CONDITIONER
Heater, air conditioner and audio systems4-3
ZX
Page 83 of 224

Ð Interior air is recirculated inside the
vehicle.
Move the air intake lever to the
position:
cwhen driving on a dusty road.
cto prevent traffic fumes from entering the
passenger compartment.
cfor maximum cooling when using the air
conditioner.
Air conditioner switch
(if so equipped)
This button is provided only for vehicles with
an air conditioner.
Start the engine, push the switch and move
the fan control lever to the desired speed.
The indicator light comes on when the air
conditioner is on.
HEATER OPERATION
Heating
This mode directs hot air to the foot outlets.
A small amount of air is also directed to the
defrost outlets.
1. Move the air intake lever to the
position for normal heating.
2. Move the air control dial to the
position.
3. Move the fan control lever to the desired
speed.
4. Move the temperature control dial to the
desired position between the middle and
the HOT position.
Ventilation
This mode directs outside air to the side and
center ventilators.
1. Move the air intake lever to the
position.
2. Move the air control dial to the
position.
3. Move the fan control lever to the desired
speed.
4. Move the temperature control dial to the
desired position.
Defrosting or defogging
This mode defrosts/defogs the windows.
1. Move the air intake lever to the
position.2. Move the air control dial to the
position.
3. Move the fan control lever to the desired
speed.
4. Move the temperature control dial to the
desired position between the middle and
the HOT position.
cIf it is difficult to defog the windshield,
turn the air conditioner switch on (if so
equipped).
Bi-level heating
This mode directs cooler air from the side
and center ventilators and warmer air from
the foot outlets.
1. Move the air intake lever to the
position.
2. Move the air control dial to the
position.
3. Move the fan control lever to the desired
speed.
4. Move the temperature control dial to the
desired position.
4-4Heater, air conditioner and audio systems
ZX
Page 84 of 224

Heating and defrosting
This mode heats the interior and defogs the
windshield.
1. Move the air intake lever to the
position.
2. Move the air control dial to the
position.
3. Move the fan control lever to the desired
speed.
4. Move the temperature control dial to the
desired position between the middle and
the HOT position.
Operating tips
Clear snow and ice from the wiper blade
and air inlet in front of the windshield. This
improves heater and defroster operation.
AIR CONDITIONER OPERATION
(if so equipped)
Start the engine, move the fan control lever
to the desired (one to four) position, and
push in the air conditioner switch to activate
the air conditioner. When the air conditioner
is on, cooling and dehumidifying functions
are added to the heater operation.The air conditioner cooling function op-
erates only when the engine is running.
Cooling
This mode cools and dehumidifies.
1. Move the air intake lever to the
position.
2. Move the air control dial to the
position.
3. Move the fan control lever to the desired
position.
4. Push in the air conditioner switch. The
indicator light comes on.
5. Move the temperature control dial to the
desired position.
cFor quick cooling when the outside tem-
perature is high, move the air intake lever
to the
position. Be sure to return
the air intake lever to theposition
for normal cooling.
Dehumidified heating
This mode heats and dehumidifies.
1. Move the air intake lever to the
position.
2. Move the air control dial to the
position.3. Move the fan control lever to the desired
position.
4. Push in the air conditioner switch. The
indicator light comes on.
5. Move the temperature control dial to the
desired position.
Dehumidified defrosting
This mode defrosts/defogs the windows and
dehumidifies.
1. Move the air intake lever to the
position.
2. Move the air control dial to the
position
3. Move the fan control lever to the desired
position.
4. Push in the air conditioner switch. The
indicator light comes on.
5. Move the temperature control dial to the
desired position.
Operating tips
cKeep windows and sunroof closed while
operating the air conditioner.
cAfter parking in the sun, drive for two or
Heater, air conditioner and audio systems
4-5
ZX