check engine light NISSAN FRONTIER 1999 D22 / 1.G Owners Manual
[x] Cancel search | Manufacturer: NISSAN, Model Year: 1999, Model line: FRONTIER, Model: NISSAN FRONTIER 1999 D22 / 1.GPages: 247, PDF Size: 1.89 MB
Page 34 of 247
WARNING
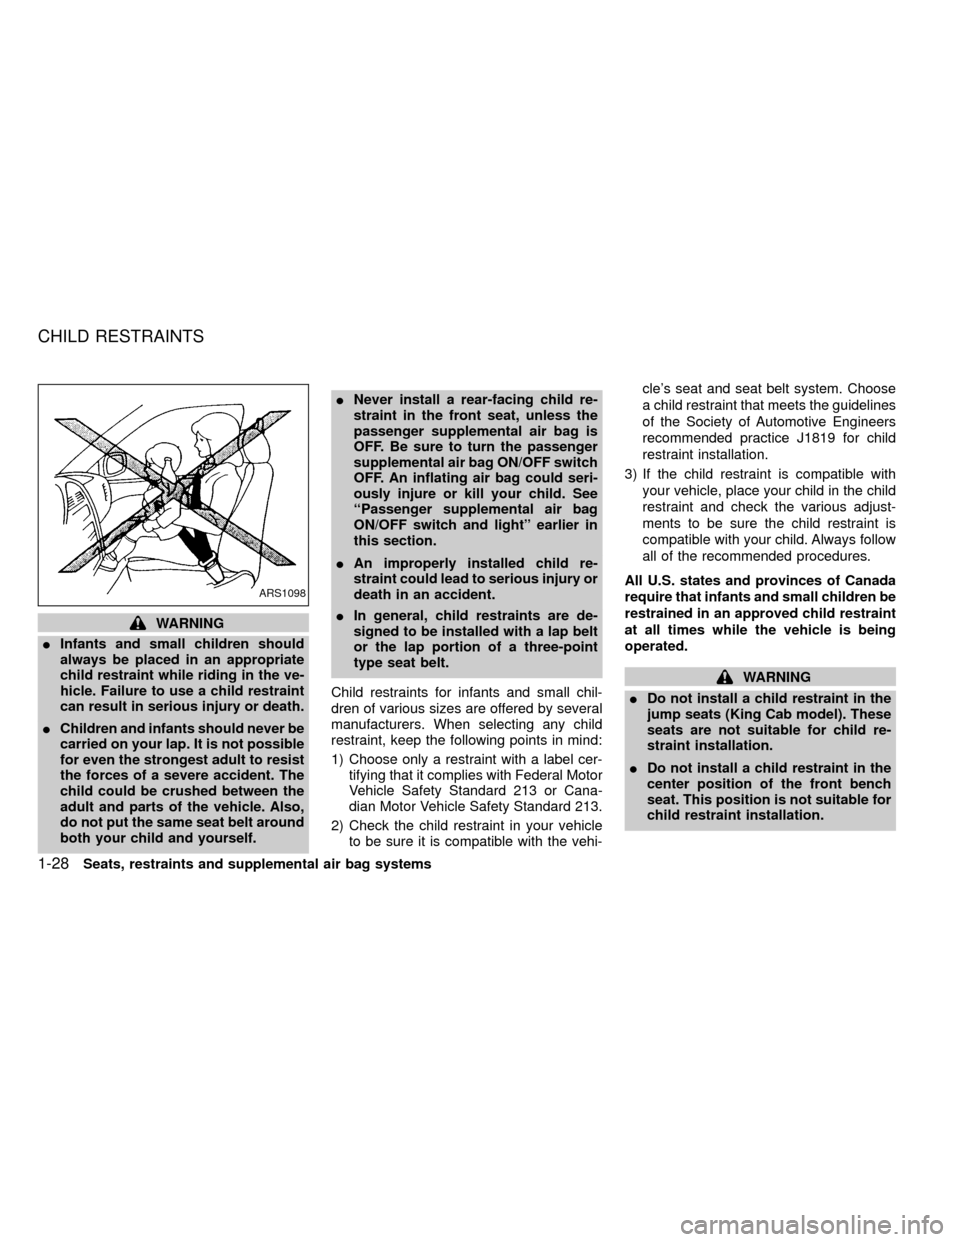
IInfants and small children should
always be placed in an appropriate
child restraint while riding in the ve-
hicle. Failure to use a child restraint
can result in serious injury or death.
IChildren and infants should never be
carried on your lap. It is not possible
for even the strongest adult to resist
the forces of a severe accident. The
child could be crushed between the
adult and parts of the vehicle. Also,
do not put the same seat belt around
both your child and yourself.INever install a rear-facing child re-
straint in the front seat, unless the
passenger supplemental air bag is
OFF. Be sure to turn the passenger
supplemental air bag ON/OFF switch
OFF. An inflating air bag could seri-
ously injure or kill your child. See
``Passenger supplemental air bag
ON/OFF switch and light'' earlier in
this section.
IAn improperly installed child re-
straint could lead to serious injury or
death in an accident.
IIn general, child restraints are de-
signed to be installed with a lap belt
or the lap portion of a three-point
type seat belt.
Child restraints for infants and small chil-
dren of various sizes are offered by several
manufacturers. When selecting any child
restraint, keep the following points in mind:
1) Choose only a restraint with a label cer-
tifying that it complies with Federal Motor
Vehicle Safety Standard 213 or Cana-
dian Motor Vehicle Safety Standard 213.
2) Check the child restraint in your vehicle
to be sure it is compatible with the vehi-cle's seat and seat belt system. Choose
a child restraint that meets the guidelines
of the Society of Automotive Engineers
recommended practice J1819 for child
restraint installation.
3) If the child restraint is compatible with
your vehicle, place your child in the child
restraint and check the various adjust-
ments to be sure the child restraint is
compatible with your child. Always follow
all of the recommended procedures.
All U.S. states and provinces of Canada
require that infants and small children be
restrained in an approved child restraint
at all times while the vehicle is being
operated.
WARNING
IDo not install a child restraint in the
jump seats (King Cab model). These
seats are not suitable for child re-
straint installation.
IDo not install a child restraint in the
center position of the front bench
seat. This position is not suitable for
child restraint installation.
ARS1098
CHILD RESTRAINTS
1-28Seats, restraints and supplemental air bag systems
ZX
Page 49 of 247
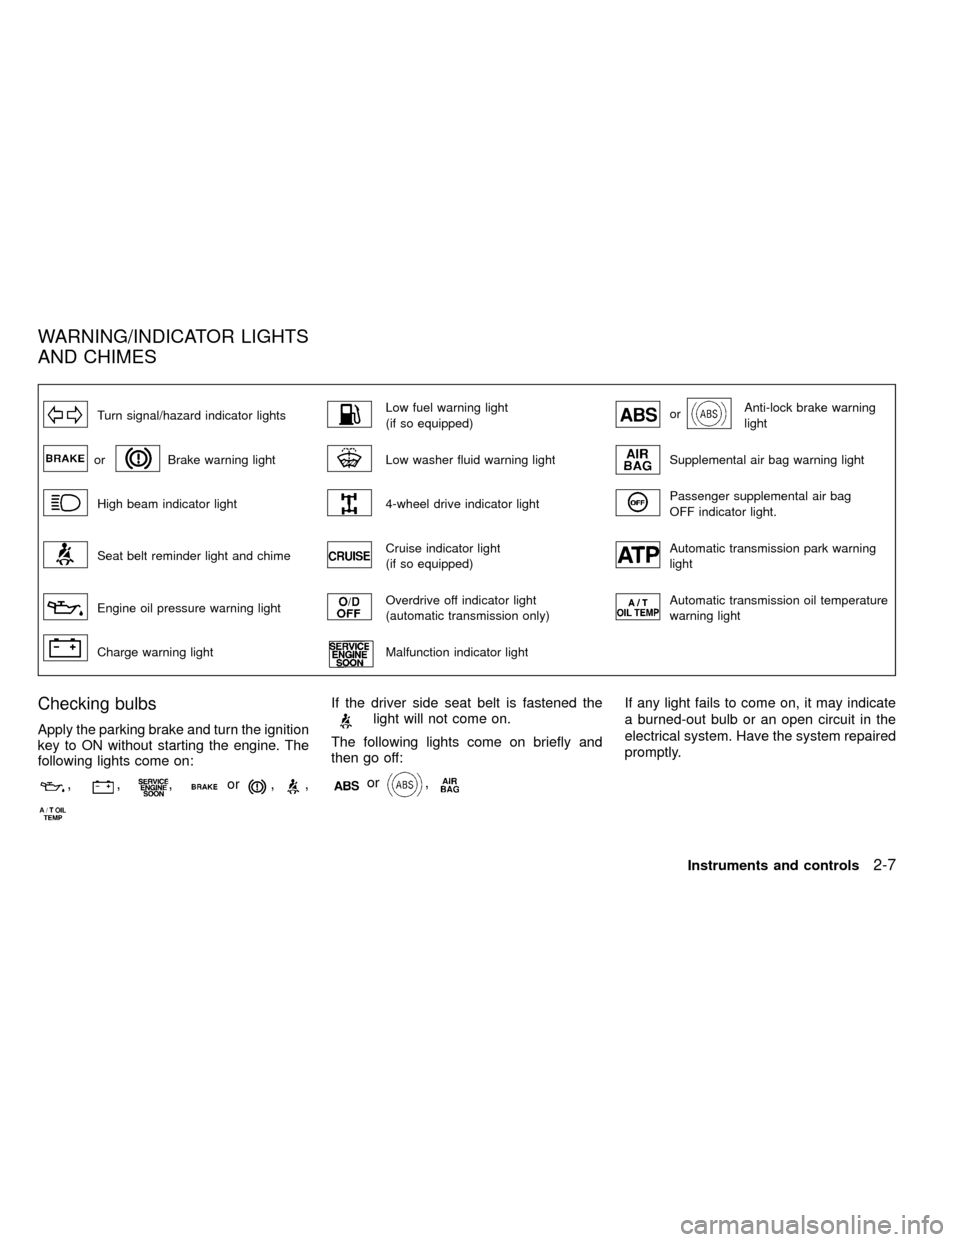
Turn signal/hazard indicator lightsLow fuel warning light
(if so equipped)orAnti-lock brake warning
light
orBrake warning lightLow washer fluid warning lightSupplemental air bag warning light
High beam indicator light4-wheel drive indicator lightPassenger supplemental air bag
OFF indicator light.
Seat belt reminder light and chimeCruise indicator light
(if so equipped)Automatic transmission park warning
light
Engine oil pressure warning lightOverdrive off indicator light
(automatic transmission only)Automatic transmission oil temperature
warning light
Charge warning lightMalfunction indicator light
Checking bulbs
Apply the parking brake and turn the ignition
key to ON without starting the engine. The
following lights come on:
,,,or,,
If the driver side seat belt is fastened thelight will not come on.
The following lights come on briefly and
then go off:
or,
If any light fails to come on, it may indicate
a burned-out bulb or an open circuit in the
electrical system. Have the system repaired
promptly.
WARNING/INDICATOR LIGHTS
AND CHIMES
Instruments and controls2-7
ZX
Page 50 of 247
Turn signal/hazard indicator
lights
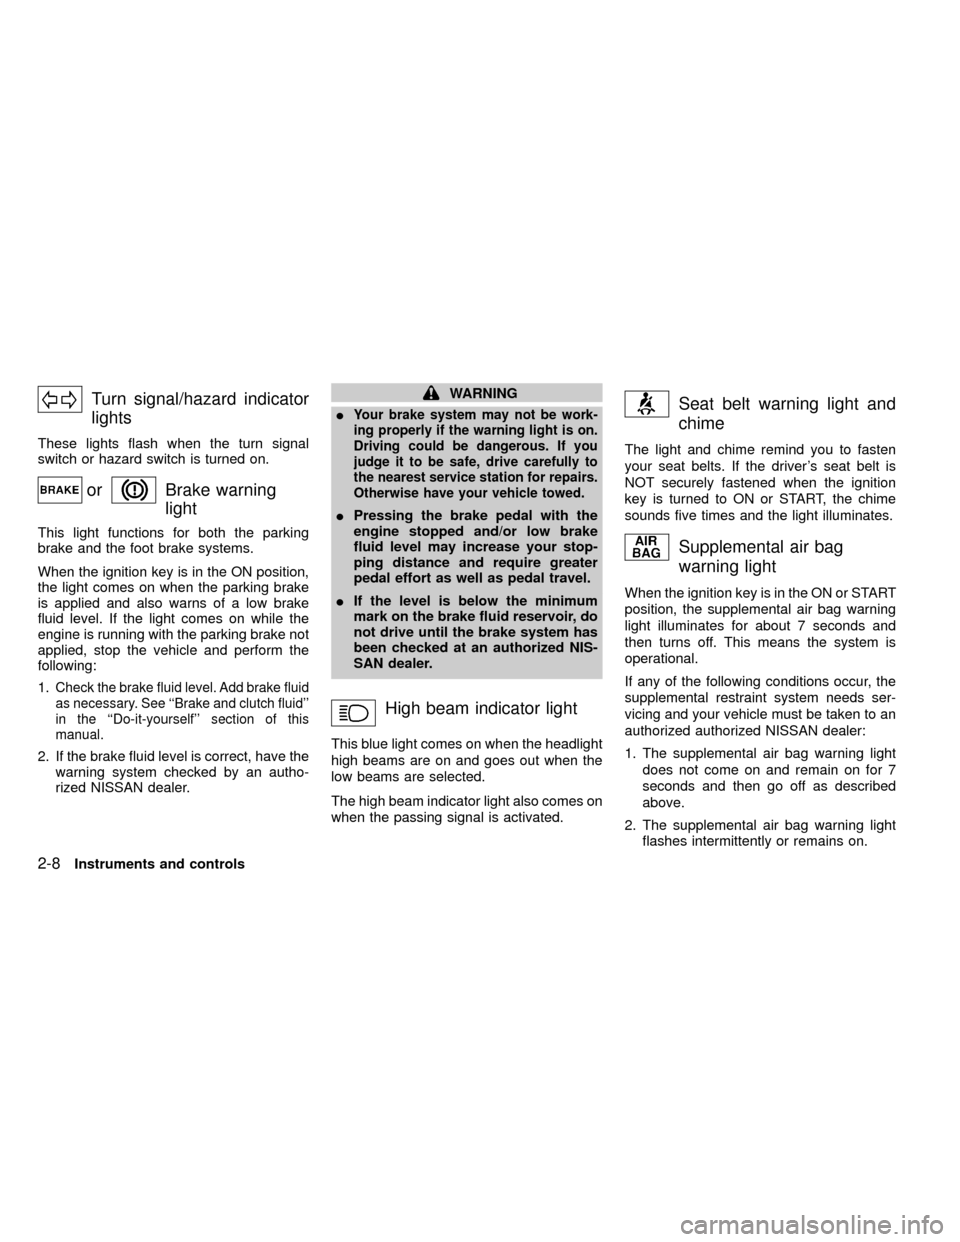
These lights flash when the turn signal
switch or hazard switch is turned on.
orBrake warning
light
This light functions for both the parking
brake and the foot brake systems.
When the ignition key is in the ON position,
the light comes on when the parking brake
is applied and also warns of a low brake
fluid level. If the light comes on while the
engine is running with the parking brake not
applied, stop the vehicle and perform the
following:
1.
Check the brake fluid level. Add brake fluid
as necessary. See ``Brake and clutch fluid''
in the ``Do-it-yourself'' section of this
manual.
2. If the brake fluid level is correct, have the
warning system checked by an autho-
rized NISSAN dealer.
WARNING
I
Your brake system may not be work-
ing properly if the warning light is on.
Driving could be dangerous. If you
judge it to be safe, drive carefully to
the nearest service station for repairs.
Otherwise have your vehicle towed.
IPressing the brake pedal with the
engine stopped and/or low brake
fluid level may increase your stop-
ping distance and require greater
pedal effort as well as pedal travel.
IIf the level is below the minimum
mark on the brake fluid reservoir, do
not drive until the brake system has
been checked at an authorized NIS-
SAN dealer.
High beam indicator light
This blue light comes on when the headlight
high beams are on and goes out when the
low beams are selected.
The high beam indicator light also comes on
when the passing signal is activated.
Seat belt warning light and
chime
The light and chime remind you to fasten
your seat belts. If the driver's seat belt is
NOT securely fastened when the ignition
key is turned to ON or START, the chime
sounds five times and the light illuminates.
Supplemental air bag
warning light
When the ignition key is in the ON or START
position, the supplemental air bag warning
light illuminates for about 7 seconds and
then turns off. This means the system is
operational.
If any of the following conditions occur, the
supplemental restraint system needs ser-
vicing and your vehicle must be taken to an
authorized authorized NISSAN dealer:
1. The supplemental air bag warning light
does not come on and remain on for 7
seconds and then go off as described
above.
2. The supplemental air bag warning light
flashes intermittently or remains on.
2-8Instruments and controls
ZX
Page 51 of 247
3. The supplemental air bag warning light
does not come on at all.
Unless checked and repaired, the supplemen-
tal restraint system may not function properly.
For additional details on the Supplemental
restraint system (Supplemental air bag sys-
tem), see the ``Seats, restraints and supple-
mental air bag systems'' section of this
manual
WARNING
If the supplemental air bag warning
light is on, it could mean that the air
bag will not operate in an accident.
Passenger supplemental air
bag OFF indicator light
The passenger supplemental air bag is
equipped with an ON/OFF switch. The
switch is located in the center of the instru-
ment panel, near the ashtray. When the
switch is turned to the ON position, the
passenger supplemental air bag is enabled
and could inflate in a frontal collision. When
the switch is turned to the OFF position, the
passenger supplemental air bag is disabled
and will not inflate in a frontal collision. Thepassenger supplemental air bag OFF indi-
cator light on the instrument panel illumi-
nates when the passenger supplemental air
bag ON/OFF switch is turned to the OFF
position. The driver's side supplemental air
bag always remains enabled and is not
affected by the passenger supplemental air
bag ON/OFF switch. The key for the pas-
senger supplemental air bag ON/OFF
switch should not be left in the switch.
Remove the key after turning the switch in
the desired position. Do not leave a key in
the switch. See ªPassenger supplemental
air bag ON/OFF switch and lightº in Section
1 for details.
Engine oil pressure warning
light
This light warns of low engine oil pressure. If
the light flickers or comes on during normal
driving, pull off the road in a safe area, stop
the engineimmediatelyand call an autho-
rized NISSAN dealer.
The oil pressure warning light is not
designed to indicate a low oil level. Use
the dipstick to check the oil level.See
``Engine oil'' in the ``Do-it-yourself'' section
of this manual.
CAUTION
Running the engine with the oil pres-
sure warning light on could cause seri-
ous damage to the engine almost im-
mediately. Turn off the engine as soon
as it is safe to do so.
Charge warning light
If this light comes on while the engine is
running, it may indicate a problem with the
charging system. Turn the engine off and
check the generator belt. If the belt is loose,
broken, missing or if the light remains on, see
an authorized NISSAN dealer immediately.
CAUTION
Do not continue driving if the belt is
loose, broken or missing.
Low fuel warning light
(if so equipped)
This light comes on when the fuel in the tank
is low. Refuel as soon as it is convenient,
preferably before the fuel gauge reaches E
(Empty).
Instruments and controls
2-9
ZX
Page 52 of 247
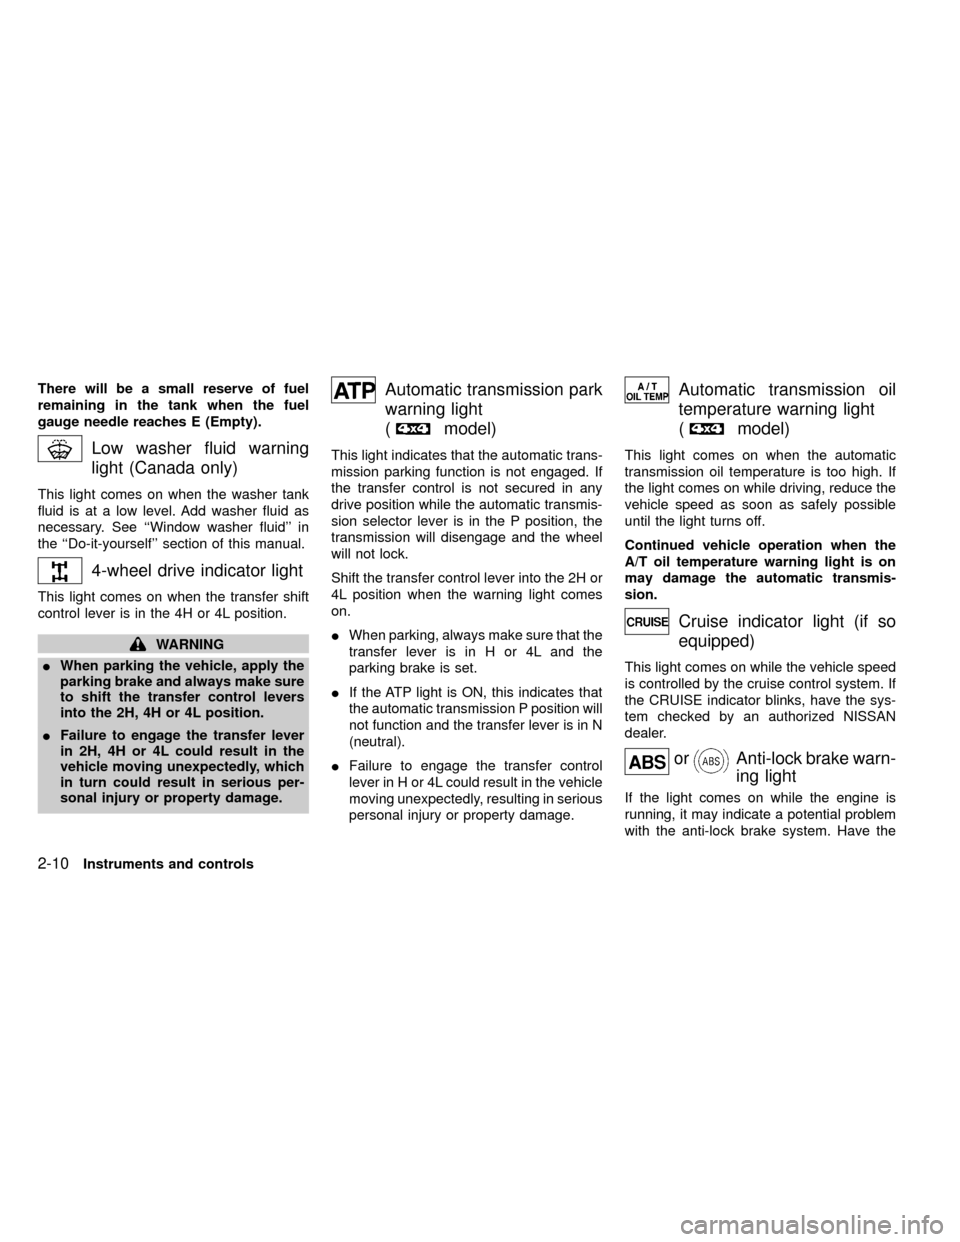
There will be a small reserve of fuel
remaining in the tank when the fuel
gauge needle reaches E (Empty).
Low washer fluid warning
light (Canada only)
This light comes on when the washer tank
fluid is at a low level. Add washer fluid as
necessary. See ``Window washer fluid'' in
the ``Do-it-yourself'' section of this manual.
4-wheel drive indicator light
This light comes on when the transfer shift
control lever is in the 4H or 4L position.
WARNING
IWhen parking the vehicle, apply the
parking brake and always make sure
to shift the transfer control levers
into the 2H, 4H or 4L position.
IFailure to engage the transfer lever
in 2H, 4H or 4L could result in the
vehicle moving unexpectedly, which
in turn could result in serious per-
sonal injury or property damage.
Automatic transmission park
warning light
(
model)
This light indicates that the automatic trans-
mission parking function is not engaged. If
the transfer control is not secured in any
drive position while the automatic transmis-
sion selector lever is in the P position, the
transmission will disengage and the wheel
will not lock.
Shift the transfer control lever into the 2H or
4L position when the warning light comes
on.
IWhen parking, always make sure that the
transfer lever is in H or 4L and the
parking brake is set.
IIf the ATP light is ON, this indicates that
the automatic transmission P position will
not function and the transfer lever is in N
(neutral).
IFailure to engage the transfer control
lever in H or 4L could result in the vehicle
moving unexpectedly, resulting in serious
personal injury or property damage.
Automatic transmission oil
temperature warning light
(
model)
This light comes on when the automatic
transmission oil temperature is too high. If
the light comes on while driving, reduce the
vehicle speed as soon as safely possible
until the light turns off.
Continued vehicle operation when the
A/T oil temperature warning light is on
may damage the automatic transmis-
sion.
Cruise indicator light (if so
equipped)
This light comes on while the vehicle speed
is controlled by the cruise control system. If
the CRUISE indicator blinks, have the sys-
tem checked by an authorized NISSAN
dealer.
orAnti-lock brake warn-
ing light
If the light comes on while the engine is
running, it may indicate a potential problem
with the anti-lock brake system. Have the
2-10Instruments and controls
ZX
Page 53 of 247

system checked by an authorized NISSAN
dealer.
If an abnormality occurs in the system, the
anti-lock function ceases but the ordinary
brakes continue to operate normally.
If the light comes on while you are driving,
contact an authorized NISSAN dealer for
repair.
Overdrive off indicator light
(if so equipped)
This light comes on when the overdrive
switch is pushed to the OFF position.
Key reminder chime
The chime sounds when the driver's door is
opened and the key is left in the ignition
switch. Take the ignition key when you leave
the vehicle.
Light reminder chime
A chime sounds if the driver's door is
opened with the headlight switch on unless
the ignition key is in the ON position. Turn
the headlight switch off when you leave the
vehicle.
Brake pad wear warning
The disc brake pads have audible wear
warnings. When a brake pad requires re-
placement, it makes a high pitched scraping
sound when the vehicle is in motion whether
or not the brake pedal is depressed. Have
the brakes checked as soon as possible if
the warning sound is heard.
Malfunction indicator light
(MIL)
If the malfunction indicator light comes on
steady or blinks while the engine is running,
it may indicate a potential emission control
problem.
The malfunction indicator light may also
come on steady or blink if the fuel filler cap
has not been closed tightly or if the fuel tank
is nearly empty. Check to make sure the fuel
cap is secure and that you have at least
three gallons (14 liters) of fuel in the fuel
tank.
Operation
After driving for a while, the light should
remain off if no other potential emisssion
control system problem exists.The malfunction indicator light will come on
in one of two ways:
IMalfunction indicator light on steady þ An
emission control system malfunction has
been detected. Have the vehicle in-
spected by an authorized NISSAN
dealer. You do not need to have your
vehicle towed to the dealer.
IMalfunction indicator light blinking þ An
engine misfire has been detected which
may damage the emission control sys-
tem. To reduce or avoid emission control
system damage:
Ido not drive at speeds above 45 MPH
(72 km/h).
I
avoid hard acceleration or deceleration.
Iavoid steep uphill grades.
Iif possible, reduce the amount of cargo
being hauled or towed.
The malfunction indicator light may stop
blinking and come on steady.
Have the vehicle inspected by an autho-
rized NISSAN dealer. You do not need to
have your vehicle towed to the dealer.
Instruments and controls
2-11
ZX
Page 76 of 247
device must accept any interference re-
ceived including interference that may
cause undesired operation of the device.
WARNING
IMake sure the hood is completely
closed and latched before driving.
Failure to do so could cause the
hood to fly open and result in an
accident.
IIf you see steam or smoke coming
from the engine compartment, to
avoid injury do not open the hood.
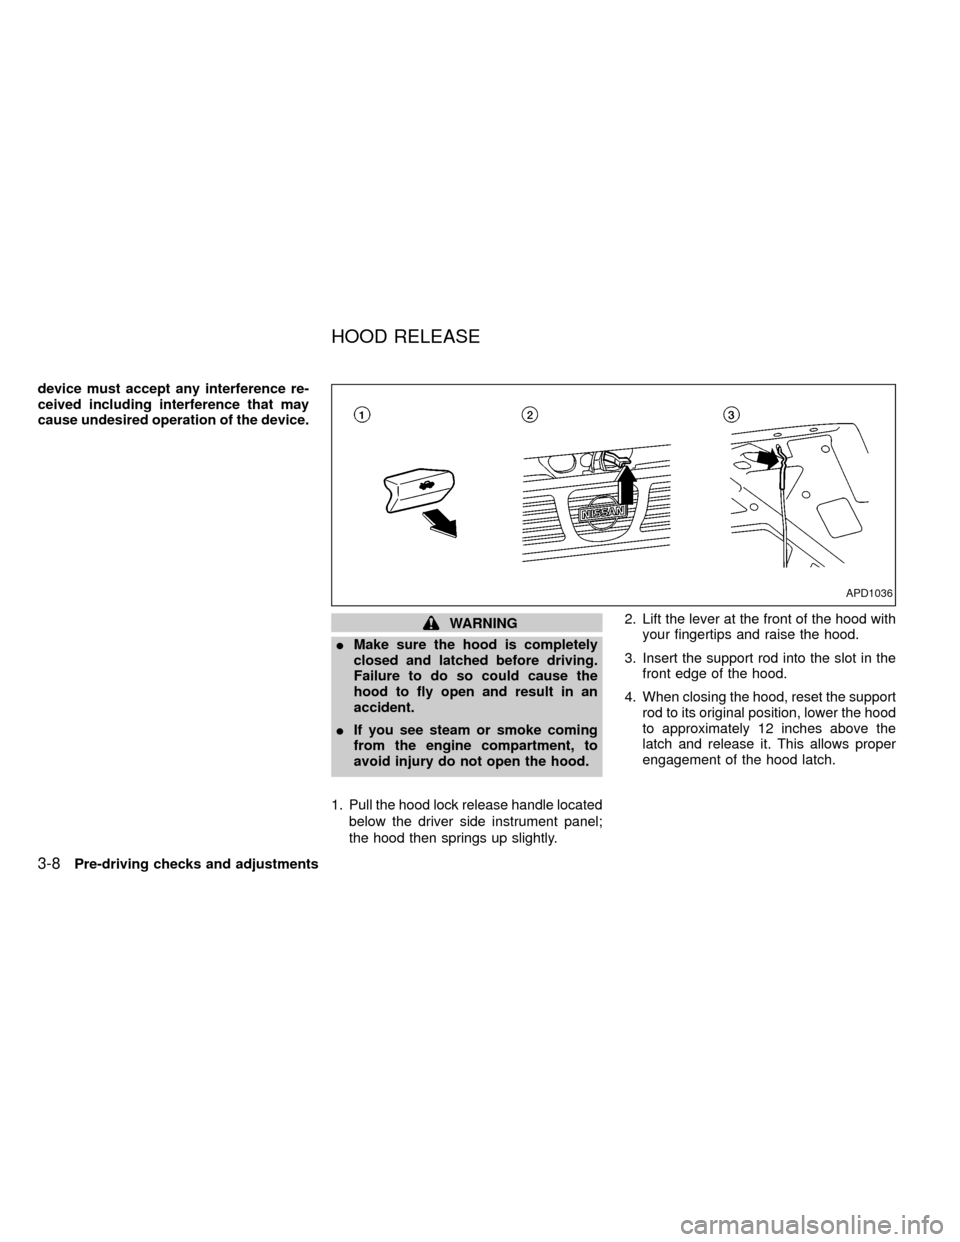
1. Pull the hood lock release handle located
below the driver side instrument panel;
the hood then springs up slightly.2. Lift the lever at the front of the hood with
your fingertips and raise the hood.
3. Insert the support rod into the slot in the
front edge of the hood.
4. When closing the hood, reset the support
rod to its original position, lower the hood
to approximately 12 inches above the
latch and release it. This allows proper
engagement of the hood latch.
APD1036
HOOD RELEASE
3-8Pre-driving checks and adjustments
ZX
Page 114 of 247
START (4)
This position starts the engine. As soon as
the engine has started, release the key. It
automatically returns to the ON position.IMake sure the area around the vehicle is
clear.
ICheck fluid levels such as engine oil,
coolant, brake and clutch fluid, and win-
dow washer fluid as frequently as pos-
sible, at least whenever you refuel.
ICheck that all windows and lights are
clean.
IVisually inspect tires for their appearance
and condition. Also check tires for proper
inflation.
ILock all doors.
IPosition seat and adjust head restraints.
IAdjust inside and outside mirrors.
IFasten seat belts and ask all passengers
to do likewise.
ICheck the operation of warning lights
when key is turned to the ON (3) position.
See²Warning/Indicator lights and
chimes²in the²Instruments and con-
trols²section.WARNING
IDo not depress the accelerator pedal
while shifting from P (Park) or N
(Neutral) to R (Reverse), D (Drive), 2
or 1. Always depress the brake pedal
until shifting is completed. Failure to
do so could cause you to lose con-
trol and have an accident.
ICold engine idle speed is high, so
use caution when shifting into a for-
ward or reverse gear before the en-
gine has warmed up.
INever shift to P (Park) or R (Reverse)
while the vehicle is moving. This
could cause an accident.
CAUTION
IWhen stopping the vehicle on an
uphill grade, do not hold the vehicle
by depressing the accelerator pedal.
The foot brake should be used for
this purpose.
IOn slippery roads, do not downshift.
This may cause a loss of control.
BEFORE STARTING THE
ENGINEDRIVING WITH AUTOMATIC
TRANSMISSION (if so
equipped)
5-6Starting and driving
ZX
Page 124 of 247
Precautions
IThe cruise indicator light in the instru-
ment panel may blink when the cruise
control main switch is turned ON while
pushing the RES/ACCEL, COAST/SET,
or CANCEL switch. To properly set the
cruise control system, perform the follow-
ing steps in the order indicated.
IIf the cruise control system malfunctions,
it cancels automatically. The CRUISE
light in the instrument panel then blinks to
warn the driver.
IIf the cruise light blinks, turn the cruisecontrol main switch off and have the
system checked by an authorized NIS-
SAN dealer.
WARNING
Don't use the cruise control when driv-
ing under the following conditions:
Iit is not possible to keep the vehicle
at a set speed.
Iin heavy traffic or in traffic that var-
ies in speed.
Ion winding or hilly roads.Ion slippery roads (rain, snow, ice,
etc.).
Iin very windy areas.
Doing so could cause a loss of vehicle
control and result in an accident.
CAUTION
On manual transmission models, do
not shift into neutral without depress-
ing the clutch pedal when the cruise
control is on. Should this occur, de-
press the clutch pedal and turn the
main switch off immediately. Failure to
do so may cause engine damage.
The cruise control allows driving at a fixed
speed between 30 and 90 MPH (48 and 145
km/h) without keeping your foot on the
accelerator pedal.
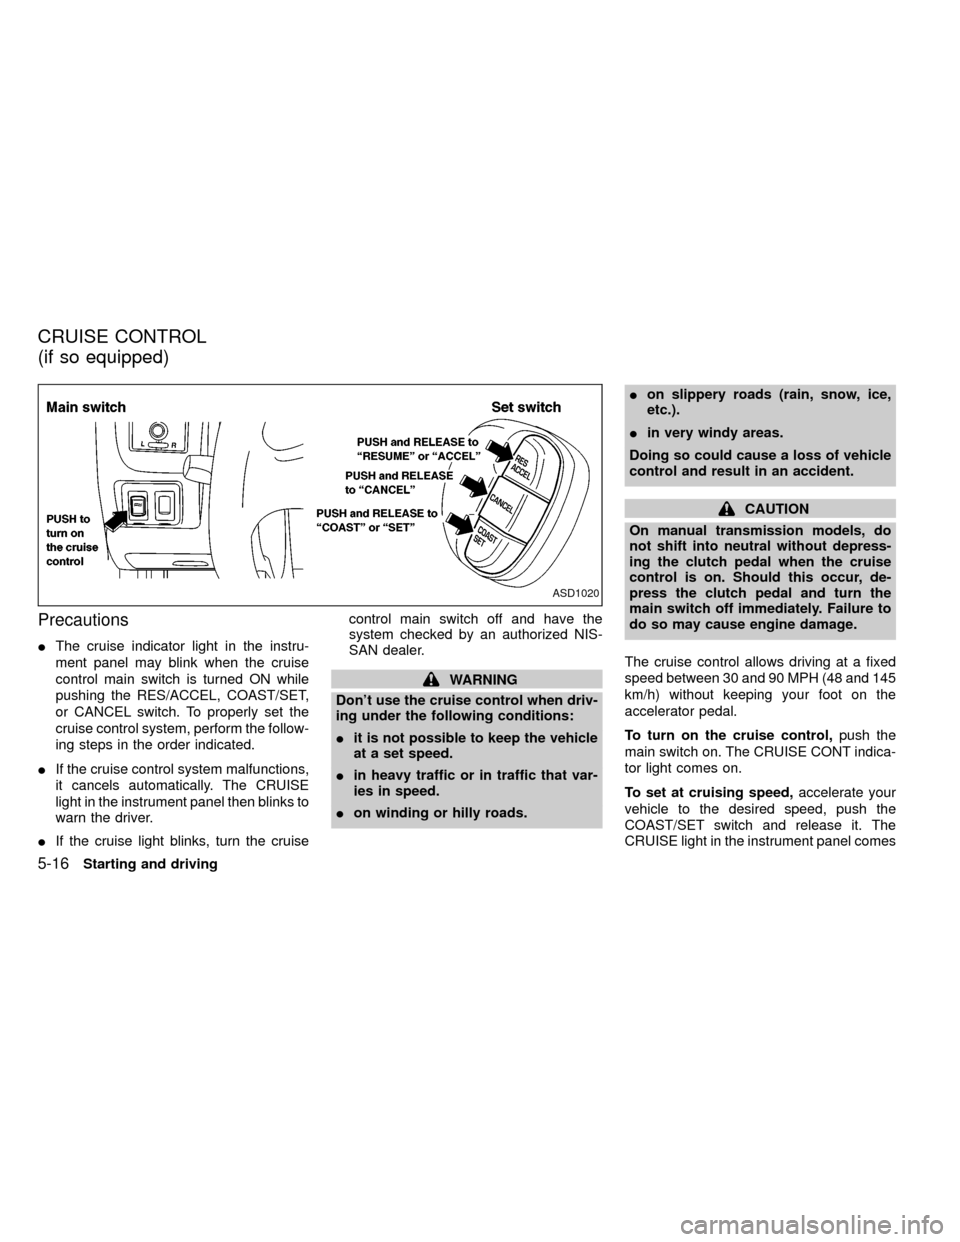
To turn on the cruise control,push the
main switch on. The CRUISE CONT indica-
tor light comes on.
To set at cruising speed,accelerate your
vehicle to the desired speed, push the
COAST/SET switch and release it. The
CRUISE light in the instrument panel comes
ASD1020
CRUISE CONTROL
(if so equipped)
5-16Starting and driving
ZX
Page 138 of 247
Using the system, 2WD Vehicles
(2 wheel rear ABS)
Depress the brake pedal and hold it down.
With the rear anti-lock brake system, the
front wheels can still lock. If this happens,
release the brake pedal slightly and then
reapply pressure.
WARNING
The anti-lock brake system is a sophis-
ticated device. But it cannot prevent
accidents resulting from careless or
dangerous driving techniques. It can
help maintain vehicle control under
some conditions, but remember that
the stopping distance on slippery sur-
faces will be longer than on normal
surfaces even with ABS. Stopping dis-
tances may also be longer on rough,
gravel, or snow covered roads, or if you
are using tire chains. Always maintain a
safe distance from the vehicle in front
of you. Ultimately, the responsibility for
safety of self and others rests in the
hands of the driver.Tire type and condition may also affect
braking effectiveness.
IWhen replacing tires, install the
specified size of tires on all four
wheels.
IWhen installing a spare tire, make
sure it is the proper size and type as
specified on the tire placard. See
``Tire placard'' in the ``Technical and
consumer information'' section.
Freeing a frozen door lock
To prevent a door lock from freezing, apply
de-icer or glycerin through the key hole. If
the lock becomes frozen, heat the key be-
fore inserting it in the key hole.
Anti-freeze
In the winter when it is anticipated that the
temperature will drop below 32ÉF (0ÉC),
check anti-freeze (ethylene glycol base) to
assure proper winter protection. For details,
see ``Engine cooling system'' in the ``Do-it-
yourself'' section of this manual.
Battery
If the battery is not fully charged during
extremely cold weather conditions, the bat-
tery fluid may freeze and damage the bat-
tery. To maintain maximum efficiency, the
battery should be checked regularly. For
details, see ``Battery'' in the ``Do-it-yourself''
section of this manual.
Draining of coolant water
If the vehicle is to be left outside without
anti-freeze, drain the cooling system by
opening the drain valves located under the
radiator and on the engine block. Refill
COLD WEATHER DRIVING
5-30Starting and driving
ZX